By Kris Stadler and Dave Rankin

Introduction
Online advertisements are not only irritating but also potential sources of malware on your devices. While there are plugins designed to block ads on a per-application/per-device basis, stopping advertisements at the DNS level provides a much more complete solution across all of your applications and devices at once.
Pi-hole — a DNS server originally created to be used on the Raspberry Pi single-board computer — filters out requests to ad-serving domains, blocking ads and improving network performance. With Pi-hole, you can actively monitor every DNS request made on your network and block requests on the fly. This functionality also extends beyond web browsers, allowing you to filter out ads within other applications by targeting the appropriate DNS query.
Pi-hole is particularly effective when you use it in conjunction with a Virtual Private Network (VPN). VPNs establish and maintain connections via tunnels, which are logical network connections between clients and servers. Additionally, if your VPN supports Secure Socket Layer (SSL), the entire transaction is encrypted, providing a secure link for data transmission.
In this tutorial, you will install and configure OpenVPN and Pi-hole to act as your own private, network-wide, DNS-based, ad-blocking filter for all of the devices connected to your network.
Prerequisites
To complete this tutorial, you will need:
-
One Ubuntu 16.04 server with 2 GB of memory set up by following this Ubuntu 16.04 initial server setup tutorial, including a sudo non-root user and a firewall.
-
OpenVPN installed and configured by following this OpenVPN Server on Ubuntu 16.04 guide.
Step 1 — Gathering Network Information
Before beginning installation, you need to gather the network information Pi-hole uses to communicate with the VPN. As Pi-hole’s installation process takes over your terminal session, having this information on hand before you start will make the whole process go much more smoothly.
First, use the ip command with the addr and show subcommands to identify the IP address of tun0, the network interface that your VPN tunnel is active on.
- ip addr show tun0
The output provides in-depth information about the interface.
Output from ip addr show tun01: tun0: <POINTOPOINT,MULTICAST,NOARP,UP,LOWER_UP> mtu 1500 qdisc pfifo_fast state UNKNOWN group default qlen 100
    link/none
    inet 10.8.0.1 peer 10.8.0.2/32 scope global tun0
       valid_lft forever preferred_lft forever
More specifically:
- The first line tells you the interface name,
tun0, followed by a series of flags that describe the characteristics of the network socket. - The second line indicates that there are currently no link layer devices available on this interface.
- The third line contains the IP address values for this network interface.
- The fourth line reports that the interface’s IPv6 valid and preferred lease lifetimes are both set to
forever. In this case, the lease time for the IP address will never change, because the address was specifically assigned to the interface during the VPN installation.
Make note of the IP address following inet, as this is the address of your VPN server. You will need to know this when installing Pi-hole.
In addition to your VPN server’s IP address, Pi-hole also needs to know the gateway to use for IPv4 traffic. You can think of a gateway as an access point between different networks.
Use the ip command again, this time with the route and show subcommands, to get your server’s routing table information. Pipe the routing table information to grep which will parse and search the output for the string, default. default indicates the default gateway used by the server.
- ip route show | grep default
In the following example, the output tells you that the default gateway’s IP address is 198.51.100.1, that the gateway is reachable on the eth0 interface, and that the gateway’s onlink option is turned on, which is the default with tunneled connections.
Output from ip r | grep defaultdefault via 198.51.100.1 dev eth0 onlink
Make note of the IP address following via, as this is your server’s default gateway address. You will need to know this when installing Pi-hole.
With the network information in hand, you’re ready to download and install Pi-hole.
Step 2 — Downloading Pi-hole
Per the official installation instructions, use Git to clone the Pi-hole repository on GitHub into ~/Pi-hole, a directory that will automatically be created during the cloning process. Use the --depth 1 option to create a clone with a history truncated to the last revision; this will give you the latest version of Pi-hole without all the extra historical revisions.
Change to your home directory and clone the repository.
- cd ~
- git clone --depth 1 https://github.com/pi-hole/pi-hole.git Pi-hole
The output confirms the location you’re cloning into and then provides a real-time report of the process, including a count of the objects Git expected to copy as well as the number it actually did copy.
Output from git cloneCloning into 'Pi-hole'...
remote: Counting objects: 65, done.
remote: Compressing objects: 100% (56/56), done.
remote: Total 65 (delta 5), reused 26 (delta 1), pack-reused 0
Unpacking objects: 100% (65/65), done.
Checking connectivity... done.
Now, go into to the newly created Pi-hole/automated\ install/ directory where you’ll find Pi-hole’s installation script.
- cd Pi-hole/automated\ install/
Open the installation script to make sure that you’re comfortable with what it does or modify it as necessary.
- nano basic-install.sh
Save and close the file to continue.
You now have a copy of the most up-to-date version of Pi-hole, and you’ve examined the automated installation script for potential problems. It’s time to install and configure Pi-hole.
Step 3 — Running the Installation Script
Pi-hole installation and configuration takes place with the help of a terminal-based wizard. Start the wizard with the following command:
- bash basic-install.sh
First, the installation script tells you that it’s Installing packages and that it’s retrieving additional files needed for installation.

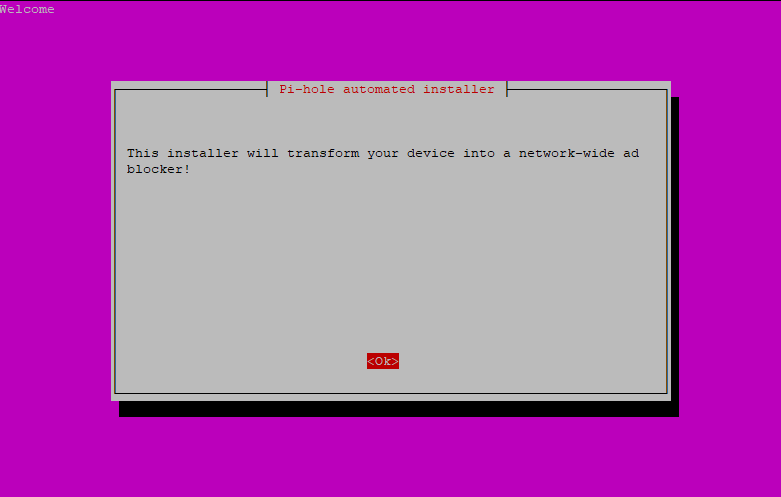
The next screen is a message from the Pi-hole automated installer informing you that you are installing a network-wide ad blocker.
Press ENTER to proceed.
Next, the installation wizard tells you that Pi-hole is Free and open source and lets you know how you can donate to the Pi-hole project.
Press ENTER to continue the installation.

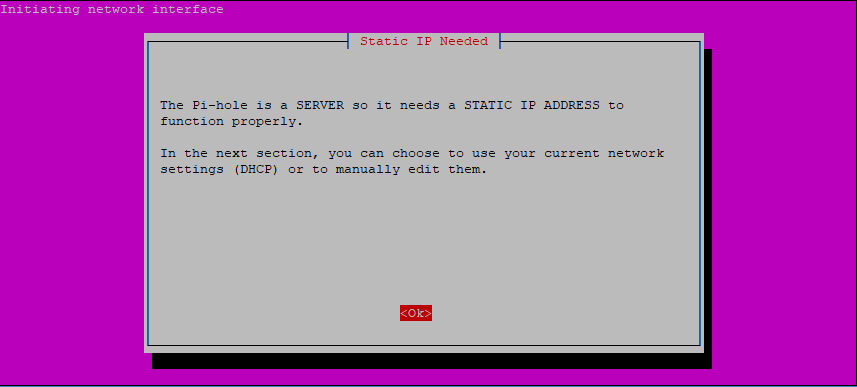
The installation script will then inform you that a Static IP Address is required for the service to function properly.
Again, press ENTER to continue.
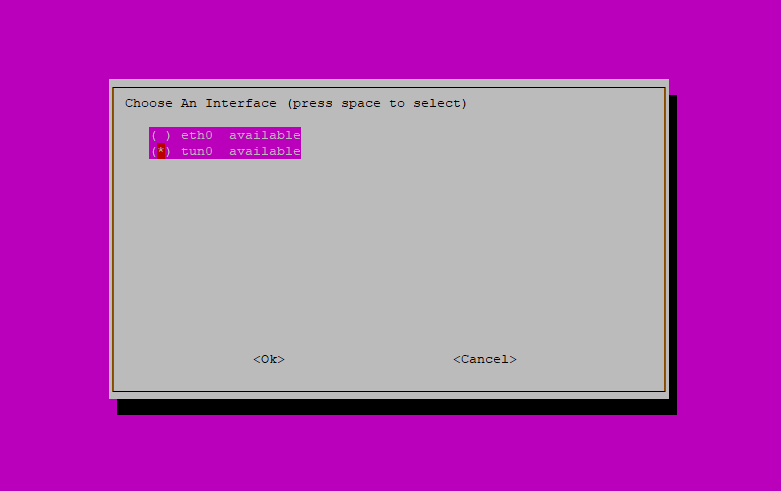
The next screen asks you to Choose An Interface for Pi-hole to listen on. Because you need Pi-hole to monitor the VPN’s network interface, use the arrow keys on your keyboard to highlight tun0 and then press SPACE to make the selection. Next, press TAB to jump to the options at the bottom of screen. With <Ok> highlighted, press ENTER to save the settings and continue.
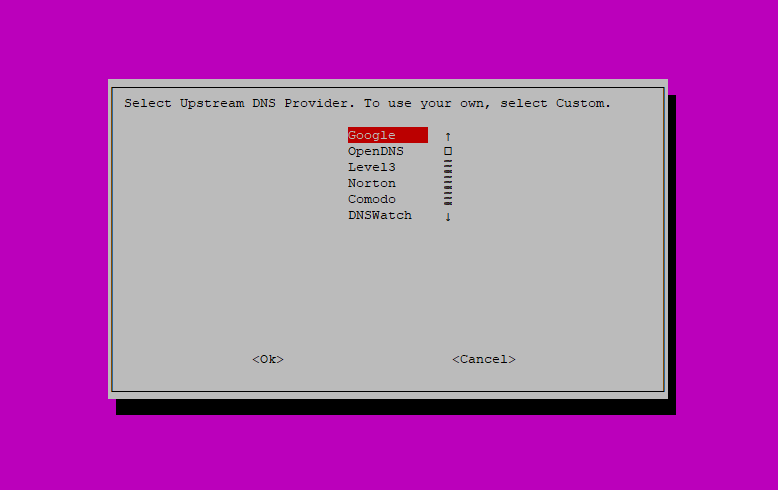
The wizard now asks you to specify the Upstream DNS Provider. This is the service Pi-hole will use to resolve domain names. For simplicity’s sake, you can leave this set to the default value, Google.
Press TAB to jump to the bottom of the screen, then press ENTER when <Ok> is highlighted.
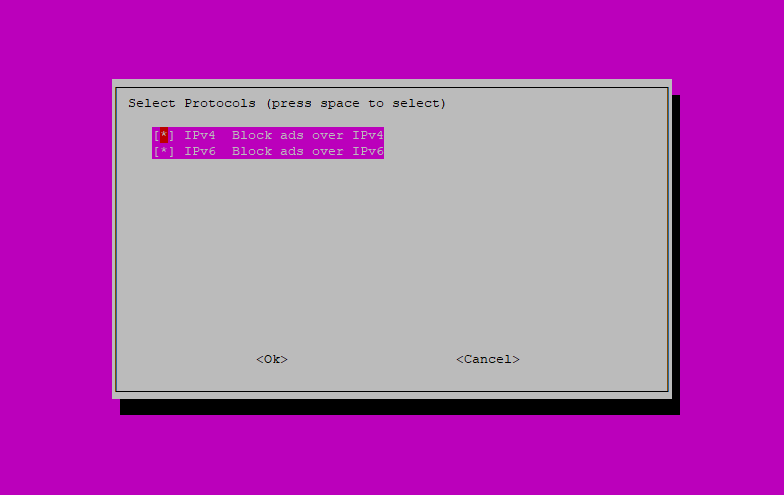
On the following screen, Pi-hole prompts you to select which internet protocols to filter. Protocols — like IPv4 and IPv6 — specify the technical format of packets and the addressing scheme for computers to communicate over a network. IPv4 is the most widely adopted internet protocol for connecting devices to a network.
Filtering of both IPv4 and IPv6 is needed for Pi-hole to perform effectively, so leave both protocols selected and press TAB to jump to the options at the bottom of the screen. Select <Ok> and then press ENTER.
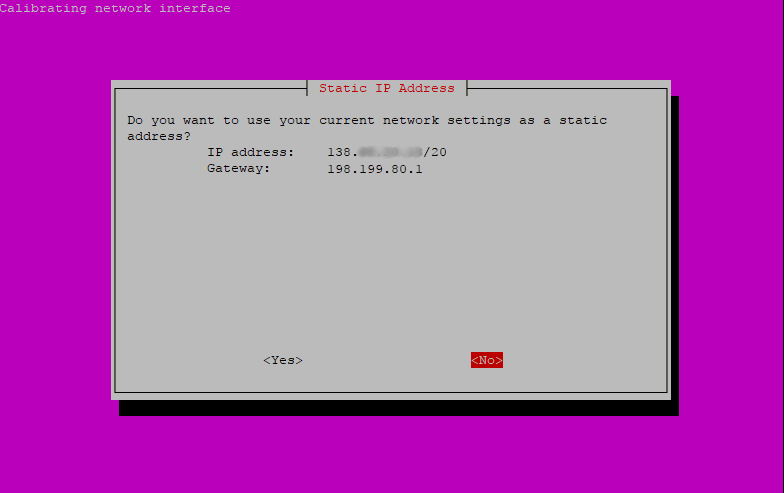
Pi-hole now asks if you want to use the current network settings as the Static IP Address. Because you need Pi-hole to make use of the VPN, you’ll enter this information manually on the next screen.
Use your arrow keys to select <No> and then press ENTER.
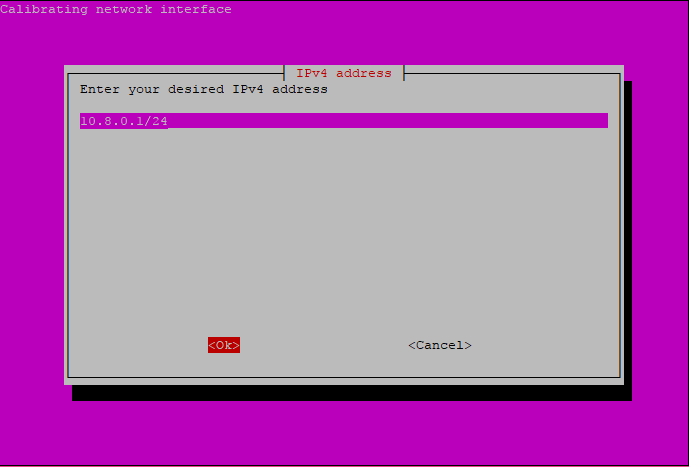
Pi-hole will now prompt you for an IPv4 address. Enter your VPN server’s address here. This is the IP address from Step 1 that came after inet in the output you received the first time you ran the ip command.
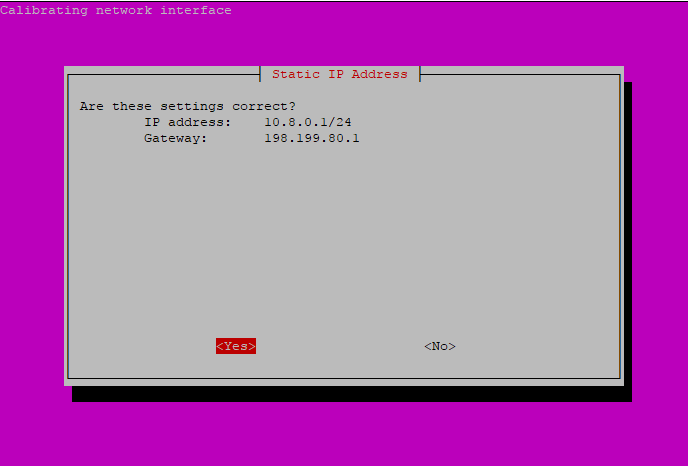
If you followed the OpenVPN Server on Ubuntu 16.04 guide in the Prerequisites, then your IP address should be the same as the one in the following screenshot. Add /24 to the end of the IP address to specify the VPN’s subnet mask.
Select <Ok> and press ENTER to continue.
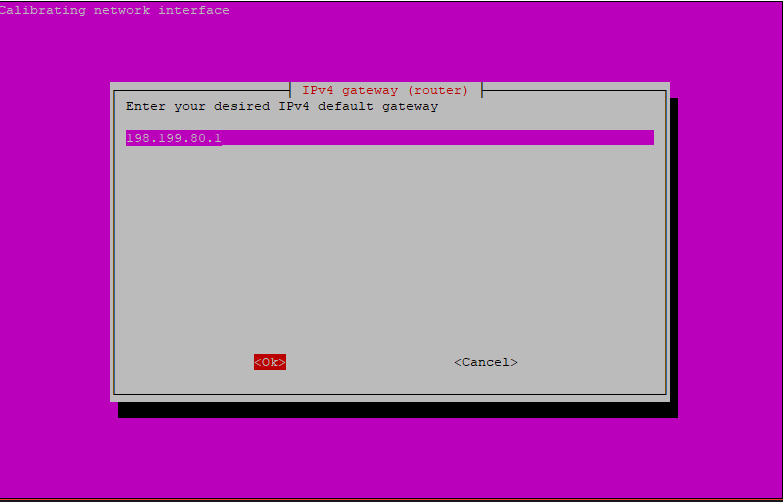
The next screen requires you to enter the IPv4 gateway (router) that Pi-hole should use to access the internet. Enter the IP address of your server’s default gateway here. This is the IP address from Step 1 that came after via in the output you received the second time you ran the ip command.
Select <Ok> and press ENTER after you’ve entered the information.
On the next screen, confirm that the IP address and Gateway are correct before they are applied to Pi-hole’s configuration. If you need to make a change, select <No> and press ENTER. Otherwise, select <Yes> and press ENTER to continue with the installation.
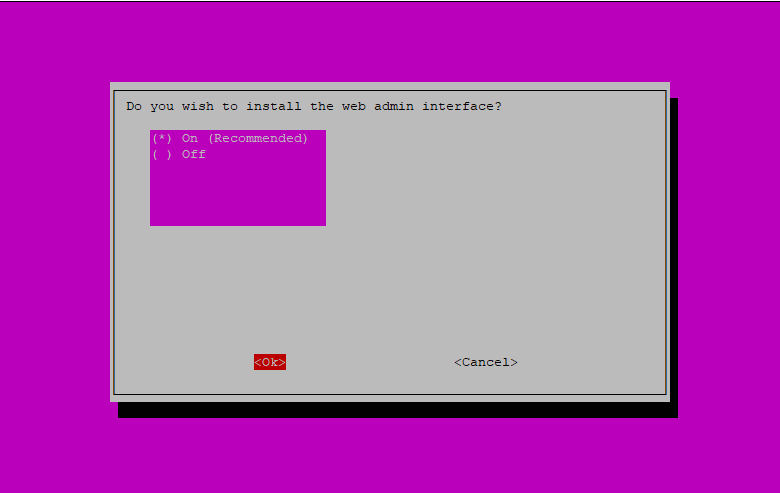
In addition to a command-line interface, you can also manage Pi-hole through its web admin interface. One of the web interface’s main advantages is its ability to view live DNS queries and blocking statistics.
By default, the web admin interface is set to On. This is both the recommended setting and required for Step 7 and Step 8 in this tutorial.
Although this tutorial uses the web interface to manage Pi-hole, if you’d like to check out different branches of the project while still in development or if you simply prefer working through a terminal session, you can learn more about Pi-hole’s command-line interface in this official FAQ.
Use TAB to select <Ok> and then press ENTER.
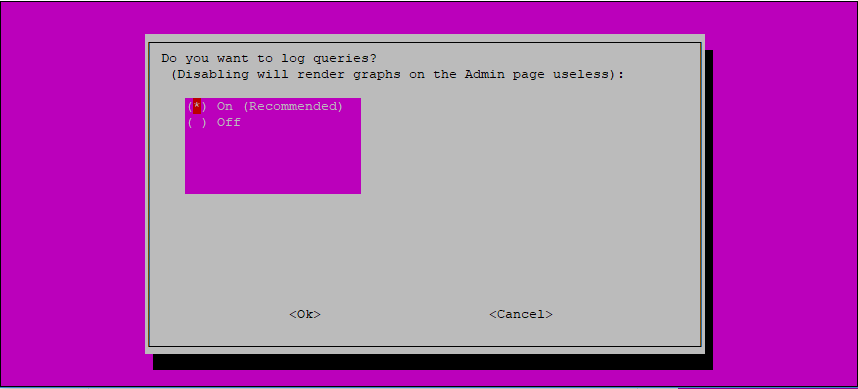
In order to make use of the web admin interface’s ability to view live DNS queries and blocking statistics, you have to configure Pi-hole to log queries.
This is both the default and recommended setting, so use TAB to select <Ok> and then press ENTER.
At this point, Pi-hole will download and install the remaining dependencies along with the default data for the block- and blacklist. From there, Pi-hole will apply all of the network configuration settings you entered in the previous screens.
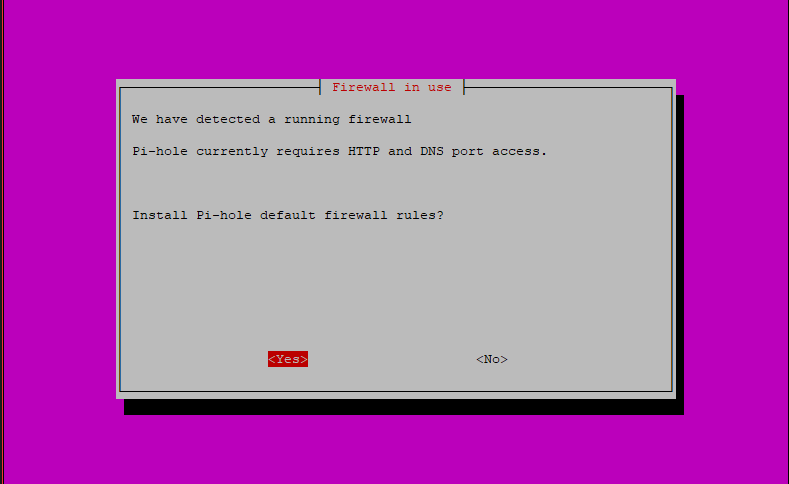
During this step, Pi-hole will tell you that there is a Firewall in use and then the installer will prompt you to accept the firewall settings required for the service to function properly.
Use TAB to select <Yes> and then press ENTER.
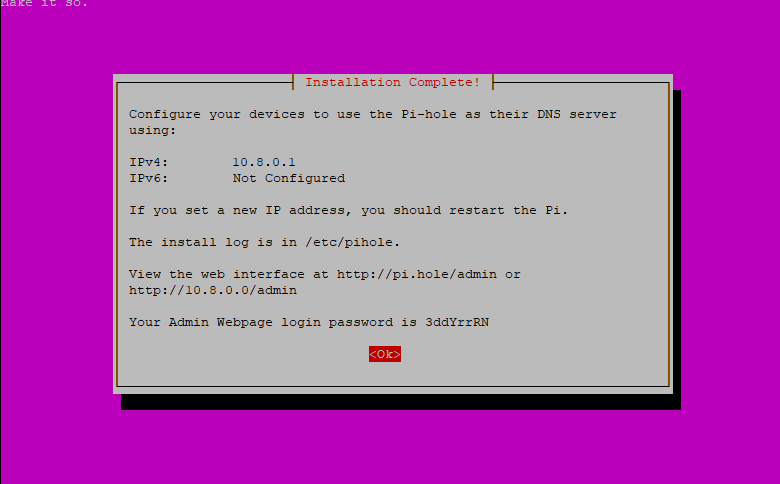
From here, Pi-hole will continue with the installation on its own. When finished, the dialogue title will change to, Installation Complete!, and Pi-hole will start automatically and begin filtering all DNS queries on the network.
Press ENTER to exit the installation wizard.
Pi-hole is now installed and configured, but before moving on, let’s test that everything is working as expected.
Step 4 — Testing DNS Filtering
When both OpenVPN and Pi-hole are completely set up and working together, every DNS request made on your network will get forwarded to Pi-hole, which will then check to see whether the requested domain matched any other domain in either the block lists or blacklist. If so, the filter will drop the domain altogether; if not, the filter will allow the domain to pass through.
Even though Pi-hole isn’t yet configured to work with OpenVPN, you can still verify the current installation by testing Pi-hole’s ability to filter ad-serving domains right from your server.
To perform the test, use the host command to do a DNS lookup on google.com, specifying the default gateway, 10.8.0.1, as the name server to query. This will cause the request to pass through Pi-hole’s filters.
- host google.com 10.8.0.1
Because the output includes the domain’s public IP address, you know that google.com did not match any domains on the block lists or blacklist.
Output from host google.com 10.8.0.1...
google.com has address 216.58.194.174
...
Now, try the host command again, this time passing it pagead2.googlesyndication.com, a known ad-serving domain.
- host pagead2.googlesyndication.com 10.8.0.1
Rather than the domain’s public IP address, this time you get back the default gateway’s address. This means that Pi-hole successfully identified the ad-serving domain and then responded by dropping the request.
Output from host pagead2.googlesyndication.com 10.8.0.1...
pagead2.googlesyndication.com has address 10.8.0.1
...
If you don’t see the default gateway’s address in the output, double check that you’ve included 10.8.0.1 as the name server to query and then review the terminal for messages indicating there was a problem either installing or starting Pi-hole.
Pi-hole is now correctly installed and filtering requests, so it’s time to configure OpenVPN to point DNS requests to Pi-hole.
Step 5 — Configuring OpenVPN
OpenVPN is currently configured to direct all DNS traffic to the DNS server you specified during installation in the Prerequisites. To make use of Pi-hole as an ad-blocker, you now need to reconfigure OpenVPN to point DNS traffic to Pi-hole instead.
First, open OpenVPN’s main configuration file for editing.
- sudo nano /etc/openvpn/server.conf
Find the following lines:
...
;push "dhcp-option DNS 208.67.222.222"
;push "dhcp-option DNS 208.67.220.220"
...
These settings allow you to push DHCP options — including DNS settings — to clients connected to the VPN.
As the two dhcp-option settings included in server.conf are commented out by default, leave them in place in case you need to refer to them again in the future.
Now, add the new setting telling OpenVPN to direct clients to use Pi-hole, located at 10.8.0.1, for all DNS requests.
...
;push "dhcp-option DNS 208.67.222.222"
;push "dhcp-option DNS 208.67.220.220"
push "dhcp-option DNS 10.8.0.1"
...
Save and close the file to continue.
To apply the changes, reload OpenVPN.
- sudo systemctl restart openvpn@server
Finally, test that OpenVPN successfully started back up.
- sudo systemctl status openvpn@server
If everything worked, the output will tell you that OpenVPN is active (running).
Output from systmctl...
Active: active (running) since Mon 2017-11-27 22:08:43 UTC; 1 day 23h ago
...
If the service failed to start, retrace the previous steps to resolve the problem.
OpenVPN is now configured to direct DNS requests to Pi-hole, but you still have to adjust the firewall to make everything work.
Step 6 — Adjusting Firewall Rules
Now that Pi-hole and OpenVPN are both configured and running, open port 53 to allow DNS requests that passed Pi-hole’s filters to continue on to the upstream DNS server.
- sudo ufw allow 53
For web browsing to work correctly, open up the firewall for HTTP and HTTPS traffic.
- sudo ufw allow http
- sudo ufw allow https
Next, tell UFW to allow all udp and tcp transmissions originating in the 10.8.0.0/24 to 10.8.0.1 IP range on port 53. This will allow DNS queries from the VPN’s IP range to pass to Pi-hole for filtering.
- sudo ufw allow proto udp from 10.8.0.0/24 to 10.8.0.1 port 53
- sudo ufw allow proto tcp from 10.8.0.0/24 to 10.8.0.1 port 53
Similarly, allow web traffic originating in the 10.8.0.0/24 IP range to pass through the VPN server at 10.8.0.1 on port 80.
- sudo ufw allow proto tcp from 10.8.0.0/24 to 10.8.0.1 port 80
To apply the changes, reload UFW.
- sudo ufw reload
If successful, the output will read:
Output from ufw reloadFirewall reloaded
If you run into a problem, follow the on-screen messages to resolve the issue.
Now that the firewall is configured for OpenVPN and Pi-hole, you can log into the web admin interface to explore Pi-hole’s filtering capabilities.
Step 7 — Filtering with Block Lists
Pi-hole ships with a set of default block lists that are maintained by the project’s development team; however, these lists alone are not always sufficient. Ideally, you should tailor the block lists to fit your specific browsing habits and the applications you use. You can manage block lists and more with Pi-hole’s admin web interface.
To manage Pi-hole through its web interface, you need to connect to your OpenVPN network first. Once you’re connected, navigate your web browser to the web interface’s default homepage at http://10.8.0.1/admin.
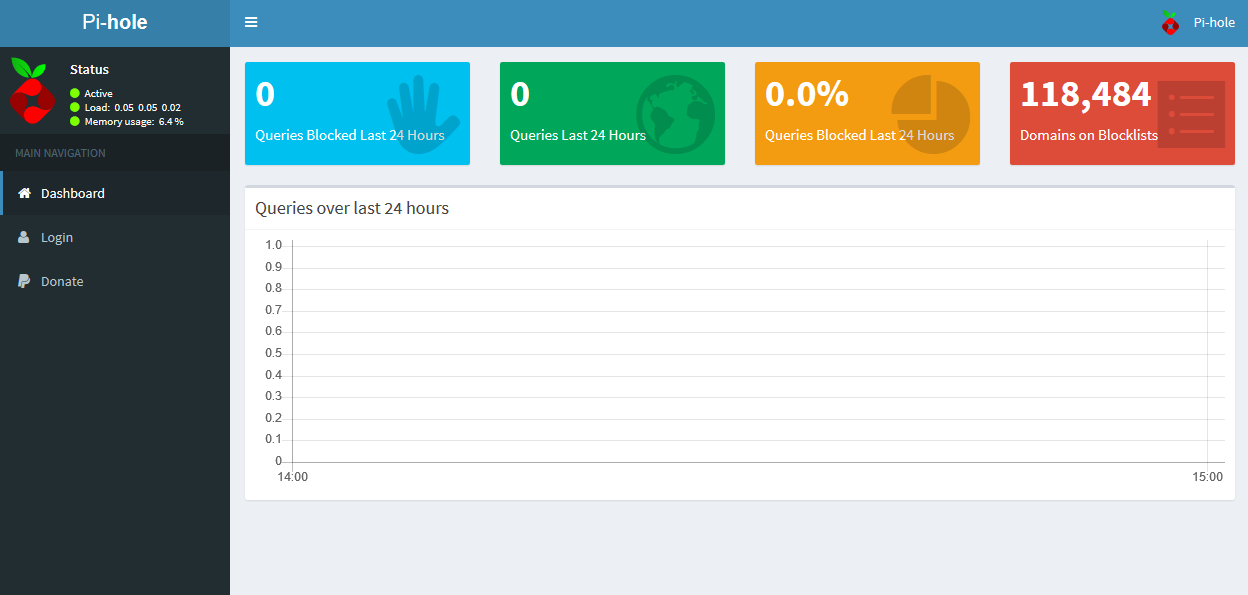
You’ll be greeted by a screen that includes widgets reporting the number of Queries Blocked Last 24 Hours, number of Queries Last 24 Hours, percent of Queries Blocked Last 24 Hours, and number of Domains on Blocklists. You’ll also see a chart of the Queries over last 24 hours, a Pi-hole Status indicator, and navigation options for the Dashboard, Login screen, and Donate page on PayPal.
Click Login to access the full interface. When prompted, enter the password you received on the final Pi-hole installation screen in Step 3.
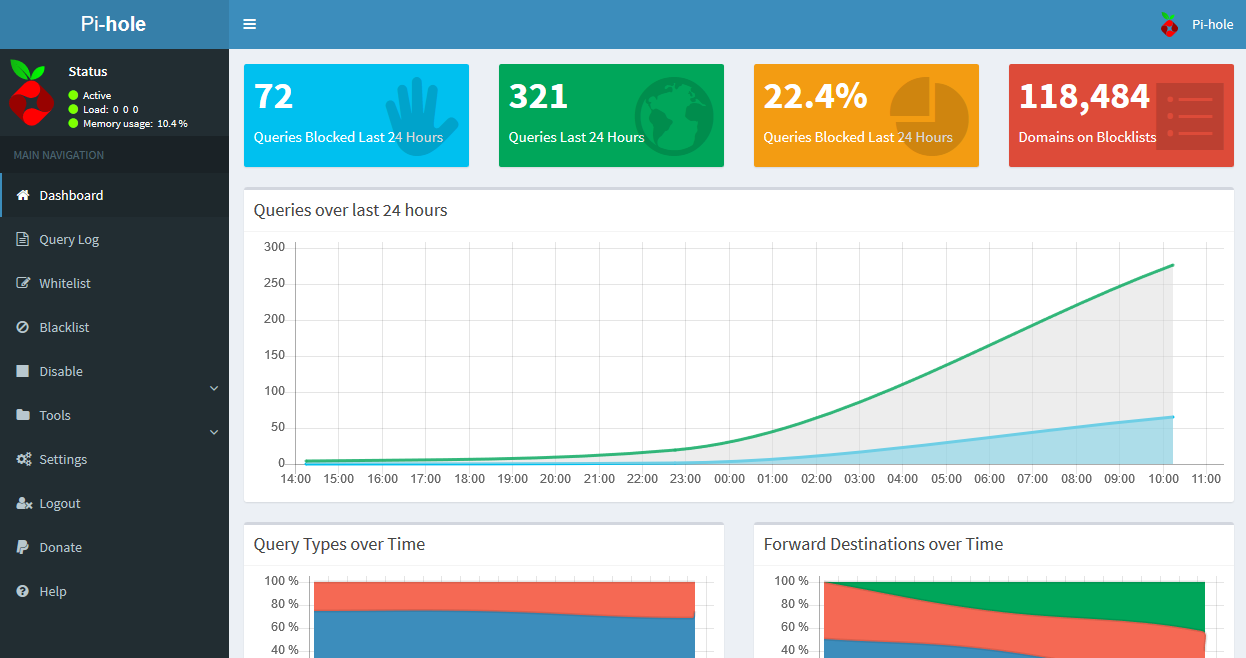
After you’ve logged in, the interface’s general layout will remain the same, but it will now include more menu options on the left-hand side of the screen and additional widgets for Query Types over Time and Forward Destinations over Time.
Before adding additional block lists to Pi-hole, you should first update the official block list data from the project’s maintainers, as it’s possible that the most recent update includes some or all of the data sources you’re about to add manually.
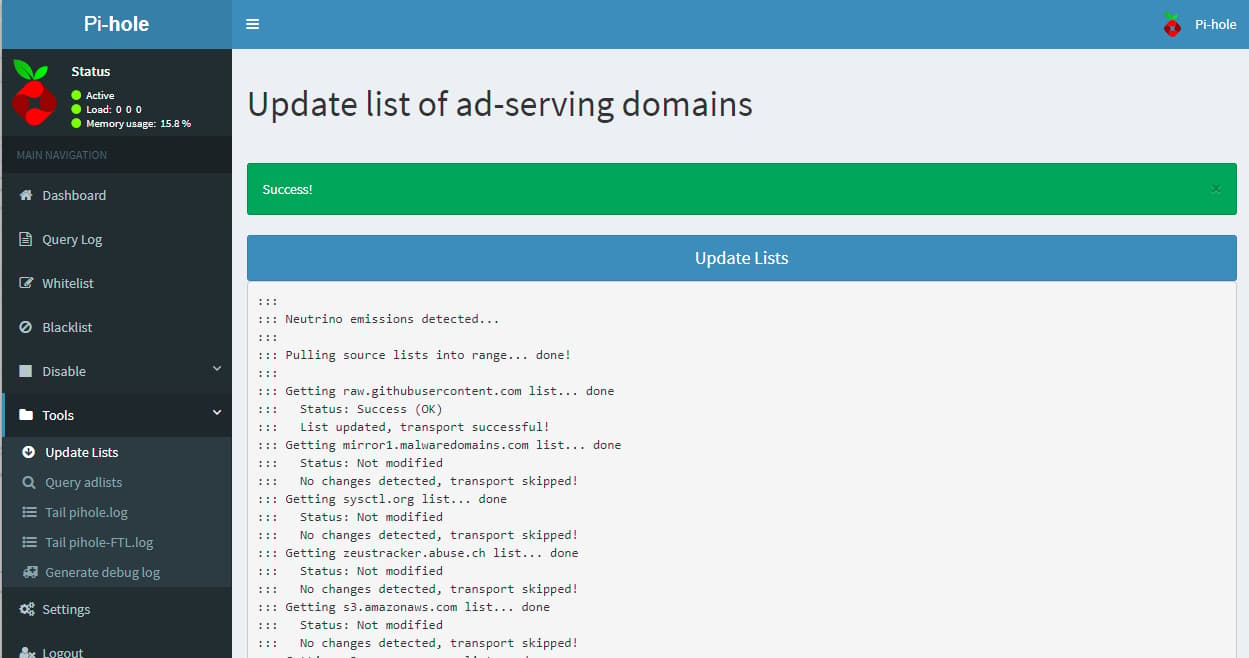
On the left-hand side of the screen, click Tools to expand the navigation menu and then select Update Lists.
On the next screen, click the blue Update Lists button in the middle of the screen to fetch the latest version of official block list sources.
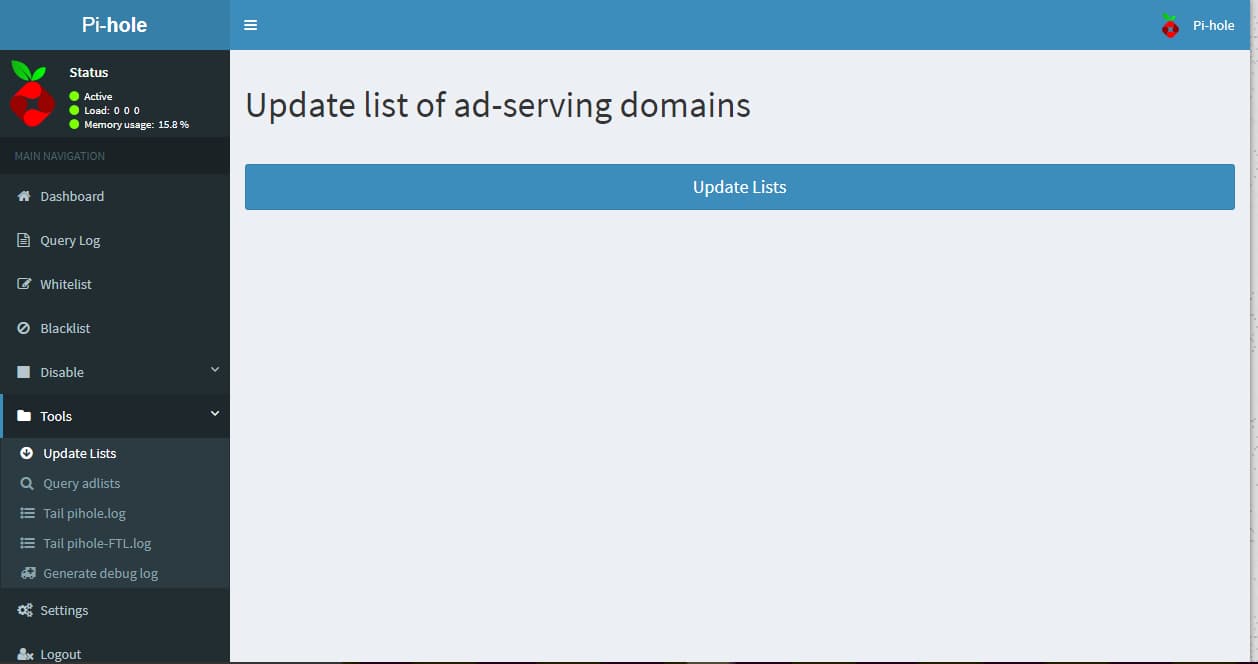
As Pi-hole performs the update, it will show you the sources it’s pulling the list data from, whether the sources have been modified since your last update, and whether any data was imported into your installation. When complete, the green bar at the top of the screen will read, Success!.
With the official block list data updated, you’re ready to add your own additional block lists.
Click Settings in the navigation menu on the left-hand side of the screen for Pi-hole’s main configuration options.
On the next screen, click the + symbol in the box labeled Pi-Hole’s Block Lists to view the current block list data.
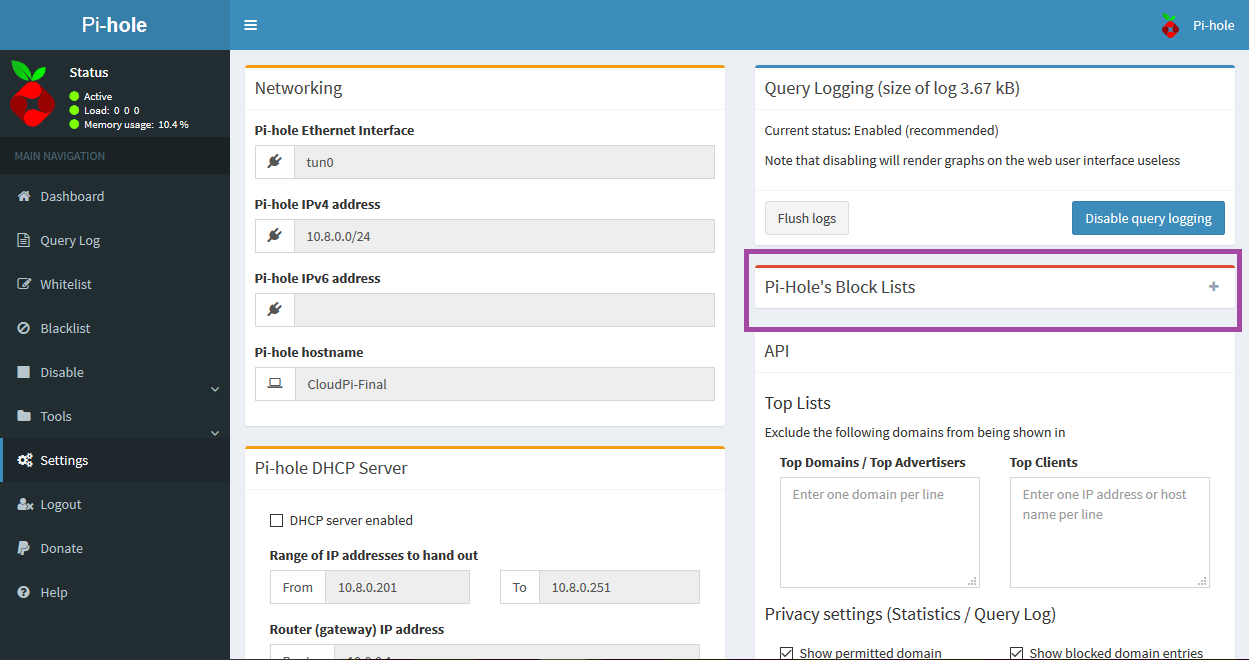
By default, Pi-hole uses the following block lists for filtering:
- https://raw.githubusercontent.com/StevenBlack/hosts/master/hosts
- https://mirror1.malwaredomains.com/files/justdomains
- http://sysctl.org/cameleon/hosts
- https://zeustracker.abuse.ch/blocklist.php?download=domainblocklist
- https://s3.amazonaws.com/lists.disconnect.me/simple_tracking.txt
- https://s3.amazonaws.com/lists.disconnect.me/simple_ad.txt
- https://hosts-file.net/ad_servers.txt
To add a new list to your installation, enter the list’s source URL in the input field at the bottom of the pane, then press the Save and Update button to save your addition and re-run the Update Lists function. This will automatically pull in the data associated with the new block list source.
For additional block lists broken down into categories, like Suspicious Lists, Advertising Lists, and Tracking & Telemetry Lists, see The Big Blocklist Collection.
Now that you’ve updated the default block lists and learned how to manually add more, let’s take a look at filtertering requests with black- and whitelists.
Step 8 — Filtering with Blacklists and Whitelists
Alongside the block lists that Pi-hole uses to filter DNS requests, you can also target individual domains with blacklists. Blacklists automatically drop outgoing and incoming requests to and from specific domains. This can be particularly useful to businesses and other organizations who need to block domains that contain content that isn’t appropriate for work or are known for hosting viruses and other malware.
To blacklist a domain, click Blacklist in the main navigation on the left-hand side of the screen.
On the next screen, you can either add exact or wildcard blocking to a domain.
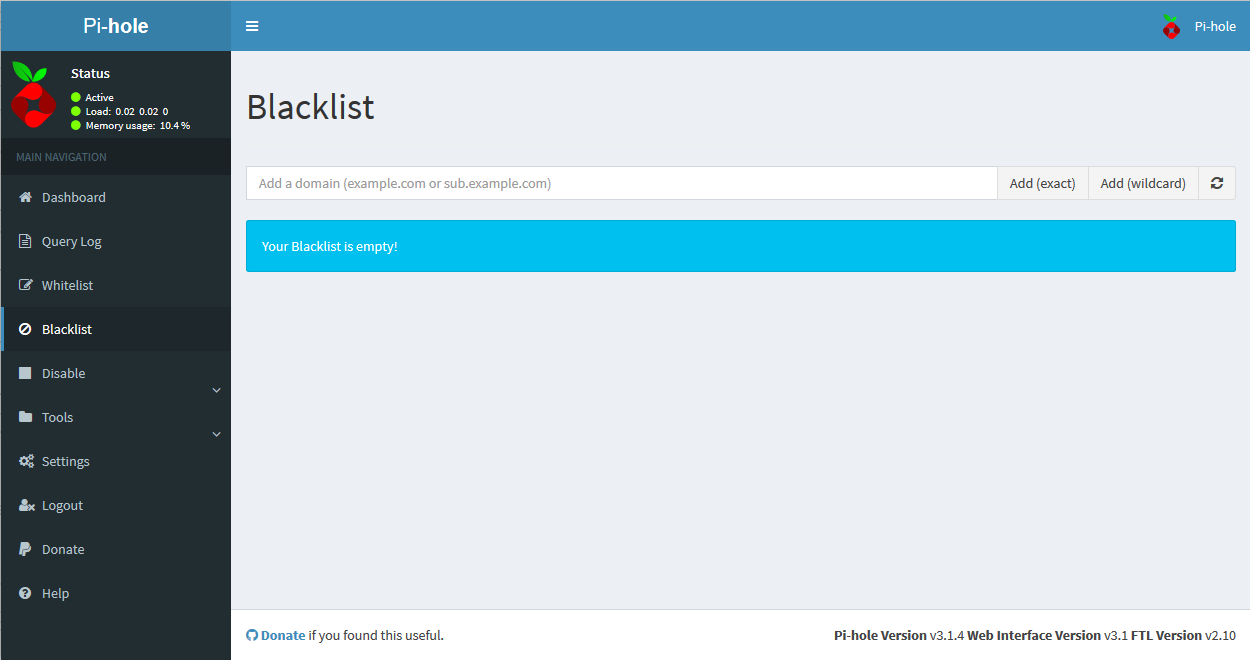
With exact blocking, only those domains that perfectly match the values you enter in the Add a domain input field will be blocked. In other words, if you enter example.com in the input field, then requests made to and from example.com will be blocked, but requests made to and from www.example.com will not.
With wildcard blocking, both the domain you enter and any related subdomains will be blocked. In this case, that means both example.com and www.example.com will be blocked.
Test the blacklist functionality by entering pi-hole.net into the Add a domain input field, then click on the Add (exact) button. pi-hole.net is now listed under Exact blocking on the Blacklist screen.

Any request made to or from pi-hole.net will now be blocked by Pi-hole’s blacklist filter. Try navigating your web browser to https://pi-hole.net. Although the error message differs from browser to browser, you will no longer be able to reach this address.
To remove pi-hole.net from Exact blocking, click the red button with the white trashcan icon to the right of the domain.
At the opposite end of the spectrum, the whitelist tells Pi-hole to always allow all requests to and from specific domains to pass through its filters. Whitelisting can be useful when legitmate domains end up in a block list you’re using or when you want to allow traffic to and from domains that contain a mix of ad-based and non-ad content.
To whitelist a domain, click Whitelist in the main navigation on the left-hand side of the screen.
On the next screen, you can add new domains to be whitelisted and see which domains already are whitelisted.
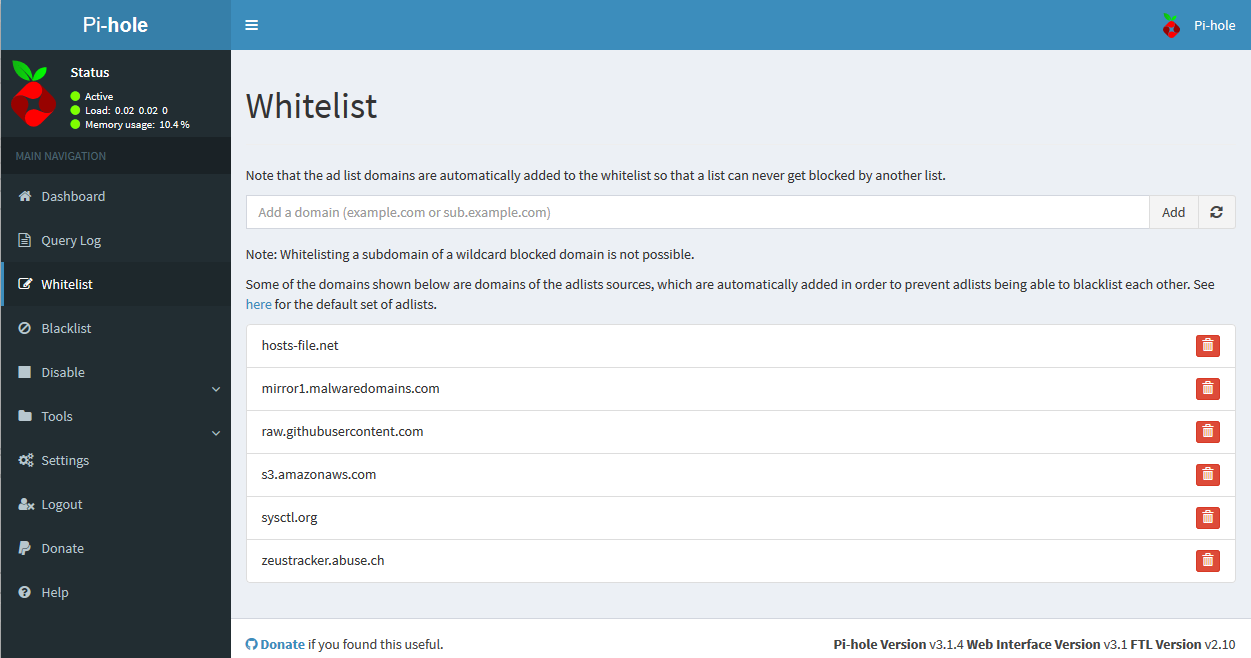
Even though you haven’t yet whitelisted any domains yourself, by default, Pi-hole whitelists the domains it uses for updating block lists. This is to prevent one block list from blocking another block list.
Additionally, notice the Note that explains you cannot whitelist a subdomain of a wildcard-blocked domain. This means that if you already have a wildcard block on example.com, whitelisting www.example.com still won’t give you access to the subdomain. In order to blacklist example.com but whitelist www.example.com, you need to apply an exact block to example.com instead.
To whitelist a domain, enter the domain in the Add a domain input field and then press the Add button. Pi-hole will briefly flash one message that says, Adding to the Whitelist …, followed by a second message saying, Success! The list will refresh. Both messages will then disappear and the list of whitelisted domains will contain the domain you just entered.
To remove a domain from the whitelist, click the red button with the white trashcan icon to the right of the domain you no longer want whitelisted.
Finally, to test your installation’s black- and whitelisting abilities, see Pi-hole’s official list of pages to test your setup’s ad-blocking performance.
Conclusion
You now have a simple yet effective way of filtering any DNS request on your network, but keep in mind that you might need to tweak your block lists a bit to suit your personal browsing habits.
To learn about another way of running Pi-hole, see this project that puts Pi-hole in a Docker container.
Or, to further enhance your network security, find out how to enable DNSCrypt on your current Pi-hole installation to create a private and secure intranet.
For general information and other questions, visit the official Pi-hole discussion forum.
Thanks for learning with the DigitalOcean Community. Check out our offerings for compute, storage, networking, and managed databases.
About the author(s)
Technical Editor @ DigitalOcean
Still looking for an answer?
This textbox defaults to using Markdown to format your answer.
You can type !ref in this text area to quickly search our full set of tutorials, documentation & marketplace offerings and insert the link!
How well is the connection to the Droplet from the computer connecting to it? Want to make sure there are no serious lag issues.
I’m curious to know if Fail2Ban might be a good thing to add to the server as a means to stop any brute force attacks. If so, I’d be curious to know if the settings might be any different than what is already listed in the existing tutorials.
Do you actually need 2gb RAM or was is just an example? Both tools are designed to work on raspberry pi which has a much smaller RAM.
Looking at the dashboard of my Pi-hole I noticed that there are total of 10 clients. Half of then are my own devices utilizing Pi-hole. Other half I don’t recognize. Once of client is scan-09o.shadowserver.org.
Is it something to do with port 53 being open?
I’d like to see this tutorial updated or a new one created now that CloudFlare is offering DNS services using 1.1.1.1, which is supposed to be more secure.
We have created a huge (2.5+ Mil) list, broken down into categories, of potentially malicious URLs FREE for everyone to use.
These lists work great with the PH.
Please check it out:
Link: https://qkly.xyz/tspprs Direct Link: https://tspprs.com
Hmmm with the given setup, the pi-hole admin panel is accessible without using the vpn connection…
acctually most of the firewall part doesnt make much sense…
should be just:
ufw allow proto tcp from 10.8.0.0/24 to 10.8.0.1 port 53
ufw allow proto udp from 10.8.0.0/24 to 10.8.0.1 port 53
and to access the admin panel:
ufw allow proto tcp from 10.8.0.0/24 to 10.8.0.1 port 80
and done… this way the panel is only available via vpn…
to make it even more unlikely that the panel is leaked to the public address, edit /etc/lighttpd/external.conf to add this line:
server.bind="10.8.0.1"
reload the lighttpd service
systemctl restart lighttpd
and bam! the panel is even in the case of some firewall bs only available via the vpn…
btw instead of the internal ip you can simply use the url: ‘pi.hole’ much easier to remember :D
 This work is licensed under a Creative Commons Attribution-NonCommercial- ShareAlike 4.0 International License.
Become a contributor for community
Get paid to write technical tutorials and select a tech-focused charity to receive a matching donation.

DigitalOcean Documentation
Full documentation for every DigitalOcean product.

Resources for startups and AI-native businesses
The Wave has everything you need to know about building a business, from raising funding to marketing your product.
The developer cloud
Scale up as you grow — whether you're running one virtual machine or ten thousand.

Start building today
From GPU-powered inference and Kubernetes to managed databases and storage, get everything you need to build, scale, and deploy intelligent applications.
