By Oluyemi Olususi and Kathryn Hancox

The author selected Software in the Public Interest Inc to receive a donation as part of the Write for DOnations program.
Introduction
Nest.js is a scalable, server-side JavaScript framework built with TypeScript that still preserves compatibility with JavaScript, which makes it an effective tool for building efficient and reliable back-end applications. It has a modular architecture that provides a mature, structural design pattern to the Node.js development world.
Vue.js is a front-end JavaScript framework for building user interfaces. It has a simple, yet very powerful API along with great performance. Vue.js is capable of powering the front-end layer and logic of any web application irrespective of the size. The ease of integrating it with other libraries or existing projects makes it a perfect choice for most modern web applications.
In this tutorial, you’ll build a Nest.js application to get yourself familiar with its building blocks as well as the fundamental principles of building modern web applications. You’ll approach this project by separating the application into two different sections: the frontend and the backend. Firstly, you’ll concentrate on the RESTful back-end API built with Nest.js. You’ll then focus on the frontend, which you will build with Vue.js. Both applications will run on different ports and will function as separate domains.
You’ll build a blog application with which users can create and save a new post, view the saved posts on the homepage, and carry out other processes such as editing and deleting posts. Furthermore, you’ll connect your application and persist its data with MongoDB, which is a schema-less NoSQL database that can receive and store JSON documents. This tutorial focuses on building your application in a development environment. For a production environment, you should also consider user authentication for your application.
Prerequisites
To complete this tutorial, you will need:
- A local installation of Node.js (at least v6) and npm (at least v5.2). Node.js is a JavaScript run-time environment that allows you to run your code outside of the browser. It comes with a pre-installed package manager called
npm, which lets you install and update packages. To install these on macOS or Ubuntu 18.04, follow the steps in How to Install Node.js and Create a Local Development Environment on macOS or the “Installing Using a PPA” section of How To Install Node.js on Ubuntu 18.04. - MongoDB installed on your machine. Follow the instructions here to download and install it for your choice of operating system. To successfully install MongoDB, you can either install it by using Homebrew on Mac or by downloading it from the MongoDB website.
- A basic understanding of TypeScript and JavaScript.
- A text editor installed, such as Visual Studio Code, Atom, or Sublime Text.
Note: This tutorial uses a macOS machine for development. If you’re using another operating system, you may need to use sudo for npm commands throughout the tutorial.
Step 1 — Installing Nest.js and Other Dependencies
In this section, you will get started with Nest.js by installing the application and its required dependencies on your local machine. You can easily install Nest.js by either using the CLI that Nest.js provides, or, by installing the starter project from GitHub. For the purpose of this tutorial, you’ll use the CLI to set up the application. To begin, run the following command from the terminal to have it installed globally on your machine:
- npm i -g @nestjs/cli
You will see output similar to the following:
Output@nestjs/cli@5.8.0
added 220 packages from 163 contributors in 49.104s
To confirm your installation of the Nest CLI, run this command from your terminal:
- nest --version
You’ll see output showing the current version installed on your machine:
Output5.8.0
You’ll make use of the nest command to manage your project and use it to generate relevant files — like the controller, modules, and providers.
To begin the project for this tutorial, use the nest command to craft a new Nest.js project named blog-backend by running the following command from your terminal:
- nest new blog-backend
Immediately after running the command, nest will prompt you to provide some basic information like the description, version, and author. Go ahead and provide the appropriate details. Hit ENTER on your computer to proceed after responding to each prompt.
Next, you’ll choose a package manager. For the purpose of this tutorial, select npm and hit ENTER to start installing Nest.js.
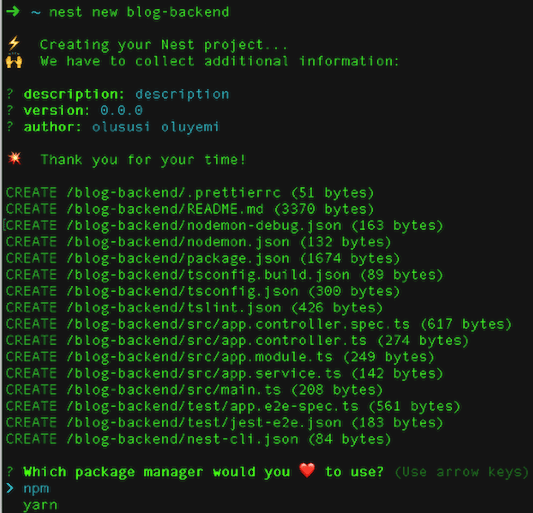
This will generate a new Nest.js project in a blog-backend folder within your local development folder.
Next, navigate to the new project’s folder from your terminal:
- cd blog-backend
Run the following command to install other server dependencies:
- npm install --save @nestjs/mongoose mongoose
You’ve installed @nestjs/mongoose, which is a Nest.js dedicated package for an object modelling tool for MongoDB, and mongoose, which is a package for Mongoose.
Now you’ll start the application using the following command:
- npm run start
Now, if you navigate to http://localhost:3000 from your favorite browser, you will see your application running.

You’ve successfully generated the project by leveraging the availability of the Nest CLI command. Afterward, you proceeded to run the application and accessed it on the default port 3000 on your local machine. In the next section, you’ll take the application further by setting up the configuration for the database connection.
Step 2 — Configuring and Connecting with the Database
In this step, you’ll configure and integrate MongoDB into your Nest.js application. You’ll use MongoDB to store data for your application. MongoDB stores its data in documents as field : value pairs. To access this data structure, you’ll use Mongoose, which is an object document modeling (ODM) that allows you to define schemas representing the types of data that a MongoDB database stores.
To start MongoDB, open a separate terminal window so that the application can keep running, and then execute the following command:
- sudo mongod
This will start the MongoDB service and run the database in the background of your machine.
Open the project blog-backend in your text editor and navigate to ./src/app.module.ts. You can set up a connection to the database by including the installed MongooseModule within the root ApplicationModule. To achieve this, update the content in app.module.ts with the following highlighted lines:
import { Module } from '@nestjs/common';
import { AppController } from './app.controller';
import { AppService } from './app.service';
import { MongooseModule } from '@nestjs/mongoose';

@Module({
  imports: [
    MongooseModule.forRoot('mongodb://localhost/nest-blog', { useNewUrlParser: true }),
  ],
  controllers: [AppController],
  providers: [AppService],
})
export class AppModule { }
In this file, you use the forRoot() method to supply the connection to the database. Save and close the file when you are finished editing.
With this in place, you have set up the database connection by using the Mongoose module for MongoDB. In the next section, you will create a database schema using the Mongoose library, a TypeScript interface, and a data transfer object (DTO) schema.
Step 3 — Creating a Database Schema, Interfaces, and DTO
In this step, you will create a schema, interface, and a data transfer object for your database using Mongoose. Mongoose helps to manage relationships between data and provides schema validation for data types. To help define the structure and datatype of the data in your application’s database, you’ll create files that determine the following:
-
database schema: This is an organization of data as a blueprint for defining the structure and the types of data that the database needs to store.
-
interfaces: TypeScript interfaces are used for type-checking. It can be used to define the types of data that should be passed for an application.
-
data transfer object: This is an object that defines how data will be sent over the network and carries the data between processes.
To begin, go back to your terminal where the application is currently running and stop the process with CTRL + C, then navigate to the ./src/ folder:
- cd ./src/
Then, create a directory named blog, and a schemas folder within that:
- mkdir -p blog/schemas
In the schemas folder, create a new file called blog.schema.ts and open it using your text editor. Then, add the following content:
import * as mongoose from 'mongoose';

export const BlogSchema = new mongoose.Schema({
    title: String,
    description: String,
    body: String,
    author: String,
    date_posted: String
})
Here, you have used Mongoose to define the type of data that you will store in the database. You’ve specified that all the fields will store and only accept string values. Save and close the file when you are finished editing.
Now, with the database schema determined, you can move on to creating the interfaces.
To begin, navigate back into the blog folder:
- cd ~/blog-backend/src/blog/
Create a new folder named interfaces and move into it:
- mkdir interfaces
In the interfaces folder, create a new file called post.interface.ts and open it using your text editor. Add the following content to define the types of data for a Post:
import { Document } from 'mongoose';

export interface Post extends Document {
    readonly title: string;
    readonly description: string;
    readonly body: string;
    readonly author: string;
    readonly date_posted: string
}
In this file, you have successfully defined the types of data for a Post type as string values. Save and exit the file.
Since your application will carry out the functionality of posting data to the database, you will create a data transfer object that will define how data will be sent over the network.
To achieve this, create a folder dto inside the ./src/blog folder. Within the newly created folder, create another file named create-post.dto.ts
Navigate back into the blog folder:
- cd ~/blog-backend/src/blog/
Then create a folder named dto and move into it:
- mkdir dto
In the dto folder, create a new file called create-post.dto.ts and open it using your text editor to add the following content:
export class CreatePostDTO {
    readonly title: string;
    readonly description: string;
    readonly body: string;
    readonly author: string;
    readonly date_posted: string
}
You’ve marked each of the individual properties in the CreatePostDTO class to have a data type of string and as readonly to avoid unnecessary mutation. Save and exit the file when you are finished editing.
In this step, you have created a database schema for the database, an interface, and a data transfer object for the data your database will store. Next, you’ll generate a module, controller, and service for your blog.
Step 4 — Creating the Module, Controller, and Service for the Blog
In this step, you’re going to improve on the existing structure of the application by creating a module for your blog. This module will organize the file structure of your application. Next, you’ll create a controller to handle routes and process HTTP requests from the client. To wrap things up, you’ll set up a service to handle all the business logic that is too complex for the controller of the application to process.
Generating a Module
Similarly to the Angular front-end web framework, Nest.js uses a modular syntax. Nest.js applications have a modular design; it comes installed with a single root module, which is often sufficient for a small application. But when an application starts to grow, Nest.js recommends a multiple-module organization, splitting the code into related features.
A module in Nest.js is identified by the @Module() decorator and takes in an object with properties such as controllers and providers. Each of these properties takes an array of controllers and providers respectively.
You will generate a new module for this blog application in order to keep the structure more organized. To begin, still in the ~/blog-backend folder, execute the following command:
- nest generate module blog
You will see output similar to the following:
OutputCREATE /src/blog/blog.module.ts

UPDATE /src/app.module.ts
The command generated a new module named blog.module.ts for the application and imported the newly created module into the root module for the application. This will allow Nest.js to be aware of another module besides the root module.
In this file, you will see the following code:
import { Module } from '@nestjs/common';

@Module({})
export class BlogModule {}
You will update this BlogModule with the required properties later in the tutorial. Save and exit the file.
Generating a Service
A service, which can also be called a provider in Nest.js, was designed to remove logic from controllers, which are meant to only handle HTTP requests and redirect more complex tasks to services. Services are plain JavaScript classes with an @Injectable() decorator on top of them. To generate a new service, run the following command from the terminal while you are still within the project directory:
- nest generate service blog
You will see output similar to the following:
[secondary_label Output]
CREATE /src/blog/blog.service.spec.ts (445 bytes)

CREATE /src/blog/blog.service.ts (88 bytes)

UPDATE /src/blog/blog.module.ts (529 bytes)
The nest command used here has created a blog.service.spec.ts file, which you can use for testing. It has also created a new blog.service.ts file, which will hold all the logic for this application and handle adding and retrieving documents to the MongoDB database. Also, it automatically imported the newly created service and added to blog.module.ts.
The service handles all the logic within the application, is responsible for interacting with the database, and returns the appropriate responses back to the controller. To accomplish this, open the blog.service.ts file in your text editor and replace the contents with the following:
import { Injectable } from '@nestjs/common';
import { Model } from 'mongoose';
import { InjectModel } from '@nestjs/mongoose';
import { Post } from './interfaces/post.interface';
import { CreatePostDTO } from './dto/create-post.dto';

@Injectable()
export class BlogService {

    constructor(@InjectModel('Post') private readonly postModel: Model<Post>) { }

    async getPosts(): Promise<Post[]> {
        const posts = await this.postModel.find().exec();
        return posts;
    }

    async getPost(postID): Promise<Post> {
        const post = await this.postModel
            .findById(postID)
            .exec();
        return post;
    }

    async addPost(createPostDTO: CreatePostDTO): Promise<Post> {
        const newPost = await this.postModel(createPostDTO);
        return newPost.save();
    }

    async editPost(postID, createPostDTO: CreatePostDTO): Promise<Post> {
        const editedPost = await this.postModel
            .findByIdAndUpdate(postID, createPostDTO, { new: true });
        return editedPost;
    }

    async deletePost(postID): Promise<any> {
        const deletedPost = await this.postModel
            .findByIdAndRemove(postID);
        return deletedPost;
    }

}
In this file, you first imported the required module from @nestjs/common, mongoose, and @nestjs/mongoose. You also imported an interface named Post and a data transfer object CreatePostDTO.
In the constructor, you added @InjectModel(``'``Post``'``), which will inject the Post model into this BlogService class. You will now be able to use this injected model to retrieve all posts, fetch a single post, and carry out other database-related activities.
Next, you created the following methods:
getPosts(): to fetch all posts from the database.getPost(): to retrieve a single post from the database.addPost(): to add a new post.editPost(): to update a single post.deletePost(): to delete a particular post.
Save and exit the file when you are finished.
You have finished setting up and creating several methods that will handle proper interaction with the MongoDB database from the back-end API. Now, you will create the required routes that will handle HTTP calls from a front-end client.
Generating a Controller
In Nest. js, controllers are responsible for handling any incoming requests from the client side of an application and returning the appropriate response. Similarly to most other web frameworks, it is important for the application to listen for a request and respond to it.
To cater to all the HTTP requests for your blog application, you will leverage the nest command to generate a new controller file. Ensure that you are still in the project directory, blog-backend, and run the following command:
- nest generate controller blog
You will see output similar to:
OutputCREATE /src/blog/blog.controller.spec.ts (474 bytes)

CREATE /src/blog/blog.controller.ts (97 bytes)

UPDATE /src/blog/blog.module.ts (483 bytes)
The output indicates that this command created two new files within the src/blog directory. They are blog.controller.spec.ts and blog.controller.ts. The former is a file that you can use to write automated testing for the newly created controller. The latter is the controller file itself. Controllers in Nest.js are TypeScript files decorated with @Controller metadata. The command also imported the newly created controller and added to the blog module.
Next, open the blog.controller.ts file with your text editor and update it with the following content:
import { Controller, Get, Res, HttpStatus, Param, NotFoundException, Post, Body, Query, Put, Delete } from '@nestjs/common';
import { BlogService } from './blog.service';
import { CreatePostDTO } from './dto/create-post.dto';
import { ValidateObjectId } from '../shared/pipes/validate-object-id.pipes';


@Controller('blog')
export class BlogController {

    constructor(private blogService: BlogService) { }

    @Get('posts')
    async getPosts(@Res() res) {
        const posts = await this.blogService.getPosts();
        return res.status(HttpStatus.OK).json(posts);
    }

    @Get('post/:postID')
    async getPost(@Res() res, @Param('postID', new ValidateObjectId()) postID) {
        const post = await this.blogService.getPost(postID);
        if (!post) throw new NotFoundException('Post does not exist!');
        return res.status(HttpStatus.OK).json(post);

    }

    @Post('/post')
    async addPost(@Res() res, @Body() createPostDTO: CreatePostDTO) {
        const newPost = await this.blogService.addPost(createPostDTO);
        return res.status(HttpStatus.OK).json({
            message: "Post has been submitted successfully!",
            post: newPost
        })
    }
}
In this file, you first imported the necessary modules to handle HTTP requests from @nestjs/common module. Then, you imported three new modules which are: BlogService, CreatePostDTO, and ValidateObjectId. After that, you injected the BlogService into the controller via a constructor in order to gain access and make use of the functions that are already defined within the BlogService file. This is a pattern regarded as dependency injection used in Nest.js to increase efficiency and enhance the modularity of the application.
Finally, you created the following asynchronous methods:
-
getPosts(): This method will carry out the functionality of receiving an HTTP GET request from the client to fetch all posts from the database and then return the appropriate response. It is decorated with a@Get(``'``posts``'``). -
getPost(): This takes apostIDas a parameter and fetches a single post from the database. In addition to thepostIDparameter passed to this method, you realized the addition of an extra method namedValidateObjectId(). This method implements thePipeTransforminterface from Nest.js. Its purpose is to validate and ensure that thepostIDparameter can be found in the database. You will define this method in the next section. -
addPost(): This method will handle a POST HTTP request to add a new post to the database.
To be able to edit and delete a particular post, you will need to add two more methods to the blog.controller.ts file. To do that, include the following editPost() and deletePost() methods directly after the addPost() method you previously added to blog.controller.ts:
...
@Controller('blog')
export class BlogController {
    ...
    @Put('/edit')
    async editPost(
        @Res() res,
        @Query('postID', new ValidateObjectId()) postID,
        @Body() createPostDTO: CreatePostDTO
    ) {
        const editedPost = await this.blogService.editPost(postID, createPostDTO);
        if (!editedPost) throw new NotFoundException('Post does not exist!');
        return res.status(HttpStatus.OK).json({
            message: 'Post has been successfully updated',
            post: editedPost
        })
    }


    @Delete('/delete')
    async deletePost(@Res() res, @Query('postID', new ValidateObjectId()) postID) {
        const deletedPost = await this.blogService.deletePost(postID);
        if (!deletedPost) throw new NotFoundException('Post does not exist!');
        return res.status(HttpStatus.OK).json({
            message: 'Post has been deleted!',
            post: deletedPost
        })
    }
}
Here you have added:
-
editPost(): This method accepts a query parameter ofpostIDand will carry out the functionality of updating a single post. It also made use of theValidateObjectIdmethod to provide proper validation for the post that you need to edit. -
deletePost(): This method will accept a query parameter ofpostIDand will delete a particular post from the database.
Similarly to the BlogController, each of the asynchronous methods you have defined here has a metadata decorator and takes in a prefix that Nest.js uses as a routing mechanism. It controls which controller receives which requests and points to the methods that should process the request and return a response respectively.
For example, the BlogController that you have created in this section has a prefix of blog and a method named getPosts() that takes in a prefix of posts. This means that any GET request sent to an endpoint of blog/posts (http:localhost:3000/blog/posts) will be handled by the getPosts()method. This example is similar to how other methods will handle HTTP requests.
Save and exit the file.
For the complete blog.controller.ts file, visit the DO Community repository for this application.
In this section, you have created a module to keep the application more organized. You also created a service to handle the business logic for the application by interacting with the database and returning the appropriate response. Finally, you generated a controller and created the required methods to handle HTTP requests such as GET, POST, PUT, and DELETE from the client side. In the next step, you’ll complete your back-end setup.
Step 5 — Creating an Extra Validation for Mongoose
You can identify each post in your blog application by a unique ID, also known as PostID. This means that fetching a post will require you to pass this ID as a query parameter. To validate this postID parameter and ensure that the post is available in the database, you need to create a reusable function that can be initialized from any method within the BlogController.
To configure this, navigate to the ./src/blog folder:
- cd ./src/blog/
Then, create a new folder named shared:
- mkdir -p shared/pipes
In the pipes folder, using your text editor, create a new file called validate-object-id.pipes.ts and open it. Add the following content to define the accepted postID data:
import { PipeTransform, Injectable, ArgumentMetadata, BadRequestException } from '@nestjs/common';
import * as mongoose from 'mongoose';

@Injectable()
export class ValidateObjectId implements PipeTransform<string> {
   async transform(value: string, metadata: ArgumentMetadata) {
       const isValid = mongoose.Types.ObjectId.isValid(value);
       if (!isValid) throw new BadRequestException('Invalid ID!');
       return value;
   }
}
The ValidateObjectId() class implements the PipeTransform method from the @nestjs/common module. It has a single method named transform() that takes in value as a parameter — postID in this case. With the method above, any HTTP request from the frontend of this application with a postID that can’t be found in the database will be regarded as invalid. Save and close the file.
After creating both the service and controller, you need to set up the Post model that is based on the BlogSchema. This configuration could be set up within the root ApplicationModule, but in this instance building the model in BlogModule will maintain your application’s organization. Open the ./src/blog/blog.module.ts and update it with the following highlighted lines:
import { Module } from '@nestjs/common';
import { BlogController } from './blog.controller';
import { BlogService } from './blog.service';
import { MongooseModule } from '@nestjs/mongoose';
import { BlogSchema } from './schemas/blog.schema';

@Module({
 imports: [
   MongooseModule.forFeature([{ name: 'Post', schema: BlogSchema }])
],
 controllers: [BlogController],
 providers: [BlogService]
})
export class BlogModule { }
This module uses the MongooseModule.forFeature() method to define which models should be registered in the module. Without this, injecting the PostModel within the BlogService using @injectModel() decorator wouldn’t work. Save and close the file when you have finished adding the content.
In this step, you’ve created the complete backend RESTful API with Nest.js and integrated it with MongoDB. In the next section, you’ll configure the server to allow HTTP requests from another server, because your frontend application will be running on a different port.
Step 6 — Enabling CORS
An HTTP request from one domain to another is often blocked by default, except when specified by the server to allow it. For your front-end application to make a request to the back-end server, you must enable Cross-origin resource sharing (CORS), which is a technique that allows requests for restricted resources on a web page.
In Nest.js to enable CORS, you need to add a single method to your main.ts file. Open this file in your text editor, which is located at ./src/main.ts, and update it with the following highlighted content:
import { NestFactory } from '@nestjs/core';
import { AppModule } from './app.module';

async function bootstrap() {
 const app = await NestFactory.create(AppModule);
 app.enableCors();
 await app.listen(3000);
}
bootstrap();
Save and exit the file.
Now that you have completed the back-end setup, you’ll shift your focus to the frontend and use Vue.js to consume the APIs built so far.
Step 7 — Creating the Vue.js Frontend
In this section, you are going to create your front-end application with Vue.js. Vue CLI is a standard tool that allows you to quickly generate and install a new Vue.js project without much hassle.
To begin, you first need to install the Vue CLI globally on your machine. Open another terminal, and instead of working from the blog-backend folder, navigate to your local project’s development folder and run:
- npm install -g @vue/cli
Once the installation process is complete, you’ll make use of the vue command to create a new Vue.js project:
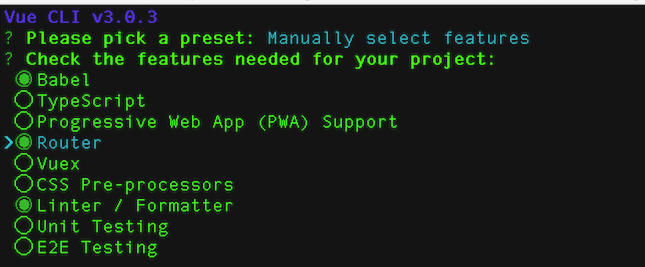
- vue create blog-frontend
You’ll see a short prompt after you’ve entered this command. Choose the manually select features option, and then select the features you’ll need for this project by pressing SPACE on your computer to highlight multiple features. You’ll select Babel, Router, and Linter / Formatter.
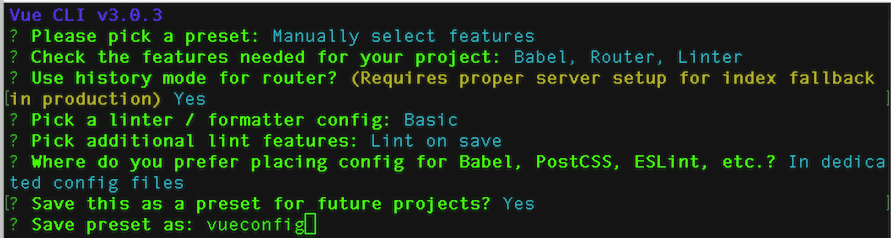
For the next instructions, type y to use history mode for a router; this will ensure that history mode is enabled within the router file, which will automatically generate for this project. In addition, select ESLint with error prevention only to pick a linter/formatter configuration. Next, select Lint on save for additional Lint features. Then select to save your configuration in a dedicated config file for future projects. Type a name for your preset, like vueconfig.
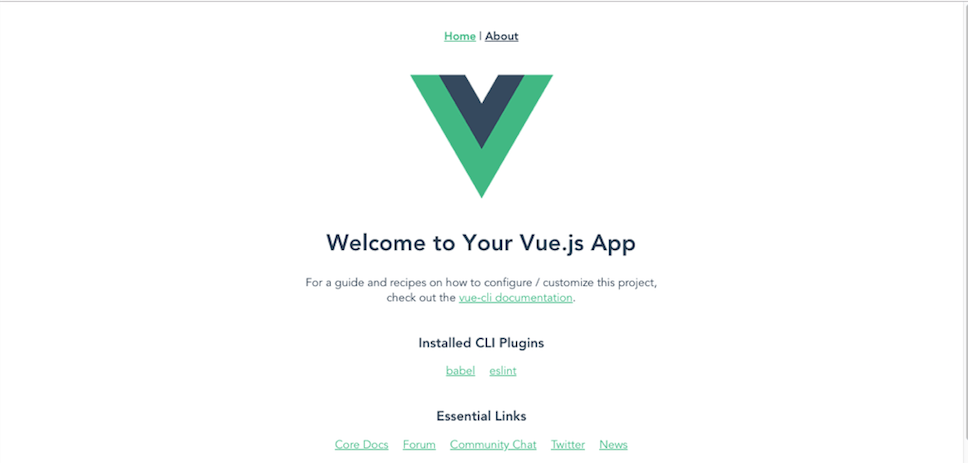
Vue.js will then start creating the application and all its required dependencies in a directory named blog-frontend.
Once the installation process is complete, navigate inside the Vue.js application:
- cd blog-frontend
Then, start the development server with:
- npm run serve
Your application will be running on http://localhost:8080.
Since you’ll be performing HTTP requests within this application, you’ll need to install Axios, which is a promise-based HTTP client for the browser. You’ll use Axios here to perform HTTP requests from the different components within the application. Stop the front-end application by hitting CTRL + C from the terminal on your computer and then run the following command:
- npm install axios --save
Your front-end application will be making an API call to the back-end API on a particular domain from different components within the application. In order to ensure proper structure for this application, you can create a helper file and define the server baseURL.
To begin, from you terminal still within blog-frontend, navigate to the ./src/ folder:
- cd ./src/
Create another folder named utils:
- mkdir utils
In the utils folder, using your text editor, create a new file called helper.js and open it. Add the following content to define the baseURL for the back-end Nest.js project:
export const server = {

baseURL: 'http://localhost:3000'

}
By defining a baseURL, you’ll be able to call it from anywhere within you Vue.js component files. In the event that you need to change the URL, it will be an easier process to update the baseURL in this file rather than across your application.
In this section, you installed the Vue CLI, a tool for creating a new Vue.js application. You used this tool to craft the blog-frontend application. In addition, you ran the application and installed a library named Axios, which you will use whenever there is an HTTP call within the app. Next, you will create components for the application.
Step 8 — Creating Reusable Components
Now you’re going to create reusable components for your application, which is the standard structure for Vue.js applications. The component system in Vue.js makes it possible for developers to build a single, independent unit of an interface that can have its own state, markup, and style. This makes it appropriate for components in Vue.js to be reusable.
Every Vue.js component contains three different sections:
-
<template>: contains the HTML contents -
<script>: holds all the basic frontend logic and defines the functions -
<style>: the stylesheet for each separate component
First, you’ll start by creating a component to create a new post. To do that, create a new folder named post within the ./src/components folder, which will house the necessary reusable components for posts. Then using your text editor, inside the newly created post folder, create another file and name it Create.vue. Open the new file and add the following code, which contains the necessary input fields for submitting a post:
<template>
  <div>
       <div class="col-md-12 form-wrapper">
         <h2> Create Post </h2>
         <form id="create-post-form" @submit.prevent="createPost">
              <div class="form-group col-md-12">
               <label for="title"> Title </label>
               <input type="text" id="title" v-model="title" name="title" class="form-control" placeholder="Enter title">
              </div>
             <div class="form-group col-md-12">
                 <label for="description"> Description </label>
                 <input type="text" id="description" v-model="description" name="description" class="form-control" placeholder="Enter Description">
             </div>
             <div class="form-group col-md-12">
                 <label for="body"> Write Content </label>
                 <textarea id="body" cols="30" rows="5" v-model="body" class="form-control"></textarea>
             </div>
             <div class="form-group col-md-12">
                 <label for="author"> Author </label>
                 <input type="text" id="author" v-model="author" name="author" class="form-control">
             </div>

             <div class="form-group col-md-4 pull-right">
                 <button class="btn btn-success" type="submit"> Create Post </button>
             </div>
         </form>
       </div>
   </div>
</template>
This is the <template> section of the CreatePost component. It contains the HTML input elements required to create a new post. Each of the input fields has a v-model directive as an input attribute. This is to ensure two-way data bindings on each of the form input to make it easy for Vue.js to obtain the user’s input.
Next, add the <script> section to the same file directly following the preceding content:
...
<script>
import axios from "axios";
import { server } from "../../utils/helper";
import router from "../../router";
export default {
 data() {
   return {
     title: "",
     description: "",
     body: "",
     author: "",
     date_posted: ""
   };
 },
 created() {
   this.date_posted = new Date().toLocaleDateString();
 },
 methods: {
   createPost() {
     let postData = {
       title: this.title,
       description: this.description,
       body: this.body,
       author: this.author,
       date_posted: this.date_posted
     };
     this.__submitToServer(postData);
   },
   __submitToServer(data) {
     axios.post(`${server.baseURL}/blog/post`, data).then(data => {
       router.push({ name: "home" });
     });
   }
 }
};
</script>
Here you’ve added a method named createPost() to create a new post and submit it to the server using Axios. Once a user creates a new post, the application will redirect back to the homepage where users can view the list of created posts.
You will configure vue-router to implement the redirection later in this tutorial.
Save and close the file when you are finished editing. For the complete Create.vue file, visit the DO Community repository for this application.
Now, you need to create another component for editing a particular post. Navigate to ./src/components/post folder and create another file and name it Edit.vue. Add the following code that contains the <template> section to it:
<template>
<div>
      <h4 class="text-center mt-20">
       <small>
         <button class="btn btn-success" v-on:click="navigate()"> View All Posts </button>
       </small>
    </h4>
        <div class="col-md-12 form-wrapper">
          <h2> Edit Post </h2>
          <form id="edit-post-form" @submit.prevent="editPost">
            <div class="form-group col-md-12">
                <label for="title"> Title </label>
                <input type="text" id="title" v-model="post.title" name="title" class="form-control" placeholder="Enter title">
            </div>
            <div class="form-group col-md-12">
                <label for="description"> Description </label>
                <input type="text" id="description" v-model="post.description" name="description" class="form-control" placeholder="Enter Description">
            </div>
            <div class="form-group col-md-12">
                <label for="body"> Write Content </label>
                <textarea id="body" cols="30" rows="5" v-model="post.body" class="form-control"></textarea>
            </div>
            <div class="form-group col-md-12">
                <label for="author"> Author </label>
                <input type="text" id="author" v-model="post.author" name="author" class="form-control">
            </div>

            <div class="form-group col-md-4 pull-right">
                <button class="btn btn-success" type="submit"> Edit Post </button>
            </div>
          </form>
        </div>
    </div>
</template>
This template section holds similar content as the CreatePost() component; the only difference is that it contains the details of the particular post that needs to be edited.
Next, add the<script> section directly following the </template> section in Edit.vue:
...
<script>
import { server } from "../../utils/helper";
import axios from "axios";
import router from "../../router";
export default {
  data() {
    return {
      id: 0,
      post: {}
    };
  },
  created() {
    this.id = this.$route.params.id;
    this.getPost();
  },
  methods: {
    editPost() {
      let postData = {
        title: this.post.title,
        description: this.post.description,
        body: this.post.body,
        author: this.post.author,
        date_posted: this.post.date_posted
      };

      axios
        .put(`${server.baseURL}/blog/edit?postID=${this.id}`, postData)
        .then(data => {
          router.push({ name: "home" });
        });
    },
    getPost() {
      axios
        .get(`${server.baseURL}/blog/post/${this.id}`)
        .then(data => (this.post = data.data));
    },
    navigate() {
      router.go(-1);
    }
  }
};
</script>
Here, you obtained the route parameter id to identify a particular post. You then created a method named getPost() to retrieve the details of this post from the database and updated the page with it. Finally, you created an editPost() method to submit the edited post back to the back-end server with a PUT HTTP request.
Save and exit the file. For the complete Edit.vue file, visit the DO Community repository for this application.
Now, you’ll create a new component within the ./src/components/post folder and name it Post.vue. This will allow you to view the details of a particular post from the homepage. Add the following content to Post.vue:
<template>
    <div class="text-center">
        <div class="col-sm-12">
      <h4 style="margin-top: 30px;"><small><button class="btn btn-success" v-on:click="navigate()"> View All Posts </button></small></h4>
      <hr>
      <h2>{{ post.title }}</h2>
      <h5><span class="glyphicon glyphicon-time"></span> Post by {{post.author}}, {{post.date_posted}}.</h5>
      <p> {{ post.body }} </p>

    </div>
    </div>
</template>
This code renders the details of a post that includes, title, author, and the post body.
Now, directly following </template>, add the following code to the file:
...
<script>
import { server } from "../../utils/helper";
import axios from "axios";
import router from "../../router";
export default {
  data() {
    return {
      id: 0,
      post: {}
    };
  },
  created() {
    this.id = this.$route.params.id;
    this.getPost();
  },
  methods: {
    getPost() {
      axios
        .get(`${server.baseURL}/blog/post/${this.id}`)
        .then(data => (this.post = data.data));
    },
    navigate() {
      router.go(-1);
    }
  }
};
</script>
Similar to the <script> section of the edit post component, you obtained the route parameter id and used it to retrieve the details of a particular post.
Save and close the file when you are finished adding the content. For the complete Post.vue file, visit the DO Community repository for this application.
Next, to display all the created posts to users, you will create a new component. If you navigate to the views folder in src/views, you will see a Home.vue component — if this file is not present, use your text editor to create it, add the following code:
<template>
    <div>

      <div class="text-center">
        <h1>Nest Blog Tutorial</h1>
       <p> This is the description of the blog built with Nest.js, Vue.js and MongoDB</p>

       <div v-if="posts.length === 0">
            <h2> No post found at the moment </h2>
        </div>
      </div>

        <div class="row">
           <div class="col-md-4" v-for="post in posts" :key="post._id">
              <div class="card mb-4 shadow-sm">
                <div class="card-body">
                   <h2 class="card-img-top">{{ post.title }}</h2>
                  <p class="card-text">{{ post.body }}</p>
                  <div class="d-flex justify-content-between align-items-center">
                    <div class="btn-group" style="margin-bottom: 20px;">
                      <router-link :to="{name: 'Post', params: {id: post._id}}" class="btn btn-sm btn-outline-secondary">View Post </router-link>
                       <router-link :to="{name: 'Edit', params: {id: post._id}}" class="btn btn-sm btn-outline-secondary">Edit Post </router-link>
                       <button class="btn btn-sm btn-outline-secondary" v-on:click="deletePost(post._id)">Delete Post</button>
                    </div>
                  </div>

                  <div class="card-footer">
                    <small class="text-muted">Posted on: {{ post.date_posted}}</small><br/>
                    <small class="text-muted">by: {{ post.author}}</small>
                  </div>

                </div>
              </div>
            </div>
      </div>
    </div>
</template>
Here, within the <template> section, you used the <router-link> to create a link for editing as well as for viewing a post by passing the post._id as a query parameter. You also used the v-if directive to conditionally render the post for users. If there is no post from the database, a user will only see this text: No post found at the moment.
Save and exit the file. For the complete Home.vue file, visit the DO Community repository for this application.
Now, directly following the </template> section in Home.vue, add the following </script> section:
...
<script>
// @ is an alias to /src
import { server } from "@/utils/helper";
import axios from "axios";

export default {
  data() {
    return {
      posts: []
    };
  },
  created() {
    this.fetchPosts();
  },
  methods: {
    fetchPosts() {
      axios
        .get(`${server.baseURL}/blog/posts`)
        .then(data => (this.posts = data.data));
    },
    deletePost(id) {
      axios.delete(`${server.baseURL}/blog/delete?postID=${id}`).then(data => {
        console.log(data);
        window.location.reload();
      });
    }
  }
};
</script>
Within the <script> section of this file, you created a method named fetchPosts() to fetch all posts from the database, and you updated the page with the data returned from the server.
Now, you’ll update the App component of the front-end application in order to create links to the Home and Create components. Open src/App.vue and update it with the following:
<template>
  <div id="app">
    <div id="nav">
      <router-link to="/">Home</router-link> |
      <router-link to="/create">Create</router-link>
    </div>
    <router-view/>
  </div>
</template>

<style>
#app {
  font-family: "Avenir", Helvetica, Arial, sans-serif;
  -webkit-font-smoothing: antialiased;
  -moz-osx-font-smoothing: grayscale;
  color: #2c3e50;
}
#nav {
  padding: 30px;
  text-align: center;
}

#nav a {
  font-weight: bold;
  color: #2c3e50;
}

#nav a.router-link-exact-active {
  color: #42b983;
}
</style>
Apart from including the links to both Home and Create components, you also included the <Style> section, which is the stylesheet for this component and holds the definition of styles for some of the elements on the page. Save and exit the file.
You have created all the required components for your application in this step. Next, you will configure the router file.
Step 9 — Setting Up Routing
After creating all the necessary reusable components, you can now properly configure the router file by updating its content with links to all the components you’ve created. This will ensure that all endpoints within the front-end application are mapped to a particular component for appropriate action. Navigate to ./src/router.js and replace its content with the following:
import Vue from 'vue'
import Router from 'vue-router'
import HomeComponent from '@/views/Home';
import EditComponent from '@/components/post/Edit';
import CreateComponent from '@/components/post/Create';
import PostComponent from '@/components/post/Post';

Vue.use(Router)

export default new Router({
 mode: 'history',
 routes: [
   { path: '/', redirect: { name: 'home' } },
   { path: '/home', name: 'home', component: HomeComponent },
   { path: '/create', name: 'Create', component: CreateComponent },
   { path: '/edit/:id', name: 'Edit', component: EditComponent },
   { path: '/post/:id', name: 'Post', component: PostComponent }
 ]
});
You imported Router from the vue-router module and instantiated it by passing the mode and routes parameters. The default mode for vue-router is a hash mode, which uses the URL hash to simulate a full URL so that the page won’t be reloaded when the URL changes. In order to make the hash unnecessary, you have used history mode here to achieve URL navigation without a page reload. Finally, within the routes option, you specified the path for the endpoint — a name for the route and the component that should be rendered when the route is called within the application. Save and exit the file.
Now that you have set up routing to the application, you need to include the Bootstrap file to help with pre-built styling for the user interface of the application. To achieve that, open ./public/index.html file in your text editor and include the CDN file for Bootstrap by adding the following content to the file:
<!DOCTYPE html>
<html lang="en">
<head>
  ...
  <link rel="stylesheet" href="https://stackpath.bootstrapcdn.com/bootstrap/4.1.3/css/bootstrap.min.css">
  <title>blog-frontend</title>
</head>
<body>
   ...
</body>
</html>
Save and exit the file, and then restart the application with npm run serve for your blog-frontend, if it is not currently running.
Note: Ensure that both the back-end server and the MongoDB instance are running as well. If otherwise, navigate to the blog-backend from another terminal and run npm run start. Also, start the MongoDB service by running sudo mongod from a new terminal as well.
Navigate to your application at: http://localhost:8080. Now you can test your blog by creating and editing posts.
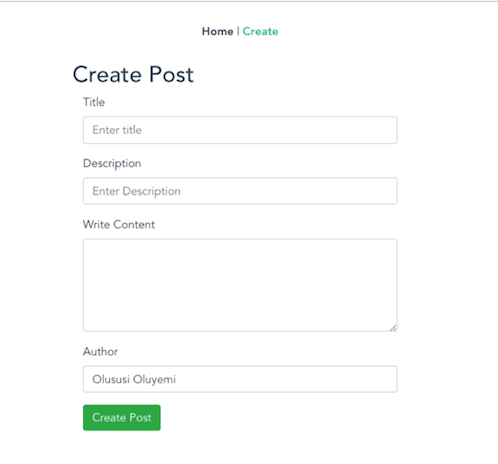
Click on Create on your application to see the Create Post screen, which relates to and renders the CreateComponent file. Enter values into the input fields and click on the Create Post button to submit a post. Once you are done, the application will redirect you back to the homepage.
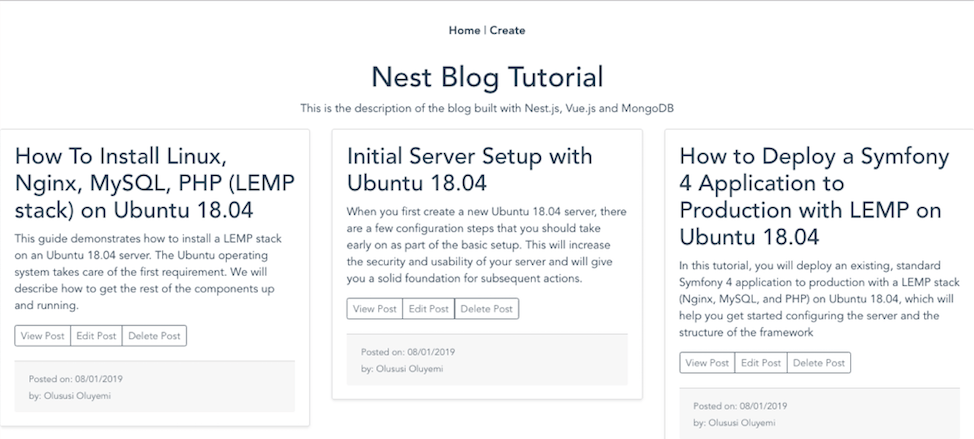
The homepage of the application renders the HomeComponent. This component has a method that sends an HTTP call to fetch all posts from the database and displays them to users.
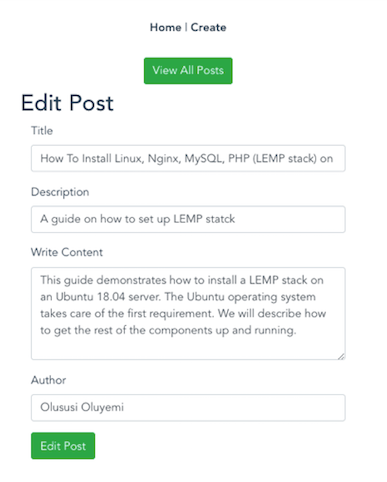
Clicking on the Edit Post button for a particular post will take you to an edit page where you can incorporate any changes and save your post.
In this section, you configured and set up routing for the application. With this in place, your blog application is ready.
Conclusion
In this tutorial, you have explored a new way of structuring a Node.js application by using Nest.js. You created a simple blog application using Nest.js to build the back-end RESTful API and used Vue.js to handle all the front-end logic. Furthermore, you also integrated MongoDB as a database for your Nest.js application.
To learn more about how to add authentication to your application, you can make use of Passport.js, a popular Node.js authentication library. You can learn about Passport.js integration in the Nest.js documentation.
You can find the complete source code for this project here on GitHub. For more information about Nest.js, you can visit the official documentation.
Thanks for learning with the DigitalOcean Community. Check out our offerings for compute, storage, networking, and managed databases.
About the author(s)
A tech enthusiast, programming freak and web development junkie
Former Senior Technical Editor at DigitalOcean, with a strong focus on DevOps and System Administration content. Areas of expertise include Terraform, PyTorch, Python, and Django.
Still looking for an answer?
This textbox defaults to using Markdown to format your answer.
You can type !ref in this text area to quickly search our full set of tutorials, documentation & marketplace offerings and insert the link!
nice article!
Any words on how to do db migrations? For instance, a new column to be added or removed, etc. Does mongoose allow that?
Thanks
The description of mongoose.Types.ObjectId.isValid() (and therefore the description of ValidateObjectId()) is incorrect, I think. It says, “With the method above, any HTTP request from the frontend of this application with a postID that can’t be found in the database will be regarded as invalid.” I believe the method simply checks that the format of the string matches that of an ObjectId. It does not ensure that the id is in the database. But that’s okay, as subsequent use (say, in the deletePost() method) of an id that doesn’t exist in the db will result in an error return from mongoose.
It would be nice to point out this code only works on Vue2, for Vue3 you will need to change the way router is created… Maybe the tutorial could be updated to prevent newbies (like me) the struggle to debug unreadable errors.
 This work is licensed under a Creative Commons Attribution-NonCommercial- ShareAlike 4.0 International License.
Become a contributor for community
Get paid to write technical tutorials and select a tech-focused charity to receive a matching donation.

DigitalOcean Documentation
Full documentation for every DigitalOcean product.

Resources for startups and AI-native businesses
The Wave has everything you need to know about building a business, from raising funding to marketing your product.
The developer cloud
Scale up as you grow — whether you're running one virtual machine or ten thousand.

Start building today
From GPU-powered inference and Kubernetes to managed databases and storage, get everything you need to build, scale, and deploy intelligent applications.
