By nnamdiekweekwe and Kathryn Hancox

The author selected NPower to receive a donation as part of the Write for DOnations program.
Introduction
Angular is a front-end web framework built by Google. It allows developers to build single-page applications modeled around a model-view-controller (MVC) or model-view-viewmodel (MVVM) software architectural pattern. This architecture divides applications into different, but connected parts allowing for parallel development. Following this pattern, Angular splits its different components into the respective parts of a web application. Its components manage the data and logic that pertain to that component, display the data in its respective view, and adapts or controls the view based on the different messages that it receives from the rest of the app.
Bootstrap is a front-end library that helps developers build responsive websites (sites that adapt to different devices), quickly and effectively. It makes use of a grid system that divides each page into twelve columns, which ensures that the page maintains its correct size and scale no matter what device it’s being viewed on.
APIXU provides global weather data to users via their API. Using APIXU, a user can retrieve the latest weather as well as future weather forecasts for any location in the world.
In this tutorial, you’ll create a weather app using Angular, Bootstrap, and the APIXU API. You’ll be able to type a location into a search form and on submission of that form, see the current weather details for that location displayed in your app. The Angular version used in this tutorial is 7.2.0 and the Bootstrap version used is 4.2.1.
Prerequisites
Before you begin this tutorial, you’ll need the following:
- Node.js and npm installed on your local machine. You can install both of these from the Node.js website, or, you can follow this tutorial on installing Node.js and setting up a local development environment.
- An APIXU API Key. Sign up for a free APIXU account and obtain a free API key here.
- A text editor installed, such as Visual Studio Code, Atom, or Sublime Text.
- Familiarity with JSON and its format. You can learn more about this in how to work with JSON in Javascript.
- An understanding of arrays and objects in Javascript which you can learn more of in Understanding arrays in Javascript and in Understanding data types in Javascript respectively.
Step 1 — Installing Angular
Before you begin creating your app, you need to install Angular. Open your terminal and run the following command to install the Angular CLI globally on your machine:
- npm install -g @angular/cli
The Angular CLI is the Command Line Interface for Angular. It serves as the main way to create a new Angular project as well as the different sub-elements that make up an Angular project. Using the -g argument will install it globally.
After a short while, you’ll see the following output:
...
+ @angular/cli@7.2.2
...
You’ve now installed Angular on your local machine. Next, you’ll create your Angular application.
Step 2 — Creating Your Angular App
In this step you’ll create and configure your new Angular application, install all its dependencies, such as Bootstrap and jQuery, and then finally check that the default application is working as expected.
First, use the ng command to create an Angular application, you can run this from your terminal.
Note: If you’re on Windows, you may have issues trying to run an ng command from Command Prompt even though you’ve installed Node.js and npm correctly. For example, you may get an error such as: ng is not recognized as an internal or external command. In order to resolve this, please run the ng command inside the installed Node.js command prompt located in the Node.js folder on Windows.
The ng command is a prerequisite to running any action with Angular from the command line. For example, whether you’re building a new project, creating components, or creating tests, you prefix each desired functionality with the ng command. In this tutorial, you’ll want to create a new application; you’ll achieve this by executing the ng new command. The ng new command creates a new Angular application, imports the necessary libraries, and creates all the default code scaffolding that your application requires.
Begin by creating a new application, in this tutorial it will be called weather-app, but you can change the name as you wish:
- ng new weather-app
The ng new command will prompt you for additional information about features that you want to add to your new application.
OutputWould you like to add Angular routing? (y/N)
The Angular routing allows you to build single page applications with different views using the routes and components. Go ahead and type y or hit ENTER to accept the defaults.
OutputWhich stylesheet format would you like to use? (Use arrow keys)
Hit ENTER to accept the default CSS option.
The app will continue its creation process, and after a short time you’ll see the following message:
Output...
CREATE weather-app/e2e/src/app.e2e-spec.ts (623 bytes)
CREATE weather-app/e2e/src/app.po.ts (204 bytes)
...
Successfully initialized git.
Next, in your text editor, open the weather-app folder.
Looking at the structure of your directory, you’ll see several different folders and files. You can read a full explanation of what all of these files do here, but for the purposes of this tutorial, these are the most important files to understand:
-
The
package.jsonfile. Located in the rootweather-appfolder, it performs just like any other Node.js application, holding all the libraries your application will use, the name of your application, commands to run when testing, and so on. Primarily, this file holds details about external libraries that your Angular application needs in order to run properly. -
The
app.module.tsfile. Located in theappfolder within theweather-app/srcfolder, this file tells Angular how to assemble your application and holds details about the components, modules, and providers in your application. You’ll already have an imported module,BrowserModule, within yourimportsarray. TheBrowserModuleprovides essential services and directives for your application and should always be the first imported module in yourimportsarray. -
The
angular.jsonfile. Located in the rootweather-appfolder of your app, this is the configuration file for the Angular CLI. This file holds internal configuration settings of what your Angular application needs to run. It sets defaults for your entire application, and has options such as what configuration files to use when testing, what global styles to use in your app, or to which folder to output your build files. You can find out more about these options in the official Angular-CLI documentation.
You can leave all of these files alone for the moment, as you’ll install Bootstrap next.
Bootstrap has two dependencies that you’ll need to install in order for it to work properly in Angular — jQuery and popper.js. jQuery is a JavaScript library focused on client-side scripting, while popper.js is a positioning library that mainly manages tooltips and popovers.
In your terminal, move to your root weather-app directory:
- cd weather-app
Then execute the following command to install all of the dependencies and save the references to the package.json file:
- npm install --save jquery popper.js bootstrap
The --save option automatically imports your references into the package.json file so that you don’t have to manually add them after installation.
You’ll see output showing the version numbers that were installed, like the following:
Output+ popper.js@1.14.6
+ bootstrap@4.2.1
+ jquery@3.3.1
...
You have now successfully installed Bootstrap and its dependencies. However, you’ll also need to include these libraries inside your application. Your weather-app does not yet know that it’ll need these libraries, therefore you need to add the paths to jquery, popper.js, bootstrap.js, and bootstrap.css into your angular.json file.
For popper.js, the file you’ll need to include is node_modules/popper.js/dist/umd/popper.js. jQuery requires the node_modules/jquery/dist/jquery.slim.js file. Finally, for Bootstrap you’ll need two files (both the JavaScript file and the CSS file). These are node_modules/bootstrap/dist/js/bootstrap.js and node_modules/bootstrap/dist/css/bootstrap.css respectively.
Now that you have all the required file paths, open the angular.json file in your text editor. The styles array is where you’ll add the reference to the CSS files, whilst the scripts array will reference all the scripts. You’ll find both of these arrays near the top of the angular.json file, within the "options": JSON object. Add the following highlighted content to the file:
...
"options:" {
...
"styles": [
    "node_modules/bootstrap/dist/css/bootstrap.css",
     "src/styles.css"
],
"scripts": [
    "node_modules/jquery/dist/jquery.slim.js",
    "node_modules/popper.js/dist/umd/popper.js",
    "node_modules/bootstrap/dist/js/bootstrap.js"
]},
...
You’ve now imported the main .js and .css files you need for Bootstrap to work properly. You’ve specified the relative paths to these files from your angular.json file: adding your .css files in the styles array and .js files in the scripts array of angular.json. Make sure you’ve saved the angular.json file after adding this content.
Now, start your application with the ng serve command to check that everything is working correctly. From the weather-app directory in your terminal, run:
- ng serve --o
The --o argument will automatically open up a browser window that will show your application. The application will take a few seconds to build, and then will display in your browser.
You’ll see the following output in your terminal:
Output** Angular Live Development Server is listening on localhost:4200, open your browser on http://localhost:4200/ **
...
Once the browser opens, you’ll see a default Angular app page.
If you don’t see these outputs, run through this step again and ensure that everything is correct. If you see an error such as: Port 4200 is already in use. Use '--port' to specify a different port then you can change the port number by typing:
- ng serve --o --port <different-port-number>
The reason for this potential error message is because port 4200 on your machine is being used by another program or process. You can either, if you know what that process is, terminate it or you can follow the above step to specify a different port number.
You’ve now set up your application scaffolding. Next, you’ll create a weather component that will contain the main form and associated weather details of the search location.
Step 3 — Creating Your Weather Component
An Angular application is primarily made up of components, which are pieces of logic that have a particular function within an application. The component is composed of some logic that manages part of the screen in an application — this is called the view.
For example in this tutorial, you’re going to create a Weather Component that will be responsible for handling two tasks:
- Searching for a location
- Displaying associated weather data for that location
To achieve the first objective, you’ll create a form that will allow you to search for a location. When you click the search button on your form, it will trigger a function that will search for that location.
To achieve the second objective, you’ll have a <div> with nested <p> tags that will neatly display your retrieved data.
Whilst your app is running from your terminal window, you can’t type anything else in that particular window. Therefore, open up the weather-app directory in a new terminal window if you want to execute other ng commands. Alternatively, you can stop the app from running in the original terminal window by pressing CTRL + C. You can then install the new component, and after that start the app again by typing ng serve --o.
Execute the following command that will create your Weather Component and automatically import it into your app.module.ts file. Remember that your app.module.ts file holds details about all the components, modules, and providers in your application.
- ng generate component weather
You’ll see output like this (the exact byte sizes may vary):
OutputCREATE src/app/weather/weather.component.css (0 bytes)
CREATE src/app/weather/weather.component.html (26 bytes)
CREATE src/app/weather/weather.component.spec.ts (635bytes)
CREATE src/app/weather/weather.component.ts (273 bytes)
UPDATE src/app/app.module.ts (400 bytes)
...
This output shows that Angular has created the four files necessary for a component:
- The
.cssand.htmlfiles for your view - A
.spec.tsfile for testing your component - A
.component.tsfile to hold your component’s functions
Angular has also updated the src/app/app.module.ts file to add a reference to the newly created component. You’ll always find component files under the src/app/name-of-component directory.
Now that you have installed your new component, return to your browser to see the app. If you stopped the app running to install the new component, start it again by typing:
- ng serve --o
You’ll notice that you can still see “Welcome to app!” (the default component) displayed on the page. You can’t see your newly created component. In the next section, you’ll change this so that whenever you go to localhost:4200, you’ll access your newly created weather component instead of Angular’s default component.
Step 4 — Accessing Your Weather Component
In standard HTML, whenever you want to create a new page, you create a new .html file. For example, if you already had a pre-existing HTML page from which you wanted to navigate to your newly created page, you’d have an href attribute with an anchor tag to point to that new page. For example:
<a href="/newpage.html">Go to New Page</a>
In Angular, however, this works slightly differently. You cannot use an href attribute in this way to navigate to a new component. When you want to link through to a component, you need to make use of Angular’s Router library and declare a desired URL path within a file that will map directly to a component.
In Angular, you call this file routes.ts. This holds all the details of your routes (links). For this file to work correctly, you will import the Routes type from the @angular/router library and list your desired links to be of type Routes. This will communicate to Angular that these are a list of routes for navigation in your app.
Create the file routes.ts in your text editor and save it in the src/app directory. Next, add the following content to the routes.ts file:
import { Routes } from '@angular/router'
Now, declare the URL path and the component in src/app/routes.ts. You want to make your app such that when you go to the homepage (http://localhost:4200), you access your newly created Weather Component. Add these lines to the file, which will map the root URL to the Weather Component you just created:
import { Routes } from '@angular/router'
import { WeatherComponent } from './weather/weather.component';

export const allAppRoutes: Routes = [
  { path: '', component: WeatherComponent }
];
You’ve imported your WeatherComponent, and then created a variable allAppRoutes that’s an array of type Routes. The allAppRoutes array holds route definition objects each containing a URL path and the component to map to. You’ve specified that any time you go to the root URL (‘’), it should navigate to the WeatherComponent.
Your final routes.ts file will look like this:
import { Routes } from "@angular/router";
import { WeatherComponent } from "./weather/weather.component";

export const allAppRoutes: Routes = [
  { path: '', component: WeatherComponent }
];
You now need to add these routes to your main app.module.ts file. You need to pass the array you just created — allAppRoutes — into an Angular module called the RouterModule. The RouterModule will initialize and configure the Router (responsible for carrying out all app navigation) and provide it with its routing data from allAppRoutes. Add the following highlighted content:
...
import {WeatherComponent} from './weather/weather.component';
import {RouterModule} from '@angular/router';
import {allAppRoutes} from './routes';
...
@NgModule({
    declarations:[
      ...
    ],
    imports: [
        BrowserModule,
        RouterModule.forRoot(allAppRoutes)
    ]
    ...
})
...
In this file, you’ve imported the RouterModule and allAppRoutes array of route objects. You’ve then passed the allAppRoutes array into the RouterModule so that your Router knows where to route your URLs to.
Lastly, you need to enable routing itself. Open the app.component.ts file. There’s a templateUrl property that specifies the HTML for that particular component: ./app.component.html. Open this file, src/app/app.component.html, and you will see that it contains all of the HTML for your localhost:4200 page.
Remove all of the HTML contained within app.component.html and replace it with:
<router-outlet></router-outlet>
The router-outlet tag activates routing and matches the URL the user types into the browser to the route definition you created earlier in the routes.ts file under the allAppRoutes variable. The router then displays the view in the HTML. In this tutorial, you’ll display the weather.component.html code directly after the <router-outlet></router-outlet> tag.
Now, if you navigate to http://localhost:4200, you will see weather works! appear on your page.
You’ve set up routing in your application. Next, you’ll create your form and details section that will enable you to search for a location and show its associated details.
Step 5 — Defining the User Interface
You’ll be using Bootstrap to act as the scaffolding for your application view. Bootstrap is useful for creating ready-made, responsive websites that adapt to any device (mobile, tablet, or desktop). It achieves this by treating every row on a webpage as twelve columns wide. On a webpage, a row is simply a line from one end of the page to the other. This means that every page’s content must be contained within that line, and it must equal twelve columns. If it doesn’t equal twelve columns, it’ll be pushed down to another row. For example, in Bootstrap’s grid system, there would be a twelve-column row divided into two sections of six columns, and the next twelve-column row divided into three sections of four columns.
In the Bootstrap documentation, you can read more about this grid system.
You’ll be splitting your page into two sections of six columns with the left column holding your search form and the right showing the weather details.
Open src/app/weather/weather.component.html to access your WeatherComponent HTML code. Delete the paragraph that is currently in the file, and then add the following code:
<div class="container">
  <div class="row">
    <div class="col-md-6"><h3 class="text-center">Search for Weather:</h3></div>
    <div class="col-md-6"><h3 class="text-center">Weather Details:</h3></div>
  </div>
</div>
You created a <div> with class container to hold all your content. You then created a row that you split into two sections of six columns each. The left-hand side will hold your search form and the right, your weather data.
Next, to build your form, you’ll work in the first col-md-6 column. You’ll also add a button that will submit what you’ve typed into your form to APIXU, which will then return the requested weather details. To do this, identify the first col-md-6 class and add the following highlighted content underneath the <h3> tag:
...
<div class="col-md-6">
  <h3 class="text-center">Search for Weather:</h3>
  <form>
    <div class="form-group">
      <input
        class="form-control"
        type="text"
        id="weatherLocation"
        aria-describedby="weatherLocation"
        placeholder="Please input a Location"
      />
     </div>
     <div class="text-center">
      <button type="submit" class="btn btn-success btn-md">
        Search for the weather</button>
     </div>
   </form>
</div>
...
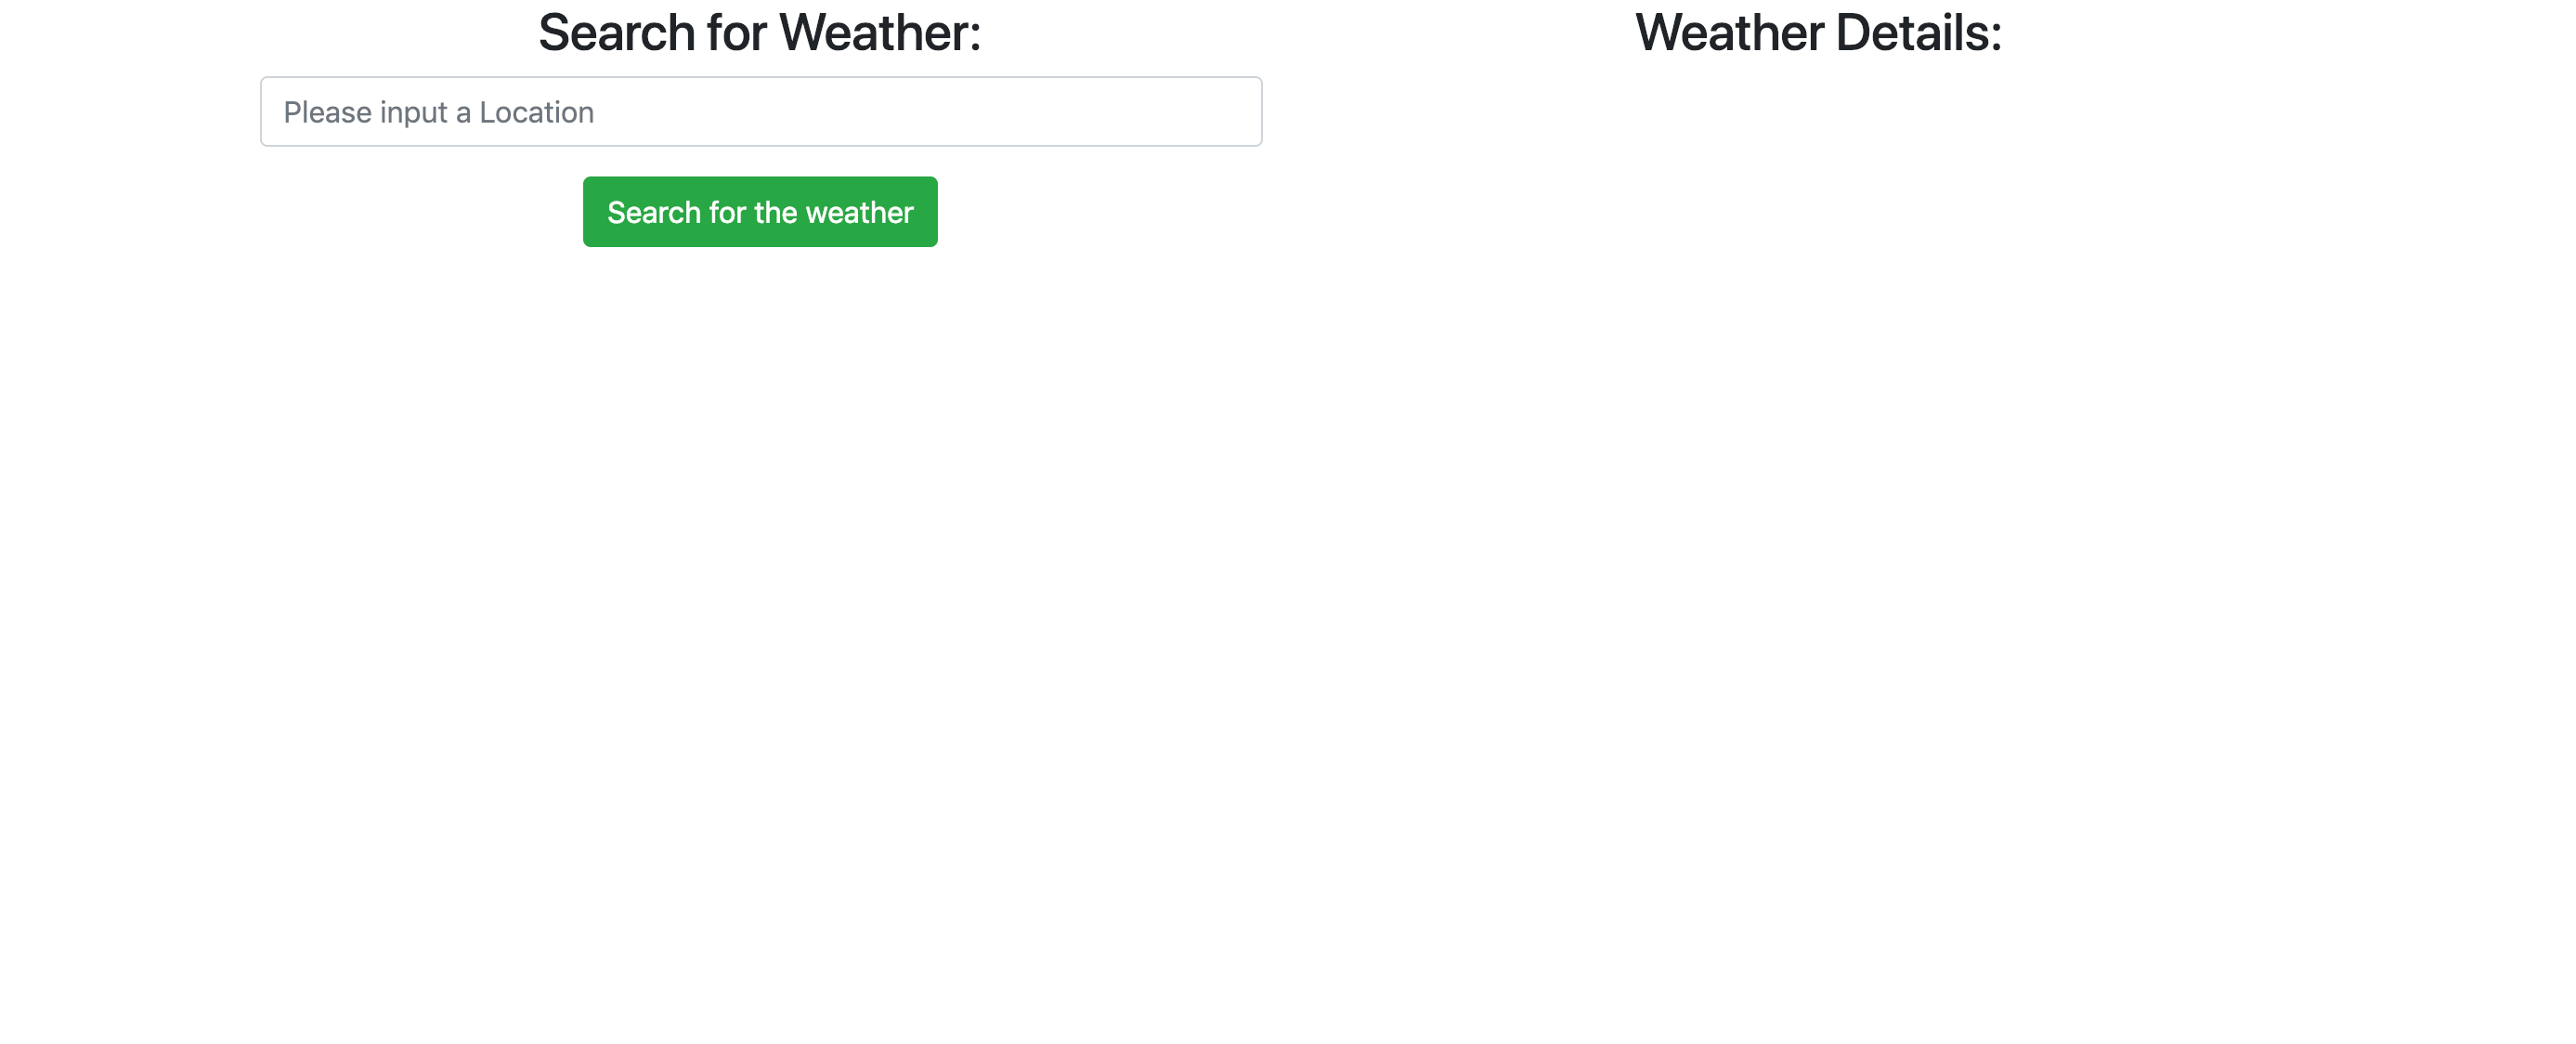
You’ve added your form and added a form-group class that holds your search bar. You’ve also created your button to search for the weather. In your browser, your weather app page will look like this:
This looks a little compact, so you can add some CSS in order to style the page with some better spacing. The major advantage of Bootstrap is that it comes with spacing classes that you can add to your HTML without needing to write any extra CSS of your own. If, however, there is any extra CSS you would like to incorporate that Bootstrap’s standard classes don’t cover, you can write in your own CSS as necessary. For this tutorial, you will use Bootstrap’s standard classes.
For every <h3> tag, you will add the .my-4 Boostrap CSS class. The m sets margin on the element, the y sets both margin-top and margin-bottom on the element, and finally 4 specifies the amount of margin to add. You can find out more details about the different spacing types and sizes here. In your weather.component.html file, add the following highlighted content to replace the current <h3> tags:
<div class="col-md-6">
  <h3 class="text-center my-4">Search for Weather:</h3>
  <form>
    <div class="form-group">
      <input
        class="form-control"
        type="text"
        id="weatherLocation"
        aria-describedby="weatherLocation"
        placeholder="Please input a Location"
      />
    </div>
    <div class="text-center">
      <button type="submit" class="btn btn-success btn-md">
        Search for the weather
      </button>
    </div>
  </form>
</div>
<div class="col-md-6">
  <h3 class="text-center my-4">Weather Details:</h3>
</div>
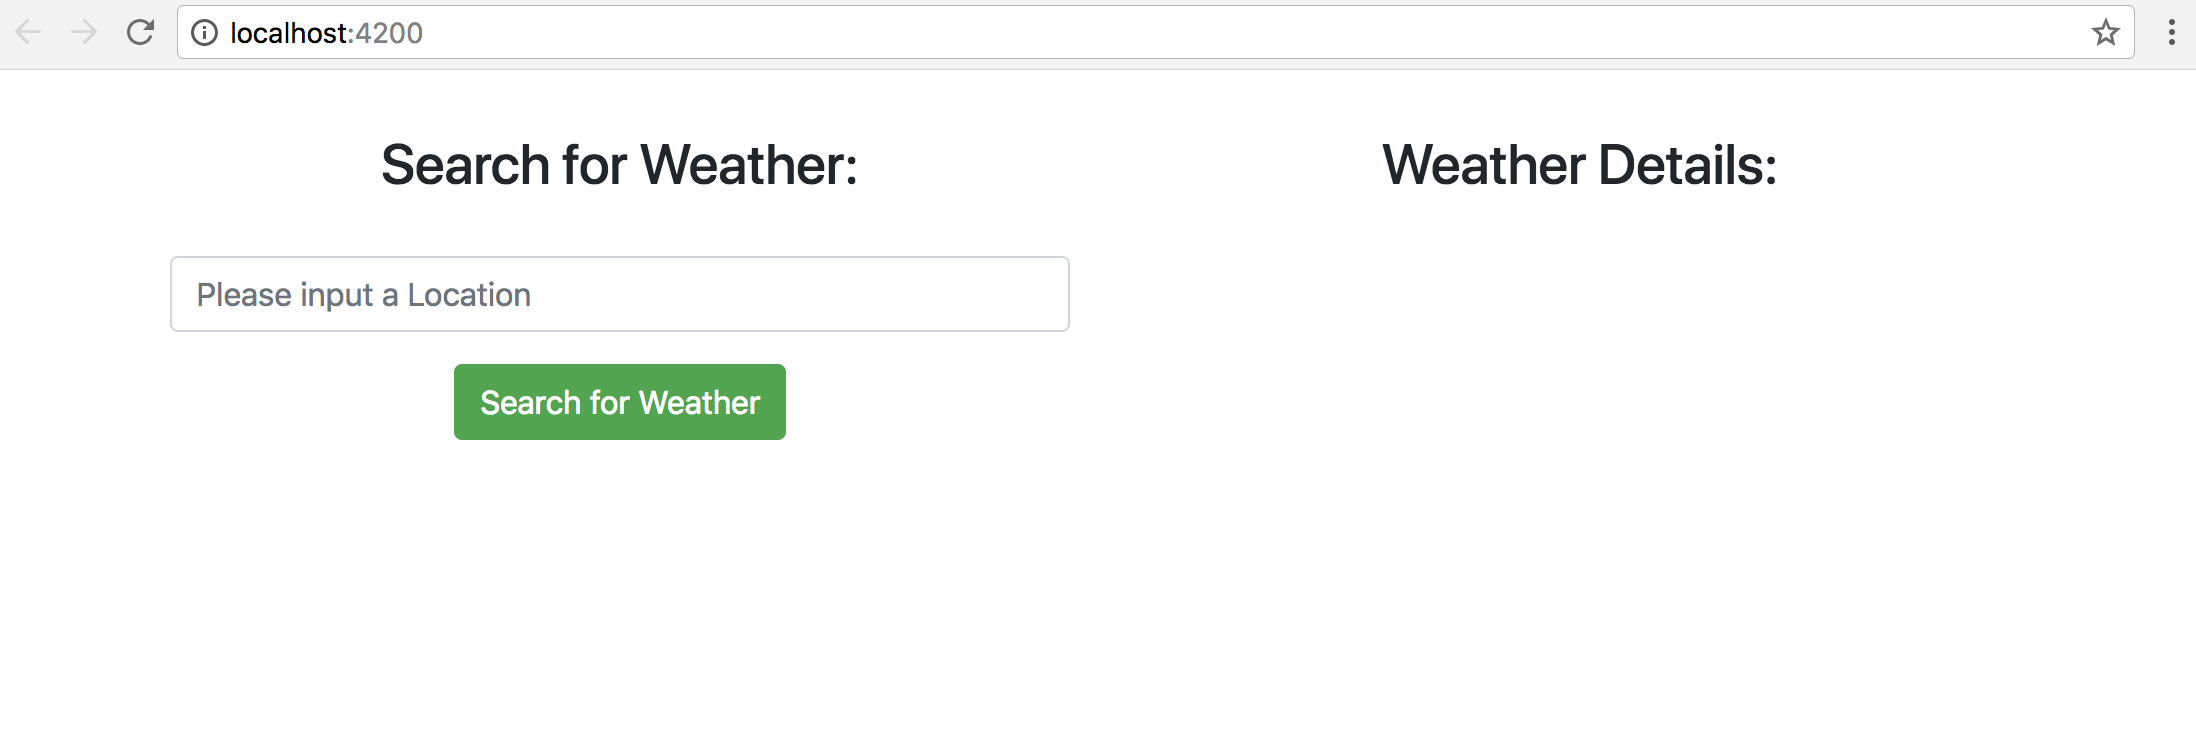
Reload the page in your browser and you’ll see that you have more spacing.
You’ve created your form as well as the section where you’re going to display the information you receive from the APIXU API. Next, you’ll wire up your form to be able to input your location correctly.
Step 6 — Wiring Up Your Form
In Angular, there are two ways of creating forms for user input in your application — reactive or template-driven. Although they achieve the same result, each form type handles processing user input data differently.
With reactive forms, you create a list of the different elements of your form in your .component.ts file. You then connect them to your created HTML form within the respective .component.html file. This is strictly one-way; that is, data flows from your HTML to your .component.ts file, there is no bi-directional flow of data.
With template-driven forms, you create your form as you would in normal HTML. Then, using directives such as ngModel, you can create either one-way or two-way data bindings from your HTML, back to your data model in your component, and vice-versa.
There are strengths and weaknesses in each approach, but in general, reactive forms are preferable because of the:
- Flexibility to create forms of varying complexities.
- Simplicity to unit test by checking on the state of each form control in the component’s
.component.tsfile. - Capability to subscribe to values within a form. A developer can subscribe to the form’s value stream allowing them to perform some action on values being typed into the form in real time.
Despite these strengths, reactive forms can sometimes be more complex to implement. This can lead to developers writing more code than compared to a template-driven form. To see a comprehensive overview of both form types and best use cases, Angular’s official guide provides a good starting point. For this tutorial, you’ll be using reactive forms.
To use a reactive form, open the file app.module.ts. Next, import the ReactiveFormsModule by declaring the import toward the top of the file.
...
import { ReactiveFormsModule } from '@angular/forms';
@NgModule({
    ...
})
...
Finally, add the ReactiveFormsModule to your list of imports.
...
@NgModule({
    ...
    imports: [
        BrowserModule,
        RouterModule.forRoot(allAppRoutes),
        ReactiveFormsModule
    ]
    ...
})
...
Following these code additions, your app.module.ts will look like this:
import { BrowserModule } from "@angular/platform-browser";
import { NgModule } from "@angular/core";

import { AppComponent } from "./app.component";
import { WeatherComponent } from "./weather/weather.component";
import { RouterModule } from "@angular/router";
import { allAppRoutes } from "./routes";
import { ReactiveFormsModule } from "@angular/forms";

@NgModule({
  declarations: [AppComponent, WeatherComponent],
  imports: [
    BrowserModule,
    RouterModule.forRoot(allAppRoutes),
    ReactiveFormsModule
  ],
  providers: [],
  bootstrap: [AppComponent]
})
export class AppModule {}
Once you’ve added both of these lines, open the weather.component.ts file and import the FormBuilder and FormGroup classes.
import { Component, OnInit } from '@angular/core';
import { FormBuilder, FormGroup } from '@angular/forms';
Now create a variable in your weather.component.ts file that will reference your FormGroup:
export class WeatherComponent implements OnInit {
   public weatherSearchForm: FormGroup;
   constructor() { }
...
Every time you want to perform an action on your form, you’ll reference it via the weatherSearchForm variable. You’ll now add the FormBuilder import into your constructor so that you can use it in your component.
...
public weatherSearchForm: FormGroup;
constructor(private formBuilder: FormBuilder) {}
...
By adding the formBuilder to the constructor, it creates an instance of the FormBuilder class, allowing you to use it within your component.
You are now ready to create your FormGroup and its respective values in the weather.component.ts file. If you have several input options in your form, it’s best practice to enclose it within a FormGroup. In this tutorial, you will only have one (your location input), but you will use the FormGroup anyway for practice.
It’s important that your form is ready for use when you navigate to your component. Because you’re using a reactive form, you must create the tree of elements within the form first before you bind it to the HTML. To achieve this, you need to ensure that you create your form elements in the ngOnInit hook inside your WeatherComponent. The ngOnInit method runs once at the initialization of a component, executing any logic that you specify needs to run before the component is ready to use.
You therefore have to create your form before you can complete the binding to HTML process.
In your WeatherComponent, you’ll initialize the form within the ngOnInit hook:
...
constructor(private formBuilder: FormBuilder) {}
ngOnInit() {
    this.weatherSearchForm = this.formBuilder.group({
      location: ['']
    });
  }
You have created the first part of the form according to reactive form style: defining your form components in the weather.component.ts file. You’ve created a group of your form’s composite elements (at the moment, you have one element, location). The [''] array allows you to specify some extra options for your form inputs such as: pre-populating it with some data and using validators to validate your input. You have no need of any of these for this tutorial, so you can just leave it blank. You can find out more about what you can pass into an element property here.
You have two more things to do before your form is complete. First open up your weather.component.html file. You need to assign the form a property [formGroup]. This property will be equal to the variable you just declared in your weather.component.ts file: weatherSearchForm. Second, you have to bind your location element (declared in your weather.component.ts file) to your HTML. In weather.component.html, add the following highlighted content:
...
<form
  [formGroup]="weatherSearchForm" >
  <div class="form-group">
    <input
      class="form-control"
      type="text"
      id="weatherLocation"
      aria-describedby="weatherLocation"
      placeholder="Please input a Location"
    />formControlName="location" />
  </div>
  <div class="text-center">
    <button type="submit" class="btn btn-success btn-md">
      Search for the weather
    </button>
  </div>
</form>
...
You’ve added the [formGroup] property, binding your form to HTML. You’ve also added the formControlName property that declares that this particular input element is bound to the location element in your weather.component.ts file.
Save your file and return to your browser, you’ll see that your app looks exactly the same. This means that your form is correctly wired up. If you see any errors at this stage, then please go back through the previous steps to ensure that everything is correct in your files.
Next, you’ll wire up your button to be able to accept input data into your form.
Step 7 — Connecting Your Button
In this step you’re going to connect your search button to your form in order to be able to accept the user’s input data. You’re also going to create the scaffolding for the method that will eventually send the user’s input data to the APIXU weather API.
If you take a look back at your code in weather.component.html, you can see that your button has a type submit:
<form>
...
<div class="text-center">
    <button type="submit" class="btn btn-success btn-md">Search for the weather</button>
</div>
</form>
This is a standard HTML value that will submit your form values to some function to take action on.
In Angular, you specify that function in the (ngSubmit) event. When you click your button in your form, as long as it has a type of submit, it will trigger the (ngSubmit) event, which will subsequently call whatever method you have assigned to it. In this case, you want to be able to get the location that your user has typed in and send it to the APIXU API.
You’re going to first create a method to handle this. In your weather.component.ts, create a method sendToAPIXU() that will take one argument: the value(s) you’ve typed into your form. Add the following highlighted content to the file:
...
ngOnInit() {
    this.weatherSearchForm = this.formBuilder.group({
      location: [""]
    });
  }

sendToAPIXU(formValues) {

}
...
Next, add the ngSubmit event to your HTML and pass the values of your submitted form into the sendToAPIXU() method:
...
<form [formGroup]="weatherSearchForm" (ngSubmit)="sendToAPIXU(weatherSearchForm.value)">
  ...
</form>
...
You’ve added the ngSubmit event to your form, connected your method you want to run when you submit your form, and passed in the values of your weatherSearchForm as an argument to your handler method (weatherSearchForm.value). You can now test this works by using console.log to print out your formValues, in your sendToAPIXU() method, add the following highlighted content to weather.component.ts:
...
sendToAPIXU(formValues){
    console.log(formValues);
}
Go to your browser and open your console by right clicking anywhere on your website page, and then click on Inspect Element. There will be a tab on the window that pops up called Console. Type London into your form. When you click on the Search for Weather button, you’ll see an object with your location enclosed.

Your output from the console is a JSON object {location: "London"}. If you wanted to access your location value, you can do this by accessing formValues.location. Similarly, if you had any other inputs inside your form, you would swap .location for any other element names you had.
Note:
All values of a reactive form are stored in an object — where the key is the name of the value you passed into the formBuilder.group({}).
The button is now wired up and can receive input correctly. Next, you’ll make the sendToAPIXU() method make an HTTP request to the APIXU API.
Step 8 — Calling the APIXU API
The APIXU API accepts location information, searches the current weather details for that location, and returns them back to the client. You’ll now modify your app so that it sends location data to the API, obtains the response, and then displays the results on your page.
In order to make HTTP requests in Angular, you have to import the HttpClientModule. Open your src/app/app.module.ts and add the following highlighted lines:
...
import { ReactiveFormsModule } from '@angular/forms';
import { HttpClientModule } from '@angular/common/http';
@NgModule({
    ...
    imports: [
        BrowserModule,
        RouterModule.forRoot(allAppRoutes),
        ReactiveFormsModule,
        HttpClientModule
    ]
    ...
})
...
Next, you need to write the code to make the HTTP call to the APIXU API. It’s best practice to create an Angular service to make HTTP requests. Separation of concerns is key in any app that you build. A service allows you to move all of those HTTP requests your app makes into one file that you can then call inside any .component.ts file you create. You could “legally” write in those HTTP requests in the specific .component.ts file, but this isn’t best practice. You may, for instance, find that some of your requests are complex and require you to perform some post-processing actions after receiving your data. Several different components in your app might use some of your HTTP requests, and you don’t want to write the same method multiple times.
From a new terminal window or by stopping the server in your current terminal session, execute the following command to create a service called apixu:
- ng g service apixu
You’ll see output resembling the following:
Outputcreate src/app/apixu.service.spec.ts (328 bytes)
create src/app/apixu.service.ts (134 bytes)
...
The command created the service file (apixu.service.ts) and a test file (apixu.service.spec.ts).
You now need to add this service as a provider into your app.module.ts file. This makes it available to use inside your app. Open this file, and first import the ApixuService:
...
import { HttpClientModule } "@angular/common/http";
import { ApixuService } from "./apixu.service";
...
Next add the newly imported ApixuService as a provider into the providers block:
...
@NgModule({
    ...
    providers: [ApixuService],
    ...
})
...
In Angular, if you want to use a service that you have created, you need to specify that service as a provider within your module.ts file. In this case, you’ve specified it as a provider within your entire application in app.module.ts.
Finally, open up the src/app/apixu.service.ts file. You’ll see the boilerplate code of what you need to create a service: first the import of the Injectable interface from Angular; then the fact that the service should be with the providedIn root injector (for the entire application); and then the decorating (this effectively means specifying) of your service as @Injectable.
import { Injectable } from '@angular/core';

@Injectable({
  providedIn: 'root'
})
export class ApixuService {

  constructor() { }
}
The decorating of the service as @Injectable allows you to inject this service within the constructor in weather.component.ts so that you can use it inside your component.
If you stopped your application, restart it by running:
- ng serve --o
As aforementioned, your service needs to make HTTP requests to the APIXU API and import the HttpClientModule in the app.module.ts file to make HTTP requests throughout the application. You additionally need to import the HttpClient library into the apixu.service.ts file to make HTTP requests to the APIXU API from the apixu.service.ts file itself. Open the apixu.service.ts file, and add the following highlighted content:
...
import { HttpClient } from '@angular/common/http';
...
Now you need to write a method, getWeather(), that takes in one paramater: location. This method will make an API request to APIXU and return the retrieved location data.
For this, you’ll need the provided API key when you signed up for the APIXU API. If you log in to APIXU, you’ll come to the dashboard:

You will see your key, and below that, links to the API URL with your key already pre-filled for both the Current Weather and Forecast Weather. Copy the HTTPS link for the Current Weather details, it will be something like:
https://api.apixu.com/v1/current.json?key=YOUR_API_KEY&q=Paris
This URL will give you current weather details for Paris. You want to be able to to pass in the location from your form into the &q= parameter instead. Therefore, remove Paris from the URL as you add it to your apixu.service.ts file:
...
export class ApixuService {

  constructor(private http: HttpClient) {}

  getWeather(location){
      return this.http.get(
          'https://api.apixu.com/v1/current.json?key=YOUR_API_KEY&q=' + location
      );
  }
}
Note: You’ve used the API key directly within the code. In a production situation, you should store this securely server-side, and retrieve this key in a secure manner and use it within your application. You can either store it securely server-side, or use a key management application such as Hashicorp Vault or Azure Key Vault, to name a few.
You’ve now imported and injected HttpClient into the constructor so that you can use it. You’ve also created a method getWeather() that takes a location parameter and makes a GET request to your provided URL. You left the &q= parameter blank, as you’re going to provide this location directly from location parameter in the method. Lastly, you’ve returned the data back to whoever called the method.
Your service is now complete. You need to import your service into your WeatherComponent, inject it into your constructor to use it, and then update your sendToAPIXU() method to send your location to your newly created service. Open the weather.component.ts file to complete these tasks by adding the highlighted content:
...
import { FormBuilder, FormGroup } from "@angular/forms";
import { ApixuService } from "../apixu.service";
...
constructor(
    private formBuilder: FormBuilder,
    private apixuService: ApixuService
  ) {}
...
ngOnInit(){...}
sendToAPIXU(formValues){
    this.apixuService
      .getWeather(formValues.location)
      .subscribe(data => console.log(data));
}
You’ve removed the former console.log statement in your sendToAPIXU() method and updated it with this content. You’re now passing in your location from your form to the sendToAPIXU() method you created earlier. You’ve then passed that data to the getWeather() method of the ApixuService that has subsequently made an HTTP request to the API with that location. You’ve then subscribed to the response you got back and, in this example, logged that data to the console. You always have to call the subscribe method on an HTTP request as the request will not begin until you have a way of reading the Observable response you get back. Observables are a way of sending messages between publishers and subscribers, allowing you to pass any kind of data back and forth. You will not be able to receive data from an observable until a subscriber has subscribed to it, because it won’t execute before that point.
Open the console in your browser again again. Now, type in London, UK and click Search for Weather. If you click on the tab arrows, you’ll see a list of the weather details in the console.
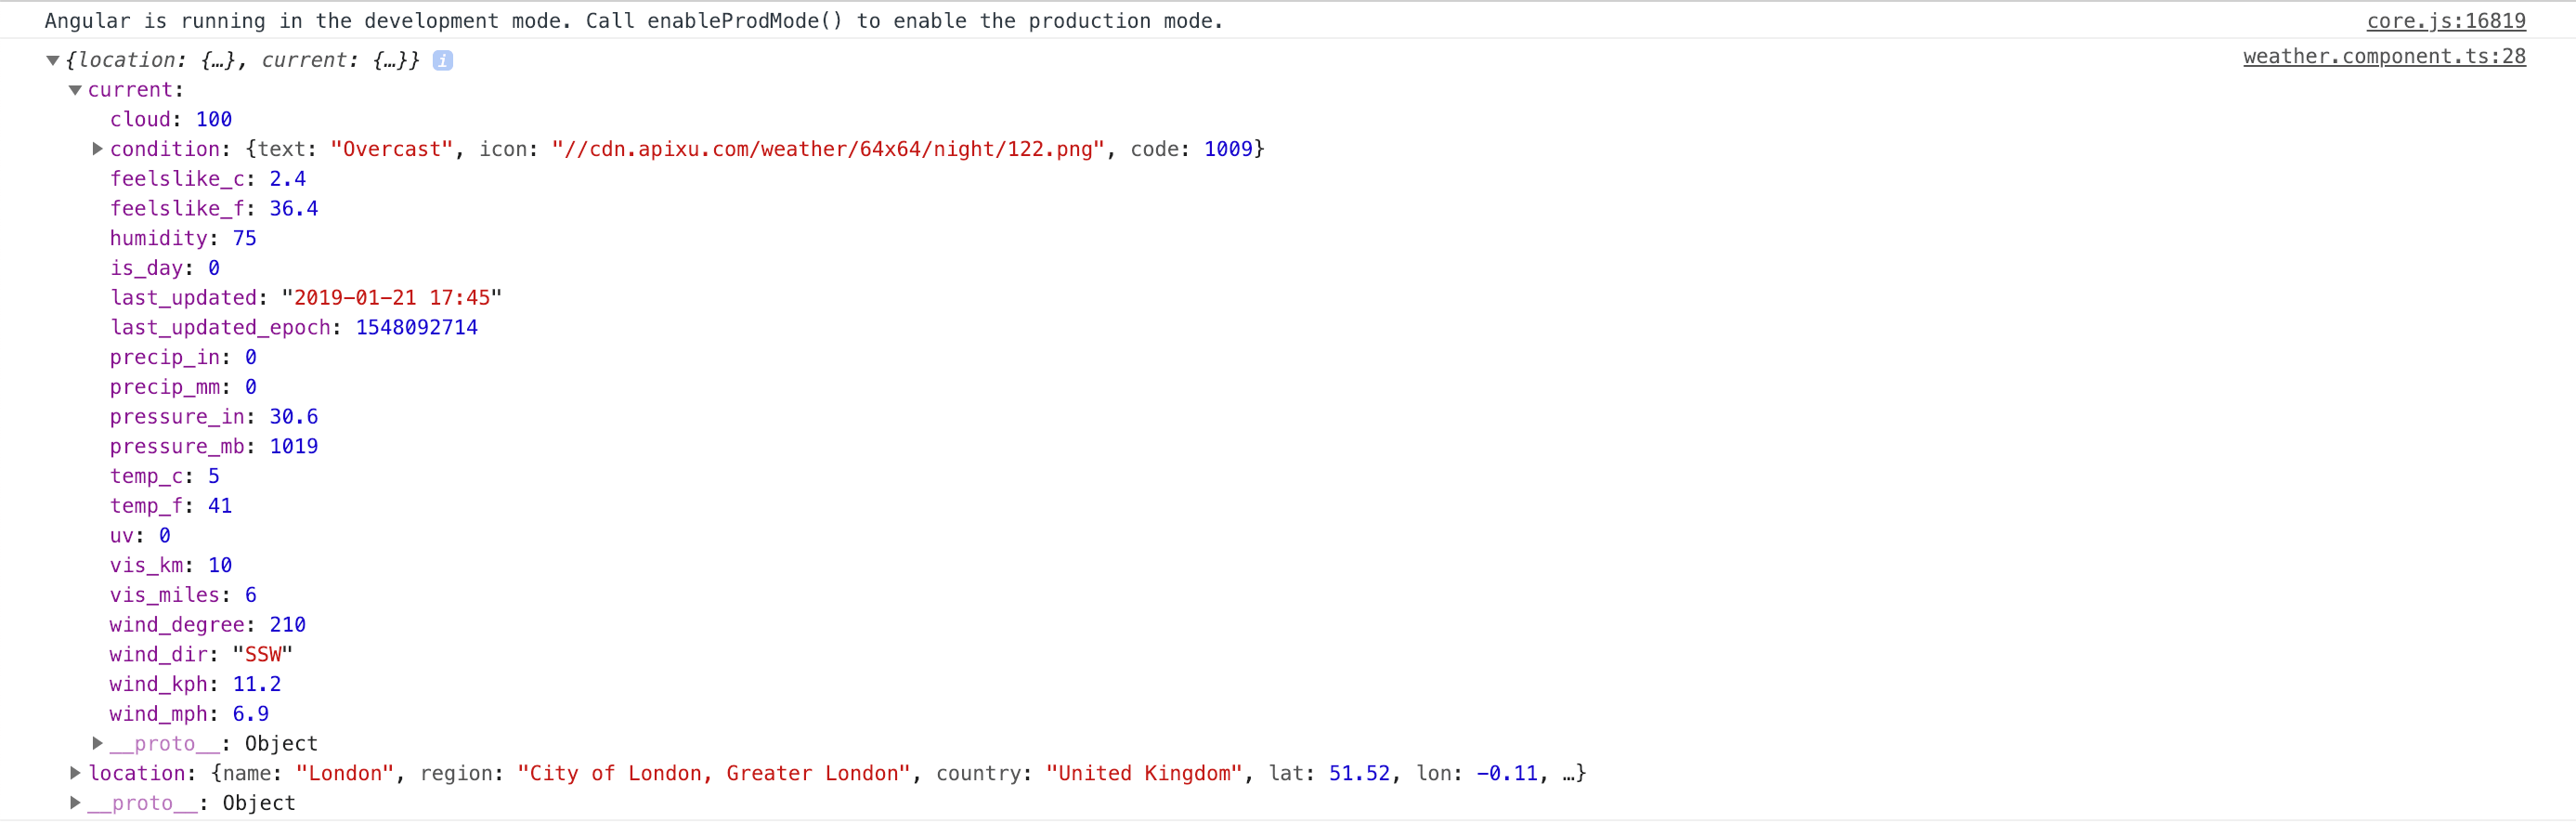
The output shows JSON objects containing all of the weather information needed. You have two objects returned: a current object and a location object. The former gives the desired weather details and the latter details about your location.
You’ve now got your weather data successfully showing in the console. To finish this tutorial, you’ll display these weather details in your HTML.
Step 9 — Displaying Your Weather Data in Your App
Displaying the results in the console is a good initial step to check that everything is working. However, you want to eventually show the weather data in HTML for your users. To do this, you’ll create a variable to hold your returned weather data, and then display that using interpolation in your HTML.
Interpolation allows you to display data in your views. To do this, it requires you to bind a property via the {{ }} style, to show that property in your HTML.
Open up the weather.component.ts file and create a variable called weatherData to which you’ll assign the retrieved JSON data from the API. Additionally, remove the code that was previously in the .subscribe() brackets and replace it with the following highlighted code:
...
export class WeatherComponent implements OnInit {
public weatherSearchForm: FormGroup;
public weatherData: any;
...
sendToAPIXU(formValues){
    this.apixuService
    .getWeather(formValues.location)
    .subscribe(data => this.weatherData = data)
      console.log(this.weatherData);
    }
}
You’ve created the variable weatherData and declared that it can hold data of any type. You’ve then assigned the data you receive back from your API call to that variable. Finally, you’ve added a console.log() statement to double check that weatherData holds all of your retrieved information.
Your weather.component.ts file should be looking like this at this stage:
import { Component, OnInit } from "@angular/core";
import { FormBuilder, FormGroup } from "@angular/forms";
import { ApixuService } from "../apixu.service";

@Component({
  selector: "app-weather",
  templateUrl: "./weather.component.html",
  styleUrls: ["./weather.component.css"]
})
export class WeatherComponent implements OnInit {
  public weatherSearchForm: FormGroup;
  public weatherData: any;

  constructor(
    private formBuilder: FormBuilder,
    private apixuService: ApixuService
  ) {}

  ngOnInit() {
    this.weatherSearchForm = this.formBuilder.group({
      location: [""]
    });
  }

  sendToAPIXU(formValues) {
    this.apixuService.getWeather(formValues.location).subscribe(data => {
      this.weatherData = data;
      console.log(this.weatherData);
    });
  }
}
If you go back and search for London, UK again, you’ll see your object printed out to the console as normal. Now, you want to show this data in your HTML. If you examine the current object from the retrieved weather data in the console, you’ll see values such as condition, feelslike_c, feelslike_f, temp_c, temp_f, and so on You’re going to make use of all five of these properties.
Open your weather.component.html file again and add in the subtitles to the data you want to display. You’ll be adding these <p> tags within the second col-md-6:
...
<div class="col-md-6">
  <h3 class="text-center my-4">Weather Details:</h3>
  <p class="text-center">Current weather conditions:</p>
  <p class="text-center">Temperature in Degrees Celsius:</p>
  <p class="text-center">Temperature in Degrees Farenheit:</p>
  <p class="text-center">Feels like in Degrees Celsius:</p>
  <p class="text-center">Feels like in Degrees Farenheit:</p>
  <p class="text-center">Location Searched:</p>
</div>
Next, you’ll add the data you have received from your JSON object to your HTML:
...
<h3 class="text-center my-4 ">Weather Details:</h3>
<p class="text-center">
  Current weather conditions: {{this.weatherData?.current.condition.text}}
</p>
<p class="text-center">
  Temperature in Degrees Celsius: {{this.weatherData?.current.temp_c}}
</p>
<p class="text-center">
  Temperature in Degrees Farenheit: {{this.weatherData?.current.temp_f}}
</p>
<p class="text-center">
  Feels like in Degrees Celsius: {{this.weatherData?.current.feelslike_c}}
</p>
<p class="text-center">
  Feels like in Degrees Farenheit:
  {{this.weatherData?.current.feelslike_f}}
</p>
<p class="text-center">
  Location Searched: {{this.weatherData?.location.name}},
  {{this.weatherData?.location.country}}
</p>
You have used an operator ? as you retrieved data from your weatherData variable within your HTML. This operator is called an Elvis Operator.
Because you’re making an HTTP call, you’re making an asynchronous request. You’ll get that data back at some point, but it will not be an immediate response. Angular, however, will still continue to fill out your HTML with the data you specified from the weatherData variable. If you haven’t received data back by the time that Angular begins to populate your paragraphs, there will be an error stating that Angular can’t find that data. For example, .current or .location would be showing as undefined.
The Elvis Operator is a safe navigator and prevents this from happening. It tells Angular to wait and check if weatherData is first defined, before going ahead and showing that data in the HTML. Once weatherData has all of its information, Angular will then update your bindings and show your data as normal.
You final weather.component.ts file will look like the following:
<div class="container">
  <div class="row">
    <div class="col-md-6">
      <h3 class="text-center my-4">Search for Weather:</h3>
      <form
        [formGroup]="weatherSearchForm"
        (ngSubmit)="sendToAPIXU(weatherSearchForm.value)"
      >
        <div class="form-group">
          <input
            class="form-control"
            type="text"
            id="weatherLocation"
            aria-describedby="weatherLocation"
            placeholder="Please input a Location"
            formControlName="location"
          />
        </div>
        <div class="text-center">
          <button type="submit" class="btn btn-success btn-md">
            Search for the weather
          </button>
        </div>
      </form>
    </div>
    <div class="col-md-6">
      <h3 class="text-center my-4">Weather Details:</h3>
      <p class="text-center">
        Current weather conditions: {{ this.weatherData?.current.condition.text
        }}.
      </p>
      <p class="text-center">
        Temperature in Degrees Celsius: {{ this.weatherData?.current.temp_c }}
      </p>
      <p class="text-center">
        Temperature in Degrees Farenheit: {{ this.weatherData?.current.temp_f }}
      </p>
      <p class="text-center">
        Feels like in Degrees Celsius: {{ this.weatherData?.current.feelslike_c
        }}
      </p>
      <p class="text-center">
        Feels like in Degrees Farenheit: {{
        this.weatherData?.current.feelslike_f }}
      </p>
      <p class="text-center">
        Location Searched: {{ this.weatherData?.location.name }}, {{
        this.weatherData?.location.country }}.
      </p>
    </div>
  </div>
</div>
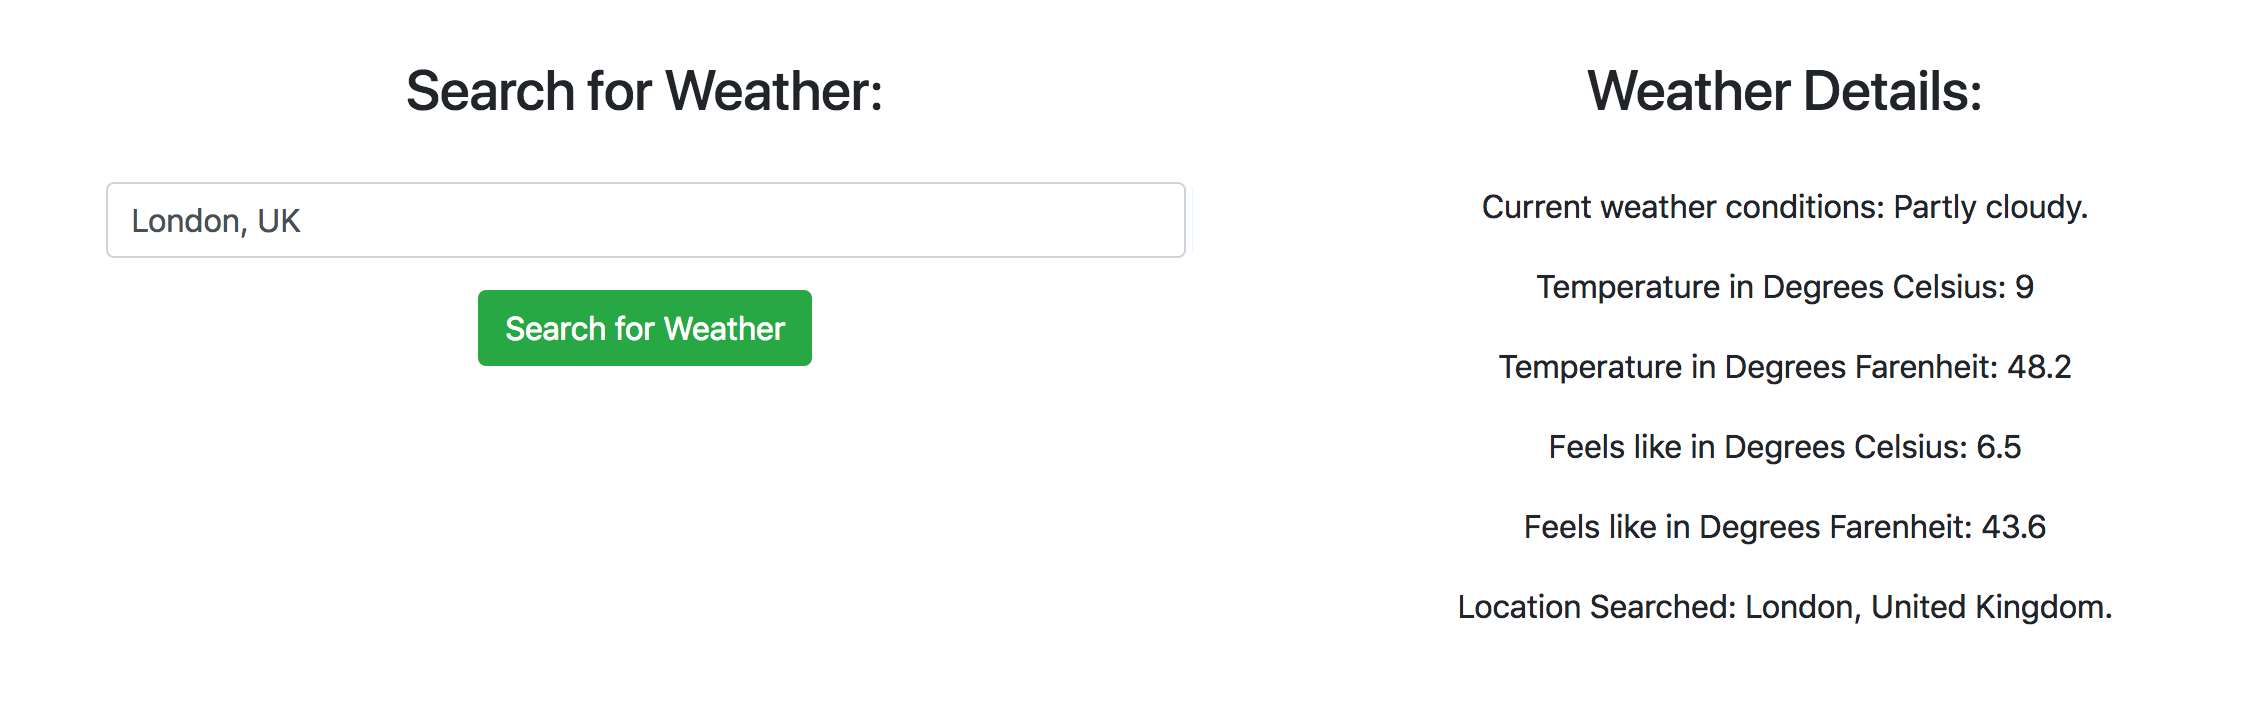
You’ve followed the pattern of the returned JSON weather object in order to output your desired data. Save your file, go back to your browser, and type London, UK, you’ll see your weather data appear on the right-hand side.
Try it with different locations, like: San Francisco, US, Dakar, Senegal, and Honololu, Hawaii. You’ll see the respective weather data appear for all those locations.
Conclusion
You have created a weather app using Angular, Bootstrap, and the APIXU API. You have set up an Angular project from scratch, following Angular best practices while ensuring your application is well designed and set up appropriately.
Angular is an advanced framework allowing you to create anything from small web applications to large, complex ones with ease. Angular, as with any frameworks, does have a learning curve, but small projects like this one can help you to quickly learn and start using it productively.
Another feature to consider adding to your application is handling errors from your HTTP requests; for instance, if you were to type in an invalid location. Another enhancement would be displaying different images if the temperature is between certain thresholds. You can also create different applications with Angular using other APIs.
You may also want to use NgBootstrap, which is a special type of Bootstrap built for Angular. This allows you to use all the standard Bootstrap JavaScript widgets as well as some special ones not included in the standard installation specifically adapted for Angular.
The full code for this tutorial is available on GitHub.
Thanks for learning with the DigitalOcean Community. Check out our offerings for compute, storage, networking, and managed databases.
About the author(s)
Former Senior Technical Editor at DigitalOcean, with a strong focus on DevOps and System Administration content. Areas of expertise include Terraform, PyTorch, Python, and Django.
Still looking for an answer?
This textbox defaults to using Markdown to format your answer.
You can type !ref in this text area to quickly search our full set of tutorials, documentation & marketplace offerings and insert the link!
This comment has been deleted
Hello Sir, great tutorial! Can you suggest me a way to add an authentication system to this app?
In the last step, my weather details are not displaying on the HTML page. but it is displaying in the console window. How to make it appear on the HTML page. All the previous steps are working fine. Help me, please.
In step 6 I got the error “no provider for controlcontainer” after importing ReactiveFormsModule. It turns out that I also needed to import FormsModule in app.module.ts. I hope this helps someone that experiences the same issue.
A couple of more updates to this guide. It looks like weatherstack bought this service and shut down the URL so you now have to use the new URL. Also, I was getting CORS errors on my pc because I was making a cross-domain call. I inserted a proxy into my URL and now it is working.
‘https://cors-anywhere.herokuapp.com/http://api.weatherstack.com/current?access_key=<YOURKEY>&query=’ + location
Insert your key, of course.
Hello! When I try to build this, I get this error:
Error: src/app/weather/weather.component.ts:13:10 - error TS2564: Property ‘weatherSearchForm’ has no initializer and is not definitely assigned in the constructor. 13 public weatherSearchForm: FormGroup;
can someone help me?
 This work is licensed under a Creative Commons Attribution-NonCommercial- ShareAlike 4.0 International License.
Become a contributor for community
Get paid to write technical tutorials and select a tech-focused charity to receive a matching donation.

DigitalOcean Documentation
Full documentation for every DigitalOcean product.

Resources for startups and AI-native businesses
The Wave has everything you need to know about building a business, from raising funding to marketing your product.
The developer cloud
Scale up as you grow — whether you're running one virtual machine or ten thousand.

Start building today
From GPU-powered inference and Kubernetes to managed databases and storage, get everything you need to build, scale, and deploy intelligent applications.
