By Kiyoto Tamura and Sharon Campbell

An Article from Fluentd
Introduction
What’s Fluentd?
Fluentd is an open source data collector designed to unify logging infrastructure. It is designed to bring operations engineers, application engineers, and data engineers together by making it simple and scalable to collect and store logs.
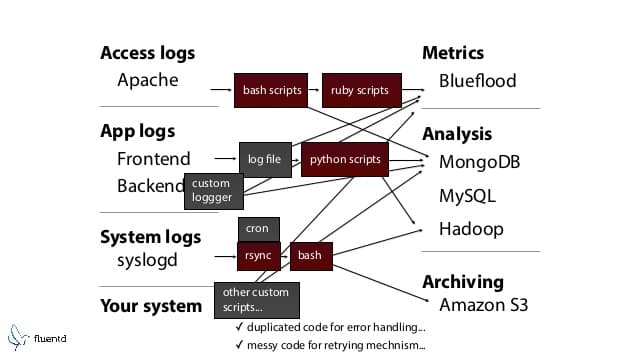
Before Fluentd
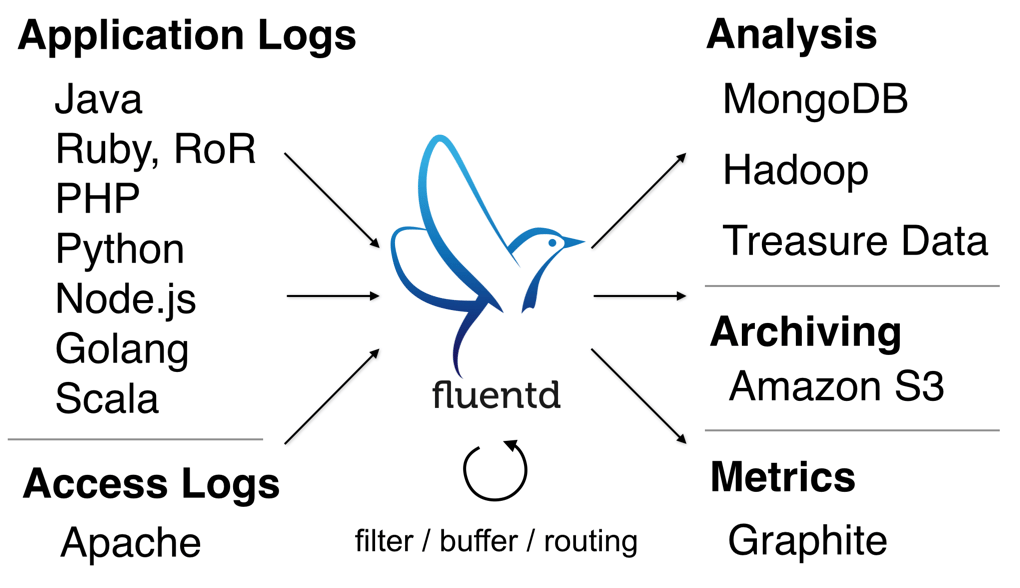
After Fluentd
Key Features
Fluentd has four key features that makes it suitable to build clean, reliable logging pipelines:
- Unified Logging with JSON: Fluentd tries to structure data as JSON as much as possible. This allows Fluentd to unify all facets of processing log data: collecting, filtering, buffering, and outputting logs across multiple sources and destinations. The downstream data processing is much easier with JSON, since it has enough structure to be accessible without forcing rigid schemas
- Pluggable Architecture: Fluentd has a flexible plugin system that allows the community to extend its functionality. The 300+ community-contributed plugins connect dozens of data sources to dozens of data outputs, manipulating the data as needed. By using plugins, you can make better use of your logs right away
- Minimum Resources Required: A data collector should be lightweight so that the user can run it comfortably on a busy machine. Fluentd is written in a combination of C and Ruby, and requires minimal system resources. The vanilla instance runs on 30-40MB of memory and can process 13,000 events/second/core
- Built-in Reliability: Data loss should never happen. Fluentd supports memory- and file-based buffering to prevent inter-node data loss. Fluentd also supports robust failover and can be set up for high availability
Goals: Collecting Centralized Docker Container Logs with Fluentd
As Docker containers are rolled out in production, there is an increasing need to persist containers’ logs somewhere less ephemeral than containers.
In this tutorial, we’ll show you how to install Fluentd and use it to collect logs from Docker containers, storing them outside so the data can be saved after the containers have been stopped. We’ll stream the data to another container running Elasticsearch, on the same Ubuntu 14.04 server.
As outlined in Kubernetes’s GitHub repo, this architecture uses Fluentd’s ability to tail and parse JSON-per-line log files produced by Docker daemon for each container. For a minimal setup, please see this recipe.
At the end of this tutorial, we’ll discuss two more use cases. After reading this article, you should know the basics of how to use Fluentd.
Prerequisites
Please make sure you complete these prerequisites for the tutorial.
- Ubuntu 14.04 Droplet
- User with sudo access
Step 1 — Installing Fluentd
The most common way of deploying Fluentd is via the td-agent package. Treasure Data, the original author of Fluentd, packages Fluentd with its own Ruby runtime so that the user does not need to set up their own Ruby to run Fluentd.
Currently, td-agent supports the following platforms:
- Ubuntu: Lucid, Precise and Trusty
- Debian: Wheezy and Squeeze
- RHEL/Centos: 5, 6 and 7
- Mac OSX: 10.9 and above
In this tutorial, we assume you are on DigitalOcean Droplet running Ubuntu 14.04 LTS (Trusty).
Install td-agent with the following command:
curl -L http://toolbelt.treasuredata.com/sh/install-ubuntu-trusty-td-agent2.sh | sh
Start td-agent:
sudo /etc/init.d/td-agent start
Check the logs to make sure it was installed successfully:
tail /var/log/td-agent/td-agent.log
You should see output similar to the following:
	port 24230
  </source>
</ROOT>
2015-02-22 18:27:45 -0500 [info]: adding source type="forward"
2015-02-22 18:27:45 -0500 [info]: adding source type="http"
2015-02-22 18:27:45 -0500 [info]: adding source type="debug_agent"
2015-02-22 18:27:45 -0500 [info]: adding match pattern="td.*.*" type="tdlog"
2015-02-22 18:27:45 -0500 [info]: adding match pattern="debug.**" type="stdout"
2015-02-22 18:27:45 -0500 [info]: listening fluent socket on 0.0.0.0:24224
2015-02-22 18:27:45 -0500 [info]: listening dRuby uri="druby://127.0.0.1:24230" object="Engine"
Note: Alternately, Fluentd is available as a Ruby gem and can be installed with
gem install fluentd. If you do NOT have sudo privileges, please install Ruby (see Installing Ruby here, for example) and run:gem install fluentd --no-rdoc --no-ri
Step 2 — Installing Docker
Now we’ll install Docker. This tutorial was tested with Docker v1.5.0.
Add the key for the Docker repository so we can get an up-to-date Docker package:
sudo apt-key adv --keyserver hkp://keyserver.ubuntu.com:80 --recv-keys 36A1D7869245C8950F966E92D8576A8BA88D21E9
Add the repository to your sources:
sudo sh -c "echo deb https://get.docker.com/ubuntu docker main > /etc/apt/sources.list.d/docker.list"
Update your system:
sudo apt-get update
Install Docker:
sudo apt-get install lxc-docker
Verify that Docker was installed by checking the version:
docker --version
You should see output like the following:
Docker version 1.5.0, build a8a31ef
Step 3 — Adding User to docker Group
Docker runs as root, so in order to issue docker commands, add your sudo user to the docker group. Replace sammy with the user of your choice.
sudo gpasswd -a sammy docker
Then, restart Docker.
sudo service docker restart
Finally, if you are currently logged in as your sudo user, you must log out and log back in.
Step 4 — Building the Fluentd Image
In this section we’ll create the Docker image for the Fluentd Docker container. If you’d like to learn more about Docker in general, please read this introductory tutorial.
Create a new directory for your Fluentd Docker resources, and move into it:
mkdir ~/fluentd-docker && cd ~/fluentd-docker
Create the following Dockerfile:
sudo nano Dockerfile
Add the following contents to your file exactly. This file tells Docker to update the Docker container and install Ruby, Fluentd, and Elasticsearch:
FROM ruby:2.2.0
MAINTAINER kiyoto@treausuredata.com
RUN apt-get update
RUN gem install fluentd -v "~>0.12.3"
RUN mkdir /etc/fluent
RUN apt-get install -y libcurl4-gnutls-dev make
RUN /usr/local/bin/gem install fluent-plugin-elasticsearch
ADD fluent.conf /etc/fluent/
ENTRYPOINT ["/usr/local/bundle/bin/fluentd", "-c", "/etc/fluent/fluent.conf"]
You also need to create a fluent.conf file in the same directory.
sudo nano fluent.conf
The fluent.conf file should look like this. You can copy this file exactly:
<source>
  type tail
  read_from_head true
  path /var/lib/docker/containers/*/*-json.log
  pos_file /var/log/fluentd-docker.pos
  time_format %Y-%m-%dT%H:%M:%S
  tag docker.*
  format json
</source>
# Using filter to add container IDs to each event
<filter docker.var.lib.docker.containers.*.*.log>
  type record_transformer
  <record>
    container_id ${tag_parts[5]}
  </record>
</filter>

<match docker.var.lib.docker.containers.*.*.log>
  type elasticsearch
  logstash_format true
  host "#{ENV['ES_PORT_9200_TCP_ADDR']}" # dynamically configured to use Docker's link feature
  port 9200
  flush_interval 5s
</match>
The purpose of this file is to tell Fluentd where to find the logs for other Docker containers.
Then, build your Docker image, called fluentd-es:
docker build -t fluentd-es .
This will take a few minutes to complete. Check that you have successfully built the images:
docker images
You should see output like this:
REPOSITORY      	TAG             	IMAGE ID        	CREATED         	VIRTUAL SIZE
fluentd-es      	latest          	89ba1fb47b23    	2 minutes ago   	814.1 MB
ruby            	2.2.0           	51473a2975de    	6 weeks ago     	774.9 MB
Step 5 — Starting the Elasticsearch Container
Now move back to your home directory or preferred directory for your Elasticsearch container:
cd ~
Download and start the Elasticsearch container. There is already an automated build for this:
docker run -d -p 9200:9200 -p 9300:9300 --name es dockerfile/elasticsearch
Wait for the container image to download and start.
Next, make sure that the Elasticsearch container is running properly by checking the Docker processes:
docker ps
You should see output like this:
CONTAINER ID    	IMAGE                         	COMMAND            	CREATED         	STATUS          	PORTS                                        	NAMES
c474fd99ce43    	dockerfile/elasticsearch:latest   "/elasticsearch/bin/   4 minutes ago   	Up 4 minutes    	0.0.0.0:9200->9200/tcp, 0.0.0.0:9300->9300/tcp   es
Step 6 — Starting the Fluentd-to-Elasticsearch Container
Now we’ll start the container that runs Fluentd, collects the logs, and sends them to Elastcisearch.
docker run -d --link es:es -v /var/lib/docker/containers:/var/lib/docker/containers fluentd-es
In the above command, the --link es:es portion links the Elasticsearch container to the Fluentd container. The -v /var/lib/docker/containers:/var/lib/docker/containers portion is needed to mount the host container’s log directory into the Fluentd container, so that Fluentd can tail the log files as containers are created.
Finally, check that the container is running by checking our active Docker processes:
docker ps
This time, you should see both the Elasticsearch container and the new fluentd-es container:
CONTAINER ID    	IMAGE                         	COMMAND            	CREATED         	STATUS          	PORTS                                        	NAMES
f0d2cac81ac8    	fluentd-es:latest             	"/usr/local/bundle/b   2 seconds ago   	Up 2 seconds                                                     	stupefied_brattain
c474fd99ce43    	dockerfile/elasticsearch:latest   "/elasticsearch/bin/   6 minutes ago   	Up 6 minutes    	0.0.0.0:9200->9200/tcp, 0.0.0.0:9300->9300/tcp   es
Step 7 — Confirming that Elasticsearch is Receiving Events
Finally, let’s confirm that Elasticsearch is receiving the events:
curl -XGET 'http://localhost:9200/_all/_search?q=*'
The output should contain events that look like this:
{"took":66,"timed_out":false,"_shards":{"total":5,"successful":5,"failed":0},"hits":{"total":0,"max_score":null,"hits":[]}}
{"took":59,"timed_out":false,"_shards":{"tod","_id":"AUwLaKjcnpi39wqZnTXQ","_score":1.0,"_source":{"log":"2015-03-12 00:35:44 +0000 [info]: following tail of /var/lib/docker/containers/6abeb6ec0019b2198ed708315f4770fc7ec6cc44a10705ea59f05fae23b81ee9/6abeb6ec0019b2198ed708315f4770fc7ec6cc44a10705ea59f05fae23b81ee9-json.log\n","stream":"stdout","container_id":"6abeb6ec0019b2198ed708315f4770fc7ec6cc44a10705ea59f05fae23b81ee9","@timestamp":"2015-03-12T00:35:44+00:00"}}]}}
You may have quite a few events logged depending on your setup. A single event should start with {"took": and end with a timestamp.
As this output shows, Elasticsearch is receiving data. (Your container ID will be different than the one shown above!)
Step 8 — Taking Event Logs to the Next Level
Now that your container events are being saved by Elasticsearch, what should you do next? There are plenty of useful things to do with Elasticsearch. If you’re looking for ideas, you may want to check out:
- Basic Elasticsearch operations
- Adding a dashboard so you can visualize your logs
Conclusion
Collecting logs from Docker containers is just one way to use Fluentd. In this section we’ll present two other common use cases for Fluentd.
Use Case 1: Real-time Log Search and Log Archiving
Many users come to Fluentd to build a logging pipeline that does both real-time log search and long-term storage. The architecture looks like this:
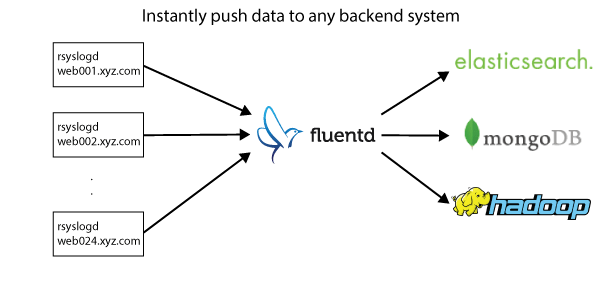
This architecture takes advantage of Fluentd’s ability to copy data streams and output them to multiple storage systems. In the above setting, Elasticsearch is used for real-time search, while MongoDB and/or Hadoop are used for batch analytics and long-term storage.
Use Case 2: Centralized Application Logging
Web applications produce a lot of logs, and they are often formatted arbitrarily and stored on the local filesystem. This is bad for two reasons:
- The logs are difficult to parse programmatically (requiring lots of regular expressions) and hence are not very accessible to those who wish to understand user behavior through statistical analysis (A/B testing, fraud detection, etc.)
- The logs are not accessible in real-time because the text logs are bulk-loaded into storage systems. Also, if the server’s disk gets corrupted between bulk-loads, the logs become lost or corrupted
Fluentd solves these problems by:
- Providing logger libraries for various programming languages with a consistent API: each logger sends a triple of (timestamp, tag, JSON-formatted event) to Fluentd. Currently, there are logger libraries for Ruby, Node.js, Go, Python, Perl, PHP, Java and C++
- Allowing the application to “fire and forget”: the logger can log asynchronously to Fluentd, which in turn buffers the logs before uploading to backend systems
Resources:
- Read about the Unified Logging Layer
- Fluentd + Elasticsearch for Kubernetes by Satnam Singh (Kubernetes committer)
Thanks for learning with the DigitalOcean Community. Check out our offerings for compute, storage, networking, and managed databases.
About the author(s)
Current fan and former Editorial Manager at DigitalOcean. Hi! Expertise in areas including Ubuntu, Docker, Rails, and more.
Still looking for an answer?
This textbox defaults to using Markdown to format your answer.
You can type !ref in this text area to quickly search our full set of tutorials, documentation & marketplace offerings and insert the link!
This comment has been deleted
Handy walkthrough! I found it helpful in getting me started. :-)
Just an editing note, to help keep the article up to date:
The official Elasticsearch Docker image is now in the root namespace, so
docker run -d -p 9200:9200 -p 9300:9300 --name es dockerfile/elasticsearch
should now be
docker run -d -p 9200:9200 -p 9300:9300 --name es elasticsearch
followed step #2 for installing docker
Error getting container f46788556f5c5636ab33fdb3ec63e76d7c621f2b66770c3950ef9180e20ae046 from driver devicemapper: Error mounting '/dev/mapper/docker-202:1-789513-f46788556f5c5636ab33fdb3ec63e76d7c621f2b66770c3950ef9180e20ae046' on '/var/lib/docker/devicemapper/mnt/f46788556f5c5636ab33fdb3ec63e76d7c621f2b66770c3950ef9180e20ae046': no such file or directory
corresponding issue on gthub
Follow this for installing docker
Описал установку RSYSLOG+FLUENTD+ELASTICSEARCH+KIBANA + конфигурование клиентских машин http://itc-life.ru/fluentd-bystryj-poisk-logov-s-elasticsearch-kibana-and-fluentd/
An updated Ubuntu 16.04 will be helpful. I was having issues doing the same steps in Ubuntu 16.04
 This work is licensed under a Creative Commons Attribution-NonCommercial- ShareAlike 4.0 International License.
Become a contributor for community
Get paid to write technical tutorials and select a tech-focused charity to receive a matching donation.

DigitalOcean Documentation
Full documentation for every DigitalOcean product.

Resources for startups and AI-native businesses
The Wave has everything you need to know about building a business, from raising funding to marketing your product.
The developer cloud
Scale up as you grow — whether you're running one virtual machine or ten thousand.

Start building today
From GPU-powered inference and Kubernetes to managed databases and storage, get everything you need to build, scale, and deploy intelligent applications.
