
Introduction
Consul is a distributed, highly available, datacenter-aware, service discovery and configuration system. It can be used to present services and nodes in a flexible and powerful interface that allows clients to always have an up-to-date view of the infrastructure they are a part of.
Consul provides many different features that are used to provide consistent and available information about your infrastructure. This includes service and node discovery mechanisms, a tagging system, health checks, consensus-based election routines, system-wide key/value storage, and more. By leveraging consul within your organization, you can easily build a sophisticated level of awareness into your applications and services.
In our last guide, we provided a quick demonstration of some of consul’s functionality. In this guide, we will get started on creating a production-ready consul configuration that can be used to start implementing service discovery for your infrastructure.
Prerequisites and Goals
In this series, we will be setting up a system of servers that will be able to communicate with each other and maintain service information, key/value storage pools, and other details for client machines. The first steps towards getting our system production ready will take place in this guide, as we install the software, and automate some of our configuration.
The consul documentation recommends that you have either 3 or 5 consul servers running in each datacenter to avoid data loss in the event of a server failure. Consul servers are the component that do the heavy lifting. They store information about services and key/value information. An odd number of servers is necessary to avoid stalemate issues during elections.
Apart from the consul servers, other machines can run consul agents. Consul agents are very light-weight and simply forward requests to the servers. They provide a method of insulating your servers and offload the responsibility of knowing the servers’ addresses to the agents themselves.
For us to implement some of the security mechanisms in a later guide, we need to name all of our machines within a single domain. This is so that we can issue a wildcard SSL certificate at a later time.
The details of our machines are here:
| Hostname | IP Address | Role |
|---|---|---|
| server1.example.com | 192.0.2.1 | bootstrap consul server |
| server2.example.com | 192.0.2.2 | consul server |
| server3.example.com | 192.0.2.3 | consul server |
| agent1.example.com | 192.0.2.50 | consul client |
We will be using 64-bit Ubuntu 14.04 servers for this demonstration, but any modern Linux server should work equally well. When the configuration is complete, you should have a system in place that will allow you to easily add services, checks, and nodes.
Log into your machines as the root user to complete the steps in this guide.
Downloading and Installing Consul
If you did not already install consul in the initial introduction to consul guide, you will have to do that now. We will be installing consul as a system-level application on each of the four machines we are configuring.
Before we look into the consul application, we need to get unzip to extract the executable. Update the local systems package cache and then install the package using apt:
apt-get update
apt-get install unzip
Now, we can go about getting the consul program. The consul project’s page provides download links to binary packages for Windows, OS X, and Linux.
Go to the page above and right-click on the operating system and architecture that represents your servers. In this guide, since we are using 64-bit servers, we will use the “amd64” link under “linux”. Select “copy link location” or whatever similar option your browser provides.
In your terminal, move to the /usr/local/bin directory, where we will keep the executable. Type wget and a space, and then paste the URL that you copied from the site:
cd /usr/local/bin
wget https://dl.bintray.com/mitchellh/consul/0.3.0_linux_amd64.zip
Now, we can extract the binary package using the unzip command that we installed earlier. We can then remove the zipped file:
unzip *.zip
rm *.zip
You should now have the consul command available on all of your servers.
Create the Necessary Directory and System Structure
We can easily try out consul in an unstructured way by using the consul command. This will allow you to test out some functionality. We did this in the last guide to get familiar with the software.
However, we are going to attempt to set up a more reliable system that is easier to manage, so we will be creating some structure to make this work. Complete the following steps on each of your computers (servers and clients).
The first thing we should take care of is creating a user specific to our task. This is a standard case of user privilege separation, so we will run our consul processes with a dedicated user.
Create the user now by typing:
adduser consul
You can skip all of the prompts (You might want to set a password. It will complain otherwise) if you would like.
Next, we will create the configuration hierarchy that will house the different configurations that we will use depending on how we want to start the service. To make this easy, we will make a parent consul.d directory in the /etc config structure and put subdirectories called bootstrap, server, and client under this on each system:
mkdir -p /etc/consul.d/{bootstrap,server,client}
We can put our configurations in each of these later. Each server will probably use, at most, two of these directories, but we will create the structure for consistency on each host.
We also need to create a location where consul can store persistent data between reboots. We will create a directory at /var/consul for this purpose and give it to the consul user so that it can manage the data:
mkdir /var/consul
chown consul:consul /var/consul
With this structure in place, we should be able to get started crafting our configuration files.
Creating the Bootstrap Configuration
The first configuration we need to create is for bootstrapping the cluster. This is not a very common event as it is only necessary for creating the cluster initially. However, we’re going to create the configuration file so that we can quickly get started again in the event that the cluster goes down completely.
You can put this configuration file on only one of your consul servers, or on all of them to give you more options for bootstrapping. We will only be putting it on server1 for this demonstration.
The configuration files are stored in simple JSON, so they’re quite easy to manage. Create the first file in the bootstrap subdirectory:
nano /etc/consul.d/bootstrap/config.json
In this file, we can start off by specifying that when this config is used, consul should start as a server in bootstrap mode:
{
    "bootstrap": true,
    "server": true
}
We should also specify the datacenter where our cluster will live. This can be any name that helps you identify the physical location of the cluster. Consul is datacenter-aware and these designations will help you organize your different clusters by datacenter.
We can also pass in the data directory that we created at /var/consul. Consul will use this to store information about the cluster state:
{
    "bootstrap": true,
    "server": true,
    "datacenter": "nyc2",
    "data_dir": "/var/consul"
}
Next, we want to implement some encryption to the whisper protocol that consul uses. It has this functionality built in using a shared secret system. The secret must be a 16-bit base-64 encoded string. To get a value of appropriate for this value, we will exit the file temporarily.
In the terminal, we can use the consul command to generate a key of the necessary length and encoding. Type:
consul keygen
X4SYOinf2pTAcAHRhpj7dA==
Copy the value that is generated and re-open the configuration file:
nano /etc/consul.d/bootstrap/config.json
Use the copied string as the value for the encrypt parameter:
{
    "bootstrap": true,
    "server": true,
    "datacenter": "nyc2",
    "data_dir": "/var/consul",
    "encrypt": "X4SYOinf2pTAcAHRhpj7dA=="
}
Finally, we’ll add some additional information to specify the log level and to indicate that want to use syslog for logging:
{
    "bootstrap": true,
    "server": true,
    "datacenter": "nyc2",
    "data_dir": "/var/consul",
    "encrypt": "X4SYOinf2pTAcAHRhpj7dA==",
    "log_level": "INFO",
    "enable_syslog": true
}
Save and close the file when you are finished.
Creating the Regular Server Configuration
Now that we have our bootstrap configuration complete, we can use it as the basis for our general server configuration. The server configuration will be used once the cluster is bootstrapped.
Start by copying the bootstrap file from server1 into the server subdirectory on that machine for editing:
cp /etc/consul.d/bootstrap/config.json /etc/consul.d/server
Open the file to make the necessary modifications:
nano /etc/consul.d/server/config.json
To start, we need to turn off the bootstrap flag since this configuration is for non-bootstrap configurations.
The only other thing we need to modify for the server configuration is specifying the other server’s IP addresses that this node should attempt to join when it starts up. This takes care of joining automatically, so that we do not have to manually join the cluster after our server is started:
{
    "bootstrap": false,
    "server": true,
    "datacenter": "nyc2",
    "data_dir": "/var/consul",
    "encrypt": "X4SYOinf2pTAcAHRhpj7dA==",
    "log_level": "INFO",
    "enable_syslog": true,
    "start_join": ["192.0.2.2", "192.0.2.3"]
}
The encrypt parameter must be the same for all of the participants in the system, so copying the file has already taken care of that requirement for us. Keep this in mind when creating new configurations.
Save the file when you are finished.
You should copy the contents of this configuration file to the other machines that will be acting as your consul servers. Place them in a file at /etc/consul.d/server/config.json just as you did in the first host.
The only value you need to modify on the other hosts is the IP addresses that it should attempt to connect to. You should make sure that it attempts to connect to the first server instead of its own IP. For instance, the second server in our example would have a file that looks like this:
{
    "bootstrap": false,
    "server": true,
    "datacenter": "nyc2",
    "data_dir": "/var/consul",
    "encrypt": "X4SYOinf2pTAcAHRhpj7dA==",
    "log_level": "INFO",
    "enable_syslog": true,
    "start_join": ["192.0.2.1", "192.0.2.3"]
}
Save and close the files you have created when you are finished.
Creating the Client Configuration
Now, our server configurations are all complete. We can focus on getting our client machine up and running with a proper configuration.
Open a configuration file under the client subdirectory on the client machine:
nano /etc/consul.d/client/config.json
We will again use a previous configuration as the basis for our new configuration. Copy the contents of one of the server files into this file.
We will start out by removing any mention of the bootstrap parameter since this only applies to server configurations and changing the server parameter to false.
Next, we will add a parameter specifying the location of the web UI directory. We will be acquiring the files necessary for this in a bit. The location where they will reside is /home/consul/dist.
Finally, we want to adjust the start_join parameter to list all of our servers:
{
    "server": false,
    "datacenter": "nyc2",
    "data_dir": "/var/consul",
    "ui_dir": "/home/consul/dist",
    "encrypt": "X4SYOinf2pTAcAHRhpj7dA==",
    "log_level": "INFO",
    "enable_syslog": true,
    "start_join": ["192.0.2.1", "192.0.2.2", "192.0.2.3"]
}
Save and close the file when you are finished.
Downloading the Web UI Files
Now that we have configured the client to serve the web UI, we need to acquire the actual files that will allow us to do this.
On the consul website, right-click the link to the consul web UI and select “copy link location” or whatever similar option you have.
On the client, use su to become the consul user. We are going to set up the web directory in the consul user’s home directory.
su consul
cd ~
Now, type wget, followed by a space and paste the link you copied for the web UI download. At the time of this writing, it will look like this:
wget https://dl.bintray.com/mitchellh/consul/0.3.0_web_ui.zip
Unzip the file downloaded and remove the zip file:
unzip *.zip
rm *.zip
This will create a directory called dist within your home directory. This is the directory that we pointed the web UI parameter to in the configuration file.
Before we continue, you should exit the consul user’s session to get back into the root session:
exit
Create an Upstart Script
We now have our configuration files in place. Next, we can focus on creating an upstart script so that our consul instances are automatically started upon boot and restart in case of any problem.
Since bootstrapping a cluster is not something we will have to do often (most of the time, the cluster itself will persist and a single node may have to be restarted and rejoin the cluster), we will not factor bootstrapping into the upstart script. We will show you how to manually complete this process shortly.
Our upstart script will be similar on our servers and on the client. On one of the consul servers, create a file within the /etc/init directory to hold your consul configuration:
nano /etc/init/consul.conf
We will copy the contents of this file to the other servers and then use it as the basis for our client configuration as well. Within this file, the first order of business is to create a description of the process. On our servers we’ll use:
description "Consul server process"
Next, we specify the conditions under which the process will start. For this service, we want the service to begin when the local filesystem is mounted and when the public network interface is running.
We also want to specify when the process should stop. Using the standard Linux runlevels, we can tell it to stop the process whenever it is not in one of the normal operating modes (stop the process when halting or rebooting the server):
description "Consul server process"

start on (local-filesystems and net-device-up IFACE=eth0)
stop on runlevel [!12345]
We can tell the init system to restart the process if it ever dies unexpectedly. We also want to specify the user and group that the process should run under. Remember, we created the consul user and group to isolate the process:
description "Consul server process"

start on (local-filesystems and net-device-up IFACE=eth0)
stop on runlevel [!12345]

respawn

setuid consul
setgid consul
Finally, we need to provide the actual command that we want to run. This will simply be the consul command run in agent mode. We will pass in the directory that contains our server configuration specifications as an argument to the command:
description "Consul server process"

start on (local-filesystems and net-device-up IFACE=eth0)
stop on runlevel [!12345]

respawn

setuid consul
setgid consul

exec consul agent -config-dir /etc/consul.d/server
Save the file when you are finished.
Copy the contents of this file to a file called /etc/init/consul.conf on each of your servers and the client as well.
On the client, we need to modify the file just a bit. We should change the description to reference the fact that this is a client machine. We also need to change the configuration directory that is passed into the actual consul command.
The end file should look something like this:
description "Consul client process"

start on (local-filesystems and net-device-up IFACE=eth0)
stop on runlevel [!12345]

respawn

setuid consul
setgid consul

exec consul agent -config-dir /etc/consul.d/client
Save and close the file when you are finished.
Getting a Cluster Started
Now, we have everything in place to get a consul cluster up and running quickly. The process is relatively simple.
On a server that contains the bootstrap configuration file (server1 in our case), use su to change to the consul user briefly. We can then call consul and pass in the bootstrap directory as an argument:
su consul
consul agent -config-dir /etc/consul.d/bootstrap
The service should start up and occupy the terminal window. In bootstrap mode, this server will self-elect as leader, creating a basis for forming the cluster.
On your other consul servers, as root, start the consul service that we just created with the upstart script by typing:
start consul
These servers will connect to the bootstrapped server, completing the cluster. At this point, we have a cluster of three servers, two of which are operating normally, and one of which is in bootstrap mode, meaning that it can make executive decisions without consulting the other servers.
This is not what we want. We want each of the servers on equal footing. Now that the cluster is created, we can shutdown the bootstrapped consul instance and then re-enter the cluster as a normal server.
To do this, hit CTRL-C in the bootstrapped server’s terminal:
CTRL-C
Now, exit back into your root session and start the consul service like you did with the rest of the servers:
exit
start consul
This will cause the previously-bootstrapped server to join the cluster with un-elevated privileges, bringing the cluster into its final state.
Now that the cluster is fully operational, client machines can connect. On the client machine, do the same procedure as root:
start consul
The client will connect to the cluster as a client. You can see the members of the cluster (servers and clients) by asking consul for its members on any of the machines:
consul members
Node     Address             Status  Type    Build  Protocol
server3  192.0.2.3:8301  alive   server  0.3.0  2
server2  192.0.2.2:8301  alive   server  0.3.0  2
server1  192.0.2.1:8301  alive   server  0.3.0  2
agent1   192.0.2.50:8301    alive   client  0.3.0  2
Connecting to the Web UI
We have configured our client machine to host a web interface to the cluster. However, this is being served on the local interface, meaning that it is not accessible to us using the machine’s public interface.
To get access to the web UI, we will create an SSH tunnel to the client machine that holds the UI files. Consul serves the HTTP interface on port 8500. We will tunnel our local port 8500 to the client machine’s port 8500. On your local computer, type:
ssh -N -f -L 8500:localhost:8500 root@192.0.2.50
This will connect to the remote machine, create a tunnel between our local port and the remote port and then put the connection into the background.
In your local web browser, you can now access the consul web interface by typing:
http://localhost:8500
This will give you the default web UI page:
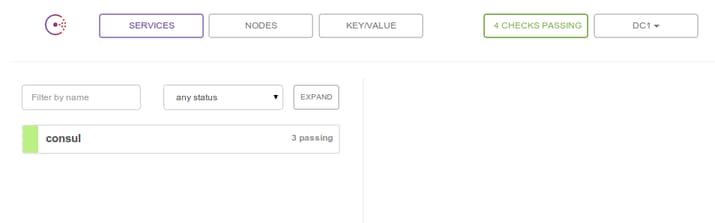
You can use this interface to check the health of your servers and get an overview of your services and infrastructure.
When you are finished using the web UI, you can close the SSH tunnel. Search for the process’s pid number using the ps command and grep to search for the port number we forwarded:
ps aux | grep 8500
1001      5275  0.0  0.0  43900  1108 ?        Ss   12:03   0:00 ssh -N -f -L 8500:localhost:8500 root@192.241.170.60
1001      5309  0.0  0.0  13644   948 pts/7    S+   12:12   0:00 grep --colour=auto 8500
The highlighted number in the output above (on the line that contains the tunneling command we used) is the pid number we’re looking for. We can then pass this to the kill command to close the tunnel:
kill 5275
Conclusion
You should now have a stable way of managing your consul members. The consul cluster can be bootstrapped and started up quickly and easily. Additional nodes can be configured quickly by copying the configuration files (consul config and upstart script) of the existing servers.
Although we now have our consul environment set up in a way that allows us to easily manage our services, we have not yet fully secured our communications. In the next guide, we will focus on how to set up SSL certificate validation in order to encrypt and validate the RPC communications of our members.
Thanks for learning with the DigitalOcean Community. Check out our offerings for compute, storage, networking, and managed databases.
Tutorial Series: Getting Started with Consul
Consul is a distributed, highly-available, data center-aware service discovery solution for servers. In this series, we will discuss how to get up and running with Consul to help manage your infrastructure and maintain up-to-date information about the state of your systems.
About the author
Former Senior Technical Writer at DigitalOcean, specializing in DevOps topics across multiple Linux distributions, including Ubuntu 18.04, 20.04, 22.04, as well as Debian 10 and 11.
Still looking for an answer?
This textbox defaults to using Markdown to format your answer.
You can type !ref in this text area to quickly search our full set of tutorials, documentation & marketplace offerings and insert the link!
Awesome tutorial Justin… Something that should have been part of Consul Documentation. Looking forward for configuration of Health checks and services… If you do get time, could you do a tutorial on Consul-Haproxy for production usage too…
vinit.khandagle: Thanks for the kind words!
Yes, there Consul-Haproxy article on the writing schedule, so we will be getting that out some time in the near future and appending it to this series.
I’m a little confused about the bootstrap node. Earlier in the tutorial, we had a dedicated VM for the bootstrapping, however later server1 was started as the bootstrap node, and then restarted once the others joined. Do I need a dedicated bootstrap node?
And do I have to manually copy the config files to each new server that I start?
On this line of config:
exec consul agent -config-dir /etc/consul.d/client
You can actually add the -client param and avoid to have to run the “ssh -N -f -L 8500:localhost:8500 root@192.0.2.50” command on the local machine where the web-ui will be accessed:
So the config with the -client param included will look like this:
exec consul agent -client 192.0.2.50 -config-dir /etc/consul.d/client
This would enable you to use the web-ui on any remote machine on your network via IP e.g,
@jellingwood not sure if this was a feature at the time you wrote the article, but it is not necessary to download and configure the Consul Web UI separately. Consul comes with it built in and can be enabled with the ui setting. So this would be added to /etc/consul.d/client/config.json:
{
...
  "ui": "true",
...
}
Or you can enable it by setting the command line tag: consul agent -ui
This feature is documented here: https://www.consul.io/intro/getting-started/ui.html
Hello Justin, Thank you for the blog, this really helpful. Trying to setup the consul init script for server and client. I checked the doc what you have provided, seems getting error. Is there working script that I can able to test.
Thank you for your time Mihir M
Hi Justin, I configure the consul.conf as you have mentioned, I am able to start the consul service using command ‘initctl start consul’, but the consul fails to start on bootstrap, the return code 1.
Do you have any ideas of it?
Aug 29 22:41:45 ip-10-0-0-61 init: consul main process (7739) terminated with status 1 Aug 29 22:41:45 ip-10-0-0-61 init: plymouth-shutdown main process (7838) terminated with status 1 Aug 29 22:41:45 ip-10-0-0-61 init: splash-manager main process (7833) terminated with status 1
I am getting the following error when I try to start consul on servers.
start: Unable to connect to Upstart: Failed to connect to socket /com/ubuntu/upstart: Connection refused```

Can you please help ?If someone is interested, I wrote an Ansible role to manage all this configuration:
https://github.com/ish-xyz/consul_management
See ya, Bye
The secret must be a 16-bit base-64 encoded string.
Typo correction, key must be 16-bytes (128-bit).
 This work is licensed under a Creative Commons Attribution-NonCommercial- ShareAlike 4.0 International License.
Become a contributor for community
Get paid to write technical tutorials and select a tech-focused charity to receive a matching donation.

DigitalOcean Documentation
Full documentation for every DigitalOcean product.

Resources for startups and AI-native businesses
The Wave has everything you need to know about building a business, from raising funding to marketing your product.
The developer cloud
Scale up as you grow — whether you're running one virtual machine or ten thousand.

Start building today
From GPU-powered inference and Kubernetes to managed databases and storage, get everything you need to build, scale, and deploy intelligent applications.
