By Liang Zan Wong and Sharon Campbell
Not using Ubuntu 14.04?
Choose a different version or distribution.
Introduction
WebDAV is an extension of the HTTP protocol that allows users to manage files on servers. There are many ways to use a WebDAV server. For example, you can share Word or Excel documents with your colleagues by uploading them to your WebDAV server. You can even share your music collection with your family and friends by simply giving them a URL. All this can be achieved without them installing anything.
There are many ways to manage files on a remote server. WebDAV has several benefits over other solutions such as FTP or Samba. In this article, we will go through how to configure your Apache server to allow native WebDAV access from Windows, Mac, and Linux with authentication.
Why WebDAV?
WebDAV offers several advantages:
- Native integration on all major operating systems(Windows, Mac, Linux); there is no need to install third party software to use WebDAV.
- Support for partial transfers.
- More choices for authentication. Being on HTTP means NTLM, Kerberos, LDAP, etc. are all possible.
Depending on your situation, WebDAV may be the best solution for your needs.
Why Apache?
There are many web servers around that support WebDAV on Linux. However, Apache has the most compliant implementation of the WebDAV protocol out there. At the time of writing, WebDAV on Nginx and Lighttpd works, but only partially.
Prerequisites
You’ll need a Ubuntu 14.04 server.
Before we start, let us first create a user with sudo access. You can run commands as root, but it is not encouraged due to security concerns. There is an excellent article on adding users on Ubuntu 14.04 should you wish to learn more.
Creating a User
When you first create a Digital Ocean instance, you will be given credentials that allows you to log in as root. As root, let us first add a user called alex.
adduser alex
You will be prompted to create a password for the user alex as shown below. There will be further prompts for information about the user alex. You may enter them if you wish.
Adding user `alex' ...
Adding new group `alex' (1000) ...
Adding new user `alex' (1000) with group `alex' ...
Creating home directory `/home/alex' ...
Copying files from `/etc/skel' ...
Enter new UNIX password:
Retype new UNIX password:
passwd: password updated successfully
Changing the user information for alex
Enter the new value, or press ENTER for the default
        Full Name []:
        Room Number []:
        Work Phone []:
        Home Phone []:
        Other []:
Is the information correct? [Y/n] y
Granting sudo Privileges to the User
After creating a new user, the next step is to grant the user alex sudo privileges. Assuming you are still logged in as root, add the user alex to the sudo group by typing in the following command.
usermod -aG sudo alex
Users in the sudo group are granted sudo privileges. Now you can log out and log in as the user alex.
Step One — Installing Apache
Let us get Apache installed.
sudo apt-get update
sudo apt-get install apache2
The Apache web server should be installed and running.
Step Two — Setting Up WebDAV
There are three steps to set up WebDAV. We designate a location, enable the necessary modules, and configure it.
Preparing the Directory
We need to designate a folder for serving WebDAV. We’ll create the new directory /var/www/webdav for this. You will also need to change the owner to www-data (your Apache user) in order to allow Apache to write to it.
sudo mkdir /var/www/webdav
sudo chown -R www-data:www-data /var/www/
Enabling Modules
Next we enable the WebDAV modules using a2enmod
sudo a2enmod dav
sudo a2enmod dav_fs
The Apache modules are found under /etc/apache2/mods-available. This creates a symbolic link from /etc/apache2/mods-available to /etc/apache2/mods-enabled.
Configuration
Open or create the configuration file at /etc/apache2/sites-available/000-default.conf using your favorite text editor.
nano /etc/apache2/sites-available/000-default.conf
On the first line, add the DavLockDB directive configuration:
DavLockDB /var/www/DavLock
And the Alias and Directory directives inside the VirtualHost section:
Alias /webdav /var/www/webdav

<Directory /var/www/webdav>
    DAV On
</Directory>
The file should look like this after editing.
DavLockDB /var/www/DavLock
<VirtualHost *:80>
        # The ServerName directive sets the request scheme, hostname and port that
        # the server uses to identify itself. This is used when creating
        # redirection URLs. In the context of virtual hosts, the ServerName
        # specifies what hostname must appear in the request's Host: header to
        # match this virtual host. For the default virtual host (this file) this
        # value is not decisive as it is used as a last resort host regardless.
        # However, you must set it for any further virtual host explicitly.
        #ServerName www.example.com

        ServerAdmin webmaster@localhost
        DocumentRoot /var/www/html

        # Available loglevels: trace8, ..., trace1, debug, info, notice, warn,
        # error, crit, alert, emerg.
        # It is also possible to configure the loglevel for particular
        # modules, e.g.
        #LogLevel info ssl:warn

        ErrorLog ${APACHE_LOG_DIR}/error.log
        CustomLog ${APACHE_LOG_DIR}/access.log combined

        # For most configuration files from conf-available/, which are
        # enabled or disabled at a global level, it is possible to
        # include a line for only one particular virtual host. For example the
        # following line enables the CGI configuration for this host only
        # after it has been globally disabled with "a2disconf".
        #Include conf-available/serve-cgi-bin.conf

        Alias /webdav /var/www/webdav

        <Directory /var/www/webdav>
            DAV On
        </Directory>
</VirtualHost>

# vim: syntax=apache ts=4 sw=4 sts=4 sr noet
The DavLockDB directive designates the name of the DAV Lock database. It should be a path to a file. The file does not need to be created. The directory should be writeable by the Apache server.
The Alias directive maps requests to http://your.server/webdav to the /var/www/webdav folder.
The Directory directive tells Apache to enable WebDAV for the /var/www/webdav folder. You can find out more about mod_dav from the Apache docs.
If you restart the Apache server, you will have a working WebDAV server without authentication.
Restart the Apache server like this:
sudo service apache2 restart
Testing
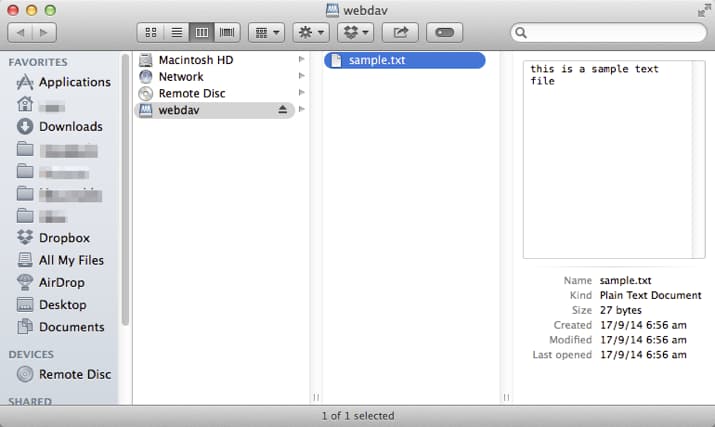
WebDAV without authentication allows only read access for the users. For testing, let us create a sample file.
echo "this is a sample text file" | sudo tee -a /var/www/webdav/sample.txt
A text file called sample.txt should be created in /var/www/webdav. It should contain the text this is a sample text file.
Now we can try logging in from an external computer. The WebDAV server should be found at http://<your.server.com>/webdav. For the sake of brevity, we are only showing how to log in without credentials on a Mac.
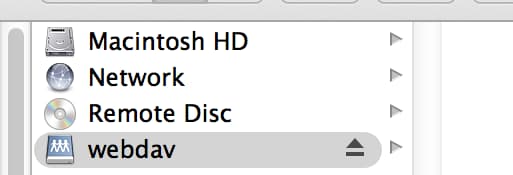
On Mac, open Finder. On the menu bar, find Go and select the option Connect to Server.
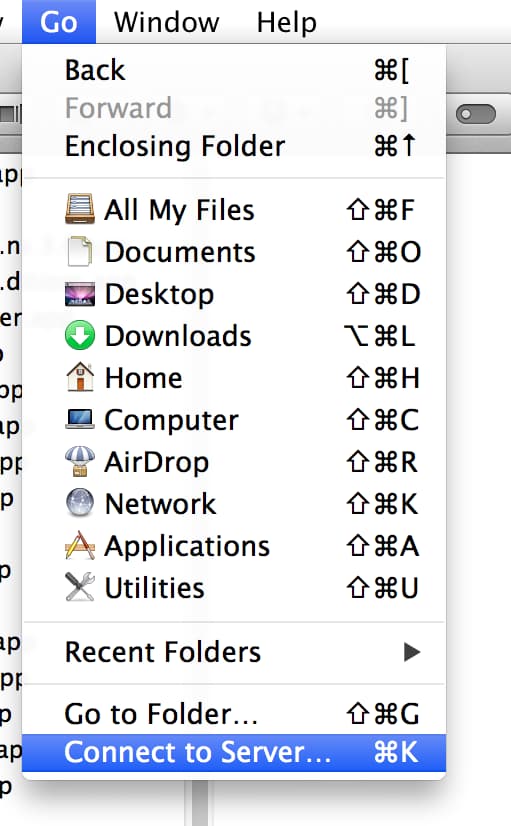
Select the Connect as Guest option. Then, click Connect.

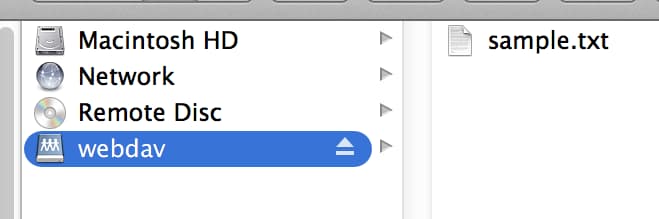
You should be logged in. If you connect to that shared file system and enter the webdav folder, you should be able to see the file sample.txt that was created earlier. The file should be downloadable.
Step Three — Adding Authentication
A WebDAV server without authentication is not secure. In this section we’ll add authentication to your WebDAV server using the Digest authentication scheme.
Basic or Digest Authentication?
There are many authentication schemes available. This table illustrates the compatibility of the various authentication schemes on different operating systems. Note that if you are serving HTTPS, we are assuming your SSL certificate is valid (not self-signed).

If you are using HTTP, use Digest authentication as it will work on all operating systems. If you are using HTTPS, you have the option of using Basic authentication.
We’re going to cover the Digest authentication scheme since it works on all the operating systems without the need for an SSL certificate.
Digest Authentication
Let us generate the file (called users.password) that stores the passwords for the users. In Digest authentication, there is the realm field which acts as a namespace for the users. We will use webdav as our realm. Our first user will be called alex.
To generate the digest file, we have to install the dependencies.
sudo apt-get install apache2-utils
We are going to add users next. Let us generate the user password file using the command below.
sudo htdigest -c /etc/apache2/users.password webdav alex
This adds the user alex to the password file. There should be a password prompt to create the password for alex.
For subsequent addition of users, you should remove the c flag. Here’s another example adding a user called chris. Create a password when prompted.
sudo htdigest /etc/apache2/users.password webdav chris
We also need to allow Apache to read the password file, so we change the owner.
sudo chown www-data:www-data /etc/apache2/users.password
After the password file is created, we should make changes to the configuration at /etc/apache2/sites-available/000-default.conf.
Add the following lines to the Directory directive
AuthType Digest
AuthName "webdav"
AuthUserFile /etc/apache2/users.password
Require valid-user
The final version should look like this (with the comments removed).
DavLockDB /var/www/DavLock

<VirtualHost *:80>
    ServerAdmin webmaster@localhost
    DocumentRoot /var/www/html

    ErrorLog ${APACHE_LOG_DIR}/error.log
    CustomLog ${APACHE_LOG_DIR}/access.log combined

    Alias /webdav /var/www/webdav

    <Directory /var/www/webdav>
        DAV On
        AuthType Digest
        AuthName "webdav"
        AuthUserFile /etc/apache2/users.password
		Require valid-user
    </Directory>
</VirtualHost>
The mod_authn module contains the definitions for the authentication directives.
The AuthType directive instructs Apache that for the /var/www/webdav directory, there should be authentication using the Digest scheme.
Digest authentication requires a value for realm which we set as webdav. Realm acts like a namespace. When you have users which have the same name, you can separate them using different values for realm. We use the AuthName directive to set the value for realm.
The AuthUserFile directive is used to indicate the location of the password file.
The Require directive states that only valid users who authenticate themselves are able to acess that directory.
Finally, enable the Digest module and restart the server for the settings to take effect.
sudo a2enmod auth_digest
sudo service apache2 restart
Step Four - Accessing the Files
We’ll demonstrate how to access your WebDAV server from the native file browsers of Mac, Windows, and Linux (Ubuntu). We are going to demonstrate file and folder operations on just the Mac for the sake of brevity, although you can add, edit, and delete files on the server from all operating systems.
You can also access the files over the Internet using a web browser.
You may need to eject the drive and reconnect to it if you tested it earlier before we added authentication.
Mac
On a Mac, open Finder. On the menu bar, find Go and select the option Connect to Server.

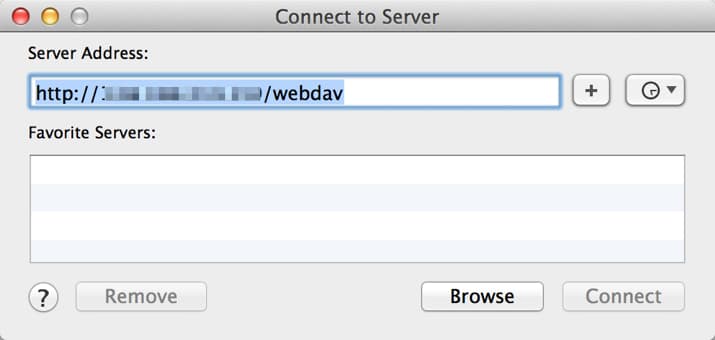
Enter the server address. It should be http://<your.server>/webdav. Press Connect.
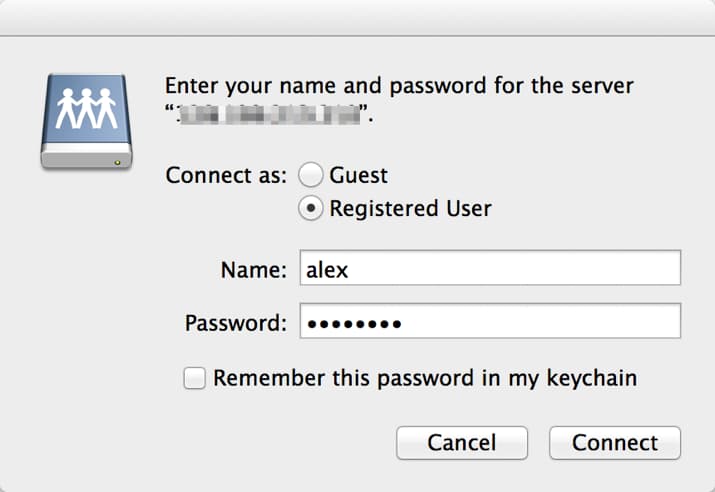
You will be prompted for a username and pssword. Enter one of the users we created on the server and press Connect.
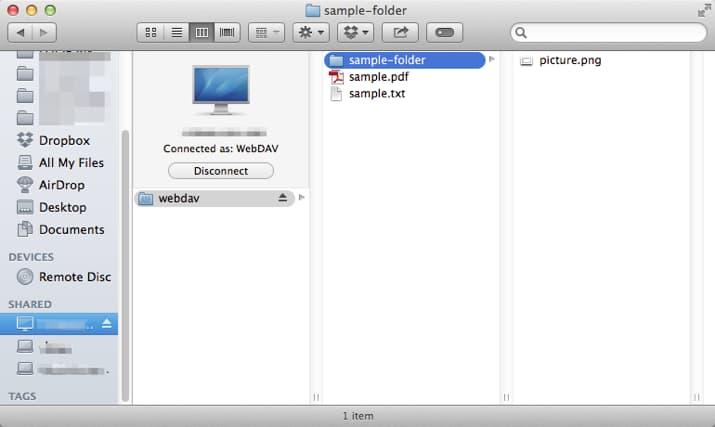
Once you have connected, the directory should appear in Finder.
You can copy and save files to the webdav directory, and create subdirectories. Here is the initial state of the directory on the server:
You can add or rename files and create new directories exactly as normal with Finder. Below is the end result.
Windows
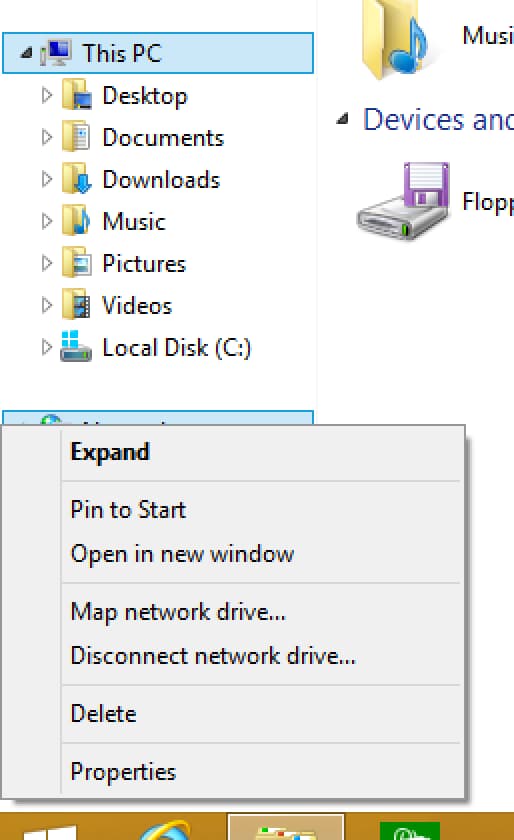
On Windows, open File Explorer. On the left sidebar, you should find the Network icon.
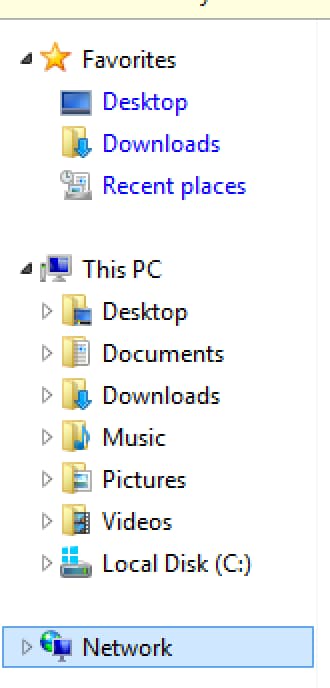
Right click on the Network icon. It should show the context menu with the option Map network drive. Click on that.
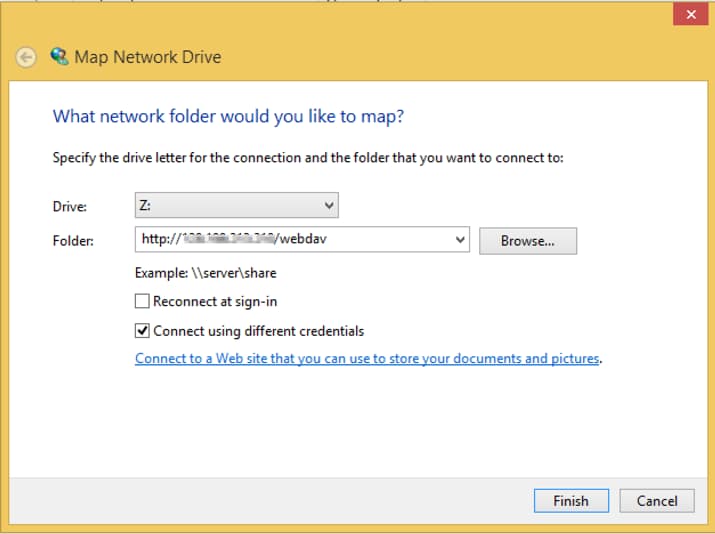
Enter the server address in the folder field. It should be http://<your.server>/webdav. Select the Connect using different credentials if your login is different. Press Finish.
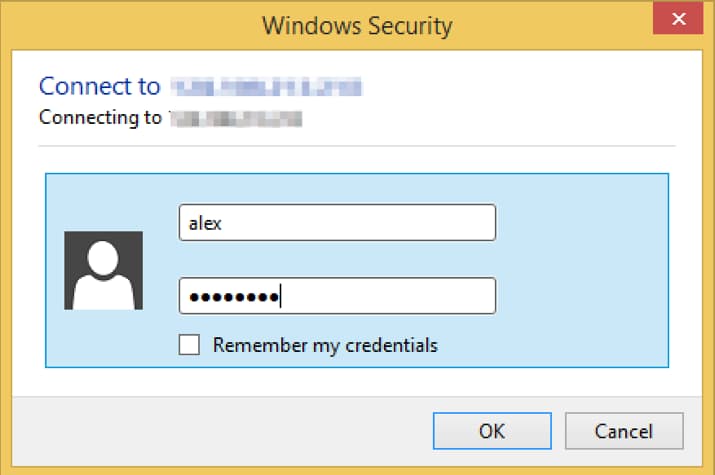
You will be prompted for a username and password. Enter them and press OK.
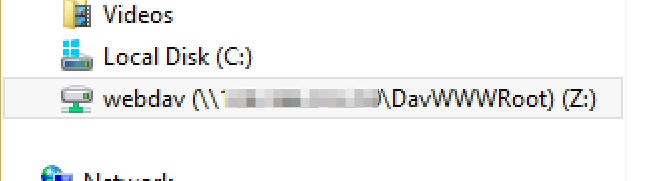
Once you have connected, it should appear as a network drive on the left sidebar of your File Explorer.
Linux (Ubuntu)
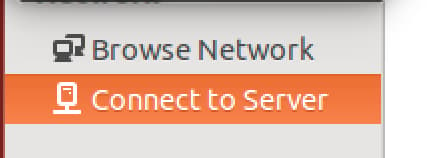
We are using Ubuntu 14.04 as our Linux desktop operating system. On Ubuntu, open Files. THere is a Connect to Server option on the left sidebar. Click on that.
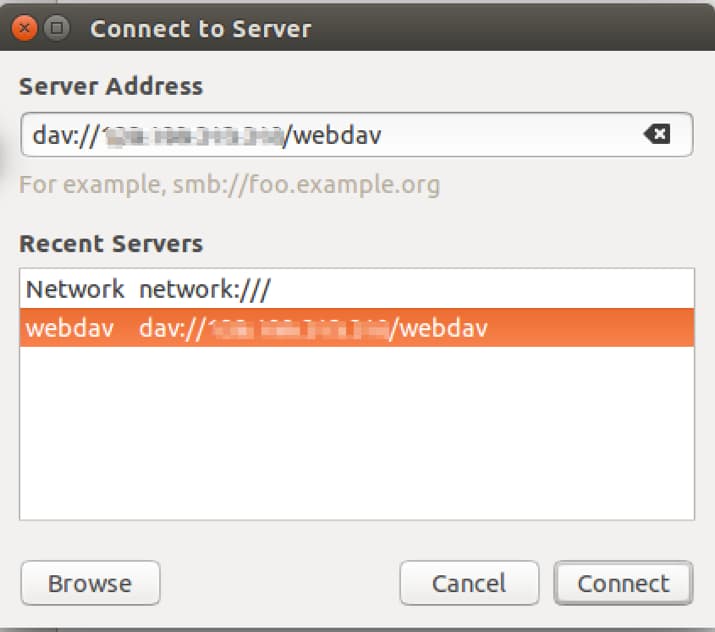
Enter the server address. It should be dav://<your.server>/webdav. Press Connect.
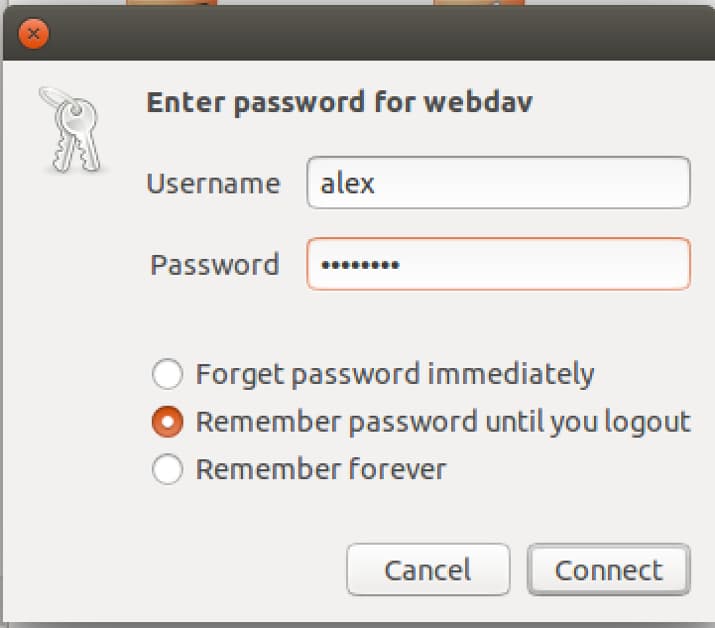
You will be prompted for a username and password. Enter them and press Connect.
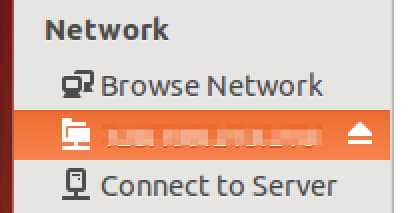
Once you have connected, the directory should appear under the Network listing.
Conclusion
In this article, we have gone through how to set up a WebDAV server using Apache on Ubuntu 14.04. We have also discussed how to configure Digest authentication to secure the server. Lastly, we have shown you how to connect to the WebDAV server from all three major operating systems using their native file browsers.
Thanks for learning with the DigitalOcean Community. Check out our offerings for compute, storage, networking, and managed databases.
About the author(s)
Current fan and former Editorial Manager at DigitalOcean. Hi! Expertise in areas including Ubuntu, Docker, Rails, and more.
Still looking for an answer?
This textbox defaults to using Markdown to format your answer.
You can type !ref in this text area to quickly search our full set of tutorials, documentation & marketplace offerings and insert the link!
Hello!
You wrote:
The Apache modules are found under /etc/apache2/modules-available. This creates a symbolic link from /etc/apache2/modules-available to /etc/apache2/modules-enabled. Configuration
Open the configuration file at /etc/apache2/sites-available/000-default.conf using your favorite text editor.
nano /etc/apache2/sites-available/000-default.conf
I think
/etc/apache2/modules-available
should read
/etc/apache2/mods-available
and
/etc/apache2/modules-enabled
should read
/etc/apache2/mods-enabled
But I don’t have the configuration file
/etc/apache2/sites-available/000-default.conf
I only have
/etc/apache2/sites-available/default

/etc/apache2/sites-available/default-ssl
Can you tell me which one should be edited? Is one of them “your” 000-default.conf file?
Hi tws,
Sorry for the typos. You are correct.
For the question on which file to edit
/etc/apache2/sites-available/default
/etc/apache2/sites-available/default-ssl
You want Apache to load your configuration. Apache will load the configuration if the configuration file is linked from sites-enabled. By default, the existing files in sites-available are linked in sites-enabled. You can edit any one of them. You can even create a new file under sites-available(but make sure you link them in sites-enabled)
I followed this write up line for line on my Ubuntu 14.04 server. I checked twice and three times and I don’t know what my issue is but I can’t get any read/write access to the WebDav server. Tried it on several computers and several OS’s from several locations, no dice. Wish I knew what I was missing…
I would like to create subfolders in the directory /var/www/webdav, for example
/var/www/webdav/calendars/
/var/www/webdav/projectfolderforuserXY/
Now I want to give multiple users access to /calendars/, but not to /projectfolderforuserXY/.
This leads me to the question what the argument “webdav” in your line
/etc/apache2/users.password webdav chris
means.
Is “webdav” the folder name?
When I want to create a new user that has access to /var/www/webdav/calendars/, should I say
"/etc/apache2/users.password webdav calendaruser"
?
I thought about giving the access data to multiple people, so that they would all use the same username and password. Is that a valid approach?
I have recently tried setting webDAV up on a couple of Ubuntu 14.04 servers only to run into a strange problem. My files appear to get uploaded into the directory above the webdav dir, with the webdav dir and the filename combined as the filename. Basically, if I’m uploading myfile.ext into /parent/mydir, the file uploads as /parent/mydirmyfile.ext. The config is:
    <Directory "/var/www/sites/domain/htdocs/">
            Options Indexes FollowSymlinks MultiViews
            AllowOverride None
            Require all granted
    </Directory>
    Alias /htdocs/ "/var/www/sites/domain/htdocs"
    <Location /htdocs/>
            DAV On
            AuthType Digest
            AuthName "DAV"
            AuthDigestProvider file
            AuthUserFile "/var/www/sites/domain/.dav_pw_digest"
            Require valid-user
            ForceType text/plain
    </Location>
if I add a slash to the end of the alias line (before the quotation mark), it breaks the config outright. Removing the quotation marks, with or without the trailing slash, changes nothing. Deleting one or more of the Options set also changes nothing. Moving the stuff in the Location block to the Directory block and eliminating the Location and/or Alias sections breaks the config. I feel like there’s something simple here I’m overlooking but I can’t find the error.
Thanks. Very clear tutorial. Very helpful. Webdav directory, after many false starts, finally up and running. Very appreciated!
This comment has been deleted
Hi,
great guide! Thanks to you I was able to set up webdav on Debian 8.2 with Apache 2.4.1. However, I encountered a permission (403 forbidden) issue but was able to track it down. I had to add
Order allow,deny
Allow from all
to the <Directory> entry. So the whole entry looks like this:
<Directory /var/www/webdav>
Order allow,deny
Allow from all
    DAV On
AuthType Digest
AuthName "webdav"
AuthUserFile /etc/apache2/users.password
Require valid-user
</Directory>
I had to add the code either to 000-default.conf or apache2.conf (both worked). Not sure but perhaps I configured some denial somewhere in the past which was preventing access. Maybe someone will find this helpful or even knows why this occured. In apache2.conf I have listed: <Directory /var/www/> Options Indexes FollowSymLinks AllowOverride All Require all granted </Directory>
Great tutorial. However, I have one word of caution: Ubuntu 14.04 sets DAVLockDB by default so I don’t see the point of messing with its default location: /var/lock/apache2/DAVLock
You can check this for yourselfs:
# cat /etc/apache2/mods-enabled/dav_fs.conf
DAVLockDB ${APACHE_LOCK_DIR}/DAVLock
...
Hi, thanks for this guide.It works now. But I would like to remove the icons.How can I do that?
 This work is licensed under a Creative Commons Attribution-NonCommercial- ShareAlike 4.0 International License.
Become a contributor for community
Get paid to write technical tutorials and select a tech-focused charity to receive a matching donation.

DigitalOcean Documentation
Full documentation for every DigitalOcean product.

Resources for startups and AI-native businesses
The Wave has everything you need to know about building a business, from raising funding to marketing your product.
The developer cloud
Scale up as you grow — whether you're running one virtual machine or ten thousand.

Start building today
From GPU-powered inference and Kubernetes to managed databases and storage, get everything you need to build, scale, and deploy intelligent applications.
