By Erin Glass
Senior Manager, DevEd

Introduction
In this tutorial, you will create a CSS class selector, which will allow you to apply CSS rules only to HTML elements that are assigned the class. CSS class selectors are useful when you want to apply different style rules for different instances of the same HTML element.
Prerequisites
To follow this tutorial, make sure you have set up the necessary files and folders as instructed in a previous tutorial in this series How To Set Up You CSS and HTML Practice Project.
How CSS Class Selectors Work
A CSS class selector allows you to assign style rules to HTML elements that you designate with that class rather than all instances of a certain element. Unlike HTML elements (such as <p>, <h1> or <img>), whose names are predetermined, class names are chosen by the developer when they create the class. Class names are always preceded by a ., which can help you distinguish between tag selectors and class selectors in CSS files.
A CSS rule for a class selector is written in the same way as a rule for a tag selector, with the exception of the . prepended to the class name:
.red-text {
  color: red;
}
To use a class when adding HTML content to your webpage, you must specify it in the opening tag of an HTML element using the class attribute in your HTML document like so:
<h1 class=".red-text">Content.</element>
Creating a CSS Class Using a Class Selector
Let’s begin exploring CSS classes in practice. Erase everything in your styles.css file and add the following code snippet to specify a rule for the class red-text:
.red-text {
  color: red;
}
After adding the code snippet to your styles.css file, save the file.
Return to your index.html and erase everything but the first line of code <link rel="stylesheet" href="css/styles.css"> that links to your CSS stylesheet. Then add the following HTML code snippet:
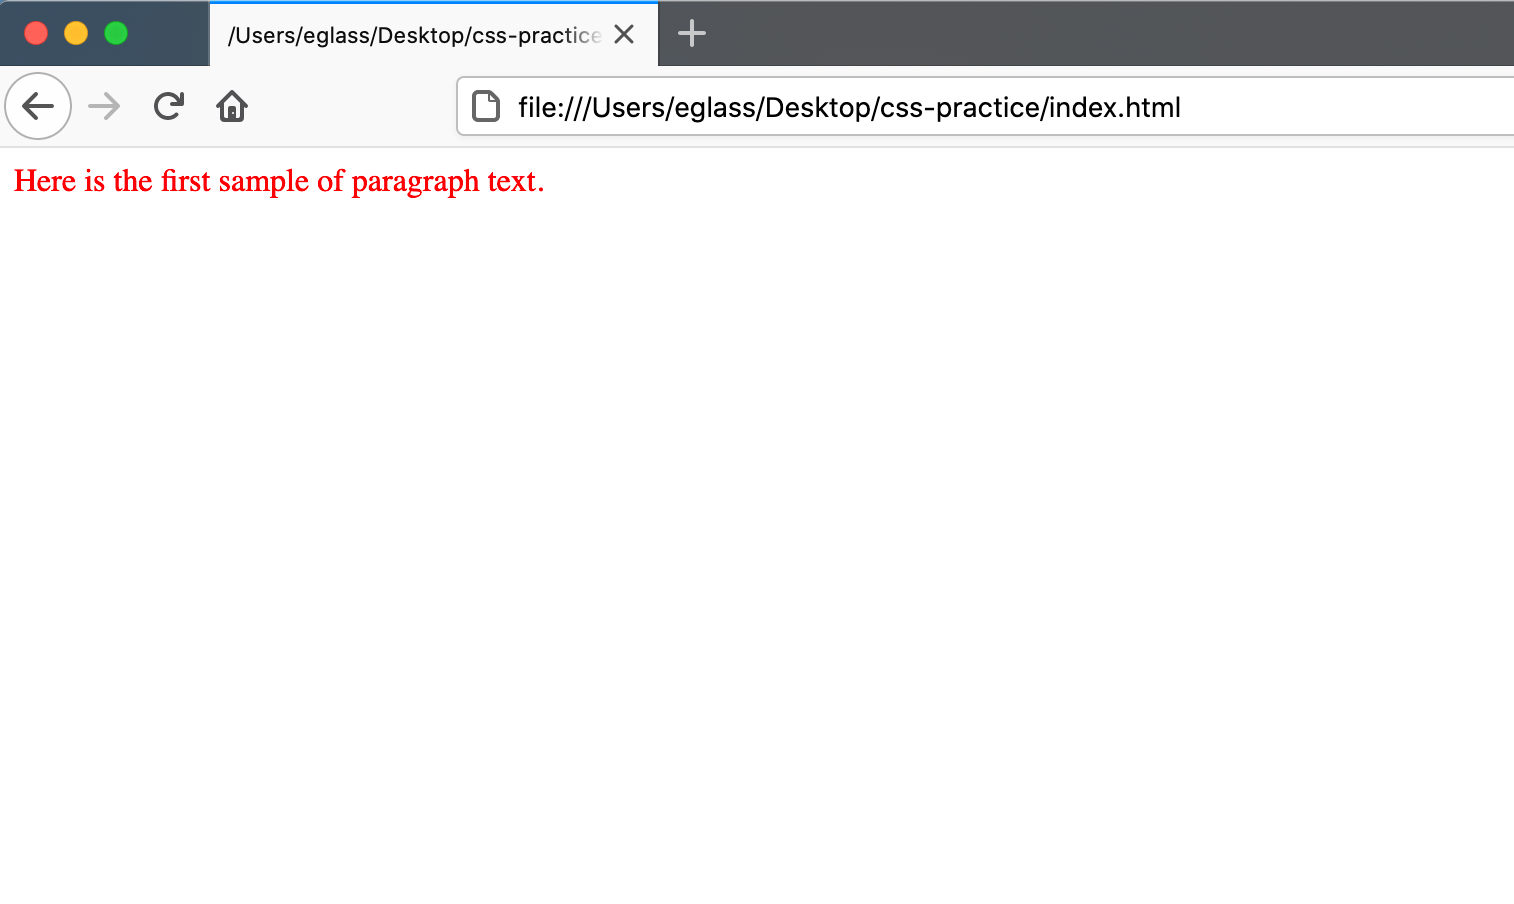
<p class="red-text">Here is the first sample of paragraph text.</p>
Note that the class name is not prepended here with a . as it is when being used as a selector for a CSS rule. Your entire index.html file should have the following contents:
. . .
<link rel="stylesheet" href="css/styles.css">
<p class="red-text" Here is the first sample of paragraph text.</p>
In this code snippet you have added text using the HTML <p> tag. But you have also specified the red-text class by adding the highlighted class attribute class="red-text" inside the opening HTML tag.
Save your index.html file and load it in the browser. (For instructions on loading an HTML file, please visit our tutorial step How To View An Offline HTML File In Your Browser).
You should receive a webpage with red text:
Let’s add an additional CSS class to explore styling different pieces of <p> text content with different classes. Add the following code snippet to your styles.css file (after your CSS rule for “red-text”):
.yellow-background-text {
  background-color: yellow;
}
This CSS rule declares that the class yellow-background-text is assigned the yellow value for the background-color property. Any HTML text element assigned this class will have a yellow background. Note that the use of the word textin the class yellow-background-*text* is for human readability purposes only. You do not need to include the word text in your class names for classes assigned to HTML text.
To apply this new CSS class, return to your index.html file and add the following line of code to the bottom:
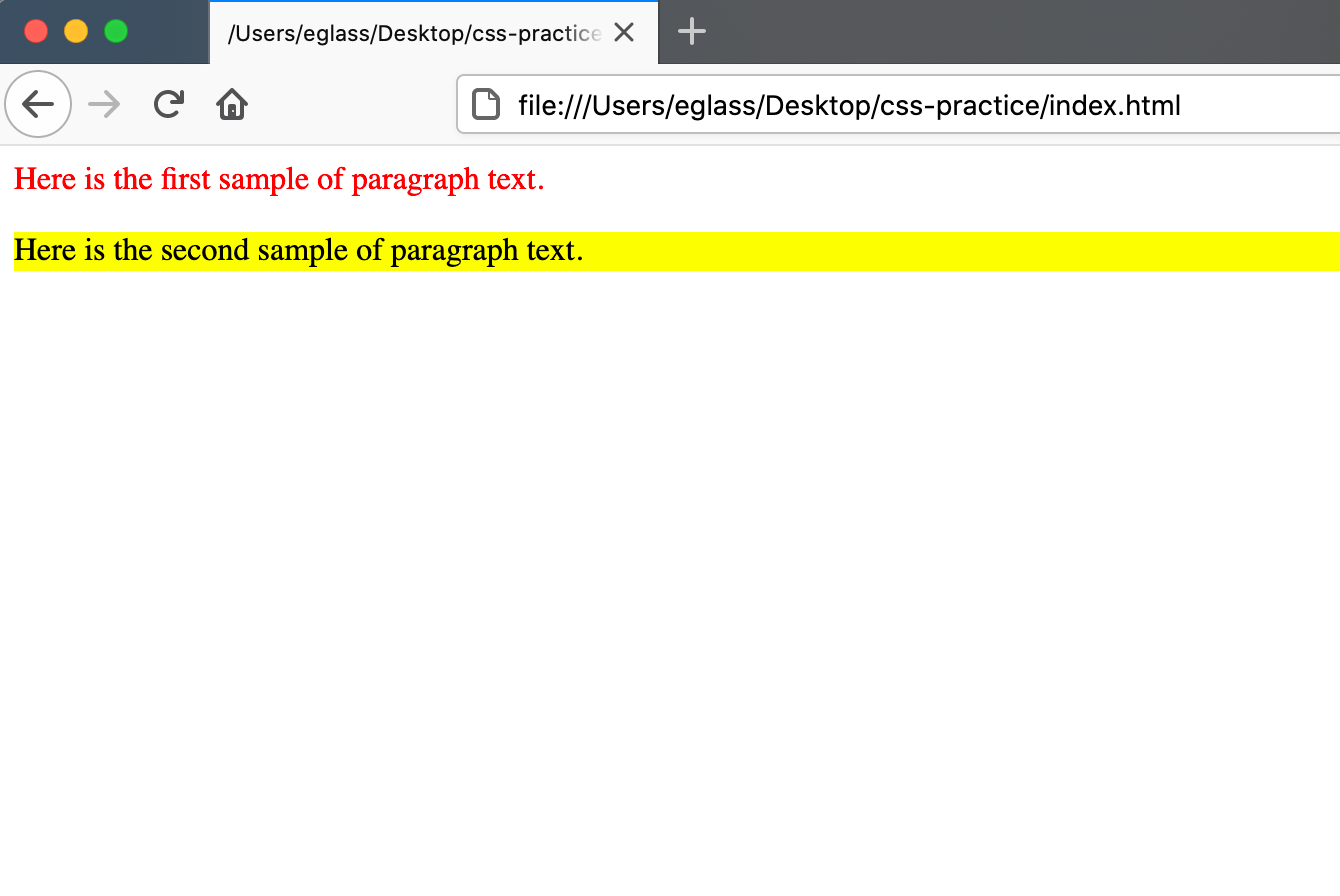
<p class="yellow-background-text"> Here is the second sample of paragraph text.<p>
In this code snippet, you have added some text content with the <p> element and specified the yellow-background-text class. Save the file and reload it in your browser. You should have a webpage with two different sentences, the first one red and the second one with a yellow background:
Note that you can add more than one class to an HTML tag. Try adding both classes to a single text element by adding the following line to your index.html file:
<p class="red-text yellow-background-text">Here is a third sample of text.</p>
Note that the class names are only separated by a space. Save the file and reload it in the browser. You should receive something like this:
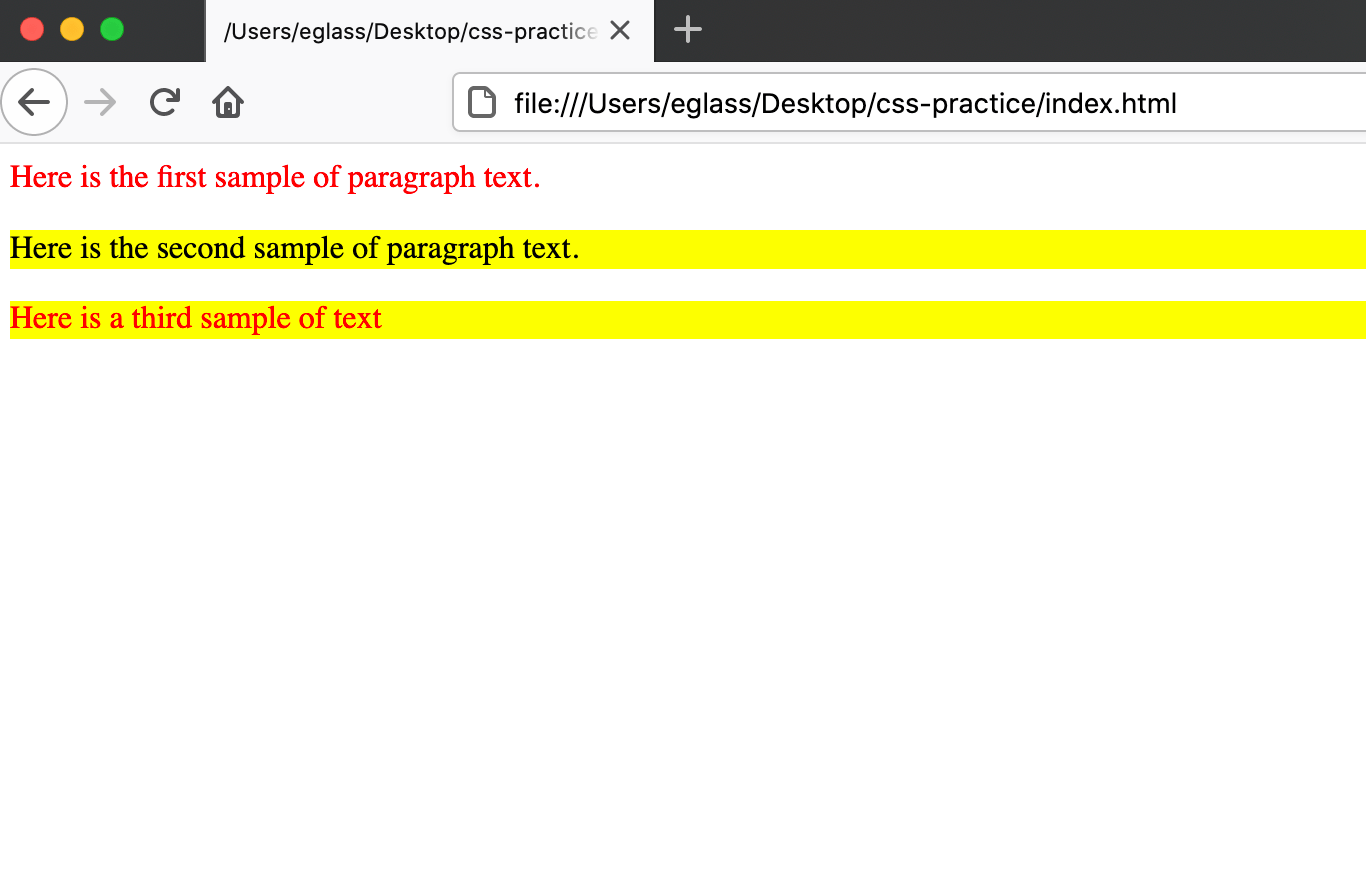
Your third line of text should now be styled according to the property values set in the red-text class and the yellow-background-text class and have a red font and yellow background.
Adding CSS Classes to Images
CSS classes can also be applied to other HTML elements, such as images. To explore using CSS classes for images, erase the content in your styles.css file and add the following code snippet:
.black-img {
  border: 5px dotted black;
  border-radius: 10%;
}

.yellow-img {
  border: 25px solid yellow;
  border-radius: 50%;
}

.red-img {
  border: 15px double red;
}
Here you have created CSS rules for three different classes that can be applied to the HTML <img> tag. Before you move on, let’s briefly study what we’ve declared in each ruleset:
- The first CSS rule declares that the class
black-imgshould have ablack,dottedborder five pixels wide and aborder-radiussized at 10%, which gives the element rounded corners. - The second CSS rule declares that the class
yellow-imgshould have ayellow,solidborder 25 pixels wide and aborder-radiussized at 50%, which gives the element a circular shape. - The third CSS rule declares that the class
red-imgshould have ared,doubleborder 15 pixels wide. You have not set a border-radius, so the border will conform to the element’s shape.
Save the styles.css file. Then erase everything from your index.html file (except for the first line of code: <link rel="stylesheet" href="css/styles.css">) and add the following code snippet:
<img src="https://css.sammy-codes.com/images/small-profile.jpeg" class="black-img">
<img src="https://css.sammy-codes.com/images/small-profile.jpeg" class="yellow-img">
<img src="https://css.sammy-codes.com/images/small-profile.jpeg" class="red-img">
Each of these three lines of HTML code add an image to the HTML document and assign it one of the three classes you just added to the styles.css file. Note that you are sourcing the image from an online location. You can also use your own image by specifying the file path as instructed in our tutorial How To Add Images To Your Webpage With HTML.
Save your index.html file and load it in the browser. You should receive something like this:
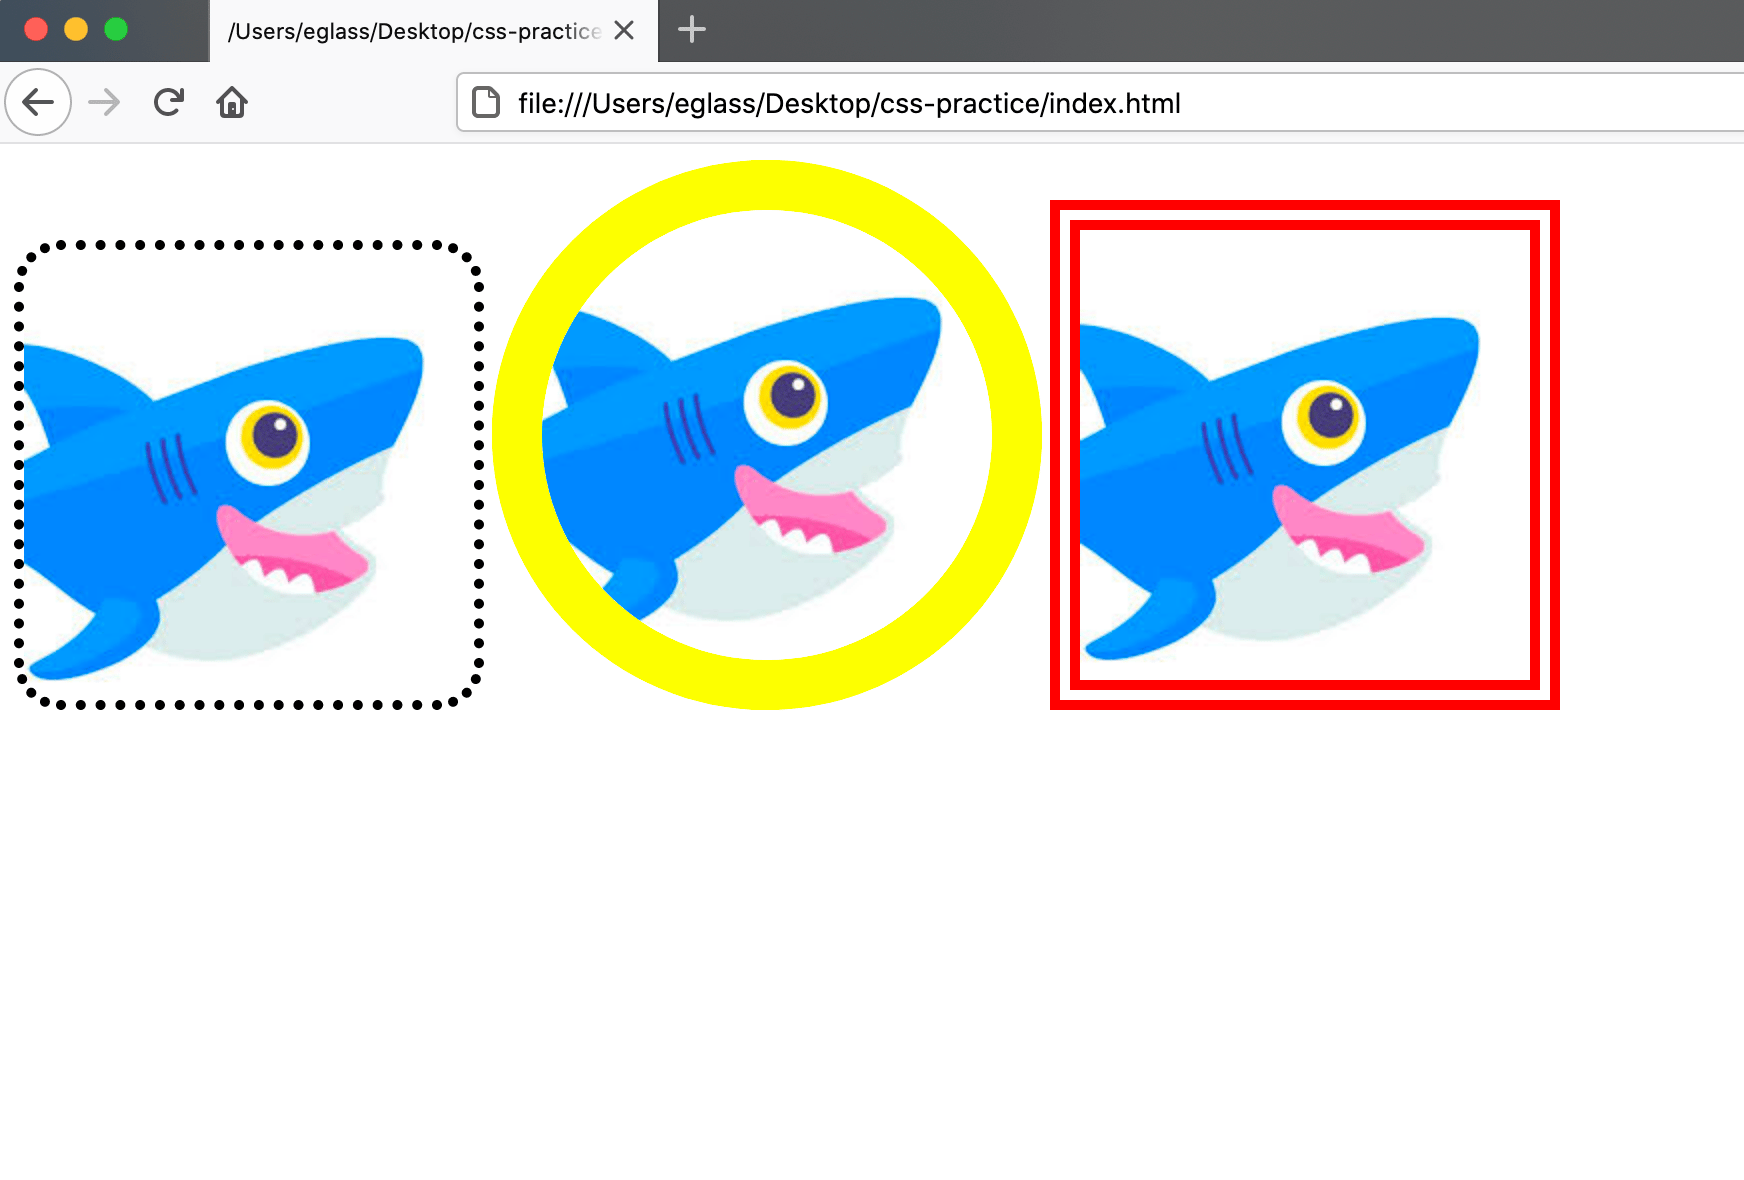
Your webpage should now display three images, each styled with the different specifications of their assigned class.
To continue exploring CSS classes, trying creating new classes with different rulesets and applying them to different types of HTML content. Note that properties and values specified in class declaration blocks will only work on elements that they are intended for. For example, a font-color declaration will not change the color of an image border. Likewise, a height declaration will not change the size of the font.
Conclusion
You have now explored how to create classes, assign them specific property values, and apply them to text and image content. You will return to using classes when you begin building the website in the second half of this tutorial series.
In the next tutorial, you will create CSS ID selectors, which work similarly as class selectors with the exception of some unique features.
Thanks for learning with the DigitalOcean Community. Check out our offerings for compute, storage, networking, and managed databases.
Tutorial Series: How To Build a Website With CSS
This tutorial is part of a series on creating and customizing this website with CSS, a stylesheet language used to control the presentation of websites. You may follow the entire series to recreate the demonstration website and gain familiarity with CSS or use the methods described here for other CSS website projects.
Before proceeding, we recommend that you have some knowledge of HTML, the standard markup language used to display documents in a web browser. If you don’t have familiarity with HTML, you can follow the first ten tutorials of our series How To Build a Website With HTML before starting this series.
Browse Series: 20 tutorials
About the author
Open source advocate and lover of education, culture, and community.
Still looking for an answer?
This textbox defaults to using Markdown to format your answer.
You can type !ref in this text area to quickly search our full set of tutorials, documentation & marketplace offerings and insert the link!
 This work is licensed under a Creative Commons Attribution-NonCommercial- ShareAlike 4.0 International License.
Become a contributor for community
Get paid to write technical tutorials and select a tech-focused charity to receive a matching donation.

DigitalOcean Documentation
Full documentation for every DigitalOcean product.

Resources for startups and AI-native businesses
The Wave has everything you need to know about building a business, from raising funding to marketing your product.
The developer cloud
Scale up as you grow — whether you're running one virtual machine or ten thousand.

Start building today
From GPU-powered inference and Kubernetes to managed databases and storage, get everything you need to build, scale, and deploy intelligent applications.
