
Introduction
The web2py framework is a powerful and easy-to-use tool for quickly developing full-featured Python web applications. With web2py, you can easily develop and manage your applications through the use of an administrative web UI.
In this guide, we will demonstrate how to deploy a web2py application on CentOS 7. We will be using the uWSGI application server to interface with the application with multiple worker processes. In front of uWSGI, we will set up Nginx in a reverse proxy configuration to handle the actual client connections. This is a much more robust deployment strategy than using the web2py server or uWSGI alone.
Prerequisites and Goals
In order to complete this guide, you should have a fresh CentOS 7 server instance with a non-root user with sudo privileges configured. You can learn how to set this up by running through our initial server setup guide.
We will be downloading the web2py framework and testing it to make sure the default application environment functions correctly. Afterwards, we will download and install the uWSGI application container to serve as an interface between requests and the web2py Python code. We will set up Nginx in front of this so that it can handle client connections and proxy requests to uWSGI. We will configure each of our components to start at boot to minimize the need for administrative intervention.
Download the web2py Framework
Our first step will be to download the actual web2py framework. This is maintained in a git repository on GitHub, so the best way to download it is with git itself.
We can download and install git from the default CentOS repositories by typing:
sudo yum install git
Once git is installed, we can clone the repository to our user’s home directory. We can name the application whatever we’d like. In our example, we are using the name myapp for simplicity. We need to add the --recursive flag because the database abstraction layer is handled as its own git submodule:
git clone --recursive https://github.com/web2py/web2py.git ~/myapp
The web2py framework will be downloaded to a directory called myapp within your home directory.
We can test out the default application by moving into the directory:
cd ~/myapp
The administrative interface must be secured by SSL, so we can make a simple self-signed certificate to test this out. Create the server key and certificate by typing:
openssl req -x509 -new -newkey rsa:4096 -days 3652 -nodes -keyout myapp.key -out myapp.crt
You will have to fill out some information for the certificate you are generating. The only part that actually matters in this circumstance is the Common Name field, which should reference your server’s domain name or IP address:
. . .

Country Name (2 letter code) [AU]:US
State or Province Name (full name) [Some-State]:New York
Locality Name (eg, city) []:New York City
Organization Name (eg, company) [Internet Widgits Pty Ltd]:DigitalOcean
Organizational Unit Name (eg, section) []:
Common Name (e.g. server FQDN or YOUR name) []:server_domain_or_IP
Email Address []:admin@email.com
When you are finished, an SSL key and certificate should be in your application directory. These will be called myapp.key and myapp.crt respectively.
With that complete, we can start up the web2py web interface to test it out. To do this, we can type:
python web2py.py -k myapp.key -c myapp.crt -i 0.0.0.0 -p 8000
You will be asked to select a password for the administrative interface.
Now, you can visit your application in your web browser by navigating to:
https://server_domain_or_IP:8000
Make sure you use https instead of http in the above address. You will be warned that your browser does not recognize the SSL certificate:
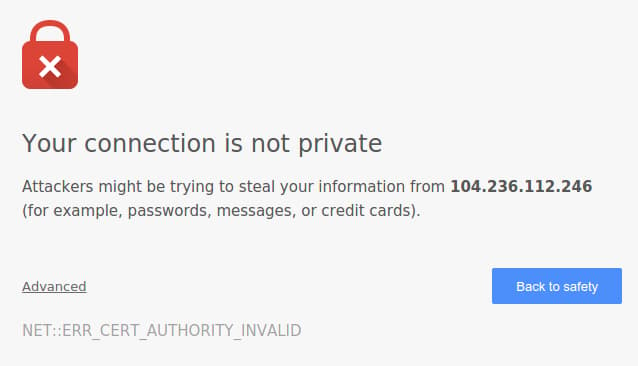
This is expected since we have signed our own certificate. Click on the “Advanced” link or whatever other link your browser gives you and then proceed to the site as planned. You will see the web2py interface:
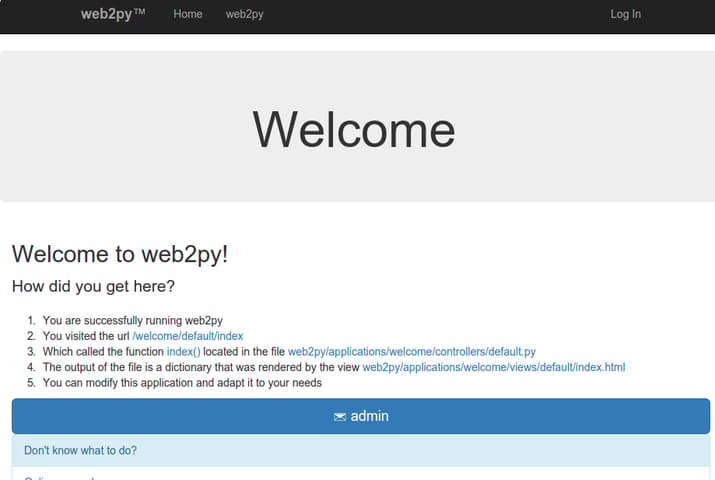
By clicking on the “Administrative Interface” button on the far right, you should be able to input the password you selected when running the server and get to the administrative site:
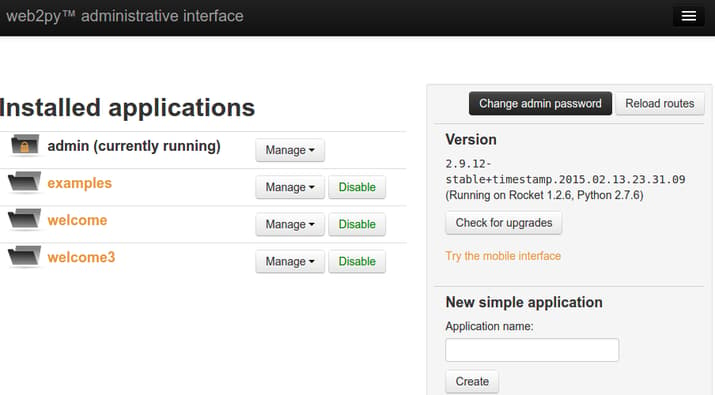
This gives you access to the actual code that is running your applications, allowing you to edit and tweak the files from within the interface itself.
When you are finished looking around, type CTRL-C back in your terminal window. We have tested our application and demonstrated that it can be accessed on the web when the web2py development server is running.
Install and Configure uWSGI
Now that we have the web2py application operational, we can configure uWSGI. uWSGI is an application server that can communicate with applications over a standard interface called WSGI. To learn more about this, read this section of our guide on setting up uWSGI and Nginx on Ubuntu 14.04.
Installing uWSGI
Unlike the guide linked above, in this tutorial, we’ll be installing uWSGI globally. Before we can install uWSGI, we will need to install pip, the Python package manager, and the Python development files that uWSGI relies on. We will also need a compiler to build the actual binary. To get pip, we’ll have to use the EPEL repository, which contains extra packages.
We can activate the EPEL repository by typing:
sudo yum install epel-release
Afterwards, we can install the packages we need by typing
sudo yum install python-devel python-pip gcc
Now we can install uWSGI globally with pip by typing:
sudo pip install uwsgi
The uWSGI application container server interfaces with Python applications using the WSGI inteface specification. The web2py framework includes a file designed to provide this interface within its handlers directory. To use the file, we need to move it out of the directory and into the main project directory:
mv ~/myapp/handlers/wsgihandler.py ~/myapp
With the WSGI handler in the main project directory, we can check that uWSGI is able to serve the application by typing:
uwsgi --http :8000 --chdir ~/myapp -w wsgihandler:application
This should start up the application again on port 8000. This time, since we aren’t using the SSL certificate and key, it will be served over plain HTTP instead of HTTPS. You can test this in your browser again using the http protocol. You will be unable to test the admin interface because web2py disables this when encryption is not available.
When you are finished, type CTRL-C in your terminal window to stop the server.
Creating a uWSGI Configuration File
Now that we know that uWSGI can serve the application, we can create a uWSGI configuration file with our application’s information.
Create a directory at /etc/uwsgi/sites to store our configurations and then move into that directory:
sudo mkdir -p /etc/uwsgi/sites
cd /etc/uwsgi/sites
We will call our configuration file myapp.ini:
sudo nano myapp.ini
In the configuration file, we need to start with a [uwsgi] header under which all of our configuration directives will be placed. After the header, we will indicate the directory path of our application and tell it the module to execute. This will be the same information we used on the command line earlier. You do not need to modify the module line:
[uwsgi]
chdir = /home/user/myapp
module = wsgihandler:application
Next, we need to specify that we want uWSGI to operate in master mode. We want to spawn five worker processes:
[uwsgi]
chdir = /home/user/myapp
module = wsgihandler:application

master = true
processes = 5
Next, we need to specify how we want uWSGI to get connections. In our test of the uWSGI server, we accepted normal HTTP connections. However, since we will be configuring Nginx as a reverse proxy in front of uWSGI, we have other options.
Instead of using a network port, since all of the components are operating on a single server, we can use a Unix socket. This is more secure and offers better performance. This socket will not use HTTP, but instead will implement uWSGI’s uwsgi protocol, which is a fast binary protocol designed for communicating with other servers. Nginx can natively proxy using the uwsgi protocol, so this is our best choice.
We need to set the user who will run the processes to our own user, since we own the files. We will also modify the permissions and ownership of the socket because we will be giving the web server write access. The socket itself will be placed within the /run/uwsgi directory (we’ll create this directory in a bit) where both uWSGI and Nginx can reach it. We’ll set the vacuum option so that the socket file will be automatically cleaned up when the service is stopped:
[uwsgi]
chdir = /home/user/myapp
module = wsgihandler:application

master = true
processes = 5

uid = user
socket = /run/uwsgi/myapp.sock
chown-socket = user:nginx
chmod-socket = 660
vacuum = true
Our uWSGI configuration file is now complete. Save and close the file.
Create a Systemd Unit File for uWSGI
We have created a configuration file for uWSGI, but we still have not set up our application server to start automatically at boot. To implement this functionality, we can create a Systemd unit file.
We will create the unit file in the /etc/systemd/system directory where user-created unit files are kept. We will call our file uwsgi.service:
sudo nano /etc/systemd/system/uwsgi.service
Start with the [Unit] section, which is used to specify metadata. We’ll simply put a description of our service here:
[Unit]
Description=uWSGI Emperor service
Next, we’ll open up the [Service] section. We’ll use the ExecStartPre directive to set up the pieces we need to run our server. This will make sure the /run/uwsgi directory is created and that our normal user owns it with the Nginx group as the group owner. Both mkdir with the -p flag and the chown command return successfully even if they already exist. This is what we want.
For the actual start command, specified by the ExecStart directive, we will point to the uwsgi executable. We will tell it to run in “Emperor mode”, allowing it to manage multiple applications using the files it finds in /etc/uwsgi/sites. We will also add the pieces needed for Systemd to correctly manage the process. These are taken from the uWSGI documentation here:
[Unit]
Description=uWSGI Emperor service

[Service]
ExecStartPre=/usr/bin/bash -c 'mkdir -p /run/uwsgi; chown user:nginx /run/uwsgi'
ExecStart=/usr/bin/uwsgi --emperor /etc/uwsgi/sites
Restart=always
KillSignal=SIGQUIT
Type=notify
NotifyAccess=all
Now, all we need to do is add the [Install] section. This allows us to specify when the service should be automatically started. We will tie our service to the multi-user system state. Whenever the system is set up for multiple users (the normal operating condition), our service will be activated:
[Unit]
Description=uWSGI Emperor service

[Service]
ExecStartPre=/usr/bin/bash -c 'mkdir -p /run/uwsgi; chown user:nginx /run/uwsgi'
ExecStart=/usr/bin/uwsgi --emperor /etc/uwsgi/sites
Restart=always
KillSignal=SIGQUIT
Type=notify
NotifyAccess=all

[Install]
WantedBy=multi-user.target
When you are finished with this, save and close the file.
We will be unable to start the service successfully at this point because it relies on the nginx user being available. We will have to wait to start the uWSGI service until after Nginx is installed.
Install and Configure Nginx as a Reverse Proxy
With uWSGI configured and ready to go, we can now install and configure Nginx as our reverse proxy. This can be downloaded with yum by typing:
sudo yum install nginx
Once Nginx is installed, we can go ahead and modify the server block configuration. We will edit the main Nginx configuration file:
sudo nano /etc/nginx/nginx.conf
The web2py application detects whether you are connecting with plain HTTP or with SSL encryption. Because of this, our file will actually contain one server block for each. We will start with the server block that is configured to operate on port 80.
Change the server_name to reference the domain name or IP address where your site should be accessible. Afterwards, we will create a location {} block that will match requests for static content. Basically, we want to use regular expressions to match requests ending with /static/ with a preceding path component. We want to map these requests to the applications directory within our web2py project. Make sure you reference your user’s home directory and app name:
server {
    listen                  80 default_server;
    server_name             server_domain_or_IP;
    root                    /usr/share/nginx/html;

    include /etc/nginx/default.d/*.conf;

    location ~* /(\w+)/static/ {
        root /home/user/myapp/applications/;
    }

    . . .
Afterwards, we need to adjust the location / {} block to pass requests to our uWSGI socket. We just need to include the uWSGI parameter file packaged with Nginx and pass the requests to the socket we configured (in our uWSGI .ini file):
server {
    listen                  80 default_server;
    server_name             server_domain_or_IP;
    root                    /usr/share/nginx/html;

    include /etc/nginx/default.d/*.conf;

    location ~* /(\w+)/static/ {
        root /home/user/myapp/applications/;
    }

    location / {
        include uwsgi_params;
        uwsgi_pass unix:/home/user/myapp/myapp.sock;
    }
}

    . . .
This will be all that we need for our first server block.
At the bottom of the file, but inside the closing http {} block bracket, make another server {} block. We will use this to configure SSL connections.
Start with the basics. This server block will listen for connections on port 443, the default SSL port. We will set the server’s domain name or IP address, just as we did for the port 80 server block. To start the actual SSL configuration, we’ll specify that SSL should be on for this block and we’ll indicate the path to the SSL certificate and key that should be used to encrypt the connection. We’ll be moving the files there momentarily:
http {
    . . .
    server {
        listen 80;
        . . .
    }
    server {
        listen 443;
        server_name server_domain_or_IP;

        ssl on;
        ssl_certificate /etc/nginx/ssl/myapp.crt;
        ssl_certificate_key /etc/nginx/ssl/myapp.key;
    }
}
We’ll continue on with a bit of SSL boilerplate meant to establish the accepted protocols and ciphers. Afterwards, we can set up the same location / {} block we configured in the port 80 server block:
http {
    . . .
    server {
        listen 80;
        . . .
    }
    server {
        listen 443;
        server_name server_domain_or_IP;

        ssl on;
        ssl_certificate /etc/nginx/ssl/myapp.crt;
        ssl_certificate_key /etc/nginx/ssl/myapp.key;

        ssl_protocols TLSv1 TLSv1.1 TLSv1.2;
        ssl_ciphers "HIGH:!aNULL:!MD5 or HIGH:!aNULL:!MD5:!3DES";
        ssl_prefer_server_ciphers on;

        location / {
            include uwsgi_params;
            uwsgi_pass unix:/run/uwsgi/myapp.sock;
        }
    }
}
You should now have two server blocks configured in this file. Save and close it when you are finished.
Final Steps
Next, we need to move the SSL certificates to the directory we specified. Create the directory first:
sudo mkdir -p /etc/nginx/ssl
Now, move the certificate and key you created to that directory. If you have an SSL certificate signed by a commercial certificate authority, you can substitute the certificate and corresponding key here in order to avoid untrusted SSL certificate warnings for your visitors:
sudo mv ~/myapp/myapp.crt /etc/nginx/ssl
sudo mv ~/myapp/myapp.key /etc/nginx/ssl
Modify the permissions so non-root users cannot access that directory:
sudo chmod 700 /etc/nginx/ssl
The nginx user must have access to our applications directory so that it can directly serve static files as necessary. CentOS locks down each user’s home directory very restrictively, so we will add the nginx user to our user’s group so that we can then open up the minimum permissions necessary to get this to function.
Add the nginx user to your group by typing this. Substitute your username for the user in the command below:
sudo usermod -a -G user nginx
Now, we will give our user group execute permissions on our directory, which will allow the Nginx process to enter and access content within:
chmod 710 /home/user
Now, check your Nginx configuration file for syntax errors:
sudo nginx -t
If no syntax errors are reported, we can go ahead and start the Nginx:
sudo service nginx start
We can also start our uWSGI service:
sudo service uwsgi start
The last thing we need to do is copy our application’s parameters file so that it will be read correctly when serving connections on port 443. This contains the password we configured for the administrative interface. We just need to copy it to a new name that indicates port 443 instead of port 8000:
cp ~/myapp/parameters_8000.py ~/myapp/parameters_443.py
With that, you should be able to access your server using your server’s domain name or IP address. Use https if you wish to sign into the administrative interface.
If everything goes well, you can enable Nginx and uWSGI to start at boot by typing:
sudo systemctl enable nginx
sudo systemctl enable uwsgi
Conclusion
In this guide, we’ve set up a sample web2py project to practice deployment. We’ve configured uWSGI to act as an interface between our application and client requests. We then set up Nginx in front of uWSGI to allow for SSL connections and to efficiently process client requests.
The web2py project simplifies the development of sites and web applications by providing a workable web interface from the very beginning. By leveraging the general tool chain described in this article, you can easily serve the applications you create from a single server.
Thanks for learning with the DigitalOcean Community. Check out our offerings for compute, storage, networking, and managed databases.
About the author
Former Senior Technical Writer at DigitalOcean, specializing in DevOps topics across multiple Linux distributions, including Ubuntu 18.04, 20.04, 22.04, as well as Debian 10 and 11.
Still looking for an answer?
This textbox defaults to using Markdown to format your answer.
You can type !ref in this text area to quickly search our full set of tutorials, documentation & marketplace offerings and insert the link!
Hi Justin,
thanks a lot for this great guide!
I was following it on CentOS7 but had to do some additional steps because of SELinux enabled (the move of the certificates needed a restorecon and the socket is not accessible by nginx by default). Would be great if you can also include this information.
Petr
How would I go about making it so Nginx loads Web2Py from a subdirectory? For example, how could I set it to load on domain.tld/web2py/ instead of just domain.tld?
I followed this tutorial, but at the end my site have shown nginx error page. There is a line that points to nonexistent file /home/user/myapp/myapp.sock while setting up nginx for port 80. All went well when I replaced it with /run/uwsgi/myapp.sock used for port 443 after.
Anyway, thanks for this tutorial.
Hi Justin, thank you for this great guide.
Although I have done all the steps with no error, I see Nginx default index.html when I go to my IP or domain in browser. What should I do to have access to Web2py admin, or applications?
 This work is licensed under a Creative Commons Attribution-NonCommercial- ShareAlike 4.0 International License.
Become a contributor for community
Get paid to write technical tutorials and select a tech-focused charity to receive a matching donation.

DigitalOcean Documentation
Full documentation for every DigitalOcean product.

Resources for startups and AI-native businesses
The Wave has everything you need to know about building a business, from raising funding to marketing your product.
The developer cloud
Scale up as you grow — whether you're running one virtual machine or ten thousand.

Start building today
From GPU-powered inference and Kubernetes to managed databases and storage, get everything you need to build, scale, and deploy intelligent applications.
