By Vadym Kalsin and Sharon Campbell

Introduction
Network Documentation Tool (Netdot) is an open source tool which can help network administrators collect, organize, and maintain network documentation.
Basic capabilities:
- Discover and poll devices using SNMP
- Discover and build L2 topology using different sources: CDP, LLDP, STP, and switch forwarding tables
- Asset management
- IP address management for v4 and v6
- DHCP management
- DNS management
- Cable management: closets, rooms, sockets, connections within and between buildings, etc.
- Contact management: administrators, operators, departments, providers, vendors, etc.
- Export settings for external tools: Nagios, RANCID, Cacti, BIND, etc.
See the Netdot project’s site.
In this tutorial, we’ll show you how to add devices to Netdot, and how to use it to map and manage your IP address space.
Prerequisites
Before you get started, make sure you’ve completed these steps.
- Deploy a CentOS 7 Droplet
- Add a sudo user by following the Initial Server Setup
- Add swap space to your server; the example 4 GB amount is fine
- Install LAMP software, since Netdot requires web and database servers
- Make a note of your root MySQL password; you’ll need it in this tutorial
- Enable the EPEL (Extra Packages for Enterprise Linux) repository:
wget http://dl.fedoraproject.org/pub/epel/7/x86_64/e/epel-release-7-2.noarch.rpm
sudo rpm -ivh epel-release-7-2.noarch.rpm
More information about the EPEL repo is available here.
- Install these prerequisite tools that will allow you to compile other packages:
sudo yum install make gcc gcc-c++ autoconf automake rpm-build openssl-devel git perl perl-CPAN perl-Inline
- Install dnssec-tools manually (you may want to use a different method if you’re concerned about skipping the certificate check):
wget --no-check-certificate https://www.dnssec-tools.org/download/dnssec-tools-2.1-1.fc22.src.rpm -O /tmp/dnssec-tools.src.rpm
rpmbuild --rebuild /tmp/dnssec-tools.src.rpm
cd ~/rpmbuild/RPMS/x86_64/
sudo rpm -ivh --nodeps dnssec-tools-*
Installation
In the first part of this tutorial, we’ll install and access Netdot.
Step 1 — Clone the Netdot Repository
Get the latest source for Netdot from GitHub:
cd /usr/local/src/
sudo git clone https://github.com/cvicente/Netdot.git netdot
Step 2 — Install Dependencies
Now you need to install the dependencies. We’ll do this with the script included with Netdot, which uses the package manager yum to install quite a few dependencies.
First navigate to the directory where you extracted the files from the Netdot repository:
cd /usr/local/src/netdot/
Run the installation script:
sudo make rpm-install
The prompt will ask you which database you want to use. The answer is marked in red:
Installing required RPM packages
/usr/bin/perl bin/perldeps.pl rpm-install

Which RDBMS do you plan to use as backend: [mysql|Pg]? mysql
Then the script will install the necessary modules. At the end you’ll see this summary, which shows that some installed and some didn’t:
Complete!

===============RESULTS===============
RRDs..............................................ok
GraphViz..........................................ok
Module::Build.....................................ok
CGI...............................................MISSING
Class::DBI........................................MISSING
Class::DBI::AbstractSearch........................MISSING
Apache2::Request..................................ok
HTML::Mason.......................................MISSING
Apache::Session...................................MISSING
URI::Escape.......................................ok
SQL::Translator...................................MISSING
SNMP::Info 2.06...................................ok
NetAddr::IP 4.042.................................ok
Apache2::AuthCookie...............................MISSING
Apache2::SiteControl..............................MISSING
Log::Dispatch.....................................ok
Log::Log4perl.....................................ok
Parallel::ForkManager.............................ok
Net::Patricia 1.20................................MISSING
Authen::Radius....................................MISSING
Test::Simple......................................MISSING
Net::IRR..........................................MISSING
Time::Local.......................................ok
File::Spec........................................ok
Net::Appliance::Session...........................MISSING
BIND::Config::Parser..............................MISSING
Net::DNS..........................................ok
Text::ParseWords..................................ok
Carp::Assert......................................ok
Digest::SHA.......................................ok
Net::DNS::ZoneFile::Fast..........................ok
Socket6...........................................ok
XML::Simple.......................................ok
DBD::mysql........................................ok

If there are still any missing Perl modules, you can try:

make installdeps
So you have to install the missing Perl modules:
sudo make installdeps
The prompt will ask you some questions. Answers are marked in red:
Installing required Perl modules
/usr/bin/perl bin/perldeps.pl install

Which RDBMS do you plan to use as backend: [mysql|Pg]? mysql

CPAN.pm requires configuration, but most of it can be done automatically.
If you answer 'no' below, you will enter an interactive dialog for each
configuration option instead.

Would you like to configure as much as possible automatically? [yes] ENTER

 <install_help>

Warning: You do not have write permission for Perl library directories.

To install modules, you need to configure a local Perl library directory or
escalate your privileges.  CPAN can help you by bootstrapping the local::lib
module or by configuring itself to use 'sudo' (if available).  You may also
resolve this problem manually if you need to customize your setup.

What approach do you want?  (Choose 'local::lib', 'sudo' or 'manual')
 [local::lib] ENTER

Autoconfigured everything but 'urllist'.

Now you need to choose your CPAN mirror sites.  You can let me
pick mirrors for you, you can select them from a list or you
can enter them by hand.

Would you like me to automatically choose some CPAN mirror
sites for you? (This means connecting to the Internet) [yes] ENTER
The script may ask you to create a fake password for testing purposes. You can skip that part.
This will take 10-15 minutes to complete. The script will install the missing modules. At the end, you should see that every module installed successfully:
===============RESULTS===============
RRDs..............................................ok
GraphViz..........................................ok
Module::Build.....................................ok
CGI...............................................ok
Class::DBI........................................ok
Class::DBI::AbstractSearch........................ok
Apache2::Request..................................ok
HTML::Mason.......................................ok
Apache::Session...................................ok
URI::Escape.......................................ok
SQL::Translator...................................ok
SNMP::Info 2.06...................................ok
NetAddr::IP 4.042.................................ok
Apache2::AuthCookie...............................ok
Apache2::SiteControl..............................ok
Log::Dispatch.....................................ok
Log::Log4perl.....................................ok
Parallel::ForkManager.............................ok
Net::Patricia 1.20................................ok
Authen::Radius....................................ok
Test::Simple......................................ok
Net::IRR..........................................ok
Time::Local.......................................ok
File::Spec........................................ok
Net::Appliance::Session...........................ok
BIND::Config::Parser..............................ok
Net::DNS..........................................ok
Text::ParseWords..................................ok
Carp::Assert......................................ok
Digest::SHA.......................................ok
Net::DNS::ZoneFile::Fast..........................ok
Socket6...........................................ok
XML::Simple.......................................ok
DBD::mysql........................................ok
All the necessary Perl modules are installed! Now you can proceed to the next step.
Step 3 — Configure the SNMP Service
We need to configure SNMP on this server so Netdot can monitor it. You’ll need to configure SNMP on other networking devices that you want Netdot to monitor as well, but for this tutorial, we’ll just monitor this Droplet itself.
First, you have to install Netdisco MIBs. Install SNMP supporting packages:
sudo yum install net-snmp net-snmp-utils
Download the Netdisco files and extract them:
wget http://downloads.sourceforge.net/project/netdisco/netdisco-mibs/latest-snapshot/netdisco-mibs-snapshot.tar.gz -P /tmp
sudo tar -zxf /tmp/netdisco-mibs-snapshot.tar.gz -C /usr/local/src
Make a new directory for Netdisco and move/copy the needed files:
sudo mkdir /usr/local/netdisco
sudo mv /usr/local/src/netdisco-mibs /usr/local/netdisco/mibs
sudo cp /usr/local/netdisco/mibs/snmp.conf /etc/snmp/
Edit the configuration file:
sudo vi /etc/snmp/snmp.conf
Comment out the lines with unnecessary vendors to save memory and time by adding a hash mark in front of them (#). You’ll want to leave the netdisco lines active and comment out all the others:
. . .

mibdirs /usr/local/netdisco/mibs/rfc
mibdirs +/usr/local/netdisco/mibs/net-snmp
mibdirs +/usr/local/netdisco/mibs/cisco

# mibdirs +/usr/local/netdisco/mibs/3com
# mibdirs +/usr/local/netdisco/mibs/aerohive
# mibdirs +/usr/local/netdisco/mibs/alcatel
# mibdirs +/usr/local/netdisco/mibs/allied
# mibdirs +/usr/local/netdisco/mibs/apc
# mibdirs +/usr/local/netdisco/mibs/arista

. . .

# mibdirs +/usr/local/netdisco/mibs/sonicwall
# mibdirs +/usr/local/netdisco/mibs/trapeze
# mibdirs +/usr/local/netdisco/mibs/xirrus

. . .
Finally, you need to start the SNMP service:
sudo systemctl start snmpd.service
Learn more about SNMP in the tutorial series Monitoring and Managing your Network with SNMP. You’ll want to consult that tutorial series when you add more devices to Netdot.
Step 4 — Configure Database Settings for Netdot
Netdot comes with a configuration file that you need to customize to your needs. Create a copy of Default.conf with the name Site.conf:
sudo cp /usr/local/src/netdot/etc/Default.conf /usr/local/src/netdot/etc/Site.conf
Then, you can modify the file Site.conf to reflect your specific options.
sudo vi /usr/local/src/netdot/etc/Site.conf
The complete file isn’t shown here. You have to locate the following variables, and update them to match your settings:
DB_TYPE => 'mysql'
DB_DBA => 'root',
DB_DBA_PASSWORD => 'rootpass',
DB_HOST => 'localhost',
DB_DATABASE => 'netdot',
DB_NETDOT_USER => 'netdot_user',
DB_NETDOT_PASS => 'netdot_pass',
Most of the default settings are fine.
DB_DBA: The MySQL user which has the right to create databases; should be root in most casesDB_DBA_PASSWORD: MySQL password for rootDB_DATABASE: Name of the database you want to create for NetdotDB_NETDOT_USER: Netdot database user you want to createDB_NETDOT_PASS: Set a unique password for the Netdot database user
You don’t have to create the Netdot database or user manually. The installation process will read the values from this file and create the appropriate database and user.
Note: If you modify the configuration file in the future, you must restart Apache for the changes to take effect.
sudo systemctl restart httpd.service
Step 5 — Install Netdot
Initialize the database:
sudo make installdb
Then install Netdot:
sudo make install PREFIX=/usr/local/netdot APACHEUSER=apache APACHEGROUP=apache
Step 6 — Finish the Installation
The only thing left to configure after a successful installation of Netdot is the Apache server.
Copy the configuration file in the directory with the Apache settings:
sudo cp /usr/local/netdot/etc/netdot_apache24_local.conf /etc/httpd/conf.d/
Restart Apache:
sudo systemctl restart httpd.service
Step 7 - Set Up Cron Jobs
Netdot has several scripts that should be run periodically. Copy the sample crontab file to your cron.d directory:
sudo cp /usr/local/src/netdot/netdot.cron /etc/cron.d/netdot
The installation is complete.
Step 8 — Access Netdot
Launch your browser and go to the address http://your_server_ip/netdot.
Log in with the default user name and password, which are both admin.
Make sure you change the password right away!
Use Netdot to Document Your Network
In this section we’ll introduce Netdot and show you how to add devices and use it to manage your IPs.
Once you are logged in you will see the following:

Netdot’s interface is quite simple. Let’s look at the basic tasks you can perform with it.
Collect Data from Devices
First we need to add your network devices. They can be added in several ways:
- One at a time, using a script
- By scanning devices in a given subnet
- By scanning devices listed in a file
- Manually using the Netdot control panel
Poll one device using a script
This is the method we’ll use to add this Droplet’s own information to Netdot.
This command will run the script to get the data from single host:
/usr/local/netdot/bin/updatedevices.pl -H your_server_ip -I -c snmp community
For example, you can add the server on which the Netdot is installed with this command:
/usr/local/netdot/bin/updatedevices.pl -H localhost -I -c public
Go ahead and run this command. You should see output like the following:
INFO - /usr/local/netdot/bin/updatedevices.pl started at Wed Nov  5 09:49:39 2014
INFO - Updating single device: localhost
INFO - Inserted new RR: localhost.defaultdomain
INFO - Inserting new Device: localhost
INFO - localhost.defaultdomain: SNMP target address set to 127.0.0.1
INFO - localhost.defaultdomain: Interface 1 (lo) updated
INFO - localhost.defaultdomain: Interface 2 (eno16777728) updated
INFO - localhost.defaultdomain [eno16777728]: Inserted new IP fe80::20c:29ff:fe20:4f53
INFO - localhost.defaultdomain [eno16777728]: Inserted new IP 192.168.176.128
INFO - Device::snmp_update: localhost.defaultdomain: Finished updating
INFO - /usr/local/netdot/bin/updatedevices.pl total runtime: 18 sec
Scan devices in a given subnet
This method uses the same script to scan all the devices in a given subnet:
/usr/local/netdot/bin/updatedevices.pl -B 111.111.111.0/24 -I -c snmp community
Scan devices listed in a file
You might find it helpful to list all of your devices in a simple text file. The file should contain a list of devices (hostnames or IPs) and their SNMP communities, one per line:
host1.sample community1
host2.sample community2
host3.sample community2
host4.sample community3

. . .
Then you can use the Netdot script to scan all the devices listed in the file:
/usr/local/netdot/bin/updatedevices.pl -E /path/to/file
You can use the following command to get the full list of the script parameters:
/usr/local/netdot/bin/updatedevices.pl -h
Add a device from the Netdot control panel
In the Netdot control panel, navigate to Management in the top navigation. Choose Management > Devices. Click the [new] link.
Enter the hostname or IP address of the device. Choose the SNMP version and community from the dropdown menus. Then, click Discover. Netdot will then poll the device using SNMP.
Device Documentation
Once you have created a device you can add more information about it. You can search for a device by its name, IP, or MAC address. Each information page contains several sections:
Basics:
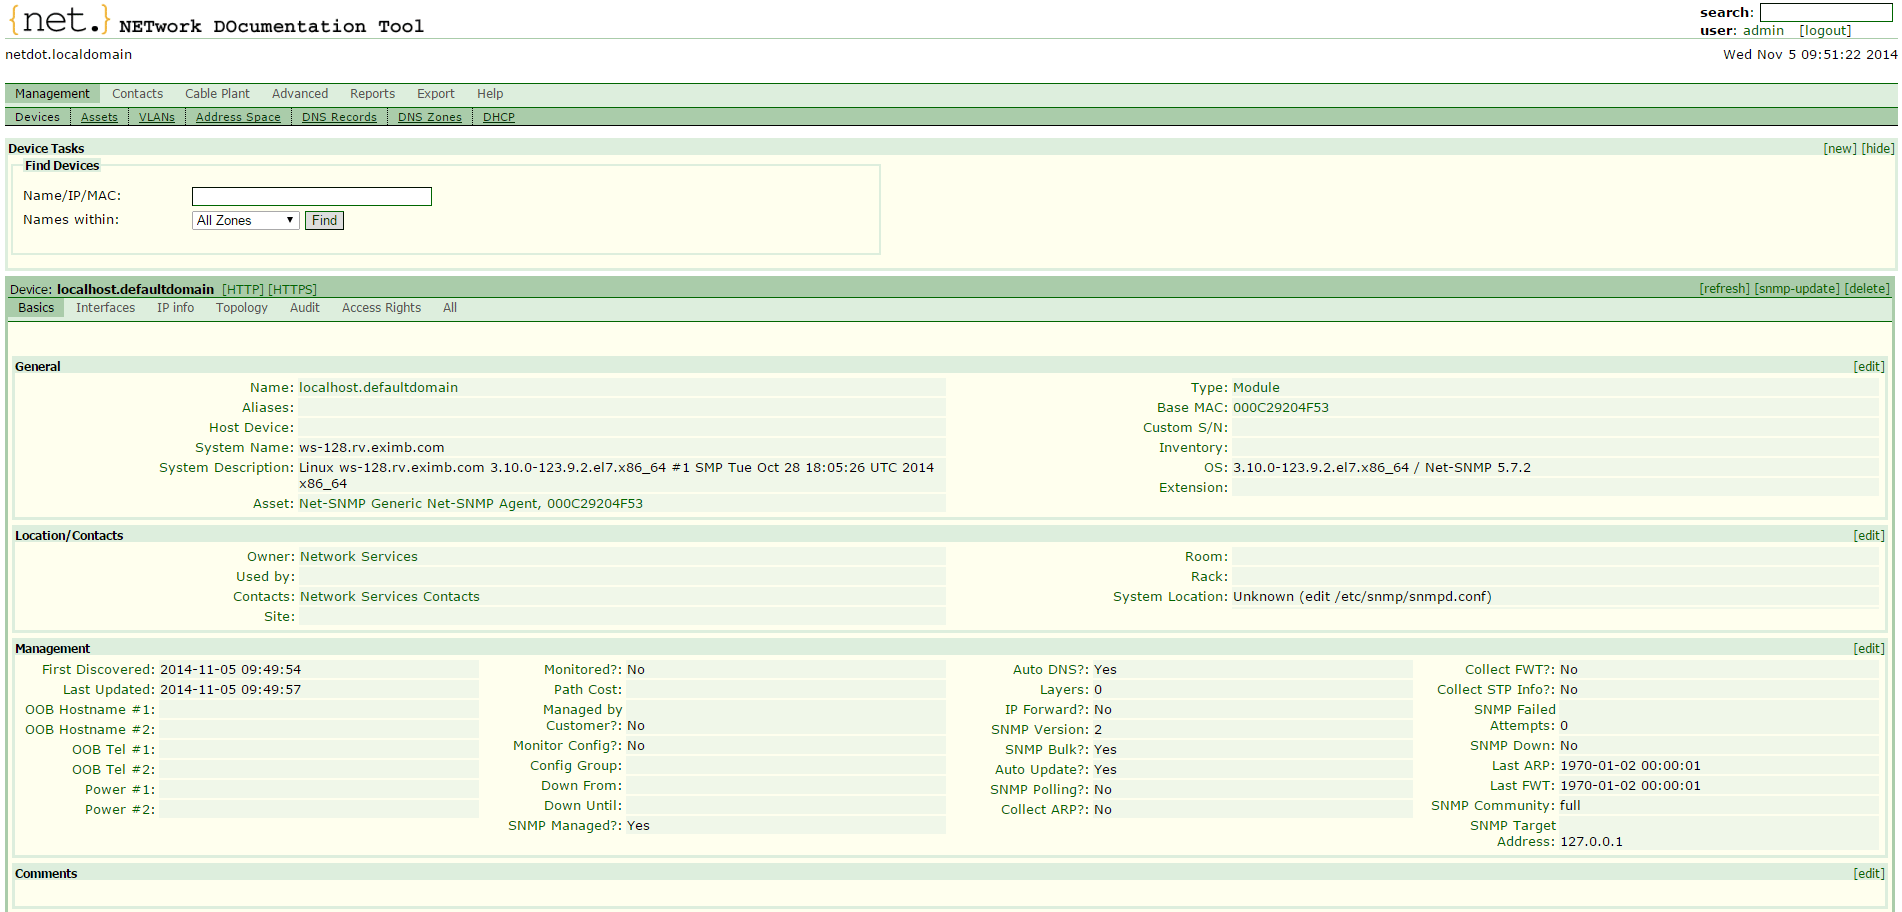
In this section you can view and edit general information about the device: its owner, location, operating system, and management information. You can also add comments and custom attributes.
Some information can be obtained automatically, and some information must be entered manually.
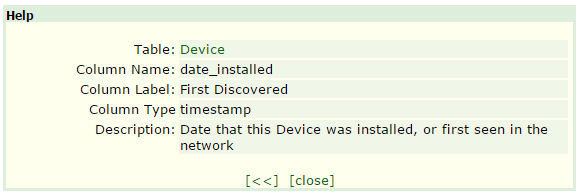
You can get help on any of the parameters by simply clicking on its title. For example, clicking on the title “First Discovered” you will see the following pop-up window:
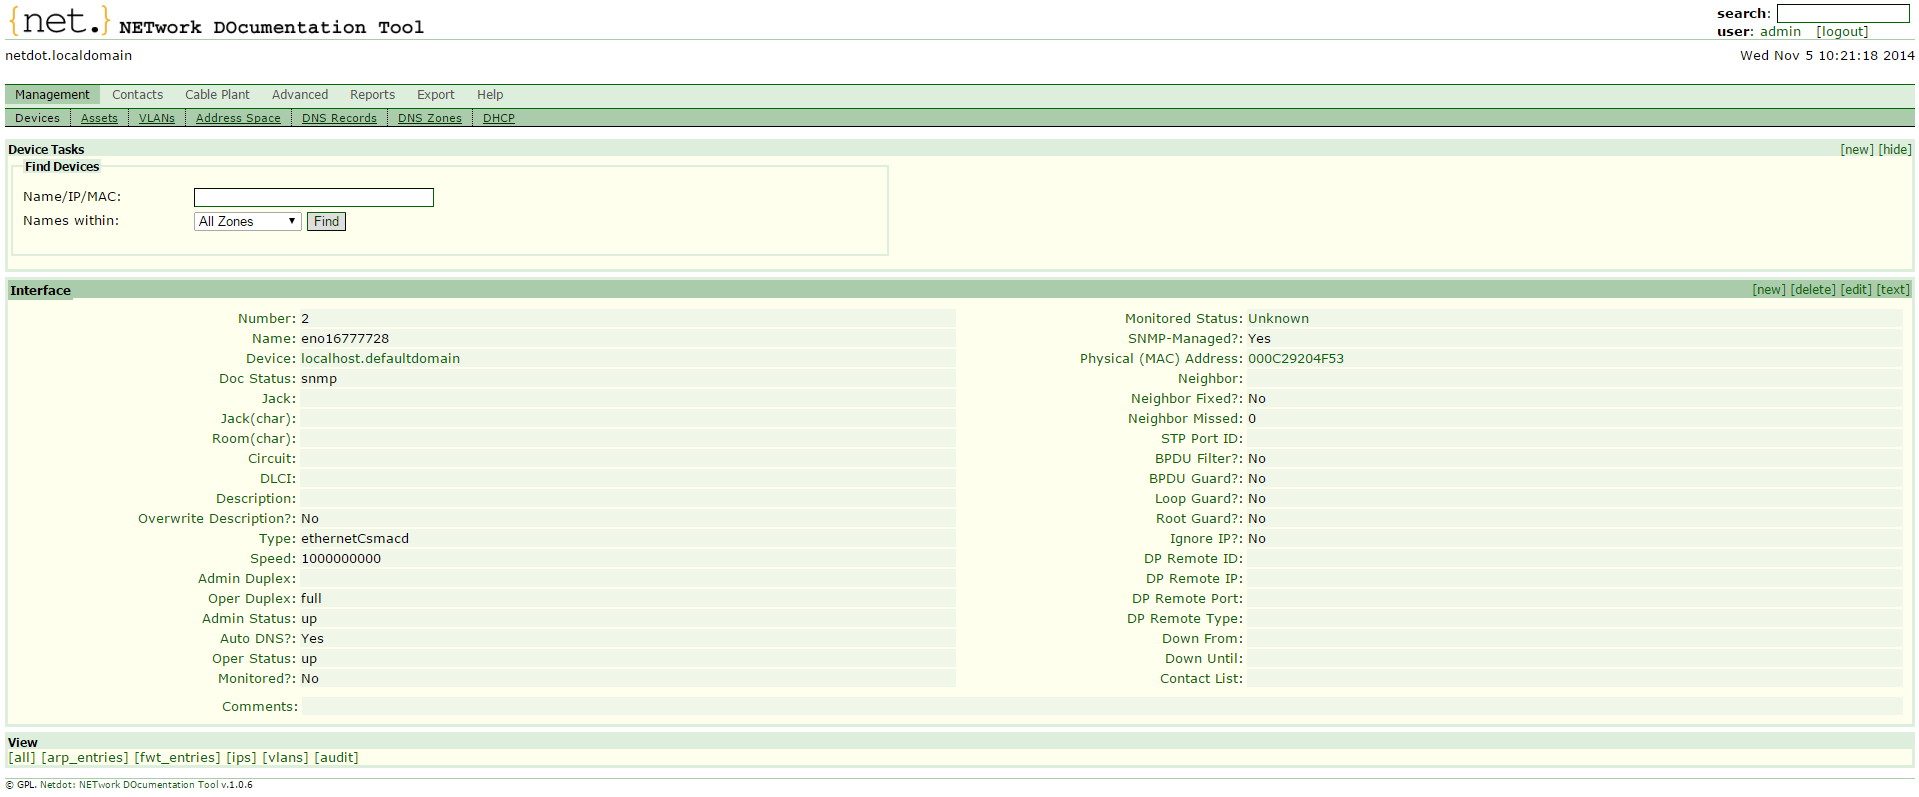
Interfaces:
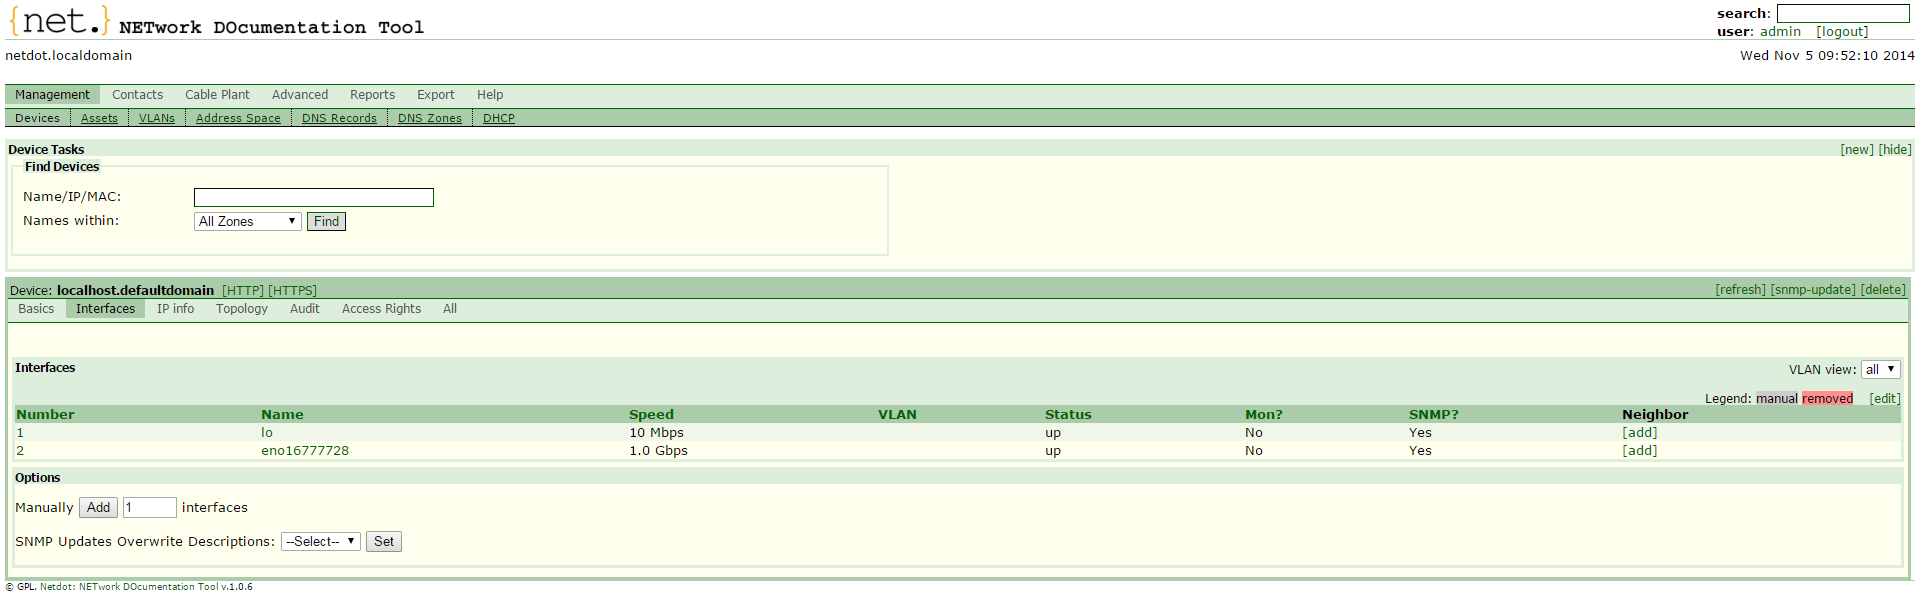
In this section you can view and edit information about a device’s interfaces: name, speed, status, neighbor (directly connected device), etc.
You can also view detailed interface information by clicking on its number or its name.
IP info:
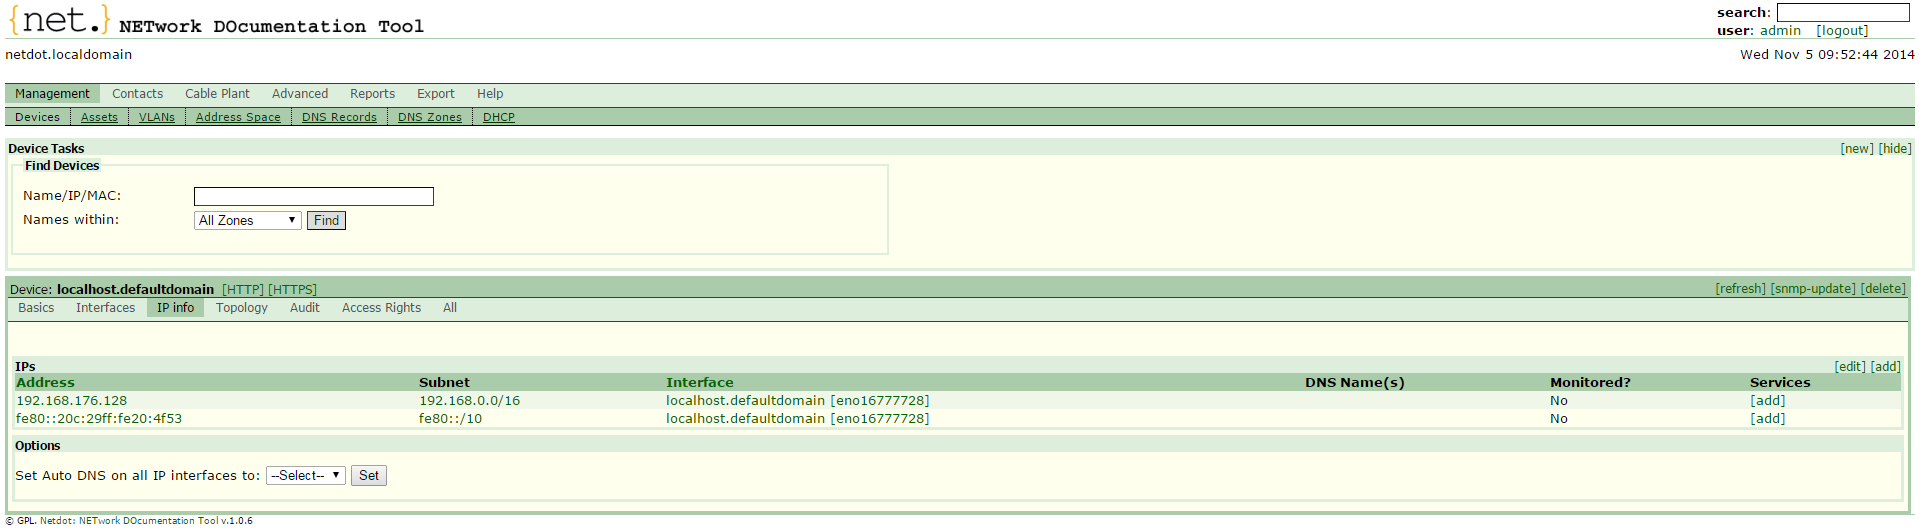
In this section you can view information about all the IP addresses found on the device together with the subnets they belong in, the device interface where they were found, and optionally their DNS names. You can also connect services (HTTP, DNS, MySQL, etc.) to the corresponding addresses.
Topology:
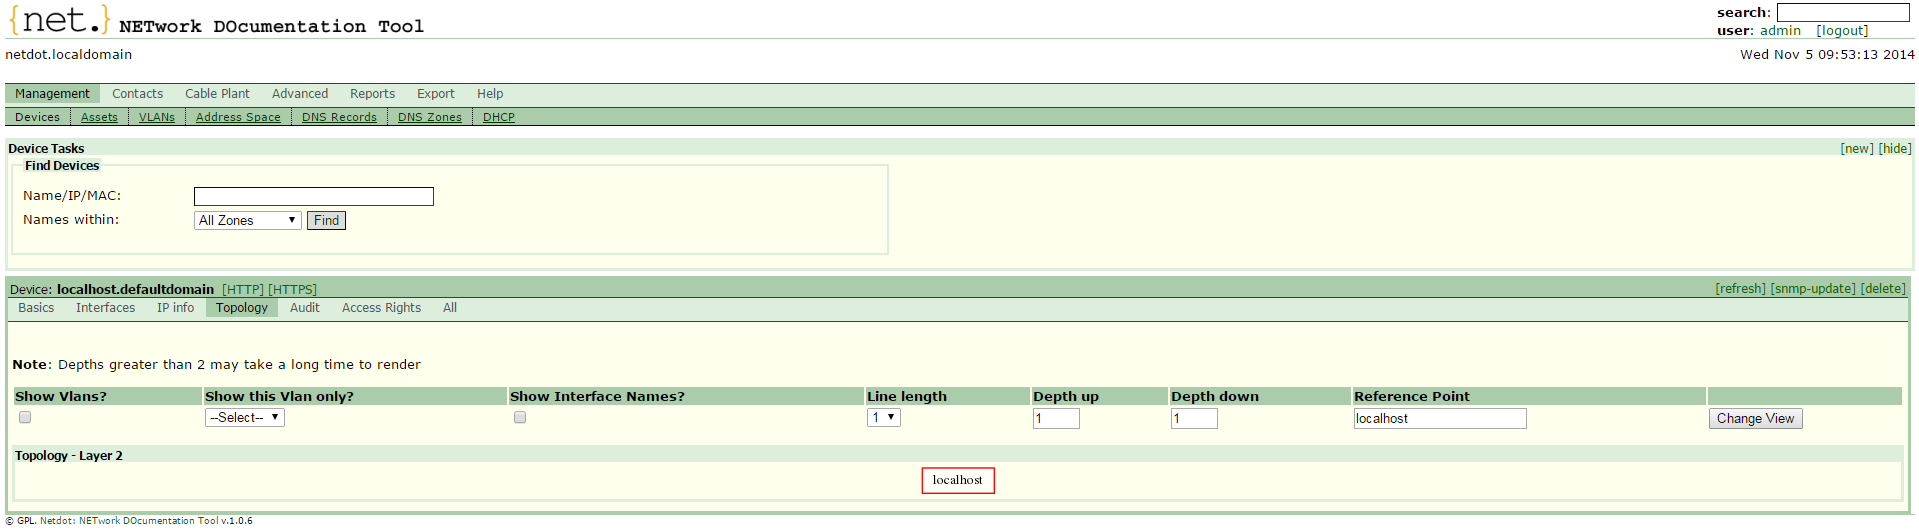
In this section you can see a graph of the device and its directly connected neighbors.
IP Address Management
One of the most useful features of Netdot is the address space management. You can plan, monitor, and manage IP addresses on your network.
Basic objects in the Netdot’s address space are IP blocks. They can represent individual end-node addresses, as well as groups of addresses. The distinguishing characteristic is the prefix: the end-node address is an IP block with a prefix of /32, and a subnet of 126 end-node address is an IP block with a prefix /25.
For example, let’s create the following simple structure:
104.236.38.0/24
	104.236.38.0/25
	104.236.38.128/25
	    104.236.38.128/26
	    104.236.38.192/26
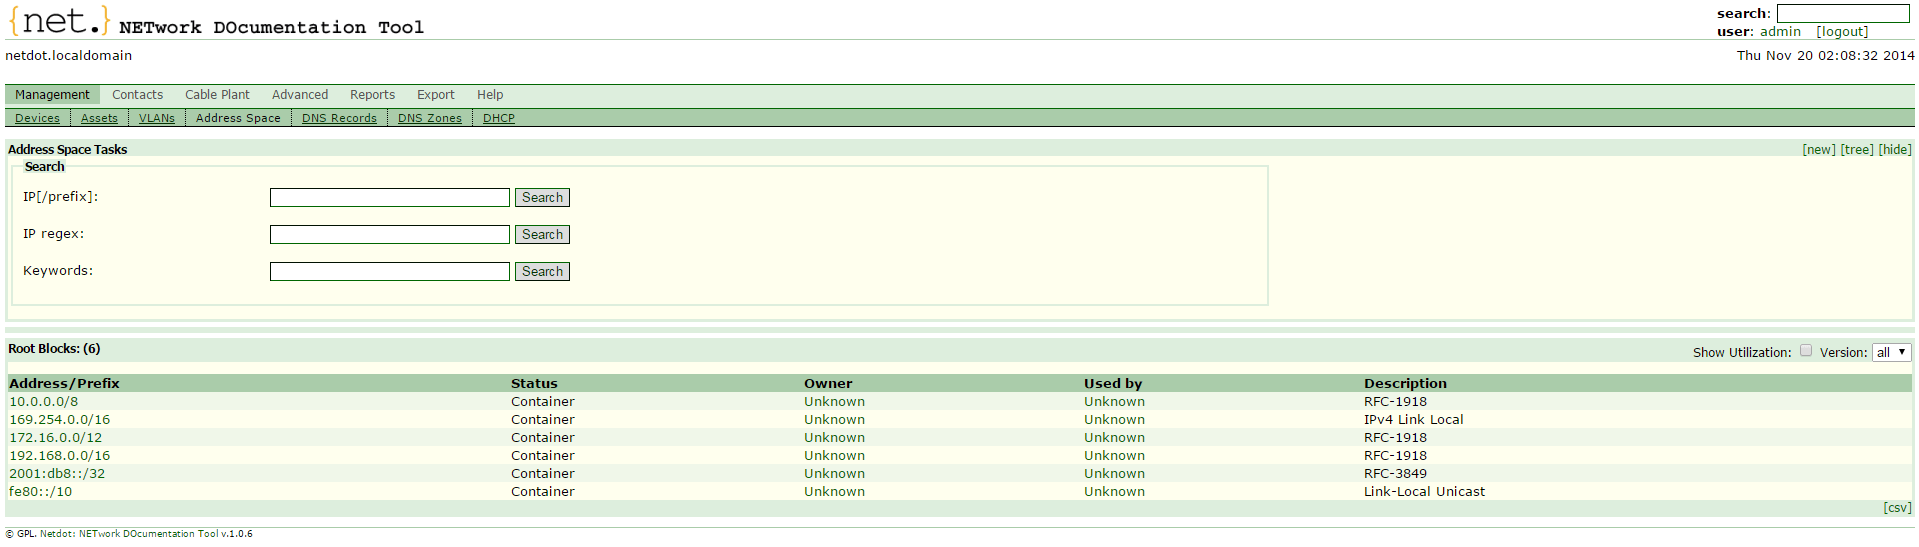
Navigate to Management > Address space.
Click the [new] link.
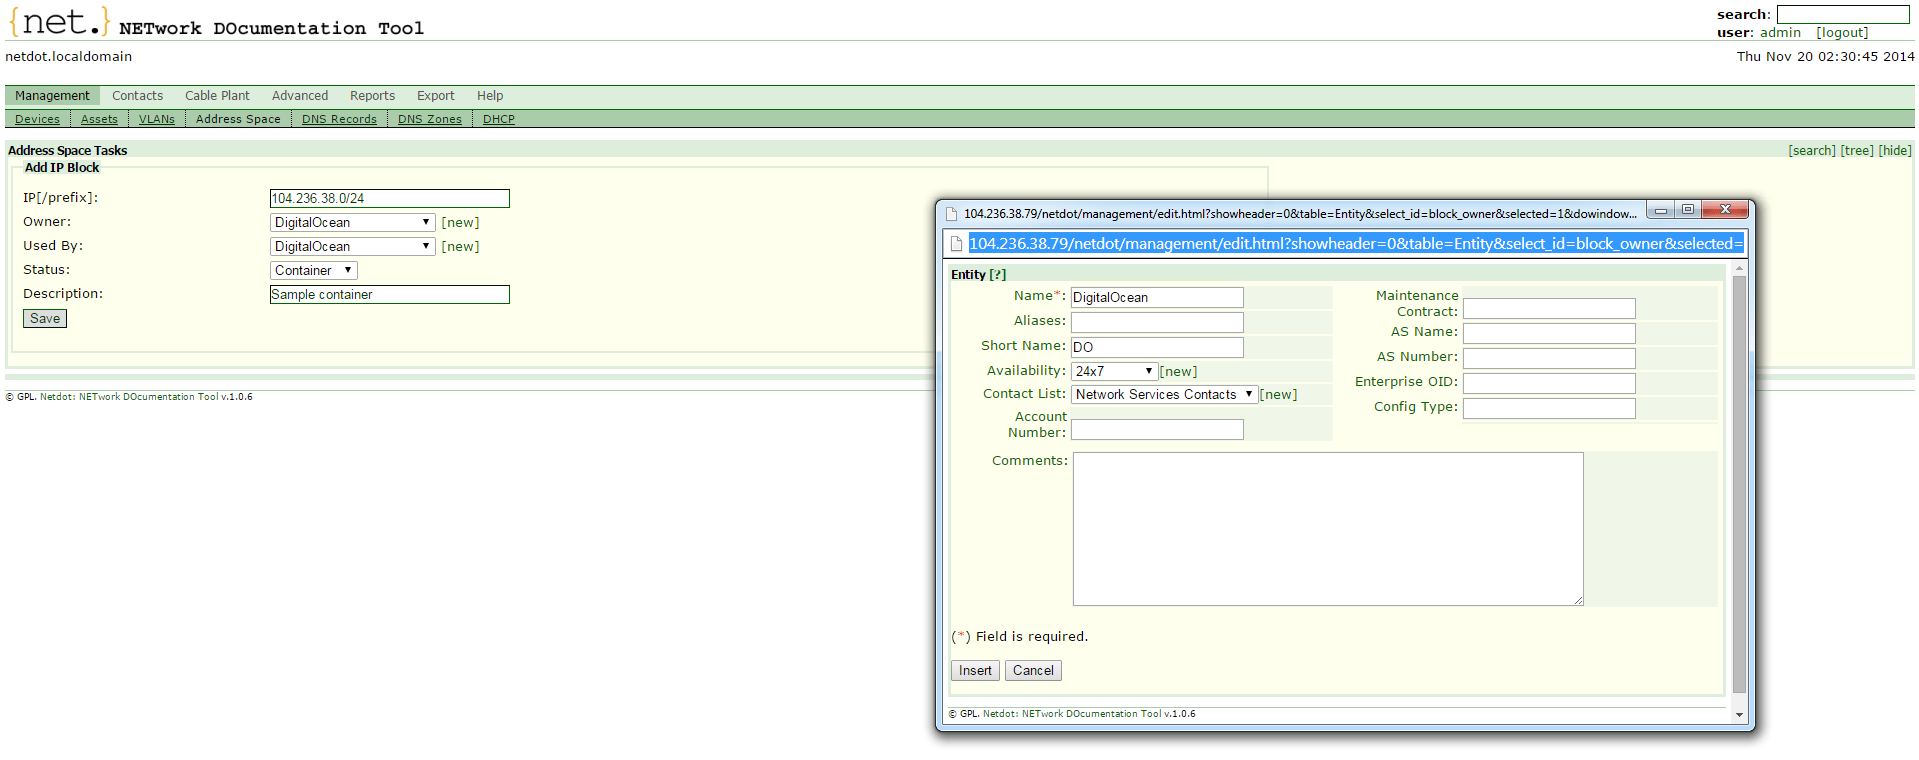
Enter the 104.236.38.0/24 in the IP[/prefix] field. You can optionally specify the Owner and Used By. (You can add an item to the dropdown list by clicking on the [new] link, filling out the form, and refreshing the page.) From the Status dropdown menu, select Container. Enter a Description of this container.
Click Save.
Netdot supports the following statuses:
- Container: Includes other containers or IP blocks
- Subnet: Represents the actual subnets
- Reserved: Blocks that should not be allocated for whatever reason
- Static: Statically assigned
Next, create a new subnet for 104.236.38.0/25, selecting Subnet for Status:

You will see the following as a result:

To create the next container, you can click on the green bar area next to the red one at the bottom of the Usage for 104.236.38.0/24 section.
Then Netdot will ask for confirmation: The IP address or block 104.236.38.128/25 does not yet exist. Are you sure that you want to create it? After confirmation you will create a new container.
Within this container, you can add another subnet for 104.236.38.128/26 and another container for 104.236.38.192/26, and so on.
Now, take a look at the entire hierarchy you’ve set up. To do this, go to the primary container (104.236.38.0/24) and click the [Tree View] link on the far right. You’ll see the following:
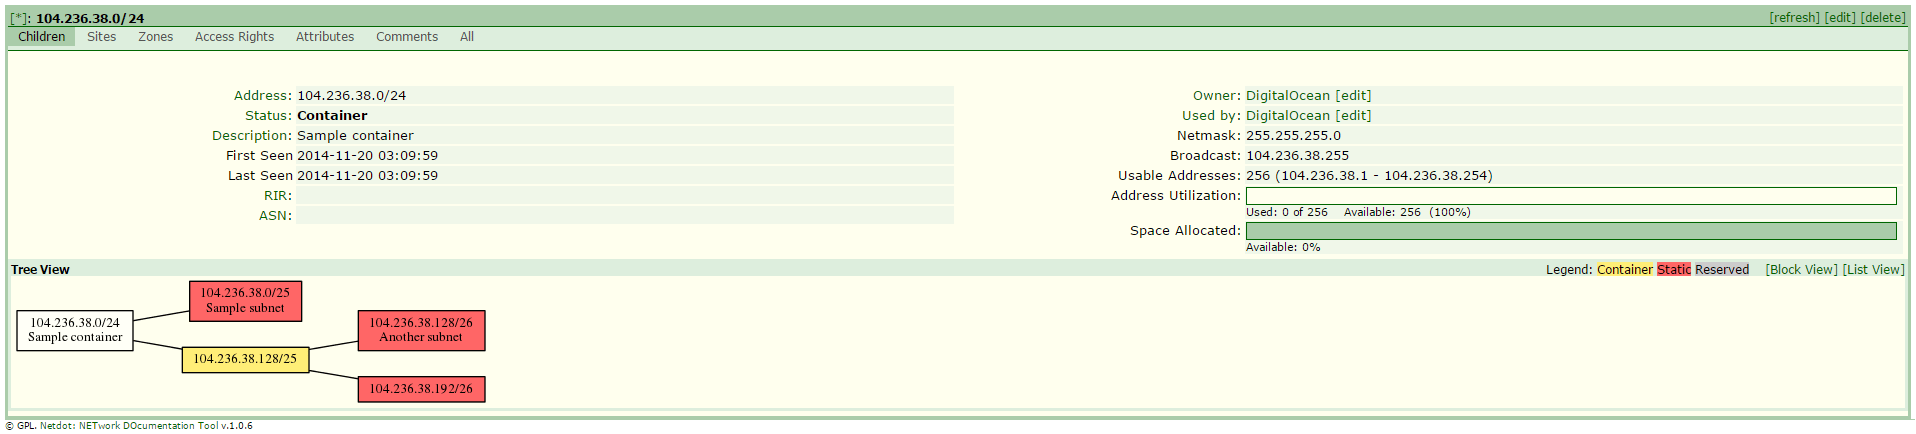
If you click one of the boxes in the diagram, you will see a detailed map of the appropriate subnet.
For example, it may look as follows:
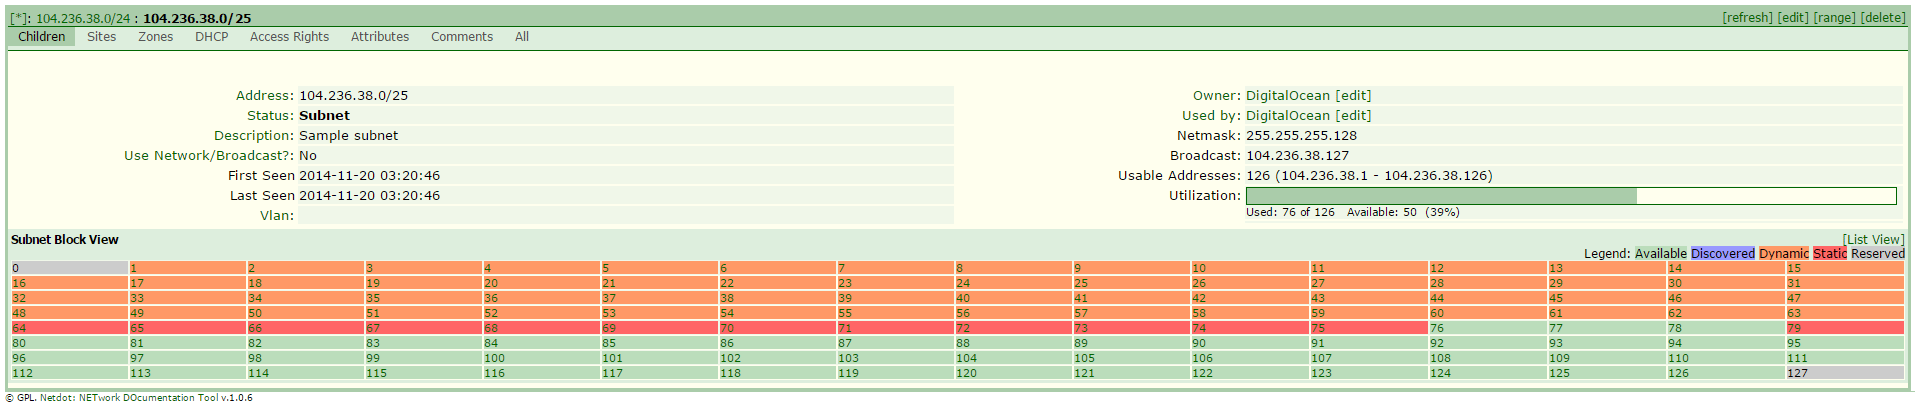
This figure shows that the first and last addresses of the network are automatically reserved. The addresses 1 to 63 are used for DHCP. Addresses that have been statically assigned to hosts or device interfaces are marked red. Addresses that have not been assigned as static or dynamic, but have been seen on the network, are marked blue. Available addresses are marked green.
To add, reserve, or edit an address you have to click on it. Also, you can see the overall statistics on used and available addresses on the subnet in the Utilization field, which in this example are:
Used: 76 of 126 Available: 50 (39%)
Conclusion
Netdot is a powerful tool for documenting your network. After completing this tutorial you’ve got general understanding of how to install it, how to do basic setup, how to add new devices, and how to manage your address space.
Thanks for learning with the DigitalOcean Community. Check out our offerings for compute, storage, networking, and managed databases.
About the author(s)
Monitoring engineer
Current fan and former Editorial Manager at DigitalOcean. Hi! Expertise in areas including Ubuntu, Docker, Rails, and more.
Still looking for an answer?
This textbox defaults to using Markdown to format your answer.
You can type !ref in this text area to quickly search our full set of tutorials, documentation & marketplace offerings and insert the link!
Hi,
I’m trying to install netdot folowing your tuto. After “make installdeps”, Net::IRR is still missing. When i try to install it with cpan i got the message below. Hove you got any idea. Thank you Jean-Claude
PERL_DL_NONLAZY=1 “/usr/bin/perl” “-MExtUtils::Command::MM” “-MTest::Harness” “-e” "undef Test::Harness::Switches; test_harness(0, ‘blib/lib’, ‘blib/arch’)" t/.t t/01_methods.t … 3/21
Failed test ‘connected to whois.radb.net’
at t/01_methods.t line 9.
Failed test ‘->can(…)’
at t/01_methods.t line 11.
can_ok() called with empty class or reference
Can’t call method “get_irrd_version” on an undefined value at t/01_methods.t line 12.
Looks like you planned 21 tests but ran 4.
Looks like you failed 2 tests of 4 run.
Looks like your test exited with 110 just after 4.
t/01_methods.t … Dubious, test returned 110 (wstat 28160, 0x6e00) Failed 19/21 subtests
Test Summary Report
t/01_methods.t (Wstat: 28160 Tests: 4 Failed: 2) Failed tests: 3-4 Non-zero exit status: 110 Parse errors: Bad plan. You planned 21 tests but ran 4. Files=1, Tests=4, 127 wallclock secs ( 0.02 usr 0.01 sys + 0.04 cusr 0.01 csys = 0.08 CPU) Result: FAIL Failed 1/1 test programs. 2/4 subtests failed. make: *** [test_dynamic] Erreur 110 TCAINE/Net-IRR-0.08.tar.gz /usr/bin/make test – NOT OK //hint// to see the cpan-testers results for installing this module, try: reports TCAINE/Net-IRR-0.08.tar.gz
Hello,
thanks for a great write up. I followed your instructions with the exception of installing epel-release-7-5.noarch.rpm instead of 7.2. however. After the install, when i try the webpage, I’m getting the following error
error: mkdir /usr/local/netdot/htdocs/masondata/obj/1874909815: Permission denied at /usr/local/share/perl5/HTML/Mason/Compiler/ToObject.pm line 112
I’ve checked the file system and tried doing a “chmod -R 777 /usr/local/netdot” it’s still giving me the same errors.
Any suggestion on where the problem might be?
thanks, Alan
This comment has been deleted
Thank you for very useful link. I have followed your instrusction with
Version: Netdot 1.0.7 OS : CentOS 7.1.1503 All required Perl modules : installed
Unfortunately, I still got same error message when restart Apache as below :
Nov 20 09:46:55 httpd30387: AH00526: Syntax error on line 32 of /etc/httpd/conf.d/netdot_apache24_local.con Nov 20 09:46:55 httpd30387: Attempt to reload Netdot/Model/Zone.pm aborted.\nCompilation failed in require at (eval 529) line 2.\n\t…propagated at /usr/share/perl5/base.pm line 84.\nBEGIN failed–compilation aborted at (eval 528) line 1.\nBEGIN failed–compilation aborted at /usr/local/netdot/lib/Netdot/Model.pm line 381.\nCompilation failed in require at /usr/local/netdot/lib/Netdot/UI.pm line 5\nBEGIN failed–compilation aborted at /usr/local/netdot/lib/Netdot/UI.pm line 5.\nCompilation failed in require at /usr/local/netdot/lib/Netdot/Mason.pm line 21.\nBEGIN failed–compilation aborted at /usr/local/netdot/lib/Netdot/Mason.pm line 21.\nCompilation failed in require at /etc/httpd/conf.d/netdot_apache24_local.conf line 33.\nBEGIN failed–compilation aborted
Any more suggestion ?? Thank you.
Even I changed perl.conf to 00.perl.conf in order to allow Apache load mod_perl before Netdot’s configuration, I still got below error message when restart Apache.
:AH00526: Syntax error on line 33 of /etc/httpd/conf.d/netdot_apache24_local.conf: :Attempt to reload Netdot/Model/Zone.pm aborted.\nCompilation failed in require at (eval 529) line 2.\n\t…propagated at /usr/share/perl5/base.pm line 84.\nBEGIN failed–compilation aborted at (eval 528) line 1.\nBEGIN failed–compilation aborted at /usr/local/netdot/lib/Netdot/Model.pm line 381.\nCompilation failed in require at /usr/local/netdot/lib/Netdot/UI.pm line 5.\nBEGIN failed–compilation aborted at /usr/local/netdot/lib/Netdot/UI.pm line 5.\nCompilation failed in require at /usr/local/netdot/lib/Netdot/Mason.pm line 21.\nBEGIN failed–compilation aborted at /usr/local/netdot/lib/Netdot/Mason.pm line 21.\nCompilation failed in require at /etc/httpd/conf.d/netdot_apache24_local.conf line 34.\nBEGIN failed–compilation aborted
Also add PerlSwitches -I/usr/local/netdot/lib or use lib qw( /usr/local/netdot/lib ); in my netdot_apache24_local.conf. But still not fix yet. Is there any suggestion. ??
PS1: I already reinstalled Netdot in /usr/local/netdot as your guide.
PS2: CentOS Linux release 7.1.1503 (Core) Server version: Apache/2.4.6 (CentOS) perl5 (revision 5 version 16 subversion 3) netdot-1.0.7
Thank you
 This work is licensed under a Creative Commons Attribution-NonCommercial- ShareAlike 4.0 International License.
Become a contributor for community
Get paid to write technical tutorials and select a tech-focused charity to receive a matching donation.

DigitalOcean Documentation
Full documentation for every DigitalOcean product.

Resources for startups and AI-native businesses
The Wave has everything you need to know about building a business, from raising funding to marketing your product.
The developer cloud
Scale up as you grow — whether you're running one virtual machine or ten thousand.

Start building today
From GPU-powered inference and Kubernetes to managed databases and storage, get everything you need to build, scale, and deploy intelligent applications.
