By Rafe Colton and Timothy Nolan

The author selected the Electronic Frontier Foundation to receive a donation as part of the Write for DOnations program.
Introduction
WordPress is a popular content management system that, according to W3Techs (Web Technology Surveys), powers over 33% of websites on the Internet. One reason it is so popular is that it is easy to set up with clear, straight-forward documentation. In addition, there are a great deal of community resources supporting WordPress developers. WordPress can solve many use-cases with an inexpensive or even free out-of-the-box solution. Finally, WordPress comes with a well-defined plugin system, which allows developers to write custom code to add their own functionality. This plugin system is well-documented, works well, and as you will see later in this tutorial, is easy to use.
Developers who want to deliver the richest, most interactive experiences can use JavaScript, supported by frameworks such as React. React is a JavaScript library that is designed to make it easy for developers to create dynamic, interactive UIs that go above and beyond a typical static page or form. Created by Facebook, and thus well maintained for security, stability, and ease of use, React is popular because it is has good documentation and a well-established, community-driven ecosystem of documentation and plugins.
This tutorial will walk you through best practices for embedding a React application in a WordPress site. For its example, it will use a common use case: creating a widget intended to be embedded on multiple pages and sometimes multiple times on a page. On the server side, it will be implemented as a WordPress shortcode. A shortcode is like an HTML tag, but it uses square brackets ([...]) instead of angle brackets (<...>). Instead of rendering an HTML element directly, it invokes a PHP function, which in turn renders HTML, interpolated with data from the database.
By the end of this tutorial, you will have created your own shortcode, inserted it into a page in WP Admin, and published that page. On that page, you will be able to see your React widget displayed by the browser.
Prerequisites
In order to follow this tutorial, you must have:
-
An Ubuntu 18.04 server set up with the Initial Server Setup with Ubuntu 18.04 tutorial to configure a firewall for your server along with a new user who has root privileges.
-
A fully registered domain name. This tutorial will use
your_domainas an example throughout. You can purchase a domain name on Namecheap, get one for free on Freenom, or use the domain registrar of your choice. -
Both of the following DNS records set up for your server. You can follow this introduction to DigitalOcean DNS for details on how to add them.
- An A record with
your_domainpointing to your server’s public IP address. - An A record with
www.your_domainpointing to your server’s public IP address.
- An A record with
-
Installations of Apache, MySQL, and PHP on your server. You can get this by following How To Install Linux, Apache, MySQL, PHP (LAMP) stack on Ubuntu 18.04.
-
Secured Apache with Let’s Encrypt by following How To Secure Apache with Let’s Encrypt on Ubuntu 18.04 to generate a free SSL certificate.
-
A WordPress installation, which you can get by following How To Install WordPress with LAMP on Ubuntu 18.04 and its prerequisites.
-
Installation of Node.js by following the “Installing Using a PPA” option in How To Install Node.js on Ubuntu 18.04. This tutorial will be using version
11.15.0, so when usingcurlto download the installation script, replace10.xwith11.xto follow along with the procedure in this tutorial.
Step 1 — Updating and Configuring Filesystem Permissions
When logged in as the non-root user created in the Initial Server Setup with Ubuntu 18.04 prerequisite, you will not have access to view or edit any files in the WordPress directory. This is a problem, as you will be adding and modifying files later to create your WordPress plugin and your React application. To fix this problem, in this step you will update your WordPress configuration so that you have access to edit your WordPress files.
Run the following command, substituting sammy for the name of your non-root user and /var/www/wordpress for the path to your WordPress directory (which is the Apache document root folder you created in the prerequisite):
- sudo chown -R sammy:www-data /var/www/wordpress
Let’s break down this command:
sudo— This allows you to execute this command asroot, since you are modifying filessammydoes not have access to.chown— This command changes file ownership.-R— This flag changes the ownership recursively, including all subfolders and files.sammy:www-data— This sets the owner as your non-root user (sammy) and keeps the group aswww-dataso that Apache can still access the files in order to serve them./var/www/wordpress— This specifies the path to your WordPress directory. This is the directory on which the ownership will change.
To verify that this command was successful, list out the contents of the WordPress directory:
- ls -la /var/www/wordpress
You will see a listing of the contents of the directory:
Outputtotal 216
drwxr-x---  5 sammy www-data  4096 Apr 13 15:42 .
drwxr-xr-x  4 root  root      4096 Apr 13 15:39 ..
-rw-r-----  1 sammy www-data   235 Apr 13 15:54 .htaccess
-rw-r-----  1 sammy www-data   420 Nov 30  2017 index.php
-rw-r-----  1 sammy www-data 19935 Jan  1 20:37 license.txt
-rw-r-----  1 sammy www-data  7425 Jan  9 02:56 readme.html
-rw-r-----  1 sammy www-data  6919 Jan 12 06:41 wp-activate.php
drwxr-x---  9 sammy www-data  4096 Mar 13 00:18 wp-admin
-rw-r-----  1 sammy www-data   369 Nov 30  2017 wp-blog-header.php
-rw-r-----  1 sammy www-data  2283 Jan 21 01:34 wp-comments-post.php
-rw-r-----  1 sammy www-data  2898 Jan  8 04:30 wp-config-sample.php
-rw-r-----  1 sammy www-data  3214 Apr 13 15:42 wp-config.php
drwxr-x---  6 sammy www-data  4096 Apr 13 15:54 wp-content
-rw-r-----  1 sammy www-data  3847 Jan  9 08:37 wp-cron.php
drwxr-x--- 19 sammy www-data 12288 Mar 13 00:18 wp-includes
-rw-r-----  1 sammy www-data  2502 Jan 16 05:29 wp-links-opml.php
-rw-r-----  1 sammy www-data  3306 Nov 30  2017 wp-load.php
-rw-r-----  1 sammy www-data 38883 Jan 12 06:41 wp-login.php
-rw-r-----  1 sammy www-data  8403 Nov 30  2017 wp-mail.php
-rw-r-----  1 sammy www-data 17947 Jan 30 11:01 wp-settings.php
-rw-r-----  1 sammy www-data 31085 Jan 16 16:51 wp-signup.php
-rw-r-----  1 sammy www-data  4764 Nov 30  2017 wp-trackback.php
-rw-r-----  1 sammy www-data  3068 Aug 17  2018 xmlrpc.php
These files are the ones included in the WordPress core in the file named latest.tar.gz that you downloaded from wordpress.org in the prerequisite How To Install WordPress with LAMP on Ubuntu 18.04. If the permissions appear as they do in the preceding output, this means that your files and directories have been updated correctly.
In this step, you updated your WordPress installation to give yourself access to edit its files. In the next step, you will use that access to create files that will compose a WordPress plugin.
Step 2 — Creating a Basic WordPress Plugin
Now that you have access to modify files in the WordPress directory, you will create a basic WordPress plugin and add it to the installation. This will allow React to interact with WordPress later in the tutorial.
A WordPress plugin can be as simple as:
- A directory inside
wp-content/plugins. - A file inside that directory with the same name and a
.phpfile extension. - A special comment at the top of that file that provides WordPress with important plugin metadata.
To make a plugin for the React code you will write later, start by creating a directory for the WordPress plugin. For simplicity, this tutorial will name the plugin react-wordpress. Run the following command, replacing wordpress with your Apache document root:
- mkdir /var/www/wordpress/wp-content/plugins/react-wordpress
Then, navigate to the newly-created directory. Subsequent commands will be executed from here.
- cd /var/www/wordpress/wp-content/plugins/react-wordpress
Let’s create the plugin file now. This tutorial will use nano, invoked with the command nano, as the command line text editor for all files. You are also free to use any other text editor of your choice, such as Pico, Vim, or Emacs.
Open up react-wordpress.php for editing:
- nano react-wordpress.php
Add the following lines to your file to create the start of the plugin:
<?php
/**
 * @wordpress-plugin
 * Plugin Name:       Embedding React In Wordpress
 */

defined( 'ABSPATH' ) or die( 'Direct script access disallowed.' );
The commented section at the top provides metadata for the plugin, and the line that checks for the ABSPATH constant prevents a bad actor from accessing this script directly by its URL. ABSPATH is the absolute path to your WordPress root directory, so if ABSPATH is defined, you can be sure the file was loaded through the WordPress environment.
Note: Many fields are available for a plugin metadata comment, but only Plugin Name is required. See the Header Requirements page in the WordPress documentation for more details.
Next, open up a web browser and navigate to the Plugins page of your domain (https://your_domain/wp-admin/plugins.php). You will see your plugin listed along with WordPress’s default plugins:
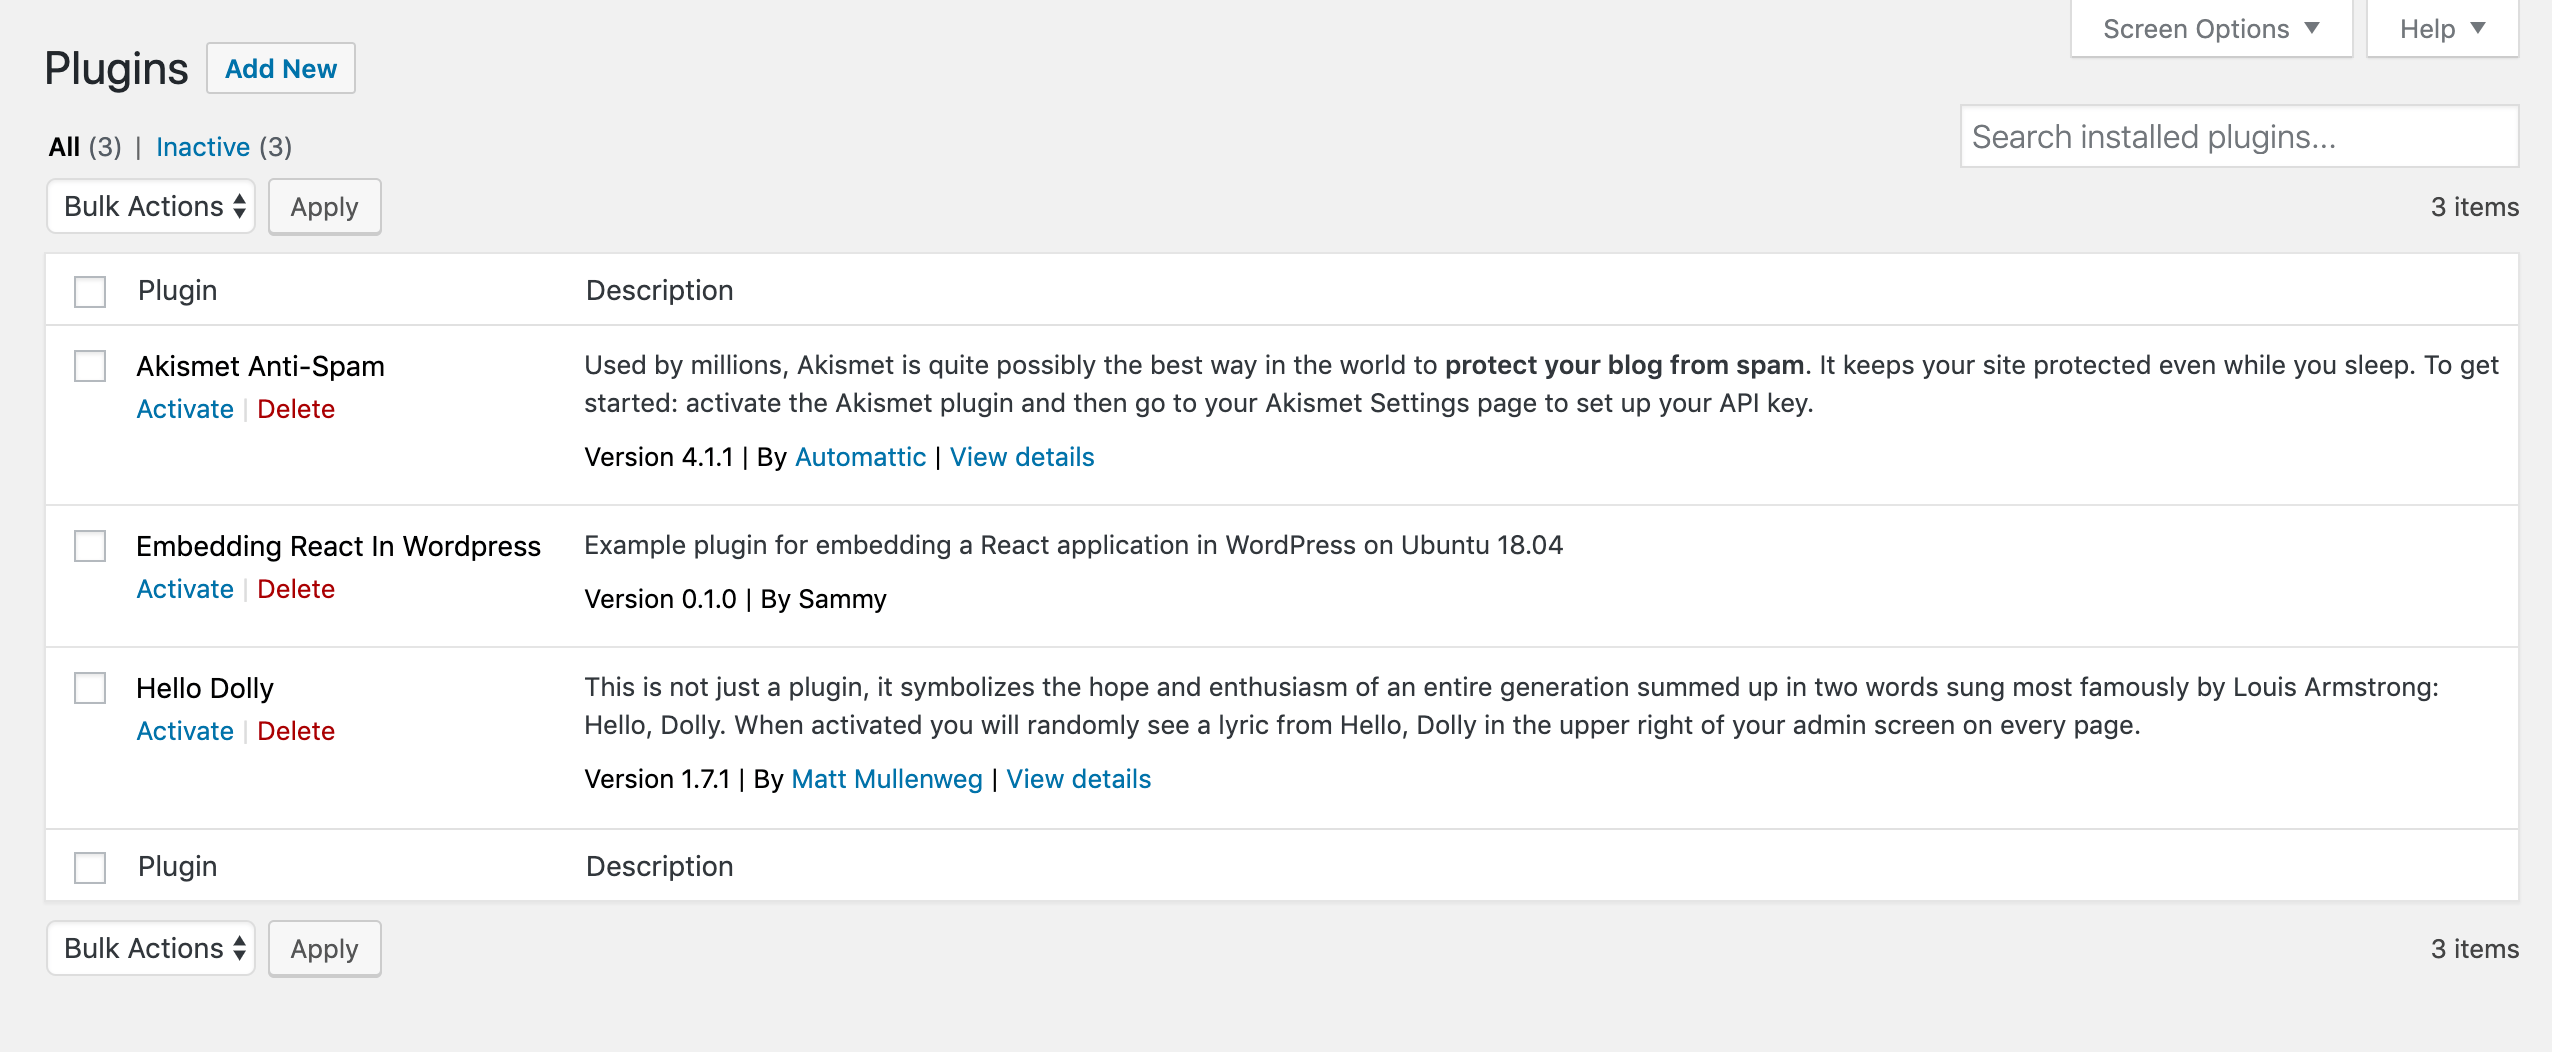
Click Activate to enable your plugin.
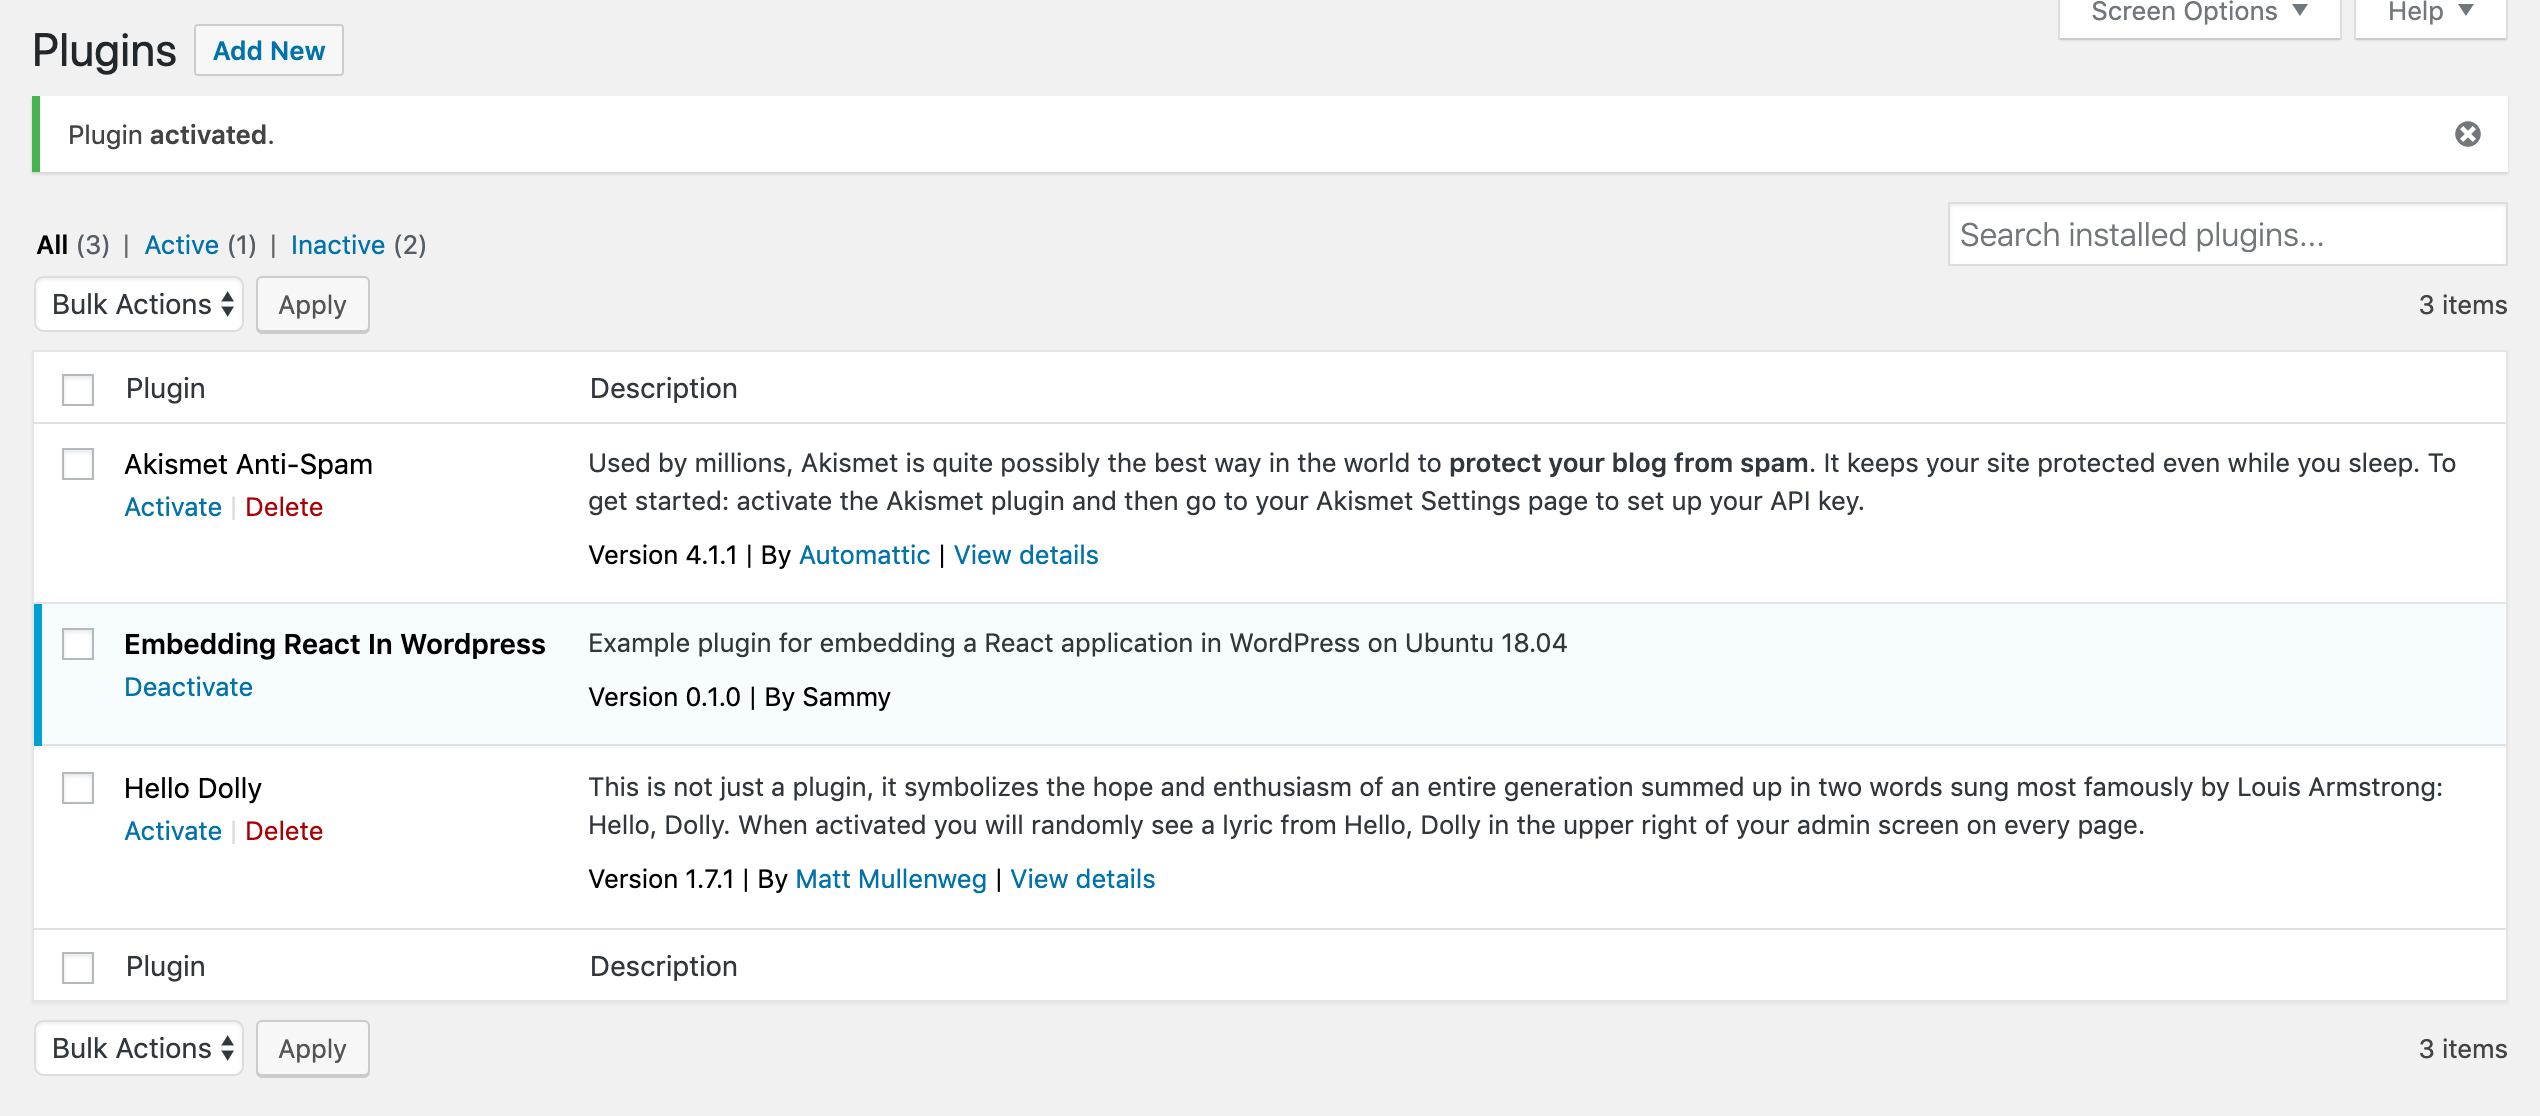
Once you have activated your plugin, the row containing your plugin will be highlighted in blue, with a blue border on the left, and instead of a link below it that says Activate, there will be one that says Deactivate:
Next, you will establish the structure of your plugin.
Go back to your terminal to open react-wordpress.php:
- nano react-wordpress.php
Then update it to add the following highlighted lines, which define useful constants:
<?php
/**
 * @wordpress-plugin
 * Plugin Name:       Embedding React In Wordpress
 */

defined( 'ABSPATH' ) or die( 'Direct script access diallowed.' );

define( 'ERW_WIDGET_PATH', plugin_dir_path( __FILE__ ) . '/widget' );
define( 'ERW_ASSET_MANIFEST', ERW_WIDGET_PATH . '/build/asset-manifest.json' );
define( 'ERW_INCLUDES', plugin_dir_path( __FILE__ ) . '/includes' );
In the newly added lines, you defined three constants:
ERW_WIDGET_PATH— This will be the path to the React application.ERW_ASSET_MANIFEST— This is the path to the React asset manifest, a file that contains the list of JavaScript and CSS files that need to be included on the page for your application to work.ERW_INCLUDES— This subdirectory will contain all of the PHP files.
Note that each define() refers to plugin_dir_path( __FILE__ ). That stands for the directory path to that file.
After adding the constant definitions, save the file and exit the editor.
Note: It is important to namespace your constants. In this case we are using the namespace ERW_, which stands for Embedding React in WordPress. Prefixing variables with this namespace ensures they are unique so that they don’t conflict with constants defined in other plugins.
To create the includes/ folder, which will contain the other PHP files, start at the top level of the plugin directory, /var/www/your_domain/wp-content/plugins/react-wordpress. Then, create the folder:
- mkdir includes
Now that you’ve scaffolded the PHP-related files and folders needed to make a WordPress plugin, you will create the initial files and folders for React.
Step 3 — Initializing the React Application
In this step, you will use Create React App to initialize your React application.
This tutorial was tested using Create React App version 3.0.1. Version 3.0.0 made breaking changes to the structure of asset-manifest.json, so this earlier version is not compatible with this tutorial without modifications. To ensure you are using the version expected here, run this command to install Create React App:
- sudo npm install --global create-react-app@3.0.1
This command will install version 3.0.1 of Create React App. The --global flag will install it system-wide. Installing system-wide ensures that when you run create-react-app (or npx create-react-app) without any path specified, you will use the version that you just installed.
After installing Create React App, use it to create the React application. This tutorial will name the app widget:
- sudo create-react-app widget
This command uses npx, which is a binary that ships with NPM. It is designed to make it easy to use CLI tools and other executables that are hosted on NPM. It will install those tools if they are not found locally.
The create-react-app command will generate a project folder and all of the necessary files for a basic React app. This includes an index.html file, starting JavaScript, CSS, and test files, and a package.json for defining your project and dependencies. It pre-includes dependencies and scripts that let you build your application for production without needing to install and configure any additional build tools.
Once you have set up the widget app, the output in the terminal will look something like this:
Output...
Success! Created widget at /var/www/wordpress/wp-content/plugins/react-wordpress/widget
Inside that directory, you can run several commands:

  npm start
    Starts the development server.

  npm run build
    Bundles the app into static files for production.

  npm test
    Starts the test runner.

  npm run eject
    Removes this tool and copies build dependencies, configuration files
    and scripts into the app directory. If you do this, you can’t go back!

We suggest that you begin by typing:

  cd widget
  npm start

Happy hacking!
Next, navigate to the newly created directory:
- cd widget
You will now be able to build your application using the default build command, npm run build. This build command looks at the file package.json under the key scripts for a script named build:
{
  "name": "widget",
  "version": "0.1.0",
  "private": true,
  "dependencies": {
    "react": "^16.9.0",
    "react-dom": "^16.9.0",
    "react-scripts": "3.1.1"
  },
  "scripts": {
    "start": "react-scripts start",
    "build": "react-scripts build",
    "test": "react-scripts test",
    "eject": "react-scripts eject"
  },
  "eslintConfig": {
    "extends": "react-app"
  },
  "browserslist": {
    "production": [
      ">0.2%",
      "not dead",
      "not op_mini all"
    ],
    "development": [
      "last 1 chrome version",
      "last 1 firefox version",
      "last 1 safari version"
    ]
  }
}
This calls the react-scripts.js executable provided by the react-scripts node module, which is one of the core components provided by create-react-app. This in turn calls the build script, which uses webpack to compile your project files into static asset files your browser understands. It does this by:
- Resolving dependencies.
- Compiling SASS files into CSS and JSX or TypeScript into JavaScript.
- Transforming ES6 syntax into ES5 syntax with better cross-browser compatibility.
Now that you know a bit about build, run the command in your terminal:
- sudo npm run build
Once the command completes, you will receive output similar to the following:
Output> widget@0.1.0 build /var/www/wordpress/wp-content/plugins/react-wordpress/widget
> react-scripts build

Creating an optimized production build...
Compiled successfully.

File sizes after gzip:

  36.83 KB (+43 B)  build/static/js/2.6efc73d3.chunk.js
  762 B (+44 B)     build/static/js/runtime~main.a8a9905a.js
  710 B (+38 B)     build/static/js/main.2d1d08c1.chunk.js
  539 B (+44 B)     build/static/css/main.30ddb8d4.chunk.css

The project was built assuming it is hosted at the server root.
You can control this with the homepage field in your package.json.
For example, add this to build it for GitHub Pages:

  "homepage" : "http://myname.github.io/myapp",

The build folder is ready to be deployed.
You may serve it with a static server:

  npm install -g serve
  serve -s build

Find out more about deployment here:

  https://bit.ly/CRA-deploy
Your project is now built, but before moving to the next step, it is a best practice to ensure that your application only loads if it is present.
React uses an HTML element in the DOM inside of which it renders the application. This is called the target element. By default, this element has the ID root. To ensure that this root node is the app you are creating, alter src/index.js to check the ID of the target for the namespaced erw-root. To do this, first open src/index.js:
- sudo nano src/index.js
Modify and add the highlighted lines:
import React from 'react';
import ReactDOM from 'react-dom';
import './index.css';
import App from './App';
import * as serviceWorker from './serviceWorker';

const target = document.getElementById('erw-root');
if (target) { ReactDOM.render(<App />, target); }

serviceWorker.unregister();
Finally, save and quit the file when you are done editing.
In this file, you made two important changes to the default index.js file:
- You changed the target element from
<div id="root"></div>to<div id="erw-root"></div>so it is namespaced for your application. - You enclosed the call to
ReactDOM.render()in anif (...)statement so that the app is only loaded if it is present.
Note: If you expect the widget to be present on every page, you may also wish to add a line of error handling, which prints a message to the console if an element with ID erw-root is not found. However, this tutorial will omit this step. A line like this would produce a console error on every page that does not have the element, including ones in which you are not planning to include the element. These multiple JavaScript console errors can risk lowering the search engine rankings for your site.
After changing any JavaScript or CSS file in your src/ directory, it is important to recompile your app so that your changes are incorporated. To rebuild your app, run:
- sudo npm run build
Now your build/ directory contains a working React application in the form of JavaScript and CSS files. The next step involves setting up some PHP files that will enqueue your JavaScript and CSS in the page.
Step 4 — Enqueueing the JavaScript and CSS Files
In this step, you will use WordPress actions and filters to:
- Output the script-enqueueing code at the appropriate time in the WordPress page load cycle.
- Enqueue your JavaScript and CSS files in a way that least impacts page load speed.
WordPress uses actions and filters as its primary hooks. Actions make it possible to execute code at a specified time in the page load cycle, and filters modify specific behavior by changing the return value of functions you do not otherwise own.
To use these hooks, you will create a PHP file that will contain the code that parses the asset manifest. This is the same file you will use later to enqueue all of the assets so the scripts are written into the <head> tag.
Before creating the file, use the following command to navigate out of the directory containing your React app and into the top-level react-wordpress plugin directory:
- cd /var/www/wordpress/wp-content/plugins/react-wordpress
Create the enqueue.php file inside the includes/ folder:
- nano includes/enqueue.php
Start by placing the opening <?php tag at the top of the file. Also add the line that checks for ABSPATH, which as discussed before is a best practice in every PHP file:
<?php
// This file enqueues scripts and styles

defined( 'ABSPATH' ) or die( 'Direct script access disallowed.' );
Save and quit this file.
Then, update react-wordpress.php to require enqueue.php from the project. First, open up the file for editing:
- nano react-wordpress.php
Add the following highlighted line:
<?php
/**
 * @wordpress-plugin
 * Plugin Name:       Embedding React In Wordpress
 */

defined( 'ABSPATH' ) or die( 'Direct script access diallowed.' );

define( 'ERW_WIDGET_PATH', plugin_dir_path( __FILE__ ) . '/widget' );
define( 'ERW_ASSET_MANIFEST', ERW_WIDGET_PATH . '/build/asset-manifest.json' );
define( 'ERW_INCLUDES', plugin_dir_path( __FILE__ ) . '/includes' );

require_once( ERW_INCLUDES . '/enqueue.php' );
It is a common pattern in WordPress plugins to require other PHP files from the includes/ directory in order to split important tasks into chunks. The require_once() function parses the contents of the file passed as an argument as though that file’s PHP code were written right there inline. Unlike the similar command include, require will raise an exception if the file you are trying to require cannot be found. Using require_once() (as opposed to just require()) ensures that enqueue.php will not be parsed multiple times if the directive require_once( ERW_INCLUDES . '/enqueue.php' ); is given multiple times.
Save and exit the file.
Now reopen includes/enqueue.php:
- nano includes/enqueue.php
Then, add the following highlighted code:
<?php
// This file enqueues scripts and styles

defined( 'ABSPATH' ) or die( 'Direct script access diallowed.' );

add_action( 'init', function() {

  add_filter( 'script_loader_tag', function( $tag, $handle ) {
    if ( ! preg_match( '/^erw-/', $handle ) ) { return $tag; }
    return str_replace( ' src', ' async defer src', $tag );
  }, 10, 2 );

  add_action( 'wp_enqueue_scripts', function() {

  });
});
Adding a function to the init action means that this code will be run during the init phase of the load process, which is after your theme and other plugins have loaded.
Setting the async and defer attributes on the <script> tags using the script_loader_tag filter tells the browser to load the scripts asynchronously instead of blocking DOM construction and page rendering.
The wp_enqueue_scripts action then enqueues front-end items. See this page for more details.
Be sure to write the file and exit.
You have now told WordPress to write script and stylesheet tags to the page. In this next step, you will parse a file called the asset manifest. This will give you the paths to all of the files that you’ll need to enqueue.
Step 5 — Parsing the Asset Manifest
In this step, you will parse the asset manifest generated by the React build into a list of JavaScript and CSS files.
When you build the application, the React build script will build your project into multiple JavaScript and CSS files. The files quantity and names will vary from one build to the next, as each one includes a hash of the file’s contents. The asset manifest provides the name of each file generated in the last build along with the path to that file. By parsing it programatically, you are guaranteed that script and stylesheet tags you write to the page will always point to the right files, even when the names change.
First, examine the asset-manifest.json with the cat command:
- cat widget/build/asset-manifest.json
It will look something like this:
Output{
  "files": {
    "main.css": "/static/css/main.2cce8147.chunk.css",
    "main.js": "/static/js/main.a284ff71.chunk.js",
    "main.js.map": "/static/js/main.a284ff71.chunk.js.map",
    "runtime~main.js": "/static/js/runtime~main.fa565546.js",
    "runtime~main.js.map": "/static/js/runtime~main.fa565546.js.map",
    "static/js/2.9ca06fd6.chunk.js": "/static/js/2.9ca06fd6.chunk.js",
    "static/js/2.9ca06fd6.chunk.js.map": "/static/js/2.9ca06fd6.chunk.js.map",
    "index.html": "/index.html",
    "precache-manifest.e40c3c7a647ca45e36eb20f8e1a654ee.js": "/precache-manifest.e40c3c7a647ca45e36eb20f8e1a654ee.js",
    "service-worker.js": "/service-worker.js",
    "static/css/main.2cce8147.chunk.css.map": "/static/css/main.2cce8147.chunk.css.map",
    "static/media/logo.svg": "/static/media/logo.5d5d9eef.svg"
  }
}
To parse it, your code will look for object keys that end with .js and .css.
Open up your enqueue.php file:
- nano includes/enqueue.php
Add the highlighted snippet:
<?php
// This file enqueues scripts and styles

defined( 'ABSPATH' ) or die( 'Direct script access disallowed.' );

add_action( 'init', function() {

  add_filter( 'script_loader_tag', function( $tag, $handle ) {
    if ( ! preg_match( '/^erw-/', $handle ) ) { return $tag; }
    return str_replace( ' src', ' async defer src', $tag );
  }, 10, 2 );

  add_action( 'wp_enqueue_scripts', function() {

    $asset_manifest = json_decode( file_get_contents( ERW_ASSET_MANIFEST ), true )['files'];

    if ( isset( $asset_manifest[ 'main.css' ] ) ) {
      wp_enqueue_style( 'erw', get_site_url() . $asset_manifest[ 'main.css' ] );
    }

    wp_enqueue_script( 'erw-runtime', get_site_url() . $asset_manifest[ 'runtime~main.js' ], array(), null, true );

    wp_enqueue_script( 'erw-main', get_site_url() . $asset_manifest[ 'main.js' ], array('erw-runtime'), null, true );

    foreach ( $asset_manifest as $key => $value ) {
      if ( preg_match( '@static/js/(.*)\.chunk\.js@', $key, $matches ) ) {
        if ( $matches && is_array( $matches ) && count( $matches ) === 2 ) {
          $name = "erw-" . preg_replace( '/[^A-Za-z0-9_]/', '-', $matches[1] );
          wp_enqueue_script( $name, get_site_url() . $value, array( 'erw-main' ), null, true );
        }
      }

      if ( preg_match( '@static/css/(.*)\.chunk\.css@', $key, $matches ) ) {
        if ( $matches && is_array( $matches ) && count( $matches ) == 2 ) {
          $name = "erw-" . preg_replace( '/[^A-Za-z0-9_]/', '-', $matches[1] );
          wp_enqueue_style( $name, get_site_url() . $value, array( 'erw' ), null );
        }
      }
    }

  });
});
When you are done, write and quit the file.
The highlighted code does the following:
- Reads the asset manifest file and parses it as a JSON file. It accesses the content stored at the key
'files'and stores it to the$asset_manifestvariable. - Enqueues the main CSS file if it exists.
- Enqueues the React runtime first, then the main JavaScript file, setting the runtime as a dependency to ensure it is loaded in the page first.
- Parses the asset manifest file list for any JavaScript files named
static/js/<hash>.chunk.jsand enqueues them in the page after the main file. - Parses the asset manifest file list for any CSS files named
static/css/<hash>.chunk.cssand enqueues them in the page after the main CSS file.
Note: Using wp_enqueue_script() and wp_enqueue_style will cause <script> and <link> tags for the enqueued files to appear in every page. The last argument true tells WordPress to place the file below the page content footer instead of at the bottom of the <head> element. This is important so that loading the JavaScript files doesn’t slow down the rest of the page.
In this step, you isolated the filepaths of the scripts and styles used by your app. In the next step, you will ensure that those filepaths point to your React app’s build directory and that none of your source files are accessible from the browser.
Step 6 — Serving and Securing Static Files
At this point, you have told WordPress which JavaScript and CSS files to load and where to find them. However, if you visit https://your_domain in the browser and look at the JavaScript console, you will see HTTP 404 errors. (Check out this article for more info on how to use the JavaScript console.)

This is because the URL route to the file (e.g., /static/js/main.2d1d08c1.chunk.js) does not match the actual path to the file (e.g., /wp-content/plugins/react-wordpress/widget/build/static/js/main.2d1d08c1.chunk.js).
In this step, you will correct this issue by telling React where the build directory is located. You will also add an Apache rewrite rule to the .htaccess file to protect your source files from being viewed in the browser.
To give React the correct path to your app, open package.json inside of your React application’s directory:
- sudo nano widget/package.json
Then, add the highlighted homepage line:
{
  "name": "widget",
  "version": "0.1.0",
  "private": true,
  "homepage": "/wp-content/plugins/react-wordpress/widget/build",
  "dependencies": {
    "react": "^16.9.0",
    "react-dom": "^16.9.0",
    "react-scripts": "3.1.1"
  },
  "scripts": {
    "start": "react-scripts start",
    "build": "react-scripts build",
    "test": "react-scripts test",
    "eject": "react-scripts eject"
  },
  "eslintConfig": {
    "extends": "react-app"
  },
  "browserslist": {
    "production": [
      ">0.2%",
      "not dead",
      "not op_mini all"
    ],
    "development": [
      "last 1 chrome version",
      "last 1 firefox version",
      "last 1 safari version"
    ]
  }
}
Write and quit the file. Then, rebuild your React application. Move to the top level of widget/:
- cd widget
Then run the build command:
- sudo npm run build
After the build command completes, inspect the asset manifest by outputting its contents to the terminal:
- cat build/asset-manifest.json
You will see that the file paths have all changed:
{
  "files": {
    "main.css": "/wp-content/plugins/react-wordpress/widget/build/static/css/main.2cce8147.chunk.css",
    "main.js": "/wp-content/plugins/react-wordpress/widget/build/static/js/main.a28d856a.chunk.js",
    "main.js.map": "/wp-content/plugins/react-wordpress/widget/build/static/js/main.a28d856a.chunk.js.map",
    "runtime~main.js": "/wp-content/plugins/react-wordpress/widget/build/static/js/runtime~main.2df87c4b.js",
    "runtime~main.js.map": "/wp-content/plugins/react-wordpress/widget/build/static/js/runtime~main.2df87c4b.js.map",
    "static/js/2.9ca06fd6.chunk.js": "/wp-content/plugins/react-wordpress/widget/build/static/js/2.9ca06fd6.chunk.js",
    "static/js/2.9ca06fd6.chunk.js.map": "/wp-content/plugins/react-wordpress/widget/build/static/js/2.9ca06fd6.chunk.js.map",
    "index.html": "/wp-content/plugins/react-wordpress/widget/build/index.html",
    "precache-manifest.233e0a9875cf4d2df27d6280d12b780d.js": "/wp-content/plugins/react-wordpress/widget/build/precache-manifest.233e0a9875cf4d2df27d6280d12b780d.js",
    "service-worker.js": "/wp-content/plugins/react-wordpress/widget/build/service-worker.js",
    "static/css/main.2cce8147.chunk.css.map": "/wp-content/plugins/react-wordpress/widget/build/static/css/main.2cce8147.chunk.css.map",
    "static/media/logo.svg": "/wp-content/plugins/react-wordpress/widget/build/static/media/logo.5d5d9eef.svg"
  }
}
This tells your app where to find the correct files, but also presents a problem: It exposes the path to your app’s src directory, and somebody who is familiar with create-react-app could visit https://your_domain/wp-content/plugins/react-wordpress/widget/src/index.js and start exploring the source files for your app. Try it yourself!
To protect the paths you do not want users to access, add an Apache rewrite rule to your WordPress’s .htaccess file.
- nano /var/www/wordpress/.htaccess
Add the four highlighted lines:
<IfModule mod_rewrite.c>
RewriteRule ^wp-content/plugins/react-wordpress/widget/(build|public)/(.*) - [L]
RewriteRule ^wp-content/plugins/react-wordpress/widget/* totally-bogus-erw.php [L]
</IfModule>

# BEGIN WordPress
<IfModule mod_rewrite.c>
RewriteEngine On
RewriteBase /
RewriteRule ^index\.php$ - [L]
RewriteCond %{REQUEST_FILENAME} !-f
RewriteCond %{REQUEST_FILENAME} !-d
RewriteRule . /index.php [L]
</IfModule>

# END WordPress
This tells Apache to allow browser requests to anything at wp-content/plugins/react-wordpress/widget/build/ or wp-content/react-wordpress/widget/public/. Anything else will redirect to totally-bogus-erw.php. Unless you have a file named totally-bogus-erw.php at your top level, this request will be handled by WordPress, which will render a 404 error.
There are WordPress plugins, such as Stream, that will monitor request activity and log 404s. In the logs, the request will show the IP address and the page requested when the user received the 404. Watching for totally-bogus-erw.php will tell you if a specific IP address is trying to crawl your React app’s src directory.
Be sure to write and quit the file.
Now that you have established the routing necessary to load your JavaScript and CSS files onto the page, it is time to use a shortcode to add HTML elements to the page that the JavaScript will interact with to render your app.
Step 7 — Creating a Shortcode
Shortcodes make it possible to insert complex HTML blocks interpolated with server-side data, with very simple in-page syntax. In this step, you will create and register a WordPress shortcode and use that to embed your application in the page.
Navigate to the top level of your plugin:
- cd /var/www/wordpress/wp-content/plugins/react-wordpress/
Create a new PHP file that will contain the shortcode:
- touch includes/shortcode.php
Then, edit your main PHP file so that includes/shortcode.php is required when your plugin loads. First open react-wordpress.php:
- nano react-wordpress.php
Then add the following highlighted line:
<?php
/**
 * @wordpress-plugin
 * Plugin Name:       Embedding React In Wordpress
 */

defined( 'ABSPATH' ) or die( 'Direct script access diallowed.' );

define( 'ERW_WIDGET_PATH', plugin_dir_path( __FILE__ ) . '/widget' );
define( 'ERW_ASSET_MANIFEST', ERW_WIDGET_PATH . '/build/asset-manifest.json' );
define( 'ERW_INCLUDES', plugin_dir_path( __FILE__ ) . '/includes' );

require_once( ERW_INCLUDES . '/enqueue.php' );
require_once( ERW_INCLUDES . '/shortcode.php' );
Write and quit the file.
Now, open the newly created shortcode file:
- nano includes/shortcode.php
Add the following code:
<?php
// This file enqueues a shortcode.

defined( 'ABSPATH' ) or die( 'Direct script access disallowed.' );

add_shortcode( 'erw_widget', function( $atts ) {
  $default_atts = array();
  $args = shortcode_atts( $default_atts, $atts );

  return "<div id='erw-root'></div>";
});
This code contains mostly boilerplate. It registers a shortcode named erw_widget that, when invoked, prints <div id="erw-root"></div>, the React app’s root element, to the page.
Save and quit shortcode.php.
To see the React app in action, you will need to create a new WordPress page and add the shortcode to it.
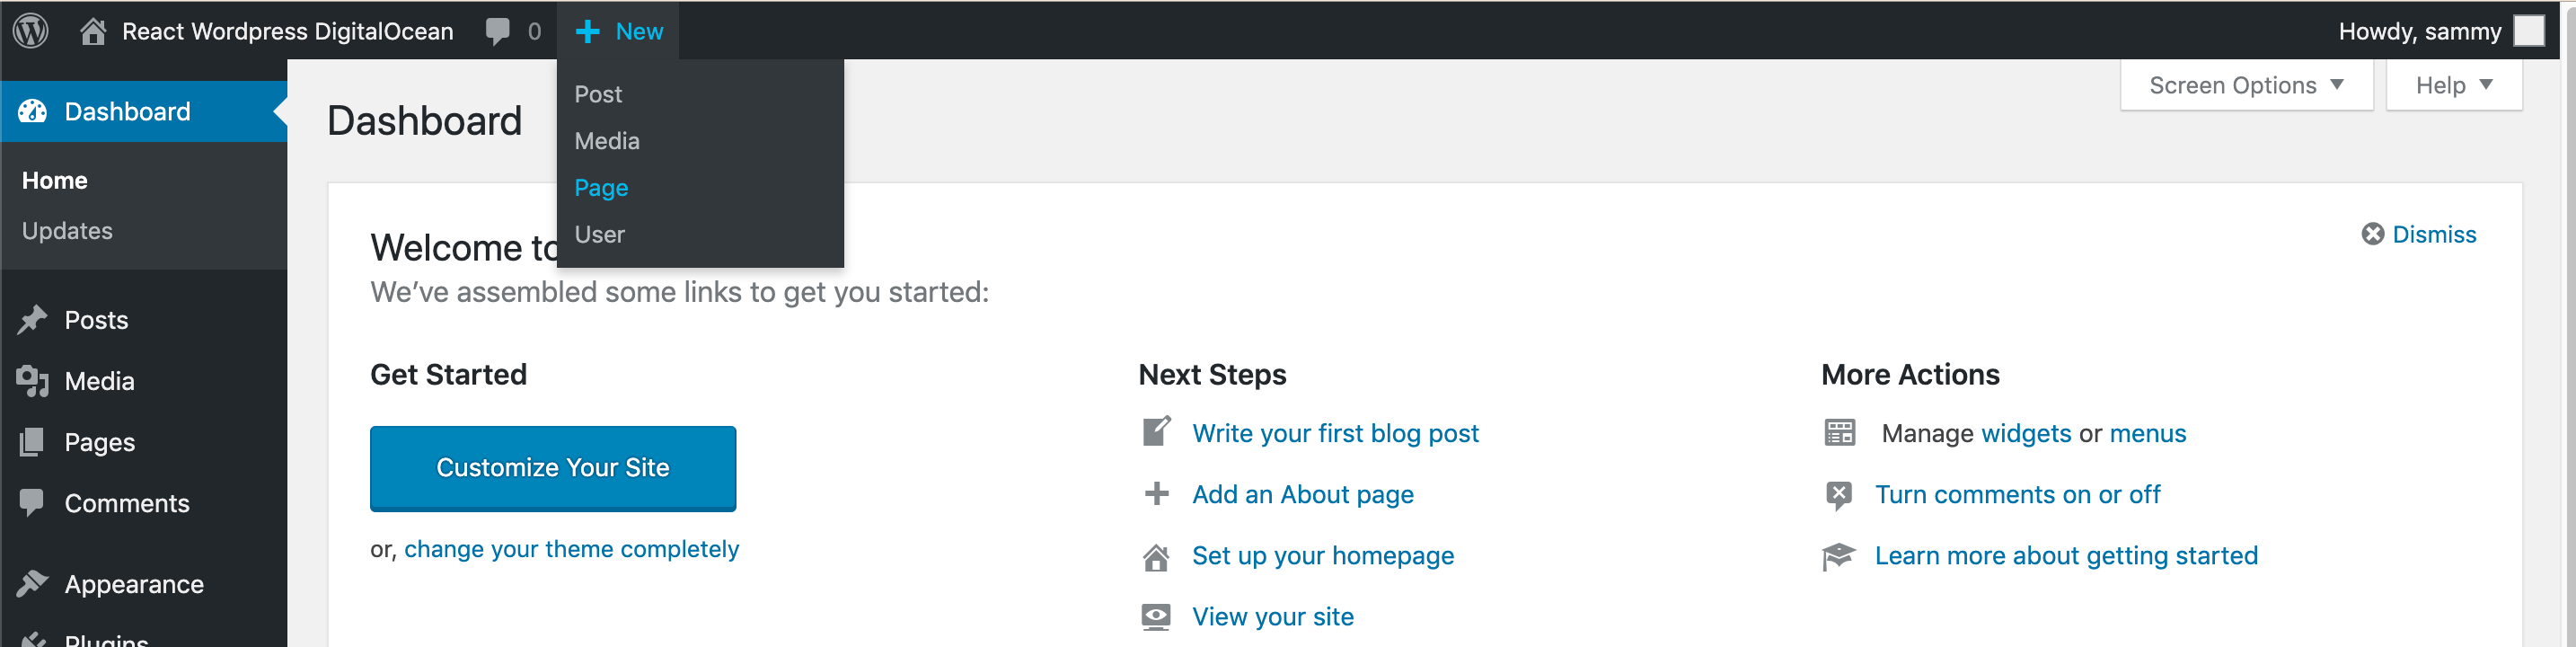
Navigate to https://your_domain/wp-admin in a web browser. At the very top of the page, you’ll see a black bar that has the WordPress logo on the left, followed by a house icon, the name of your site, a comment bubble icon and number, and another link that says + New. Hover over the + New button and a menu will drop down. Click the menu item that says Page.
When the screen loads, your cursor will be focused in the text box that says Add title. Click there and start typing to give the new page a relevant title. This tutorial will use My React App:
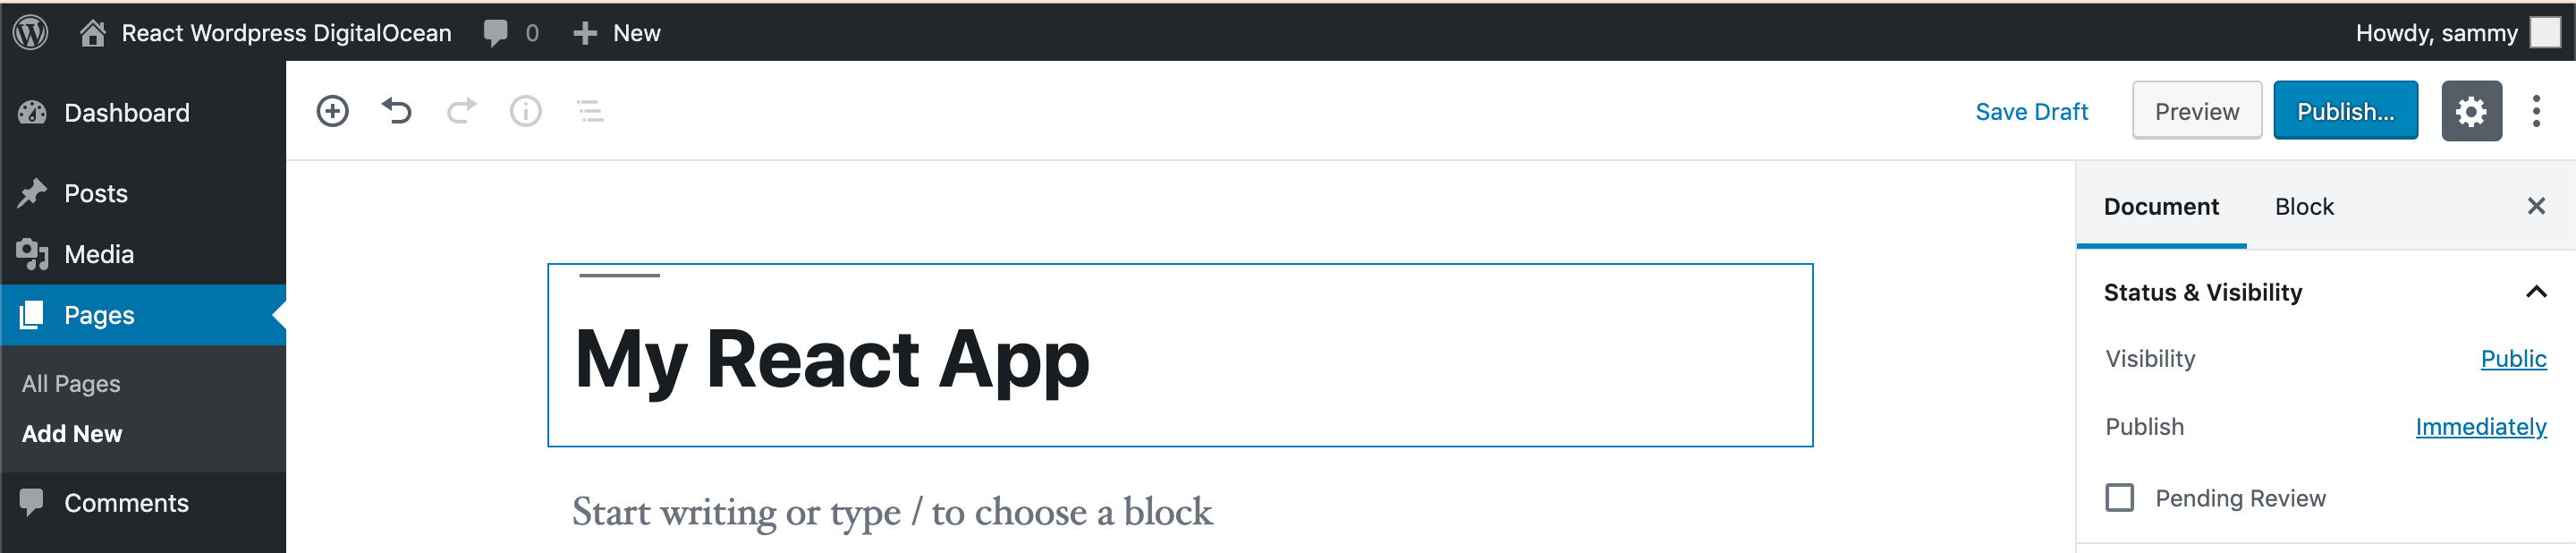
Assuming you are using the WordPress Gutenberg editor, you will see a line of text near the top of the page, below the title, that reads Start writing or type / to choose a block. When you hover over that text, three symbols will appear on the right. Choose the nearest one that resembles [/] to add a shortcode block:
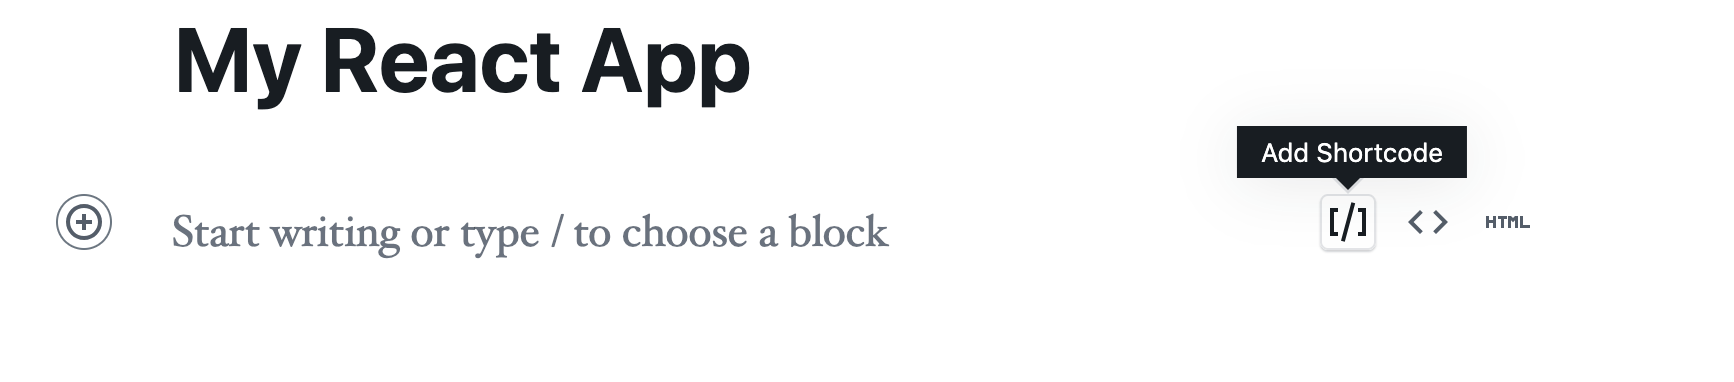
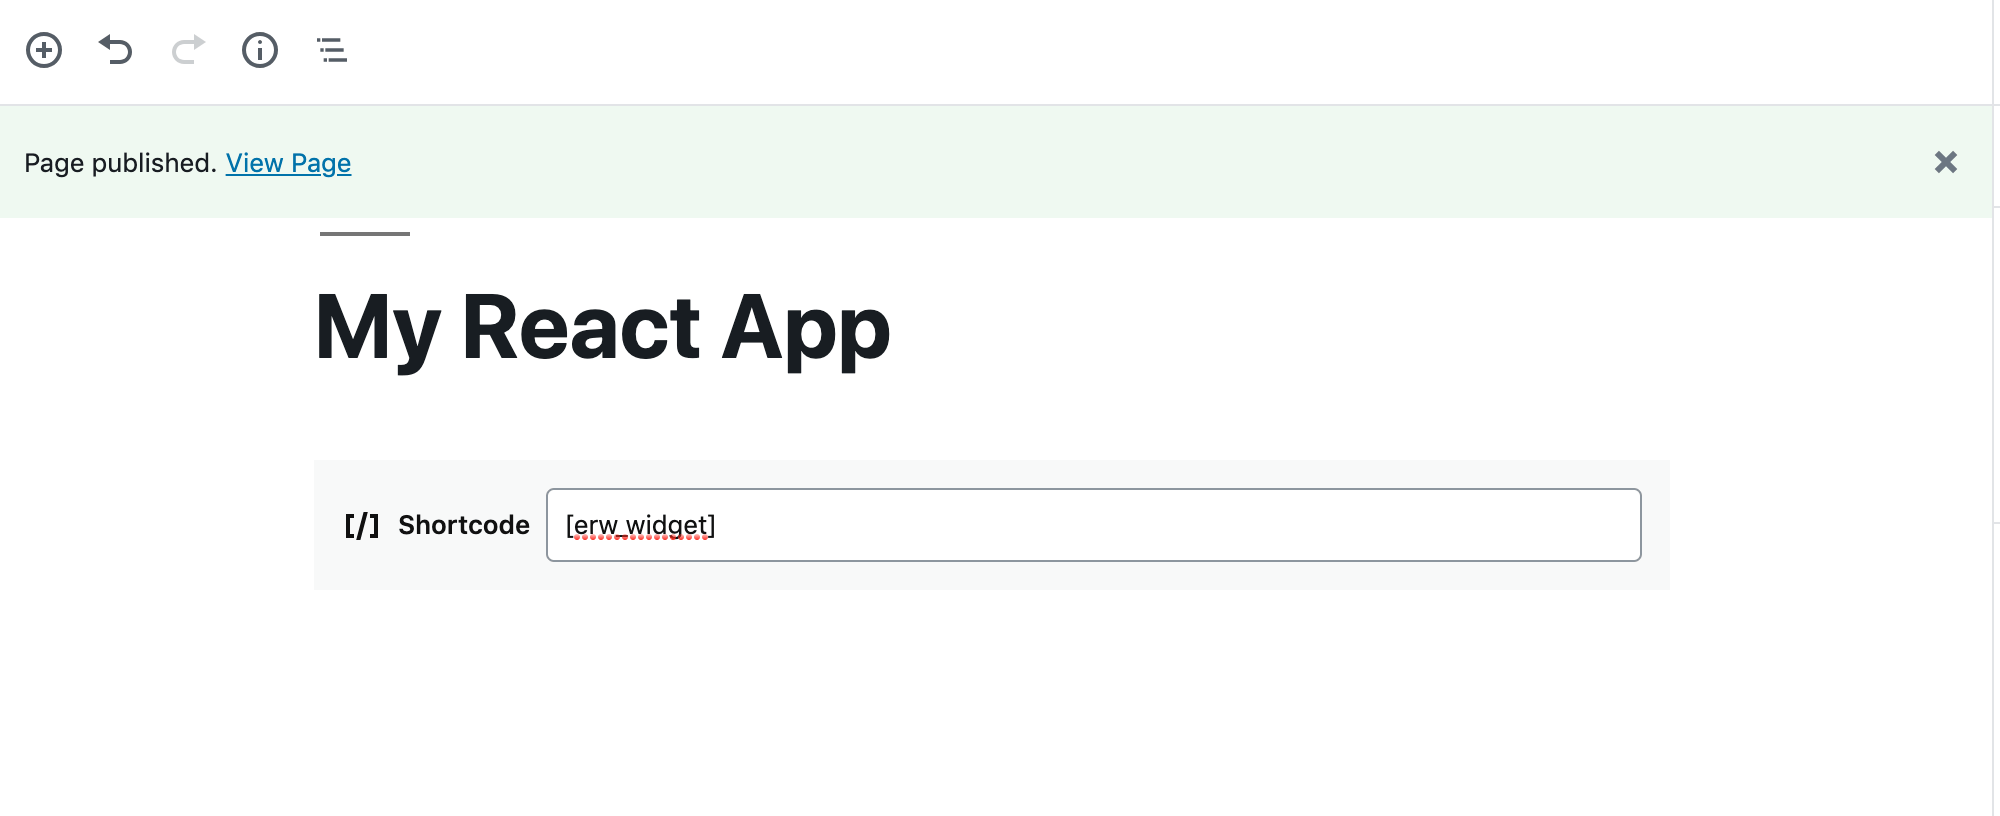
Type the shortcode [erw_widget] into the newly-added text area. Then, click the blue Publish… button in the upper right corner of the window, then press Publish to confirm.

You will see a green bar confirming that the page has been published. Click the View Page link:
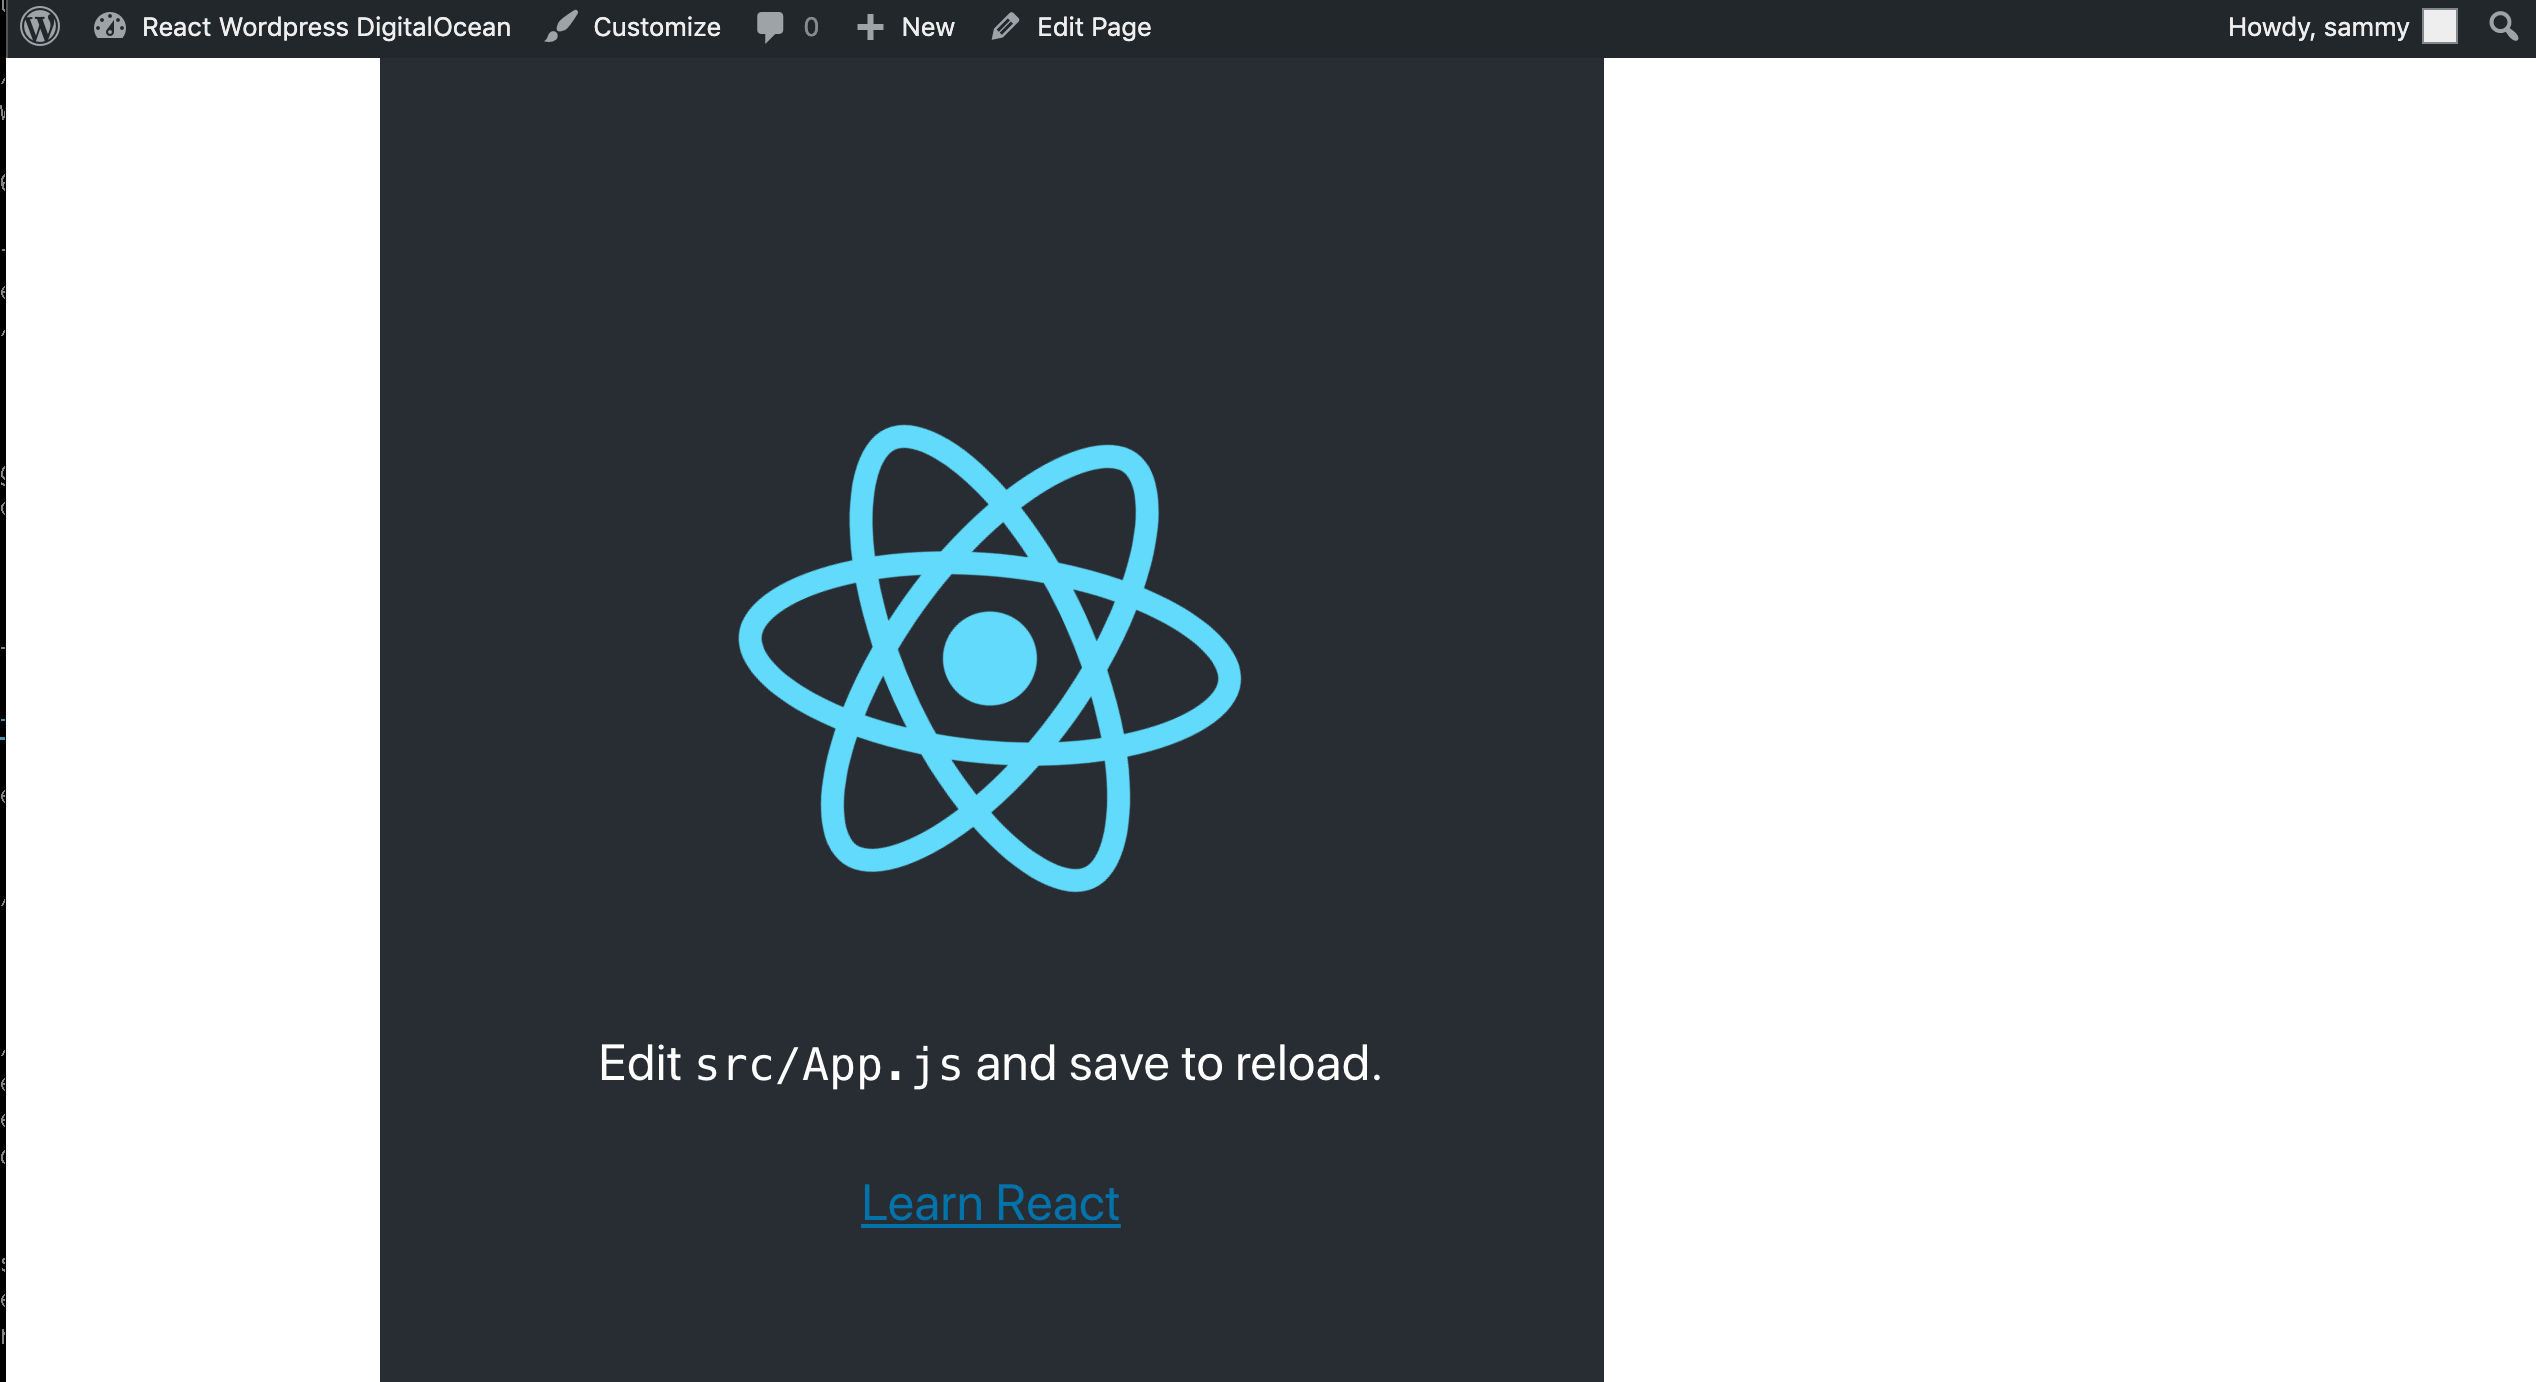
On the screen, you will see your app:
Now that you have a basic React app rendering in the page, you can customize that app with options provided server-side by an admin.
Step 8 — Injecting Server-Generated Settings
In this step, you will inject settings into the application using both server-generated data and user-provided data. This will enable you to display dynamic data in your application and to use the widget multiple times in a page.
First, open the index.js file:
- sudo nano widget/src/index.js
Then, delete the import App from './App'; line and update the contents of index.js with the following highlighted lines:
import React from 'react';
import ReactDOM from 'react-dom';
import './index.css';
import * as serviceWorker from './serviceWorker';

const App = () => (
  <div className="App">
    <span className="App__Message">Hello,<br />World!</span>
  </div>
);

const target = document.getElementById('erw-root');
if (target) { ReactDOM.render(<App />, target); }

serviceWorker.unregister();
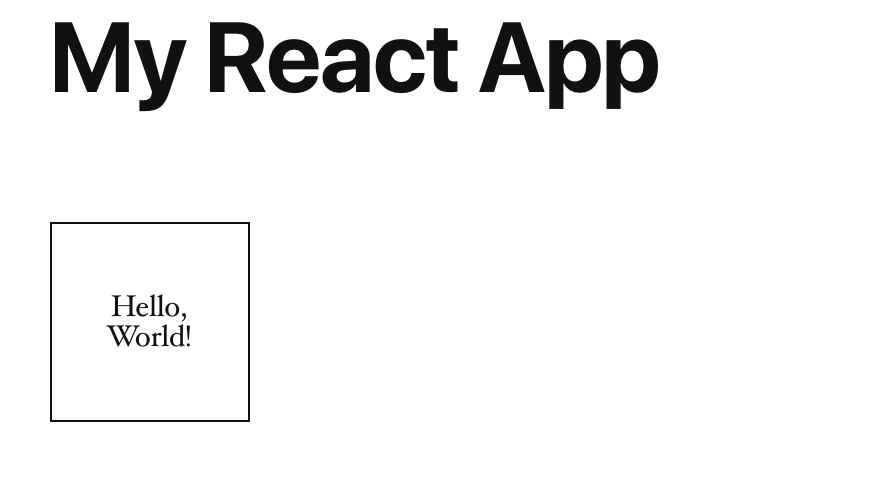
This modifies your React application so that instead of returning the default Create React App screen, it returns an element that reads Hello, World!.
Save and quit the file. Then open index.css for editing:
- nano widget/src/index.css
Replace the contents of index.css with the following code:
.App {
  width: 100px;
  height: 100px;
  border: 1px solid;
  display: inline-block;
  margin-right: 20px;
  position: relative;
}

.App .App__Message {
  font-size: 15px;
  line-height: 15px;
  position: absolute;
  top: 50%;
  transform: translateY(-50%);
  text-align: center;
  width: 100%;
}
The styles for .App will render a 100-pixel square, with a solid border, and the styles for .App__Message will render text that is centered inside the square, both vertically and horizontally.
Write and quit the file, then rebuild the application:
- cd widget
- sudo npm run build
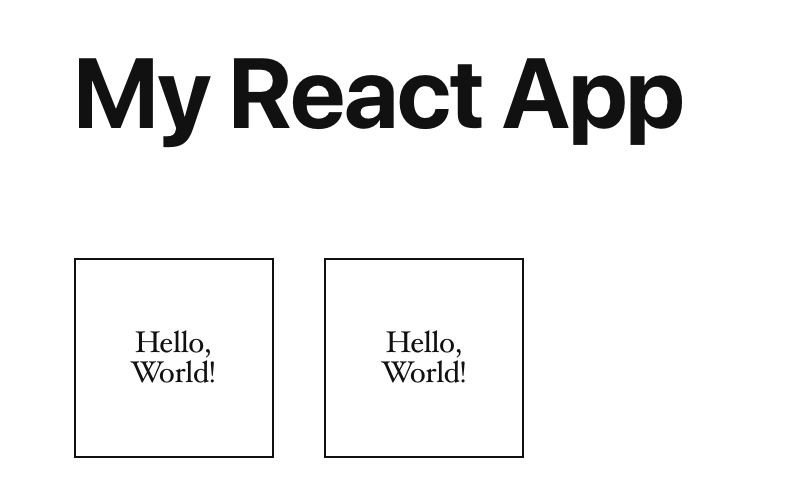
Once the build is successful, refresh https://your_domain/index.php/my-react-app/ in your browser. You will now see the box that you styled with CSS, along with the text Hello, World!:
Next, you will add custom settings, consisting of a user-provided border color and size. You will also pass the display name of the current user from the server.
Updating the Shortcode to Accept Arguments
To pass a user-provided argument, you must first give the user a way to pass an argument. Back in the terminal, navigate back to the top level of your plugin:
- cd ..
Next, open your shortcode.php file for editing:
- nano includes/shortcode.php
Update your shortcode file to contain the following highlighted lines:
<?php
[label /var/www/wordpress/wp-content/plugins/react-wordpress/includes/shortcode.php]
// This file enqueues your shortcode.

defined( 'ABSPATH' ) or die( 'Direct script access disallowed.' );

add_shortcode( 'erw_widget', function( $atts ) {
  $default_atts = array( 'color' => 'black' );
  $args = shortcode_atts( $default_atts, $atts );

  return "<div class='erw-root'></div>";
});
Write and quit the file. Notice how the code adds 'color' => 'black' to the $default_atts array. The array key color instructs WordPress to expect that the color attribute might be passed to the [erw_widget] shortcode. The array value, black, sets the default value. All shortcode attributes are passed to the shortcode function as strings, so if you do not want to set a default value, you could use the empty string ('') instead. The last line changes to use a class instead of an ID because it is expected that there will be more than one of the element in the page.
Now, go back to your browser and click the Edit button beneath your Hello, World! box. Update the WordPress page in your browser to add a second instance of the shortcode, and add a color attribute to both instances. This tutorial will use [erw_widget color="#cf6f1a"] and [erw_widget color="#11757e"]:
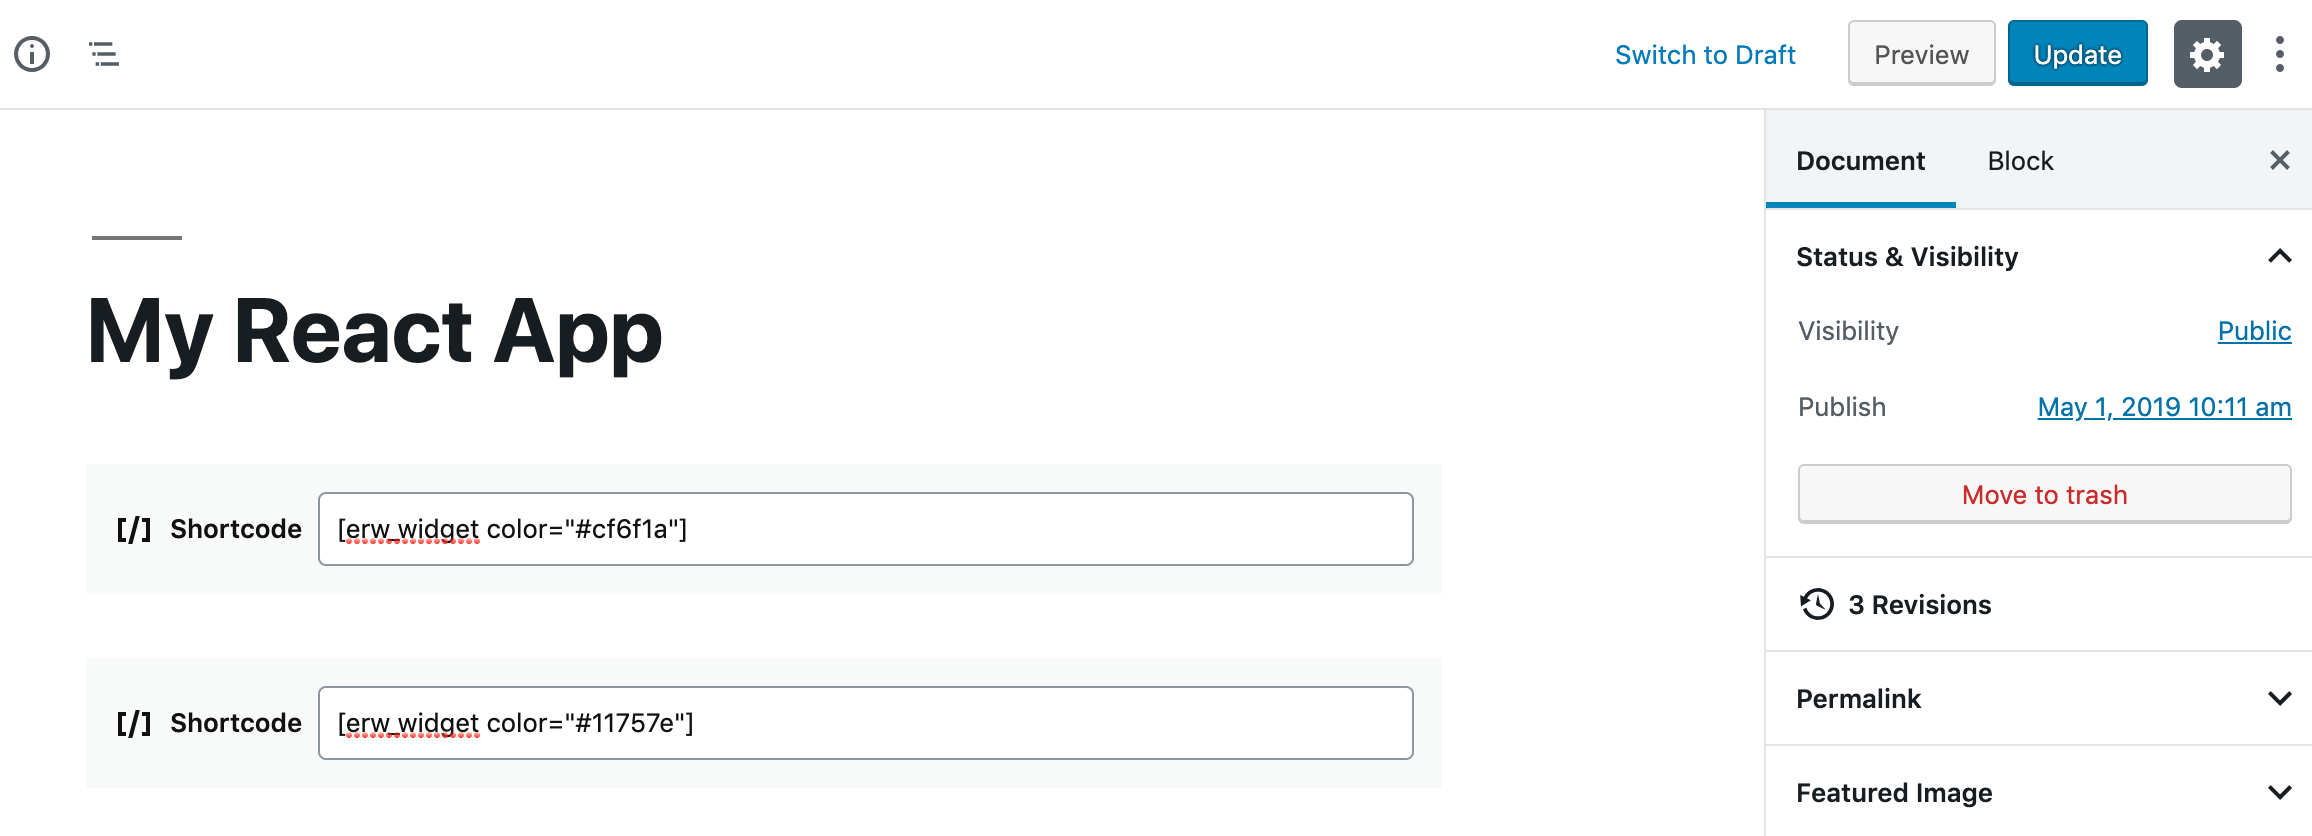
Click the blue Update button to save.
Note: The second widget will not display yet. You need to update the React app to expect multiple instances identified by a class instead of a single instance identified by an ID.
Next, open index.js for editing:
- sudo nano widget/src/index.js
Update it with the following:
import React from 'react';
import ReactDOM from 'react-dom';
import './index.css';
import * as serviceWorker from './serviceWorker';

const App = () => (
  <div className="App">
    <span className="App__Message">Hello,<br />World!</span>
  </div>
);

const targets = document.querySelectorAll('.erw-root');
Array.prototype.forEach.call(targets, target => ReactDOM.render(<App />, target));

serviceWorker.unregister();
Write and quit the file. The updated lines will invoke the React app on each instance with the class erw-root. So if the shortcode is used twice, two squares will appear in the page.
Finally, open index.css for editing:
- sudo nano widget/src/index.css
Update the file to contain the following highlighted line:
.erw-root { display: inline-block; }

.App {
  width: 100px;
  height: 100px;
  border: 1px solid;
  display: inline-block;
  margin-right: 20px;
  position: relative;
}

.App .App__Message {
  font-size: 15px;
  line-height: 15px;
  position: absolute;
  top: 50%;
  transform: translateY(-50%);
  text-align: center;
  width: 100%;
}
With this added line, multiple adjacent widgets will appear side-by-side instead of one above the other.
Save and quit the file.
Now, re-compile your React app:
- cd widget
- sudo npm run build
Now, if you refresh the page in your browser, you will see both widgets:
Notice that the widgets still do not display the border color. This will be addressed in a future section.
Uniquely Identifying Each Widget Instance
In order to uniquely identify each widget, it is necessary to pass an ID from the server. This can be done through the data-id attribute of the root element. This is important, since each widget on the page may have different settings.
To do this, return back to your top level plugin directory and open shortcode.php for editing:
- cd ..
- nano includes/shortcode.php
Update it to have the following highlighted lines:
<?php
// This file enqueues your shortcode.

defined( 'ABSPATH' ) or die( 'Direct script access disallowed.' );

add_shortcode( 'erw_widget', function( $atts ) {
  $default_atts = array( 'color' => 'black' );
  $args = shortcode_atts( $default_atts, $atts );
  $uniqid = uniqid('id');

  return "<div class='erw-root' data-id='{$uniqid}'></div>";
});
The first new line generates a unique ID with the prefix id. The updated line attaches the ID to the React root using the data-id attribute. This will make the ID accessible in React.
Save the file, but do not yet exit from it.
Write Settings to the JavaScript window Object
In the shortcode file, you will write the settings to the page in a window-global JavaScript object. Using the window object ensures it can be accessed from within React.
With shortcode.php still open, update it so it contains the following:
<?php
// This file enqueues your shortcode.

defined( 'ABSPATH' ) or die( 'Direct script access disallowed.' );

add_shortcode( 'erw_widget', function( $atts ) {
  $default_atts = array( 'color' => 'black' );
  $args = shortcode_atts( $default_atts, $atts );
  $uniqid = uniqid('id');

  global $current_user;
  $display_name = $current_user ? $current_user->display_name : 'World';

  ob_start(); ?>
  <script>
  window.erwSettings = window.erwSettings || {};
  window.erwSettings["<?= $uniqid ?>"] = {
    'color': '<?= $args["color"] ?>',
    'name': '<?= $display_name ?>',
  }
  </script>
  <div class="erw-root" data-id="<?= $uniqid ?>"></div>

  <?php
  return ob_get_clean();
});
These updates write a <script> block before each element that initializes the window-global settings object and populates it with the data provided in WP Admin.
Note: The syntax <?= is shorthand for <?php echo
Save and quit the file.
Now, inspect the WordPress page in your web browser. This will show you the HTML for your page. If you CTRL+F and search for window.erwSettings, you will see the settings being written to the HTML of your page as the following:
...
  window.erwSettings = window.erwSettings || {};
  window.erwSettings["id5d5f1958aa5ae"] = {
    'color': '#cf6f1a',
    'name': 'sammy',
  }
...
Retrieve Settings From React
In the React app, you will retrieve the settings based on the ID and pass the border color value to the App component as a property (prop). This lets the App component use the value without needing to know where it came from.
Open index.js for editing:
- sudo nano widget/src/index.js
Update it so it contains the following highlighted lines:
import React from 'react';
import ReactDOM from 'react-dom';
import './index.css';
import * as serviceWorker from './serviceWorker';

const App = ({ settings }) => (
  <div className="App" style={{borderColor: settings.color}}>
    <span className="App__Message">Hello,<br />{settings.name}!</span>
  </div>
);

const targets = document.querySelectorAll('.erw-root');
Array.prototype.forEach.call(targets, target => {
  const id = target.dataset.id;
  const settings = window.erwSettings[id];
  ReactDOM.render(<App settings={settings} />, target)
});

serviceWorker.unregister();
Save the file and exit from your text editor.
Your React app will now use the unique ID from the window-global window.erwSettings object to retrieve settings and pass them to the App component. To put this into effect, re-compile your application:
- cd widget
- sudo npm run build
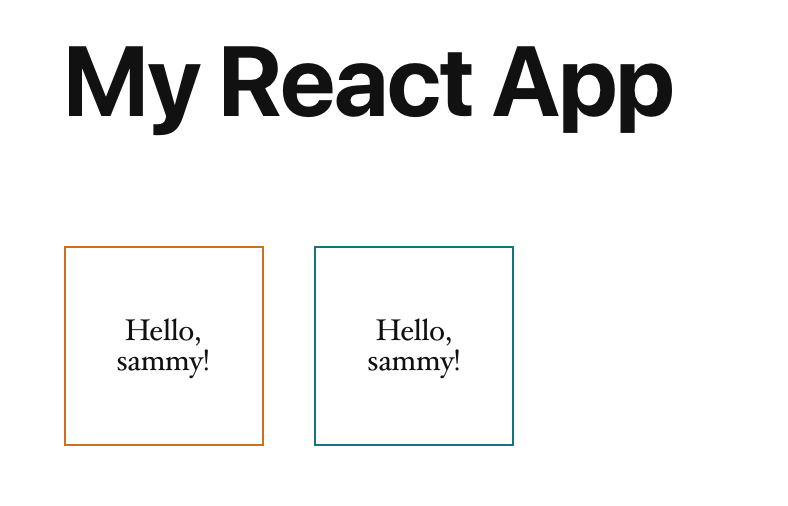
After completing this last step, refresh the WordPress page in your browser. You will see the user-provided border color and the server-provided display name appear in the widgets:
Conclusion
In this tutorial, you created your own WordPress plugin with a React application inside of it. You then built a shortcode as a bridge to make your application embeddable within the WP Admin page builder, and in the end, you customized your widget on the page.
Now, you can expand on your React application with the confidence that your delivery mechanism is already in place. This foundation in WordPress ensures that you can focus on the client-side experience, and as your application expands and grows, you can easily add more production-oriented tools and techniques that will work with any WordPress installation.
For further reading on what you can do with your solid React foundation, try exploring one of these tutorials:
- How To Display Data from the DigitalOcean API with React gives a fun and practical use-case for React.
- How To Build a Customer List Management App with React and TypeScript offers more advanced usage of React along with TypeScript.
Thanks for learning with the DigitalOcean Community. Check out our offerings for compute, storage, networking, and managed databases.
About the author(s)
Work: WordPress-flavored PHP. Hacking: DevOps w/ Golang, Docker, & Ansible. Past: Ruby. Fun: International travel, meditation, chai, & making bread.
Former Senior Technical Editor at DigitalOcean, fiction writer and podcaster elsewhere, always searching for the next good nautical pun! Areas of expertise include Node.js, PostgreSQL, CSS, JavaScript.
Still looking for an answer?
This textbox defaults to using Markdown to format your answer.
You can type !ref in this text area to quickly search our full set of tutorials, documentation & marketplace offerings and insert the link!
Hey thank you so much for this article!
Quick question: How would I enqueue the development scripts from the webpack-dev-server? I tried doing this
if (in_array($_SERVER['REMOTE_ADDR'], array('127.0.0.1, '::1'))) {
            wp_enqueue_script('rev-main', 'http://localhost:3000/static/js', null, null, true);
but referencing it does not seem to work.
$mcqatrConfigs = array(
   'name' => 'MCQ Academy',
    'lang' => 'en',
 );
wp_register_script( 'erw-runtime', get_site_url() . $asset_manifest[ 'runtime-main.js' ], array(), null, true );
wp_localize_script( 'erw-runtime', 'mcqatrConfigs', $mcqatrConfigs );
wp_enqueue_script('erw-runtime');
wp_register_script( 'erw-main', get_site_url() . $asset_manifest[ 'main.js' ], array('erw-runtime'), null, true );
wp_localize_script( 'erw-main', 'mcqatrConfigs', $mcqatrConfigs );
wp_enqueue_script('erw-main');
Just tried to send data to react build script using wp_localize_script function. But how to access the mcqatrConfigs variable in index.js file?
Anyway, Thank you for the awesome article.
Thank you very much for this article!
For anyone else following, please be aware that there is a small typo in the ‘includes/enqueue.php’.
Instead of:
wp_enqueue_script( 'erw-runtime', get_site_url() . $asset_manifest[ 'runtime~main.js' ], array(), null, true );
You need to type:
wp_enqueue_script( 'erw-runtime', get_site_url() . $asset_manifest[ 'runtime-main.js' ], array(), null, true );
You need to use - rather than ~ in ‘runtime-main.js’.
hello very good article if you had to compile 2 different components to show in different sections of the same page as would be done
Hi There, Thank you so much such a great article. I followed it and was able to make it work locally. but react shortcode isn’t working on my website page.
I created the plugin as taught in this article on my server in “/wp-content/plugins/” directory and followed the exact same steps. Enable plugin on website.
I have set “/wp-content/plugins/react-wordpress/widget/build/” as homepage in package.json and when I do “npm start” and “npm run build”, React app is visible only at “http://localhost:3000//wp-content/plugins//react-wordpress/widget/build/”.
I created the shortcode and used it on website page. But it is not working at all.
Kindly help me on this.
Note: I have Debian 10.3 x64 and I am using nginx. Please guide me if I have to make any changes for that. (as I know .htaccess code will be different in case of nginx) is there any other change to make it work?
So I followed this up to the point where it should work for single shortcodes because that’s all I need, I don’t need multiple. Unfortunately this doesn’t work for me. Only the shortcode text is rendered to the page.
Also my asset manifest has an entrypoint array…?
1.Since plugins need to be translatable,so is it a good idea to use react?because all the strings will be coming from js file,instead of php file.
2.Its not a good idea to hardcode assets url like wp-content/plugins/… Since this path can be different for different users.
my react app is running if a use the url
“https://mysite.com/wp-content/plugins/plugin-name/widget/build/”
but when i use the shortcode [erw_widget] in the page it only returns the empty
“<div id=‘my-box-page’></div>”
with no nothing inside it
what can be the problem
I am using create-react-app 4.0.2.
The manifest is slightly different.
runtime-main.js has a hyphen, not a tilde.
Thanks!
Hi, Thanks for the article. Everything works fine, but I am facing issue when I try to use react-router-dom, the page doesn’t load(render) the content at all, can you please provide any solution to that.
This is what I am doing
function App() { const history = createBrowserHistory(); return ( <Router history={history}> <Switch> <Route exact path=“/” component={Home} /> </Switch> </Router> ); }
 This work is licensed under a Creative Commons Attribution-NonCommercial- ShareAlike 4.0 International License.
Become a contributor for community
Get paid to write technical tutorials and select a tech-focused charity to receive a matching donation.

DigitalOcean Documentation
Full documentation for every DigitalOcean product.

Resources for startups and AI-native businesses
The Wave has everything you need to know about building a business, from raising funding to marketing your product.
The developer cloud
Scale up as you grow — whether you're running one virtual machine or ten thousand.

Start building today
From GPU-powered inference and Kubernetes to managed databases and storage, get everything you need to build, scale, and deploy intelligent applications.
