By Michael Holley and Hazel Virdó

Introduction
As adoption of the cloud increases, more and more data is being stored remotely. From music to pictures to personal documents, many people are uploading files onto servers they don’t manage. If you’d rather keep your files on a server you control, you can host your own Dropbox-like file sharing server using Pydio (formerly AjaXplorer).
Pydio provides many of the same features as other file syncing services: a web interface, native clients for Mac, Windows, and Linux, mobile clients for iOS and Android, and the ability to share files with other Pydio users or the public.
Goals
In this article, we’ll stand up a straightforward Pydio installation that runs well even without powerful hardware. Like many enterprise-grade open source projects, Pydio has a community edition and an enterprise edition. We’ll be installing the community edition.
In terms of our software stack, we’ll use Postfix for email support; by default, PHP can’t send emails. If you’d like a lighter solution, you can install ssmtp, but this setup uses Postfix because it requires the least amount of tweaking to get PHP to support it. Note that enabling email support isn’t required, but it makes things much simpler; without it, Pydio won’t be able to send password reset emails or welcome emails.
We’ll also be sticking with Apache as our web server (for simplicity) and a SQLite database (instead of MySQL, for fewer moving parts). This setup is great if the group using Pydio isn’t big or doesn’t push a lot of data to the server at the same time. However, if you need something with a bit more power, there are some guidelines on how to improve performance in the conclusion.
Prerequisites
To follow this tutorial, you’ll need:
-
One Ubuntu 14.04 Droplet with a sudo non-root user.
-
Apache installed, which you can do by following step 2 of this LAMP tutorial.
-
A FQDN (Fully Qualified Domain Name), which you can set up by following this host name tutorial.
-
Postfix installed, which you can set up by following the steps through “Configure Postfix” from this Postfix installation tutorial. When prompted during installation, choose the Internet Site configuration, and enter your domain name (e.g.
example.com) for the System mail name.
We’ll also be setting SSL certificates for your domain using Let’s Encrypt. You’ll be following this Let’s Encrypt on Apache tutorial, but to simplify setup, we won’t be setting that up until Pydio is installed during step 3.
If you’d like to learn more about the how SSL/TLS certs work, please read this OpenSSL essentials article.
Step 1 — Installing Pydio
In this step, we’ll install Pydio’s dependencies and Pydio itself.
First, update your package index.
- sudo apt-get update
Now, install PHP.
- sudo apt-get install php5 libapache2-mod-php5
Next, we need to download the Pydio tar file and decompress it on our web server. The Pydio download is hosted on SourceForge. You can click through to find the mirror closest to your geographically, or you can just use the link below to use the UK mirror.
As of publishing time, Pydio is at version 6.2.2. You may want to check if Pydio has been updated and grab the latest version from SourceForge if so.
Download the Pydio tar file into your home directory.
- wget -P ~/ http://vorboss.dl.sourceforge.net/project/ajaxplorer/pydio/stable-channel/6.2.2/pydio-core-6.2.2.tar.gz
Decompress the tarball.
- tar -xvzf ~/pydio-core-6.2.2.tar.gz
Then move it into the default location for web sites on a Ubuntu server, /var/www.
- sudo mv ~/pydio-core-6.2.2 /var/www/pydio
Once the directory is in place, we’ll need to change its permissions so Apache can store data and update configuration files.
- sudo chown -R www-data:www-data /var/www/pydio
Step 2 — Setting Up PHP Modules
With Pydio in place, we need to install and set up a few dependencies to get Pydio to working correctly. We’ll be making a lot of changes in this step, and we’ll be prompted to restart Apache after every step. You can do this if you want, but here, we’ll wait to the very end of all the setup and restart Apache once.
First, we’ll install and enable the extra PHP modules we need.
- sudo apt-get install php5-mcrypt php5-gd php5-sqlite
One of these PHP modules, mcrypt, isn’t enabled by default. We can enable it using phpenmod.
- sudo php5enmod mcrypt
In addition to installing and enabling some PHP modules, we need to enable the a2enmod Apache module or the sync client won’t work.
- sudo a2enmod rewrite
Now that PHP is fully installed, we need to make a few edits in the php.ini file. There are three lines that need to be updated. Using your preferred editor, like nano, edit the php.ini file.
- sudo nano /etc/php5/apache2/php.ini
Find the line with output_buffering = 4096 and change 4096 to Off.
; Default Value: Off
; Development Value: 4096
; Production Value: 4096
; http://php.net/output-buffering
output_buffering = Off
Next, find upload_max_filesize = 2M and change 2M to any large number, like 1G. (M is short for MB and G for GB.)
; Maximum allowed size for uploaded files.
; http://php.net/upload-max-filesize
upload_max_filesize = 1G
Finally, find post_max_size = 8M and change it the same number as upload_max_filesize or larger. If you think you’ll have multiple large uploads going at the same time or multiple users using the system at once, you can go with a bigger number.
; Maximum size of POST data that PHP will accept.
; Its value may be 0 to disable the limit. It is ignored if POST data reading
; is disabled through enable_post_data_reading.
; http://php.net/post-max-size
post_max_size = 1G
You can save and close /etc/php5/apache2/php.ini. This is Apache’s php.ini file; next, open the command line access php.ini file at /etc/php5/cli/php.ini.
- sudo nano /etc/php5/cli/php.ini
Make the same three changes in this file as above, then save and close it.
Step 3 — Configuring Apache
In this step, we’ll customize our Apache configuration.
First, create and open a new file called pydio.conf with your favorite text editor.
- sudo nano /etc/apache2/sites-available/pydio.conf
The following Apache configuration is a copy of the 000-default configuration file with the comments removed and a few additional blocks added for this specific Pydio install, like the document root and log files.
<VirtualHost *:80>
	ServerAdmin sammy@your_server_ip
	ServerName your_server_ip
	DocumentRoot /var/www/pydio

	ErrorLog ${APACHE_LOG_DIR}/pydio-error.log
	CustomLog ${APACHE_LOG_DIR}/pydio-access.log combined

	<Directory /var/www/pydio/>
		AllowOverride All
	</Directory>
</VirtualHost>
Before you copy and paste this into pydio.conf, let’s go over what is in it:
-
<VirtualHost *:80>defines a virtual host, which allows multiple sites to be hosted on a single server. This line specifically defines this virtual host as the default site on this server and it’ll connect over port 80. -
ServerAdmindefines an email address for Apache to send errors to, if error handling is setup that way. -
ServerNameis the DNS name for the Pydio server or your server’s IP. If you start with an IP and want to change it later, you can, or you can leave the IP but add aServerAliasline with a new DNS name; both will work. -
DocumentRootis where the website is stored on your Droplet that Apache needs to server up. -
ErrorLogandCustomLogdefine where to save the Apache logs. These log options can get pretty complicated if you need a very custom logging setup, but these defaults will work for our purposes.
Paste this configuration into the file, then save and close it. With our Apache configuration files in place, we now need to disable the default Apache configuration.
- sudo a2dissite 000-default
Now, enable our two config files.
- sudo a2ensite pydio
In the prerequisites, we mentioned that we would set up Let’s Encrypt to enable SSL/TLS encryption. This keeps our login information and our data secure from people who can sniff packets on our local network or over the internet. Because we are using Apache as our webserver, Let’s Encrypt has support to automatically configure Apache for us. To make things easy, we’ve set up Apache without SSL so when we run the auto Let’s Encrypt script it’ll set it all up for us.
Now is time to follow the Let’s Encrypt on Apache tutorial. Use your FQDN you’ve chosen during the setup of Let’s Encrypt and the installer script will see our Apache config and create an SSL version for you.
Make sure to choose pydio.conf if you’re asked which virtual host you’d like to choose. Because we want our connection to always be secure, make sure to select Secure — Make all requests redirect to secure HTTPS access when the Let’s Encrypt script asks.
Finally, we can restart Apache for our changes to take effect.
- sudo service apache2 restart
Step 4 — Customizing PHP Mailer Support
Postfix should be installed from the prerequisites. Next, we’ll want to make a quick change to prevent anything but local apps from using it.
To make this change, we’ll need to edit the Postfix config file, /etc/postfix/main.cf.
- sudo nano /etc/postfix/main.cf
Search for the inet_interfaces line and update it from all to localhost.
. . .
recipient_delimiter = +
inet_interfaces = localhost
inet_protocols = all
. . .
Now restart the Postfix service to enable the changes.
- sudo service postfix restart
Step 5 — Finishing Pydio Setup
Pydio is installed; in this step, we’ll finish setting it up.
Visit https://example.com in your favorite browser. The first page you see will be labeled Pydio Diagnostic Tool. In the list on that page, the top item is a warning about Server charset encoding. We’ll fix that in a moment. As long as that is the only warning and the rest of the items are OK, click on the button CLICK HERE TO CONTINUE TO PYDIO.
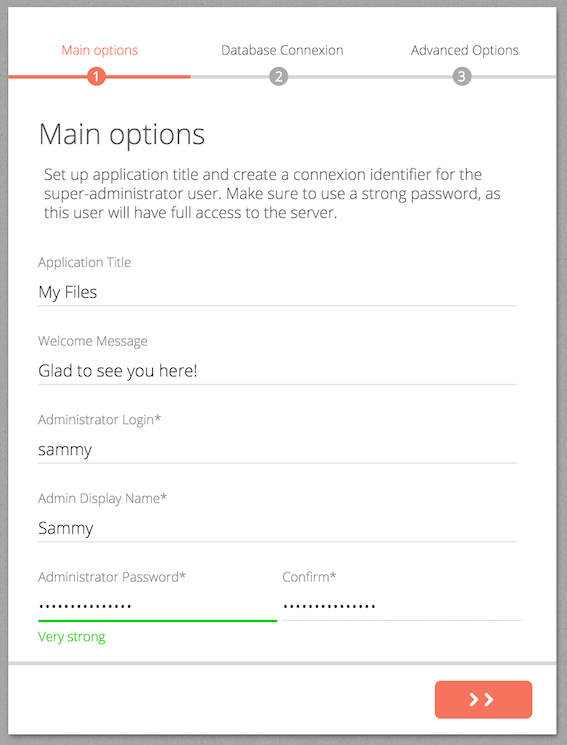
When prompted, click the Start Wizard > button. On the first page for Main options, fill out the fields:
- Application Title, which is what’s seen in the browser’s title bar
- Welcome Message, which is seen on the login screen
- Administrator Login, the admin username
- Admin Display Name, which is what it sounds like
- Adminstrator Password
When you have that all filled in, press the red >> button in the bottom right.
On the second page for Database Connexion, choose Sqlite 3 from the Database pull down menu. Don’t modify the file line to where the SQLite database will be stored. Click on the Test Connection button to make sure everything is working. You should see a green box will appear at the bottom of the screen if the test is successful. Then continue by clicking on the >> button.
On stage three for Advanced Options, most things will be automatically detected, so you just need to confirm they’re correct. The one thing we will need to do is enable email support.
- For Enable emails, select Yes from the pull down menu
- For Php Mailer, select Mail
- Enter your email address for the Administrator Email
You can click the Try sending an email with the configured data button to make sure everything is working.
Finally, finish the installation by clicking on the Install Pydio button.
Step 6 — Using Pydio
Now that Pydio is installed, we will be at the login screen with our custom welcome message. We can now log in with the admin user we defined in the previous step.
Once we’ve logged in, we’ll see two options listed on the left: Common Files and My Files. These two options are called workspaces, which are essentially file shares or folders where you can store files. My Files is just for you, and Common Files is a shared folder for all users on this Pydio installation.
We’ll be able make other workspaces and share them with whomever you wish. Now that Pydio is installed, click around and see how it works and invite other users to store their files with you.
Though the web interface is useful and you can upload, download, arrange, and share your data, you’ll probably upload your files with Pydio directly through a native client. You can download the desktop clients here (Mac/Win/Linux), the iOS client here and the Android client here.
With the sync client installed, launch Pydio Sync and follow the wizard to get it syncing our first workspace locally.
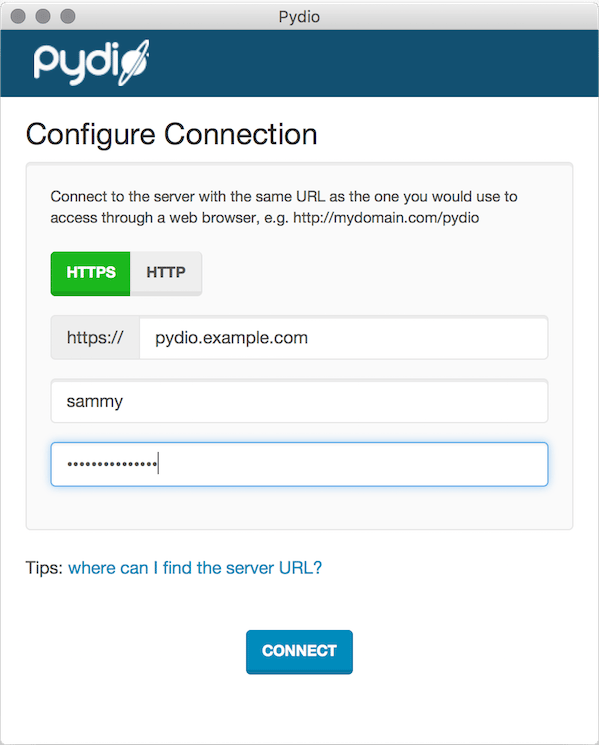
If you chose to use a self signed certificate (instead of Let’s Encrypt), you’ll get an error about the certificate. If you do, check the Trust SSL Certificate box at the bottom that appears after the warning, and then click the Connect button again.
Unlike other file sharing tools that will sync all of the content under your account, Pydio lets you choose to sync each workspace individually. When you run the client for the first time, you can choose which workspace to sync locally. Once the first synchronization is set, you can add additional workplace synchronizations.
Conclusion
Pydio lets you take control of your data and with the native clients on all major desktop and mobile platforms, your data can be accessible whenever you need it as well. But Pydio can do more than just host your files. There is a collection of plugins to extend functionality.
If you find Pydio’s performance in this setup a little too slow for your use case, here are a few tips for improving it:
- Couple Pydio with a MySQL or PostgreSQL backend instead of Sqlite.
- Use Nginx as the web server instead of Apache.
- Upgrade your server to have more RAM and CPU
- You can even enable WebDAV access on your server for 3rd party app syncing that are WebDAV aware.
Thanks for learning with the DigitalOcean Community. Check out our offerings for compute, storage, networking, and managed databases.
About the author(s)
I love Linux. I've been using it, setting it up, supporting it, and maintaining it since 2002. I do it for work and for play. Linux rocks!
former DO tech editor publishing articles here with the community, then founded the DO product docs team (https://do.co/docs). to all of my authors: you are incredible. working with you was a gift. love is what makes us great.
Still looking for an answer?
This textbox defaults to using Markdown to format your answer.
You can type !ref in this text area to quickly search our full set of tutorials, documentation & marketplace offerings and insert the link!
Does anyone know the differences in installing pydio 7 this way? I followed the steps but apache doesn’t seem to even start.
@jamesnicolas I haven’t played with Pydio 7, but I few months back I received an email with a Google Doc on how to setup Pydio 7 from the team behind Pydio. Maybe this will help:
https://docs.google.com/document/d/1zsWvHdDcaDeIlDOh6K82oMduFtgNDmWWVTajY_G3ySw/edit?usp=sharing
sudo apt-get install php5-mcrypt php5-gd php5-sqlite
E: Package ‘php5-mcrypt’ has no installation candidate E: Package ‘php5-gd’ has no installation candidate E: Package ‘php5-sqlite’ has no installation candidate
Please help me
 This work is licensed under a Creative Commons Attribution-NonCommercial- ShareAlike 4.0 International License.
Become a contributor for community
Get paid to write technical tutorials and select a tech-focused charity to receive a matching donation.

DigitalOcean Documentation
Full documentation for every DigitalOcean product.

Resources for startups and AI-native businesses
The Wave has everything you need to know about building a business, from raising funding to marketing your product.
The developer cloud
Scale up as you grow — whether you're running one virtual machine or ten thousand.

Start building today
From GPU-powered inference and Kubernetes to managed databases and storage, get everything you need to build, scale, and deploy intelligent applications.
