By finid and Sharon Campbell

Introduction
Postfix is an MTA (Mail Transfer Agent), an application used to send and receive email. In this tutorial, we will install and configure Postfix so that it can be used to send emails by local applications only – that is, those installed on the same server that Postfix is installed on.
Why would you want to do that?
If you’re already using a third-party email provider for sending and receiving emails, you, of course, do not need to run your own mail server. However, if you manage a cloud server on which you have installed applications that need to send email notifications, running a local, send-only SMTP server is a good alternative to using a 3rd party email service provider or running a full-blown SMTP server.
An example of an application that sends email notifications is OSSEC, which will send email alerts to any configured email address (see How To Install and Configure OSSEC Security Notifications on Ubuntu 14.04). Though OSSEC or any other application of its kind can use a third-party email provider’s SMTP server to send email alerts, it can also use a local (send-only) SMTP server.
That’s what you’ll learn how to do in this tutorial: how to install and configure Postfix as a send-only SMTP server.
Note: If your use case is to receive notifications from your server at a single address, emails being marked as spam is not a significant issue, since you can whitelist them.
If your use case is to send emails to potential site users, such as confirmation emails for message board sign-ups, you should definitely do Step 5 so your server’s emails are more likely to be seen as legitimate. If you’re still having problems with your server’s emails being marked as spam, you will need to do further troubleshooting on your own.
Note: As of June 22, 2022, DigitalOcean is blocking SMTP for all new accounts. As a part of this new policy, we have partnered with SendGrid so our customers can still send emails with ease. You can learn more about this partnership and get started using SendGrid by checking out our DigitalOcean’s SendGrid Marketplace App.
Prerequisites
Please complete the following prerequisites.
- Ubuntu 14.04 Droplet
- Go through the initial setup. That means you should have a standard user account with
sudoprivileges - Have a valid domain name, like example.com, pointing to your Droplet
- Your server’s hostname should match this domain or subdomain. You can verify the server’s hostname by typing
hostnameat the command prompt. The output should match the name you gave the Droplet when it was being created, such as example.com
If all the prerequisites have been met, you’re now ready for the first step of this tutorial.
Step 1 — Install Postfix
In this step, you’ll learn how to install Postfix. The most efficient way to install Postfix and other programs needed for testing email is to install the mailutils package by typing:
sudo apt-get install mailutils
Installing mailtuils will also cause Postfix to be installed, as well as a few other programs needed for Postfix to function. After typing that command, you will be presented with output that reads something like:
The following NEW packages will be installed:
guile-2.0-libs libgsasl7 libkyotocabinet16 libltdl7 liblzo2-2 libmailutils4 libmysqlclient18 libntlm0 libunistring0 mailutils mailutils-common mysql-common postfix ssl-cert

0 upgraded, 14 newly installed, 0 to remove and 3 not upgraded.
Need to get 5,481 kB of archives.
After this operation, 26.9 MB of additional disk space will be used.
Do you want to continue? [Y/n]
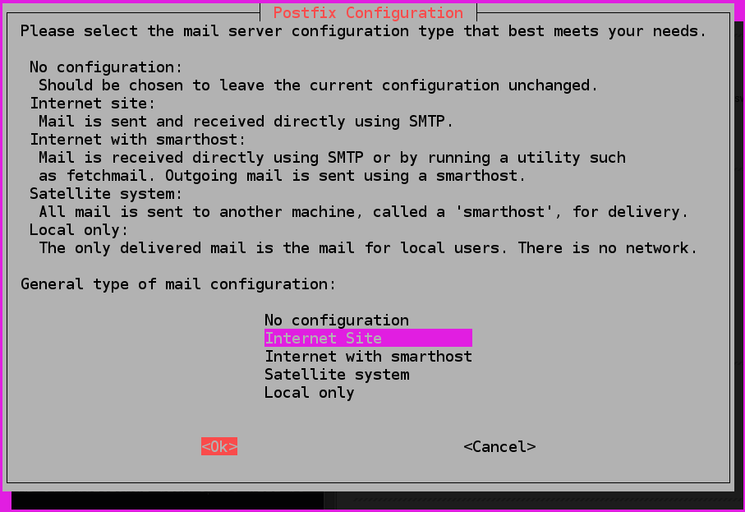
Press ENTER to install them. Near the end of the installation process, you will be presented with a window that looks exactly like the one in the image below. The default option is Internet Site. That’s the recommended option for this tutorial, so press TAB, then ENTER.
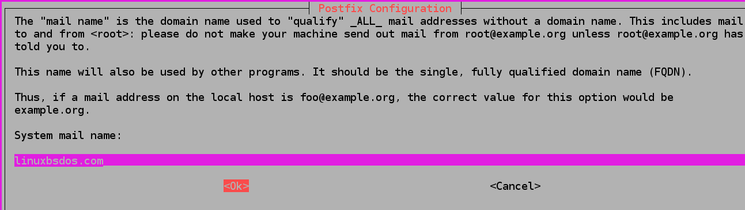
After that, you’ll get another window just like the one in this next image. The System mail name should be the same as the name you assigned to the Droplet when you were creating it. If it shows a subdomain like mars.example.com, change it to just example.com. When you’re done, Press TAB, then ENTER.
After installation has completed successfully, proceed to Step 2.
Step 2 — Configure Postfix
In this step, you’ll read how to configure Postfix to process requests to send emails only from the server on which it is running, that is, from localhost. For that to happen, Postfix needs to be configured to listen only on the loopback interface, the virtual network interface that the server uses to communicate internally. To make the change, open the main Postfix configuration file using the nano editor.
sudo nano /etc/postfix/main.cf
With the file open, scroll down until you see the entries shown in this code block.
mailbox_size_limit = 0
recipient_delimiter = +
inet_interfaces = all
Change the line that reads inet_interfaces = all to inet_interfaces = loopback-only. When you’re done, that same section of the file should now read:
mailbox_size_limit = 0
recipient_delimiter = +
inet_interfaces = loopback-only
In place of loopback-only you may also use localhost, so that the modified section may also read:
mailbox_size_limit = 0
recipient_delimiter = +
inet_interfaces = localhost
When you’re done editing the file, save and close it (press CTRL+X, followed by pressing Y, then ENTER). After that, restart Postfix by typing:
sudo service postfix restart
Step 3 — Test That the SMTP Server Can Send Emails
In this step, you’ll read how to test whether Postfix can send emails to any external email account. You’ll be using the mail command, which is part of the mailutils package that was installed in Step 1.
To send a test email, type:
echo "This is the body of the email" | mail -s "This is the subject line" user@example.com
In performing your own test(s), you may use the body and subject line text as-is, or change them to your liking. However, in place of user@example.com, use a valid email address, where the domain part can be gmail.com, fastmail.com, yahoo.com, or any other email service provider that you use.
Now check the email address where you sent the test message.
You should see the message in your inbox. If not, check your spam folder.
Note: With this configuration, the address in the From field for the test emails you send will be sammy@example.com, where sammy is your Linux username and the domain part is the server’s hostname. If you change your username, the From address will also change.
Step 4 — Forward System Mail
The last thing we want to set up is forwarding, so that you’ll get emails sent to root on the system at your personal, external email address.
To configure Postfix so that system-generated emails will be sent to your email address, you need to edit the /etc/aliases file.
sudo nano /etc/aliases
The full content of the file on a default installation of Ubuntu 14.04 is shown in this code block:
# See man 5 aliases for format
postmaster:    root
With that setting, system generated emails are sent to the root user. What you want to do is edit it so that those emails are rerouted to your email address. To accomplish that, edit the file so that it reads:
# See man 5 aliases for format
postmaster:    root
root:          sammy@example.com
Replace sammy@example.com with your personal email address. When done, save and close the file. For the change to take effect, run the following command:
sudo newaliases
You may now test that it works by sending an email to the root account using:
echo "This is the body of the email" | mail -s "This is the subject line" root
You should receive the email at your email address. If not, check your spam folder.
(Optional) Step 5 — Protect Your Domain from Spammers
In this step, you’ll be given links to articles to help you protect your domain from being used for spamming. This is an optional but highly recommended step, because if configured correctly, this makes it difficult to send spam with an address that appears to originate from your domain.
Doing these additional configuration steps will also make it more likely for common mail providers to see emails from your server as legitimate, rather than marking them as spam.
- How To use an SPF Record to Prevent Spoofing & Improve E-mail Reliability
- How To Install and Configure DKIM with Postfix on Debian Wheezy
- Also, make sure the PTR record for your server matches the hostname being used by the mail server when it sends messages. At DigitalOcean, you can change your PTR record by changing your Droplet’s name in the control panel
Though the second article was written for Debian Wheezy, the same steps apply for Ubuntu 14.04.
Thanks for learning with the DigitalOcean Community. Check out our offerings for compute, storage, networking, and managed databases.
About the author(s)
Jack of all trades, master of a few
Current fan and former Editorial Manager at DigitalOcean. Hi! Expertise in areas including Ubuntu, Docker, Rails, and more.
Still looking for an answer?
This textbox defaults to using Markdown to format your answer.
You can type !ref in this text area to quickly search our full set of tutorials, documentation & marketplace offerings and insert the link!
I created a Droplet with LAMP Application and I follow this instructions but php mail() function doesn’t work. Can you help me?
I’ve followed these directions, and the send-only server works as expected when sending email to any@externaldomains.com, however it won’t send out to email addresses for our actual domain.
To clarify, our email is hosted by Google Apps, not on our server. So when Postfix is instructed to send mail to any@ourhostname.com, that email needs to go out to Google, not just try to route to a local user on the server.
I hope that is clear enough.
This comment has been deleted
I’m having the same issue as cliffkujala
In the 4th step if I put root: xxxx@mydomain.com it does not work but if I put root: xxxx@gmail.com it works.
I am also using google apps for business to send and receive emails for xxxx@mydomain.com
Also: how does this work if you are running several domains on one droplet? I currently have two domains hosting wordpress and need notifications sent to xxxx@mydomain1.com and xxxx@mydomain2.com from the wordpress app for email notification and contact forms and such.
Does setting root: xxxx@gmail.com just send notifications from the droplet server or does it sent notifications from the wordpress app?
I fought this issue for a whole day and then some before I finally found a solution. I created my email at myname@mydomain.com through the Google app for business and I could get email through the mail app from any other mail app but could not get it from a form on my site. I searched and searched then I finally destroyed the droplet and started from scratch.
I created a new droplet with a hostname that had nothing to do with my site.
Then I did the initial server setup for Ubuntu 14.04 here https://www.digitalocean.com/community/tutorials/initial-server-setup-with-ubuntu-14-04
Then set up Apache virtual host from this tuturial https://www.digitalocean.com/community/tutorials/how-to-set-up-apache-virtual-hosts-on-ubuntu-14-04-lts
Then finally followed this tutorial.
It seems like the key is not having a host name that is the same as your domain.com name. When using the form on the website the form information will now to go my myname@mydomain.com address in my Google app rather than the local deliver system at /var/mail/user
So my question is: What do I do differently to set up for two separate domain.com’s on one droplet?
Is it going to be as simple as setting up a different user for the 2nd domain? Such as adding
user1: user1@domain1.com
then
user2: user2@domain2.com
in the /etc/aliases file?
More specifically I use admin@domain1.com and admin@domain2.com. I had been creating both sites with the same user name either user or wp-user as suggested in the tutorial for secure installs and updates for WordPress.
Eventually I would like to setup and use my own mail server but I still have far too much to learn first so for now letting Google App handle it works fine for me.
thanks for the tutorial can you use that configuration for bulk mailing ? and what size should u use in that configuration??
At step 1, I don’t get to see that screen like the image is showing. And why would I name it like my droplet? what if I host more than one website on my droplet?
I followed this tutorial and tried step 4 to send an email to my gmail and it doesn’t work.
Thanks for the guide, unfortunately I’m getting an error on step one :/
Any ideas?
I’d previously attempted to install postfix directly, not using mailutils, and it never had prompted me to check Internet Site, therefore I am following this to ensure that gets done correctly.
echo “This is the body of the email” | mail -s “This is the subject line” user@example.com
this command only working with gmail. it is not working with yahoomail or outlook or any other mail. why is that? please let me know
Hey great post…I have added a post in my blog about setting up a local mail server CentOS 7… But I didn’t have much idea about it in UBUNTU. This post is very helpful thanks…
If Postfix was previously installed and set up (perhaps by the droplet bundle itself) the Postfix config screen will not appear as seen in step 1 I had the same prob. This will bring up the Postfix config screen: sudo dpkg-reconfigure postfix
Replying to christianblair
Thanks! It does open up a more extensive config process than is covered by this tutorial. I winged it and got lucky with configuring it correctly. Now everything is working perfectly…
Hello, that may be a totally stupid question, but still, what do I do if I have many different domains running on my Droplet? It wouldn’t really make sense to name the Droplet after one of them. How do I get this to work then?
Hello!
Thank you for this article!
I’ve configured my machine according to the docs, but I’m not getting E-Mails on any domains. They either not sent or not delivered. How do I debug this situation and make it work?
Thank you!
Can anyone tell me what DNS records I would need to add to have this working with a subdomain?
thanks
What should we do if our hostname is not a FQDN? When I got started with my project a year ago, I called my droplet “blog” but not the actual domain that I’m using to point to it (“example.com”). Now, my emails are sent from “root@blog” instead of from “root@example.com”. As a result, my emails are still getting flagged as spam:
Return-Path: <[name]@blog> Received: from example.com ([100.101.200.205]) by mx.google.com with ESMTP id [REDACTED] for <[name]@gmail.com>; Fri, 03 Jun 2016 10:17:14 -0700 (PDT) Received-SPF: neutral (google.com: 100.101.200.205 is neither permitted nor denied by best guess record for domain of name@blog) client-ip=100.101.200.205; Authentication-Results: mx.google.com; dkim=temperror (no key for signature) header.i=@blog; spf=neutral (google.com: 100.101.200.205 is neither permitted nor denied by best guess record for domain of name@blog) smtp.mailfrom=name@blog Received: by example.com (Postfix) id xxxxxxxxx; Fri, 3 Jun 2016 10:17:13 -0700 (PDT) Delivered-To: root@blog Received: by example.com (Postfix, from userid 1000) id xxxxxxxxx; Fri, 3 Jun 2016 10:17:13 -0700 (PDT)
I’m a noob at all this, so my apologies if this is a silly question.
Hi, thank you for the tutorial.
I had a little problem with it, when you say: “you will be presented with a window that looks exactly like the one in the image below.” That was a window I’ve never received, and as a consequence, i think, the options on: /etc/postfix/main.cf aren’t the same.
Can anyone help me out? Cheers,
Hi, Great article. I used this and other articles about how to configure Postfix as a send only SMTP server to Gmail.
I am actually running ubuntu 16.04 and 14.04 on another system.
I have set the relay host gmail and I can send email successfully to gmail or any other email address.
Problem was when cron jobs sent email or anybody else sent email to root, the email would go to root@gmail.com
I thought I had fixed this with a kludge. I tested sending mail to root and it went where I wanted it to,namely myname@gmail.com
The way I did this was probably not correct but it worked and I couldn’t find any advice how to do this properly.
What I have configured is myorigin = /etc/mailname
The contents of mailname is “gmail.com”
The contents of /etc/aliases postmaster: root root: myname
i had myname@gmail.com in /etc/aliases but that didn’t seem work in ubuntu 14.04 so I just put in my gmail username and kludged the rest by setting /etc/mailname to gmail.com
myhostname = myname-Aspire.gateway.mts.net
Almost everything works perfectly. I can send email to anybody outside which is relayed through gmail. If I send email to root,it properly now goes to myname@gmail.com and gets send properly.
The problem is when anacron (or other apps) have a problem and send email to root it goes to root@gmail.com
I would love to set this up properly but would also be happy with a kludge.
Thanks I have been trying to fix this for many months with no luck.
Bob
my postfix stopped working few days ago and no matter what i do, cant make it work again. removed and reinstalled, and followed this guide step by step but still no good. any idea why?
Not sure why STEP 4 doesn’t work for me. I am able to successfully get emails if I do this.
echo “This is the body of the email” | mail -s “This is the subject line” myemail@gmail.com
But cannot get this to work.
echo “This is the body of the email” | mail -s “This is the subject line” root
I cannot get emails sent to root forward to myemail@gmail.com
I followed this tutorial as well as set up SPF and DKIM. I’m using Gmail for an email client so all the gmail MX records were added to my DNS. I can successfully receive emails in my Gmail inbox when they are sent from another client such as outlook.com. When the Wordpress installation on my droplet sends out an email to a domain that isn’t my droplet’s domain the emails are successfully sent however when Wordpress attempts to send an email to the same domain as the droplet the emails are never making it to my Gmail inbox… Can someone explain to me why and/or how I can fix that?
okay…ive been following this tutorial and still cant connect from my mail client(tbird,icedive,outlook)…is there anyway to connect from my desktop with mail client to this send-mail-only server?
Awesome tutorial @finid, but could you add some solutions for if Step 3 doesn’t work and the test email doesn’t send? I’m sure it would prove helpful, for me at least!
Thanks a lot!
After reading this thread, which made a lot of sense: https://serverfault.com/questions/445349/postfix-bouncing-when-destination-is-my-domain I removed my own domain as @cliffkujala suggsted. After removing it however I kept getting a weird error where it swaps the domain name after the email to “help”. I checked my hosts file and nowhere is there a host “help”
For example:
Jun  9 19:13:57 server postfix/pickup[7890]: C37B416E52: uid=1001 from=<user@help>
Jun  9 19:13:57 server postfix/qmgr[7891]: C37B416E52: from=<user@help>, size=428, nrcpt=1 (queue active)
Jun  9 19:13:57 server postfix/smtp[7895]: C37B416E52: to=<user.name@help>, relay=none, delay=0.08, delays=0.05/0/0.03/0, dsn=5.4.4, status=bounced (Host or domain name not found. Name service error for name=help type=AAAA: Host found but no data record of requested type)
Jun  9 19:13:57 server postfix/qmgr[7891]: D6AA716E48: from=<>, size=2577, nrcpt=1 (queue active)
Jun  9 19:13:57 server postfix/bounce[7892]: C37B416E52: sender non-delivery notification: D6AA716E48
Jun  9 19:13:57 server postfix/qmgr[7891]: C37B416E52: removed
Jun  9 19:13:57 server postfix/smtp[7895]: D6AA716E48: to=<user@help>, relay=none, delay=0.05, delays=0.02/0/0.03/0, dsn=5.4.4, status=bounced (Host or domain name not found. Name service error for name=help type=AAAA: Host found but no data record of requested type)
Jun  9 19:13:57 server postfix/qmgr[7891]: D6AA716E48: removed
Here’s my host file
127.0.0.1 localhost.localdomain localhost
127.0.0.1 web-server

# The following lines are desirable for IPv6 capable hosts
::1 ip6-localhost ip6-loopback
fe00::0 ip6-localnet
ff00::0 ip6-mcastprefix
ff02::1 ip6-allnodes
ff02::2 ip6-allrouters
ff02::3 ip6-allhosts
Thanks for the tutorial. I’ve decided to set up Mailgun – they provide 10k emails/month for free, which I found enough for my purposes. Here’s a tutorial on how to set it up with Wordpress:
http://www.wpbeginner.com/wp-tutorials/how-to-fix-wordpress-not-sending-email-issue/
This is a great tutorial.
One thing, though: you should also mention that you need to add your correct hostname to your /etc/hostname file. Otherwise, you may get a message like this when you check your email in a spam tester: “We didn’t find a mail server (MX Record) behind your domain name thiswrongdomainname.”
In my case, I think my username or something got added to that hostname file. Changing that to my actual domain name got my emails to actually be accepted by mail servers.
On debian 8, I have to replace the command:
sudo apt-get install mailutils
by this command to install postfix:
sudo apt-get install postfix
otherwise it will install exim instead of postfix.
i can send mail, but it sent by screweb.com when i receive it in my gmail account . why?
To reconfigure “sudo dpkg-reconfigure postfix” source : https://help.ubuntu.com/community/Postfix
i installed postfix successfully. i am able to send the mails from command prompt. but those mails are going to spam folder . how can i prevent going to spam folder. i need all mails goes to inbox only. anyone help me???
i installed postfix successfully. i am able to send the mails. but there is problem with spam. all emails are going to spam folder when i am sending mails. please help me…
This worked except for being able to send emails to the domain that the server is running (…if the server is not the mail host. And per another DO article, it shouldn’t be!) For example, if the server is example.com, I cannot successfully send mail to me@example.com because, as it tells me, the server doesn’t know the user ‘me’
So, after concluding all steps above, return to /etc/postfix/main.cf Find the line with ‘mydestination’ Set it to: mydestination = localhost
(I had earlier made the choice: inet_interfaces = localhost maybe that’s important.)
This was the last step to get my Ubuntu 16.04LTS server to send emails. (I had also edited /etc/aliases but that had no effect)
This guide is outdated and the step by step instructions are no longer valid. There are no postfix configuration screens like shown here.
 This work is licensed under a Creative Commons Attribution-NonCommercial- ShareAlike 4.0 International License.
Become a contributor for community
Get paid to write technical tutorials and select a tech-focused charity to receive a matching donation.

DigitalOcean Documentation
Full documentation for every DigitalOcean product.

Resources for startups and SMBs
The Wave has everything you need to know about building a business, from raising funding to marketing your product.
The developer cloud
Scale up as you grow — whether you're running one virtual machine or ten thousand.

Get started for free
Sign up and get $200 in credit for your first 60 days with DigitalOcean.*

*This promotional offer applies to new accounts only.