Not using Ubuntu 14.04?
Choose a different version or distribution.
Introduction
As your websites grow and see an increase in traffic, one of the components that shows stress the fastest is the backend database. If your database is not distributed and configured to handle high loads, it can easily be overwhelmed by a relatively modest increase in traffic.
One way of dealing with this is leveraging a memory object caching system, like memcached. Memcached is a caching system that works by temporarily storing information in memory that would usually be retrieved from a database. The next request for the in-memory information is then incredibly fast without putting stress on the backend database.
In this guide, we’re going to discuss how to install and use memcached on an Ubuntu 14.04 server.
Prerequisites
Before we get started, you should have a regular, non-root user on your server who has access to sudo privileges. If you have not already created such a user, you can do so by following steps 1-4 in our initial setup guide for Ubuntu 14.04.
When you have your regular user configured, continue on with this guide.
Install Memcached and the Components
To get started, we should to get all of the components we need from Ubuntu’s repositories. Luckily, everything we need is available.
Since this is our first operation with apt in this session, we should update our local package index. Then we can install our programs.
We’re going to install memcached as well as a MySQL database backend and PHP to handle the interaction. We also are installing the PHP extension that handles memcached interactions. You can get everything you need by typing:
sudo apt-get update
sudo apt-get install mysql-server php5-mysql php5 php5-memcached memcached
Note that there are *two" PHP memcache extensions available. One is called php5-memcache and the other is called php5-memcached (note the trailing “d” on the second example). We are using the second of these because it is stable and implements a wider range of features.
If you don’t already have MySQL installed, the installation will prompt you to select and confirm an administrator’s password.
This should install and configure everything you need.
Check the Installation
Believe it or not, memcached is already completely installed and ready to go. We can test this a number of different ways.
The first way is rather simple. We can just ask PHP if it knows about our memcached extension and whether it is enabled or not. We can do this by creating the ubiquitous PHP info page.
This is easily accomplished by creating a file called info.php in our document root. In Apache on Ubuntu 14.04, our default document root is /var/www/html. Open the file here with root privileges:
sudo nano /var/www/html/info.php
In this file, type this out. This basically just calls a PHP function that collects and prints information about our server into a web-friendly layout.
<?php
phpinfo();
?>
Now, you can visit your server’s domain name or public IP address followed by /info.php and you should see an information page.
<pre> http://<span class=“highlight”>server_domain_name_or_IP</span>/info.php </pre>
If you scroll down or search for the “memcached” section header, you should find something that looks like this:
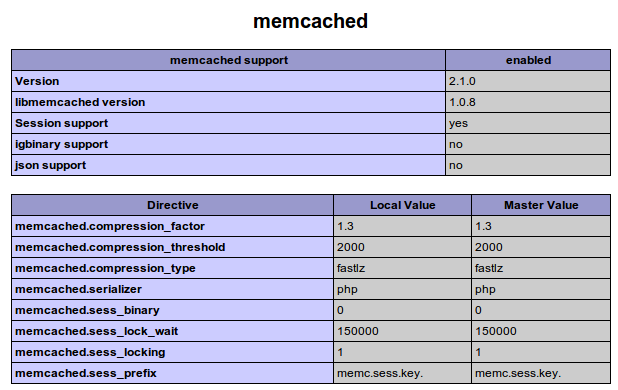
This means that the memcached extension is enabled and being found by the web server.
We can also check whether the memcached service is running by typing:
ps aux | grep memcached
memcache  6584  0.0  0.0 327448  3004 ?        Sl   14:07   0:00 /usr/bin/memcached -m 64 -p 11211 -u memcache -l 127.0.0.1
demouser  6636  0.0  0.0  11744   904 pts/0    S+   14:29   0:00 grep --color=auto memcached
You can query the service for stats by typing:
echo "stats settings" | nc localhost 11211
If you ever need to stop, start, or restart the memcached service, this can be done by typing something like this:
<pre> sudo service memcached <span class=“highlight”>restart</span> </pre>
Test Whether Memcached can Cache Data
Now that we have verified that memcached is running and that our PHP extension to connect with it is enabled, we can try to get it to store data.
We’re going to do this by creating another PHP script. This time, it’ll be more complex.
Open a file called cache_test.php in our document root:
sudo nano /var/www/html/cache_test.php
Inside, begin by creating the PHP wrapper tags:
<pre> <?php ?> </pre>
Within these, we’re going to create a new instance of the PHP Memcached object and store it in a variable. We’re going to define the location where this PHP object can connect to the actual memcached service running on our server. Memcached runs on port 11211 by default:
<pre> <?php <span class=“highlight”>$mem = new Memcached();</span> <span class=“highlight”>$mem->addServer(“127.0.0.1”, 11211);</span> ?> </pre>
Next, we’re going tell our Memcached instance to query for a key from our cache. This key can be called anything, because we haven’t created it yet. We’ll use “blah”. The result of this request will be stored into a $result variable:
<pre> <?php $mem = new Memcached(); $mem->addServer(“127.0.0.1”, 11211);
<span class=“highlight”>$result = $mem->get(“blah”);</span> ?> </pre>
Next, we just need to test whether anything was returned. If memcached found a key called “blah”, we want it to print the value associated with that key. If memcached was unable to find the matching key, we should print out a message saying so.
We then should set the key with a value so that the next time we ask for the value, memcached will find the value we give it:
<pre> <?php $mem = new Memcached(); $mem->addServer(“127.0.0.1”, 11211);
$result = $mem->get(“blah”);
<span class=“highlight”>if ($result) {</span> <span class=“highlight”>echo $result;</span> <span class=“highlight”>} else {</span> <span class=“highlight”>echo “No matching key found. I’ll add that now!”;</span> <span class=“highlight”>$mem->set(“blah”, “I am data! I am held in memcached!”) or die(“Couldn’t save anything to memcached…”);</span> <span class=“highlight”>}</span> ?> </pre>
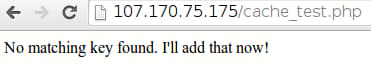
At this point, our script is done. If we visit this page in our web browser, we can see how this works:
<pre> http://<span class=“highlight”>server_domain_name_or_IP</span>/cache_test.php </pre>
You should initially see a page that looks like this:
However, if we refresh the page, we should see a different message:

As you can see, our memcached service is now caching the data that our script set.
Test Temporarily Caching Database Values
Now that we have tested our ability to store data in memcached, we can demonstrate a more realistic scenario: temporarily caching results from a database query.
Create Sample Data in MySQL
To do this, we first need to store some information in our database.
Connect to your MySQL instance as the administrative user by typing this. You’ll have to enter the MySQL root password that you set during installation:
mysql -u root -p
Afterwards, you’ll be given a MySQL prompt.
First, we want to create a database to test on. We’ll then select the database:
CREATE DATABASE mem_test;
USE mem_test;
Let’s create a user called test with a password testing123 that has access to the database we created:
GRANT ALL ON mem_test.* TO test@localhost IDENTIFIED BY 'testing123';
Now, we are going to create a really basic table and insert a record into it. The table will be called sample_data and it will just have an index and a string field:
CREATE TABLE sample_data (id int, name varchar(30));
INSERT INTO sample_data VALUES (1, "some_data");
Now, we have our structure created and the data inserted. We can exit out of MySQL:
exit
Create the PHP Script to Cache MySQL Data
Now that we have our data in MySQL, we can create another PHP script that will operate in a similar way to a production PHP application.
It will look for the data in memcached and return it if it finds the data. If it does not find the data, it will query from the database itself and then store the results in memcached for future queries.
To start, create another PHP script in our document root. We will call this script database_test.php:
sudo nano /var/www/html/database_test.php
Start off in a similar way to our last script. We’re going to create a PHP memcached instance and then tell it where the memcached service running on our server is located, just as we did last time:
<pre> <?php $mem = new Memcached(); $mem->addServer(“127.0.0.1”, 11211); ?> </pre>
Next, in our first departure from our last script, we’re going to have to define how PHP can connect to our MySQL database. We need to specify the login credentials for the user we created and then we’ll need to tell it which database to use:
<pre> <?php $mem = new Memcached(); $mem->addServer(“127.0.0.1”, 11211);
<span class=“highlight”>mysql_connect(“localhost”, “test”, “testing123”) or die(mysql_error());</span> <span class=“highlight”>mysql_select_db(“mem_test”) or die(mysql_error());</span> ?> </pre>
Next, we’re going to have to design the query that we need to fetch the data we inserted into our table. We’ll store this into a $query variable.
We’ll then create a $querykey variable to store the key that memcached will use to reference our information.
We create this key by using the string “KEY” and then appending the md5 (a hashing method) checksum of our query to the end. This will ensure that each key is unique if we were to use this technique on a larger dataset. It also ensures that a matching query will produce the same key for subsequent requests.
<pre> <?php $mem = new Memcached(); $mem->addServer(“127.0.0.1”, 11211);
mysql_connect(“localhost”, “test”, “testing123”) or die(mysql_error()); mysql_select_db(“mem_test”) or die(mysql_error());
<span class=“highlight”>$query = “SELECT ID FROM sample_data WHERE name = ‘some_data’”;</span> <span class=“highlight”>$querykey = “KEY” . md5($query);</span> ?> </pre>
Next, we’ll create a $result variable, just like our last script. This will hold the result from our memcached query, just as it did before. We are asking memcached for the query key that we’ve generated to see if it has a record identified by that key in its system.
<pre> <?php $mem = new Memcached(); $mem->addServer(“127.0.0.1”, 11211);
mysql_connect(“localhost”, “test”, “testing123”) or die(mysql_error()); mysql_select_db(“mem_test”) or die(mysql_error());
$query = “SELECT name FROM sample_data WHERE id = 1”; $querykey = “KEY” . md5($query);
<span class=“highlight”>$result = $mem->get($querykey);</span> ?> </pre>
We’re now ready to do the actual testing logic that will determine what will happen when the result is found in memcached. If the results are found, we want to print the data that we pulled out and tell the user that we were able to retrieve it from memcached directly:
<pre> <?php $mem = new Memcached(); $mem->addServer(“127.0.0.1”, 11211);
mysql_connect(“localhost”, “test”, “testing123”) or die(mysql_error()); mysql_select_db(“mem_test”) or die(mysql_error());
$query = “SELECT name FROM sample_data WHERE id = 1”; $querykey = “KEY” . md5($query);
$result = $mem->get($querykey);
<span class=“highlight”>if ($result) {</span> <span class=“highlight”>print "<p>Data was: " . $result[0] . “</p>”;</span> <span class=“highlight”>print “<p>Caching success!</p><p>Retrieved data from memcached!</p>”;</span> <span class=“highlight”>}</span> ?> </pre>
Now, let’s add logic for the alternate scenario. If the results are not found, we want to use the query that we crafted to ask MySQL for the data. We will store this into the $result variable we made. This will be in the form of an array.
After we have the result of the query, we need to add that result to memcached so that the data will be there the next time we do that. We can do this by feeding memcached the key that we want to use to reference the data (we already created this with the $querykey variable), the data itself (stored in the $result variable from the MySQL query), and the time to cache the data in seconds.
We are going to cache our content for 10 seconds. In the real world, it would most likely be beneficial to cache content for longer. Perhaps something closer to 10 minutes (600 seconds) if your content doesn’t change much. For testing, a smaller value lets us see what’s happening faster, without restarting our memcached service.
Afterwards, we’ll print out a similar message with the query results and tell the user what happened. We should add this whole block as an else for our previous if:
<pre> <?php $mem = new Memcached(); $mem->addServer(“127.0.0.1”, 11211);
mysql_connect(“localhost”, “test”, “testing123”) or die(mysql_error()); mysql_select_db(“mem_test”) or die(mysql_error());
$query = “SELECT name FROM sample_data WHERE id = 1”; $querykey = “KEY” . md5($query);
$result = $mem->get($querykey);
if ($result) { print "<p>Data was: " . $result[0] . “</p>”; print “<p>Caching success!</p><p>Retrieved data from memcached!</p>”; } <span class=“highlight”>else {</span> <span class=“highlight”>$result = mysql_fetch_array(mysql_query($query)) or die(mysql_error());</span> <span class=“highlight”>$mem->set($querykey, $result, 10);</span> <span class=“highlight”>print "<p>Data was: " . $result[0] . “</p>”;</span> <span class=“highlight”>print “<p>Data not found in memcached.</p><p>Data retrieved from MySQL and stored in memcached for next time.</p>”;</span> <span class=“highlight”>}</span> ?> </pre>
This is our completed script. It will attempt to get data from memcached and return it. Failing that, it will query from MySQL directly and cache the results for 10 seconds.
Test the Script
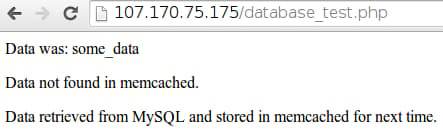
Now that we have the script written, we can run it by going to our file location in our web browser:
<pre> http://<span class=“highlight”>server_domain_name_or_IP</span>/database_test.php </pre>
The first time we visit the page, we should see output that looks like this:
If we refresh this (within 10 seconds of our last visit), the page should now show a different message:
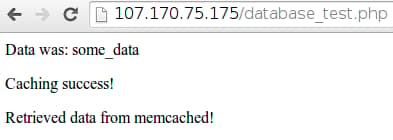
If we wait a bit again, the cached content will expire and be removed from memcached again. We can refresh at this point to get the first message again, since the server must go back to the database to get the appropriate values.
Conclusion
By now, you should have a decent understanding of how memcached works and how you can leverage it to keep your web server from hitting the database repeatedly for the same content.
Although the PHP scripts that we created in this guide were only examples, they should give you a good idea of how the system works. It should also give you a good idea of how to structure your code so that you can check memcached and fall back on the database if necessary.
<div class=“author”>By Justin Ellingwood</div>
Thanks for learning with the DigitalOcean Community. Check out our offerings for compute, storage, networking, and managed databases.
About the author
Former Senior Technical Writer at DigitalOcean, specializing in DevOps topics across multiple Linux distributions, including Ubuntu 18.04, 20.04, 22.04, as well as Debian 10 and 11.
Still looking for an answer?
This textbox defaults to using Markdown to format your answer.
You can type !ref in this text area to quickly search our full set of tutorials, documentation & marketplace offerings and insert the link!
Is it no more possible to use the “mod_cache” delivered with apache2?
I tried to make it run - but it didnt work on Ubuntu 14.04. I am considering to take your solution as an alternative.
Is there any additional steps involvedif I am running drupal7? Or is memcache activated for any php app running with mysql
@chris.gerke: You still need to hook Memcache into Drupal. Check out: https://drupal.org/project/memcache
Hi guys,
I am trying to use memcache with W3 Total Cache for Wordpress, but am getting conflicting information from multiple sources regarding the PHP modules I need installed and the distinction between “memcache” and “memcached”.
Just got a response from W3TC support stating that I need both “memcache” and “memcached” installed as the former is the client for the latter (being the service/daemon). Very confusing…
Please help!
Nice work.
Is redis better than memcached? I used google for information but almost everywhere it says that redis is better. I run wordpress website and i decided to apply redis for it. Following this excellent tutorial i configured it successfully.
The only doubt i have now is whether i have made the right choice with redis.
This comment has been deleted
 This work is licensed under a Creative Commons Attribution-NonCommercial- ShareAlike 4.0 International License.
Become a contributor for community
Get paid to write technical tutorials and select a tech-focused charity to receive a matching donation.

DigitalOcean Documentation
Full documentation for every DigitalOcean product.

Resources for startups and AI-native businesses
The Wave has everything you need to know about building a business, from raising funding to marketing your product.
The developer cloud
Scale up as you grow — whether you're running one virtual machine or ten thousand.

Start building today
From GPU-powered inference and Kubernetes to managed databases and storage, get everything you need to build, scale, and deploy intelligent applications.
