By Kulshekhar Kabra and Sharon Campbell

Introduction
Apache CouchDB, like Redis, Cassandra, and MongoDB, is a NoSQL database. CouchDB stores data as JSON documents which are non-relational in nature. This allows users of CouchDB to store data in ways that look very similar to their real world counterparts.
You can manage CouchDB from the command line or from a web interface called Futon. Futon can be used to perform administrative tasks like creating and manipulating databases, documents, and users for CouchDB.
Goals
By the end of this article, you will:
- Have CouchDB installed on a Droplet running Ubuntu 14.04
- Have Futon installed on the same server
- Have secured the CouchDB installation
- Access CouchDB using Futon from your local machine, using a secure tunnel
- Know how to add an admin user to CouchDB
- Perform CRUD operations with CouchDB using Futon
- Perform CRUD operations with CouchDB from the command line
Prerequisites
Please complete the following prerequisites:
- Ubuntu 14.04 Droplet
- You are logged in to your server as a non-root user with administrative privileges (Initial Server Setup with Ubuntu 14.04)
Note: While this tutorial assumes a non-root user, you can execute the steps below as the root user as well, in case you don’t want to create a sudo user. Please note that if you do use a non-root user, you’ll be asked for your password the first time you execute a command with sudo.
Step 1 — Preparing the Server
Before we can install CouchDB, we need to ensure that the server is set up for it.
Begin by updating the system:
- sudo apt-get update
Install the software that allows you to manage the source repositories:
- sudo apt-get install software-properties-common -y
Note: The -y flag tells the apt-get command to assume a Yes response to all the prompts that might come up during the installation process. You can drop this flag if you prefer responding manually to the prompts.
Add the PPA that will help us fetch the latest CouchDB version from the appropriate repository:
- sudo add-apt-repository ppa:couchdb/stable -y
Warning: Great care should be taken while adding a new Personal Package Archive (PPA) to your server. Since anyone can create a PPA, there’s no guarantee that it can be trusted or that it is secure. In this case, the above PPA is an official one, maintained by the Apache CouchDB team.
Now that we have added a new PPA, let’s update the system so that it has the latest package information:
- sudo apt-get update
We are now ready to install CouchDB and Futon.
Step 2 — Installing CouchDB
If you previously had CouchDB installed on this server, begin by removing the existing version:
- sudo apt-get remove couchdb couchdb-bin couchdb-common -yf
Note: If you have a fresh Droplet, you can ignore this step.
Now install CouchDB:
- sudo apt-get install couchdb -y
This will install CouchDB and Futon on your server.
By default, CouchDB runs on localhost and uses the port 5984. You can retrieve this basic information by running curl from the command line:
- curl localhost:5984
Note: If you don’t have curl installed, you can use the sudo apt-get install curl command to install it.
You should get something similar to the following:
Output{"couchdb":"Welcome","uuid":"b9f278c743b5fc0b971c4e587d77582e","version":"1.6.1","vendor":{"name":"Ubuntu","version":"14.04"}}
You can now create a new database with the curl -X PUT command:
- curl -X PUT localhost:5984/new_database
The results should look like this:
Output{"ok":true}
Step 3 — Securing the CouchDB Installation
By default, some of the files and directories created when CouchDB is installed belong to the root user and group. While this is fine (albeit not advisable) during development, it could be a security risk in production.
When CouchDB is installed, it creates a user and a group named couchdb. In this section we will change the ownership and permission of the CouchDB files to the couchdb user and group.
Changing the ownership controls what the CouchDB process can access, and changing the permissions controls who can access the CouchDB files and directories.
Before changing the ownership and permissions, stop CouchDB:
- sudo stop couchdb
Change the ownership of the /usr/lib/couchdb, /usr/share/couchdb, and /etc/couchdb directories, and the /usr/bin/couchdb executable file, such that their owner is couchdb and they belong to the couchdb group.
- sudo chown -R couchdb:couchdb /usr/lib/couchdb /usr/share/couchdb /etc/couchdb /usr/bin/couchdb
Now, change the permissions of the /usr/lib/couchdb, /usr/share/couchdb, and /etc/couchdb directories, and the /usr/bin/couchdb executable file, such that the couchdb user and the couchdb group have complete access (to the CouchDB installation) while no other user has access to these files and directories.
- sudo chmod -R 0770 /usr/lib/couchdb /usr/share/couchdb /etc/couchdb /usr/bin/couchdb
All that’s left to do is restart CouchDB:
- sudo start couchdb
CouchDB should now be up and running without any of its files or directories belonging to either the root user or the root group.
Step 4 — Accessing Futon
CouchDB offers a convenient web-based control panel called Futon. We’re going to access it from your local workstation, tunneling the traffic through an SSH connection to your server. This means that only users with an SSH login to your server can access the Futon control panel.
To connect securely to CouchDB, without making it publicly available, you can create an SSH tunnel from your local port 5984 to the remote server’s port 5984.
You can use the following command, run from your local computer, to set up the tunnel:
- ssh -L5984:127.0.0.1:5984 sammy@your_server_ip
Note: Remember to replace sammy with your username and your_server_ip with the IP address of your Droplet.
While the connection is open, you can access Futon from your favorite web browser, using port 5984. Visit this URL to display the helpful Futon page:
http://localhost:5984/_utils
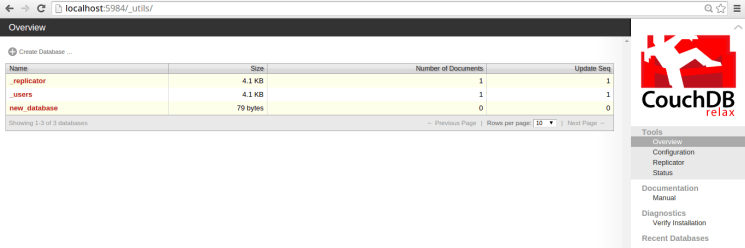
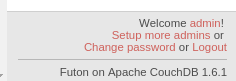
By default, all CouchDB users who access Futon do so with administrative rights. This is announced in the bottom right corner:
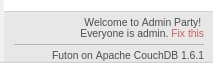
You can change this by clicking on the little Fix this link and creating new administrators.
Step 5 — Adding an Admin User
Now that we have CouchDB up and running, let’s start using it.
Before an admin user is created, all users can access CouchDB with administrative privileges (although they require SSH access to the server first).
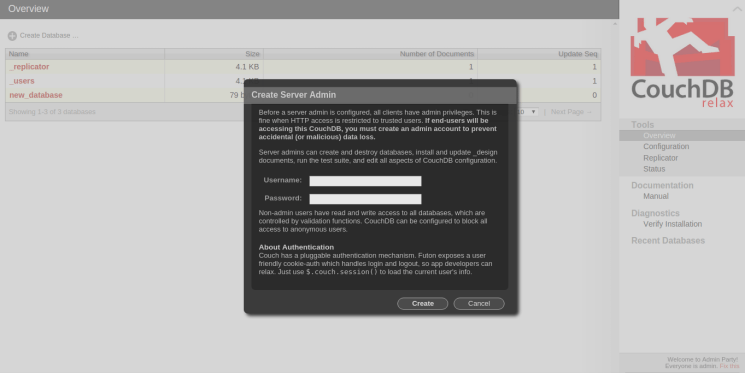
It’s a good practice to create an admin account for CouchDB, to prevent accidental or unauthorized data loss.
To do this, click the Fix this link that appears in the bottom right corner of Futon. This will bring up a screen that allows you to create a CouchDB admin user, as follows:
Enter the desired username and password:
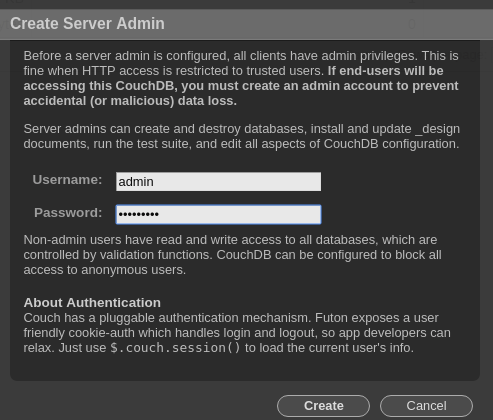
After entering your new CouchDB username and a secure password, click the Create button. This will create the new admin user. The message in the bottom right corner of Futon will confirm this by showing a message similar to the following:
Note: The creation of an admin user prevents unauthorized users from deleting and modifying databases, design documents, and the CouchDB configuration. However, it doesn’t prevent them from creating or accessing documents.
Be careful about handing out SSH access to your server.
That’s it! Our CouchDB server is now fully configured.
To learn more about using the database, keep reading.
Performing CRUD Operations from Futon
Futon has a very simple but useful user interface which allows you to perform basic CRUD operations (create, read, update, and delete).
In this section, we will create a new database named todos, add a new document to it, and then retrieve, update, and delete this document.
Note: If you have created an admin user, you will have to be logged in as the administrator to create a new database.
Make sure you still have your SSH tunnel open. If not, open your connection to the server from your local computer with this command:
- ssh -L5984:127.0.0.1:5984 sammy@your_server_ip
Let’s begin by visiting the Futon page at http://localhost:5984/_utils/.
Note: This section assumes that CouchDB is being accessed using an SSH tunnel that was set up as described in in the Accessing Futon section above. If your setup is different, make sure you access Futon at the correct URL.
Create a Database and Document
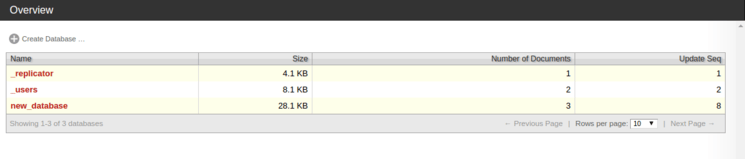
To create a new database called todos, click the Create Database link on the screen. This will bring up a dialog as follows:
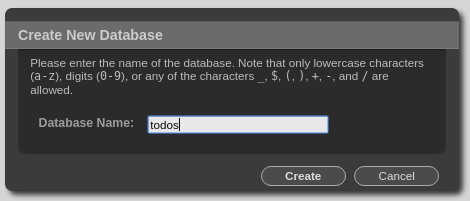
Enter the name of the database and click the Create button.
This will create a new database named todos and take you to a page where you can start creating and modifying documents in the newly created database.

Create Document
To create a new document, click the New Document link on the page.
This will open up a screen with a new document. This document will have just the _id field. You can change the value of this field if you need to or you can leave it as is.
Click the Add Field link to add a new field to this document.
As can be seen above, we have added two fields named todo and done. By default, new fields have a null value.
Double-click the value to change it.
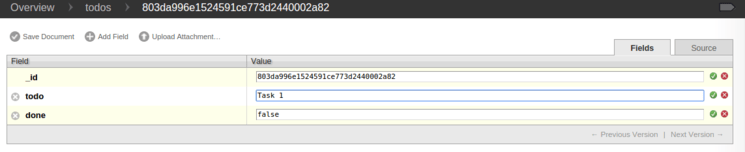
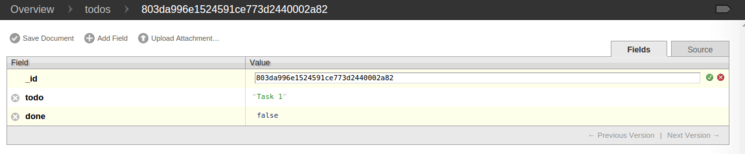
In this example, we have double-clicked the value fields of todo and done and have entered the values Task 1 and false respectively.
Once you have entered the values, either press the ENTER key or click the little green check mark next the field to save its contents. (Failing to do this will leave the value of the field as null.) This should look as follows:
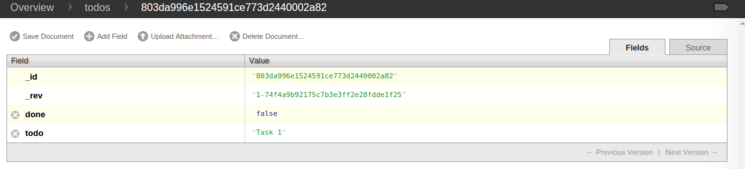
To save the document, click the Save Document link. After the document is saved, you will see that a _rev field has been added to it as follows:
Read a Document
Click on the todos link (in the top bar next to the Overview link) to view the newly-created document, as the only document in the todos database.

Click on the key of the document (the ID) in the table to access the document details page.
Edit a Document
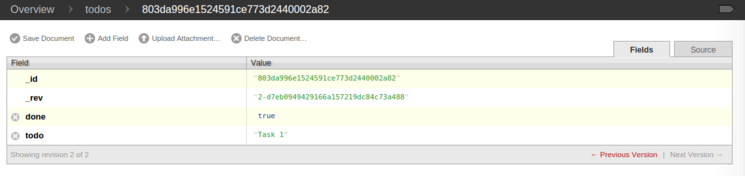
On this page, you can edit and update the document fields as follows:
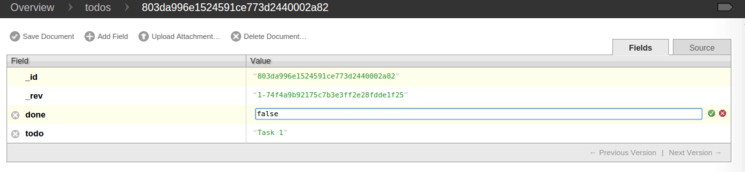
To edit a field value, double-click it and start editing.
You can delete any field (apart from the _id and _rev fields), add new fields, or change the values of existing fields. In this example, we have changed the value of the done field from false to true as follows:
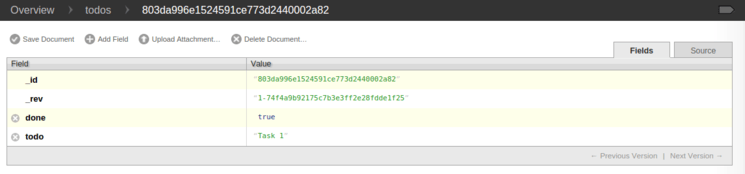
After you are satisfied with the changes, click the Save Document link to update the document. Once you do so, you’ll notice that the value of the _rev field has been updated as well.
Delete a Document
To delete a document, you can click the Delete Document link which will prompt you for confirmation:
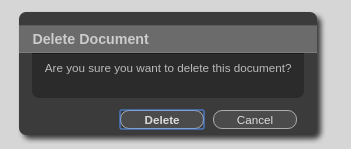
Confirm by pressing the Delete button.
Futon will delete the document and take you to the todos database page, which should now be empty, confirming that the document has indeed been deleted.
Performing CRUD Operations from the Command Line
This section will illustrate how we can perform basic CRUD (create, read, update, and delete) operations on a CouchDB database from the command line using curl.
Make sure you still have your SSH tunnel open. If not, open your connection to the server from your local computer with this command:
- ssh -L5984:127.0.0.1:5984 sammy@your_server_ip
Note: This section will use the database new_database that was created in Step 2 (Installing CouchDB) above. This section will also assume that we are accessing CouchDB using an SSH tunnel as described in the Accessing Futon step above. If your setup is different, make sure you replace the URL, PORT, and the database names appropriately while executing the commands used below.
Create a Database
If you didn’t already create the database new_database, please do so now. This command should be executed from your local workstation:
- curl -X PUT http://localhost:5984/new_database -u "admin:password"
- {"ok":true}
Since we added an admin user to CouchDB, we now have to send the admin username and password when creating a new database.
The results should look like this:
Output{"ok":true}
Create a Document
Let’s begin by creating a new document.
- curl -X POST -d '{"todo":"task 1", "done":false}' http://localhost:5984/new_database -H "Content-Type:application/json"
This command creates a new document in the new_database database.
The -X flag indicates that we are performing an HTTP POST operation. The -H flag followed by the header sets the content type of this request as application/json since we are POSTing a JSON document. Finally, the JSON document itself is included, along with the -d flag.
The response of this operation is as follows:
Output{"ok":true,"id":"803da996e1524591ce773d24400004ff","rev":"1-2fc1d70532433c39c9f61480607e3681"}
The "ok":true part of this response indicates that the operation was successful. The response includes the fields id and rev, which represent the document ID and the document revision respectively. Both these fields will be required in case this document needs to be modified or deleted.
In this example, the document ID was generated by CouchDB because we didn’t supply it with the command. If required, we can create a document with a unique ID that we have generated.
Create with Specified ID
Create a document with the ID random_task:
- curl -X POST -d '{"_id":"random_task", "todo":"task 2", "done":false}' http://localhost:5984/new_database -H "Content-Type:application/json"
This command creates a new document with the ID set to random_task. The response to this command is as follows:
Output{"ok":true,"id":"random_task","rev":"1-bceeae3c4a9154c87db1649473316e44"}
Create Multiple Documents
In addition to creating single documents, we can also create documents in bulk.
- curl -X POST -d '{"docs": [{"todo":"task 3", "done":false}, {"todo":"task 4", "done":false}]}' http://localhost:5984/new_database/_bulk_docs -H "Content-Type:application/json"
This command will create two documents as specified in the POST body. There are two slight differences, as compared to the single-document inserts:
- While inserting a single document, the POST body was just a standard JSON object. In case of bulk inserts, the POST body comprises an object with a
docsfield. This field holds the array of documents that are to be inserted. - While inserting a single document, the POST request was sent to the URL pointing to the database (
http://localhost:5984/new_database). The request for bulk inserts, however, POSTs to thehttp://localhost:5984/new_database/_bulk_docsURL.
The response of the bulk insert operation is as follows:
Output[{"ok":true,"id":"803da996e1524591ce773d24400007df","rev":"1-778fd61f8f460d0c1df1bb174279489d"},{"ok":true,"id":"803da996e1524591ce773d2440001723","rev":"1-dc9e84861bba58e5cfefeed8f5133636"}]
Read a Document
Retrieving a document from a CouchDB database is a simple matter of issuing an HTTP GET command. Let’s try to retrieve one of the documents we created above: the one called random_task.
- curl -X GET http://localhost:5984/new_database/random_task
Note that the URL includes the ID (random_task) of the document which is being retrieved. The response to this GET request, as shown below, contains the entire document along with the _id and the _rev fields, which can be used to update or delete this document.
Output{"_id":"random_task","_rev":"1-bceeae3c4a9154c87db1649473316e44","todo":"task 2","done":false}
Edit a Document
While trying to update a document, it is important to include the _rev field. CouchDB will reject any update request which doesn’t include a _rev field. Since CouchDB updates the entire document, and not just parts of it, the entire document must be sent in the request body during an update operation.
To update the document that was created with the ID random_task, we need to issue an HTTP PUT request as follows:
- curl -X PUT -d '{"_rev":"1-bceeae3c4a9154c87db1649473316e44", "todo":"task 2", "done":true}' http://localhost:5984/new_database/random_task
Be sure to replace the _rev value with the string you received in the previous output.
This modifies the document and updates the done field to true. The response to this request is as follows:
Output{"ok":true,"id":"random_task","rev":"2-4cc3dfb6e76befd665faf124b36b7f1c"}
As can be seen in the response, the rev field for this particular document changes after it has been updated. Any future request to update or delete this document will now have to use the newest rev value.
Delete a Document
Let’s use this new rev value to delete this document using an HTTP DELETE request as follows:
- curl -X DELETE http://localhost:5984/new_database/random_task?rev=2-4cc3dfb6e76befd665faf124b36b7f1c
Just like the GET & PUT requests above, the DELETE request uses the URL that points to the document. However, it also includes an additional query parameter in the URL. This parameter, rev, should have the latest _rev value for the delete operation to be successful.
In this particular case, we use the value that was returned after the update operation in the previous step. The response to the above request is shown below.
Output{"ok":true,"id":"random_task","rev":"3-07d6cde68be2a559497ec263045edc9d"}
Restarting, Stopping, and Starting the CouchDB Service
Starting, stopping and restarting the CouchDB service is quite straightforward. Complete these steps from the server.
Restart
To restart a running CouchDB instance, execute the following command:
- sudo restart couchdb
This command will restart a running CouchDB instance and display the process ID of the new instance. In case there is no instance of CouchDB running, executing this command will give a message like
Outputrestart: Unknown instance:
Stop
To stop a running CouchDB instance, execute the following command:
- sudo stop couchdb
Executing this command will stop any running CouchDB instance and provide a confirmation message like this:
Outputcouchdb stop/waiting
Start
To start CouchDB, execute the following command:
- sudo start couchdb
If CouchDB wasn’t already running, executing this command will start CouchDB and provide a confirmation message like this:
Outputcouchdb start/running, process 12345
On the other hand, if there was a CouchDB instance already running then executing the above command will result in a message like this:
Outputstart: Job is already running: couchdb
Status
In case you want to check the status of CouchDB, you can do so using the following command:
- sudo status couchdb
If CouchDB is running, this will give a message similar to the following:
Outputcouchdb start/running, process 12345
If CouchDB is not running, checking the status will result in something like:
Outputcouchdb stop/waiting
Conclusion
You now have a fully functional setup of CouchDB on your Droplet, which you can securely administer from your local machine using Futon or the command line.
Thanks for learning with the DigitalOcean Community. Check out our offerings for compute, storage, networking, and managed databases.
About the author(s)
Current fan and former Editorial Manager at DigitalOcean. Hi! Expertise in areas including Ubuntu, Docker, Rails, and more.
Still looking for an answer?
This textbox defaults to using Markdown to format your answer.
You can type !ref in this text area to quickly search our full set of tutorials, documentation & marketplace offerings and insert the link!
Thank-you for the thorough guide! SSH tunnel is a nice technique, seems more secure than editing local.ini to open up Futon to the world.
Hi, Thanks for your article. I tried to insert new document but getting errors,
Hera is my insert code:
curl -X POST -d ‘{“todo”:“task 1”, “done”:false}’ http://localhost:5984/rbp -H “Content-Type:application/json”
Output: {“error”:“not_found”,“reason”:“no_db_file”}
Hi! I’m trying to follow your guide, but it seems to be a problem with the server. When I click in Fix this, and send an admin and a password it just returns a 500 Internal Server Error and in console: “An error occurred retrieving/updating the server configuration: eacces”.
Do you know what it might be causing this issue?
UPDATE - I figured this out but left the notes for other people…
Hi Kulshekhar - thanks for this, it got me further than I had been but I’m still seeing problems. After removing and then installing it looks ok on the localhost (on an AWS ec2 Ubuntu instance):
ubuntu@ip-172-31-43-177:/etc/apache2$ sudo netstat -tnlp
Active Internet connections (only servers)
Proto Recv-Q Send-Q Local Address           Foreign Address         State       PID/Program name
tcp        0      0 0.0.0.0:22              0.0.0.0:*               LISTEN      1106/sshd
tcp        0      0 127.0.0.1:5984          0.0.0.0:*               LISTEN      2110/beam
tcp6       0      0 :::80                   :::*                    LISTEN      1558/apache2
tcp6       0      0 :::22                   :::*                    LISTEN      1106/sshd
and curl works as expected:
ubuntu@ip-172-31-43-177:/etc/apache2$ curl localhost:5984
{"couchdb":"Welcome","uuid":"3c6b2abe495d389b7e8ef7312731b9c5","version":"1.5.0","vendor":{"name":"Ubuntu","version":"14.04"}}
but my problem is that I can’t see the db when I use a web browser to try to view it from my own machine I get connection refused, basically no web interface.
My EC2 instance is open for outbound connections to anywhere and for inbound connections on port 5984 (for both tcp and udp, fwiw). I temporarily changed apache to bind to port 5984 and it served pages fine - so it seems there’s nothing specific about the port of my own ISP that is blocking connections.
Other info:
ubuntu@ip-172-31-43-177:/etc/apache2$ lsb_release -a
No LSB modules are available.
Distributor ID:	Ubuntu
Description:	Ubuntu 14.04.3 LTS
Release:	14.04
Codename:	trusty

ubuntu@ip-172-31-43-177:/etc/apache2$ couchdb -V
couchdb - Apache CouchDB 1.5.0
The suspicious thing is this:
ubuntu@ip-172-31-43-177:/etc/apache2$ couchdb -s
Apache CouchDB is not running.
UPDATE: I saw on a different link here that couchdb binds to the localhost ip address and I didn’t notice, hence it serves pages to curl localhost no problems but won’t serve via remote connections.
Solution was to stop couchdb with sudo stop couchdb, then change /etc/couchdb/ default.ini and local.ini to replace bind_address = 127.0.0.1 with 0.0.0.0. Then start couchdb with sudo start couchdb:
It now binds to all addresses and you should be good to go:
Proto Recv-Q Send-Q Local Address           Foreign Address         State       PID/Program name
tcp        0      0 0.0.0.0:22              0.0.0.0:*               LISTEN      1106/sshd
tcp        0      0 0.0.0.0:5984            0.0.0.0:*               LISTEN      3281/beam
tcp6       0      0 :::80                   :::*                    LISTEN      1558/apache2
tcp6       0      0 :::22                   :::*                    LISTEN      1106/sshd
NOTE: I still get this, no idea why:
ubuntu@ip-172-31-43-177:/etc/couchdb$ sudo couchdb -s
Apache CouchDB is not running.
Thanks for this. I have been meaning to upgrade from 1.5 to 1.6.1 for ages - these steps were the clearest and simplest I found and worked right first time. Really appreciate it.
Hi,
I can’t add the ppa on my droplet. I got the following message :
Cannot add PPA: 'ppa:couchdb/stable'.
Please check that the PPA name or format is correct.
I tried that on a other ubuntu servers and it’s working. But it looks like my droplet can’ t resolve the PPA. I’ve tried several solutions already but the only thing left is the setup the proxy settings on the droplet, but I can’t find anything on DigitalOcean about a default proxy. Could you help me out ?
Great guide! Any update for Couchdb 2.0? Some information on Ubuntu and the required daemon scripts would be helpful.
 This work is licensed under a Creative Commons Attribution-NonCommercial- ShareAlike 4.0 International License.
Become a contributor for community
Get paid to write technical tutorials and select a tech-focused charity to receive a matching donation.

DigitalOcean Documentation
Full documentation for every DigitalOcean product.

Resources for startups and AI-native businesses
The Wave has everything you need to know about building a business, from raising funding to marketing your product.
The developer cloud
Scale up as you grow — whether you're running one virtual machine or ten thousand.

Start building today
From GPU-powered inference and Kubernetes to managed databases and storage, get everything you need to build, scale, and deploy intelligent applications.
