Not using Ubuntu 16.04?
Choose a different version or distribution.
Introduction
An indispensable tool in modern software development is some kind of version control system. Version control systems allow you to keep track of your software at the source level. You can track changes, revert to previous stages, and branch to create alternate versions of files and directories.
One of the most popular version control systems is git, a distributed version control system. Many projects maintain their files in a git repository, and sites like GitHub and Bitbucket have made sharing and contributing to code simple and valuable.
In this guide, we will demonstrate how to install and configure git on an Ubuntu 16.04 system. We will cover how to install the software in two different ways, each of which have benefits.
This tutorial assumes you are signed in as a non-root user which you can learn how to create here.
How To Install Git with Apt
By far the easiest way of getting git installed and ready to use is by using Ubuntu’s default repositories. This is the fastest method, but the version may be older than the newest version. If you need the latest release, consider following the steps to compile git from source.
You can use the apt package management tools to update your local package index. Afterwards, you can download and install the program:
- sudo apt-get update
- sudo apt-get install git
This will download and install git to your system. You will still have to complete the configuration steps that we cover in the “setup” section, so feel free to skip to that section now.
How To Install Git from Source
A more flexible method of installing git is to compile the software from source. This takes longer and will not be maintained through your package manager, but it will allow you to download the latest release and will give you some control over the options you include if you wish to customize.
Before you begin, you need to install the software that git depends on. This is all available in the default repositories, so we can update our local package index and then install the packages:
- sudo apt-get update
- sudo apt-get install build-essential libssl-dev libcurl4-gnutls-dev libexpat1-dev gettext unzip
After you have installed the necessary dependencies, you can go ahead and get the version of git you want by visiting the git project’s mirror on GitHub.
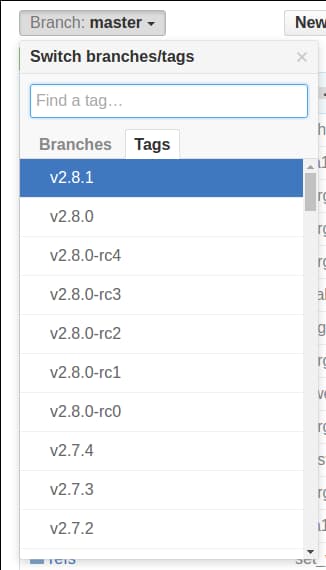
The version you see when you arrive at the project’s page is the branch that is actively being committed to. If you want the latest stable release, you should go change the branch to the latest non-“rc” tag using this button along the left side of the project header:
Next, on the right side of the page, right-click the Download ZIP button and copy the link address.
Back on your Ubuntu 14.04 server, you can type wget and follow it by pasting the address you copied. The URL that you copied may be different from mine:
- wget https://github.com/git/git/archive/v2.8.1.zip -O git.zip
Unzip the file that you downloaded and move into the resulting directory by typing:
- unzip git.zip
- cd git-*
Now, you can make the package and install it by typing these two commands:
- make prefix=/usr/local all
- sudo make prefix=/usr/local install
Now that you have git installed, if you want to upgrade to a later version, you can simply clone the repository (making sure to first change to your home directory), and then build and install. To find the URL to use for the clone operation, navigate to the branch or tag that you want on the project’s GitHub page and then copy the clone URL on the right side:

Change to your home home directory, and use git clone on the URL you just copied:
- cd ~
- git clone https://github.com/git/git.git
This will create a new directory within your current directory where you can rebuild the package and reinstall the newer version, just like you did above. This will overwrite your older version with the new version:
- cd git
- make prefix=/usr/local all
- sudo make prefix=/usr/local install
How To Set Up Git
Now that you have git installed, you need to do a few things so that the commit messages that will be generated for you will contain your correct information.
The easiest way of doing this is through the git config command. Specifically, we need to provide our name and email address because git embeds this information into each commit we do. We can go ahead and add this information by typing:
- git config --global user.name "Your Name"
- git config --global user.email "youremail@domain.com"
We can see all of the configuration items that have been set by typing:
- git config --list
user.name=Your Name
user.email=youremail@domain.com
As you can see, this has a slightly different format. The information is stored in your git configuration file, which you can optionally edit by hand with your text editor like this:
- nano ~/.gitconfig
[user]
    name = Your Name
    email = youremail@domain.com
There are many other options that you can set, but these are the two essential ones needed. If you skip this step, you’ll likely see warnings when you commit to git that are similar to this:
[master 0d9d21d] initial project version
 Committer: root
Your name and email address were configured automatically based
on your username and hostname. Please check that they are accurate.
You can suppress this message by setting them explicitly:

    git config --global user.name "Your Name"
    git config --global user.email you@example.com

After doing this, you may fix the identity used for this commit with:

    git commit --amend --reset-author
This makes more work for you because you will then have to revise the commits you have done with the corrected information.
Conclusion
You should now have git installed and ready to use on your system. To learn more about how to use Git, check out these articles:
Thanks for learning with the DigitalOcean Community. Check out our offerings for compute, storage, networking, and managed databases.
About the author
Still looking for an answer?
This textbox defaults to using Markdown to format your answer.
You can type !ref in this text area to quickly search our full set of tutorials, documentation & marketplace offerings and insert the link!
~/git$ make prefix=/usr/local all GIT_VERSION = 2.13.0.rc2 * new build flags CC credential-store.o . . . CC vcs-svn/sliding_window.o CC vcs-svn/repo_tree.o CC vcs-svn/fast_export.o CC vcs-svn/svndiff.o CC vcs-svn/svndump.o AR vcs-svn/lib.a LINK git-remote-testsvn CC http.o In file included from http.c:2:0: http.h:6:23: fatal error: curl/curl.h: No such file or directory compilation terminated. Makefile:2007: recipe for targe ~/git$ sudo make prefix=/usr/local install CC http.o In file included from http.c:2:0: http.h:6:23: fatal error: curl/curl.h: No such file or directory compilation terminated. Makefile:2007: recipe for target ‘http.o’ failed make: *** [http.o] Error 1
Hello
You have given an Excellent description about everything. I referred your many tutorials like Installation of ubuntu16.04 LTS Installation of LAMP stack Installation of Git.
Everything is very informative and successful. Thank You. Shraddha
“This tutorial assumes you are signed in as a non-root user which you can learn how to create here.” So do we install git as a non-root user? We get the message: <User-notroot> is not in the sudoers file. This incident will be reported.
 This work is licensed under a Creative Commons Attribution-NonCommercial- ShareAlike 4.0 International License.
Become a contributor for community
Get paid to write technical tutorials and select a tech-focused charity to receive a matching donation.

DigitalOcean Documentation
Full documentation for every DigitalOcean product.

Resources for startups and AI-native businesses
The Wave has everything you need to know about building a business, from raising funding to marketing your product.
The developer cloud
Scale up as you grow — whether you're running one virtual machine or ten thousand.

Start building today
From GPU-powered inference and Kubernetes to managed databases and storage, get everything you need to build, scale, and deploy intelligent applications.
