
Introduction
Icinga is a flexible and powerful open-source monitoring system used to oversee the health of networked hosts and services. It could be used to monitor the load and uptime of a cluster of web workers, free disk space on a storage device, memory consumption on a caching service, and so on. Once properly set up, Icinga can give you an at-a-glance overview of the status of large numbers of hosts and services, as well as notifications, downtime scheduling, and long-term storage of performance data.
This tutorial will cover installing the Icinga core, its database backend, and the Icinga Web interface. Finally, we’ll set up email notification so you can receive alerts in your inbox when a service is misbehaving.
Prerequisites
Before starting this tutorial you will need:
- An Ubuntu 16.04 server with the LAMP stack installed, which is detailed in our tutorial How To Install Linux, Apache, MySQL, PHP (LAMP) stack on Ubuntu 16.04.
- Because Icinga Web has a login page and also asks you to input sensitive information during setup, you should enable SSL encryption for Apache. You can learn how to fetch and install free SSL certificates in our tutorial How To Secure Apache with Let’s Encrypt on Ubuntu 16.04.
Step 1 — Installing Icinga
To get the latest version of Icinga, we first need to add a software repository maintained by the Icinga team. We will then install the software with apt-get and run through a few configuration screens to set up Icinga’s database backend.
First, download the Icinga developers’ package signing key and add it to the apt system:
- curl -sSL https://packages.icinga.com/icinga.key | sudo apt-key add -
This key will be used to automatically verify the integrity of any software we download from the Icinga repository. Now we need to add the repository address to an apt configuration file. Open up the file with your favorite text editor. We’ll use nano throughout this tutorial:
- sudo nano /etc/apt/sources.list.d/icinga.list
This will open a new blank text file. Paste in the following line:
deb https://packages.icinga.com/ubuntu icinga-xenial main
Save and close the file, then refresh your package cache:
- sudo apt-get update
apt-get will now download information from the repository we just added, making the Icinga packages available to install:
- sudo apt-get install icinga2 icinga2-ido-mysql
This will install the main Icinga software, along with a database adapter that enables Icinga to put historical data and other information into a MySQL database. You’ll be presented with a few configuration screens for the database adapter:
- Enable Icinga 2’s ido-mysql feature? YES
- Configure database for icinga2-ido-mysql with dbconfig-common? YES
- You’ll then be prompted to set up an Icinga database password. Create a strong password and record it for later. We’ll need it when setting up the web interface.
Now we need to actually enable the Icinga database backend. The icinga2 command can enable and disable features on the command line. While we’re at it, we’ll also enable the command feature which will eventually let us run manual health checks from the web interface.
- sudo icinga2 feature enable ido-mysql command
Now restart icinga2 to use the new features:
- sudo systemctl restart icinga2
And finally, let’s check the status of icinga2 to make sure it’s running properly:
- sudo systemctl status icinga2
Output● icinga2.service - Icinga host/service/network monitoring system
   Loaded: loaded (/lib/systemd/system/icinga2.service; enabled; vendor preset: enabled)
   Active: active (running) since Thu 2017-04-20 00:54:55 UTC; 3s ago
  Process: 15354 ExecStartPre=/usr/lib/icinga2/prepare-dirs /usr/lib/icinga2/icinga2 (code=exited, status=0/SUCCESS)
 Main PID: 15416 (icinga2)
    Tasks: 11
   Memory: 7.7M
      CPU: 488ms
. . .
If you see Active: active (running), Icinga is up and running. Now that we’ve set up the Icinga core system and database backend, it’s time to get the web interface up and running.
Step 2 – Installing the Icinga Web Interface
The Icinga core is completely configurable and usable without a web interface, but Icinga Web provides a nice browsable overview of the health of your hosts and services, and allows you to schedule downtime, acknowledge issues, manually trigger health checks, and send notifications, right from your browser.
Let’s install Icinga Web with apt-get:
- sudo apt-get install icingaweb2
The rest of Icinga Web’s setup is done in a web browser, but before we switch over, there’s one setting we need to update. Icinga Web needs a timezone to be set for the PHP environment, so let’s edit the PHP config file:
- sudo nano /etc/php/7.0/apache2/php.ini
We need to find a specific line to update. In nano we can press CTRL-W to bring up a search interface, type in date.timezone, then hit ENTER. The cursor will move to the line we need to update. First, uncomment the line by removing the initial ; semicolon, and then type in your correct timezone.
You can find the correct timezone format in the PHP manual’s timezone section. It should look something like this when you’re finished:
date.timezone = America/New_York
Save and close the file. Restart Apache to update:
- sudo systemctl restart apache2
Now it’s time to work through Incinga Web’s browser-based setup.
Step 3 — Setting up the Icinga Web Interface
Before we switch over to our browser for the web-based setup process, we need to create a setup token. This is a key we generate on the command line that authorizes us to use the web setup tool. We create this key with the icingacli command:
- sudo icingacli setup token create
A short token will be printed:
Output1558c2c0ec4572ab
Copy the token to your clipboard, then switch to your browser and load the Icinga Web address. By default this is your server’s domain name or IP address followed by /icingaweb2:
https://icinga-master.example.com/icingaweb2
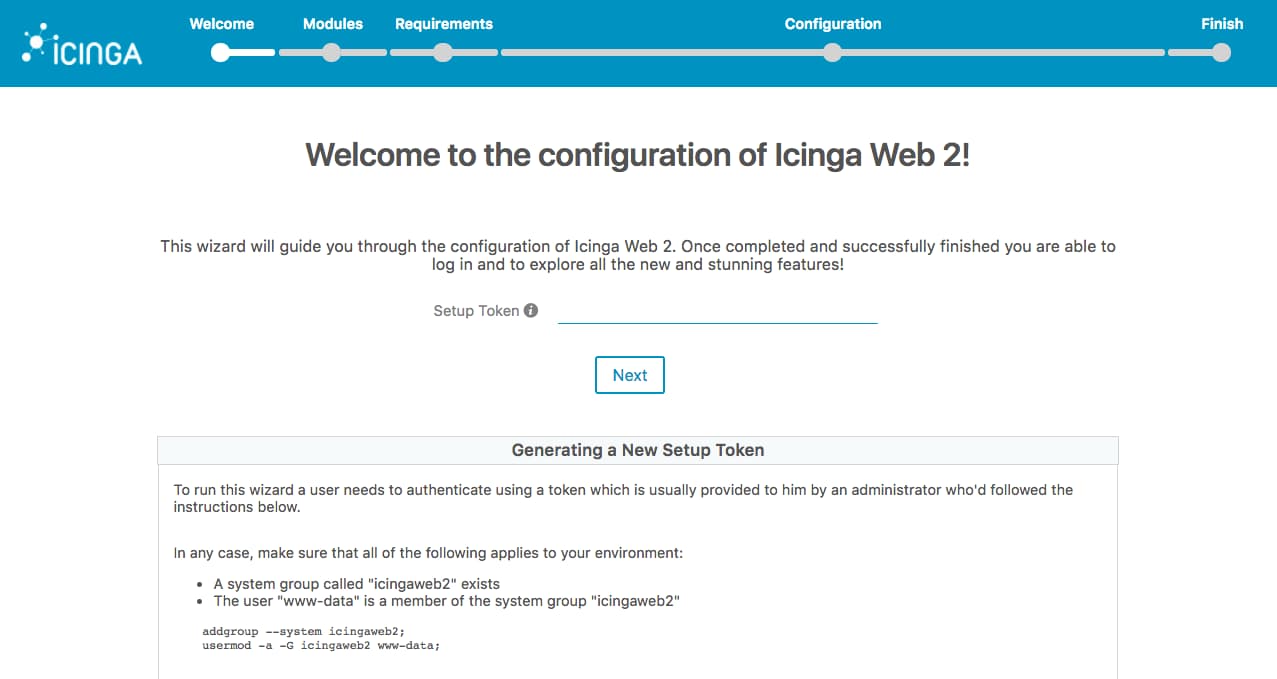
You’ll be presented with a configuration screen. Paste in the token you copied to your clipboard, and press Next to begin the process. There are many pages of options to go through. We’ll step through them one at a time.
Module Setup
On the second page, you’ll have the option to enable some extra modules for the web interface. We can safely accept the default of only enabling the Monitoring module. Click Next to continue.
Environment Status
The third page shows the status of our PHP environment. You shouldn’t see any red boxes, which would indicate an issue or misconfiguration. You may see some yellow boxes mentioning PostgreSQL modules being missing. We can safely ignore these, as we’re using MySQL, not PostgreSQL. Click Next to continue.
Icinga Web Authentication
The fourth page lets us choose how we want to authenticate Icinga Web users. If you wanted to integrate with an LDAP service for authentication, this would be the place to choose that. We’ll use the default, Database, to store users in our MySQL database. Click Next to continue.
User Database Setup
The fifth page asks us to set up a database to store the user data. This is separate from the database we previously set up during the command line install.
Most of the defaults are fine, but we also need to choose a database name and user/password combination:
- Resource Name: icingaweb_db
- Database Type: MySQL
- Host: localhost
- Port:
- Database Name: icingaweb_users
- Username: icingaweb
- Password: set and record a password
- Character Set:
- Persistent: leave unchecked
- Use SSL: leave unchecked
Hit Next to continue.
Create User Database
The next page will say that your database doesn’t exist and you don’t have the credentials to create it. Enter root for the username, type in the MySQL root password and click Next to create the Icinga Web database and user.
Name the Authentication Provider
Now we need to name the authentication backend we just created. The default icingaweb2 is fine. Click Next.
Create Admin Account
Now that we’ve set up our user database, we can create our first Icinga Web administrative account. Choose a username and password and click Next to continue.
Preferences and Log Storage
Next we’re presented with options on how to store user preferences and logs. The defaults are fine and will store preferences in the database while logging to syslog. Hit Next to continue.
Configuration Review
We are presented with a page to review all of our configurations. Click Next to confirm the configuration details and move on to configuring the monitoring module.
Introduction to Monitoring Configuration
Now we start configuring the actual monitoring module for Icinga Web. Click Next to start.
Select Monitoring Backend
First up, we select our monitoring backend. The default name of icinga and type of IDO are fine. This indicates that Icinga Web will retrieve information from the ido-mysql database we configured earlier when installing things on the command line.
Set up Monitoring Database
We need to enter the connection details for the ido-mysql database. We created this password during installation.
This page has all the same options as the user-database setup screen:
- Resource Name: icinga_ido
- Database Type: MySQL
- Host: localhost
- Port:
- Database Name: icinga2
- Username: icinga2
- Password: password you created during installation
- Character Set
- Persistent: unchecked
- Use SSL: unchecked
Click Next to continue.
Select Command Transport Method
Next is a Command Transport prompt. This lets us specify how Icinga Web will pass commands to Icinga when we manually run health checks in the web interface. The default of Local Command File is fine and will work with the command feature we enabled back in Step 1. Click Next to continue.
Set Up Monitoring Interface Security
This lets you specify data that should be masked in the web interface, to prevent any potential onlookers from seeing passwords and other sensitive information. The defaults are fine. Hit Next to continue.
Monitoring Module Configuration Summary
Once again, we’re presented with a summary of our configuration. Hit Finish to finish the setup of Icinga Web. A Congratulations! message will load.
Click Login to Icinga Web 2 and log in with your administrator username and password.
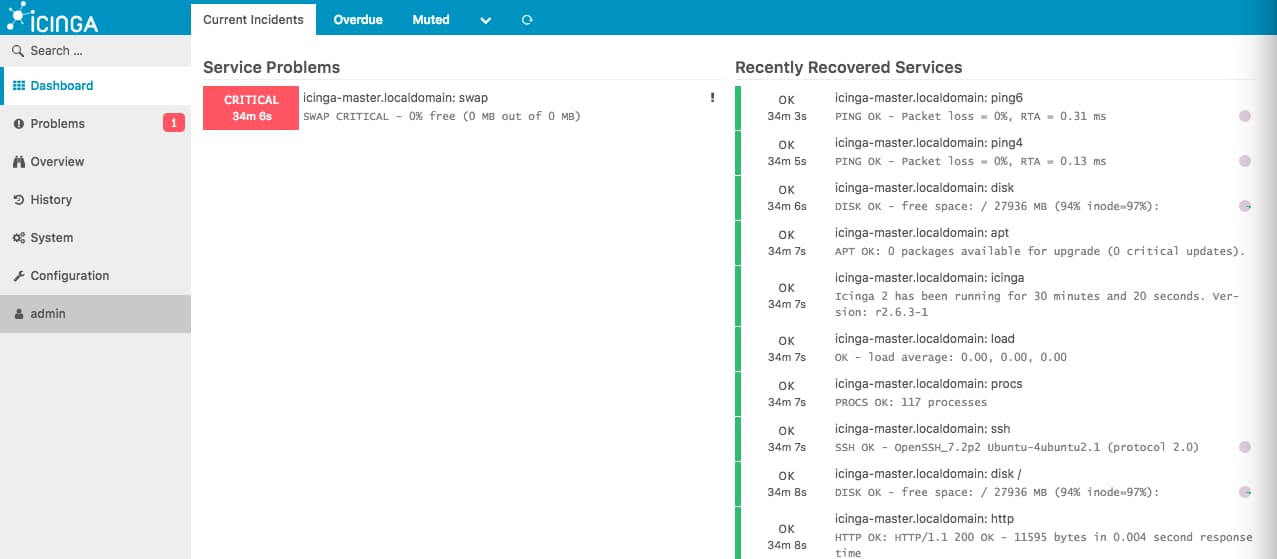
The main interface of Icinga Web will load. Explore a little and familiarize yourself with the interface. If your server has no swap space set up, you may see a red Critical Error box. We can ignore this for now, or you can Acknowledge the issue by clicking the red box, selecting Acknowledge from the right-hand column, filling out a comment, and finally clicking the Acknowledge problem button.
Now that we’ve finished setting up Icinga, and Icinga Web, let’s set email notifications.
Step 4 – Setting up Email
Monitoring isn’t too helpful if you can’t receive alerts when something goes wrong. Icinga’s default config has some scripts to email an administrator, but we need to set up email on our server before they’ll work. The simplest way to do that is to use a program called ssmtp to route all the server’s mail through a standard SMTP server.
First, install ssmtp and some helper mail utilities:
- sudo apt-get install ssmtp mailutils
And now we edit the ssmtp configuration file with our SMTP details. These should be provided by your ISP, email provider, or IT department. You’ll need a username, pasword, and the address of your SMTP server:
- sudo nano /etc/ssmtp/ssmtp.conf
There will be some existing configuration in the file. Delete it and replace it with this very basic setup that should work with most SMTP servers:
mailhub=mail.example.com:465
UseTLS=yes
FromLineOverride=yes
AuthUser=smtp_username
AuthPass=smtp_password
Save and close the file. To test the connection, use the mail command:
- echo "hello world" | mail -s "test subject" sammy@example.com
You should see an email in your inbox shortly. Now we need to update a few settings for Icinga to send mail.
Step 5 — Setting up and Testing Notifications
To get email notifications working, update the email address Icinga is sending to:
- sudo nano /etc/icinga2/conf.d/users.conf
Change the email line to the address you’d like to receive notifications at:
. . .
email = "sammy@example.com"
. . .
Restart Icinga one last time:
- sudo systemctl restart icinga2
The icinga-master host is already configured to send notifications when problems arise. Let’s cause a problem and see what happens. We’ll use a command called stress to increase the system’s load in order to trigger a warning.
Install stress:
- sudo apt-get install stress
stress can manipulate load, disk IO, memory, and other system metrics. The Icinga default configuration will trigger a warning when the system’s load is over five. Let’s cause that now:
- stress --cpu 6
Switch back to the Icinga Web interface and you’ll see the load metric slowly rise. After a few checks it will enter a soft Warning state. Soft means that the check has to fail a few more times before it’s considered a hard state, at which time notifications will be sent. This is to avoid sending notifications for transient issues that quickly fix themselves.
Wait for the warning to reach a hard state and send the notification. You should receive an email with the details of what’s going wrong.
Press CTRL-C to exit the stress command. The system load will recover fairly quickly and revert to Ok in the Icinga Web interface. You’ll also receive another email telling you that the issue has cleared up.
Conclusion
In this tutorial we have successfully set up Icinga and Icinga Web, including Icinga’s email notification feature. Currently we are only monitoring the Icinga host itself though. Continue on to our next tutorial How To Monitor Hosts and Services with Icinga on Ubuntu 16.04 where we will set up remote monitoring.
Thanks for learning with the DigitalOcean Community. Check out our offerings for compute, storage, networking, and managed databases.
About the author
Senior Technical Writer at DigitalOcean
Still looking for an answer?
This textbox defaults to using Markdown to format your answer.
You can type !ref in this text area to quickly search our full set of tutorials, documentation & marketplace offerings and insert the link!
Thank you! Everything worked (skipped email setup as I have postfix already setup). On my Ubuntu 16.04 I got red
DISK CRITICAL - /sys/kernel/debug/tracing is not accessible: Permission denied
warnings which turned out to be a triaged bug in actual version of icinga 2.1.0 (found information at https://bugs.launchpad.net/ubuntu/+source/nagios-plugins/+bug/1516451).
I could solve my problem by modifying /etc/nagios-plugins/config/disk.cfg as shown there just adding the parts (including) -A … to the check_disk and check_all_disks command. Restarting icinga2 as shown above.
define command{
        command_name    check_disk
        command_line    /usr/lib/nagios/plugins/check_disk -w '$ARG1$' -c '$ARG2$' -e -p '$ARG3$' -A --exclude-type=tracefs --exclude-type=cgroup --exclude_device=/run/lxcfs/controllers
        }

# 'check_all_disks' command definition
define command{
        command_name    check_all_disks
        command_line    /usr/lib/nagios/plugins/check_disk -w '$ARG1$' -c '$ARG2$' -e -A --exclude-type=tracefs --exclude-type=cgroup --exclude_device=/run/lxcfs/controllers
        }
hello, thanks for this tuto ! I tried to install icinga using a Lemp stack following this tuto (https://www.digitalocean.com/community/tutorials/how-to-install-linux-nginx-mysql-php-lemp-stack-in-ubuntu-16-04) but i could not reach https://icinga-master.example.com/icingaweb2 may be something is wrong with my default site conf or php conf PLEASE can you help me figure it out ! i prefer nginx over apache THANKS
On Step 3, the url: https://icinga-master.example.com/icingaweb2 does not work. The web server responses with status 403 (No token provided.). I use: https://example.com/icingaweb2/setup instead.
 This work is licensed under a Creative Commons Attribution-NonCommercial- ShareAlike 4.0 International License.
Become a contributor for community
Get paid to write technical tutorials and select a tech-focused charity to receive a matching donation.

DigitalOcean Documentation
Full documentation for every DigitalOcean product.

Resources for startups and AI-native businesses
The Wave has everything you need to know about building a business, from raising funding to marketing your product.
The developer cloud
Scale up as you grow — whether you're running one virtual machine or ten thousand.

Start building today
From GPU-powered inference and Kubernetes to managed databases and storage, get everything you need to build, scale, and deploy intelligent applications.
