
Introduction
MoinMoin is a high performance open source Wiki Engine that is written in Python. It provides a feature-rich wiki that has a large community of users, and is very customizable and easy to use. MoinMoin is used by several organizations for their public wikis, such as Ubuntu, Apache, FreeBSD, and more.
In this tutorial, we will show you how to set up your own MoinMoin wiki on a fresh Ubuntu 14.04 server, using Nginx as the web server and uWSGI as the application engine. This particular setup is for a single wiki, and it is very fast and memory-efficient.
Prerequisites
Before you begin with this guide, you should have a separate, non-root user account set up on your server. You can learn how to do this by completing steps 1-4 in the initial server setup for Ubuntu 14.04.
This guide assumes that you have a fresh Ubuntu 14.04 server.
This tutorial uses vi to open and edit files. If you prefer a different editor, feel free to use it in place of vi where applicable.
Let’s get started!
Install uWSGI
To get started, let’s install uWSGI, which we will use as the application server.
First, update your Apt database with this command:
sudo apt-get update
An easy way to install uWSGI is to use the Python package manager, pip. Install Python-pip and the Python libraries now:
sudo apt-get install python-pip python-dev
With the pip installed, we can use it to install the latest stable release of uWSGI with this command:
sudo pip install http://projects.unbit.it/downloads/uwsgi-lts.tar.gz
If uWSGI is installed successfully, you will see a message that looks like this:
    ############## end of uWSGI configuration #############
    total build time: 36 seconds
    *** uWSGI is ready, launch it with /usr/local/bin/uwsgi ***

Successfully installed uWSGI
Cleaning up...
Now that the uWSGI application server is installed, we are ready to download and install MoinMoin.
Install Moinmoin
Before installing MoinMoin, look up version that you want to install here: MoinMoin Releases. You will probably want to use the latest general release.
Find the latest general release of MoinMoin and copy its URL to your clipboard:
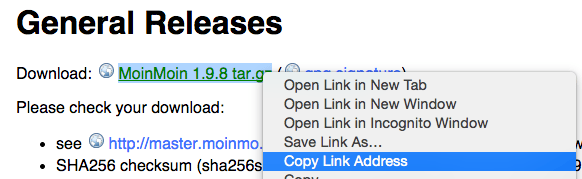
The latest available general release when this tutorial written was 1.9.8, so the example URL refers to the 1.9.8 version. Use this wget command to download the MoinMoin archive to your home directory (substitute the download URL that you copied):
cd ~
wget http://static.moinmo.in/files/moin-1.9.8.tar.gz
Now extract the archive with tar:
tar zxvf moin-1.9.8.tar.gz
Change to the directory that was created by extracting the MoinMoin archive:
cd moin-*
To build the MoinMoin Python application and copy it to /usr/local, run this command:
sudo python setup.py install --prefix=/usr/local
Assuming you are on Python 2.7, the Python script installs the MoinMoin code package to /usr/local/lib/python2.7/dist-packages/, and the rest of the MoinMoin data to /usr/local/share/moin.
Now the MoinMoin Python Application is installed but it is not yet configured. Let’s configure it now.
Configure MoinMoin Application
Before actually starting the MoinMoin application, we need to prepare its configuration files.
Change to the installation directory:
cd /usr/local/share/moin
Then copy the sample server configuration file, moin.wsgi, to the current directory:
sudo cp server/moin.wsgi .
Open the server configuration file for editing:
sudo vi moin.wsgi
Below the import sys, os line, insert the following lines:
sys.path.insert(0, '/usr/local/lib/python2.7/dist-packages/')
sys.path.insert(0, '/usr/local/share/moin/')
Save and exit. This configures the application with the location of the MoinMoin code and the location of where the wiki configuration files will be located.
Next, create and open uwsgi.ini:
sudo vi uwsgi.ini
Insert the following lines into the file:
[uwsgi]
uid = www-data
gid = www-data
socket = /usr/local/share/moin/moin.sock
chmod-socket = 660
logto = /var/log/uwsgi/uwsgi.log

chdir = /usr/local/share/moin/
wsgi-file = moin.wsgi

master
workers = 3
max-requests = 200
harakiri = 30
die-on-term
Save and exit. The uwsgi.ini file will be used to load the MoinMoin application with the uWSGI application server. Here, we are specifying the user, socket, and server configuration and log files that the application should use, among other things. Feel free to adjust the number of workers, max-requests, or acceptable session duration (harakiri).
Now create the /var/log/uwsgi directory, which is the where we configured the uWSGI application to write its logs to:
sudo mkdir -p /var/log/uwsgi
sudo chown www-data /var/log/uwsgi
Next, let’s create an initctl script that will be used to start the our MoinMoin application. This script will enable MoinMoin on server boot and allow you to control the uWSGI application with start moin and stop moin.
Create and open moin.conf with the following command:
sudo vi /etc/init/moin.conf
Insert the following configuration lines:
description "moin uwsgi service"

start on runlevel [2345]
stop on runlevel [!2345]

chdir /usr/local/share/moin
exec /usr/local/bin/uwsgi /usr/local/share/moin/uwsgi.ini
respawn
Save and exit. It is important that the paths in the chdir and exec lines accurately reflect where MoinMoin was installed, and where the uwsgi binary and uwsgi.ini file exist.
You may start the application server now (sudo start moin) but we will make a few changes to the Wiki configuration first.
Configure Wiki
Now that the uWSGI application server is ready, we will want to configure the actual Wiki.
Change to the MoinMoin installation directory and copy the sample wikiconfig.py file:
cd /usr/local/share/moin
sudo cp config/wikiconfig.py .
Now open the file for editing:
sudo vi wikiconfig.py
Here we can configure various aspects of the Wiki. At a minimum, we want to configure the following items:
sitename: The title of your Wikipage_front_page: Uncomment this line to enable a normal front pagesuperuser: The name of the user that you want to use as the admin of the Wiki. This item must also be uncommented
Find the following lines (and uncomment them if necessary, by deleting the #), and change the highlighted values to your liking:
    sitename = u'My First Wiki'

    page_front_page = u"FrontPage"

    superuser = [u"WikiAdmin", ]
Save and exit. This is a Python file, so be sure to preserve any indentations that already exist.
Before starting the application, let’s change the ownership and permissions of the MoinMoin directories:
sudo chown -R www-data: /usr/local/share/moin
sudo chmod -R o-rwx /usr/local/share/moin
Start the uWSGI application server with this command:
sudo start moin
MoinMoin is now running but we need to install configure Nginx, the web server, before you can use it.
Install and Configure Nginx
We will be using Nginx as our web server, so let’s install and configure it now.
Install Nginx with apt:
sudo apt-get install nginx
Now change to the sites-available directory, and create a new server block configuration file for the Wiki. We will call ours moin:
cd /etc/nginx/sites-available
sudo vi moin
In the file, insert the following lines (replace the highlighted parts with your own information):
server {
    server_name wiki.example.com;

    access_log /var/log/nginx/access.log;
    error_log /var/log/nginx/error.log;

    location / {
        include uwsgi_params;
        uwsgi_pass unix:///usr/local/share/moin/moin.sock;
        uwsgi_modifier1 30;
    }
}
This is a bare bones Nginx configuration. Feel free to make any changes that you feel are appropriate for your server.
Now, let’s create a symbolic link to our new server block configuration file in the sites-enabled directory:
cd /etc/nginx/sites-enabled
sudo ln -s ../sites-available/moin .
And delete the symbolic link to the default server block:
sudo rm default
Now the moin server block will be the default.
Restart Nginx to load the new settings:
sudo service nginx restart
Your new Wiki is up and running! It is available at your server’s IP address or hostname.
Create Wiki Superuser
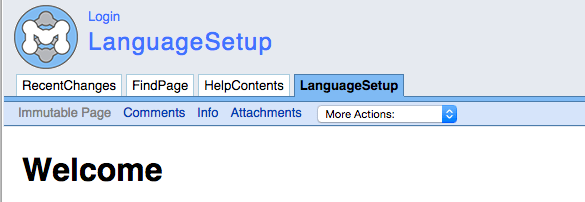
The last thing you will want to do before using your Wiki is create the Superuser account. This account has admin privileges to the blog. We configured the name of this user in the superuser field of in the wikiconfig.py file, in the Configure Wiki section of this tutorial, so make sure you use the same name here.
Connect to your server in a web browser, via its IP address or hostname: http://wiki.example.com
You will be greeted by the following front page:
Click the Login link at the top of the page.
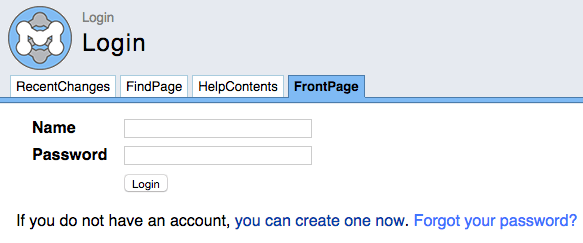
At the Login page, click the you can create one now link.
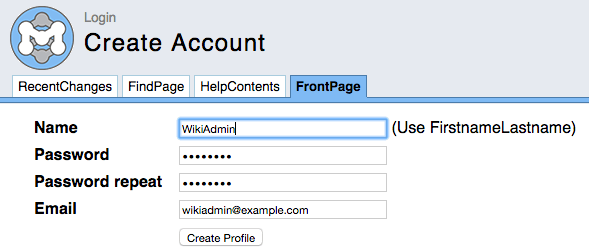
At the Create Account page, enter the name that matches your superuser configuration (the example used “WikiAdmin”), with your password and email address, then click the Create Profile button.
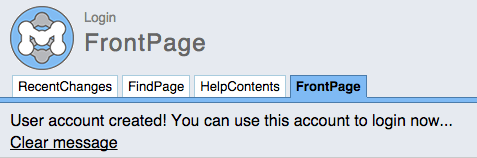
If all went well, you should see the following success message:
That’s it! Your wiki is now ready to be used.
Conclusion
Now that you have your MoinMoin wiki up and running, you are ready to use it to collaborate! Feel free to add content and users, or change its configuration and themes.
Thanks for learning with the DigitalOcean Community. Check out our offerings for compute, storage, networking, and managed databases.
About the author
Software Engineer @ DigitalOcean. Former Señor Technical Writer (I no longer update articles or respond to comments). Expertise in areas including Ubuntu, PostgreSQL, MySQL, and more.
Still looking for an answer?
This textbox defaults to using Markdown to format your answer.
You can type !ref in this text area to quickly search our full set of tutorials, documentation & marketplace offerings and insert the link!
Hi, first of all, thank you for this detailed tutorial! I followed the instructions step by step, but at the point: “sudo start moin” I got an error “command not found”
Any ideas?
This comment has been deleted
This comment has been deleted
Hi! Thanks for tutorial.
I also met the problem as ulc. I tried “sudo start moin” then I got “start: Uknow job: moin” Any idea how to solve this? really appreciate!
 This work is licensed under a Creative Commons Attribution-NonCommercial- ShareAlike 4.0 International License.
Become a contributor for community
Get paid to write technical tutorials and select a tech-focused charity to receive a matching donation.

DigitalOcean Documentation
Full documentation for every DigitalOcean product.

Resources for startups and AI-native businesses
The Wave has everything you need to know about building a business, from raising funding to marketing your product.
The developer cloud
Scale up as you grow — whether you're running one virtual machine or ten thousand.

Start building today
From GPU-powered inference and Kubernetes to managed databases and storage, get everything you need to build, scale, and deploy intelligent applications.
