By Sean Webber and Sharon Campbell

Introduction
SchoolTool is an open-source student management system alternative to Blackboard or Pearson’s PowerSchool. It can be used to manage any of the following records a school might keep:
- Achievement and goal tracking
- Attendance journals
- Event calendars
- Gradebooks
- Guardian/parent, staff, and student contact information
- Infraction/intervention reports
School administrators, clerks, students, and teachers can access SchoolTool using a typical web browser. Unlike PowerSchool, it does not require the Java Runtime Environment.
Prerequisites
Make sure you have these prerequisites before you begin.
- A server (Droplet) with at least 2GB of RAM running Ubuntu 14.04. Depending on the number of SchoolTool users, you may need more memory
- One server per school. SchoolTool does not natively support multiple schools on the same server; i.e., a single district-wide deployment
- A sudo user to execute day-to-day commands
Step 1 — Adding SchoolTool’s Package Repository
The SchoolTool team does not publish its software on the official Ubuntu package repositories, so you will need to add the address of their repository to your server:
sudo add-apt-repository ppa:schooltool-owners/2.8
When prompted, press ENTER.
Step 2 — Installing SchoolTool
Now that SchoolTool’s repository is added to your server, update your server’s package list.
sudo apt-get update
Then, install SchoolTool.
sudo apt-get install schooltool
SchoolTool will install a vast assortment of Python packages along with the SchoolTool software itself, so this can take a few minutes. Python is the programming language that SchoolTool is written in. Those of you who are experienced sysadmins will notice that SchoolTool does not require a LAMP stack for serving web pages or storing data. According to SchoolTool’s developers, the use of Python apps provides more stability in day-to-day operation and during program updates.
Step 3 — Allowing Public Access
By default, SchoolTool is accessible only from the computer where it’s installed. In this section, we will open it up to public Internet access.
Open SchoolTool’s paste.ini configuration file on your server in nano, a terminal-based text editor.
sudo nano /etc/schooltool/standard/paste.ini
Use the down arrow on your keyboard to move your cursor towards the bottom of the file. You will see this:
[server:main]
use = egg:zope.server
host = 127.0.0.1
port = 7080
Use the arrow and BACKSPACE keys to replace 127.0.0.1 with 0.0.0.0.
[server:main]
use = egg:zope.server
host = 0.0.0.0
port = 7080
Press the CONTROL + X keys simultaneously for a moment. At the bottom of your screen, nano will ask you this:
Save modified buffer (ANSWERING "No" WILL DESTROY CHANGES) ?
 Y Yes
 N No           ^C Cancel
Press the Y key on your keyboard to save your changes to the configuration file.
To apply the changes to SchoolTool, you will need to restart it.
sudo service schooltool restart
Now you can take a moment to view SchoolTool in your browser, to make sure everything is working so far.
Open your browser, and visit the URL http://example.com:7080 or http://your_server_ip:7080, depending on your desired configuration. Note that for now, you need to add the :7080 port number. The next section will show you how to access the server on the default port (80), which should make it easier for more users to access.
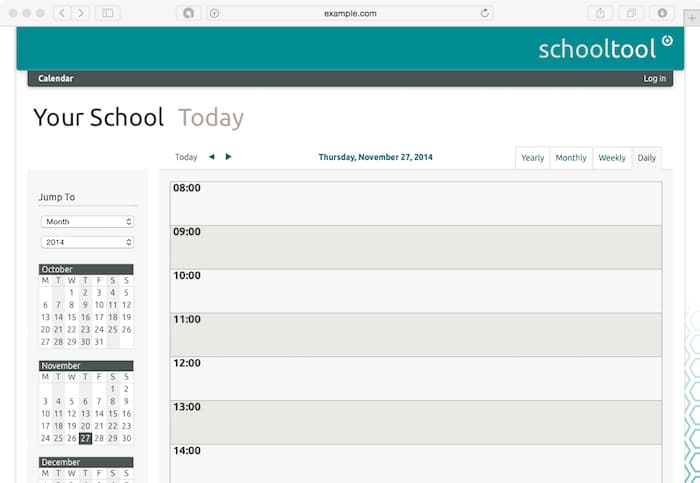
You should see the default calendar page.

(Optional) Step 4 — Configuring Port 80 Access
SchoolTool’s default port is 7080. However, most users will be more comfortable accessing it on port 80, which is one of the normal ports used by web browsers. That means people will be able to access the server at example.com rather than example.com:7080.
If you do not have any programs (e.g., Apache or Nginx) using port 80 on your server, you can change SchoolTool’s default port to 80 by following the instructions in this section. If you already have a program on your server that uses port 80, you will have to use the default port 7080 or create a new server specifically for SchoolTool.
You can use iptables to forward port 80 to port 7080. Assuming your server is connected to the internet using the interface eth0, use the following commands to accomplish this. If your server is a DigitalOcean Droplet, you are connected to the Internet using the interface eth0.
Execute these three commands on your server to set up port forwarding:
sudo iptables -A INPUT -i eth0 -p tcp --dport 80 -j ACCEPT
sudo iptables -A INPUT -i eth0 -p tcp --dport 7080 -j ACCEPT
sudo iptables -A PREROUTING -t nat -i eth0 -p tcp --dport 80 -j REDIRECT --to-port 7080
Now you will be able to log into SchoolTool using the URL http://example.com or http://your_server_ip, depending on your desired configuration.
Step 5 — Logging in to SchoolTool
Use your favorite web browser to access SchoolTool. SchoolTool’s home page is the Calendar page by default.
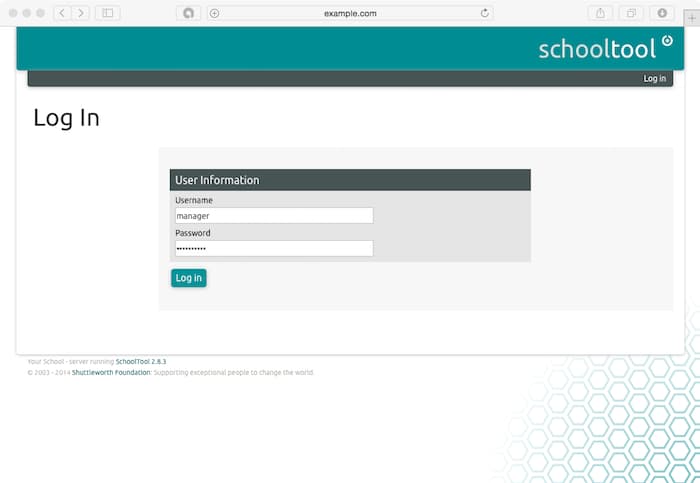
In the upper right-hand corner, click on the Log in link.
Use the default SchoolTool login credentials:
- Username: manager
- Password: schooltool
Then press the Log in button to log in.
You’re now logged in to SchoolTool.
Step 6 — Making Basic Configuration Changes
Now that you have logged into SchoolTool, you will want to make the following changes:
- Change the manager account’s password
- Specify your school’s name
- Specify your school’s logo
First we’ll update the password for the manager account. Do not leave this with the default password; otherwise, anyone could log into the account.
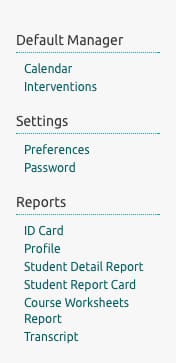
Click on the Home tab in the navigation menu located at the top of the web page. Next, click on the Settings > Password link in the left-hand navigation menu.
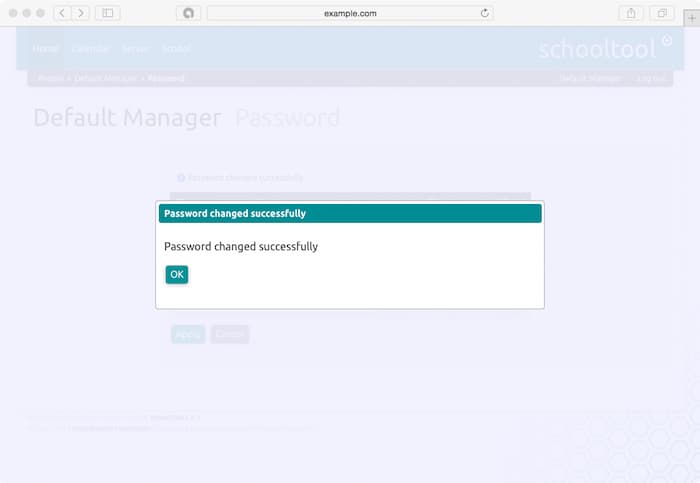
Type in the current password, schooltool. Then type in your new password twice, and press the Apply button. Please choose a strong password.
A Password changed successfully popup will appear. From now on, you should use this password to log in to the SchoolTool control panel.
Next we’ll change your school’s name and logo.
Click on the School tab in the navigation bar located at the top of the web page. Then, click on the Customize > School Name link in the left-hand navigation menu.
Replace Your School with the name of your school. In this tutorial, we’ll use DigitalOcean Academy.
Click on the Choose File button to upload an image from your computer to use as your school’s logo. Once you have selected an image to use, press the Submit button to save your changes.
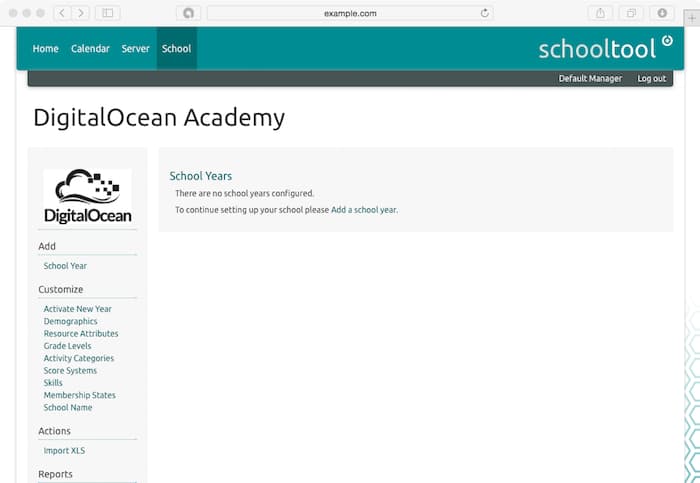
When the page reloads, SchoolTool will use the name and logo of your school instead of its defaults.
Conclusion
Now that you have installed SchoolTool, you have a free alternative to BlackBoard or PowerSchool that will allow your school to manage student records from a browser-based application.
You’ll want to add teachers and students, set up grade books, and more. To access the full SchoolTool manual, refer to The SchoolTool Book, a knowledge base maintained by the developers of SchoolTool.
Thanks for learning with the DigitalOcean Community. Check out our offerings for compute, storage, networking, and managed databases.
About the author(s)
Current fan and former Editorial Manager at DigitalOcean. Hi! Expertise in areas including Ubuntu, Docker, Rails, and more.
Still looking for an answer?
This textbox defaults to using Markdown to format your answer.
You can type !ref in this text area to quickly search our full set of tutorials, documentation & marketplace offerings and insert the link!
When you say "SchoolTool does not natively support multiple schools on the same server; " doesn’t this(http://book.schooltool.org/multiple-schooltools.html?highlight=instances) go against that?
 This work is licensed under a Creative Commons Attribution-NonCommercial- ShareAlike 4.0 International License.
Become a contributor for community
Get paid to write technical tutorials and select a tech-focused charity to receive a matching donation.

DigitalOcean Documentation
Full documentation for every DigitalOcean product.

Resources for startups and AI-native businesses
The Wave has everything you need to know about building a business, from raising funding to marketing your product.
The developer cloud
Scale up as you grow — whether you're running one virtual machine or ten thousand.

Start building today
From GPU-powered inference and Kubernetes to managed databases and storage, get everything you need to build, scale, and deploy intelligent applications.
