By Justin Ellingwood and Brian Boucheron
Not using Ubuntu 18.04?
Choose a different version or distribution.
Introduction
OpenLiteSpeed is an optimized open source web server that can be used to manage and serve sites. OpenLiteSpeed has some useful features that make it a solid choice for many installations: it features Apache-compatible rewrite rules, a built-in web-based administration interface, and customized PHP processing optimized for the server.
In this guide, we’ll demonstrate how to install and configure OpenLiteSpeed on an Ubuntu 18.04 server.
Prerequisites
To complete this tutorial you will need an Ubuntu 18.04 server with a sudo-enabled, non-root user and the ufw firewall enabled.
Please refer to our Initial Server Setup with Ubuntu 18.04 tutorial for instructions on fulfilling these requirements.
Step 1 – Installing OpenLiteSpeed
OpenLiteSpeed provides a software repository we can use to download and install the server with Ubuntu’s standard apt command.
To enable this repository for your Ubuntu system, first download and add the developer’s software signing key:
- wget -qO - https://rpms.litespeedtech.com/debian/lst_repo.gpg | sudo apt-key add -
This key is used to cryptographically verify that nobody has tampered with the software we’re about to download.
Next, we add the repository information to our system:
- sudo add-apt-repository 'deb http://rpms.litespeedtech.com/debian/ bionic main'
After the repository has been added, the add-apt-repository command will refresh our package cache and the new software will be available to install.
Install the OpenLiteSpeed server and its PHP processor using apt install:
- sudo apt install openlitespeed lsphp73
Finally, create a soft link to the PHP processor we just installed. This directs the OpenLiteSpeed server to use the correct version:
- sudo ln -sf /usr/local/lsws/lsphp73/bin/lsphp /usr/local/lsws/fcgi-bin/lsphp5
Now that the OpenLiteSpeed server is installed, we’ll secure it by updating the default admin account.
Step 2 – Setting the Administrative Password
Before we test the server, we should set a new administrative password for OpenLiteSpeed. By default, the password is set to 123456, so we should change this immediately. We can do this by running a script provided by OpenLiteSpeed:
- sudo /usr/local/lsws/admin/misc/admpass.sh
You will be asked to provide a username for the administrative user. If you press ENTER without choosing a new username, the default of admin will be used. Then, you will be prompted to create and confirm a new password for the account. Do so, then hit ENTER one last time. The script will confirm a successful update:
OutputAdministrator's username/password is updated successfully!
Now that we’ve secured the admin account, let’s test out the server and make sure it’s running properly.
Step 3 – Starting and Connecting to the Server
OpenLiteSpeed should have started automatically after it was installed. We can verify this using the lswsctrl command:
- sudo /usr/local/lsws/bin/lswsctrl status
Outputlitespeed is running with PID 990.
If you don’t see a similar message, you can start the server using lswsctrl:
- sudo /usr/local/lsws/bin/lswsctrl start
Output[OK] litespeed: pid=5137.
The server should now be running. Before we can visit it in our browser, we need to open up some ports on our firewall. We’ll do this with the ufw command:
- sudo ufw allow 8088
- sudo ufw allow 7080
The first port, 8088, is the default port for OpenLiteSpeed’s example site. It should now be accessible to the public. In your web browser, navigate to your server’s domain name or IP address, followed by :8088 to specify the port:
http://server_domain_or_IP:8088
Your browser should load the default OpenLiteSpeed web page, which looks like this:
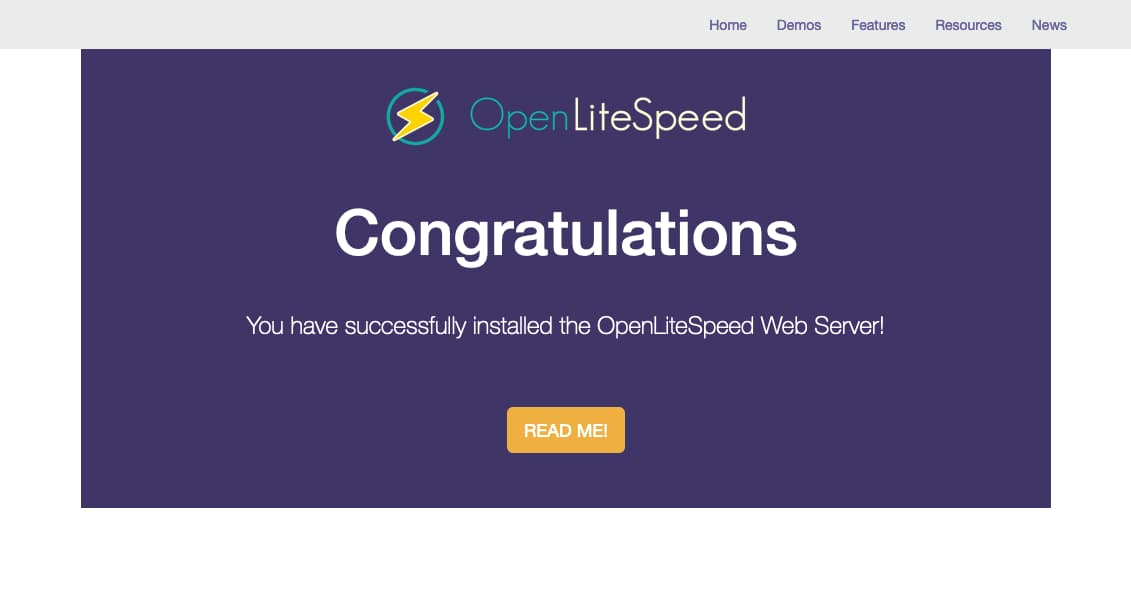
The links towards the bottom of the page are designed to demonstrate various features of the server. If you click through them you will notice that these features are already installed and properly configured. For instance, an example CGI script is available, a customized PHP instance is up and running, and custom error pages and authentication gates are configured. Click around to explore a little.
When you are satisfied with the default site, you can move on to the administrative interface. In your web browser, using HTTPS, navigate to your server’s domain name or IP address followed by :7080 to specify the port:
https://server_domain_or_IP:7080
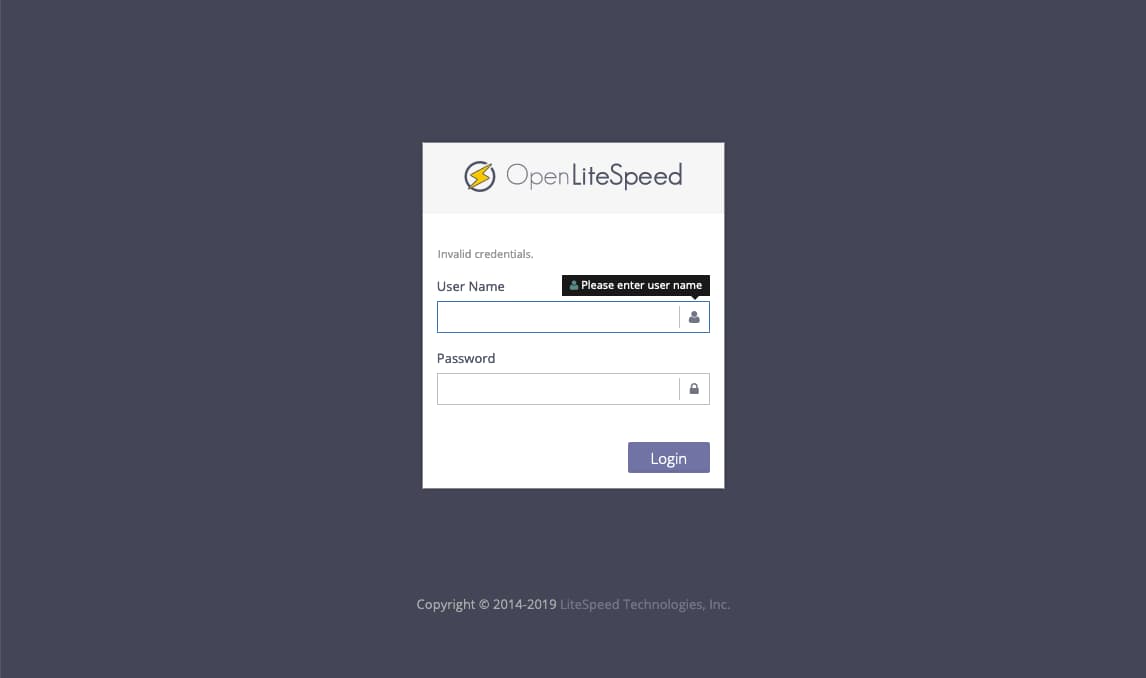
You will likely see a page warning you that the SSL certificate from the server cannot be validated. Since this is a self-signed certificate, this is expected. Click through the available options to proceed to the site. In Chrome, you must click “Advanced” and then “Proceed to…”.
You will be prompted to enter the administrative username and password that you selected with the admpass.sh script in the previous step:
Once you correctly authenticate, you will be presented with the OpenLiteSpeed administration interface:

This is where the majority of your configuration for the web server will take place.
Next, we’ll explore this interface by walking through a common configuration task: updating the port used by the default page.
Step 4 – Changing the Port for the Default Page
To demonstrate how to configure options through the web interface, we will change the port that the default site uses from 8088 to the conventional HTTP port 80.
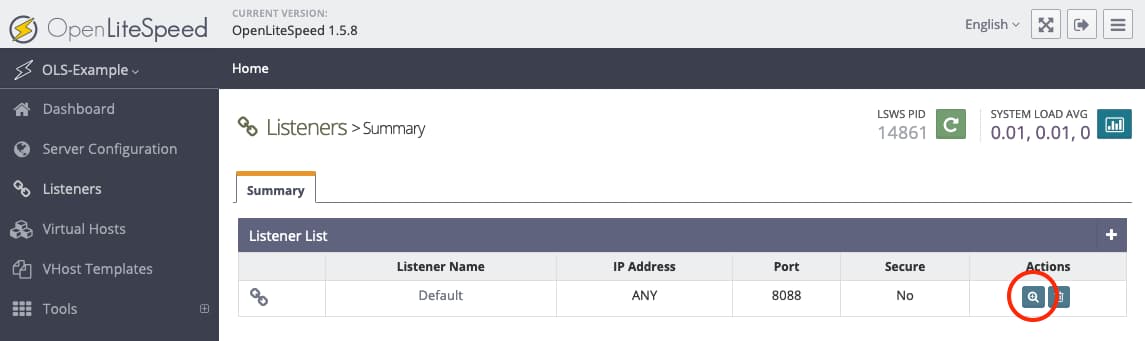
To accomplish this, first click Listeners in the list of options on the left side of the interface. A list of all available listeners will load.
In the list of listeners, click the “View/Edit” button for the Default listener:
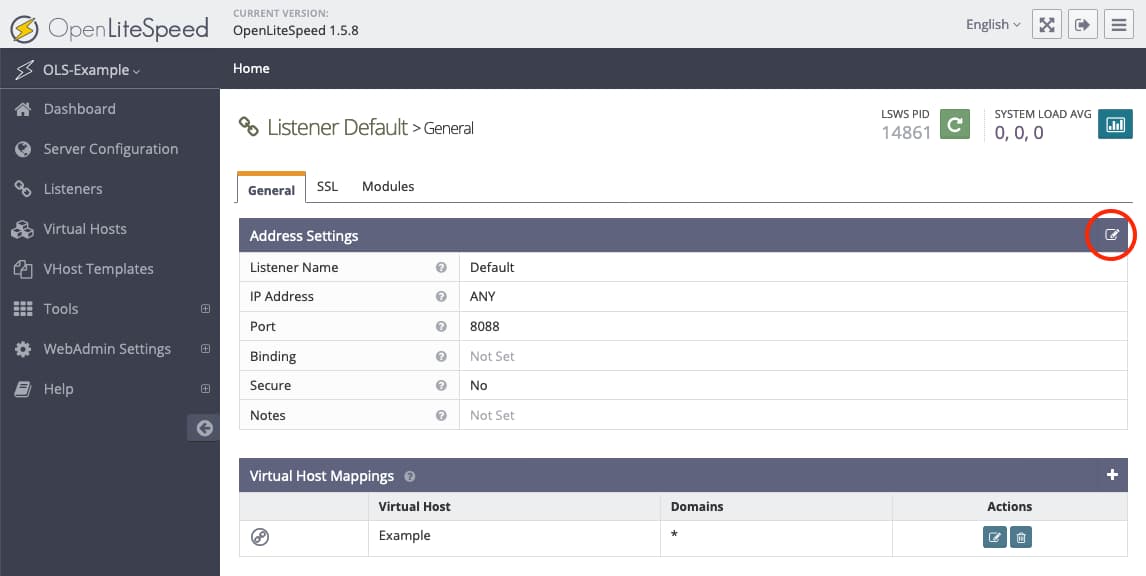
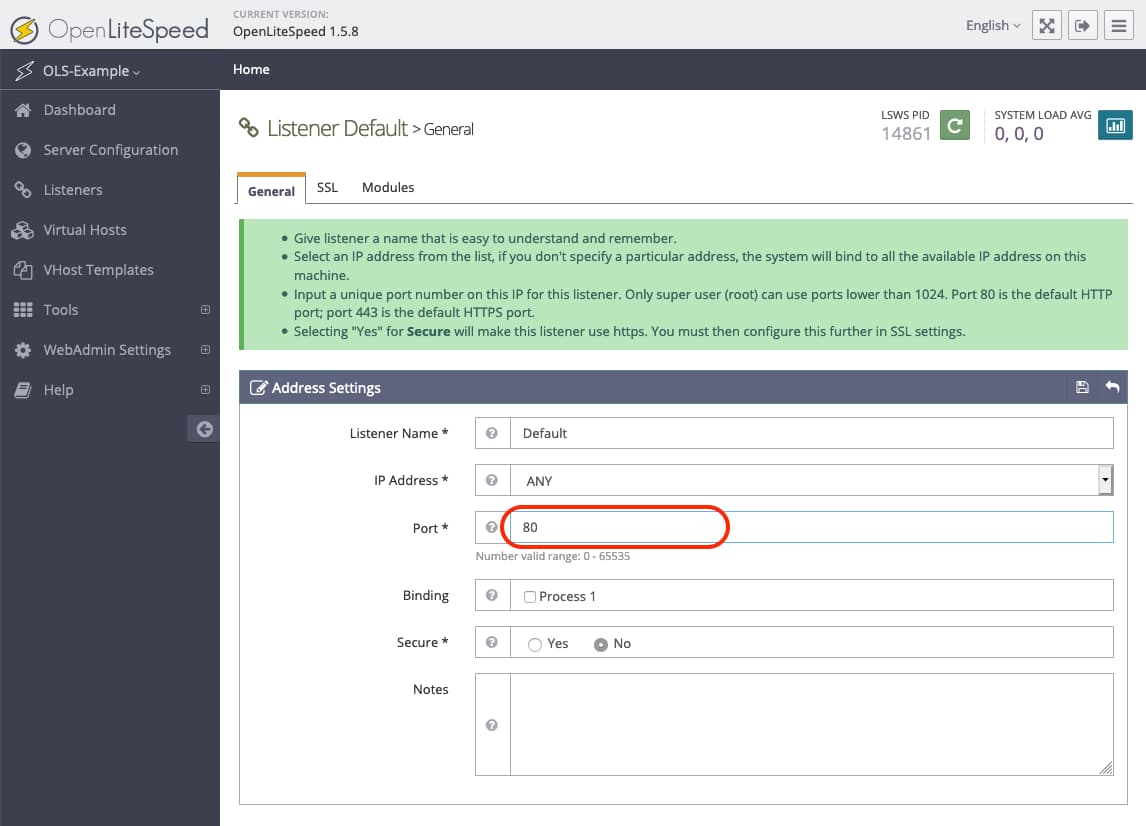
This will load a page with more details about the Default listener. Click the edit button in the top-right corner of the “Address Settings” table to modify its values:
On the next screen, change port 8088 to port 80, then click the floppy disk icon, Save:
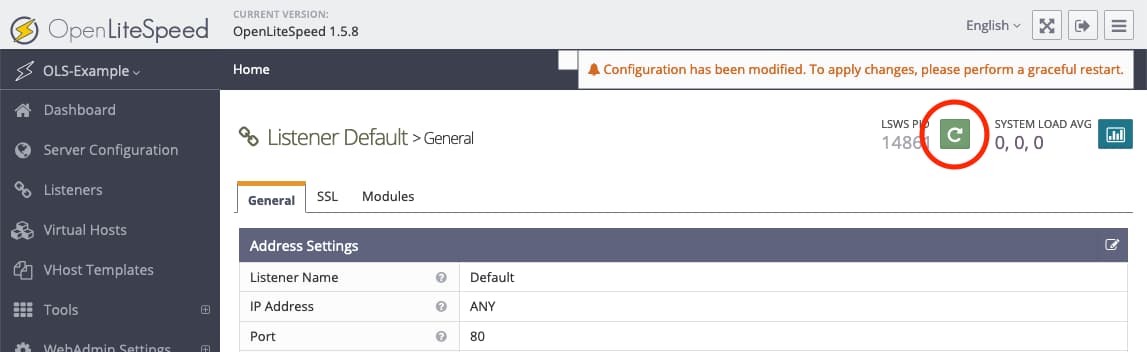
After the modification, you will need to restart the server. Click the “reload” arrow icon to restart OpenLiteSpeed:
Additionally, you’ll need to now open up port 80 on your firewall:
- sudo ufw allow 80
The default web page should now be accessible in your browser on port 80 instead of port 8088. Visiting your server’s domain name or IP address without providing any port number will now display the site.
Conclusion
OpenLiteSpeed is a fully-featured web server that is primarily managed through the administrative web interface. A full run through of how to configure your site through this interface is outside of the scope of this guide.
However, to get you started, we’ll touch on a few important points below:
- Everything associated with OpenLiteSpeed will be found under the
/usr/local/lswsdirectory. - The document root (where your files will be served from) for the default virtual host is located at
/usr/local/lsws/DEFAULT/html. The configuration and logs for this virtual host can be found under the/usr/local/lsws/DEFAULTdirectory. - You can create new virtual hosts for different sites using the admin interface. However, all of the directories that you will reference when setting up your configuration must be created ahead of time on your server. OpenLiteSpeed is not able to create the directories
- You can set up virtual host templates for virtual hosts that share the same general format.
- Often, it is easiest to copy the default virtual host’s directory structure and configuration to use as a starting point for new configurations.
- The admin interface has a built-in tooltip help system for almost all fields. There is also a Help menu option in the left-hand menu that links to the server documentation. Consult these sources of information during configuration if you need more help.
- To secure your OpenLiteSpeed installation with HTTPS, see the officall documentation’s section on SSL Setup
At this point, you should have OpenLiteSpeed and PHP installed and running on an Ubuntu 18.04 server. OpenLiteSpeed offers great performance, a web-based configuration interface, and pre-configured options for script handling.
Thanks for learning with the DigitalOcean Community. Check out our offerings for compute, storage, networking, and managed databases.
About the author(s)
Former Senior Technical Writer at DigitalOcean, specializing in DevOps topics across multiple Linux distributions, including Ubuntu 18.04, 20.04, 22.04, as well as Debian 10 and 11.
Senior Technical Writer at DigitalOcean
Still looking for an answer?
This textbox defaults to using Markdown to format your answer.
You can type !ref in this text area to quickly search our full set of tutorials, documentation & marketplace offerings and insert the link!
For anyone who sees it’s a broken package
wget -O - http://rpms.litespeedtech.com/debian/enable_lst_debain_repo.sh | bash
 This work is licensed under a Creative Commons Attribution-NonCommercial- ShareAlike 4.0 International License.
Become a contributor for community
Get paid to write technical tutorials and select a tech-focused charity to receive a matching donation.

DigitalOcean Documentation
Full documentation for every DigitalOcean product.

Resources for startups and AI-native businesses
The Wave has everything you need to know about building a business, from raising funding to marketing your product.
The developer cloud
Scale up as you grow — whether you're running one virtual machine or ten thousand.

Start building today
From GPU-powered inference and Kubernetes to managed databases and storage, get everything you need to build, scale, and deploy intelligent applications.
