Not using Ubuntu 14.04?
Choose a different version or distribution.
Introduction
WordPress is the most popular CMS (content management system) in the world. It allows you to easily get your site or blog up and running. After installation, you can manage almost everything in an easy web interface.
In this guide, we will go over how to install WordPress on an Ubuntu 14.04 server. For the web server component, we will use nginx, a powerful and efficient web server that has seen wide adoption due to its performance capabilities.
Prerequisites
Before you begin with this guide, there are a few procedures that you should undertake.
First, you will need a non-root user with sudo privileges. You can run through steps 1-4 in the Ubuntu 14.04 initial server setup guide to create this account.
You will also need a LEMP (Linux operating system, Nginx web server, MySQL database, and PHP processing) stack installed and configured on your server. You can learn how to install and set up the necessary components by following our guide on installing a LEMP stack on Ubuntu 14.04 here.
When you have finished with the steps above, you can continue.
Step One — Create a MySQL Database and User for WordPress
The first thing that we need to do to get started with WordPress is to prepare our database.
We have the MySQL database software installed, but we have not created a database for our WordPress information. We also need to create an account that WordPress can use to access the database we will be creating.
We should begin by logging into an interactive session with our MySQL administrative account like this:
mysql -u root -p
You will be prompted for the password that you chose for the MySQL root account when you installed the software. You will be given a MySQL command prompt.
Now, we can create a separate database that will be used exclusively by our WordPress application. The name is not important, but it should probably be descriptive so that you can easily recognize it. In this guide, we will call our database wordpress:
<pre> CREATE DATABASE <span class=“highlight”>wordpress</span>; </pre>
Note the semi-colon (;) that ends the MySQL statement. Each MySQL statement must end with one, so double-check that if you are running into issues.
We have a database now, so we are ready to create a user account. We will then hand over control of the database to this new user so that our application can interact with the database. This system of creating a separate database and user for each application helps keep our data separate from other data being stored by MySQL, which is good for security and data management.
For this guide, we’ll pick wordpressuser for our account name. We’ll assign it a password of password to authenticate with. When you are setting up your own configuration, you should select a more secure password:
<pre> CREATE USER <span class=“highlight”>wordpressuser</span>@localhost IDENTIFIED BY ‘<span class=“highlight”>password</span>’; </pre>
Now, we have a database and a user, but we haven’t established a relationship between the two yet. We need to tell MySQL that our new user can access and control the database. You can do that with this command:
<pre> GRANT ALL PRIVILEGES ON <span class=“highlight”>wordpress</span>.* TO <span class=“highlight”>wordpressuser</span>@localhost; </pre>
Everything should be configured correctly now. We need to flush the privileges to disk so that our current instance of MySQL knows about the privilege changes we have made:
FLUSH PRIVILEGES;
Now, exit the MySQL prompt:
exit
Now we are back in our command prompt, ready to move on.
Step Two — Download WordPress to your Server
Next, we need to download the actual WordPress content onto our server. This is available on the WordPress website.
The latest stable version of the application is always given the same URL, which makes this part easy. We want to download the file to our user’s home directory:
cd ~
wget http://wordpress.org/latest.tar.gz
Our application files have been downloaded as a compressed, archived directory structure stored in a file called latest.tar.gz. We can extract the contents by typing:
tar xzvf latest.tar.gz
This will create a directory called wordpress that contains the site files.
We should take this opportunity to download some additional components that our WordPress instance will need. We can get these directly from Ubuntu’s software repositories using apt:
sudo apt-get update
sudo apt-get install php5-gd libssh2-php
These two packages allow you to work with images and install/update plugins and components using SSH respectively.
Step Three — Configure WordPress
We have the files now, so we can start to configure our WordPress instance.
We need to modify the main configuration file located in our new directory. Move into the directory that you extracted in the last section:
cd ~/wordpress
Inside of this directory, we have a sample configuration file called wp-config-sample.php. This has most of the configuration details correct, so we can copy that to use as the base of our config file:
cp wp-config-sample.php wp-config.php
When we open the file, our first order of business will be to adjust some secret keys to provide some security for our installation. WordPress provides a secure generator for these values so that you do not have to try to come up with good values on your own. These are only used internally, so it won’t hurt usability to have complex, secure values here.
To grab secure values from the WordPress secret key generator, type:
- curl -s https://api.wordpress.org/secret-key/1.1/salt/
You will get back unique values that look something like this:
Warning
It is important that you request unique values each time. Do NOT copy the values shown below!
Outputdefine('AUTH_KEY',         '1jl/vqfs<XhdXoAPz9 DO NOT COPY THESE VALUES c_j{iwqD^<+c9.k<J@4H');
define('SECURE_AUTH_KEY',  'E2N-h2]Dcvp+aS/p7X DO NOT COPY THESE VALUES {Ka(f;rv?Pxf})CgLi-3');
define('LOGGED_IN_KEY',    'W(50,{W^,OPB%PB<JF DO NOT COPY THESE VALUES 2;y&,2m%3]R6DUth[;88');
define('NONCE_KEY',        'll,4UC)7ua+8<!4VM+ DO NOT COPY THESE VALUES #`DXF+[$atzM7 o^-C7g');
define('AUTH_SALT',        'koMrurzOA+|L_lG}kf DO NOT COPY THESE VALUES  07VC*Lj*lD&?3w!BT#-');
define('SECURE_AUTH_SALT', 'p32*p,]z%LZ+pAu:VY DO NOT COPY THESE VALUES C-?y+K0DK_+F|0h{!_xY');
define('LOGGED_IN_SALT',   'i^/G2W7!-1H2OQ+t$3 DO NOT COPY THESE VALUES t6**bRVFSD[Hi])-qS`|');
define('NONCE_SALT',       'Q6]U:K?j4L%Z]}h^q7 DO NOT COPY THESE VALUES 1% ^qUswWgn+6&xqHN&%');
These are configuration lines that we can paste directly in our configuration file to set secure keys. Copy the output you received now.
Now, open the WordPress configuration file:
nano wp-config.php
Find the section that contains the dummy values for those settings. It will look something like this:
. . .

define('AUTH_KEY',         'put your unique phrase here');
define('SECURE_AUTH_KEY',  'put your unique phrase here');
define('LOGGED_IN_KEY',    'put your unique phrase here');
define('NONCE_KEY',        'put your unique phrase here');
define('AUTH_SALT',        'put your unique phrase here');
define('SECURE_AUTH_SALT', 'put your unique phrase here');
define('LOGGED_IN_SALT',   'put your unique phrase here');
define('NONCE_SALT',       'put your unique phrase here');

. . .
Delete those lines and paste in the values you copied from the command line:
. . .

define('AUTH_KEY',         'VALUES COPIED FROM THE COMMAND LINE');
define('SECURE_AUTH_KEY',  'VALUES COPIED FROM THE COMMAND LINE');
define('LOGGED_IN_KEY',    'VALUES COPIED FROM THE COMMAND LINE');
define('NONCE_KEY',        'VALUES COPIED FROM THE COMMAND LINE');
define('AUTH_SALT',        'VALUES COPIED FROM THE COMMAND LINE');
define('SECURE_AUTH_SALT', 'VALUES COPIED FROM THE COMMAND LINE');
define('LOGGED_IN_SALT',   'VALUES COPIED FROM THE COMMAND LINE');
define('NONCE_SALT',       'VALUES COPIED FROM THE COMMAND LINE');

. . .
The file is now suitable for our needs; it is just lacking the information to connect to the database we created. The parameters we need to set are DB_NAME, DB_USER, and DB_PASSWORD.
We can find these parameters in this file and set them up to use the database and user details that we created. My file looks like this:
<pre> . . . // ** MySQL settings - You can get this info from your web host ** // /** The name of the database for WordPress */ define(‘DB_NAME’, ‘<span class=“highlight”>wordpress</span>’);
/** MySQL database username */ define(‘DB_USER’, ‘<span class=“highlight”>wordpressuser</span>’);
/** MySQL database password */ define(‘DB_PASSWORD’, ‘<span class=“highlight”>password</span>’); . . . </pre>
When you have made the changes above, save and close the file.
Step Four — Copy the Files to the Document Root
We have our changes to our config files. The next step is to copy them over to our document root so that our web server can find and serve them.
We will use the rsync utility to do the transfer. This has the advantage of preserving permissions, ownership, and ensuring data integrity.
The location of the default document root of nginx on Ubuntu 14.04 is /usr/share/nginx/html/.
However, we are going to set up our document root in /var/www/html/ to avoid modifying a directory location that is controlled by the nginx package. We will change this in our nginx configuration a bit later.
We can create the new document root directory by typing:
sudo mkdir -p /var/www/html
Now, we can copy the files to this location by typing:
sudo rsync -avP ~/wordpress/ /var/www/html/
This will recursively copy the contents of our ~/wordpress directory into our document root.
Next, let’s move over to the document root so that we can adjust some permissions:
cd /var/www/html/
The issue with the directory structure as it stands now is that all of our files have user and group ownership assigned to our regular user. This is fine, except that our web server needs to be able to modify certain directories and files.
We can give this permission without exposing too much of our system by giving the group that our web server runs under group ownership of the files. We can then open up group permissions slightly as needed.
The group that nginx operates under is www-data. For the user portion, enter your user account name. We will demonstrate with an account called demo here:
<pre> sudo chown -R <span class=“highlight”>demo</span>:www-data /var/www/html/* </pre>
This will give our files the necessary ownership.
Before we move on, we should create a new directory for user uploads:
mkdir wp-content/uploads
The new directory should have group writing set already, but the new directory isn’t assigned with www-data group ownership yet. Let’s fix that:
sudo chown -R :www-data /var/www/html/wp-content/uploads
Step Five — Modify Nginx Server Blocks
We have our files and directories configured. Now we need to modify our nginx configuration to serve the content correctly.
We can use the default nginx server block as a base for our new server block. Copy it over like this:
sudo cp /etc/nginx/sites-available/default /etc/nginx/sites-available/wordpress
Open the new file we made so that we can make some changes:
sudo nano /etc/nginx/sites-available/wordpress
We will want to make the following changes:
<pre> server { listen 80 default_server; listen [::]:80 default_server ipv6only=on;
    root <span class="highlight">/var/www/html</span>;
    index <span class="highlight">index.php</span> index.html index.htm;

    server_name <span class="highlight">your_domain.com</span>;

    location / {
            <span class="highlight">#</span> try_files $uri $uri/ =404;
            try_files $uri $uri/ <span class="highlight">/index.php?q=$uri&$args</span>;
    }

    error_page 404 /404.html;

    error_page 500 502 503 504 /50x.html;
    location = /50x.html {
            root /usr/share/nginx/html;
    }

    location ~ \.php$ {
            try_files $uri =404;
            fastcgi_split_path_info ^(.+\.php)(/.+)$;
            fastcgi_pass unix:/var/run/php5-fpm.sock;
            fastcgi_index index.php;
            include fastcgi_params;
    }
} </pre>
A summary of changes that you should be making are:
- Change the value of the
rootdirective to point to our new document root at/var/www/html. - Modify the
indexparameter to look for anindex.phpfile before the other files. - Change the value of the
server_namedirective to point to your server’s domain name or IP address. - Adjust the
try_fileswithin thelocation /block to send requests to PHP when they do not exactly match.
Some of these might already be set from your LEMP installation. When you are finished with these changes, save and close the file.
We need to link our new file to the sites-enabled directory in order to activate it. We can do that like this:
sudo ln -s /etc/nginx/sites-available/wordpress /etc/nginx/sites-enabled/
The file we just linked conflicts with our old default file, since it borrowed so much from it. We need to disable the old file:
sudo rm /etc/nginx/sites-enabled/default
Now, restart the web server and PHP processor to enable our changes:
sudo service nginx restart
sudo service php5-fpm restart
Step Six — Complete the Installation through the Web Interface
Now, our WordPress is ready to go and we can finish the installation through our web browser.
Point your browser to your server’s domain name or IP address, like this:
<pre> http://<span class=“highlight”>your_domain.com</span> </pre>
If this shows your old default nginx page, you may have to refresh the page without the cache.
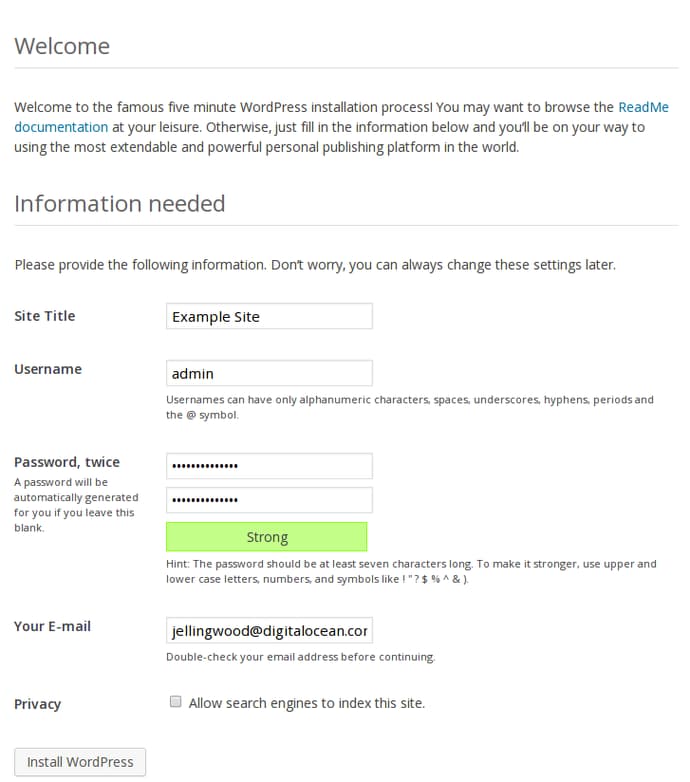
You will see the basic WordPress welcome stage. Choose your options (Site name, username, password, and email) and then click the “Install WordPress” button:
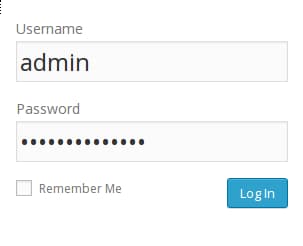
You will have to log in with the account you just created:
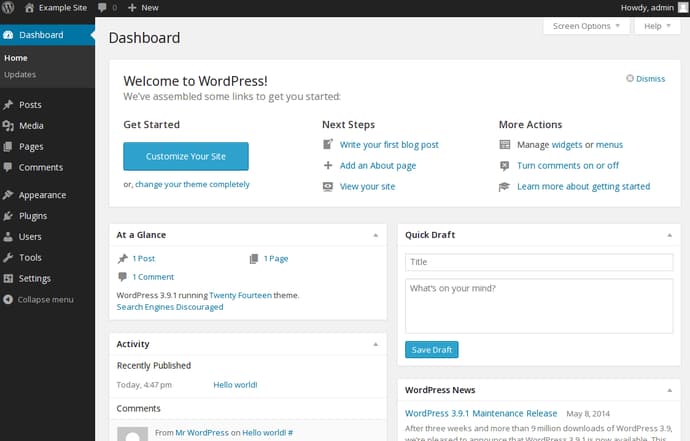
You will be presented with your WordPress dashboard, where you can begin customizing your setup and creating content:
Conclusion
You should now have your WordPress instance up and running on an nginx web server in Ubuntu 14.04. WordPress is a fairly flexible platform that you can use to customize your site. Experiment with some different plugins, themes, etc. to find out what works best for you.
Thanks for learning with the DigitalOcean Community. Check out our offerings for compute, storage, networking, and managed databases.
About the author
Former Senior Technical Writer at DigitalOcean, specializing in DevOps topics across multiple Linux distributions, including Ubuntu 18.04, 20.04, 22.04, as well as Debian 10 and 11.
Still looking for an answer?
This textbox defaults to using Markdown to format your answer.
You can type !ref in this text area to quickly search our full set of tutorials, documentation & marketplace offerings and insert the link!
This part confuses me:
sudo chown -R demo:www-data *
If I’m developing in a vagrant environment do I need to have this setup as vagrant:www-data and why is that important? I tried just using www-data as in the next command and that seems to work but my install is a bit buggy.
@Jean-Pierre: If you’re using Vagrant, depending on your setup, I think you’d be fine using something like:
<pre> config.vm.synced_folder “wordpress/”, “/var/www/html/”, :owner => “www-data”, :extra => ‘dmode=775,fmode=774’ </pre>
where “wordpress/” is the local folder that should be installed on the VM. Alternatively, there’s a pretty active project that provides a default WordPress configuration using Vagrant that you might want to base your work on:
Thanks for a great writeup, I am not able to automatically download plug-ins via the WordPress admin pages. Something is fishy with the permissions. Suggestions?
@yooakim, redo the chown permissions after you’ve installed your WP. Usually works for me just fine.
I can’t delete or install plugins after following this tutorial. Then I press delete on a plugin I get a screen that say to me that I need to enter FTO/SSH2 username/password and keys.
Please help me!
Is it possible to run a WordPress and a Ghost blog on the same server? I don’t want to set up more than one Droplet, plus the experience should be fun.
@carlos_medina: It’s certainly possible. What you’d need to do is set up a new server block for Ghost that contains a reverse proxy. By default Ghost serves it’s content on port 2368. So you just need to set up the for where you want it accessible. If you were going to use a separate subdomain, it would looks something like:
<pre> server { listen 0.0.0.0:80; server_name ghost.your-domain.com;
location / {
    proxy_set_header X-Real-IP $remote_addr;
    proxy_set_header HOST $http_host;
    proxy_set_header X-NginX-Proxy true;

    proxy_pass http://127.0.0.1:2368;
    proxy_redirect off;
}
} </pre>
This article should point you in the right direction for getting to know server blocks:
while this one will show you how to install Ghost from source:
https://www.digitalocean.com/community/articles/how-to-host-ghost-with-nginx-on-digitalocean
Er…nginx now fails to restart and I cannot see its page at my url (unbullshit.com), any suggestions?
 This work is licensed under a Creative Commons Attribution-NonCommercial- ShareAlike 4.0 International License.
Become a contributor for community
Get paid to write technical tutorials and select a tech-focused charity to receive a matching donation.

DigitalOcean Documentation
Full documentation for every DigitalOcean product.

Resources for startups and AI-native businesses
The Wave has everything you need to know about building a business, from raising funding to marketing your product.
The developer cloud
Scale up as you grow — whether you're running one virtual machine or ten thousand.

Start building today
From GPU-powered inference and Kubernetes to managed databases and storage, get everything you need to build, scale, and deploy intelligent applications.
