By Brian Hogan

Introduction
Rancher supports Docker Machine-based provisioning, which makes it easy to create Docker hosts on cloud providers, or inside your own data center. With Rancher, you can launch compute nodes directly from the Rancher UI, which is a small but critical step in being able to create and manage multi-node — and in the future, multi-cloud — deployments from a single interface.
In this tutorial, you’ll use the DigitalOcean driver that’s built into Rancher to create Droplets from the Rancher UI and provision them to run Docker compute hosts which you can monitor, scale, and use to deploy Docker containers.
Note: As of December 15, 2022, DigitalOcean no longer supports the creation of new RancherOS Droplets through the Control Panel or API. However, any existing RancherOS Droplets created prior to December 15, 2022, will be functional despite the change in offerings. Additionally, you can still spin up RancherOS Droplets using a custom image. Learn how to import a custom image to DigitalOcean by following our product documentation.
Prerequisites
To follow this tutorial, you will need:
- A DigitalOcean Personal Access Token for the API, which you can create by following the instructions in this tutorial.
- A GitHub account, which you’ll use to configure user authentication for Rancher.
Step 1 — Creating a Droplet to Host Rancher
In order to use Rancher to manage Docker hosts and containers, we need to get Rancher running. We’ll use DigitalOcean’s Docker image and a bit of User Data to get up and running quickly.
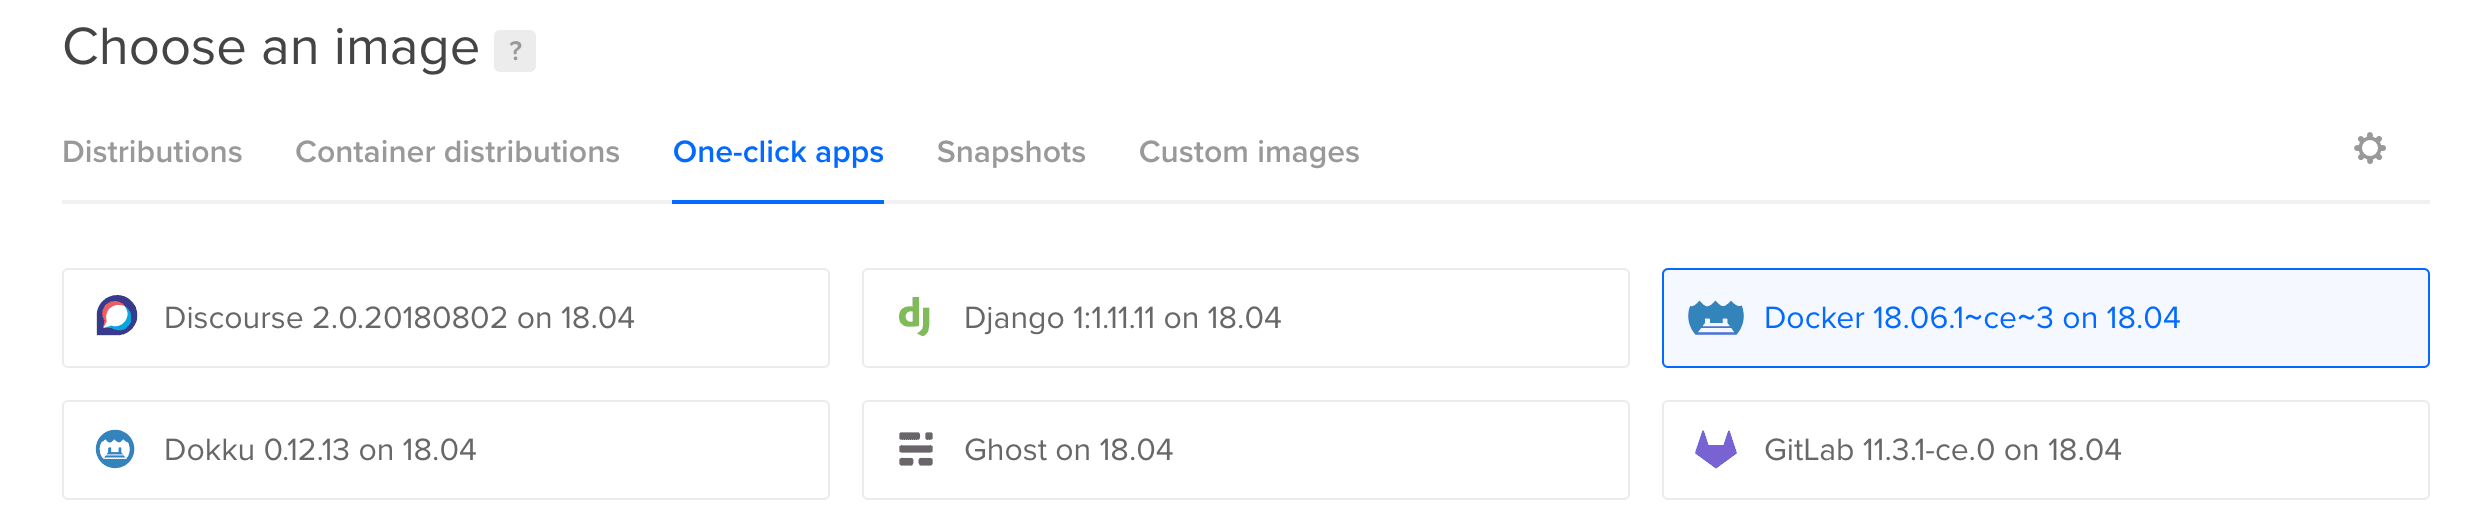
First, log into your DigitalOcean account and choose Create Droplet. Then, under the Choose an Image section, select the One-click Apps tag. Select the Docker 18.06.1~ce~3 on 18.04 image.
Next, select a 1GB Droplet and choose a datacenter region for your Droplet.
Then select User Data in the Select additional options section, and enter the script below in the text box that appears. This script tells the Droplet to fetch the rancher/server Docker image and start a Rancher server in a container upon start-up.
#!/bin/bash
docker run -d --name rancher-server -p 80:8080 rancher/server
Finally, add your SSH keys, provide a host name for your Droplet, and press the Create button. Then wait while your new server is created. Once the server starts, Docker will download a Rancher image and start the Rancher server, which may take a few more minutes.
To double-check that Rancher is running, log in to your new Droplet:
- ssh root@your_ip_address
Once logged in, get a list of running Docker containers:
- docker ps
You’ll see the following, which confirms Rancher is running:
Outputec5492f1b628 rancher/server "/usr/bin/entry /usr/" 15 seconds ago Up 13 seconds 3306/tcp, 0.0.0.0:80->8080/tcp rancher-server
If you don’t see this, wait a few minutes and try again. Once you verify that Rancher is running, you can log out of the machine.
Step 2 — Configuring Authentication for Rancher
Once your server is up, browse to http://your_server_ip/ to bring up the Rancher UI. Because the Rancher server is currently open to the internet, it’s a good idea to set up authentication so the public can’t make changes to our environment. Let’s configure Rancher to use Github OAuth-based authentication.
You will see a warning icon next to the ADMIN menu item at the top of the screen .

If you hover over this link, you’ll see the message Access Control is not configured. Choose Access Control from the ADMIN menu. Github will be selected as the default authentication method, so follow the instructions on the page to register a new application with GitHub.
Once you’ve registered the application, copy the Client ID and Client Secret from the application page on Github into the respective text fields in the Rancher user interface. Then click Save.
Then, under Test and enable authentication, click Authenticate with GitHub, and click Authorize application in the window that pops up. The page will reload and the instructions on setting up OAuth will be replaced by the Configure Authorization section. Add any additional users and organizations that should be given access to Rancher. If you make any changes, click the Save button.
Next, let’s create an environment to organize our compute hosts.
Step 3 — Creating an Environment
An environment in Rancher lets us group our hosts into logical sets. Rancher provides an environment called Default, but let’s create our own. Click the Default link at the top of the screen to reveal the Environments menu, then click Manage Environments. Click the Add Environment button that appears on the page.
Fill in a name and a description for your project. Leave all of the other settings at their defaults and click Create. Then use the project selection menu again to select your new environment.
Now let’s launch some hosts in this new environment.
Step 4 — Launching Rancher Compute Nodes
Once you have secured your Rancher deployment and added a project, select Hosts from the Infrastructure menu and then click the Add Host button.
On the Add Host screen, you will see several providers: Custom, Amazon EC2, DigitalOcean, Azure, and Packet. The Custom option lists the steps to manually launch a Rancher compute node on a server with Docker pre-installed. The others are used to launch compute nodes on the respective cloud systems.
Select the DigitalOcean option, as shown in the following figure:
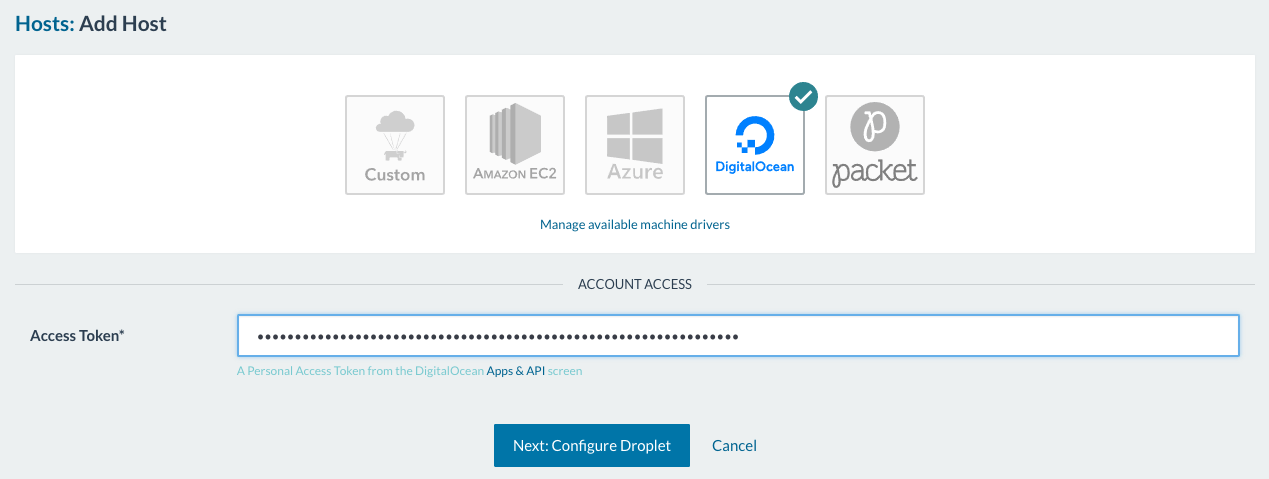
In the Access Token field, place your Personal Access Token for the DigitalOcean API, which you obtained from the prerequisites section. Then press Next: Configure Droplet.
A new set of fields will appear on the screen. Fill in the following details:
- Name: The name of the server you want to create. In this case, enter
host01. - Quantity: Leave this at
1. Increasing this will create multiple hosts and automatically name each one for you. - Image: Select the Ubuntu 16.04.1 x64 are disabled because they are not compatible with Rancher.
- Size: The size of the Droplet. Select the option for a 1GB Droplet.
- Region: The region where your Droplet will be created. Choose one geographically close to you.
Finally, click Create. Rancher will use Docker Machine to create the specified Droplet and install Docker on it. Rancher will also run rancher-agent on the newly created Droplet, which will in turn register with the Rancher server.
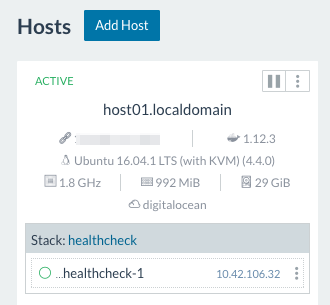
Within a few minutes you’ll see your new host in the Rancher UI. You will also get some basic information about the host such as its IP address, processor clock-speed, memory, and storage.
You can repeat this step as many times as you need to launch more compute nodes into your deployment. Now let’s explore Rancher’s built-in monitoring, and how to deactive and delete notes.
Step 5 — Monitoring and Scaling Your Deployment
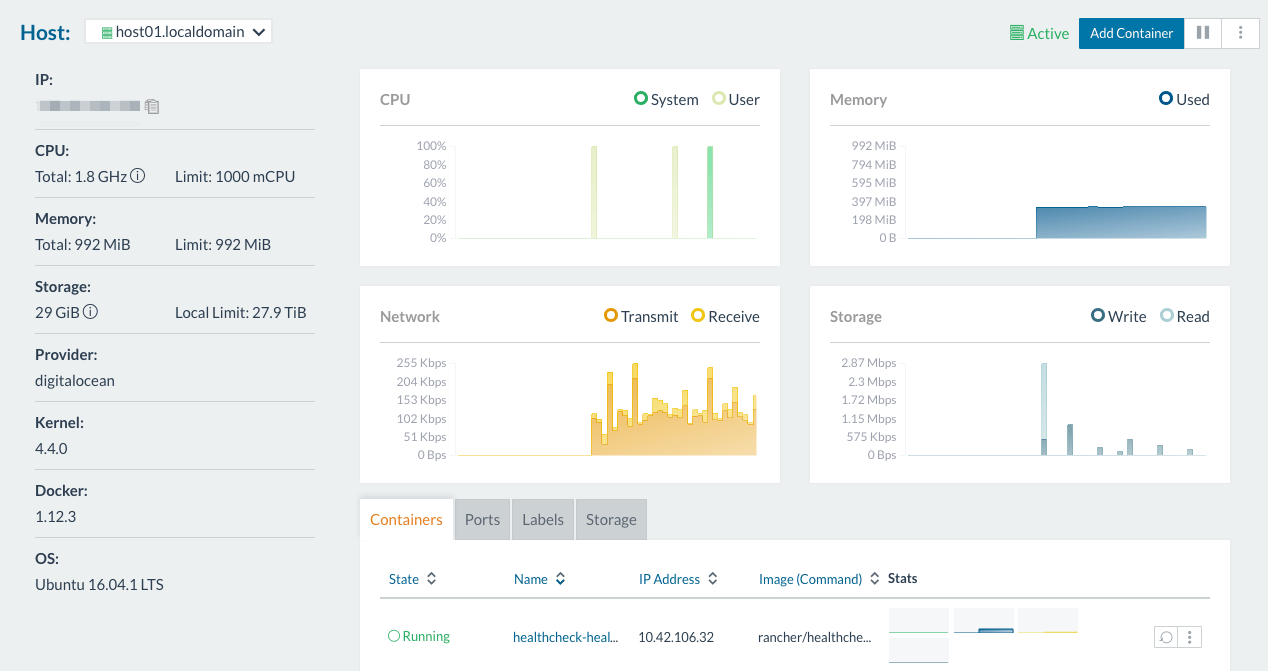
Once your compute nodes are provisioned, click on the name of one of your hosts to pull up the Monitoring screen, where you can see the CPU utilization and memory consumption of that compute node.
If you see that you are using most of the memory or if your CPU is running continuously hot, you may want to launch more nodes to reduce container density and spread out the load. This is where the docker-machine integration is really useful; you can react quickly to load spikes by provisioning more compute nodes right from Rancher’s UI.
Once the spikes abate, you can shut down any additional nodes by visiting the Hosts page, locating your host, and clicking the Deactivate icon (the box with two vertical lines), as shown in the following figure:
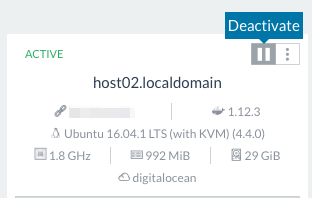
You can then subsequently click either Activate or Delete from the menu to the right of the Deactivate button.
Conclusion
You now know how to launch, monitor, and deactivate compute nodes using Rancher and its integration with native DigitalOcean driver support. From here, you can explore how to use Rancher as a load balancer.
Thanks for learning with the DigitalOcean Community. Check out our offerings for compute, storage, networking, and managed databases.
About the author
Managed the Write for DOnations program, wrote and edited community articles, and makes things on the Internet. Expertise in DevOps areas including Linux, Ubuntu, Debian, and more.
Still looking for an answer?
This textbox defaults to using Markdown to format your answer.
You can type !ref in this text area to quickly search our full set of tutorials, documentation & marketplace offerings and insert the link!
Remember, on digitlocean, deactivate does not mean save money. Also, you shouldn’t choose a location near you, but near your customers:)
Well explained article. It helped me to understand a lot on the local/in-house server setup environments (where I need to setup all the hardware/software environment, to have a website up and running on our office residing server commercially). Can any one assist me to solve my problem please.
I want to deploy a CMS application developed in React, Redux, Mongo DB. I am new so I am wondering how can I setup this. Any guidelines will be helpful. I have following questions in my mind:
-
What are pros and corn of having **Linux **or **Windows **based server. (also which versions are relevant)
-
How to setup an SSL on local hosting server. What are options.
-
What are the security precautions to be made.
-
An internet line with dedicated IP from ISP can be connected, but do need to have any security hardware in middle in the network?
-
How to setup/connect a purchased domain name (www.mydomain.com) to an internal hosting server.
-
How to have multiple IPs to an internal hosting server, so if one server fails or one network fails the other keeps working with the purchased domain name. Also how floating IP helps and how this can be setup.
-
How to log IP(visitors) access log in hardware level to keep server secure. How Ranchet is helpful and what is the purpose of setting up Ranchet. Is it not right to simply install NodeJS on the machine and run application on it (but as I’m new so I need some guidelines on this please).
-
Is it simple to start application just like I do in my local development environment and everything will be accessible on the DNS (if setup).
-
How to setup internal code version control system (using any local version control system and also GitHub), so if one deployment fails or creates any trouble; we can then restore to older code version.
-
How to setup a mailing server to send and receive emails and also how can we setup different emails on local hosting server.
-
Any application crash and monitoring tools I need to setup? How Nginx is helpful and any comparison with Ranchet?
-
What is the purpose of Containers and Dockers? and is it a feature or a service or what exactly it serves. As I’m new so I may ask: Is it ok to go for deployment without Containers and Docker :) Dont’ be angry please.
Hi,
so your basically telling us to start rancher with neither auth nor encryption and make it available to the whole interwebs? I don’t know what to say. Please don’t. You don’t want your node management go unencrypted.
But the rest of the tutorial is quite decent, thanks!
Andi
When you spin up a new Digital Ocean compute node from within Rancher, does it take care of the security on that node? For example does it set up firewall and access controls? Or is it basically spinning up a blank node and installing the Rancher host process on it?
Hi,
This bare-bones install has firewalls enabled, so Rancher isn’t available on port 80.
Andy
 This work is licensed under a Creative Commons Attribution-NonCommercial- ShareAlike 4.0 International License.
Become a contributor for community
Get paid to write technical tutorials and select a tech-focused charity to receive a matching donation.

DigitalOcean Documentation
Full documentation for every DigitalOcean product.

Resources for startups and AI-native businesses
The Wave has everything you need to know about building a business, from raising funding to marketing your product.
The developer cloud
Scale up as you grow — whether you're running one virtual machine or ten thousand.

Start building today
From GPU-powered inference and Kubernetes to managed databases and storage, get everything you need to build, scale, and deploy intelligent applications.
