By Mitchell Anicas and Milecia McGregor

Introduction
Cloudflare is a company that provides content delivery network (CDN) and distributed DNS services by acting as a reverse proxy for websites. Cloudflare’s free and paid services can be used to improve the security, speed, and availability of a website in a variety of ways.
In this tutorial, you will learn how to use Cloudflare’s free tier service to protect your web servers against ongoing HTTP-based distributed denial of service (DDoS) attacks by enabling “I’m Under Attack Mode”. This security mode can mitigate DDoS attacks by presenting an interstitial page to verify the legitimacy of a connection before passing it to your web server.
Prerequisites
This tutorial assumes that you have the following:
- A web server
- A registered domain that points to your web server
- Access to the control panel of the domain registrar that issued the domain
You must also sign up for a Cloudflare account before continuing.
Note: This tutorial will require the use of Cloudflare’s name servers.
Step 1 - Configuring Your Domain to Use Cloudflare
Before using any of Cloudflare’s features, you must configure your domain to use Cloudflare’s DNS.
If you haven’t already done so, log in to Cloudflare.
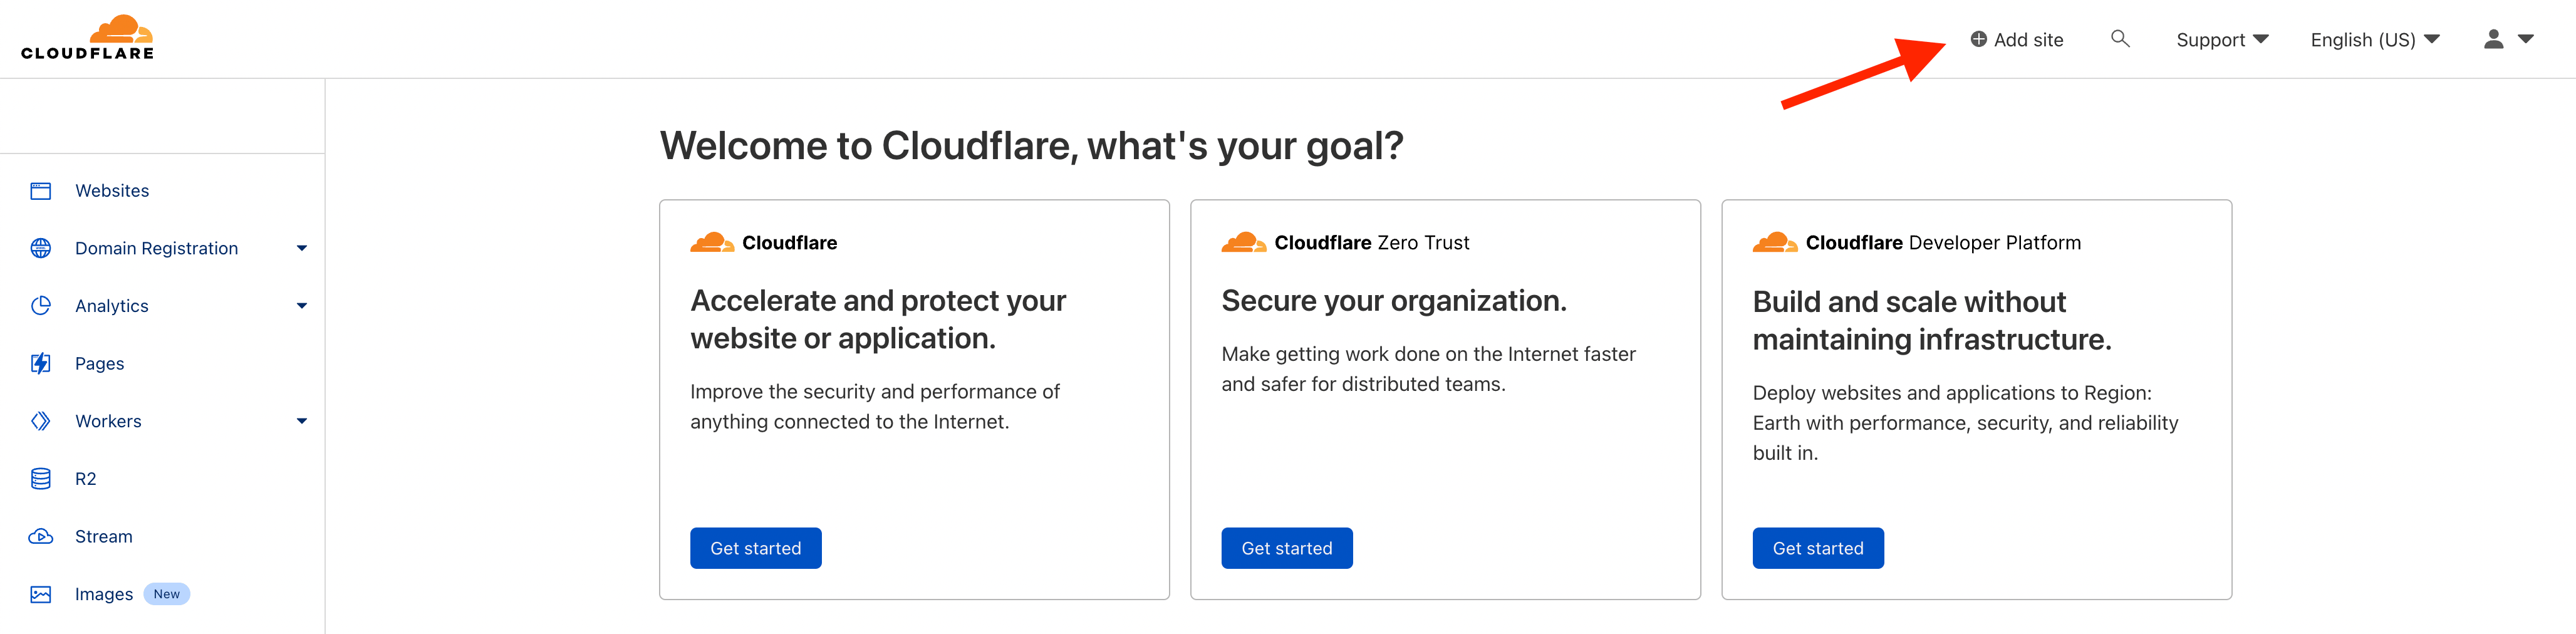
Add a Website and Scan DNS Records
After logging in, you will be taken to the Get Started with Cloudflare page. Here, you must click the Add site button at the top to add your website to Cloudflare:
Enter the domain name that you want to use Cloudflare with and click the Add Site button. You should be taken to a page that looks like this:
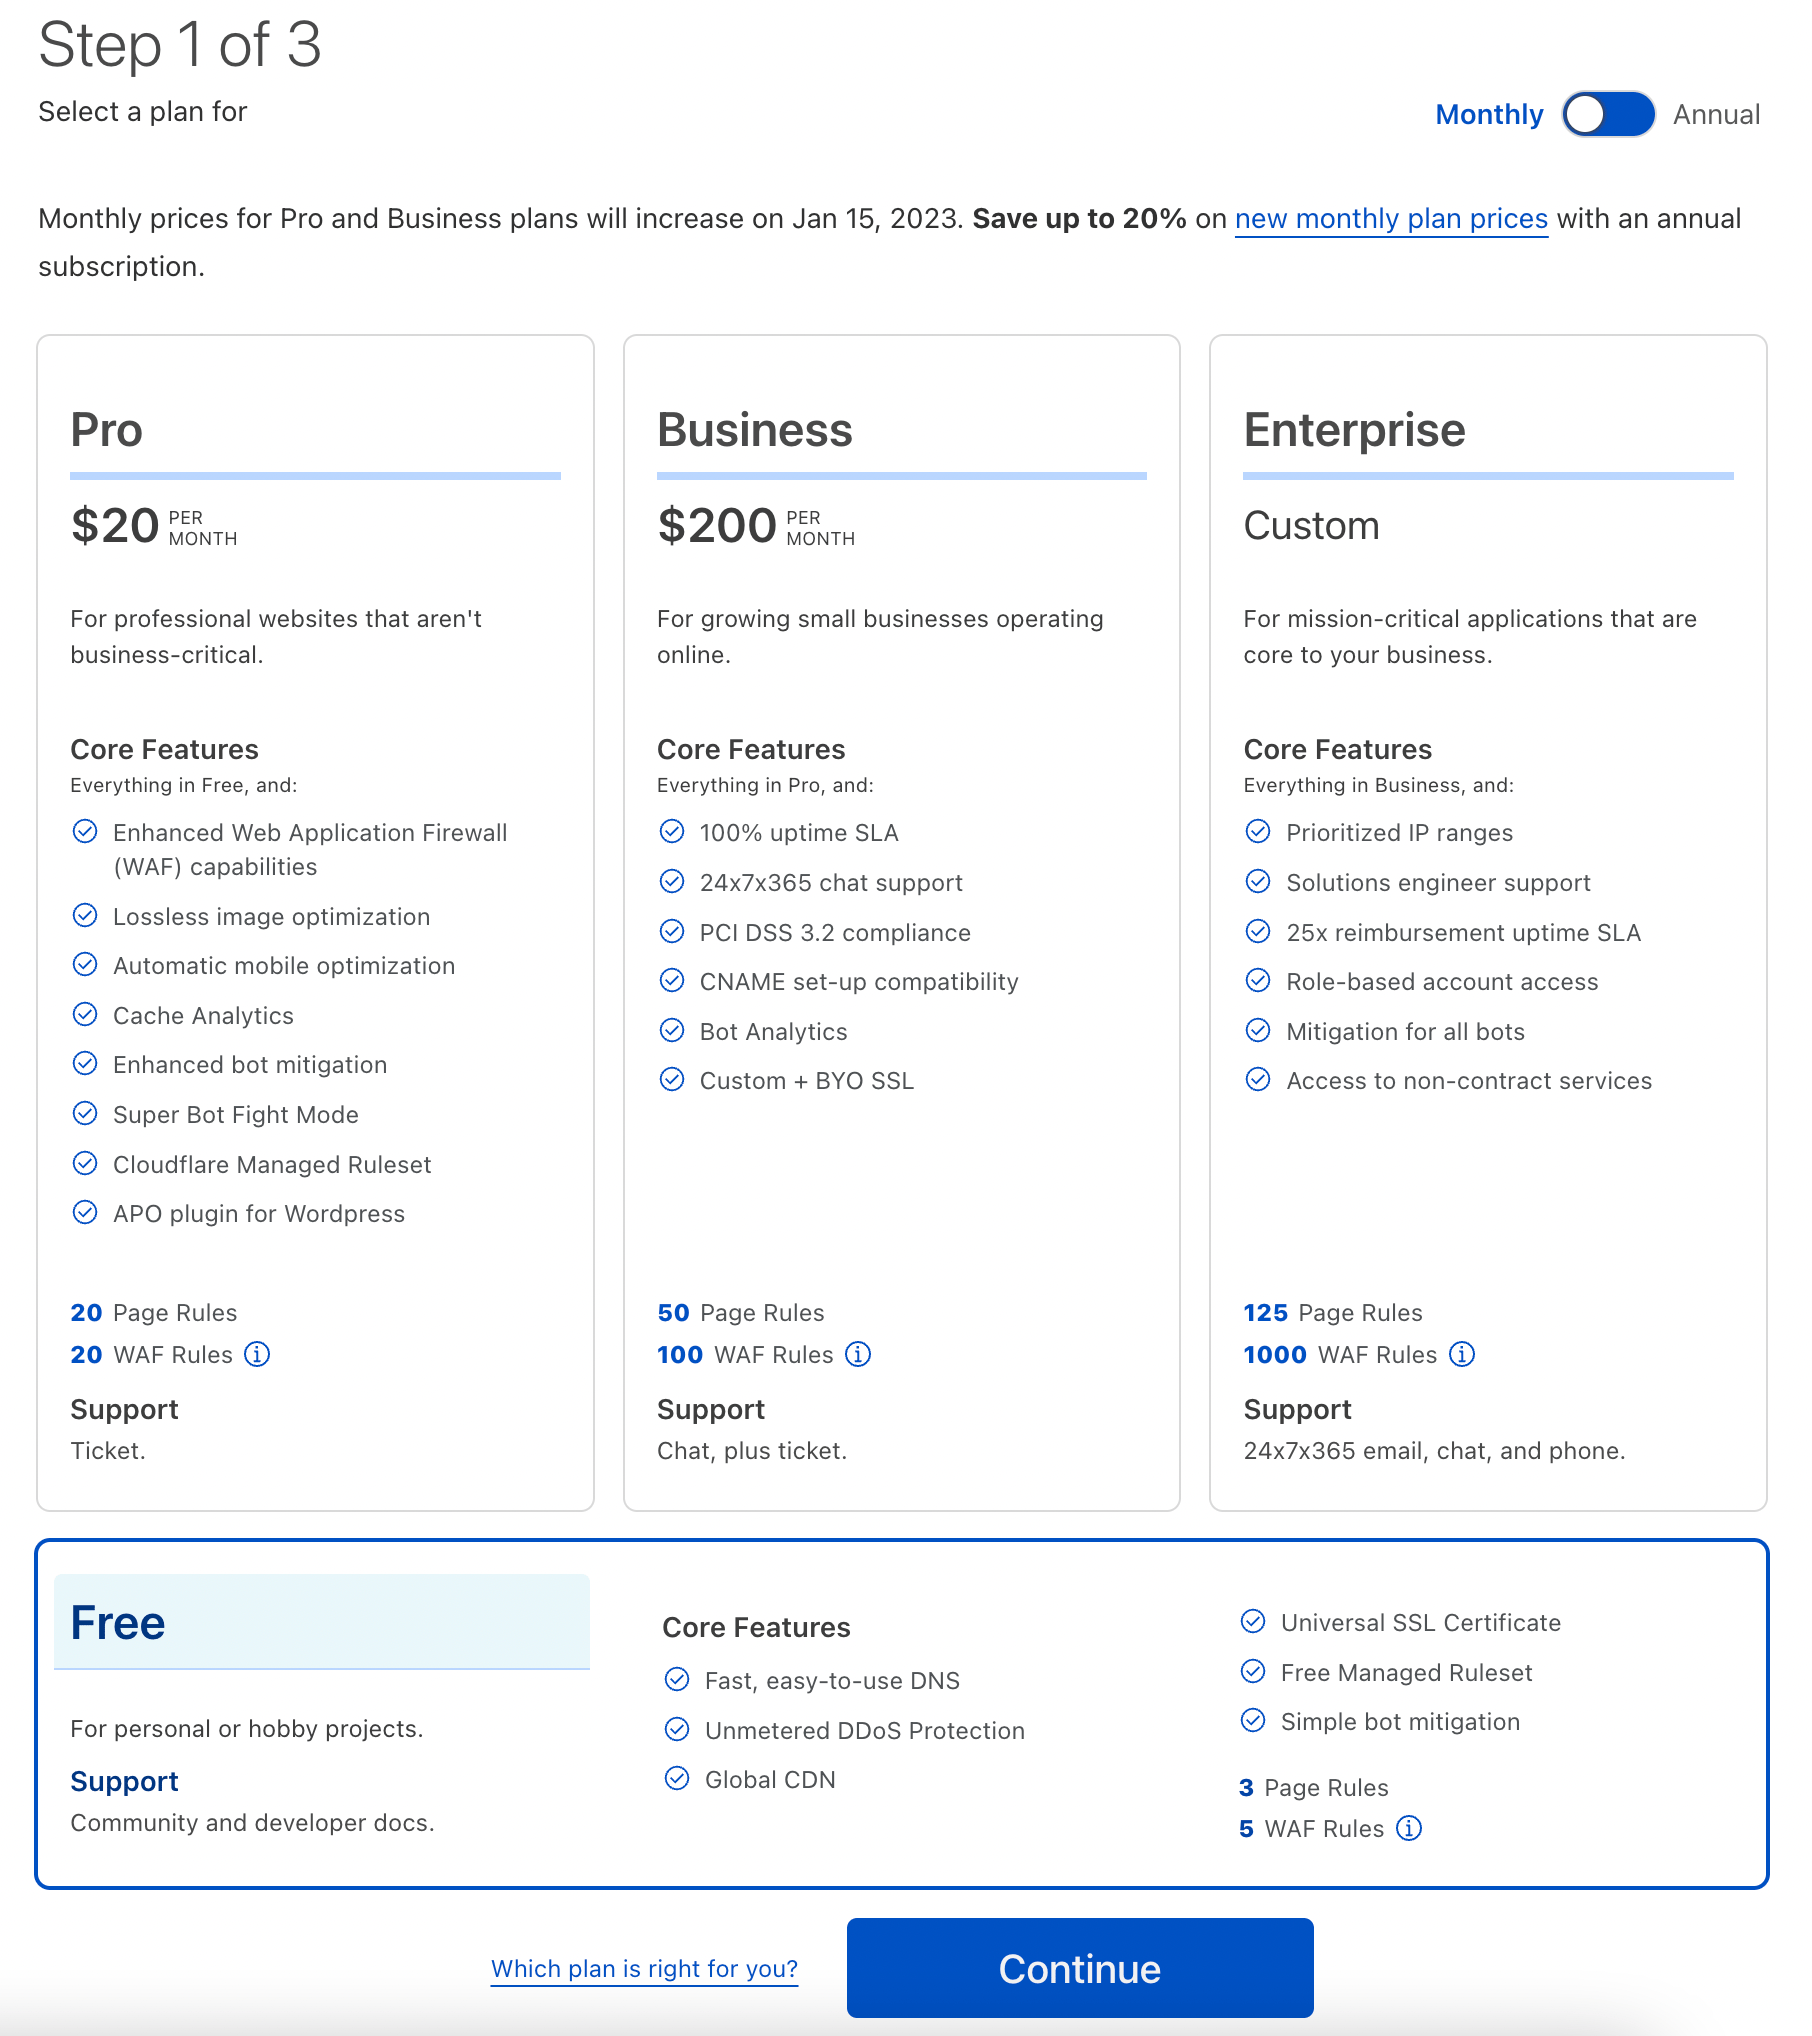
In this tutorial, we will select the Free plan option. If you want to pay for a different plan because you want additional Cloudflare features, feel free to do so. Then, click the Continue button.
The next page shows the results of the DNS record scan for your site. Be sure that all of your existing DNS records are present, as these are the records that Cloudflare will use to resolve requests to your domain. In our example, we used flippeddev.com as the domain:
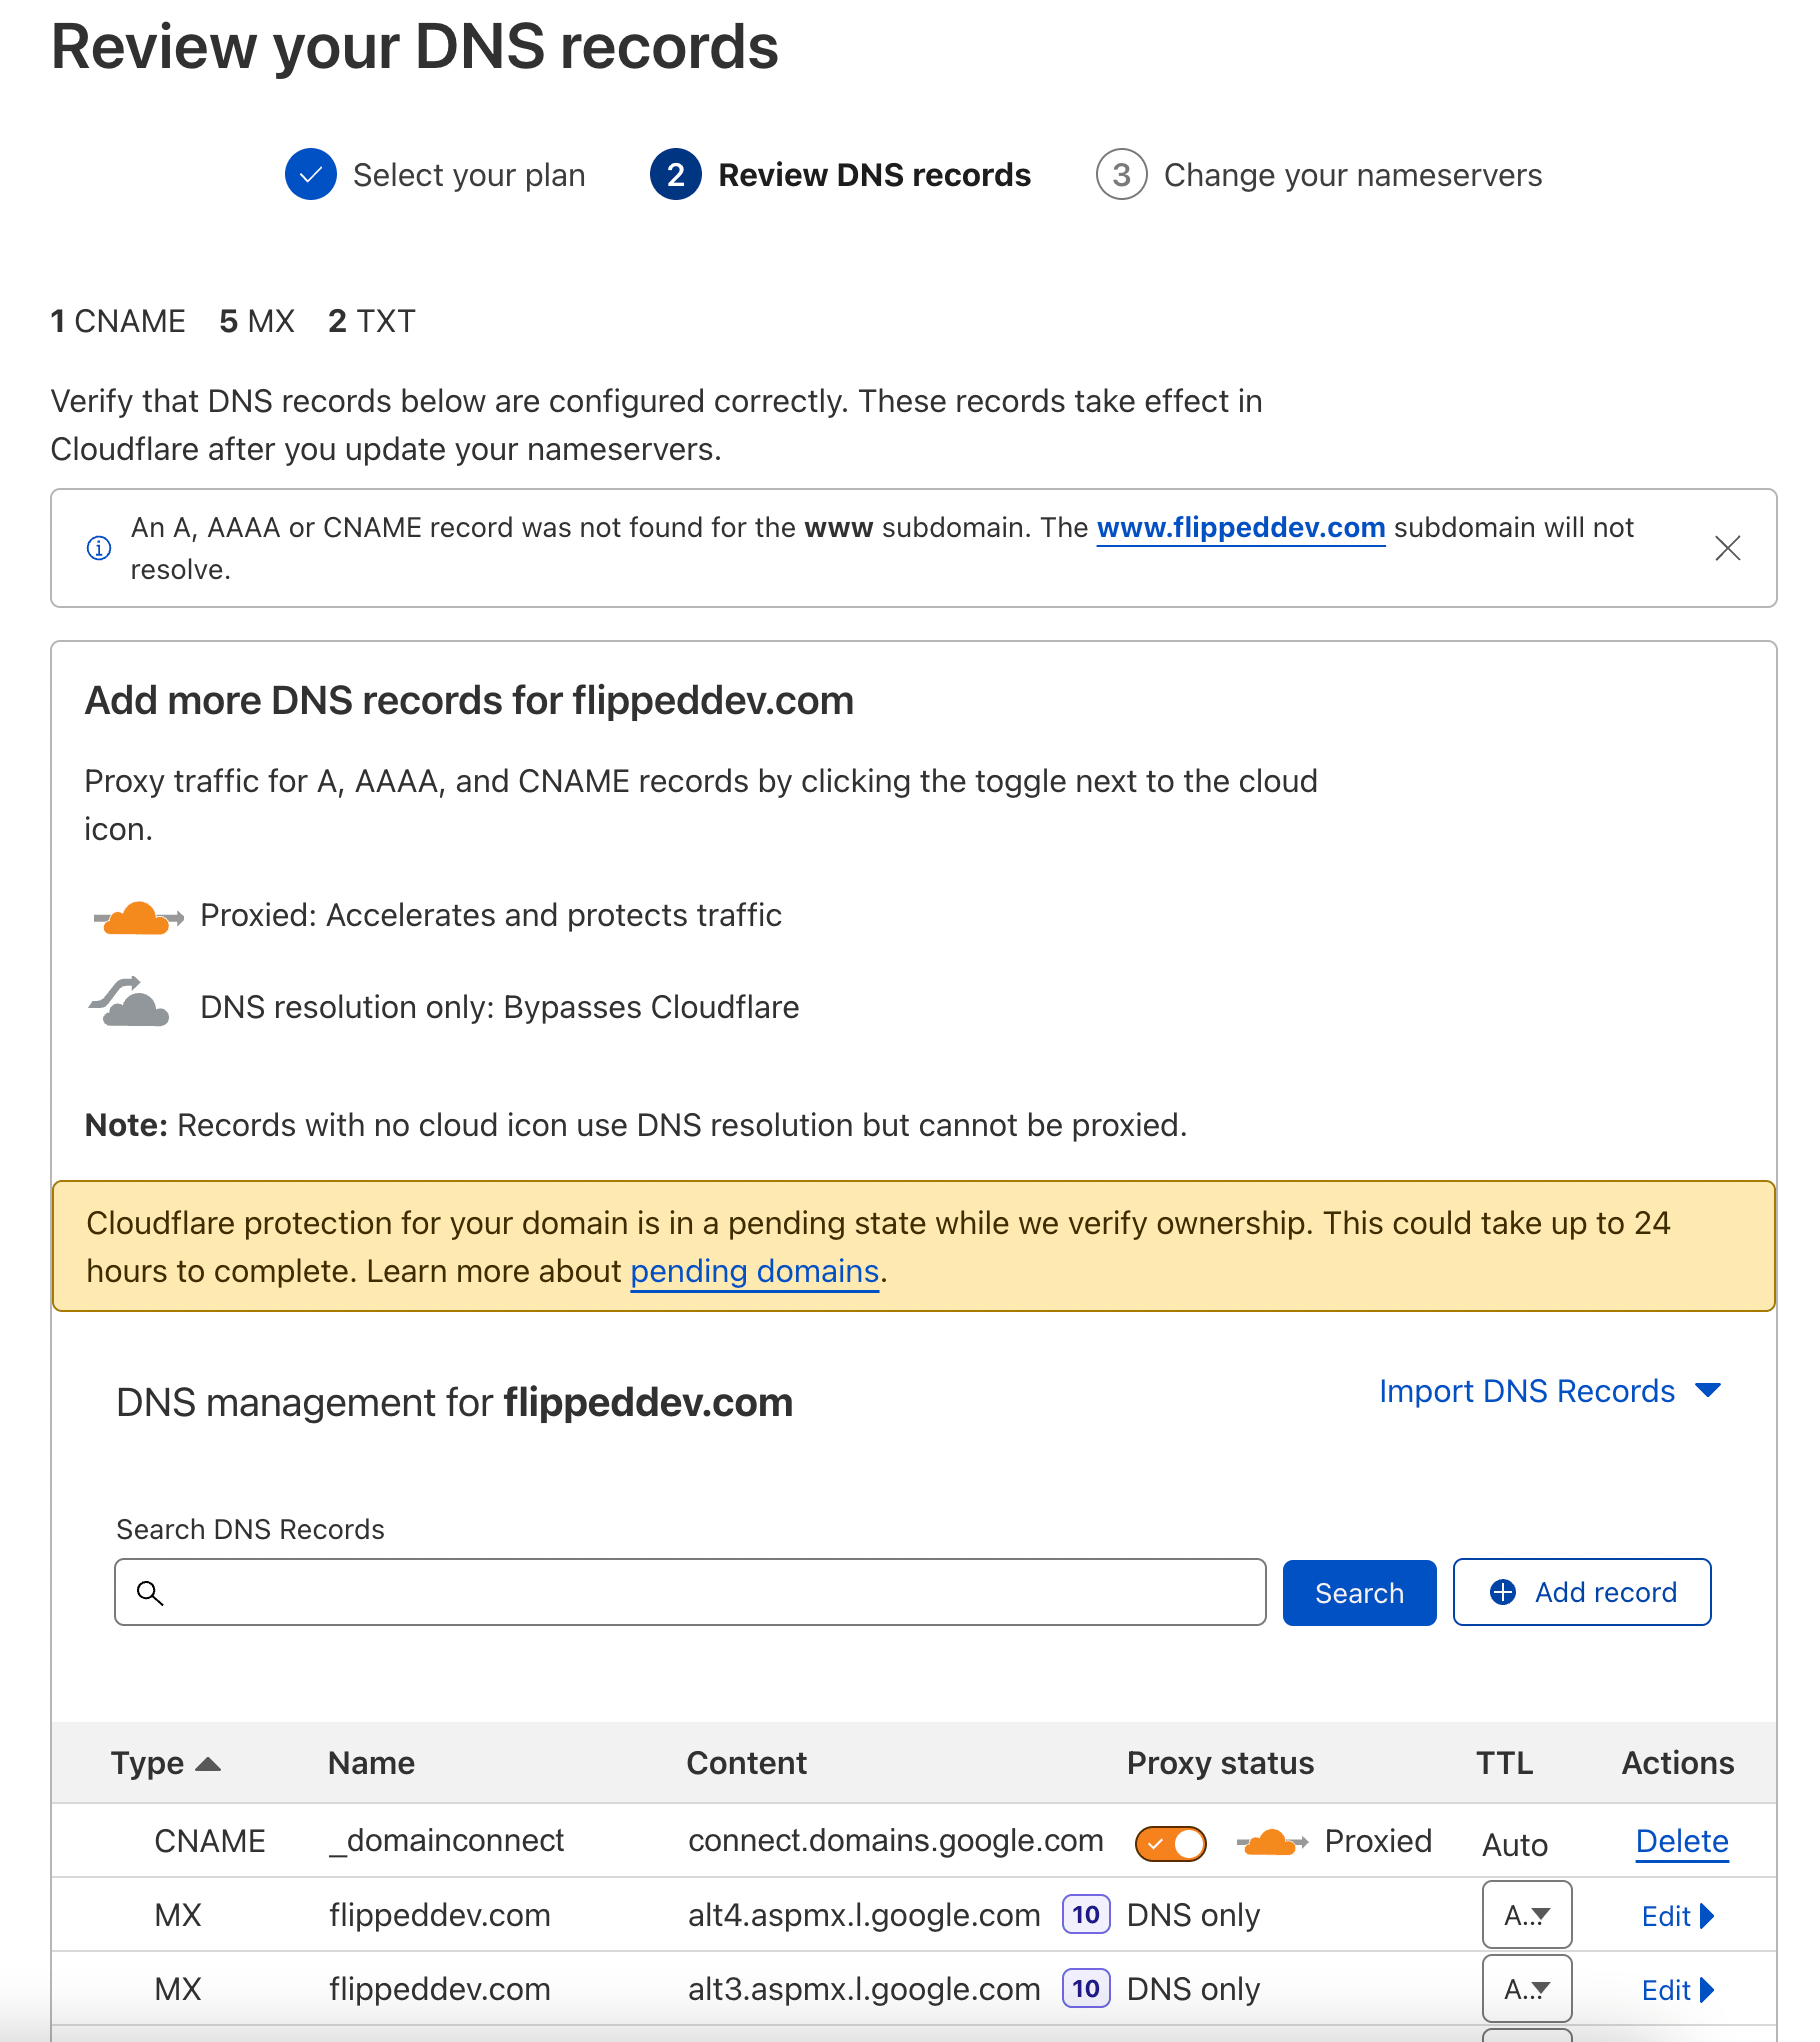
Note that, for your A and CNAME records that point to your web server(s), the Status column should have an orange cloud with an arrow going through it. This indicates that the traffic will flow through Cloudflare’s reverse proxy before hitting your server(s).
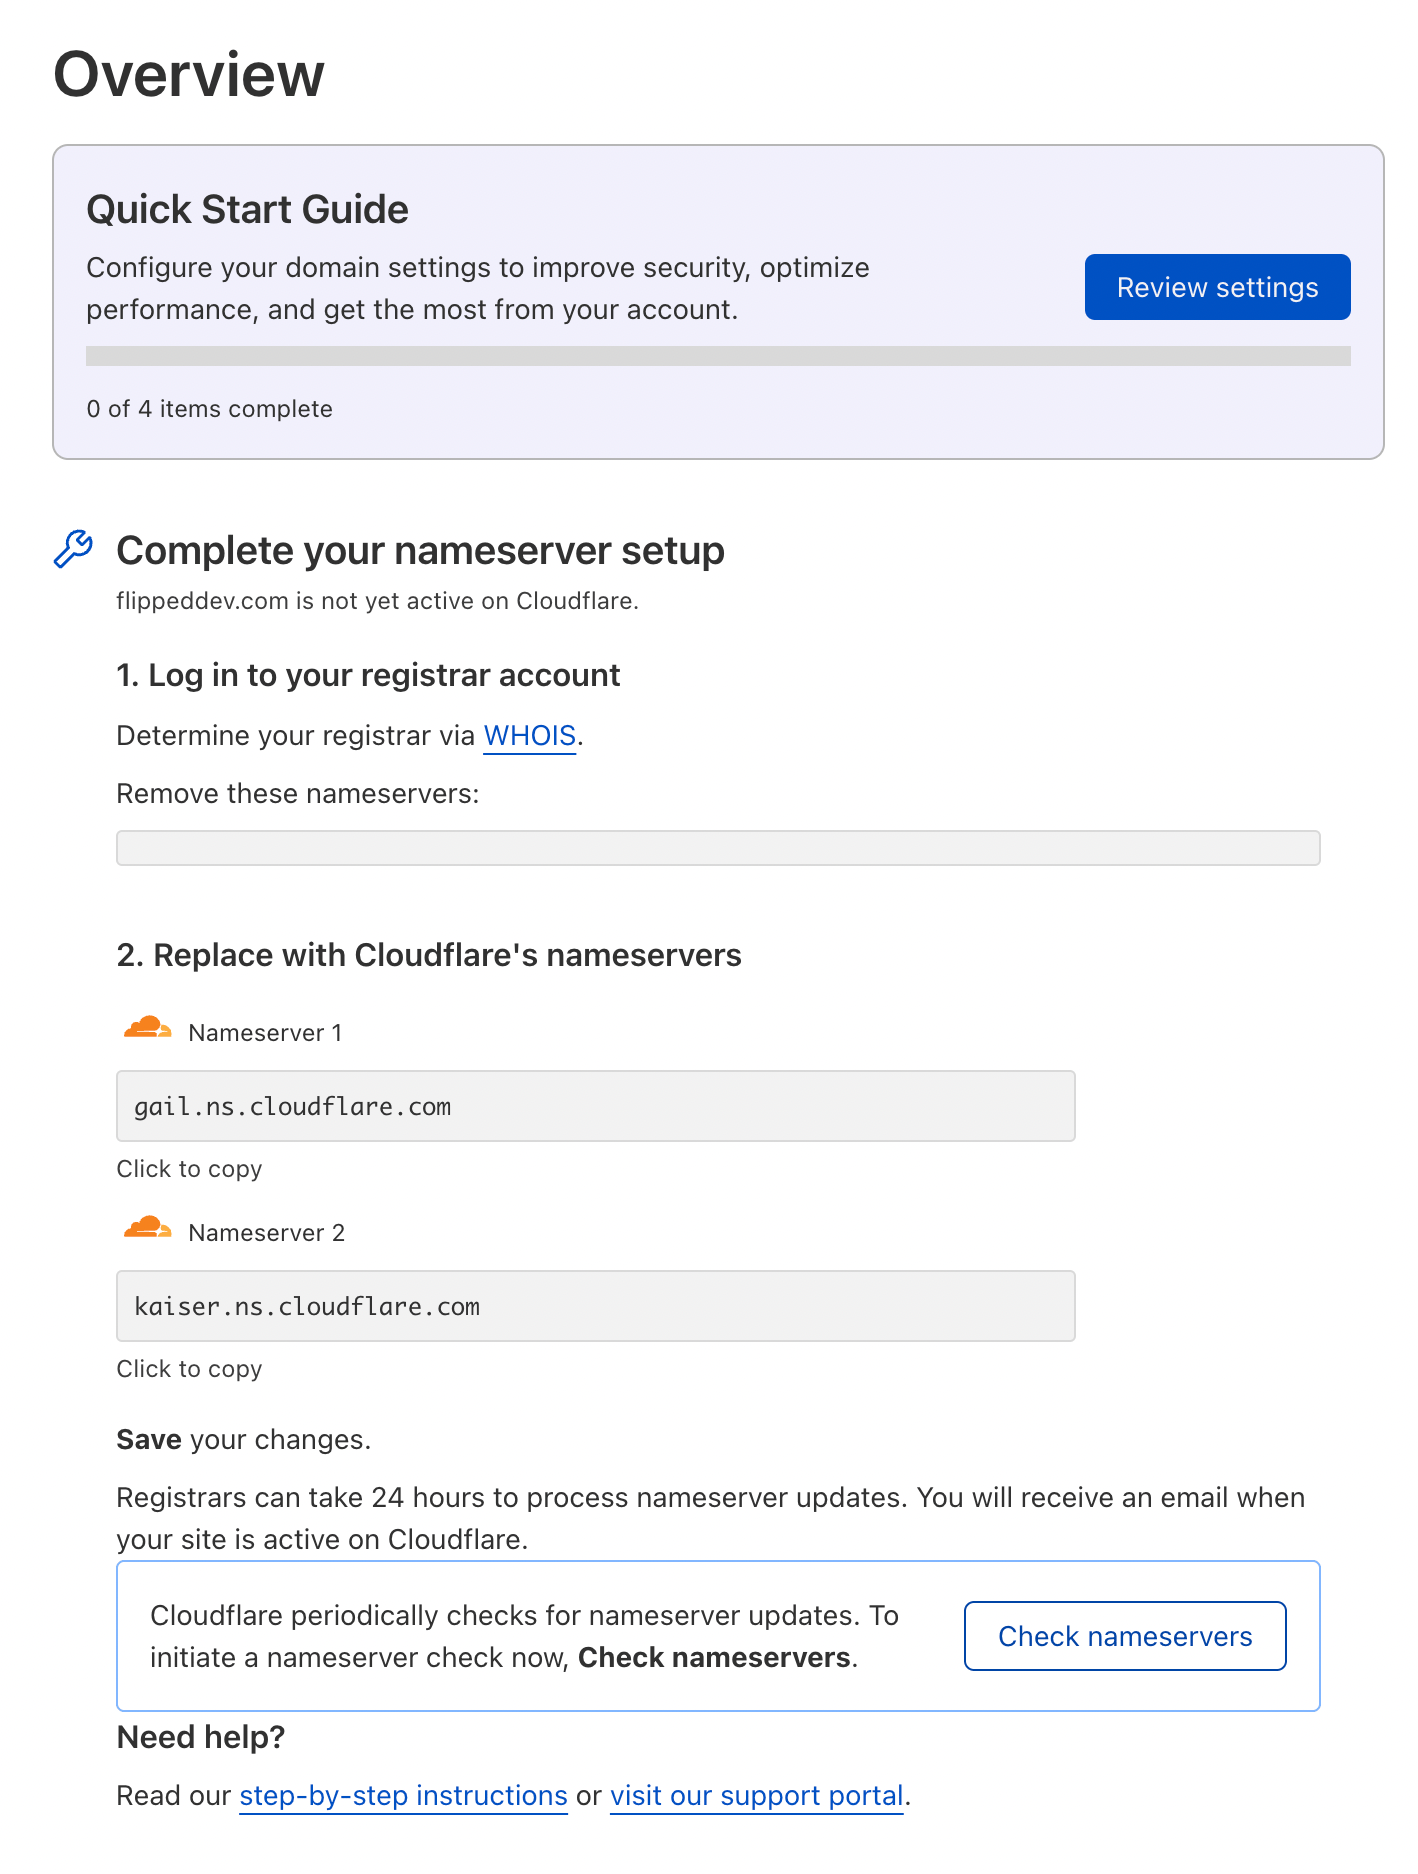
Change Your Nameservers
The next page will display name servers that need to be removed and the Cloudflare name servers that should be added. Here is an example of what the page might look like:
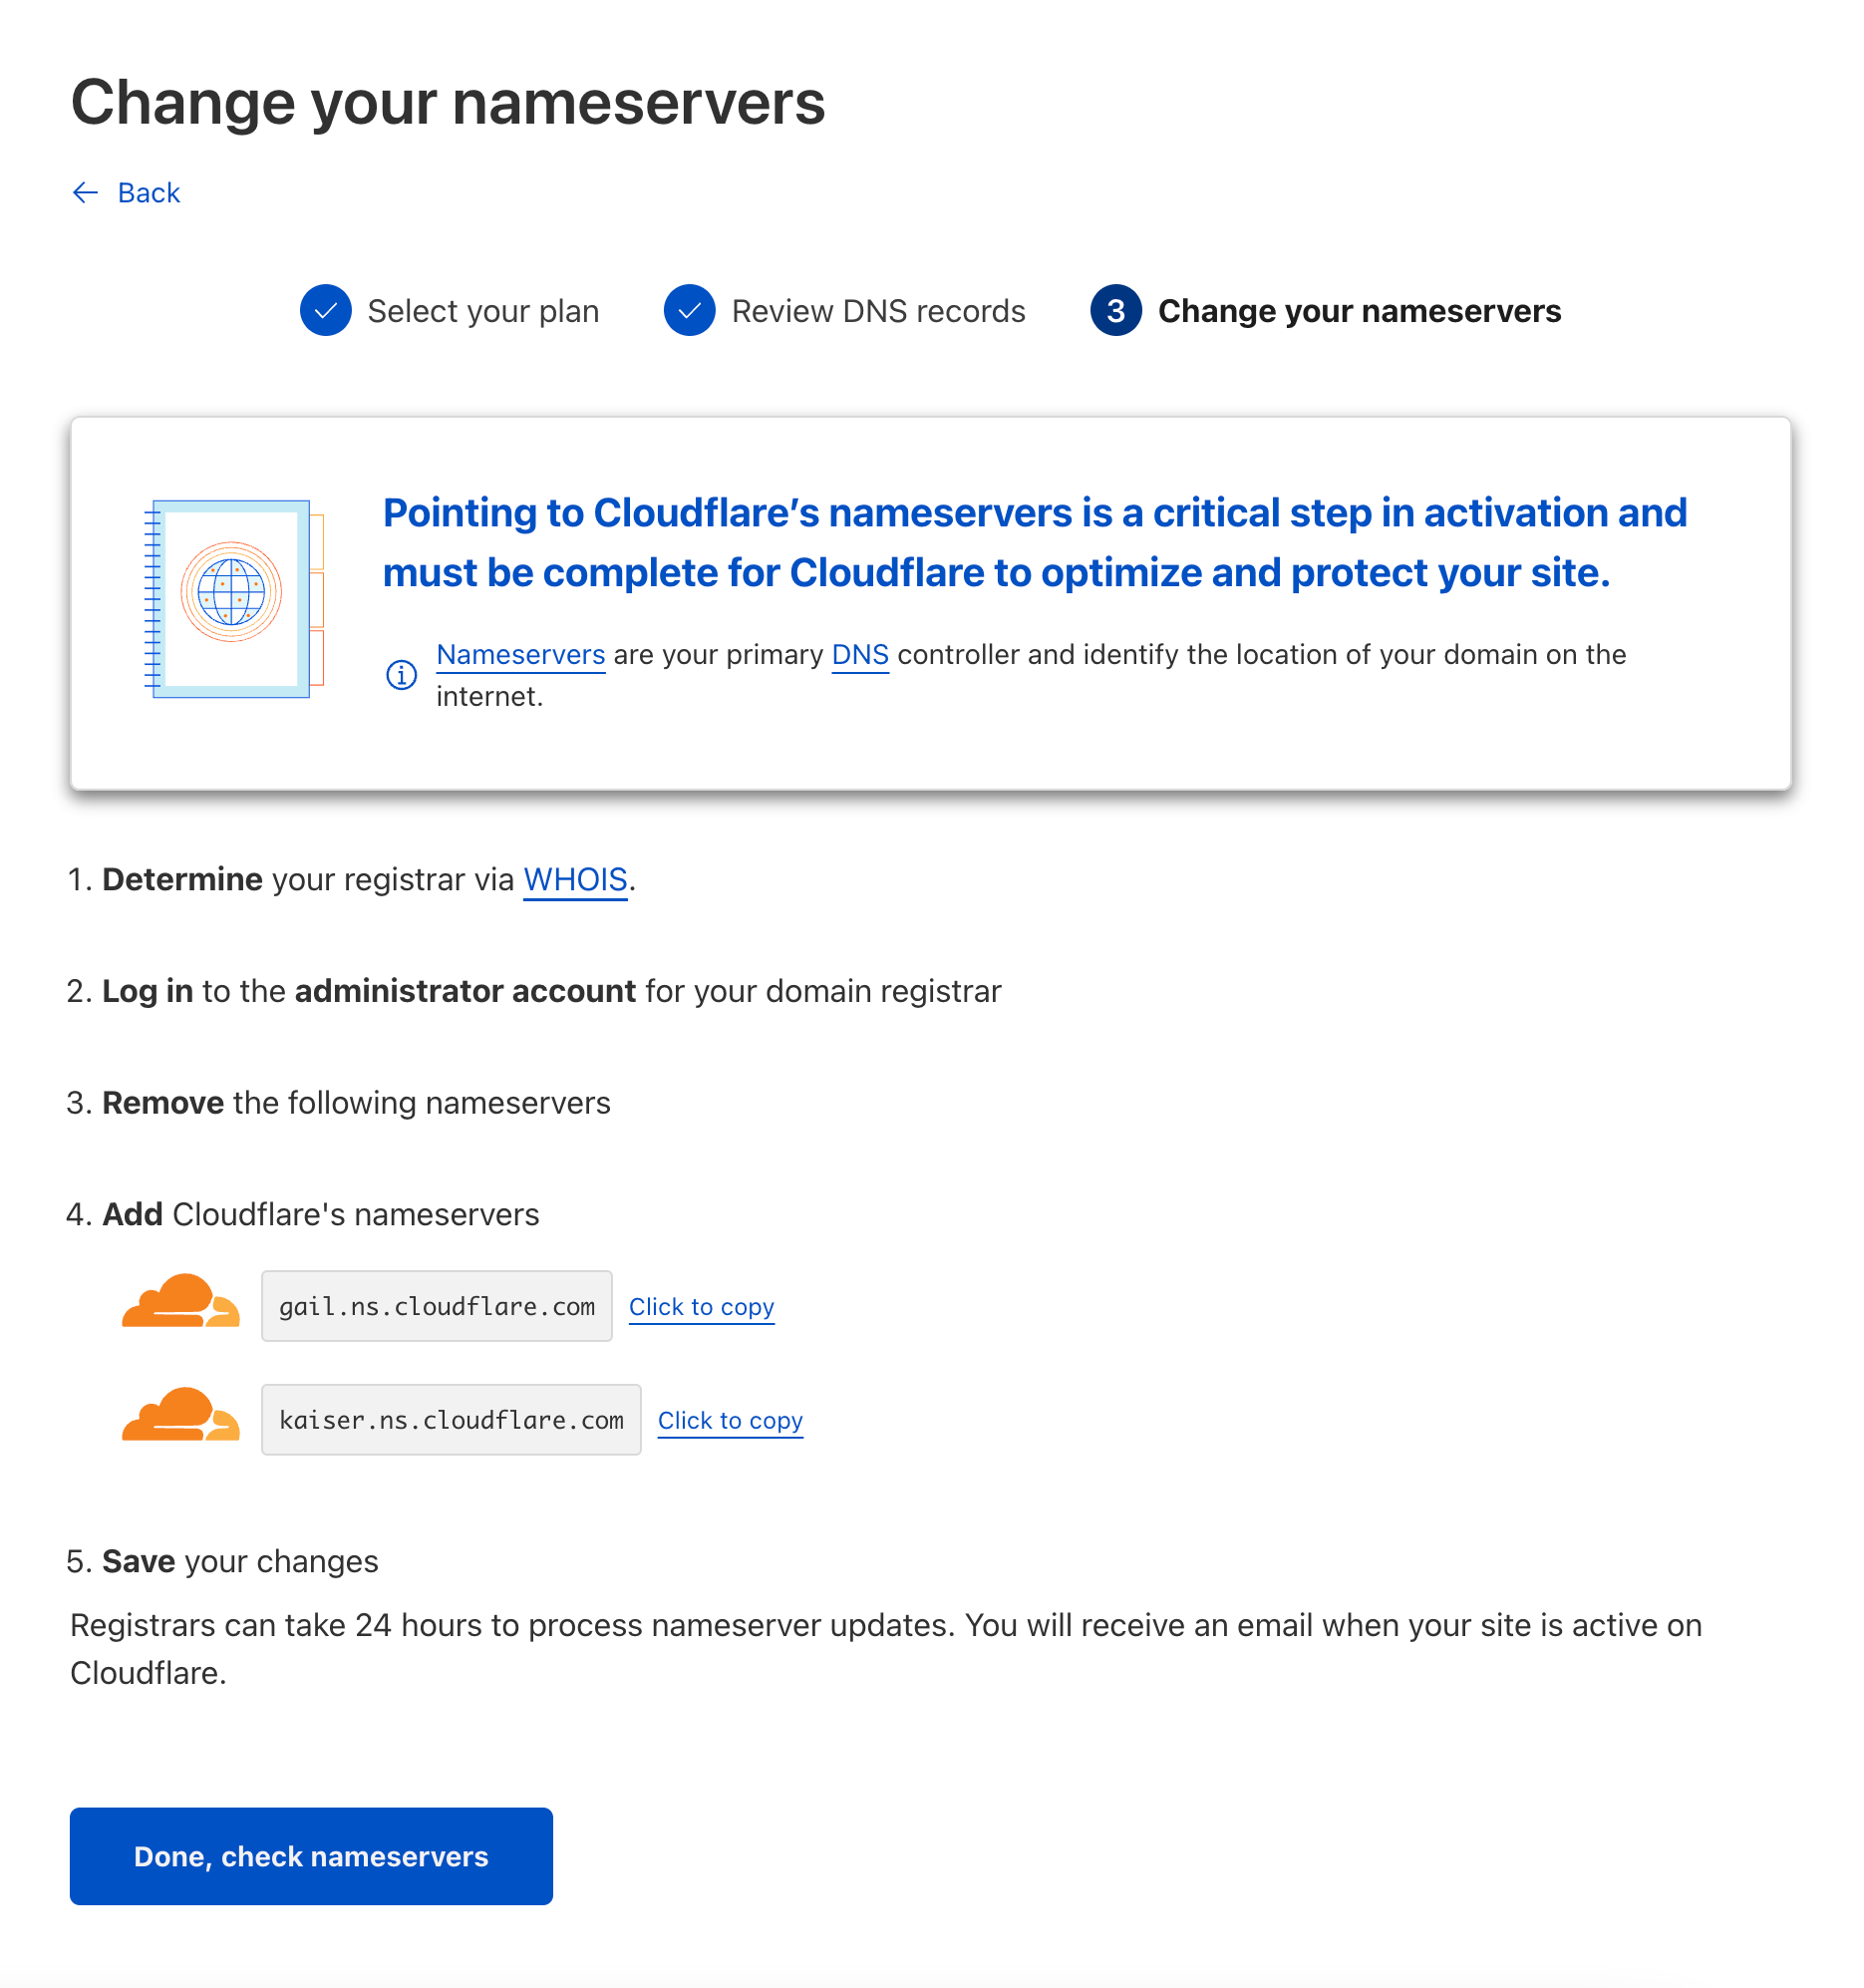
To change your domain’s nameservers, log in to your domain registrar control panel and make the DNS changes that Cloudflare presented. For example, if you purchased your domain through a registrar like Google or NameCheap, you will need to log into the appropriate registrar’s control panel and make the changes there.
The process varies based on your particular domain registrar. If you can’t figure out how to do this, it is similar to the process described in How to Point to DigitalOcean Nameservers From Common Domain Registrars except you will use the Cloudflare nameservers instead of DigitalOcean’s.
In the example case, the domain is using DigitalOcean’s nameservers and we need to update it to use Cloudflare’s DNS.
When you are finished changing your nameservers, click the Continue button. It can take up to 24 hours for the nameservers to switch but it usually only takes several minutes.
Wait for Nameservers to Update
Because updating nameservers takes an unpredictable amount of time, it is likely that you will see this page next:
The Pending status means that Cloudflare is waiting for the nameservers to update to the ones that it prescribed (e.g. olga.ns.Cloudflare.com and rob.ns.Cloudflare.com). If you changed your domain’s nameservers, all you have to do is wait and check back later for an Active status. If you click the Recheck Nameservers button or navigate to the Cloudflare dashboard, it will check if the nameservers have updated.
Cloudflare Is Active
Once the nameservers update, your domain will be using Cloudflare’s DNS and you will see it has an Active status.
This means that Cloudflare is acting as a reverse proxy to your website, and you have access to whichever features are available to the pricing tier that you signed up for. If you’re using the free tier, as we are in this tutorial, you will have access to some of the features that can improve your site’s security, speed, and availability.
We won’t cover all of the features in this tutorial, as we are focusing on mitigating ongoing DDoS attacks, but they include CDN, SSL, static content caching, a firewall (before the traffic reaches your server), and traffic analytics tools.
Also note the Settings Summary, right below your domain will show your website’s current security level (medium by default) and some other information.
Before continuing, to get the most out of Cloudflare, you will want to follow this guide: Recommended First Steps for All Cloudflare Users. This is important to ensure that Cloudflare will allow legitimate connections from services that you want to allow, and so that your web server logs will show the original visitor IP addresses (instead of Cloudflare’s reverse proxy IP addresses).
Once you’re all set up, let’s take a look at the I’m Under Attack Mode setting in the Cloudflare firewall.
Step 2 - Enabling I’m Under Attack Mode
By default, Cloudflare’s firewall security is set to Medium. This offers some protection against visitors who are rated as a moderate threat by presenting them with a challenge page before allowing them to continue to your site. However, if your site is the target of a DDoS attack, that may not be enough to keep your site operational. In this case, the I’m Under Attack Mode might be appropriate for you.
If you enable this mode, any visitor to your website will be presented with an interstitial page that performs some browser checks and delays the visitor for about 5 seconds before passing them to your server. It will look something like this;
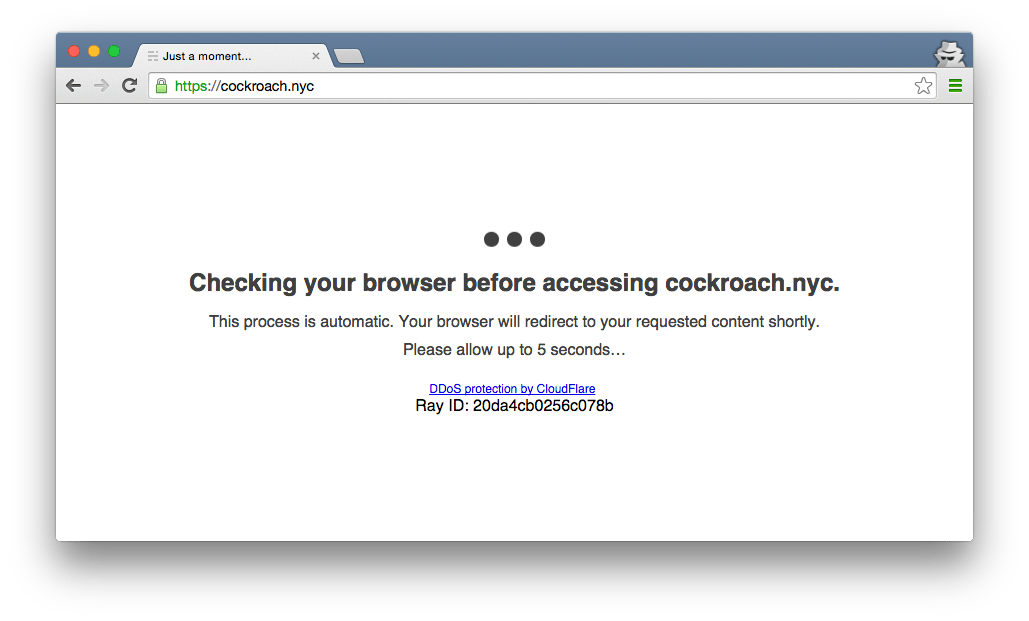
If the checks pass, the visitor will be allowed through to your website. The combination of preventing and delaying malicious visitors from connecting to your site is often enough to keep it up and running, even during a DDoS attack.
Note: Visitors to the site must have JavaScript and Cookies enabled to pass the interstitial page. If this isn’t acceptable, consider using the “High” firewall security setting instead.
Keep in mind that you only want to have I’m Under Attack Mode enabled when your site is the victim of a DDoS attack. Otherwise, it should be turned off so it does not delay normal users from accessing your website for no reason.
How To Enable I’m Under Attack Mode
If you want enable I’m Under Attack Mode, the easiest way is to go to the Cloudflare Overview page (the default page) and toggle it on in the right sidebar:
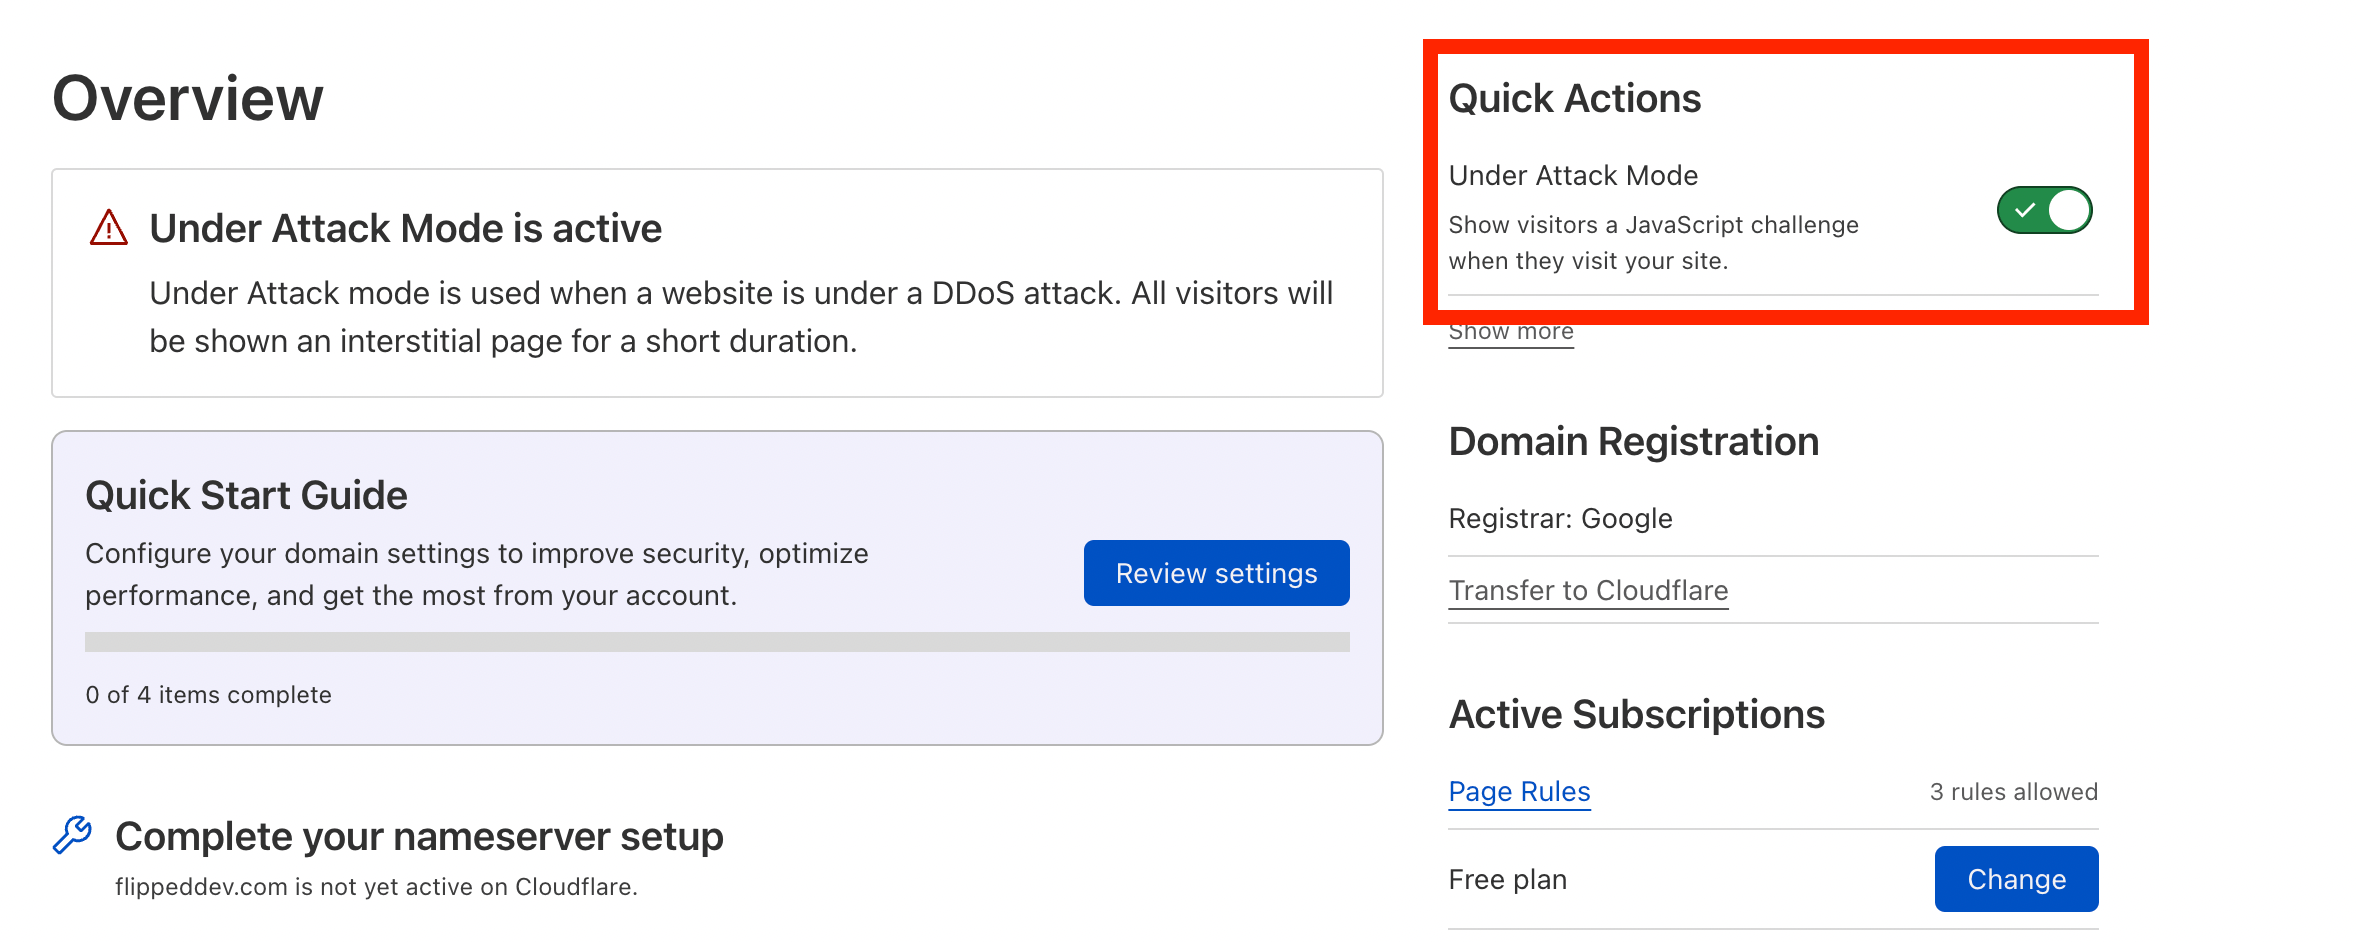
The security settings will immediately switch to I’m Under Attack status. Now, any visitors to your site will be presented with the Cloudflare interstitial page that was described above.
How To Disable I’m Under Attack Mode
As the I’m Under Attack Mode should only be used during DDoS emergencies, you should disable it if you aren’t under attack. To do so, go to the Cloudflare Overview page, and it back off. This will open a modal like this:
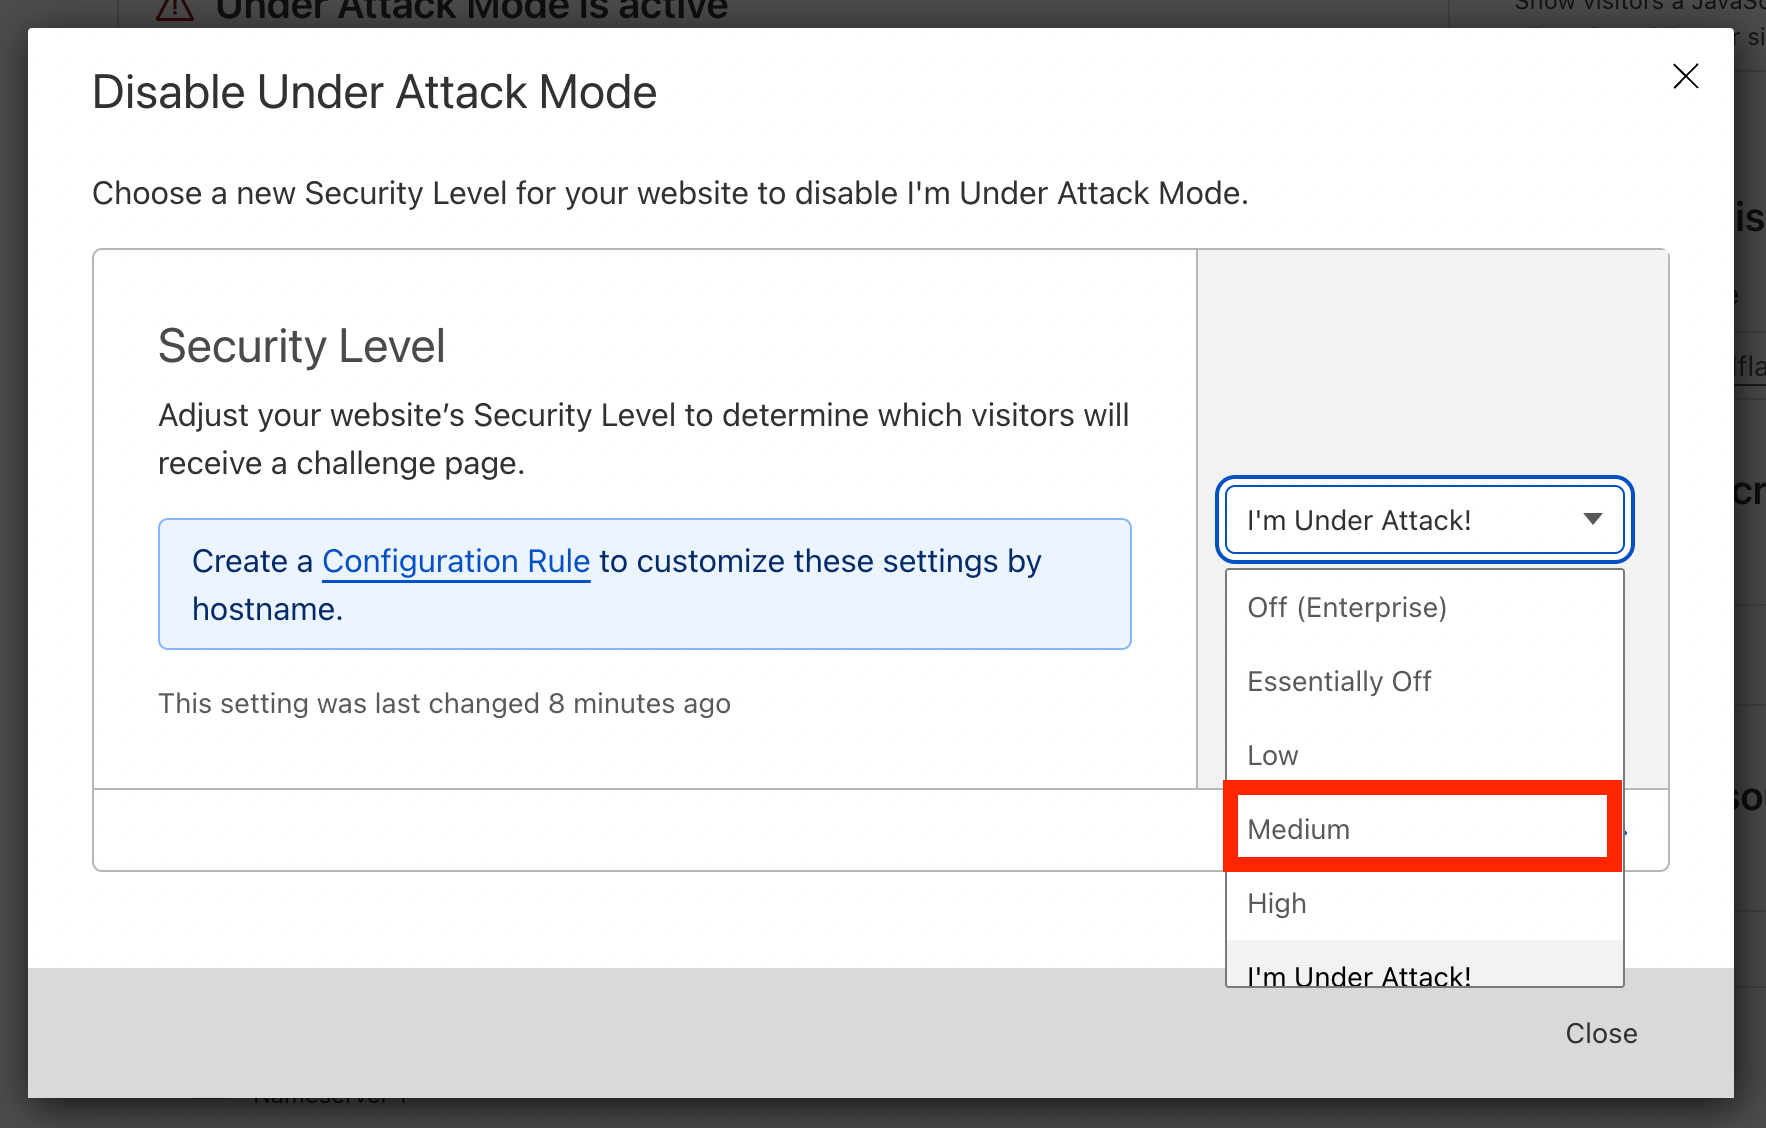
Then select the security level that you would like to switch to. The default and generally recommended, mode is Medium. Your site should revert back to an Active status, and the DDoS protection page will be disabled.
Conclusion
Now that your website is using Cloudflare, you have another tool to easily protect it against HTTP-based DDoS attacks. There are also a variety of other tools that Cloudflare provides that you may be interested in setting up, like free SSL certificates. As such, it is recommended that you explore the options and see what is useful to you.
You can learn more about using Cloudflare to protect your sites with our How To Host a Website Using Cloudflare and Nginx on Ubuntu 22.04 tutorial.
Thanks for learning with the DigitalOcean Community. Check out our offerings for compute, storage, networking, and managed databases.
About the author(s)
Software Engineer @ DigitalOcean. Former Señor Technical Writer (I no longer update articles or respond to comments). Expertise in areas including Ubuntu, PostgreSQL, MySQL, and more.
Still looking for an answer?
This textbox defaults to using Markdown to format your answer.
You can type !ref in this text area to quickly search our full set of tutorials, documentation & marketplace offerings and insert the link!
This comment has been deleted
Hi Mitchell, Nice tutorial. One of my friend added his website on CloudFlare, but it is making some error.
Any professional advice how to resolve this problem.
I’d highly recommend you remove the wildcard * record as it will leak out the origin server IP, as you don’t have the option of an orange cloud (proxy on) for wildcard records:
$ dig +short example.cockroach.nyc
104.236.3.48
Hey Mitchell, thanks for the Tutorial. I have a little Problem. I’ve added the nameserver 2 weeks ago correctly to my website(panel), but cloudflare still say “Status: Pending”. What could be the Problem there?
Hi, Recently i received a huge bot attack on my website. And cloudflare did not even bat an eye, or give me any notifications. My CPU consumption went upto 100% and it broke my website. The “im under attack mode” did not do any good.
The attack basically used a lot of my php-fpm service, and it crashed. Is there any other service, or program that you can recommend?
PS - i dont use wordpress, but do use php
There where so restrictions that had us back away from CloudFlare. If I recall correctly there are limits on what certificates are allowed and the level of protection with some items we wanted restricted to the $2400+/yr plans.
Apart from the recent “CloudBleed” controversy, this CF thing has been a terrible solution since its inception. I tried it a few years ago. My own traffic, and those of known friends, was being flagged as malicious. To get to my humble site with just about 50 unique visitors a week, CF showed “verify yourself” nonsense.
I think DO needs to invest in a proper DDOS protection like Vultr etc. Otherwise it’s quickly becoming a less attractive service.
Hi Mitchell,
Would anything else need to be done if I have multiple (2) subdomains under digital ocean?
Use the Cloudflare API to automatically turn this feature off to remove attack embankments. A simple script shell provided on linux can work well
Uh no, Don’t use cloudflare, its the most unreliable service ever And it is more bypassable than actual ddos integrated protection itself Yes Cloudflare helps proxy the actual main ip However it does not defend things very well. Their DDOS Protection fails consistently sometimes
 This work is licensed under a Creative Commons Attribution-NonCommercial- ShareAlike 4.0 International License.
Become a contributor for community
Get paid to write technical tutorials and select a tech-focused charity to receive a matching donation.

DigitalOcean Documentation
Full documentation for every DigitalOcean product.

Resources for startups and AI-native businesses
The Wave has everything you need to know about building a business, from raising funding to marketing your product.
The developer cloud
Scale up as you grow — whether you're running one virtual machine or ten thousand.

Start building today
From GPU-powered inference and Kubernetes to managed databases and storage, get everything you need to build, scale, and deploy intelligent applications.
