By Aaron Shea and Sharon Campbell

Introduction
Want a minimal setup continuous integration solution? Who wouldn’t! Drone.io uses Docker containers to run your tests, and works with GitHub, GitLab (self-hosted and service based), and Bitbucket.
Drone is built using Go and utilizes Docker. It can be run inside a container itself with very little configuration.
Continuous integration is the development practice of making frequent commits to your code base, and building and testing as you go. This means that new code will (hopefully) integrate quickly and easily your existing code base. Since continuous integration requires that you build and test your code frequently, it speeds up the development process if you can build and test automatically. Drone does this; it automates the process of building and testing.
Drone pulls code automatically from a hosted Git repository, and then run scripts you define. You can run any test suite and have it report back to you via email or indicate the status with a badge in your README. Drone’s integration with Docker means it can support a huge number of languages including PHP, Node, Ruby, Go, and Python, to name a few. Each test will spawn a new container based off of specified images from the Docker Public Registry. This means that the support for languages and development stacks will only increase as more images are created. You can even make your own to fit your specific application!
In this tutorial we’ll be taking a look on how we can containerize Drone.io so it can be run using the minimal Linux distribution CoreOS.
Requirements
- At least one SSH key added to your account
- A single CoreOS Beta Droplet (512 MB of RAM will work fine)
It is recommend to read this Introduction to CoreOS before continuing if you have never used the operating system before.
If you are unsure of how to configure CoreOS using a cloud-config file, you can find more information, plus a sample config file, here! The sample config file will work for this tutorial.
Step One — Prepare GitHub
Before we begin, we need to enable access to our GitHub accounts via oAuth. We’ll be generating a pair of tokens to be used in the next step of setting up the Drone container.
We need to generate these values from your GitHub account. Click here to go to the appropriate settings page on GitHub, called Applications.
Click the Register new application button on the upper right. This will bring up a new form to fill out:
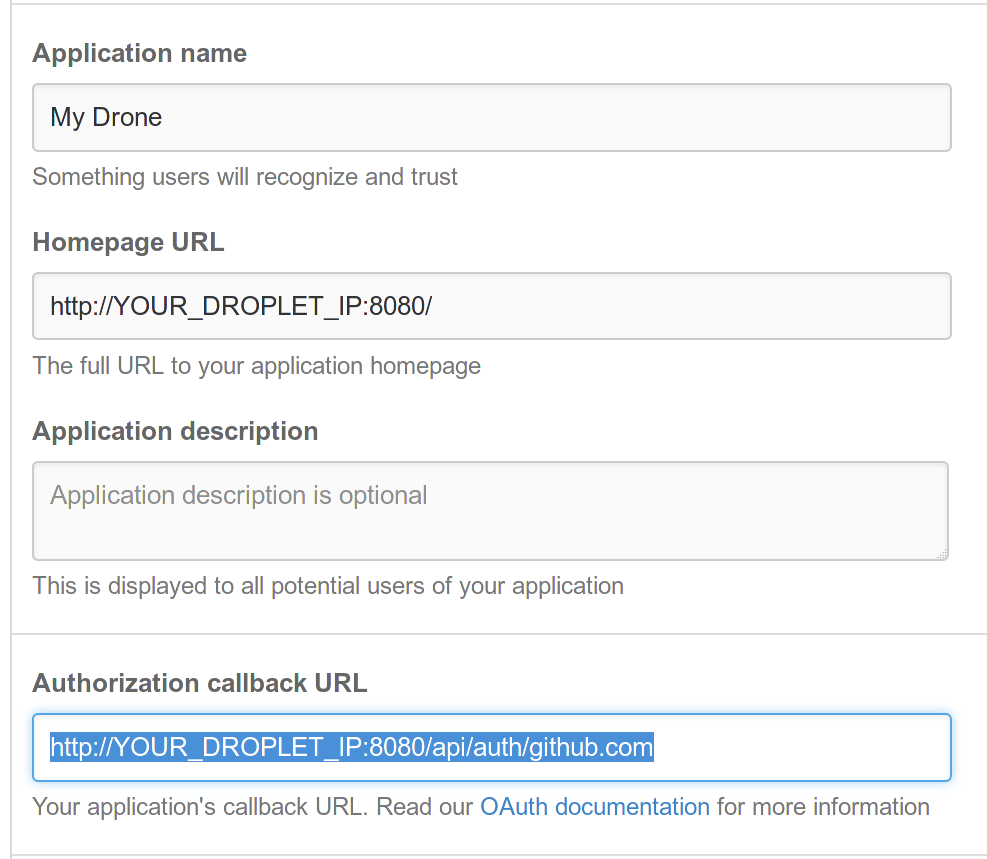
Add your Application name. The Homepage URL should be http://YOUR_DROPLET_IP:8080/. Add your Application description.
IMPORTANT: Make sure the Authorization callback URL is set to http://YOUR_DROPLET_IP:8080/api/auth/github.com in order to authenticate properly!
Once you’re set with that, click Register application to be brought to the new application’s information page.
You’ll need two bits of information from here, the Client ID and Client Secret. (Keep the Client Secret actually secret! This is NOT something you should share with anyone!)
These tokens will be used to authorize our own Drone application to add webhooks to any GitHub repository we add to Drone via the Dashboard panel. The webhooks will trigger on every new commit we push to GitHub, and this will cause Drone to clone the new changes and run the build.
Make note of these tokens, as we will need them in the next step.
Step Two — Write The Dockerfile
Once you have your CoreOS Droplet all ready to go, connect to it via SSH:
ssh -A core@YOUR_DROPLET_IP
Create a new directory called droneio:
mkdir droneio
cd droneio
Due to the read-only nature of CoreOS’s root file system, we cannot install Drone.io directly. We need to containerize it using Docker first. We’ll set up a Dockerfile that contains instructions on installing Drone.io just like we would on a stock Ubuntu system.
We will be using the terminal-based text editor vim in this section. This is the default text editor on CoreOS so it’s important to familiarize yourself with it. We’ll show you step by step how to use it to open and edit the file.
Now it’s time to use vim to create our Dockerfile. Run the command:
vim Dockerfile
This opens vim and creates a new file called Dockerfile in your current directory.
Now enter insert mode. To do this, press the i key. The bottom left corner of the terminal should now say: -- INSERT --. Now you can type or paste in the Dockerfile contents.
Here’s the Dockerfile in its entirety. Comments are included in-line for each section. You can copy this file exactly:
# Pull from base Ubuntu image
FROM ubuntu

# Do system updates and install dependencies
RUN apt-get update
RUN apt-get -y upgrade
RUN sudo apt-get -y install git wget
RUN apt-get clean

# Download Drone.io
RUN wget http://downloads.drone.io/master/drone.deb
RUN dpkg -i drone.deb

# Expose the Drone.io port
EXPOSE 8080

ENV DRONE_SERVER_PORT 0.0.0.0:8080
ENV DRONE_DATABASE_DATASOURCE /var/lib/drone/drone.sqlite

# Define our GitHub oAuth keys below
ENV DRONE_GITHUB_CLIENT <CLIENT_TOKEN_HERE>
ENV DRONE_GITHUB_SECRET <CLIENT_SECRET_HERE>

# The command we'll be running when the container starts
CMD /usr/local/bin/droned
Replace the <CLIENT_TOKEN_HERE> and <CLIENT_SECRET_HERE> with the tokens noted from the step above.
Type the command below to save the changes we’ve made. The w tells vim to write the text to the file, and q will cause vim to quit.
:wq
A very quick overview for those who aren’t familiar with Dockerfiles:
FROM- The image we are going to use for our containerRUN- Run a command inside the container during the build processEXPOSE- Allows the specified port(s) to be accessed outside of the containerCMD- The command that will be run when the container is startedENV- Sets the value of an environment variable in the container, used here for Drone configuration
For more information about the types of statements you can make in Dockerfiles, read the official Docker documentation.
At this point we can build the image using the following command:
docker build -t my_drone .
This will take a few minutes to complete. Once it builds successfully, we can spin up a container using our new image.
Step Two — Launch The Drone Container
Drone.io needs a place to store information, so we’ll be using an SQLite database file. Create an empty file to start with:
touch drone.sqlite
This file will be populated with data by Drone once the container is up and running.
Launching Drone is fairly straightforward, but we need to do a few extra steps to ensure that Drone can access our host’s Docker server. The easiest way to do this to use a volume to bind the host socket file to the location where the container’s socket file would be. The command to properly start the container is below:
docker run -d --name="drone-ci" \
	-p 8080:8080 \
	-v /var/lib/drone/ \
	-v /var/run/docker.sock:/var/run/docker.sock \
	-v /home/core/droneio/drone.sqlite:/var/lib/drone/drone.sqlite \
	my_drone
Going line by line, let’s take apart what exactly is going on:
-
docker run -d --name="drone-ci"- In this part of the command, we are telling Docker to run this container in the background, so we don’t have to worry about it dying if we disconnect from the SSH session. We also give it a friendly name, drone-ci, so we can manage it using thedockercommand. -
-p 8080:8080- Here we bind the port 8080 from our host onto the same port in the container. This lets us access Drone’s interface outside of the running container’s network. -
-v /var/lib/drone- This sets up a volume for storage within the container. -
-v /var/run/docker.sock:/var/run/docker.sock- This is the trick that allows the Drone.io container to control the host’s Docker system. We are binding the container’s location where a Docker UNIX socket would be to the actual host’s Docker UNIX socket. In other words, we are telling Drone to use the Docker installation on our host CoreOS, not inside the container that Drone is running in. This is because the host has Docker installed, and the container doesn’t (that is, the Docker container isn’t running a nested installation of Docker). -
-v /home/core/droneio/drone.sqlite:/var/lib/drone/drone.sqlite \- Bind the empty storage file to the database inside the container to keep the data we store in it. This file is outside the container in case we ever need to recover data from it, or the database needs to be modified externally for some reason. -
my_drone- We are using the image we built earlier to run this container.
After you execute that command, if any errors occur, be sure to double-check that you have created the empty database file, and that all the paths are correctly entered.
To ensure the container is running, do a quick status check:
docker ps
Your output should look similar to the following:
CONTAINER ID        IMAGE               COMMAND               CREATED             STATUS              PORTS                             NAMES
6eddddd09900        my_drone:latest    "/bin/sh -c '/usr/lo   1 seconds ago       Up 1 seconds        0.0.0.0:8080->8080/tcp            drone-ci
My container didn’t start!
If you ran docker ps and got no results, please double-check the long docker run command from above, and ensure you typed it exactly. You can try running it without the line breaks. Also make sure you created the empty drone.sqlite file in the correct directory.
To rebuild the container and try again, we need to remove the broken container from Docker; otherwise, it will complain of duplicate named containers.
Remove the old container using docker rm drone-ci (notice we used the name we gave the container in the command above). Then, try running the long docker run command from the previous section again.
If the container started but you cannot access the installation page, then you should try to restart it. Stop the container using docker stop drone-ci. Or for a more aggressive stop, use docker kill drone-ci. Then, try to start it again with docker start drone-ci.
If you want to do some digging in the container logs, you can use Docker’s log command: docker logs drone-ci.
Step Three — Set Up the Drone
Now we’re ready to set up Drone with the initial account. Open your web browser and navigate to: http://YOUR_DROPLET_IP:8080/login. You should see a login screen like the one below:
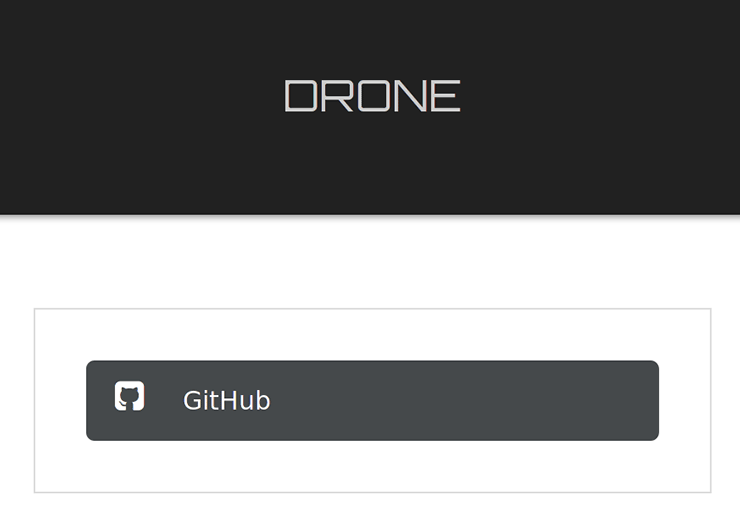
We only see GitHub because it’s the only service we set in the Dockerfile.
Now click the GitHub button, then the Authorize application button to start the login and sync process.

This is the main dashboard for Drone, you can see the three most recent repositories in your GitHub account, and expand the list by clicking “BROWSE ALL”. If all of your repos do not appear, simply click “SYNC” in the upper right hand corner.
Feel free to explore the dashboard.
Next we need to allow access to your various Git repository sources.
Step Five — Run Builds from GitHub
Find the name of the repository you’d like to add to Drone CI and select it. This will activate Drone and add webhooks to your repository.
After activation, you will see the blank repository status page:
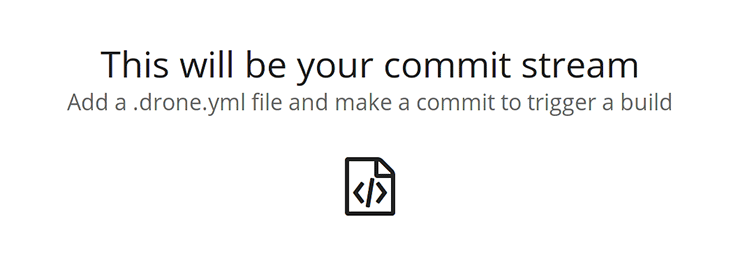
You can explore some of the more advanced settings for repository using the button in the upper right corner.
The .drone.yml file
We need to make a new file in the repository called .drone.yml. This will command Drone and tell it how to build and test the code in the GitHub repository. Here is a very simple file we will use to test if Drone is set up properly.
image: dockerfile/nginx
script:
  - echo hello world
imagedefines the base image we are pulling from (the image can be from the public Docker registry, a private registry, or locally built). In this case we are using an Nginx image.scriptsimply defines the commands that Drone should execute, and in what order. You can define more than one script command with another- <command here>on a new line. (Make sure the tabs line up!)
This script just echoes “hello world” to prove that Drone is working. It doesn’t actually test anything about your code.
In a real build and test scenario, you’d want to have Drone use a Docker image that matches your production environment, and you’d want the scripts to test the code in the repository.
Now, commit your .drone.yml file to your repository. This commit, and any other commits you make in the future (to any file, not just the .drone.yml file), will trigger the webhook Drone placed in your repository. Drone should now be hard at work pulling the base image, and running your build scripts!
Drone will detect the new commit, clone any changes made to the code, and follow the instructions defined in the .drone.yml file. It will display a notification on the bottom of the page to let you know the build is running, click it to see the build status page.

The build will take a few minutes as Drone needs to pull the image from the Docker public registry.
If the build passes, you can click on the commit to see more details. You should see output similar to the following:
$ git clone --depth=50 --recursive --branch=master git://github.com/captainshar/dronetest.git /var/cache/drone/src/github.com/captainshar/dronetest
$ git checkout -qf 9908588ae4e4abcba8afb5029baad5c49a835ba4
$ echo hello world
hello world
$ exit 0
You might also see a few warnings related to Perl; that’s fine.
If you completed all these steps and your build passes, you now have your own personal Drone.io worker ready to build and test almost any language-based project!
Drone also supports Bitbucket and GitLab, and the setup processes using OAuth are relatively the same as Github’s. You may need to edit the Dockerfile and rebuild the container using the correct environment variables:
DRONE_BITBUCKET_CLIENT
DRONE_BITBUCKET_SECRET
DRONE_GITLAB_URL
...
Next Steps
Now that you have Drone ready to run builds, you can modify the .drone.yml to do some more advanced testing.
For example, if you wanted to test a Node application using a test framework such as Karma or Mocha, you can change the image section to the official node image, and change the script section to execute npm and run the tests! Take a look around the Docker registry for images that might suit your application.
If you want to get really fancy, you can look into something called Drone Wall to provide a display board of all your build statuses.
Have fun commanding your Drone!
Thanks for learning with the DigitalOcean Community. Check out our offerings for compute, storage, networking, and managed databases.
About the author(s)
Current fan and former Editorial Manager at DigitalOcean. Hi! Expertise in areas including Ubuntu, Docker, Rails, and more.
Still looking for an answer?
This textbox defaults to using Markdown to format your answer.
You can type !ref in this text area to quickly search our full set of tutorials, documentation & marketplace offerings and insert the link!
Hello, I was following your guide and it appears that “http://downloads.drone.io/latest/drone.deb” returns a 403. This kind of halts the whole installation. Thank you.
Hi, I can’t get the install page. This is what I see: https://dl.dropboxusercontent.com/u/20146711/drone-install-page.png
Thanks a lot for this great tutorial, as usual. Regarding the way GitHub communicates with drone, how secure is it ? It seems to me (I’m probably wrong) that the drone URL needs to be exposed from the LAN to the external world to GitHub can alert Drone to trigger a build. How can this be made more secure ? Thanks a lot. Luc
Howdy! I can’t seem to get the docker container to actually run. I literally have gone and copy-pasted the docker run command, and still nothing shows up during docker ps. What version of CoreOS are you using?
(How) did you solve the CoreOS/Btrfs problems with slow Drone.io builds?
See: https://github.com/drone/drone/issues/730
This is preventing me from introducing the DigitalOcean + CoreOS + Drone.io stack at our company, as it takes up to 10 minutes before the build even starts, which is unacceptable.
This comment has been deleted
For some reasons I get a blank page when I try authorize my account ( ip/login ). How can I inspect the drone logs? It seems there is no log file whatsoever.
This thing is useless. The githhub authentication is not working and there is no way to debug why is not working.
 This work is licensed under a Creative Commons Attribution-NonCommercial- ShareAlike 4.0 International License.
Become a contributor for community
Get paid to write technical tutorials and select a tech-focused charity to receive a matching donation.

DigitalOcean Documentation
Full documentation for every DigitalOcean product.

Resources for startups and SMBs
The Wave has everything you need to know about building a business, from raising funding to marketing your product.
The developer cloud
Scale up as you grow — whether you're running one virtual machine or ten thousand.

Get started for free
Sign up and get $200 in credit for your first 60 days with DigitalOcean.*

*This promotional offer applies to new accounts only.