By Thomas Vincent and Brian Hogan

Introduction
Machine learning, or ML, is a subfield of AI focused on algorithms that learn models from data.
Let’s look at a practical application of machine learning in the field of Computer Vision called neural style transfer. In 2015, researchers used deep learning techniques to create an algorithm that mixed the content of one image with the artistic style of another. This new algorithm generated unique images, but also offered a unique perspective into how our visual system may infer new artistic concepts.
As its name suggests, neural style transfer relies on neural networks to perform this task. The exact details of this implementation are beyond the scope of this tutorial, but you can learn more in this blog post on artistic style transfer or from the original research manuscript.
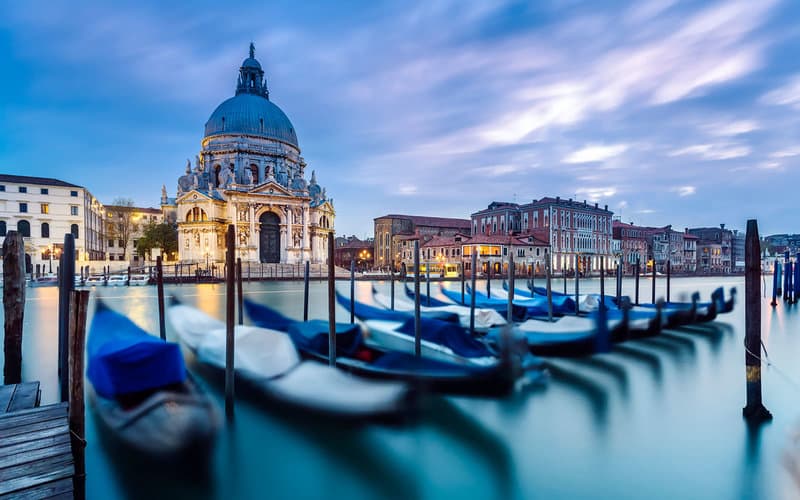
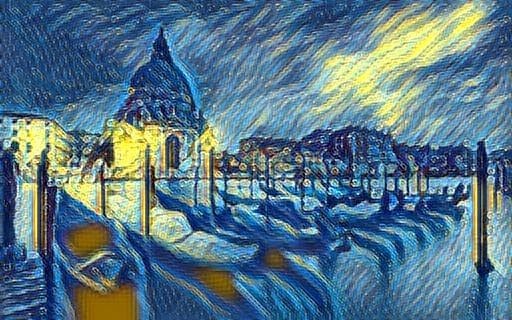
In this tutorial, you will apply neural style transfer using Jupyter Notebook and the Linux command line to take an image like this:

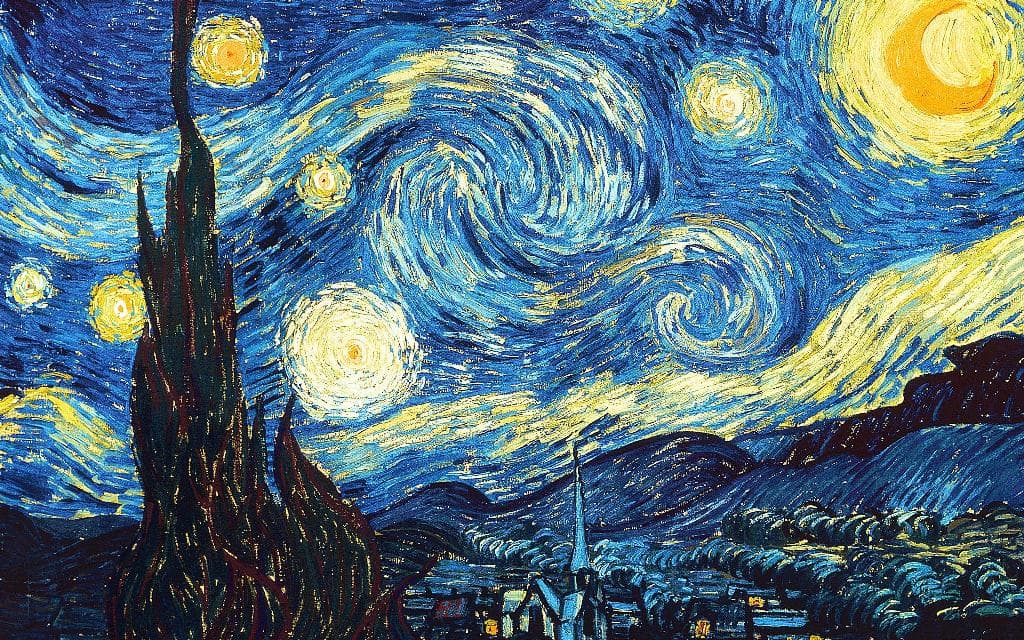
and transform it by applying the artistic style of Vincent van Gogh’s “Starry Night” to create this image:
Prerequisites
To complete this tutorial, you will need:
- One Ubuntu 20.04 server set up by following the Ubuntu 20.04 initial server setup guide, including a sudo non-root user and a firewall.
- Python 3 and a programming environment set up by following our Python setup tutorial.
- Jupyter Notebook installed by following How to Set Up Jupyter Notebook for Python 3.
Working with machine learning models can be memory intensive, so your machine should have at least 8GB of memory to perform some of the calculations in this tutorial.
Step 1 — Installing Dependencies and Cloning the PyTorch-Style-Transfer GitHub Repository
In this tutorial, we’ll use an open-source implementation of neural style transfer provided by Hang Zhang called PyTorch-Style-Transfer. This particular implementation uses the PyTorch library.
Activate your programming environment, and install the torchvision and torchfile packages with the following command:
- pip install torchvision torchfile
Pip will automatically retrieve their dependencies:
OutputSuccessfully installed numpy-1.22.0 pillow-9.0.0 torch-1.10.1 torchfile-0.1.0 torchvision-0.11.2 typing-extensions-4.0.1
To avoid cluttering your home directory with files, create a new directory called style_transfer and use it as your working directory:
- mkdir style_transfer
- cd style_transfer
Next, clone the PyTorch-Style-Transfer repository to your working directory using the git clone command. You can learn more about Git in this Git tutorial series.
- git clone https://github.com/zhanghang1989/PyTorch-Style-Transfer.git
The author of this repository has placed the code we will be using in the experiments folder of the PyTorch-Style-Transfer repository, so switch to this directory once all files have been cloned:
- cd PyTorch-Style-Transfer/experiments
Take a look at the contents of the experiments directory:
- ls
You’ll see the following directories:
Outputcamera_demo.py dataset images main.py models net.py option.py utils.py
In this tutorial you’ll work with the images/ directory, which contains stock images, and the main.py script, which is used to apply neural style transfer to your images.
Before moving to the next section, you also need to download the pre-trained deep learning model required to run neural style transfer. These models can be large and therefore not suitable for storing on GitHub, so the author provides a small script to download the file. You’ll find the script at models/download_model.sh.
First, make the script executable:
- chmod +x ./models/download_model.sh
Then execute the script to download the model:
- ./models/download_model.sh
Now that everything’s downloaded, let’s use these tools to transform some images.
Step 2 — Running your First Style Transfer Experiment
To illustrate how neural style transfer works, let’s start by using the example provided by the author of the PyTorch-Style-Transfer repository. Since we will need to display and view images, it will be more convenient to use a Jupyter notebook.
Launch Jupyter from your terminal:
- jupyter notebook
Then access Jupyter by following the instructions presented.
Once Jupyter is displayed, create a new notebook by selecting New > Python 3 from the top right pull-down menu:
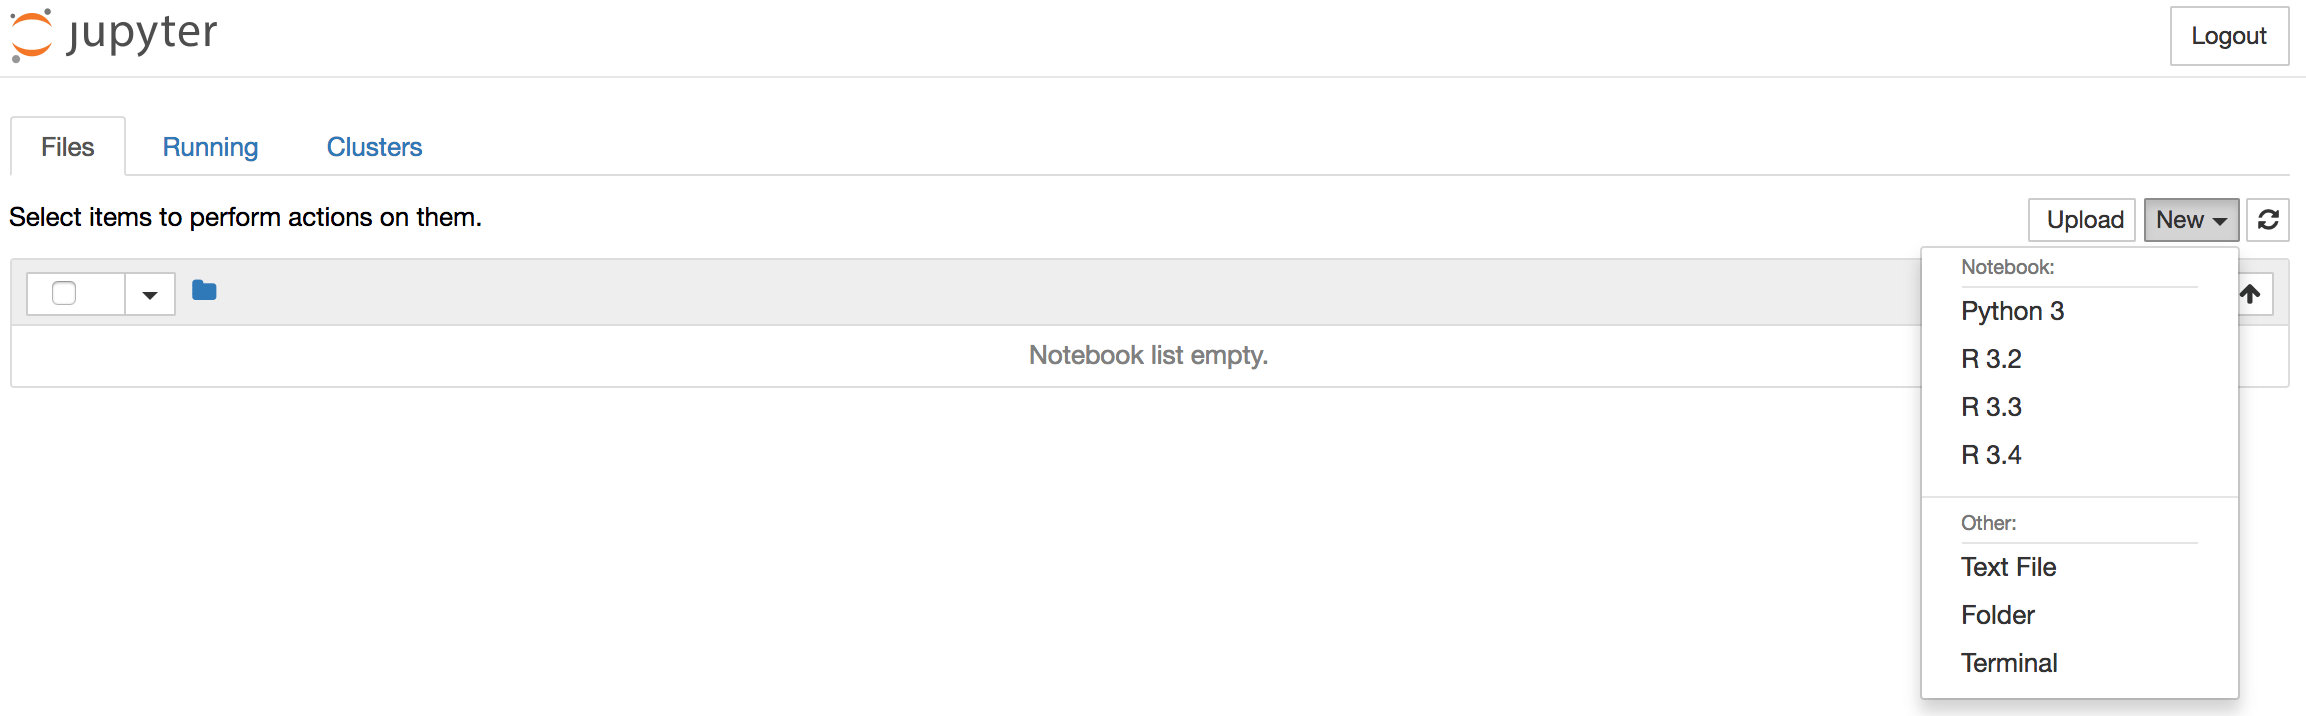
This opens a new notebook where you can enter your code.
At the top of the notebook, add the following code to load the required libraries.
import torch
import os
import subprocess
from IPython.display import Image
from IPython.display import display
Along with torch, we’re also importing the standard libraries os and subprocess, which we’ll use to run Python scripts directly from Jupyter notebook. We also include the IPython.display library, which lets us display images within the Jupyter notebook.
Note: Type ALT+ENTER (or SHIFT+ENTER on macOS) to run the code and move into a new code block within your notebook. Do this after each code block in this tutorial to see your results.
The example provided in the README file of the PyTorch-Style-Transfer repository uses stock images located in the images/ directory and the main.py script. You will need to provide at least five arguments in order to run the main.py script:
- The path to the content image (located in
/images/content). - The path to the style image (located in
/images/21styles). - The path to the pretrained GAN (Generative Adversarial Network) model used to perform the style transfer (located in
/models). - The path and name of the output image.
- Deep learning models run much faster on GPUs. If you have one available then specify the
--cuda=1parameter, otherwise use--cuda=0.
To run the neural style transfer code, we’ll specify the required arguments and use the subprocess library to run the command in the shell.
First, let’s define the path to our working directory. We’ll store in a variable called workingdir:
# define the path to the working directory
experiment_dir = 'style_transfer/PyTorch-Style-Transfer/experiments'
workingdir = '{}/{}'.format(os.environ['HOME'], experiment_dir)
We’ll use this variable throughout our code when we point to images and other files.
Now let’s define the path to the main.py script, as well as the list of arguments that we will use as input for this test run. We’ll specify that the content image is venice-boat.jpg, the style image isstarry_night.jpg, and we’ll save the output of our neural style transfer to a file called test.jpg:
# specify the path to the main.py script
path2script = '{}/main.py'.format(workingdir)

# specify the list of arguments to be used as input to main.py
args = ['eval',
        '--content-image',
        '{}/images/content/venice-boat.jpg'.format(workingdir),
        '--style-image',
        '{}/images/21styles/starry_night.jpg'.format(workingdir),
        '--model',
        '{}/models/21styles.model'.format(workingdir),
        '--output-image',
        '{}/test.jpg'.format(workingdir),
        '--cuda=0']
Before running the test example, you can take a quick look at the content and style images that you have chosen for this example by executing this code in your notebook:
content_image = Image('{}/images/content/venice-boat.jpg'.format(workingdir))
style_image = Image('{}/images/21styles/starry_night.jpg'.format(workingdir))
display(content_image)
display(style_image)
You’ll see these images displayed in the output:
Finally, concatenate the call to main.py and its list of arguments and run it in the shell using the subprocess.check_output function:
# build subprocess command
cmd = ['python3', path2script] + args

# run the command
x = subprocess.check_output(cmd, universal_newlines=True)
Depending on the amount of memory available on your machine, this may take a minute or two to run. Once it has completed, you should see a test.jpg file in your working directory. From a Jupyter notebook, you can use Ipython magic commands to display the contents of your working directory within the Jupyter notebook:
!ls $workingdir
Alternatively, you can use the ls command in your terminal. Either way you’ll see the following output:
Output__pycache__	dataset  main.py  myutils  option.py
camera_demo.py	images	 models   net	   test.jpg
You’ll see a new file called test.jpg, which contains the results of the neural style transfer using your input content and style images.
Use the Image function to display the content of test.jpg:
Image('{}/test.jpg'.format(workingdir))
The artistic style of Vincent van Vogh’s Starry Night canvas has been mapped to the content of our Venitian boat images. You’ve successfully applied neural style transfer with a textbook example, so let’s try repeating this exercise with different images.
Step 3 — Transforming Your Own Images
So far, you’ve used the images provided by the author of the library we’re using. Let’s use our own images instead. To do this, you can either find an image you are interested in and use the URL for the image in the following command, or use the URL provided to use Sammy the Shark.
We’ll use some IPython magic again to download the image to our working directory and place it into a file called sammy.png.
!wget -O - 'https://assets.digitalocean.com/blog/static/sammy-the-shark-gets-a-birthday-makeover-from-simon-oxley/sammy-jetpack.png' > $workingdir/sammy.png
When you run this command in your notebook, you’ll see the following output:
Output--2017-08-15 20:03:27--  https://assets.digitalocean.com/blog/static/sammy-the-shark-gets-a-birthday-makeover-from-simon-oxley/sammy-jetpack.png
Resolving assets.digitalocean.com (assets.digitalocean.com)... 151.101.20.233
Connecting to assets.digitalocean.com (assets.digitalocean.com)|151.101.20.233|:443... connected.
HTTP request sent, awaiting response... 200 OK
Length: 10483 (10K) [image/png]
Saving to: 'STDOUT'

-                   100%[===================>]  10.24K  --.-KB/s    in 0.001s

2017-08-15 20:03:27 (12.9 MB/s) - written to stdout [10483/10483]
Use the Image command to display the new image in the notebook:
Image('{}/sammy.png'.format(workingdir))
Following the same workflow as the test run, let’s run our artistic style transfer model using Rocket Sammy as the content image, and the same Starry Night picture as our style image.
We’ll use the same code we used previously, but this time we’ll specify the content image to be sammy.png, the style image to be starry_night.jpg, and we write the output to a file called starry_sammy.jpg. Then we execute the command:
# specify the path to the main.py script
path2script = '{}/main.py'.format(workingdir)

# specify the list of arguments to be used as input to main.py
args = ['eval',
        '--content-image',
        '{}/sammy.png'.format(workingdir),
        '--style-image',
        '{}/images/21styles/starry_night.jpg'.format(workingdir),
        '--model',
        '{}/models/21styles.model'.format(workingdir),
        '--output-image',
        '{}/starry_sammy.jpg'.format(workingdir),
        '--cuda=0']

# build subprocess command
cmd = ['python3', path2script] + args

# run the bash command
x = subprocess.check_output(cmd, universal_newlines=True)
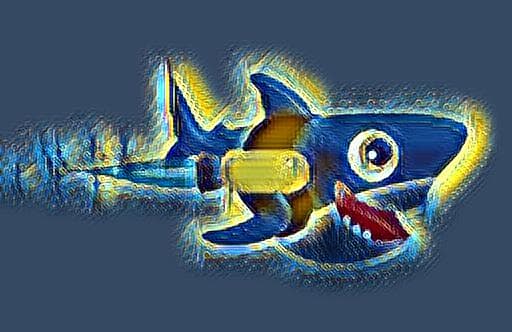
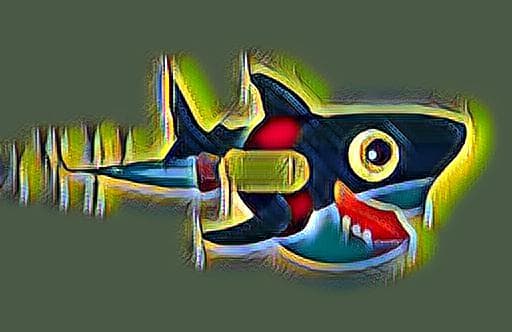
Then use the Image function to view the results of transferring the artistic style of Vincent van Vogh’s Starry Night to the content of your Rocket Sammy image.
Image('{}/starry_sammy.jpg'.format(workingdir))
You’ll see the new stylized Rocket Sammy:
Let’s try this again by mapping a different style image to our picture of Rocket Sammy. We’ll use Picasso’s The Muse this time. Again, we use sammy.png as our content image, but we’ll change the style image to be la_muse.jpg. We’ll save the output to musing_sammy.jpg:
# specify the path to the main.py script
path2script = '{}/main.py'.format(workingdir)

# specify the list of arguments to be used as input to main.py
args = ['eval',
        '--content-image',
        '{}/sammy.png'.format(workingdir),
        '--style-image',
        '{}/images/21styles/la_muse.jpg'.format(workingdir),
        '--model',
        '{}/models/21styles.model'.format(workingdir),
        '--output-image',
        '{}/musing_sammy.jpg'.format(workingdir),
        '--cuda=0']

# build subprocess command
cmd = ['python3', path2script] + args

# run the bash command
x = subprocess.check_output(cmd, universal_newlines=True)
Once the code has finished running, display the output of your work using the output filename you specified and the Image function:
Image('{}/musing_sammy.jpg'.format(workingdir))
By now, you should have a good idea how to use these transformations. Try using some of your own images if you haven’t already.
Conclusion
In this tutorial, you used Python and an open-source PyTorch implementation of a neural style transfer model to apply stylistic transfer to images. The field of machine learning and AI is vast, and this is only one of its applications. Here are some additional things you can explore:
- Package the code above into a function that you can call at any time.
- Learn to visualize and forecast with time series data using the tutorials published here.
- Try out some of the examples shared in the TensorFlow documentation or even the TensorFlow implementation for artistic style transfer.
Thanks for learning with the DigitalOcean Community. Check out our offerings for compute, storage, networking, and managed databases.
About the author(s)
Statistician & data scientist. Strong background in whiskey.
Managed the Write for DOnations program, wrote and edited community articles, and makes things on the Internet. Expertise in DevOps areas including Linux, Ubuntu, Debian, and more.
Still looking for an answer?
This textbox defaults to using Markdown to format your answer.
You can type !ref in this text area to quickly search our full set of tutorials, documentation & marketplace offerings and insert the link!
Hi there, when I’ve tried to execute the block of script in this tutorial on Python Notebook. This chunk of error just appeared, did I miss anything?
# build subprocess command
cmd = ['python3', path2script] + args

# run the command
x = subprocess.check_output(cmd, universal_newlines=True)
CalledProcessError Traceback (most recent call last) <ipython-input-41-8835dc3d4151> in <module>() 3 4 # run the command ----> 5 x = subprocess.check_output(cmd, universal_newlines=True)
/usr/lib/python3.5/subprocess.py in check_output(timeout, *popenargs, **kwargs) 624 625 return run(*popenargs, stdout=PIPE, timeout=timeout, check=True, –> 626 **kwargs).stdout 627 628
/usr/lib/python3.5/subprocess.py in run(input, timeout, check, *popenargs, **kwargs) 706 if check and retcode: 707 raise CalledProcessError(retcode, process.args, –> 708 output=stdout, stderr=stderr) 709 return CompletedProcess(process.args, retcode, stdout, stderr) 710
CalledProcessError: Command ‘[‘python3’, ‘/home/science/style_transfer/PyTorch-Style-Transfer/experiments/main.py’, ‘eval’, ‘–content-image’, ‘/home/science/style_transfer/PyTorch-Style-Transfer/experiments/images/content/venice-boat.jpg’, ‘–style-image’, ‘/home/science/style_transfer/PyTorch-Style-Transfer/experiments/images/21styles/starry_night.jpg’, ‘–model’, ‘/home/science/style_transfer/PyTorch-Style-Transfer/experiments/models/21styles.model’, ‘–output-image’, ‘/home/science/style_transfer/PyTorch-Style-Transfer/experiments/test.jpg’, ‘–cuda=0’]’ returned non-zero exit status 1
This comment has been deleted
I’m having the same issue with a new ML droplet just created. Torch version 0.1.12_2
CalledProcessError                        Traceback (most recent call last)
<ipython-input-59-28216415eceb> in <module>()
      3
      4 # run the bash command
----> 5 x = subprocess.check_output(cmd, universal_newlines=True)

/usr/lib/python3.5/subprocess.py in check_output(timeout, *popenargs, **kwargs)
    624
    625     return run(*popenargs, stdout=PIPE, timeout=timeout, check=True,
--> 626                **kwargs).stdout
    627
    628

/usr/lib/python3.5/subprocess.py in run(input, timeout, check, *popenargs, **kwargs)
    706         if check and retcode:
    707             raise CalledProcessError(retcode, process.args,
--> 708                                      output=stdout, stderr=stderr)
    709     return CompletedProcess(process.args, retcode, stdout, stderr)
    710

CalledProcessError: Command '['python3', '/home/science/style_transfer/PyTorch-Style-Transfer/experiments/main.py', 'eval', '--content-image', '/home/science/style_transfer/PyTorch-Style-Transfer/experiments/images/content/venice-boat.jpg', '--style-image', '/home/science/style_transfer/PyTorch-Style-Transfer/experiments/images/21styles/starry_night.jpg', '--model', '/home/science/style_transfer/PyTorch-Style-Transfer/experiments/models/21styles.model', '--output-image', '/home/science/style_transfer/PyTorch-Style-Transfer/experiments/test.jpg', '--cuda=0']' returned non-zero exit status -9
I got as far as trying to run the main.py script, but it cannot load pytorch apparently! Here is the error message I got:
root@machine-learning-1:/home/science/style_transfer/PyTorch-Style-Transfer/experiments# python3 main.py --content-image ./images/content/venice-boat.jpg --style-image ./images/21styles/starry_night.jpg --model ./models/21styles.model --output-image ./test.jpg --cuda=0 Traceback (most recent call last): File “main.py”, line 17, in <module> import torch ModuleNotFoundError: No module named ‘torch’**
There’s a more up to date, more user friendly/easier to use, and better implementation of Neural-Style in Pytorch here: https://github.com/ProGamerGov/neural-style-pt
It works with Python 3 and Python 2.7.
Also, PyTorch can now be installed using pip or pip3 with just simply “pip3 install torch”, “pip3 install torchvision”.
Really enjoyed this breakdown of Neural Style Transfer, especially the way you explained the roles of the content and style representations. It’s always refreshing to see technical concepts presented in such a clear and approachable way. At ARCQ AI, we’ve been experimenting with similar techniques in our generative AI projects, and it’s exciting to see how style transfer can be applied beyond just artistic images. Looking forward to more content like this!
 This work is licensed under a Creative Commons Attribution-NonCommercial- ShareAlike 4.0 International License.
Become a contributor for community
Get paid to write technical tutorials and select a tech-focused charity to receive a matching donation.

DigitalOcean Documentation
Full documentation for every DigitalOcean product.

Resources for startups and AI-native businesses
The Wave has everything you need to know about building a business, from raising funding to marketing your product.
The developer cloud
Scale up as you grow — whether you're running one virtual machine or ten thousand.

Start building today
From GPU-powered inference and Kubernetes to managed databases and storage, get everything you need to build, scale, and deploy intelligent applications.
