By Nicholas Cerminara, Bradley Kouchi and Vinayak Baranwal

Introduction
GitHub is a cloud-hosted Git management tool. Git is distributed version control, meaning the entire repository and history lives wherever you put it. People tend to use GitHub in their business or development workflow as a managed hosting solution for backups of their repositories. GitHub takes this even further by letting you connect with coworkers, friends, organizations, and more.
In this tutorial, you will learn how to take an existing project you are working on and push it so it also exists on GitHub.
Key Takeaways
-
Initialize Git Locally for Version Control: Before pushing your project to GitHub, always initialize a Git repository in your local project folder using
git init. This step creates the foundation for tracking changes, collaborating with others, and leveraging the full power of distributed version control. Proper initialization ensures your project history is preserved and ready for seamless integration with GitHub’s cloud-based platform. -
Leverage
.gitignorefor Security and Clean Repos: Utilize a.gitignorefile to exclude sensitive data, configuration files, and unnecessary system artifacts from your repository. This best practice protects credentials, reduces clutter, and keeps your GitHub repo professional and secure. A well-crafted.gitignoreis essential for compliance, privacy, and maintaining a clean codebase, especially when collaborating or deploying to production. -
Choose SSH or HTTPS Authentication Wisely: For frequent GitHub interactions, SSH authentication is highly recommended due to its enhanced security and convenience—once set up, you won’t need to re-enter credentials. HTTPS is simpler to configure and ideal for occasional use or restricted environments. Selecting the right authentication method streamlines your workflow and safeguards your code, aligning with industry best practices.
-
Push Projects Using CLI, VS Code, or GitHub Desktop: You can push your code to GitHub using the command line interface (CLI) for maximum control and reliability, or opt for graphical tools like Visual Studio Code and GitHub Desktop for a more intuitive experience. Each method supports essential Git operations—staging, committing, and pushing—so you can choose the workflow that best matches your comfort level and project needs.
-
Expand Workflows with GitHub MCP Server and AI Tools: Integrate GitHub MCP Server to connect advanced AI assistants (such as Claude, Cursor, or VS Code Copilot Chat) directly to your repositories. This enables natural language commands for pushing code, managing pull requests, and automating tasks, making your development process smarter and more efficient. Embracing AI-powered workflows future-proofs your projects and maximizes productivity.
How to Push an Existing Project to GitHub
Deploy your applications from GitHub using DigitalOcean App Platform. Let DigitalOcean focus on scaling your app.
Prerequisites
Before you can initialize a repository and push your project to GitHub, ensure you have completed the following requirements:
- GitHub Account: Register for a free GitHub account if you do not already have one. This account will serve as your identity for hosting and managing repositories.
- Git Installation: Install the latest version of
giton your local machine. Git is the distributed version control system that enables you to track changes and synchronize your project with GitHub.
Having both a GitHub account and Git installed locally is essential for leveraging the full capabilities of version control and remote collaboration.
Step 1 — Create a new GitHub Repo
Sign in to GitHub and create a new empty repo. You can choose to either initialize a README or not. It doesn’t really matter because we’re just going to override everything in this remote repository anyway.
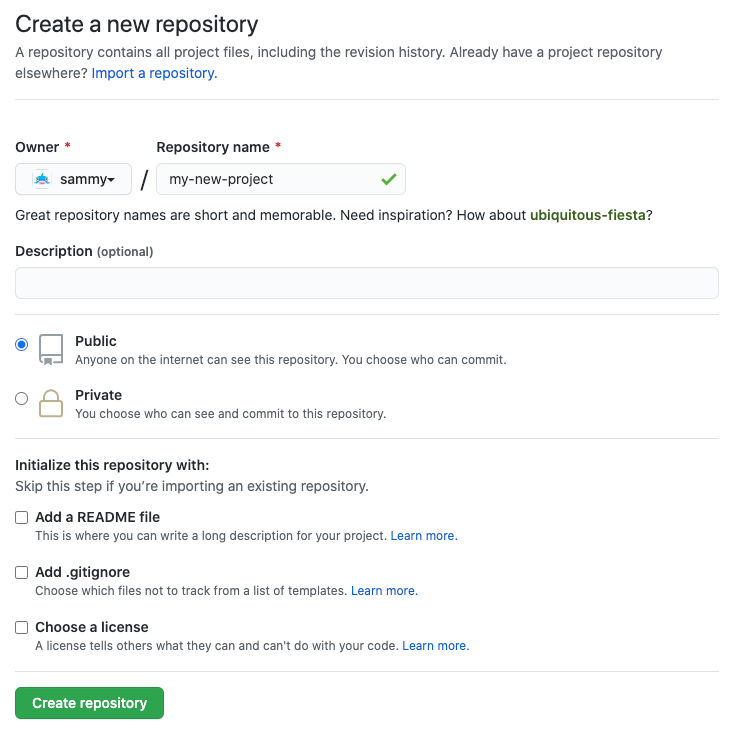
Warning: Through the rest of this tutorial, we’ll assume your GitHub username is sammy and the repo you created is named my-new-project. It is important that you replace these placeholders with your actual username and repo name.
Step 2 — Initialize Git in the project folder
From your terminal, run the following commands after navigating to the folder you would like to add.
Verify Initialization
Run the following command to confirm the repository was initialized correctly:
git rev-parse --is-inside-work-tree && ls -a | grep .git
You should see true and a .git directory listed.
Step 3 - Initialize the Git Repo
Make sure you are in the root directory of the project you want to push to GitHub and run:
Note: If you already have an initialized Git repository, you can skip this command.
- git init
This step creates a hidden .git directory in your project folder, which the git software recognizes and uses to store all the metadata and version history for the project.
Add the files to the Git index
- git add -A
The git add command is used to tell git which files to include in a commit, and the -A (or --all) argument means “include all”.
Commit Added Files
- git commit -m 'Added my project'
The git commit command creates a new commit with all files that have been “added”. The -m (or --message) sets the message that will be included alongside the commit, used for future reference to understand the commit. In this case, the message is: 'Added my project'.
Verify Commit
Use the following command to check the last commit:
git log --oneline -1
This will show the most recent commit with its short hash and message.
Using a .gitignore File
To keep your repository clean and avoid committing unnecessary or sensitive files, it’s best practice to use a .gitignore file. This file tells Git which files or directories to ignore when committing changes.
For example, you might want to ignore:
- Environment variable files that contain sensitive data
- Dependency directories that can be rebuilt
- Build output folders
Here is a sample .gitignore file:
# Ignore environment files
.env

# Ignore dependencies
node_modules/

# Ignore build output
dist/
Creating and maintaining a proper .gitignore improves security and reduces repository clutter, making collaboration smoother.
Add a new remote origin
- git remote add origin git@github.com:sammy/my-new-project.git
Note: Remember, you will need to replace the highlighted parts of the username and repo name with your own username and repo name.
In git, a “remote” refers to a remote version of the same repository, which is typically on a server somewhere (in this case, GitHub). “origin” is the default name git gives to a remote server (you can have multiple remotes), so git remote add origin instructs git to add the URL of the default remote server for this repo.
Verify Remote
Run:
git remote -v
This will list the remote origin URL you added.
SSH vs HTTPS Authentication
When connecting your local repository to GitHub, you have two main authentication methods to choose from: SSH and HTTPS. Understanding the differences helps you pick the best option for your workflow.
-
SSH Authentication
- Uses SSH keys to establish a secure connection.
- Once set up, you won’t need to enter your username or password repeatedly.
- More secure and convenient for frequent interactions.
- Requires generating and adding SSH keys to your GitHub account.
-
HTTPS Authentication
- Uses your GitHub username and a personal access token or password.
- Simple to set up and works in most environments without extra configuration.
- Requires entering credentials more often unless a credential manager is used.
- Useful if you cannot use SSH or prefer a straightforward setup.
Best Practice: If you frequently push and pull code, setting up SSH keys is recommended for a smoother and more secure experience. For occasional use or when working on restricted networks, HTTPS might be easier.
For details, see the GitHub Docs on HTTPS and PATs.
Push to GitHub
- git push -u -f origin main
The -u (or --set-upstream) flag sets the remote origin as the upstream reference. This allows you to later perform git push and git pull commands without having to specify an origin since we always want GitHub in this case.
The -f (or --force) flag stands for force. This will automatically overwrite everything in the remote directory. We’re using it here to overwrite the default README that GitHub automatically initialized.
Note: If you did not include the default README when creating the project on GitHub, the -f flag isn’t really necessary.
Verify Push
- Open your GitHub repository URL in a browser; you should see your committed files.
- Run:
git status
It should display “nothing to commit, working tree clean.”
All together
- git init
- git add -A
- git commit -m 'Added my project'
- git remote add origin git@github.com:sammy/my-new-project.git
- git push -u -f origin main
Using Visual Studio Code or GitHub Desktop
If you prefer a graphical interface over the command line, you can use tools like Visual Studio Code or GitHub Desktop to manage your Git workflow.
- Visual Studio Code has built-in Git support that lets you stage, commit, and push changes directly from the editor.
- GitHub Desktop provides an easy-to-use GUI for managing repositories, making commits, and syncing with GitHub without typing commands.
These tools are great for beginners or those who want a more visual and intuitive Git experience while still following best practices.
Command Line Reliability: The command-line approach offers universal compatibility across all operating systems and consistent behavior, making it the most reliable method for professional developers and automated workflows.
Open-Source Ecosystem (Perplexity): By hosting on GitHub, your project becomes part of the world’s largest open-source community, improving discoverability, collaboration, and opportunities for contribution.
Platform Strategy: While GitLab excels in CI/CD and Bitbucket integrates with Atlassian tools, GitHub’s market dominance (100M+ developers) and Microsoft’s enterprise backing make it the most strategic choice for long-term reach and stability.
Common Use Cases
- First-time project hosting: Make your portfolio projects accessible online.
- Migrating existing projects: Move codebases from local storage or other Git platforms.
- Team collaboration: Sync changes and collaborate with multiple developers.
- CI/CD pipelines: Enable GitHub Actions for automated testing and deployment.
- AI-assisted workflows: Use GitHub MCP Server to let AI tools analyze, manage, and automate repo tasks.
Deploy a GitHub Repo to DigitalOcean
Now that you have your GitHub repo, it is as easy as 1-click to deploy this repo to make it live by using DigitalOcean App Platform.
GitHub’s Open-Source Ecosystem Advantage: By hosting your project on GitHub, you’re joining the world’s largest developer community where your code becomes discoverable through search, stars, and forks. This visibility opens doors to collaboration opportunities, potential contributors, and the chance to contribute to global open-source projects that shape modern software development.
Setting up GitHub MCP Server on Cursor, VS Code, and Claude
The GitHub MCP Server can be integrated into multiple environments like VS Code, Cursor, and Claude to give AI tools direct access to GitHub APIs and repositories.
VS Code Setup
Prerequisites:
- Docker installed and running.
- A GitHub Personal Access Token (PAT) with appropriate scopes.
Installation Steps:
-
Clone the GitHub MCP Server repository:
git clone https://github.com/github/github-mcp-server.git cd github-mcp-server -
Build and run the Docker container:
docker build -t github-mcp-server . docker run -d -p 3000:3000 -e GITHUB_PERSONAL_ACCESS_TOKEN=<your_personal_access_token> github-mcp-server -
Configure VS Code to connect to the MCP Server by adding the following JSON snippet to your VS Code settings:
{
  "githubMCPServer": {
    "url": "http://localhost:3000",
    "token": "<your_personal_access_token>"
  }
}
Note: Configuration format may differ depending on the IDE. For the latest details and host-specific examples, always refer to the GitHub MCP Server documentation.
Cursor Setup
Prerequisites:
- Docker installed and running.
- A GitHub Personal Access Token (PAT).
Installation Steps:
-
Pull and run the MCP Server Docker image:
docker pull ghcr.io/github/github-mcp-server:latest docker run -d -p 3000:3000 -e GITHUB_PERSONAL_ACCESS_TOKEN=<your_personal_access_token> ghcr.io/github/github-mcp-server:latest -
Configure Cursor by setting the MCP Server URL and token in your Cursor config file (
cursor-config.json):{ "mcpServer": { "url": "http://localhost:3000", "token": "<your_personal_access_token>" } }
Claude Setup
Prerequisites:
- Docker installed and running.
- A GitHub Personal Access Token (PAT).
- Claude Desktop or Claude Code CLI installed.
Installation Steps:
-
Run the GitHub MCP Server Docker container:
docker run -d -p 3000:3000 -e GITHUB_PERSONAL_ACCESS_TOKEN=<your_personal_access_token> ghcr.io/github/github-mcp-server:latest -
Configure Claude by adding the MCP Server connection details in the Claude configuration file:
{ "githubMcpServer": { "url": "http://localhost:3000", "token": "<your_personal_access_token>" } } -
Restart Claude to apply the configuration.
For detailed information, refer to the official GitHub MCP Server repository.
Note: For the latest installation details and troubleshooting, always refer to the GitHub MCP Server documentation.
FAQs
Do I need Docker to run the GitHub MCP Server?
Docker is the recommended and easiest way to run the GitHub MCP Server since the official image is published on GitHub Container Registry. However, you can also build it from source using Go if you prefer not to use Docker.
What permissions should my GitHub Personal Access Token (PAT) have?
At minimum, your PAT should include repo for repository operations. Depending on your use case, you may also enable read:packages, read:org, and workflow for GitHub Actions. Follow the principle of least privilege and only enable the scopes you need.
Can I use the GitHub MCP Server without VS Code?
Yes. The MCP Server can be integrated with multiple hosts such as Cursor, Claude Desktop, Claude Code CLI, and Windsurf in addition to VS Code. Each host has its own configuration format, but all rely on the same server backend.
Is there a difference between the remote and local GitHub MCP Server?
Yes. The remote server is hosted by GitHub and provides the fastest setup for supported hosts, while the local server runs on your machine using Docker or a compiled binary. If your host does not support remote MCP servers, use the local version.
How do I keep my PAT secure?
Always store your PAT in environment variables or a .env file and add it to .gitignore to avoid committing it by mistake. Rotate tokens periodically and restrict file permissions on configuration files that contain secrets.
How do I push my first project to GitHub?
To push your first project to GitHub, start by initializing a Git repository in your project folder using git init. Next, add your files with git add -A, then commit them using git commit -m "Initial commit". Set your remote repository with git remote add origin <your-repo-url>, and finally, push your code using git push -u origin main. This process securely uploads your local project to your GitHub account, making it accessible online.
Do I need to create a new repo first?
Yes, you must create a new repository on GitHub before you can push your local project. This provides a destination for your code and generates a unique URL (HTTPS or SSH) that you’ll use as the remote origin. Creating the repo first ensures your project is organized, version-controlled, and ready for collaboration or deployment. Skipping this step will result in errors when you try to push your code.
What’s the difference between main and master?
main and master are both names for the default branch in a Git repository. GitHub now uses main as the standard default branch name for new repositories to promote more inclusive language, while older repositories may still use master. Functionally, there is no difference between the two; both serve as the primary branch where your production-ready code lives. You can rename branches as needed to match your workflow.
Platform Strategy Insight: While GitLab offers superior CI/CD integration and Bitbucket provides better Atlassian ecosystem integration, GitHub’s market dominance (100M+ developers), extensive third-party integrations, and Microsoft’s enterprise backing make it the strategic choice for maximum developer reach and long-term platform stability.
How do I fix “remote origin already exists”?
If you see the error “remote origin already exists,” it means your Git repository already has a remote named origin. To resolve this, remove the existing remote with git remote remove origin. Then, add the correct remote URL using git remote add origin <your-repo-url>. This ensures your local repository is linked to the right GitHub repository, preventing push and pull errors and keeping your workflow smooth.
Can I push an existing project to GitHub Desktop instead of CLI?
Absolutely! GitHub Desktop provides a user-friendly graphical interface for managing your repositories. You can add your local project, commit changes, and push to GitHub without using command-line commands. Visual Studio Code also offers built-in Git integration, allowing you to stage, commit, and push changes directly from the editor. These tools are ideal for beginners or anyone who prefers a visual workflow.
How do I update my project after the first push?
After your initial push to GitHub, updating your project is simple. Make changes to your files locally, then use git add to stage the changes and git commit -m "Describe your update" to save them. Finally, run git push to upload your latest commits to GitHub. This workflow keeps your remote repository in sync with your local project and ensures your code history is always up to date.
Can AI tools help me push projects to GitHub?
Yes. Tools like GitHub MCP Server allow AI assistants (such as Claude, Cursor, or VS Code Copilot Chat) to interact with your GitHub repositories using natural language. This can automate pushing code, creating pull requests, and managing issues.
Is GitHub MCP Server safe to use with AI agents?
Yes, as long as you scope your Personal Access Tokens correctly, store them securely, and follow GitHub’s recommended best practices. Limiting scopes and rotating tokens improves security when connecting AI tools.
Conclusion
Congratulations! You have successfully pushed your existing project to GitHub and are now ready to track your code changes remotely. Here are some recommended next steps and resources to help you continue your Git and GitHub journey:
Next Steps
-
Explore Open Source:
Deepen your understanding of GitHub and open-source workflows with the Introduction to GitHub and Open-Source Projects tutorial series. -
Keep a Reference Handy:
Bookmark the GitHub Cheatsheet for quick access to essential Git commands. -
Collaborate with Others:
When you’re ready to work with teammates, learn how to create a pull request to propose and review changes. -
Advance Your Skills:
For more in-depth knowledge, check out:
Edge Cases & Gotchas
- Large or Binary Files:
If your project includes large files or binaries, use Git LFS (Large File Storage) to manage them efficiently. Refer to the official documentation for setup instructions.
References
- GitHub Docs: Creating a Personal Access Token
- Git LFS Official Documentation
- Visual Studio Code Git Documentation
- GitHub Desktop Documentation
- DigitalOcean: Introduction to GitHub and Open-Source Projects
- DigitalOcean: Git Cheatsheet
- DigitalOcean: How to Use Git Effectively
- DigitalOcean: How to Create a Pull Request on GitHub
- DigitalOcean: How to Use Git Hooks
Thanks for learning with the DigitalOcean Community. Check out our offerings for compute, storage, networking, and managed databases.
About the author(s)
Building future-ready infrastructure with Linux, Cloud, and DevOps. Full Stack Developer & System Administrator. Technical Writer @ DigitalOcean | GitHub Contributor | Passionate about Docker, PostgreSQL, and Open Source | Exploring NLP & AI-TensorFlow | Nailed over 50+ deployments across production environments.
Still looking for an answer?
This textbox defaults to using Markdown to format your answer.
You can type !ref in this text area to quickly search our full set of tutorials, documentation & marketplace offerings and insert the link!
It says this:
The authenticity of host ‘github.com (13.234.210.38)’ can’t be established.
ED25519 key fingerprint is SHA256:+DiY3wvvV6TuJJhbpZisF/zLDA0zPMSvHdkr4UvCOqU.
This key is not known by any other names
Are you sure you want to continue connecting (yes/no/[fingerprint])? yes
Warning: Permanently added ‘github.com’ (ED25519) to the list of known hosts.
git@github.com: Permission denied (publickey).
fatal: Could not read from remote repository.
Please make sure you have the correct access rights and the repository exists.
Thanks for the article - its a great writeup to address this common issue. For this to work for me, at least using https github repo paths, I had to add
git branch -M main
after adding my commit message.
This comment has been deleted
I ran into the following issue when working through this, which required me to set up my SSH keys between my local workstation and the github account. Since I tend to use specific SSH keys for different purposes, there is a little more work to do; I’ll show both standard (using default SSH keys) and extended (using specific SSH keys) approaches here.
NB: Do this before you attempt to Push to Github or if you get the following error:
% git push -v -u -f origin main
Pushing to github.com:github_username/github_repository.git
git@github.com: Permission denied (publickey).
fatal: Could not read from remote repository.

Please make sure you have the correct access rights
and the repository exists.
Standard approach
This uses the default SSH keys for the user account in question. The drawback (in my opinion and scenario) is that my default SSH keys typically have passphrases which I don’t want to include for my CI/CD pipelines.
- Generate the ssh key without a passphrase; you may include one, if you wish, but bear in mind you will be prompted for this each time you run a command that needs to access the remote repository
% ssh-keygen
Generating public/private rsa key pair.
Enter file in which to save the key (/Users/bigdev/.ssh/id_rsa):
Enter passphrase (empty for no passphrase): <<Enter a passphrase if required>>
Enter same passphrase again: <<Re-Enter a passphrase if required>>
Your identification has been saved in /Users/bigdev/.ssh/id_rsa
Your public key has been saved in /Users/bigdev/.ssh/id_rsa.pub
The key fingerprint is:
SHA256:Rx349489384djasdfJD+ywf3M3q3R52wJ3qJ2KjILN0OZ0Q90 bigdev@tintin.local
The key's randomart image is:
+---[RSA 3072]----+
|       ..o o+ .o |
|      *C+o +... o|
|        ..@..  + |
|        .........|
|     . 0D8s    o |
|    . + o.  . ooB|
|     **=--..   =O|
|    . =  =+oBB .+|
|       ..oo .. 0.|
+----[SHA256]-----+
Extended approach
This uses a specific SSH key dedicated to this function; may be reused for others if needed. The advatage (in my opinion and scenario) is that it separates the keys used for standard activities and these dedicated SSH keys typically can exclude passphrases making my CI/CD smoother (IMHO).
- Generate the ssh key without a passphrase; you may include one, if you wish, but bear in mind you will be prompted for this each time you run a command that needs to access the remote repository
% ssh-keygen
Generating public/private rsa key pair.
Enter file in which to save the key (/Users/bigdev/.ssh/id_rsa): /Users/bigdev/.ssh/id_rsa_github # Note we have specified a specific filename here!
Enter passphrase (empty for no passphrase):
Enter same passphrase again:
Your identification has been saved in /Users/bigdev/.ssh/id_rsa_github
Your public key has been saved in /Users/bigdev/.ssh/id_rsa_github.pub
The key fingerprint is:
SHA256:Rx349489384djasdfJD+ywf3M3q3R52wJ3qJ2KjILN0OZ0Q90 bigdev@tintin.local
The key's randomart image is:
+---[RSA 3072]----+
|       ..o o+ .o |
|      *C+o +... o|
|        ..@..  + |
|        .........|
|     . 0D8s    o |
|    . + o.  . ooB|
|     **=--..   =O|
|    . =  =+oBB .+|
|       ..oo .. 0.|
+----[SHA256]-----+
- Add a config to enable to use of the specific ssh key when invoking commands for github
- Edit the file ~/.ssh/config as below
Host github.com
   Hostname github.com
   User git
   IdentityFile /Users/bigdev/.ssh/id_rsa_github
   IdentitiesOnly yes
#Final step
Copy the content of the .pub file created and add this to the GitHub settings.
- Navigate to Settings > SSH and GPG keys > New SSH key
- Enter a title / name for the key, any informative name will do, this is just a label
- In the Key textbox, paste the content from the chosen .pub file
- Click on Add SSH key
That’s it, you’re all set!.
This otherwise good tutorial leaves out security steps. Here, the github repo is used as a remote repository. An alternative is to treat it as an https site and use a PAT (Personal Access Token).
To set up a PAT, log into github and go to settings --> developer settings --> personal access tokens (classic). For permissions, I chose to click all in the repo category and all in the user category. You should probably check a good tutorial on PATs if you want to know more about the other permissions. With these two, I was able to push my project to the new github repo.
In the CLI instructions, replace
git remote add origin git@github.com:sammy/my-new-project.git
with
git remote add origin https://github.com/sammy/my-new-project.git
 This work is licensed under a Creative Commons Attribution-NonCommercial- ShareAlike 4.0 International License.
Become a contributor for community
Get paid to write technical tutorials and select a tech-focused charity to receive a matching donation.

DigitalOcean Documentation
Full documentation for every DigitalOcean product.

Resources for startups and AI-native businesses
The Wave has everything you need to know about building a business, from raising funding to marketing your product.
The developer cloud
Scale up as you grow — whether you're running one virtual machine or ten thousand.

Start building today
From GPU-powered inference and Kubernetes to managed databases and storage, get everything you need to build, scale, and deploy intelligent applications.
