By Mitchell Anicas and Kent Shultz
Not using Ubuntu 14.04?
Choose a different version or distribution.
Introduction
Many web developers need to allow their users to access their website or application via both the www subdomain and the root (non-www) domain. That is, users should have the same experience when visiting www.my-website.com and my-website.com. While there are many ways to set this up, the most SEO-friendly solution is to choose which domain you prefer—the subdomain or the root domain—and have the web server redirect users who visit the other one to the preferred domain.
There are many kinds of HTTP redirects, but in this scenario, it’s best to use a 301 redirect, which tells clients, “The website you have requested has permanently moved to another URL. Go there instead.” Once the browser receives the HTTP 301 response code from the server, it sends a second request to the new URL given by the server and the user is presented with the website, probably never noticing they were redirected.
Why not configure your web server to just serve the same website for requests to both domain names? That may seem easier, but it does not confer the SEO advantages of the 301 redirect. A permanent redirect tells search engine crawlers that there is one canonical location for your website, and this improves the search rankings of that one URL.
In this tutorial, you will configure a 301 redirect using Nginx on Ubuntu 14.04. If you are running Apache instead of Nginx, see this tutorial instead: How To Redirect www to Non-www with Apache on Ubuntu 14.04 .
Prerequisites
To complete this tutorial, you first need:
- Superuser privileges (a user in the
sudogroup) on the server that is running Nginx. If you don’t already have that set up, follow this tutorial: Initial Server Setup with Ubuntu 14.04. - Nginx installed and configured to serve your website. Follow this tutorial to do that: How to Install Nginx on Ubuntu 14.04. Also read: How To Set Up Nginx Server Blocks (Virtual Hosts) On Ubuntu 14.04 LTS.
- A registered domain name. If you don’t have one yet, you can get a free one from Freenom. You may use whatever DNS provider you like (including your registrar) to host your domain’s records—just make sure to point your registrar to your provider’s nameservers. If you opt to use DigitalOcean DNS, this article from our documentation shows how to do that.
Let’s get started by configuring your DNS records.
Step 1 — Configuring DNS Records
First, you need to point both www.my-website.com and my-website.com to your server running Nginx. (The rest of the tutorial assumes your domain is my-website.com. Replace that with your own domain wherever you see it below.) You will do this by creating a DNS A record for each name that points to your Nginx server’s IP address.
Open your DNS provider’s web console. This tutorial uses DigitalOcean DNS.
In the Add a domain form, enter your registered domain name in the text field and click Add Domain. This will bring up the new domain’s page, where you can view, add, and delete records for the domain.
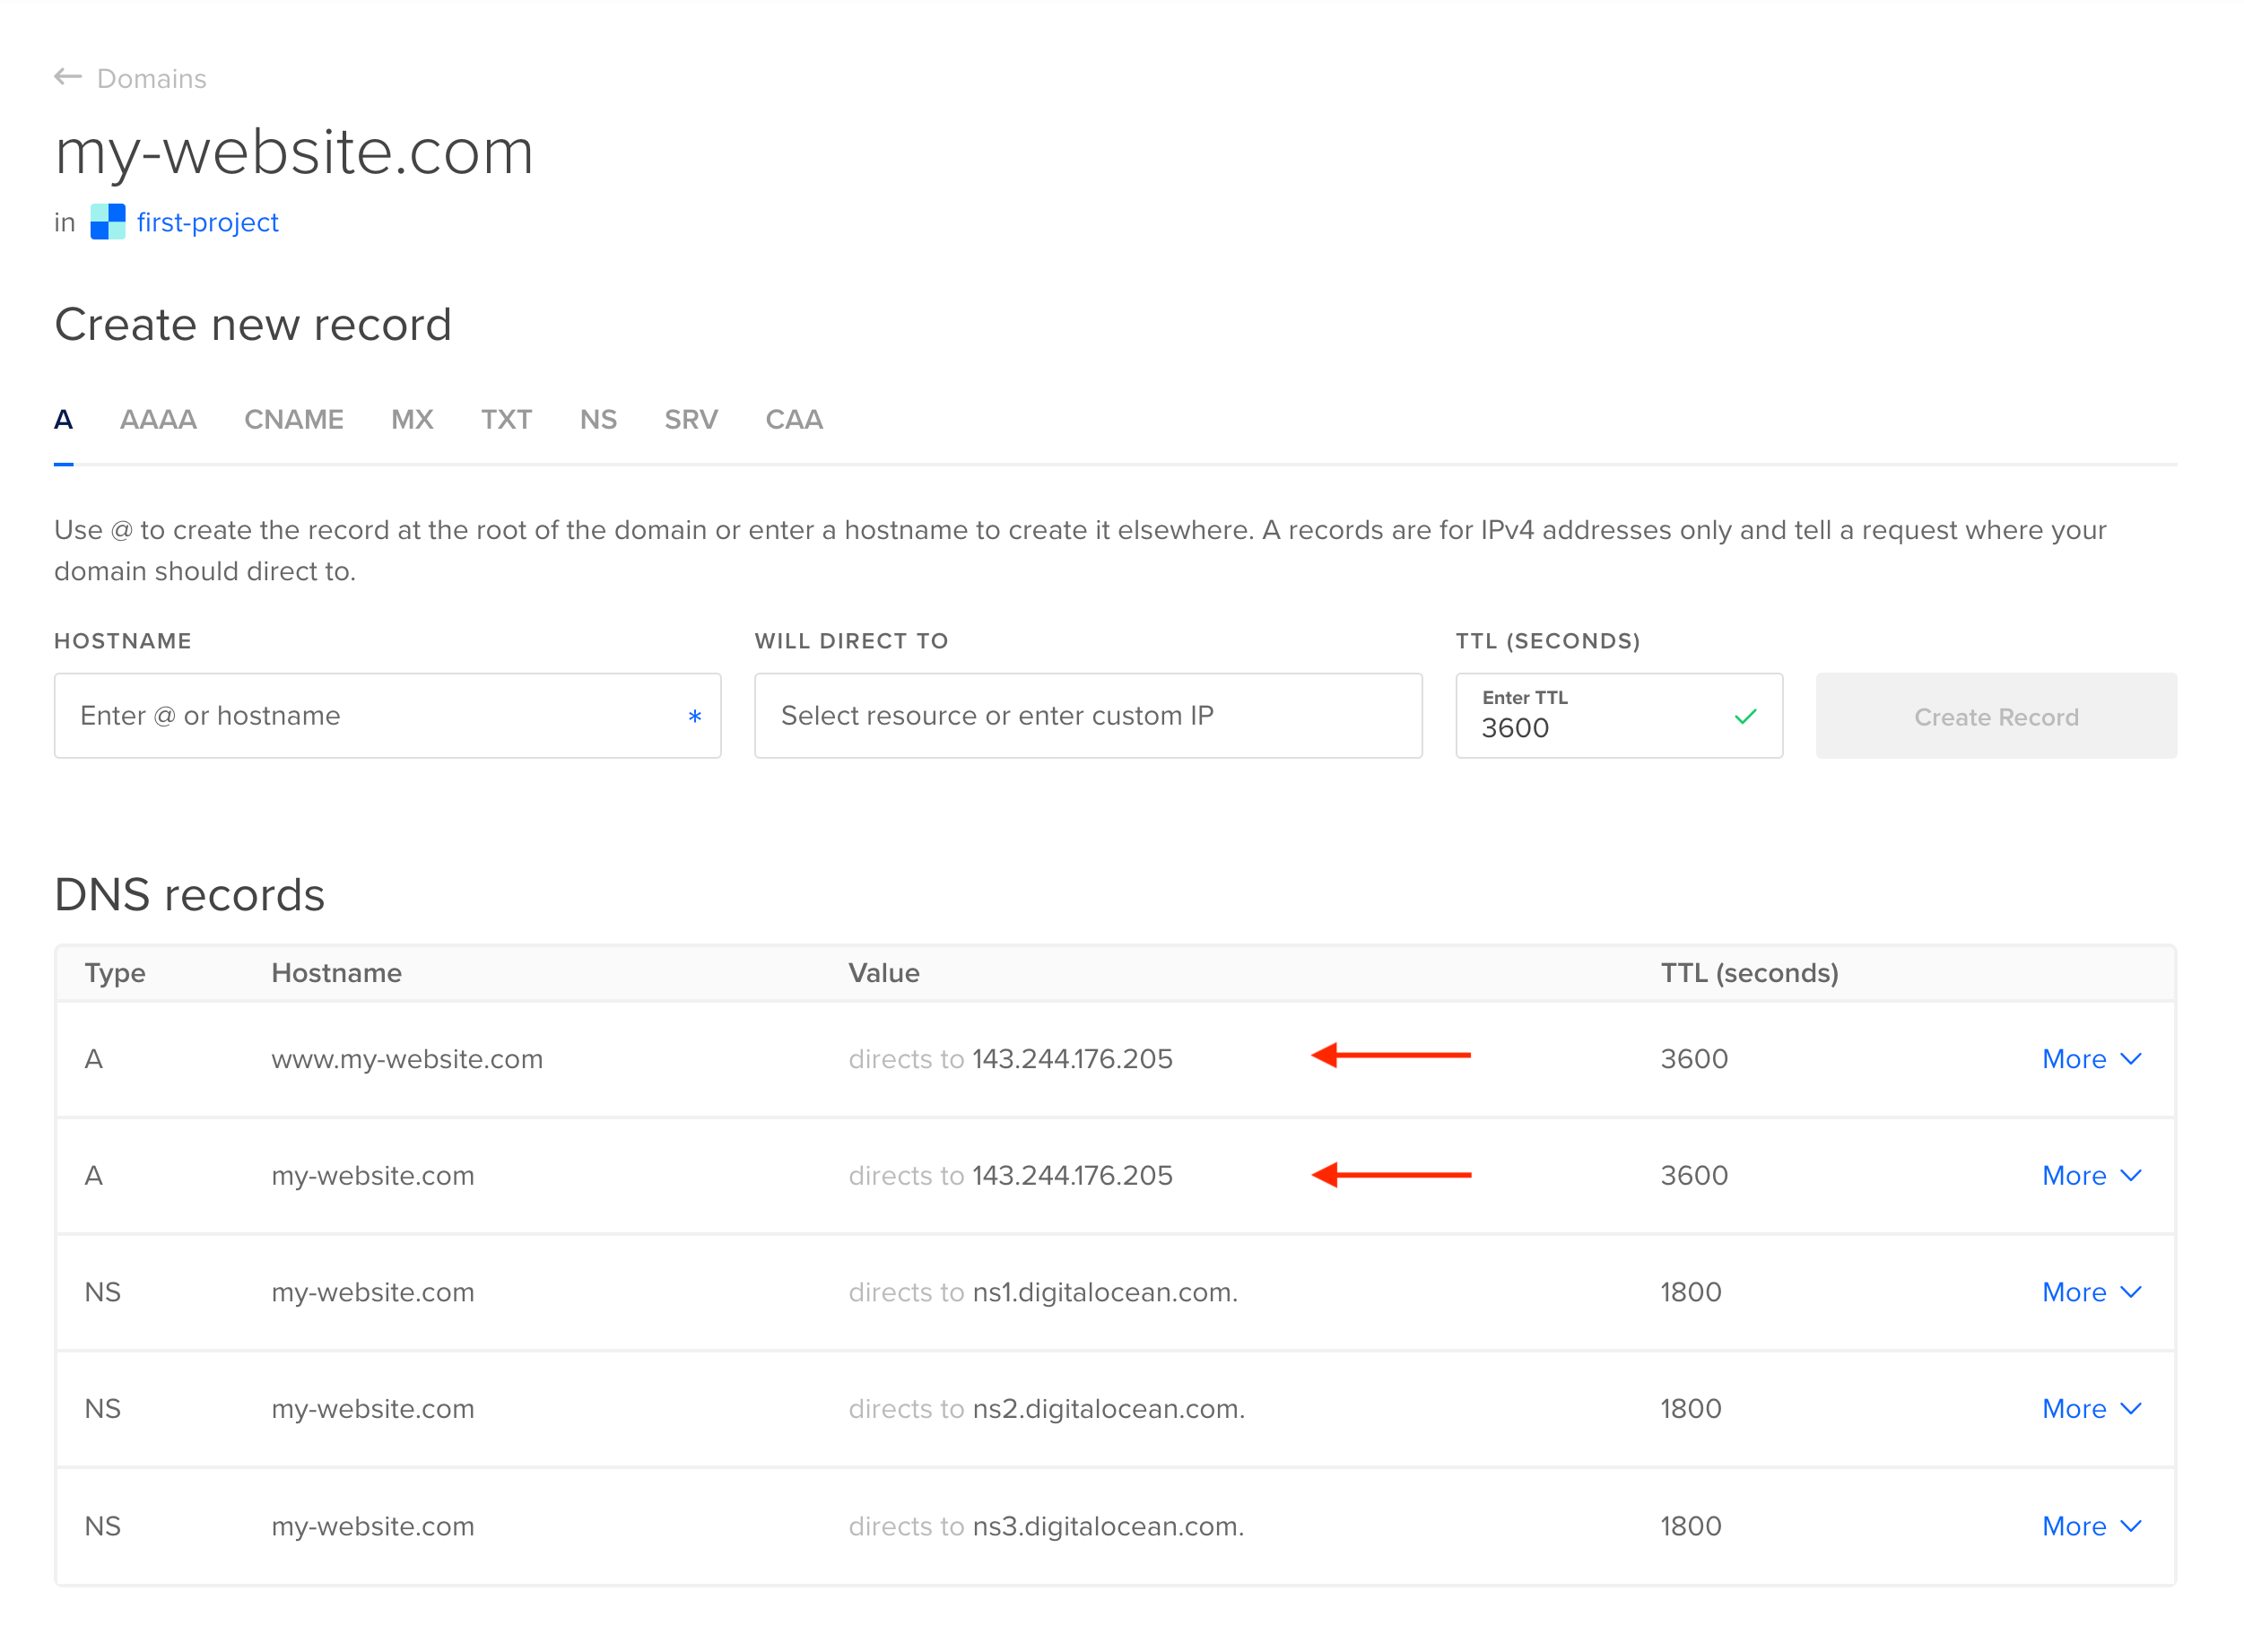
Under Create new record, type “@” in the HOSTNAME text field. This is a special character that indicates you are adding a record for the root domain name, a record for just plain my-website.com. In the WILL DIRECT TO text field, enter the public IPv4 address of your server, and click Create Record. (No need to change the TTL.)
For your second DNS record, you could use a CNAME record instead of an A record. A CNAME record is an alias that points to another name instead of an IP address. You could create a CNAME that directs www.my-website.com to my-website.com, and any HTTP request for the www subdomain would find its way to your server since you just created the A record for the root domain. But to keep things simple, just create another A record like the first one, entering “www” in the HOSTNAME field and the server’s public IP address in the WILL DIRECT TO field.
When you have created both records, it should look something like this:
With the two records in place, web requests for both my-website.com and www.my-website.com should reach your Nginx server. Now let’s configure the server.
Step 2 — Configuring the Redirect in Nginx
As stated in the Prerequisites, you should already have your website configured in Nginx. It does not matter whether the site’s server block appears in the main /etc/nginx/sites-enabled/default file or in its own file. The important thing is that you have some server block configured with the server_name directive set to my-website.com and/or www.my-website.com. Whether your server_name contains one or both names, now is the time to decide which name you would like to be the one and only name to host the site.
Open the file that contains your website configuration (e.g., /etc/nginx/sites-available/my-website.com.conf) in nano or your favorite editor and find the server_name directive:
- sudo nano /etc/nginx/sites-available/my-website.com.conf
server {
    . . .
    server_name my-website.com www.my-website.com
    . . .
}
If you want to redirect www.my-website.com to my-website.com, remove www.my-website.com from the server_name line, and save and exit the file. (If you want to redirect my-website.com to www.my-website.com, remove my-website.com instead.)
Then, create a new Nginx configuration file called /etc/nginx/sites-available/www.my-website.com.conf (or /etc/nginx/sites-available/my-website.com.conf, if that is the name you are redirecting). Name the file whatever you like, but as with all Nginx configuration files, the file name must end in .conf:
- sudo nano /etc/nginx/sites-available/www.my-website.com.conf
Add the following server block to the file, replacing my-website.com with your own domain name:
server {
    server_name www.my-website.com;
    return 301 $scheme://my-website.com$request_uri;
}
If you are redirecting my-website.com to the www subdomain instead, put my-website.com only in the server_name, and www.my-website.com in the URL on the next line.
Save and exit when you are finished. Then make a symlink in /etc/nginx/sites-enabled to this new file so Nginx will pick it up after restarting:
- sudo ln -s /etc/nginx/sites-available/www.my-website.com.conf /etc/nginx/sites-enabled/
This configures Nginx to send a 301 redirect back to any clients requesting www.my-website.com, and directs them to visit my-website.com instead. The redirect preserves the request URI, so that a request to http://www.my-website.com/login.php will be redirected to http://my-website.com/login.php.
Note: The server block above does not contain the listen directive. This is OK, because as mentioned in this tutorial, any server block without a listen directive will listen on 0.0.0.0:80 (port 80 on all interfaces). But if your Nginx server is home to multiple IP addresses, or if your site listens on a port other than 80, you may need to add a listen directive to spell out the specific IP address and port. Use the same value for listen that your site’s main server block uses.
Before applying the changes, check that your Nginx configuration is error free:
- sudo nginx -t
Unless you made a syntax error (e.g., you forgot a semicolon), the configuration should be OK.
Outputnginx: the configuration file /etc/nginx/nginx.conf syntax is ok
nginx: configuration file /etc/nginx/nginx.conf test is successful
Now restart Nginx to apply the new redirect rule:
- sudo service nginx restart
Before visiting www.my-website.com in your browser, make a request using curl on either your server or your local machine (if curl is installed locally):
- curl -IL http://www.my-website.com
The -I flag tells curl to show only the headers from the server response. The -L flag tells curl to obey any redirects from the server by automatically making a second request, this time to the URL given in the Location header (just as a web browser would do). Since you have configured the 301 redirect, curl should make two requests, and you should see just the headers of the two responses:
OutputHTTP/1.1 301 Moved Permanently
Server: nginx/1.20.1
Date: Thu, 08 Dec 2022 19:24:44 GMT
Content-Type: text/html
Content-Length: 169
Connection: keep-alive
Location: http://my-website.com

HTTP/1.1 200 OK
Server: nginx/1.20.1
Date: Thu, 08 Dec 2022 19:24:44 GMT
Content-Type: text/html
Content-Length: 57
Last-Modified: Thu, 01 Dec 2022 22:10:57 GMT
Connection: keep-alive
ETag: "63892671-39"
Accept-Ranges: bytes
In the 301 (Moved Permanently) response to the original request to http://www.my-website.com, notice the last header: Location: http://my-website.com. The second response is from curl’s followup request to http://my-website.com, and if your website is healthy, the server should have responded with 200 (OK).
Finally, visit http://www.my-website.com in your web browser. Blink, and you’ll miss the redirect. Your website should appear as usual, but look again in your address bar and notice that the “www” is missing from the URL. Most users will never notice this, and so they will have the same experience as if they had requested http://my-website.com.
Conclusion
In this tutorial, you added two DNS records for your website and configured Nginx to redirect a secondary domain to your preferred domain. Now your website is reachable via both domains. Maybe it already was before you read this tutorial; perhaps you were serving it directly from both domain names. But with just four more lines of Nginx configuration, you have improved your website’s standing in the eyes of the search engines—and thereby exposed it to more users across the internet.
Want some further reading on how Nginx decides which server block will handle a given request? Check out this guide: Understanding Nginx Server and Location Block Selection Algorithms.
Thanks for learning with the DigitalOcean Community. Check out our offerings for compute, storage, networking, and managed databases.
About the author(s)
Software Engineer @ DigitalOcean. Former Señor Technical Writer (I no longer update articles or respond to comments). Expertise in areas including Ubuntu, PostgreSQL, MySQL, and more.
Still looking for an answer?
This textbox defaults to using Markdown to format your answer.
You can type !ref in this text area to quickly search our full set of tutorials, documentation & marketplace offerings and insert the link!
Great tutorial!
But doesn’t a simple
| Record Type | Source | Target |
|---|---|---|
| A | domain.com | ip_address |
| CNAME | www.domain.com | domain.com |
do the trick?
Still Unable to redirect to WWW URL Created two A records
- A @ ip_address
- A www ip_address Please let me know what i need to do now to redirect my domain www.b2zone.in to b2zone.in, As i follow te above doc.
Waiting for your quick reply…
You should use:
server {
  server_name www.domain.com;
  return 301 $scheme://domain.com$request_uri;
}
server {
  server_name domain.com;
  [...]
}
Otherwise you will get HTTP/1.1 301 Moved Permanently for the www and non-www versions.
Using the code above you’ll get HTTP/1.1 200 OK for the non-www domain.
See: http://wiki.nginx.org/Pitfalls#Server_Name
Thanks for the tutorial, but I don’t understand how I achieve it working without the nginx configuration:
server {
    server_name www.example.com;
    return 301 $scheme://example.com$request_uri;
}
I did the nginx configuration as you say, and didn’t worked, in browsers could read “To many redirections”, after some tries, I delete the redirecting block of nginx configuracion and it worked !!
Why?
I think my registar already made a redirection of www to non www… but then, It shouldn’t be necessary the first part of this tutorial, isn’t it?
Thans a lot for your explanations
When I test the config file /sites-enabled/default I get the following error:
[emerg] “server” directive is not allowed here in /etc/nginx/sites-enabled/default:20
This is after a fresh droplet install.
This comment has been deleted
when i run : curl -I http://example.com
it show : curl: (7) Failed to connect to xxx.com port 80: Connection timed out
One question. I’m using the DO rails droplet (Nginx and Ubuntu). The thing is that the config file for nginx, named rails, is already populated with some data. What should i keep/delete in order for this to work?
upstream app_server { server unix:/var/run/unicorn.sock fail_timeout=0; }
server { listen 80; root /home/rails/joumi/public; server_name _; index index.htm index.html;
location / {
        try_files $uri/index.html $uri.html $uri @app;
}

location ~* ^.+\.(jpg|jpeg|gif|png|ico|zip|tgz|gz|rar|bz2|doc|xls|exe|pdf|ppt|txt|tar|mid|midi|wav|bmp|rtf|mp3|flv|mpeg|avi)$ {
                try_files $uri @app;
        }

 location @app {
        proxy_set_header X-Forwarded-For $proxy_add_x_forwarded_for;
        proxy_set_header Host $http_host;
        proxy_redirect off;
        proxy_pass http://app_server;
}
}
Thanks!
Hmm, it didn’t work for me. I arrive to the “Welcome to nginx” page when browsing to “myotherdomain.com”
server {
    server_name www.myotherdomain.com;
    return 301 $scheme://test.domain.com$request_uri;
}
server {
        listen 80 default_server;
        listen [::]:80 default_server ipv6only=on;
        listen 443 ssl http2 default_server;
        listen [::]:443 ssl http2 default_server;

        root /var/www/html;
        index index.php index.html index.htm;

        #Password protects the test subdomain
        auth_basic "Restricted Content";
        auth_basic_user_file /etc/nginx/.htpasswd;
        # Make site accessible from https://test.domain.com/
        server_name test.domain.com;
        include snippets/ssl-test.domain.com.conf;
        include snippets/ssl-params.conf;
        location ~ /.well-known {
                allow all;
        }
        location / {
                try_files $uri $uri/ /index.php$is_args$query_string;
        }
        error_page 500 502 503 504 /50x.html;
        location = /50x.html {
                root /usr/share/nginx/html;
        }
        location ~ [^/]\.php(/|$) {
        fastcgi_split_path_info ^(.+?\.php)(/.*)$;
        if (!-f $document_root$fastcgi_script_name) {
        return 404;
        }
        # Mitigate https://httpoxy.org/ vulnerabilities
        fastcgi_param HTTP_PROXY "";
        include snippets/fastcgi-php.conf;
        fastcgi_pass unix:/run/php/php7.0-fpm.sock;
        include fastcgi_params;
        }
        location ~ \.php$ {
        #match actual filename with extension or file not found
        #try_files $uri $uri =404;
        include snippets/fastcgi-php.conf;
        fastcgi_pass unix:/run/php/php7.0-fpm.sock;
        }
}
 This work is licensed under a Creative Commons Attribution-NonCommercial- ShareAlike 4.0 International License.
Become a contributor for community
Get paid to write technical tutorials and select a tech-focused charity to receive a matching donation.

DigitalOcean Documentation
Full documentation for every DigitalOcean product.

Resources for startups and AI-native businesses
The Wave has everything you need to know about building a business, from raising funding to marketing your product.
The developer cloud
Scale up as you grow — whether you're running one virtual machine or ten thousand.

Start building today
From GPU-powered inference and Kubernetes to managed databases and storage, get everything you need to build, scale, and deploy intelligent applications.
