By Jeanelle Horcasitas and Tony Tran

Introduction
pgAgent is a tool used for scheduling jobs for PostgreSQL databases. It also has more powerful scheduling capabilities than the often-used cron because it is specifically built for handling Postgres tasks. For example, pgAgent can schedule multiple steps without a batch script or without repeating the command. It’s important to note that even if you have pgAdmin installed, pgAgent must be downloaded independently, specifically as an extension to pgAdmin.
In this tutorial you will install pgAgent, configure your database to use pgAgent on the pgAdmin Graphical User Interface (GUI), set up pgAgent as a daemon, and then use pgAgent to schedule a job that will back up your database.
Prerequisites
To follow this tutorial, you will need:
- An Ubuntu 22.04 server set up with a non-root
sudoenabled user and firewall. You can do this by reading our Initial Server Setup guide - PostgreSQL installed on your server. You can set this up by following our guide on How To Install and Use PostgreSQL on Ubuntu 22.04. As you follow this guide, be sure to create a new role and database, as you will need both to connect pgAdmin to your PostgreSQL instance
- pgAdmin installed with an account set up. You can do this by following our tutorial on How To Install and Configure pgAdmin4 in Server Mode on Ubuntu 22.04
Step 1 — Installing pgAgent
As mentioned previously, pgAgent is not configured automatically when you install pgAdmin. You can install pgAgent from your terminal by running apt install and the package name pgagent as in the following command:
- sudo apt install pgagent
After you’ve installed pgAgent, move on to the next step to configure your database to use pgAgent in pgAdmin.
Step 2 — Configuring your Database for pgAgent
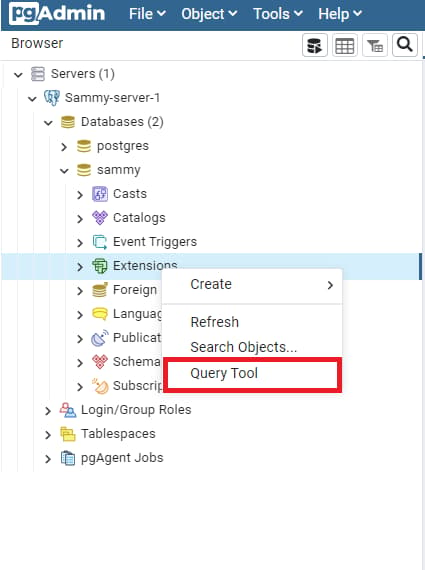
Having followed the prerequisites, pgAdmin is set up and ready to use. You can configure your database for pgAgent use through pgAdmin. Open your web browser and navigate to the pgAdmin application at http://your_domain. Once you are logged into your account, navigate to the tree control on the left-hand side panel. Locate the database you created called sammy and expand the list. From this list, there will be an option called Extensions. Once you’ve located it, right-click on it and choose the option Query Tool:
pgAgent requires an extension to be loaded into your database before it can be used in pgAdmin. To do so, write the following query and click on the sideways arrow ▶ signifying Execute to run the command:
- CREATE EXTENSION pgagent;
This step with the Query Tool function is represented in the following example:
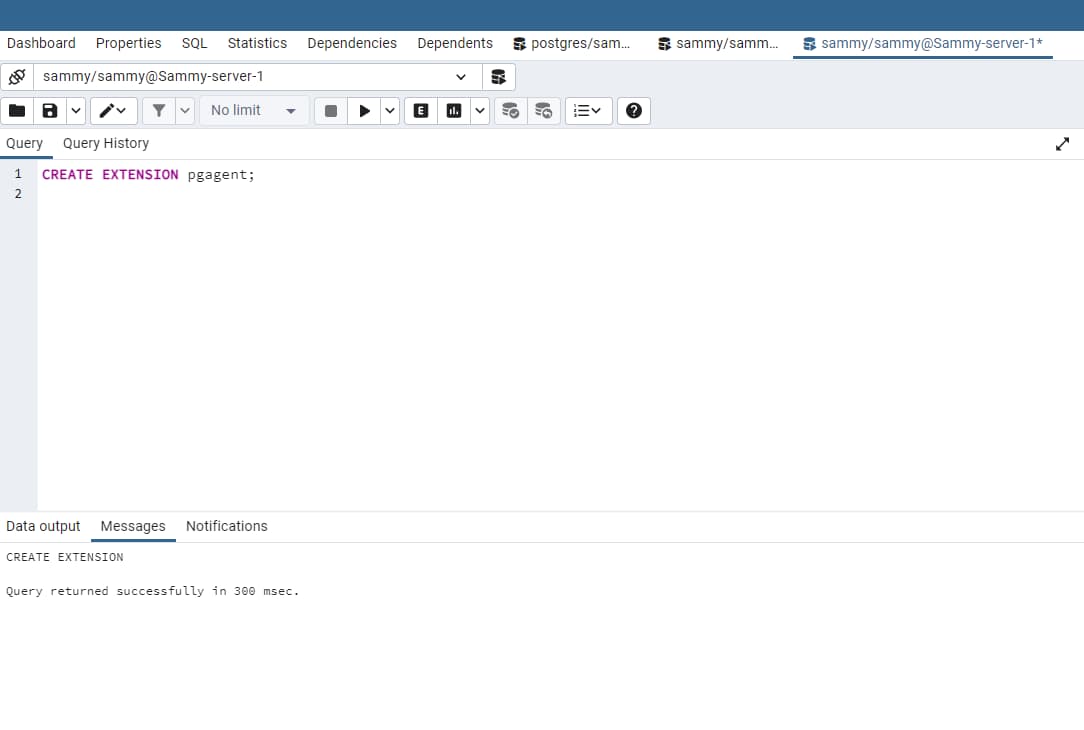
Under the Messages tab there will be an output that returns Query returned successfully in 300 msec. This confirms that the pgAgent extension was created successfully.
Note: If you do not have the appropriate plpgsql language loaded to your database you will receive the following error message:
OutputERROR:  language "plpgsql" does not exist
HINT:  Use CREATE EXTENSION to load the language into the database.
SQL state: 42704
If this happens, you need to run CREATE LANGUAGE to install the pl/pgsql procedural language required. You can install this by running the following command:
- CREATE LANGUAGE plpgsql;
Once you’ve installed the pl/pgsql language, a message at the bottom will state something like Query returned successfully in 231 msec. After this, run the previous CREATE EXTENSION pgagent query again.
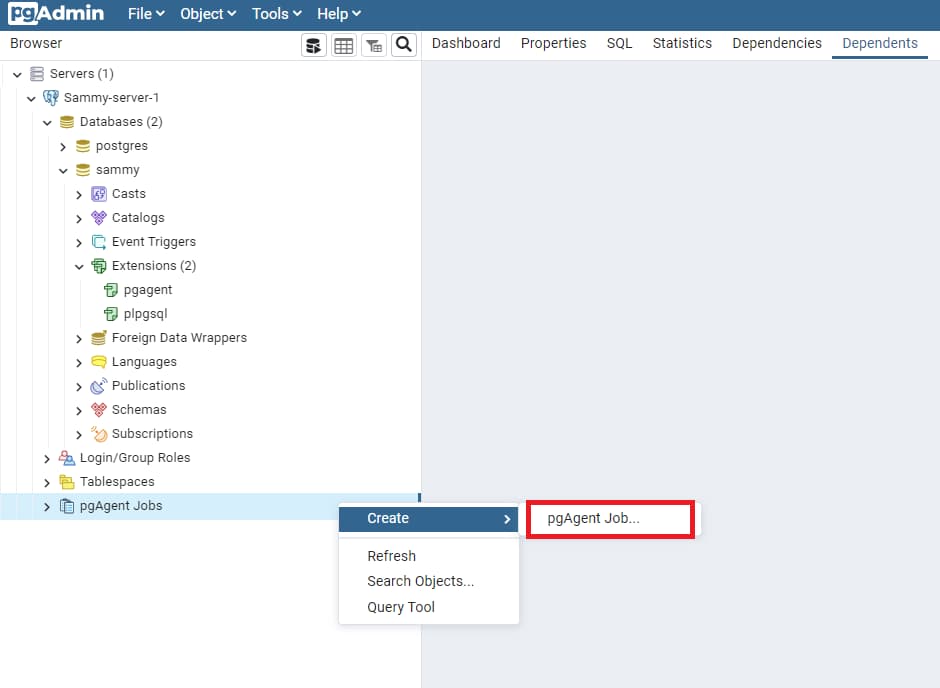
After you’ve run these queries, under Extensions, there will be two items listed for pgagent and plpgsql:

A new item in the tree control on the left-hand side will appear called pgAgent Jobs. This signifies that pgAgent was successfully installed on your pgAdmin account. Next, you will set up pgAgent as a daemon so that it can run your jobs successfully.
Note: If these items do not show up for you right away, refresh your browser page, and they should appear if your queries were successful.
Step 3 — Setting Up pgAgent as a Daemon
Now that you have pgAgent installed and configured for your database through pgAdmin, next you need to set up pgAgent as a daemon on your server. A daemon is a program that runs as a continuous process in the background and executes service tasks. pgAgent runs as a daemon on Unix systems and typically on the database server itself.
To set up pgAgent as a daemon, you need a PostgreSQL connection string so that when you schedule your job, the process will execute appropriately. In this case, you are setting up a PostgreSQL libpq connection string, meaning a string that’s user-specific and connects to certain parameters you set. You can learn more about PostgreSQL libpq connection functions in the PostgreSQL documentation.
Your connection string will provide the credentials of your hostname, database name, and username. In our example, the host will use a Unix domain socket, the database name is sammy, and the user is sammy. This string will be appended to a pgagent command to initiate the daemon. In your terminal, you’ll run the following code:
- pgagent host=/var/run/postgresql dbname=sammy user=sammy
If nothing returns in your output and you don’t receive a connection error message, then the connection string setup was successful.
After you’ve created the connection string, you’re ready to schedule a job with pgAgent.
Step 4 — Scheduling a Job with pgAgent
pgAgent serves as a scheduling agent that can run and manage jobs and can create jobs of one or more steps or schedules. For example, a step may consist of several SQL statements on a shell script and is executed consecutively after the other. Overall, you can use pgAgent to schedule, manage, modify, or disable your jobs.
For the purposes of this tutorial, you will use pgAgent to create a job that will back up your sammy database every minute on each day of the week. You can begin by right-clicking on pgAgent Jobs and selecting Create and then pgAgent Job… as in the following:
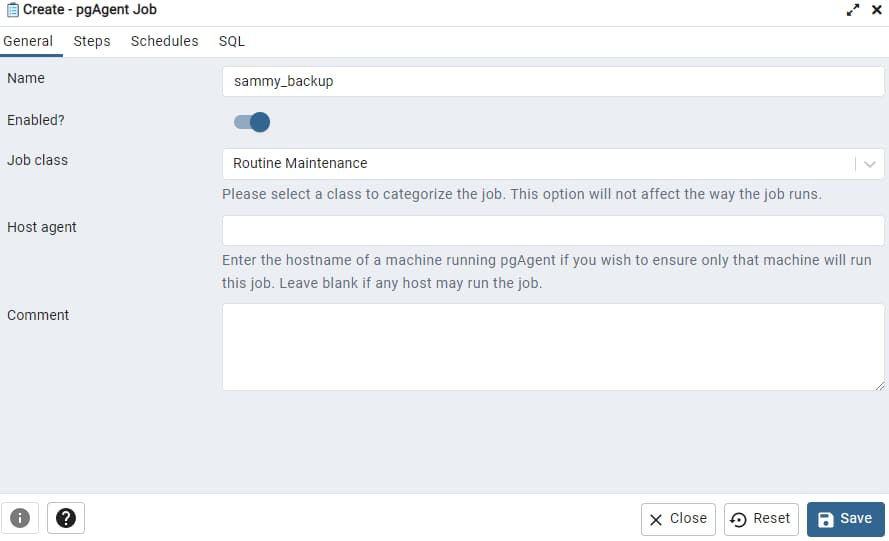
Once you do this, a prompt titled Create - pgAgent Job will appear, and you can begin completing the information required in the General tab. In this example, we will use the name sammy_backup and will not specify a Host agent since we want to be able to run this job on any host. Additionally, we will leave the Job class as Routine Maintenance. If you would like to include any other comments, feel free to do so in the Comment section:
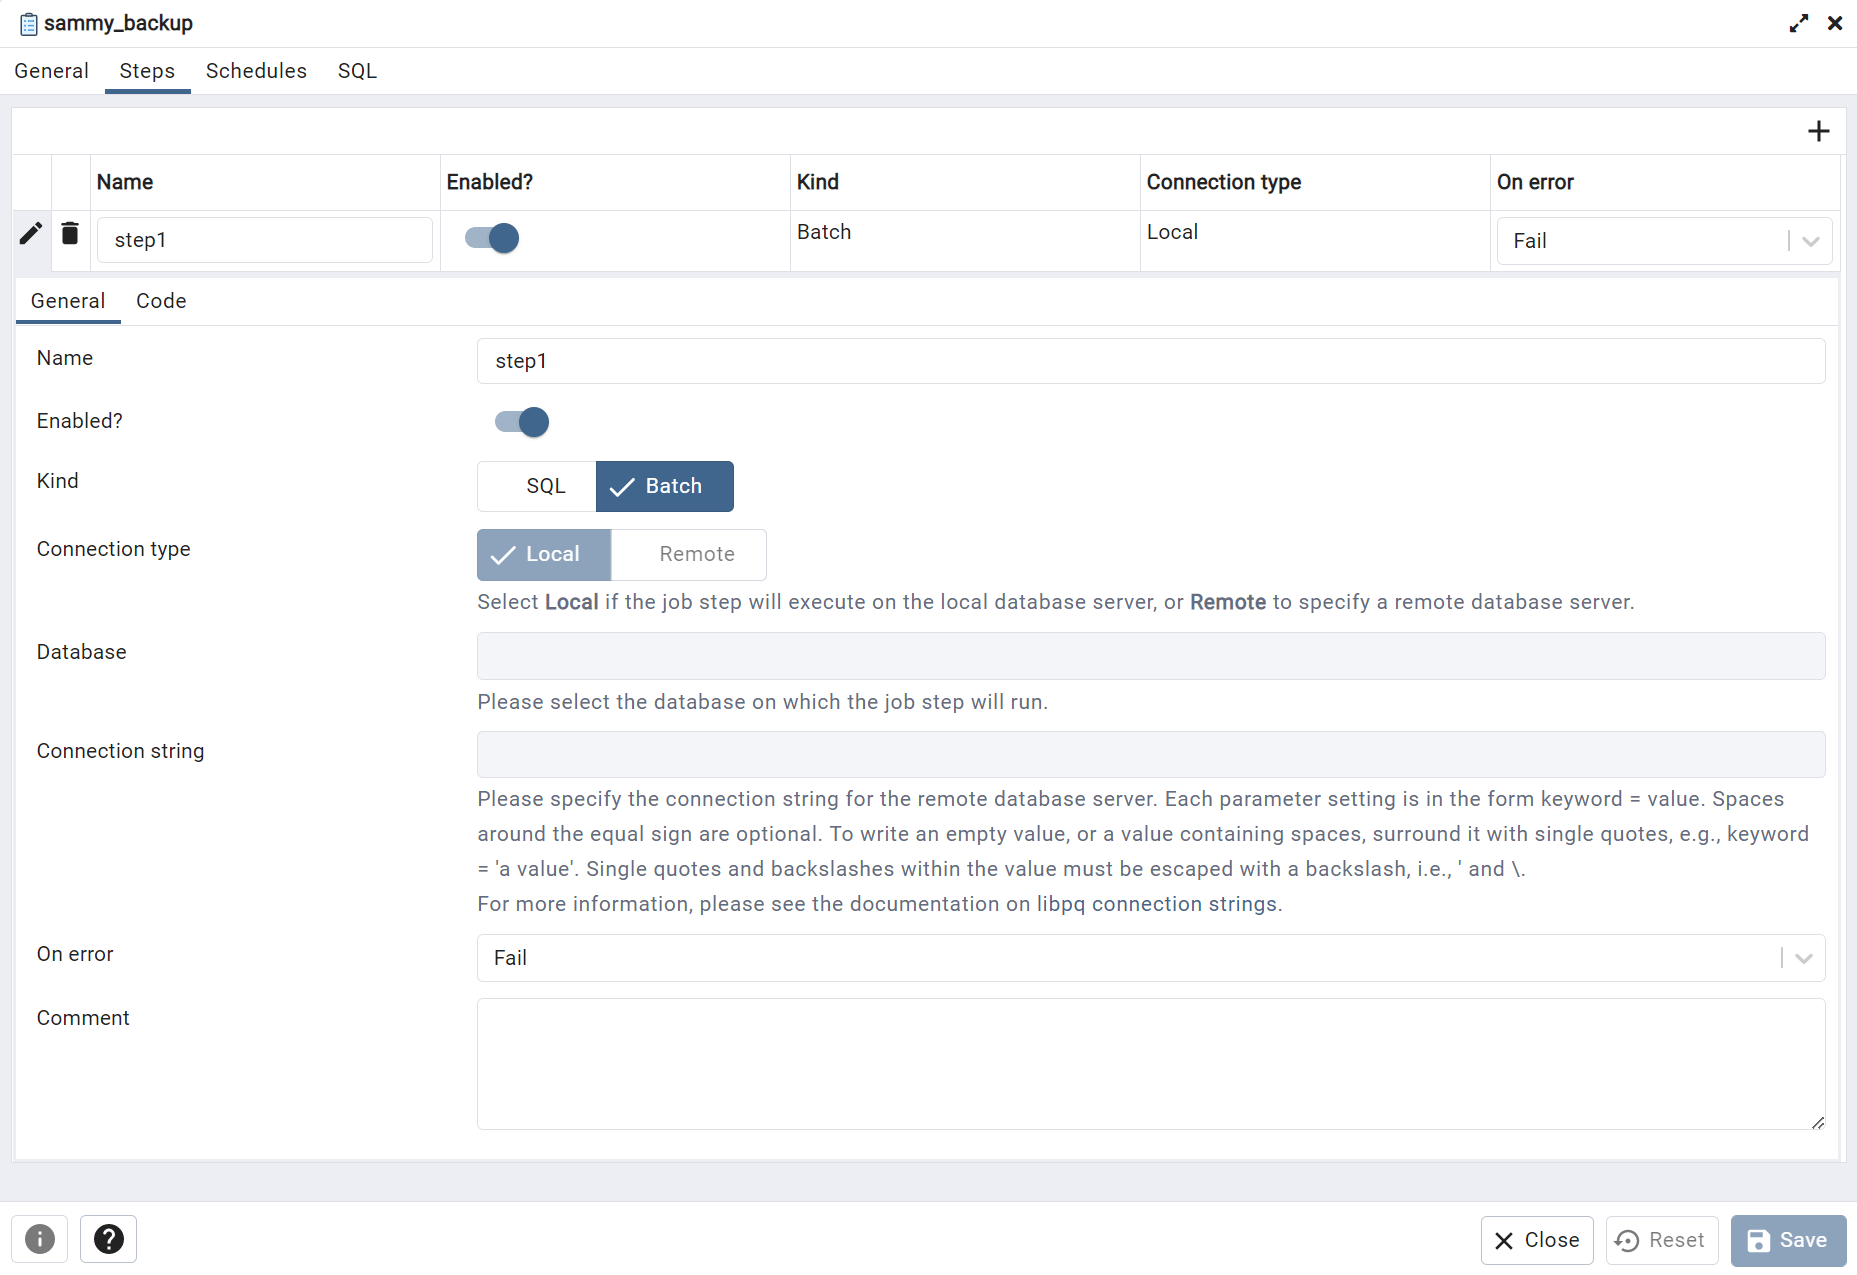
Next, navigate to the Steps tab. Click on the + symbol in the upper right-hand corner to create a step. In this example, we will name this step step1. Then, to expand your options, click on the pencil on the left-hand side of the trash bin icon. The Enabled? button is defaulted to be switched on and signifies that this step will be included when this job is executed.
For the Kind option you can select either SQL or Batch, here we have selected Batch. The reason you want to choose Batch in this example is because this is what will run the appropriate PostgreSQL commands you’ll set for the backups you want to schedule for your database. The SQL option is available for scheduling a job to execute raw SQL. In this case, we have selected Local for Connection type so that the step is executed on the local server, but if you prefer, you can also choose Remote for a remote host of your choice. If you prefer to do so on a remote host, you need to specify that criteria in the Connection string field. If you followed Step 1, your connection string is already set up and connected.
For the Database field, ensure that you have the correct database selected, here we have specified sammy. With the On error option, you can customize the pgAgent response if there’s an error when executing a step. In this case, we have selected Fail to notify us if there is an error when a step is trying to be processed. Again, if you would like to add additional notes, you can add them in the Comment box:
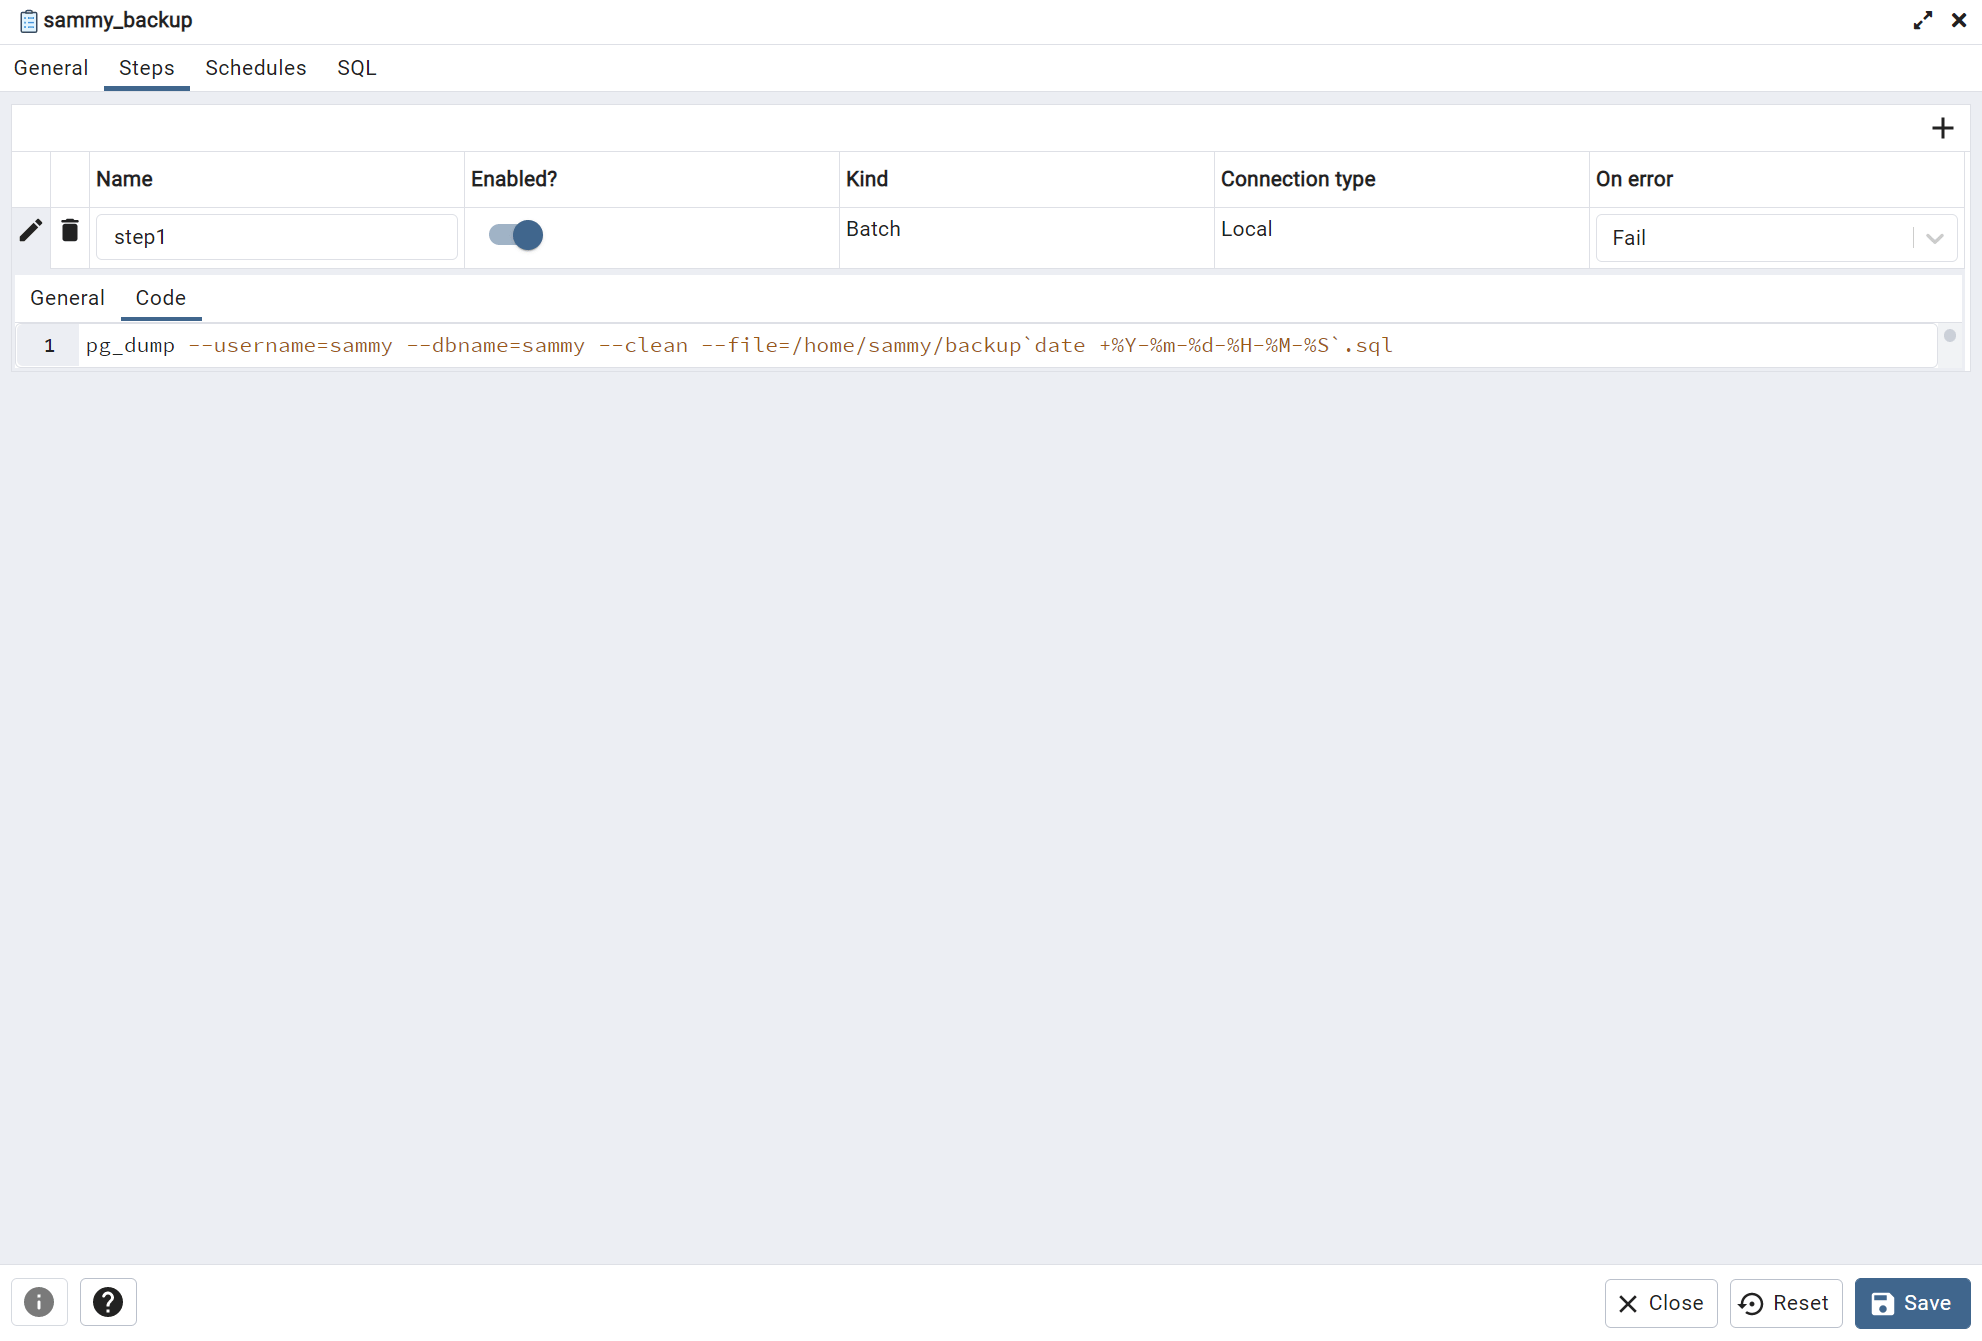
Within the same Steps tab there’s also a Code tab. If you selected Batch as we did in this example, then navigate to that Code tab. Once you’re in this tab, there’s an empty line for you to insert your PostgreSQL command. You can substitute your own backup command here with your custom set of options. Any valid command is acceptable.
This tutorial will use the pg_dump command to back up your Postgres database sammy. In this command, include your specific username, the database name, and the --clean flag, which helps with pg_dump by dropping or “cleaning” the database objects before outputting any commands that are being created. For the --file flag you’re specifying the exact location where the backup files will be saved. The final part of this statement date +%Y-%m-%d-%H-%M-%S is to dynamically generate a date and multiple files for each backup. Otherwise, the backup file will constantly override and save over the existing one. This way, you can keep track of each one of your backup files for any specified time or date you scheduled. Your complete command will be as follows:
pg_dump --username=sammy --dbname=sammy --clean --file=/home/sammy/backup-`date +%Y-%m-%d-%H-%M-%S`.sql
Note: If you choose to save your backup files to a different location, make sure to use an absolute path to your chosen directory. For example, while ~/ normally does point to the home directory of /home/sammy/, pg_dump in this case requires the absolute path of /home/sammy/.
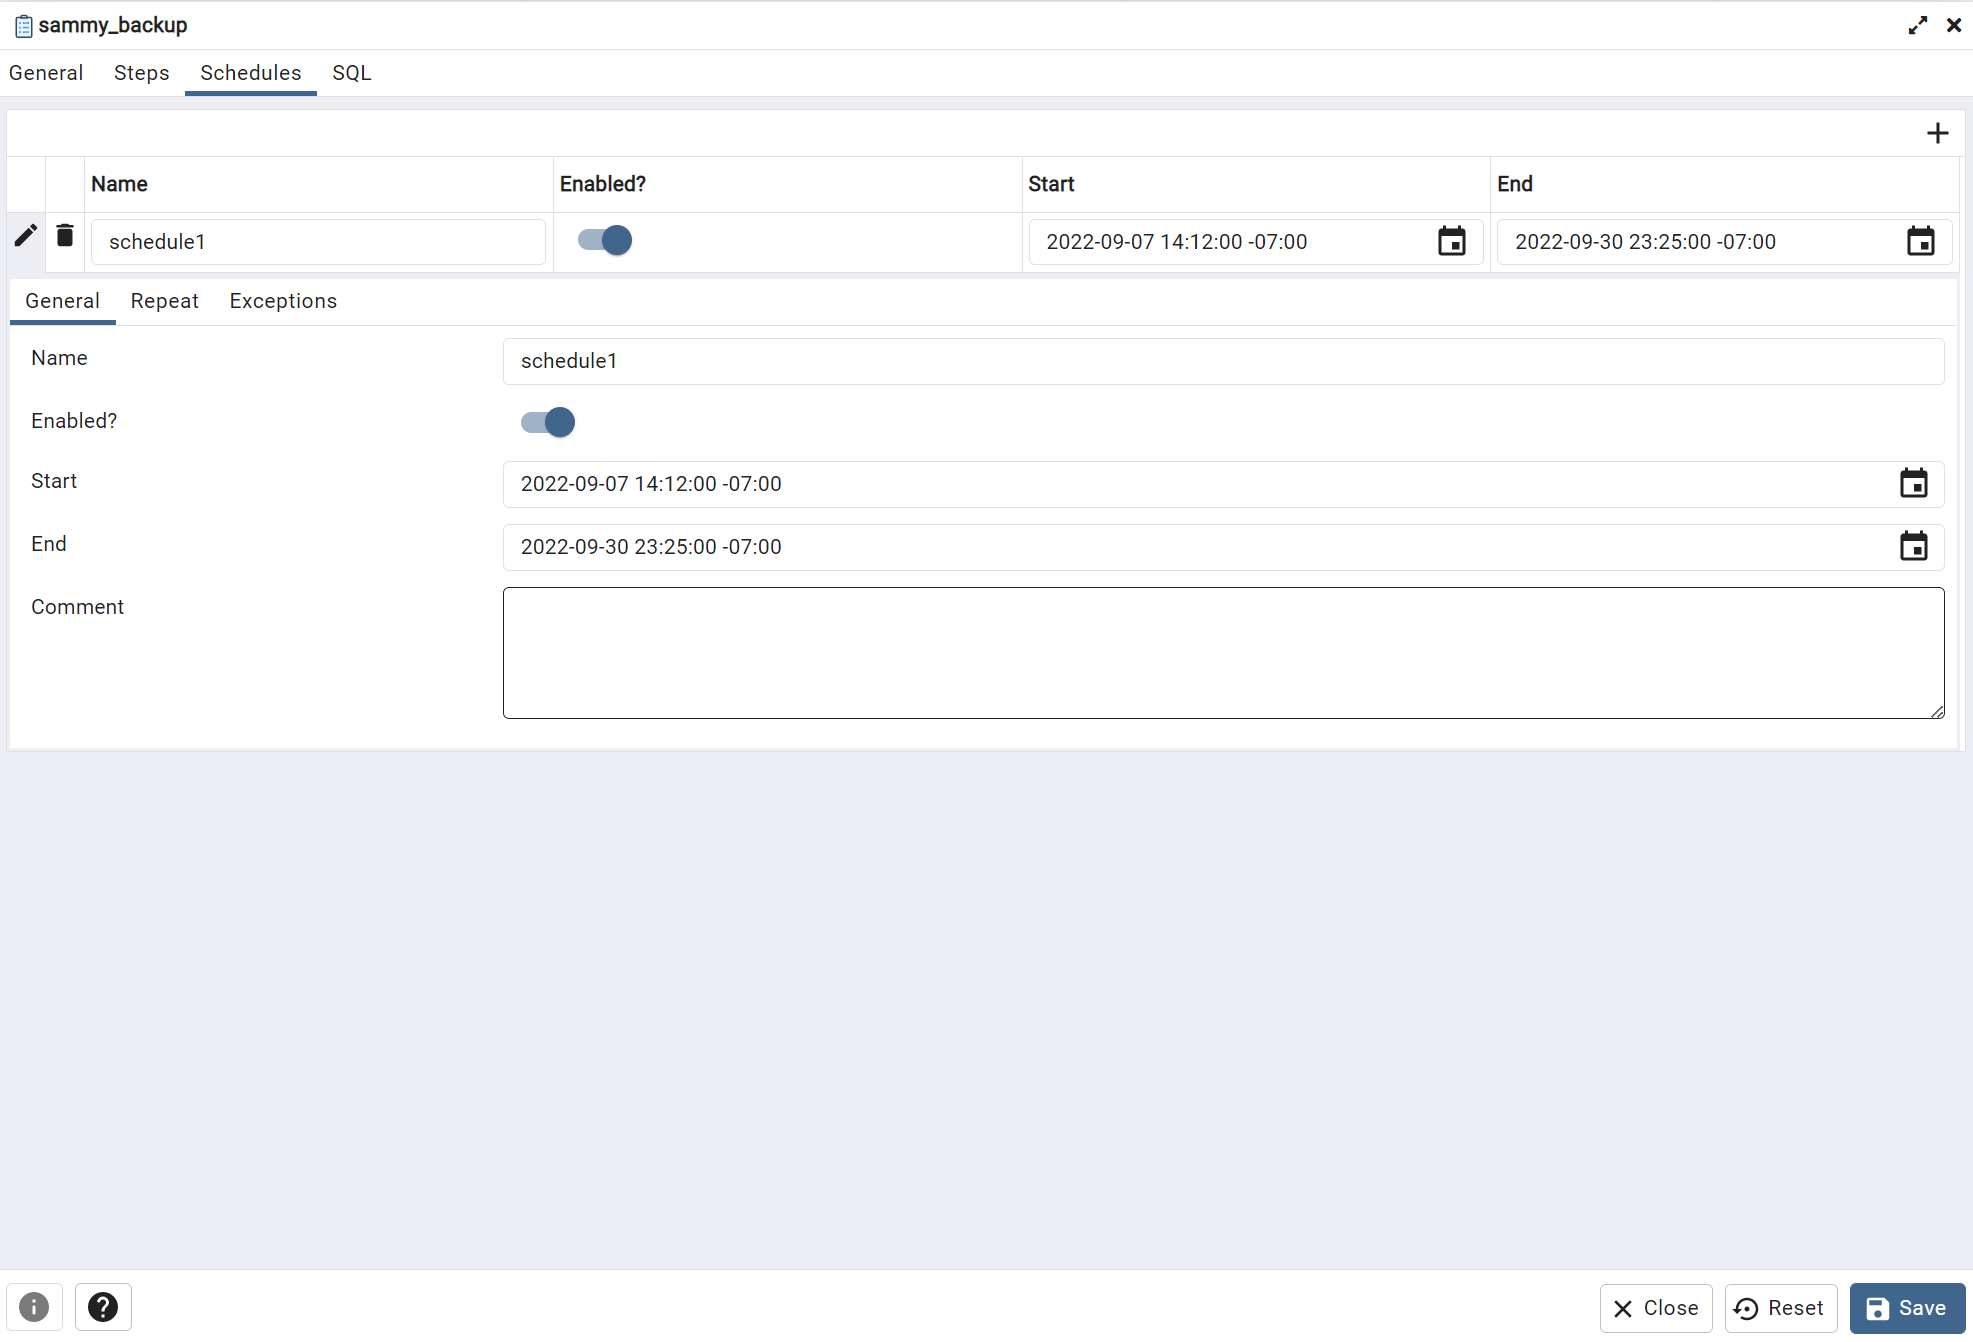
Once you’ve added your backup command, you can navigate to the tab labeled Schedules. Similar to when setting up Steps, click on the + symbol to add a schedule, then provide your preferred name, and click on the pencil icon next to the trash bin icon to expand your options. Under the General tab there will be the Name you wrote, in this example, it’s schedule1. Again, for Enabled this is defaulted to the on switch to ensure the schedule is properly executed. For the Start and End options, specify the starting and ending day and time for your scheduled job. Since you will be testing your scheduled job, make sure the current time is within the range of Start and End. Add a note in Comment if you prefer:
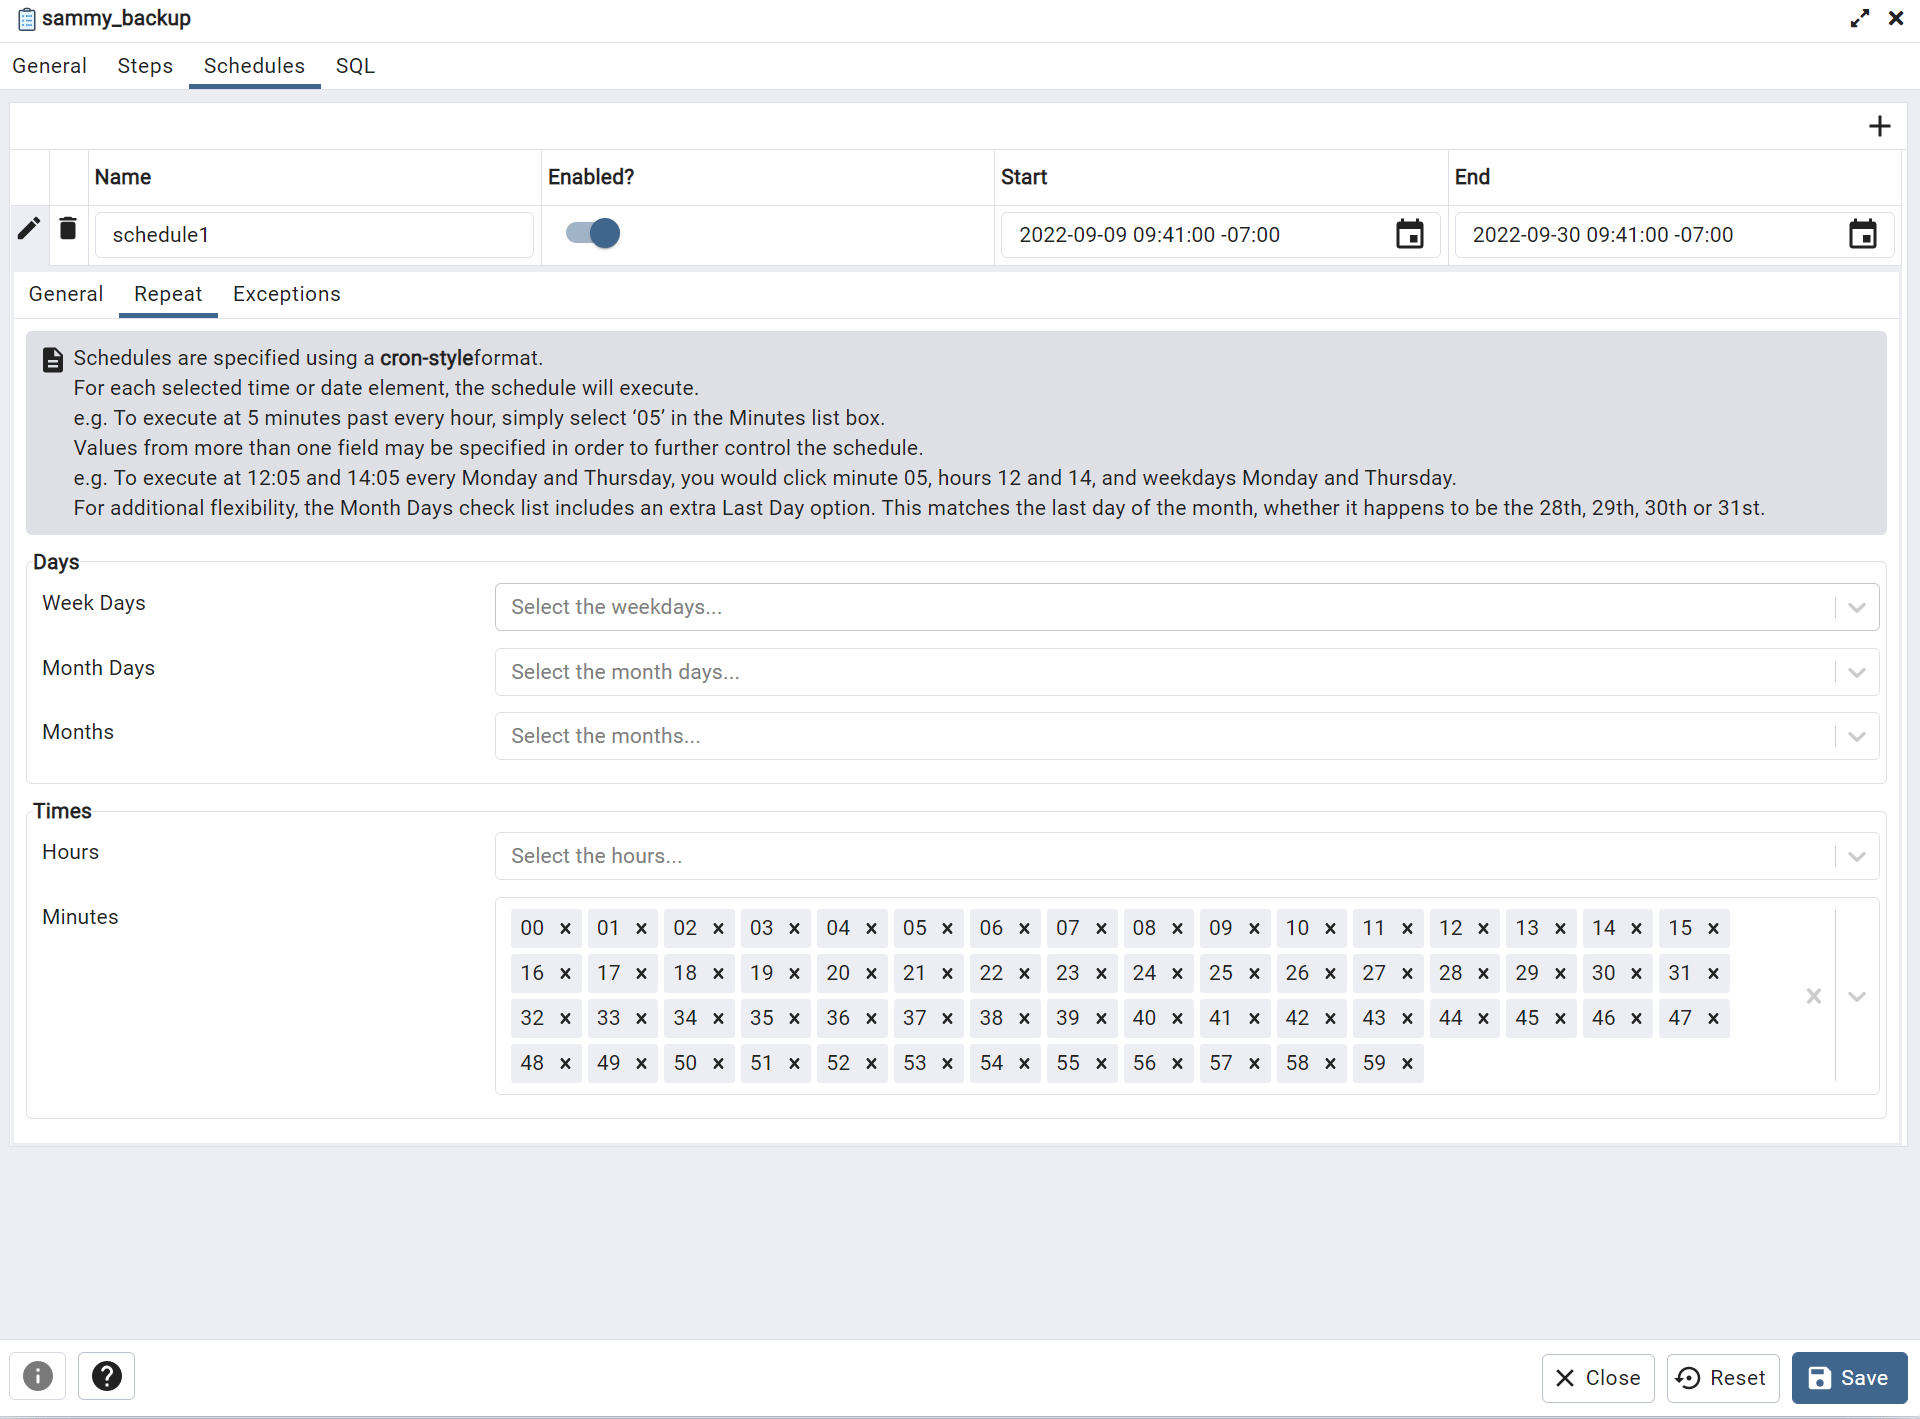
Now proceed to the Repeat tab. Here you can customize how frequently you want this scheduled job to execute. You can be as specific as possible with the week, month, date, hours, or minutes. Please note, if you do not make a selection, this is the same as choosing Select All. Therefore, if you leave the Week Days blank, your schedule will take into account all the weekdays. Similarly, with Times, you can leave the hours or minutes blank, and this is the same as Selecting All. Keep in mind that times are in cron-style format, so for this example, to generate a backup every minute, you have to select every minute in an hour (00 to 59). To demonstrate this, we’ve chosen Select All for minutes. All minutes get listed out, but leaving it blank will also achieve the same results:
If there are days or times you don’t want to execute a job, you can create a more granular time schedule, or you can set this by navigating to the Exceptions tab.
Note: A job is also executed based on the schedule, so anytime it is altered, the scheduled runtime will be re-calculated. When this happens, pgAgent will poll the database for the past scheduled runtime value and, from there, will typically start within a minute of that specified start time. If there are issues, then when pgAgent starts up again, it will return to the regular schedule you’ve set.
When you’re finished setting up and customizing the schedule you want to execute, press the Save button. A new pgAgent job will appear on the tree control on the left-hand side with the name of your job. For this example, sammy_backup appears with the Schedules and Steps listed beneath it:

Now that you’ve successfully created a pgAgent job, in the next step, you will learn about how to verify your pgAgent job is running successfully.
Step 5 — Verifying your pgAgent Job
You can check if your scheduled job to create a backup file of your database every minute is working in a couple of ways. In pgAdmin, you can navigate to the tree control on the left-hand side and click on sammy_backup. From there, proceed to the tab labeled Statistics. The Statistics page will list each instance of your scheduled job working as follows:
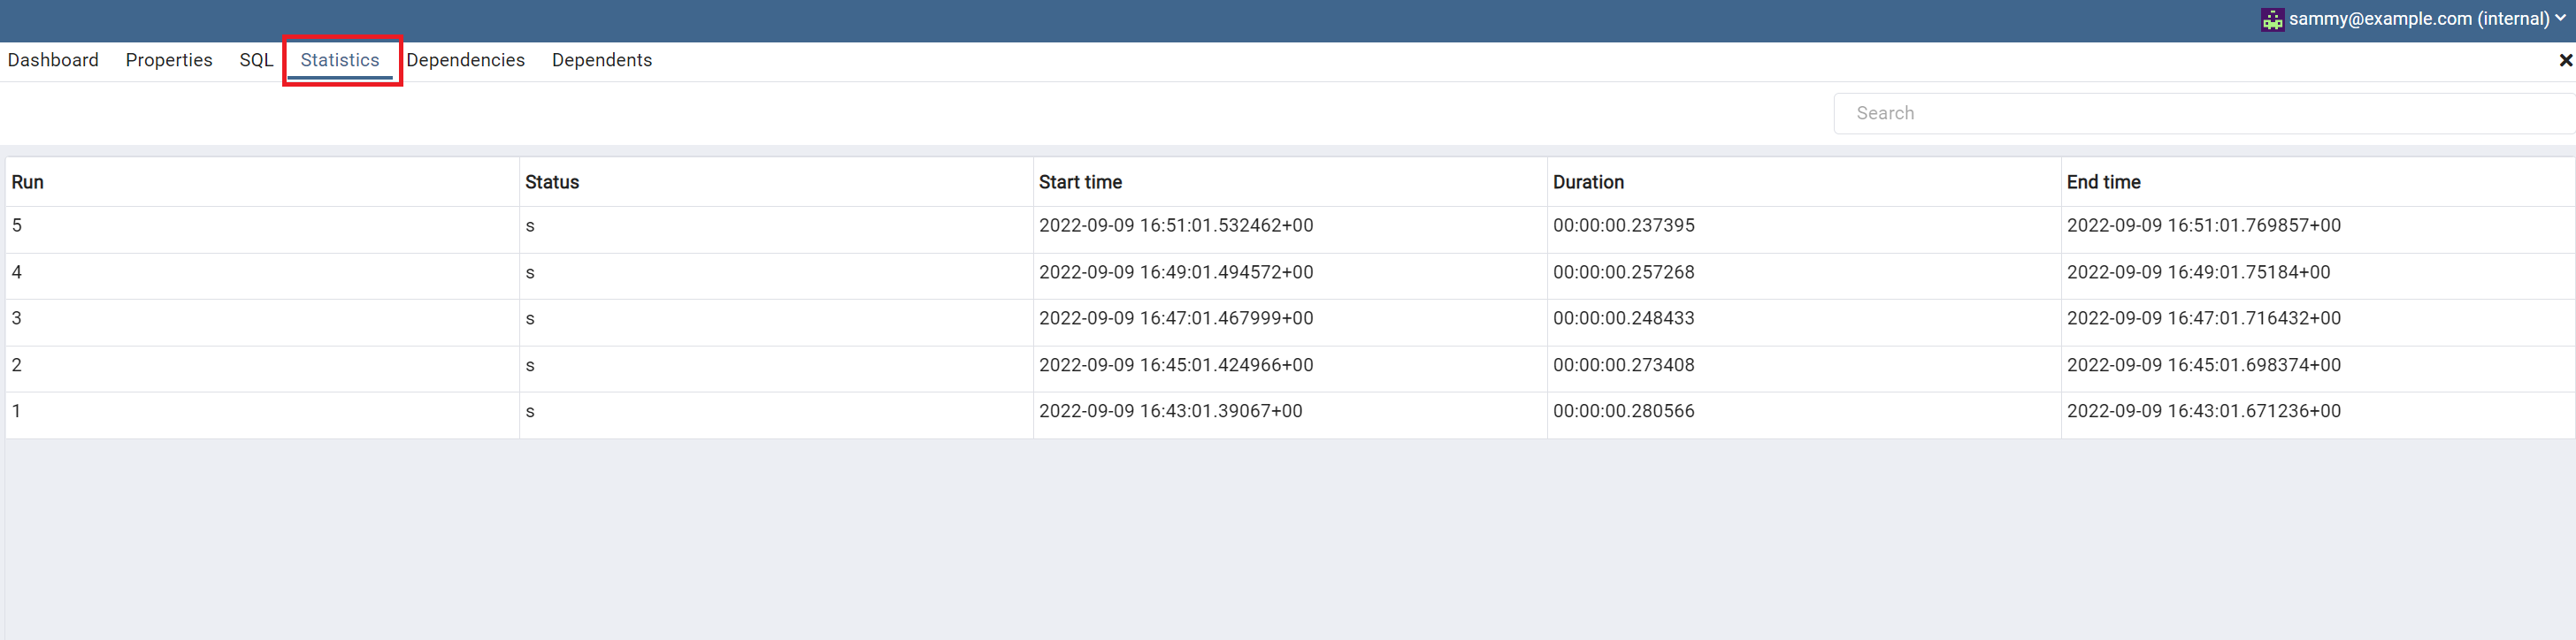
Please note that the statistics may not appear or refresh immediately, so you may need to navigate away or refresh the browser. Remember that your job is scheduled to run at a set interval, so keep this in mind if you’re setting a date or time that’s periodic or a longer length.
If you prefer to verify that your job is functioning from the command line, you can run the ls ~ command to list your home directory files. In this tutorial, you set up the exact location to this home directory when writing the pg_dump command in Step 4:
- ls ~
The output will list each instance of the backup files being saved.
Step 6 — Modifying, Disabling, Deleting, and Manually Executing pgAgent Jobs (Optional)
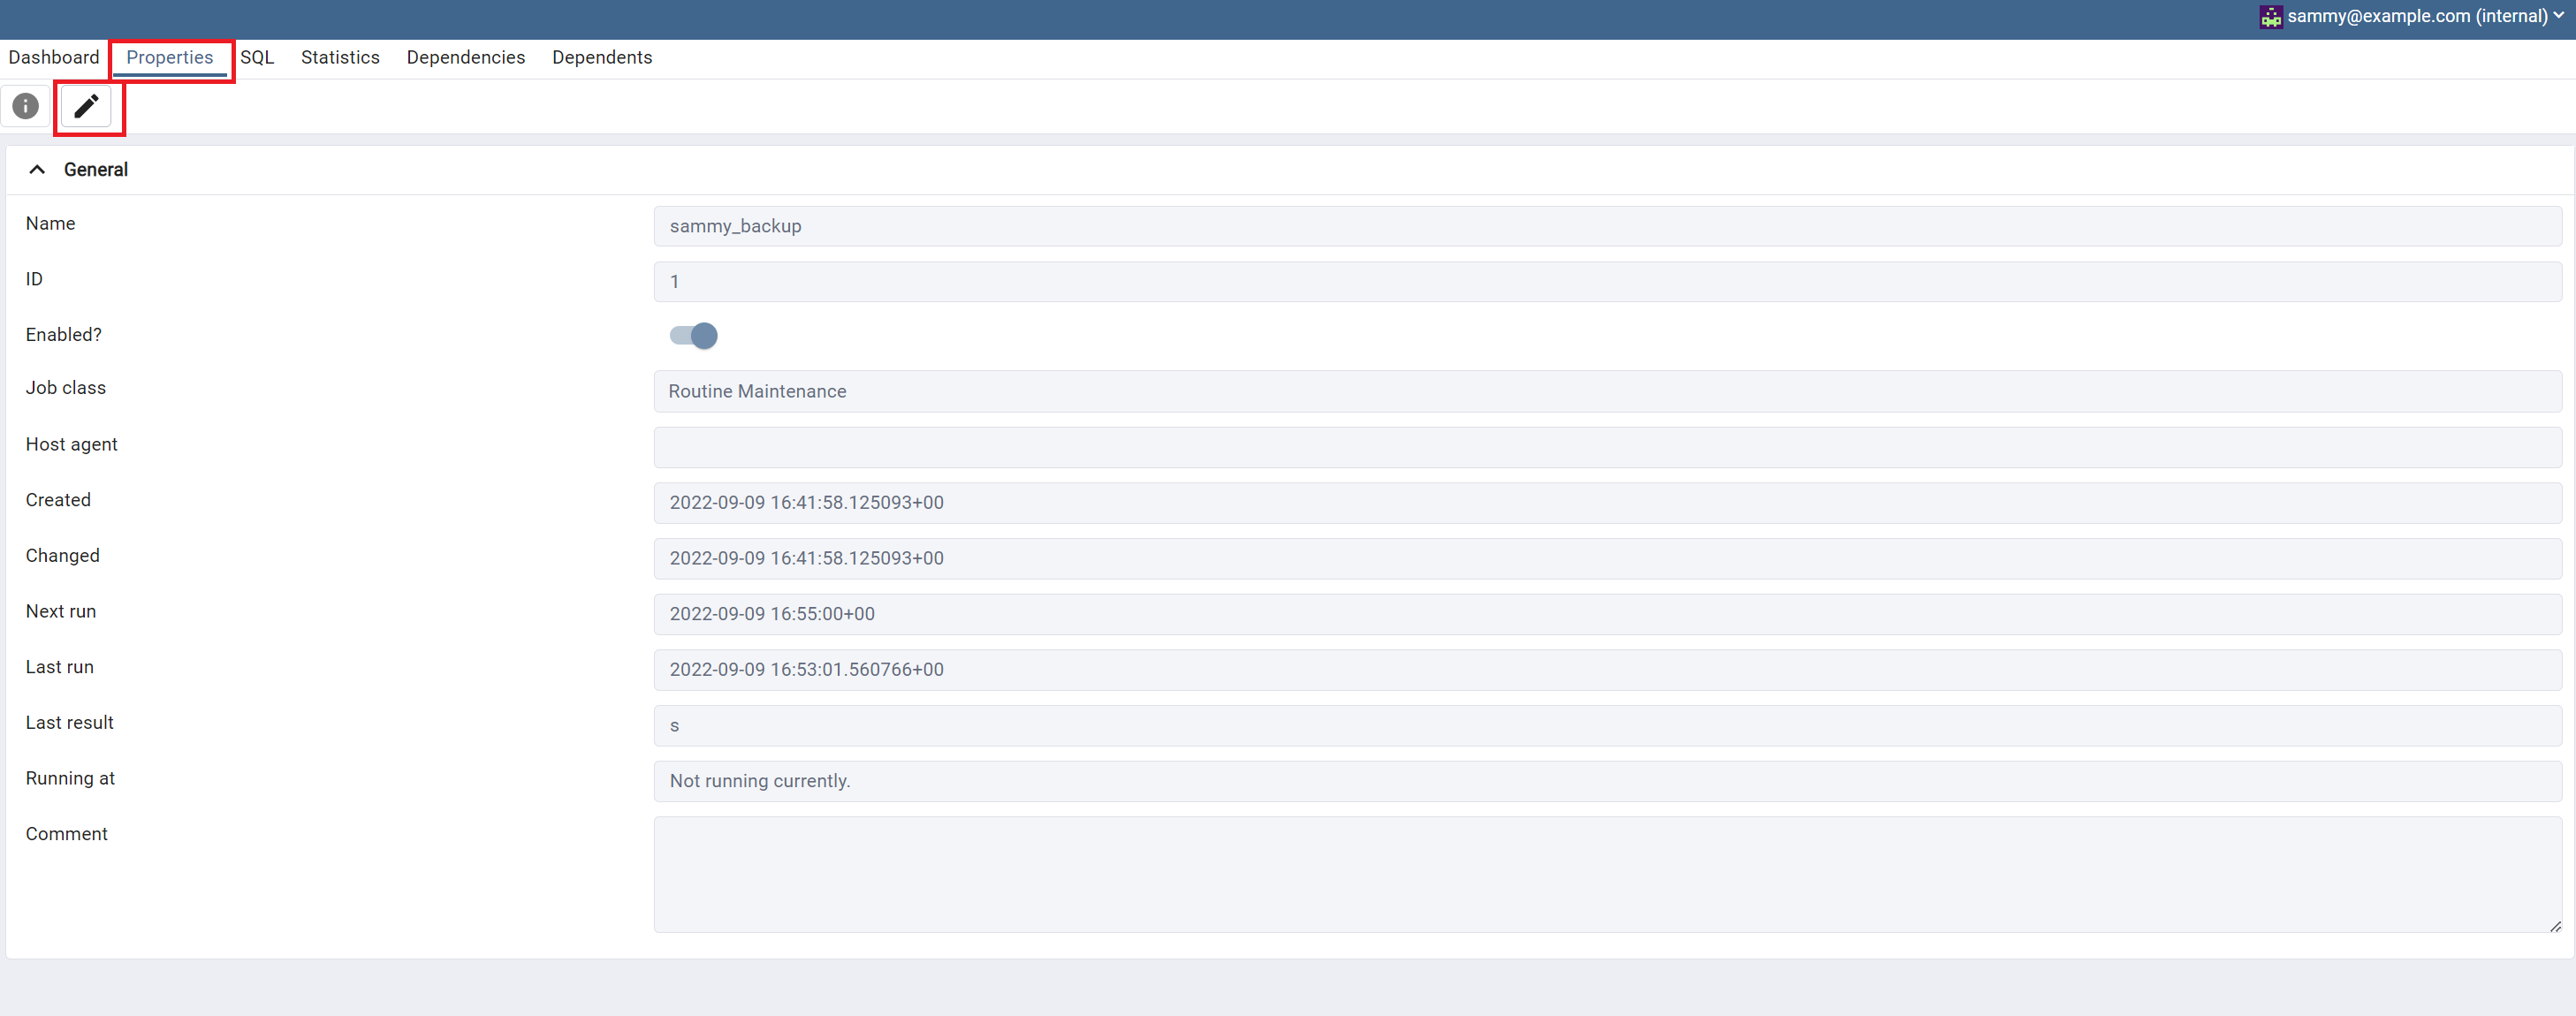
pgAgent provides flexibility when it comes to modifying or disabling a job. Using pgAdmin, you can navigate to the specific pgAgent job, in this case, sammy_backup. Then right-click and choose the Properties option from the list. From here you can press the pencil icon at the top to make modifications to your job:
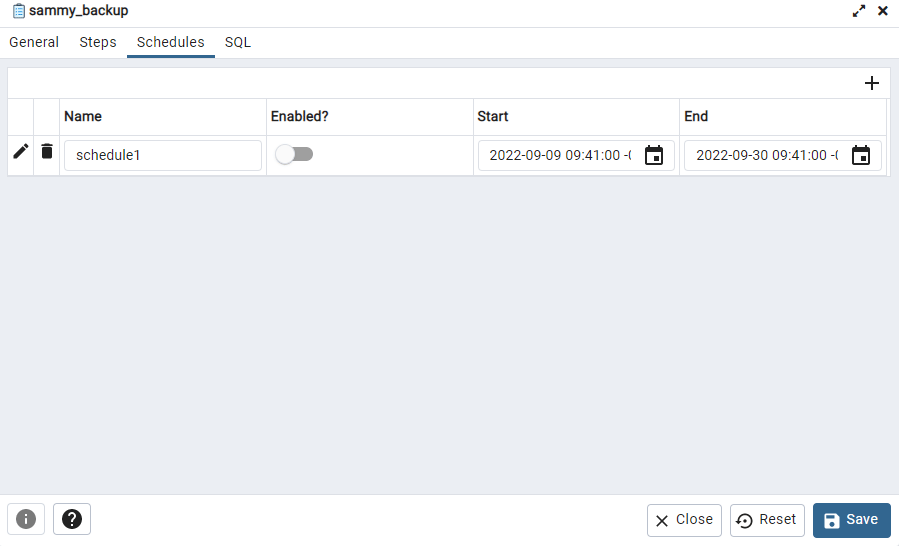
If you’re in Properties and press the pencil icon, you can navigate to the Schedules tab to disable your job as in the following:
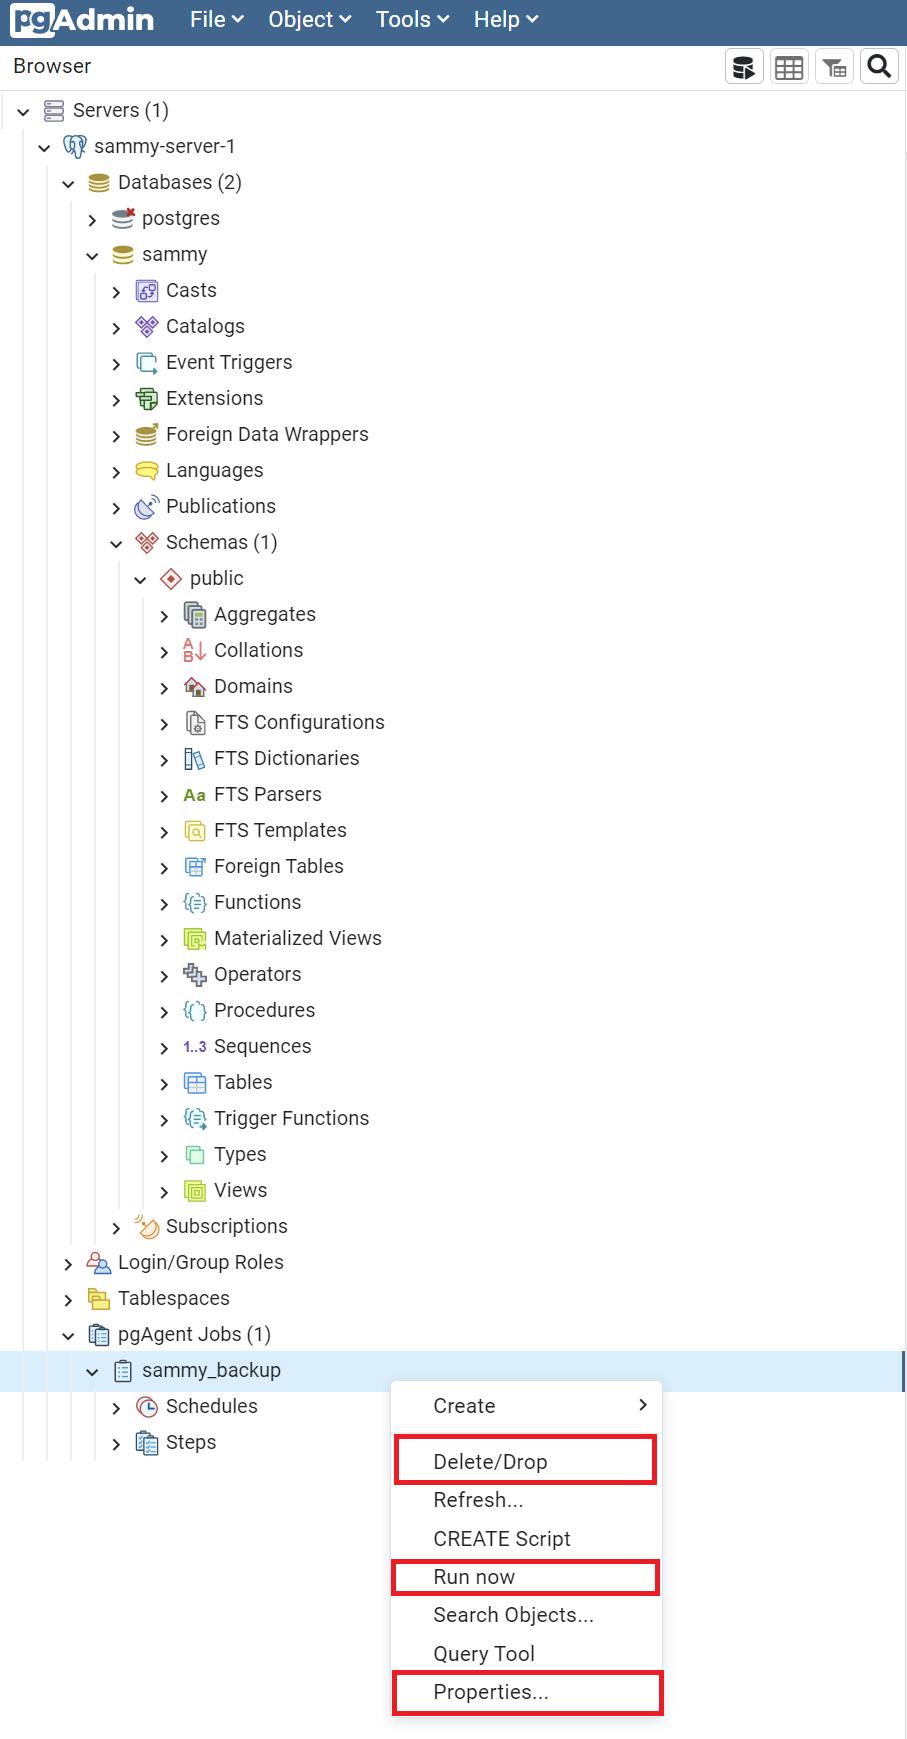
Additionally, from the tree control on the left-hand side, if you right-click on the pgAgent job you can select the DELETE/DROP selection to delete the job completely. If you want to execute a job manually, you can repeat the same step, but this time choose the RUN NOW selection from the list:
While these are only a few functions for using pgAgent to schedule jobs, there are many other possibilities. For example, you may want to schedule a job that creates a backup for all the users and roles in your database, specifically with the pg_dumpall --globals only command. You can even use more complex scripts with batch jobs, which you can learn more about from the PostgreSQL wiki page.
Conclusion
pgAgent is useful for scheduling various jobs that may help reduce some of your more mundane but necessary day-to-day tasks, such as backing up your database consistently. Once you’re more comfortable using this tool, you can even try creating a multi-step job or SQL tasks that require complex scheduling. If you would like to learn more, you can read the official pgAgent documentation on the pgAdmin website.
Thanks for learning with the DigitalOcean Community. Check out our offerings for compute, storage, networking, and managed databases.
About the author(s)
Educator and writer committed to empowering our community by providing access to the knowledge and tools for making creative ideas into a reality
Still looking for an answer?
This textbox defaults to using Markdown to format your answer.
You can type !ref in this text area to quickly search our full set of tutorials, documentation & marketplace offerings and insert the link!
BAD ARTICLE!!!
CREATE EXTENSION pgagent should be run on postgres not on USER database!
Verify before you publish something on internet!!!
 This work is licensed under a Creative Commons Attribution-NonCommercial- ShareAlike 4.0 International License.
Become a contributor for community
Get paid to write technical tutorials and select a tech-focused charity to receive a matching donation.

DigitalOcean Documentation
Full documentation for every DigitalOcean product.

Resources for startups and AI-native businesses
The Wave has everything you need to know about building a business, from raising funding to marketing your product.
The developer cloud
Scale up as you grow — whether you're running one virtual machine or ten thousand.

Start building today
From GPU-powered inference and Kubernetes to managed databases and storage, get everything you need to build, scale, and deploy intelligent applications.
