
Introduction
Let’s Encrypt is a new Certificate Authority (CA) that provides an easy way to obtain and install free TLS/SSL certificates, thereby enabling encrypted HTTPS on web servers. It simplifies the process by providing a software client, Certbot, that attempts to automate most of the required steps. Currently the entire process of obtaining and installing a certificate is fully automated only on Apache web servers. However, Certbot can be used to easily obtain a free SSL certificate, which can be installed manually, regardless of your choice of web server software.
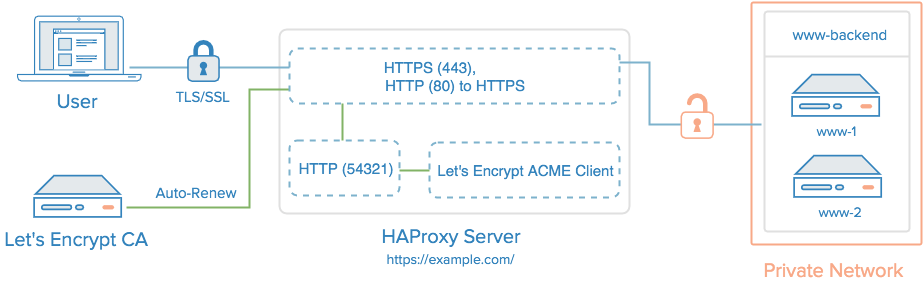
In this tutorial, we will show you how to use Certbot to obtain a free SSL certificate and use it with HAProxy on Ubuntu 14.04. We will also show you how to automatically renew your SSL certificate.
Prerequisites
Before following this tutorial, you’ll need a few things.
You should have an Ubuntu 14.04 server with a non-root user who has sudo privileges. You can learn how to set up such a user account by following steps 1-3 in our initial server setup for Ubuntu 14.04.
You must own or control the registered domain name that you wish to use the certificate with. If you do not already have a registered domain name, you may register one with one of the many domain name registrars out there (e.g. Namecheap, GoDaddy, etc.).
If you haven’t already, be sure to create an A Record that points your domain to the public IP address of your server. This is required because of how Let’s Encrypt validates that you own the domain it is issuing a certificate for. For example, if you want to obtain a certificate for example.com, that domain must resolve to your server for the validation process to work. Our setup will use example.com and www.example.com as the domain names, so both DNS records are required.
Once you have all of the prerequisites out of the way, let’s move on to installing certbot, the Let’s Encrypt client software.
Step 1 — Installing Let’s Encrypt Client
The first step to using Let’s Encrypt to obtain an SSL certificate is to install the certbot software on your server. The Certbot developers provide a repository with up-to-date versions of the software. Let’s add that repository to our package manager now:
- sudo add-apt-repository ppa:certbot/certbot
You’ll be prompted to confirm the addition. Press ENTER to continue. Then update the package cache to pick up the new package list:
- sudo apt-get update
And finally, install the certbot package:
- sudo apt-get install certbot
Now that we have certbot installed, we’re ready to get our SSL certificate.
Step 2 — Obtaining a Certificate
Let’s Encrypt provides a variety of ways to obtain SSL certificates through various plugins. Unlike the Apache plugin, which is covered in a different tutorial, most of the plugins will only help you with obtaining a certificate which you must manually configure your web server to use. Plugins that only obtain certificates, and don’t install them, are referred to as “authenticators” because they are used to authenticate whether a server should be issued a certificate.
We’ll show you how to use the Standalone plugin to obtain an SSL certificate.
Verify Port 80 is Open
The Standalone plugin provides a very simple way to obtain SSL certificates. It works by temporarily running a small web server (on port 80 by default) on your server, to which the Let’s Encrypt CA can connect and validate your server’s identity before issuing a certificate. As such, this method requires that port 80 is not in use. That is, be sure to stop your normal web server, if it’s using port 80 (i.e. http), before attempting to use this plugin.
For example, if you’re using HAProxy, you can stop it by running this command:
- sudo service haproxy stop
If you’re not sure if port 80 is in use, you can run this command:
netstat -na | grep ':80.*LISTEN'
If there is no output when you run this command, you can use the Standalone plugin.
Run Certbot
Now use the Standalone plugin by running this command:
- sudo certbot certonly --standalone --preferred-challenges http --http-01-port 80 -d example.com -d www.example.com
You will be prompted to enter your email address and agree to the Let’s Encrypt terms of service. Afterwards, the http challenge will run. If everything is successful, certbot will print an output message like this:
Output:IMPORTANT NOTES:
 - Congratulations! Your certificate and chain have been saved at
   /etc/letsencrypt/live/example.com/fullchain.pem. Your cert
   will expire on 2017-09-06. To obtain a new or tweaked version of
   this certificate in the future, simply run certbot again. To
   non-interactively renew *all* of your certificates, run "certbot
   renew"
 - Your account credentials have been saved in your Certbot
   configuration directory at /etc/letsencrypt. You should make a
   secure backup of this folder now. This configuration directory will
   also contain certificates and private keys obtained by Certbot so
   making regular backups of this folder is ideal.
 - If you like Certbot, please consider supporting our work by:

   Donating to ISRG / Let's Encrypt:   https://letsencrypt.org/donate
   Donating to EFF:                    https://eff.org/donate-le
You will want to note the path and expiration date of your certificate, which was highlighted in the example output above.
Note: If your domain is routing through a DNS service like CloudFlare, you will need to temporarily disable it until you have obtained the certificate.
Certificate Files
After obtaining the cert, you will have the following PEM-encoded files:
- cert.pem: Your domain’s certificate
- chain.pem: The Let’s Encrypt chain certificate
- fullchain.pem:
cert.pemandchain.pemcombined - privkey.pem: Your certificate’s private key
It’s important that you are aware of the location of the certificate files that were just created, so you can use them in your web server configuration. The files themselves are placed in a subdirectory in /etc/letsencrypt/archive. However, Certbot creates symbolic links to the most recent certificate files in the /etc/letsencrypt/live/your_domain_name directory.
You can check that the files exist by running this command (substituting in your domain name):
- sudo ls /etc/letsencrypt/live/your_domain_name
The output should be the four previously mentioned certificate files.
Combine fullchain.pem and privkey.pem
When configuring HAProxy to perform SSL termination, so it will encrypt traffic between itself and the end user, you must combine fullchain.pem and privkey.pem into a single file.
First, create the directory where the combined file will be placed, /etc/haproxy/certs:
- sudo mkdir -p /etc/haproxy/certs
Next, create the combined file with this cat command (substitute the highlighted example.com with your domain name):
- DOMAIN='example.com' sudo -E bash -c 'cat /etc/letsencrypt/live/$DOMAIN/fullchain.pem /etc/letsencrypt/live/$DOMAIN/privkey.pem > /etc/haproxy/certs/$DOMAIN.pem'
Secure access to the combined file, which contains the private key, with this command:
- sudo chmod -R go-rwx /etc/haproxy/certs
Now we’re ready to use the SSL cert and private key with HAProxy.
Step 3 — Installing HAProxy
This step covers the installation of HAProxy. If it’s already installed on your server, skip this step.
We will install HAProxy 1.6, which is not in the default Ubuntu repositories. However, we can still use a package manager to install HAProxy 1.6, if we use a PPA, with this command:
- sudo add-apt-repository ppa:vbernat/haproxy-1.6
Update the local package index on your load balancers and install HAProxy by typing:
- sudo apt-get update
- sudo apt-get install haproxy
HAProxy is now installed but needs to be configured.
Step 4 — Configuring HAProxy
This section will show you how to configure basic HAProxy with SSL setup. It also covers how to configure HAProxy to allow us to auto-renew our Let’s Encrypt certificate.
Open haproxy.cfg in a text editor:
- sudo nano /etc/haproxy/haproxy.cfg
Keep this file open as we edit it in the next several sections.
Global Section
Let’s add some basic settings under the global section.
The first thing you will want to do is set maxconn to a reasonable number. This affects how many concurrent connections HAProxy will allow, which can affect QoS and prevent your web servers from crashing from trying to serve too many requests. You will need to play around with it to find what works for your environment. Add the following line (with a value you think is reasonable) to the global section:
maxconn 2048
Next, add this line, to configure the maximum size of temporary DHE keys that are generated:
tune.ssl.default-dh-param 2048
Defaults Section
Add the following lines under the defaults section:
   option forwardfor
   option http-server-close
The forwardfor option sets HAProxy to add X-Forwarded-For headers to each request, and the http-server-close option reduces latency between HAProxy and your users by closing connections but maintaining keep-alives.
Frontend Sections
Now we’re ready to define our frontend sections.
The first thing we want to add is a frontend to handle incoming HTTP connections, and send them to a default backend (which we’ll define later). At the end of the file, let’s add a frontend called www-http. Be sure to replace haproxy_public_IP with the public IP address of your HAProxy server:
frontend www-http
   bind haproxy_www_public_IP:80
   reqadd X-Forwarded-Proto:\ http
   default_backend www-backend
Next, we will add a frontend to handle incoming HTTPS connections. At the end of the file, add a frontend called www-https. Be sure to replace haproxy_www_public_IP with the public IP of your HAProxy server. Also, you will need to replace example.com with your domain name (which should correspond to the certificate file you created earlier):
frontend www-https
   bind haproxy_www_public_IP:443 ssl crt /etc/haproxy/certs/example.com.pem
   reqadd X-Forwarded-Proto:\ https
   acl letsencrypt-acl path_beg /.well-known/acme-challenge/
   use_backend letsencrypt-backend if letsencrypt-acl
   default_backend www-backend
This frontend uses an ACL (letsencrypt-acl) to send Let’s Encrypt validation requests (for /.well-known/acme-challenge) to the letsencrypt-backend backend, which will enable us to renew the certificate without stopping the HAProxy service. All other requests will be forwarded to the www-backend, which is the backend that will serve our web application or site.
Backend Sections
After you are finished configuring the frontends, add the www-backend backend by adding the following lines. Be sure to replace the highlighted words with the respective private IP addresses of your web servers (adjust the number of server lines to match how many backend servers you have):
backend www-backend
   redirect scheme https if !{ ssl_fc }
   server www-1 www_1_private_IP:80 check
   server www-2 www_2_private_IP:80 check
Any traffic that this backend receives will be balanced across its server entries, over HTTP (port 80).
Lastly, add the letsencrypt-backend backend, by adding these lines
backend letsencrypt-backend
   server letsencrypt 127.0.0.1:54321
This backend, which only handles Let’s Encrypt ACME challenges that are used for certificate requests and renewals, sends traffic to the localhost on port 54321. We’ll use this port instead of 80 and 443 when we renew our Let’s Encrypt SSL certificate.
Now we’re ready to start HAProxy:
- sudo service haproxy restart
Note: If you’re having trouble with the haproxy.cfg configuration file, check out this GitHub Gist for an example.
The Let’s Encrypt TLS/SSL certificate is now in place, and we’re ready to set up the auto-renewal script. At this point, you should test that the TLS/SSL certificate works by visiting your domain in a web browser.
Step 5 — Setting Up Auto Renewal
Let’s Encrypt certificates are valid for just 90 days, so it’s important to automate the renewal process.
A practical way to ensure your certificates won’t get outdated is to create a cron job that will automatically handle the renewal process for you. The cronjob will run certbot daily and renew the certificates if they’re within thirty days of expiring. certbot will also run a special renew-hook script after any successful renewal. We’ll use this renewal script to update our combined .pem file and reload haproxy.
Let’s create that script now, then test it.
Create a Renewal Script
Open up a new file in /usr/local/bin as root:
- sudo nano /usr/local/bin/renew.sh
This will be a new blank text file. Paste in the following short script, being sure to update the highlighted domain name with your own:
#!/bin/sh

SITE=example.com

# move to the correct let's encrypt directory
cd /etc/letsencrypt/live/$SITE

# cat files to make combined .pem for haproxy
cat fullchain.pem privkey.pem > /etc/haproxy/certs/$SITE.pem

# reload haproxy
service haproxy reload
Save and close the file. This script moves into the correct Let’s Encrypt directory, runs the cat command to concatenate the two .pem files into one, then reloads haproxy.
Next, make the script executable:
- sudo chmod u+x /usr/local/bin/renew.sh
Then run the script:
- sudo /usr/local/bin/renew.sh
It should run without error. You’ll see some output about reloading haproxy. Next we’ll update Certbot and configure it to run this renewal script.
Update certbot Configs
The certbot renew command that we’ll use to renew our certificates reads a config file that was created the first time we ran certbot. We need to open this file and update the port that certbot uses to run its standalone http server so it does’t conflict with haproxy (which is already listening on ports 80 and 443). Open the config file in a text editor:
- sudo nano /etc/letsencrypt/renewal/example.com.conf
We need to change the http01_port line, so it reads like this:
http01_port = 54321
Save and close the file. Now test the renewal process, specifying --dry-run so we don’t actually renew anything:
- sudo certbot renew --dry-run
Certbot will listen on port 54321 for the renewal challenge, and haproxy will proxy the request from port 80 to 54321.
Create a Cron Job
Next, we will edit the crontab to create a new job that will run the certbot renew command every day. To edit the crontab for the root user, run:
- sudo crontab -e
Add the following to the bottom of the file:
30 2 * * * /usr/bin/certbot renew --renew-hook "/usr/local/bin/renew.sh" >> /var/log/le-renewal.log
Save and exit. This will create a new cron job that will execute the certbot renew command every day at 2:30 am. The output produced by the command will be piped to a log file located at /var/log/le-renewal.log. If the certificate is actually renewed, the --renew-hook script will run to create the combined PEM file and reload haproxy.
Conclusion
That’s it! HAProxy is now using a free Let’s Encrypt TLS/SSL certificate to securely serve HTTPS traffic.
Thanks for learning with the DigitalOcean Community. Check out our offerings for compute, storage, networking, and managed databases.
About the author
Software Engineer @ DigitalOcean. Former Señor Technical Writer (I no longer update articles or respond to comments). Expertise in areas including Ubuntu, PostgreSQL, MySQL, and more.
Still looking for an answer?
This textbox defaults to using Markdown to format your answer.
You can type !ref in this text area to quickly search our full set of tutorials, documentation & marketplace offerings and insert the link!
I’ve followed this DO tutorial:
how-to-create-a-high-availability-haproxy-setup-with-corosync-pacemaker-and-floating-ips
And now I have 4 droplets: 2 load balancers and 2 webservers. Now that I’m trying to follow this tutorial to add https to my website, it’s failing at Step 2, where I need to run the :
./letsencrypt-auto certonly --standalone command.
The error ouput is Failed authorization procedure. mydomain.com (tls-sni-01): urn:acme:error:connection :: The server could not connect to the client to verify the domain :: Failed to connect to host for DVSNI challenge for every subdomain I’m trying to get a certificate for.
Are these tutorials incompatible with each other? I’ve set up my domain like it should be:
A NAME
@       MY_FLOATING_IP
CNAME
*         MY_DOMAIN.
And I can reach both my webservers via the domain. Of course, when I need to shut down haproxy as explained in this tutorial, I can’t connect to them anymore.
Did I miss something? How should I make this work?
Is there a way to request the new cert via port 443? http://domain.com/.well-known/acme-challenge/ Changing the --standalone-supported-challenges parameter from http-01 to tls-sni-01 doesen’t work.
And I also recommend to add authenticator = standalone to the /usr/local/etc/le-renew-haproxy.ini
This comment has been deleted
Not sure if I missed it, but what you failed to explain is how to avoid the 503 Service Unavailable error when someone tries to use http instead of https
I forgot how to ensure that http requests are forwarded to https. I think you should add this to the tutorial.
Otherwise this was accomplished without a hitch if I use https. Can’t get it from inside LAN though but that is a seperate problem not related to this tutorial. I tested this from a remote desktop I have in Canada http requests were 503 errors and direct https requests were successful.
I’ll check my haproxy settings for a production server I have that uses encryption for a gluster backend to local network. Will post back here later with answer.
This comment has been deleted
Hello, nice work. I have one point to figure “le-cli-example.com.ini — 2 of 2”. Maybe I have newer version of lets encrypt client. I had also needed to enable one more line from client config example. it was the authenticator = standalone one.
ON running this command:-
./letsencrypt-auto certonly --agree-tos --renew-by-default --standalone-supported-challenges http-01 --http-01-port 54321 -d example.com -d www.example.com
It ask for option to choose:-
- Place files in webroot directory (webroot)
- Automatically use a temporary webserver (standalone)
On choosing 2nd option I receive the following error:-
Failed authorization procedure. example.com (http-01): urn:acme:error:connection :: The server could not connect to the client to verify the domain :: Could not connect to http://example.com/.well-known/acme-challenge/k1QDgbONvmXLXVMzVP3u2-3iNkvy_2VDGdmWyX06mzk

IMPORTANT NOTES:
 - The following errors were reported by the server:

   Domain: example.com
   Type:   connection
   Detail: Could not connect to
   http://example.com/.well-known/acme-challenge/k1QDgbONvmXLXVMzVP3u2-3iNkvy_2VDGdmWyX06mzk

   To fix these errors, please make sure that your domain name was
   entered correctly and the DNS A record(s) for that domain
   contain(s) the right IP address. Additionally, please check that
   your computer has a publicly routable IP address and that no
   firewalls are preventing the server from communicating with the
   client. If you're using the webroot plugin, you should also verify
   that you are serving files from the webroot path you provided.
PS: I am using example.com for sample it was my original domain on that place.
Great article
You can run crontab every 3 months with 00 00 01 Jan,Apr,Jul,Oct * /usr/local/sbin/le-renew-haproxy >> /var/log/le-renewal.log or 00 00 01 */3 * /usr/local/sbin/le-renew-haproxy >> /var/log/le-renewal.log
Regards!!
 This work is licensed under a Creative Commons Attribution-NonCommercial- ShareAlike 4.0 International License.
Become a contributor for community
Get paid to write technical tutorials and select a tech-focused charity to receive a matching donation.

DigitalOcean Documentation
Full documentation for every DigitalOcean product.

Resources for startups and AI-native businesses
The Wave has everything you need to know about building a business, from raising funding to marketing your product.
The developer cloud
Scale up as you grow — whether you're running one virtual machine or ten thousand.

Start building today
From GPU-powered inference and Kubernetes to managed databases and storage, get everything you need to build, scale, and deploy intelligent applications.
