By Ari Birnbaum and Rachel Lee

The author selected Girls Who Code to receive a donation as part of the Write for DOnations program.
Introduction
When you visit a website, various resources are used to load and render it. As an example, when you go to https://www.digitalocean.com, your browser downloads the HTML and CSS directly from digitalocean.com. However, images and other assets are downloaded from assets.digitalocean.com, and analytics scripts are loaded from their respective domains.
Some websites use a multitude of different services, styles, and scripts to load and render their content, and your browser will execute all of it. A browser doesn’t know if code is malicious, so it’s the developer’s responsibility to protect users. Because there can be many resources on a website, having a feature in the browser that only allows approved resources is a good way to ensure users don’t get compromised. This is what Content Security Policies (CSPs) are for.
Using a CSP header, a developer can explicitly allow certain resources to run while preventing all others. Because most sites can have upwards of 100 resources, and each one must be approved for the specific category of resource it is, implementing a CSP can be a tedious task. However, a website with a CSP will be more secure since it ensures only approved resources are allowed to run.
In this tutorial, you will implement a CSP in a basic Django application. You’ll customize the CSP to allow certain domains and inline resources to run. Optionally, you can also use Sentry to log violations.
Prerequisites
To complete this tutorial, you will need:
- A working Django project (version 3 or greater is preferred), either on your local machine or a DigitalOcean Droplet. If you don’t have one, you can create one with the tutorial, How to Install Django and Set Up a Development Environment on Ubuntu 20.04.
- A web browser like Firefox or Chrome and an understanding of browser network tools. For more on using browser network tools, check out the product documentation for the Network Monitor in Firefox or the DevTools Network Tab in Chrome. For more general guidance on browser developer tools, see the guide: What are Browser Developer Tools?
- Knowledge of Python 3 and Django, which you can gain from the tutorial series, How to Code in Python and Django Development.
- An account on Sentry for tracking CSP violations (optional).
Step 1 — Making a Demo View
In this step, you will modify how your application handles views so that you can add CSP support.
As a prerequisite, you installed Django and set up a sample project. The default view in Django is too simple to demonstrate all the capabilities of the CSP middleware, so you will create a simple HTML page for this tutorial.
Navigate to the project folder you created in the prerequisites:
- cd django-apps
While inside the django-apps directory, create your virtual environment. We’ll call it the generic env, but you should use a name that is meaningful for you and your project.
- virtualenv env
Now, activate the virtual environment with the following command:
- . env/bin/activate
Within the virtual environment, create a views.py file in your project folder using nano, or your favorite text editor:
- nano django-apps/testsite/testsite/views.py
Now, you will add a basic view that will render an index.html template you’ll make next. Add the following to views.py:
from django.shortcuts import render

def index(request):
    return render(request, "index.html")
Save and close the file when you’re done.
Create an index.html template in a new templates directory:
mkdir django-apps/testsite/testsite/templates
nano django-apps/testsite/testsite/templates/index.html
Add the following to index.html:
<!DOCTYPE html>
<html>
    <head>
        <title>Hello world!</title>
        <link rel="preconnect" href="https://fonts.googleapis.com" />
        <link rel="preconnect" href="https://fonts.gstatic.com" crossorigin />
        <link
            href="https://fonts.googleapis.com/css2?family=Yellowtail&display=swap"
            rel="stylesheet"
        />
        <style>
            h1 {
                font-family: "Yellowtail", cursive;
                margin: 0.5em 0 0 0;
                color: #0069ff;
                font-size: 4em;
                line-height: 0.6;
            }

            img {
                border-radius: 100%;
                border: 6px solid #0069ff;
            }

            .center {
                text-align: center;
                position: absolute;
                top: 50vh;
                left: 50vw;
                transform: translate(-50%, -50%);
            }
        </style>
    </head>
    <body>
        <div class="center">
            <img src="https://html.sammy-codes.com/images/small-profile.jpeg" />
            <h1>Hello, Sammy!</h1>
        </div>
    </body>
</html>
The view we created will render this simple HTML page. It will display the text Hello, Sammy! along with an image of Sammy the Shark.
Save and close the file when you’re done.
To access this view, you’ll need to update urls.py:
- nano django-apps/testsite/testsite/urls.py
Import the views.py file and add a new route by adding the highlighted lines:
from django.contrib import admin
from django.urls import path
from . import views

urlpatterns = [
    path('admin/', admin.site.urls),
    path('', views.index),
]
The new view you just created will now be viewable when you visit / (when the application is running).
Save and close the file.
Finally, you’ll need to update INSTALLED_APPS to include testsite in settings.py:
- nano django-apps/testsite/testsite/settings.py
# ...
INSTALLED_APPS = [
    'django.contrib.admin',
    'django.contrib.auth',
    'django.contrib.contenttypes',
    'django.contrib.sessions',
    'django.contrib.messages',
    'django.contrib.staticfiles',
    'testsite',
]
# ...
Here, you add testsite to the list of applications in settings.py so that Django can make some assumptions about the structure of your project. In this case, it will assume the templates folder contains Django templates that you can use for rendering views.
From the project’s root directory (testsite), start the Django development server with the following command, replacing your-server-ip with your own server’s IP address.
- cd ~/django-apps/testsite
- python manage.py runserver your-server-ip:8000
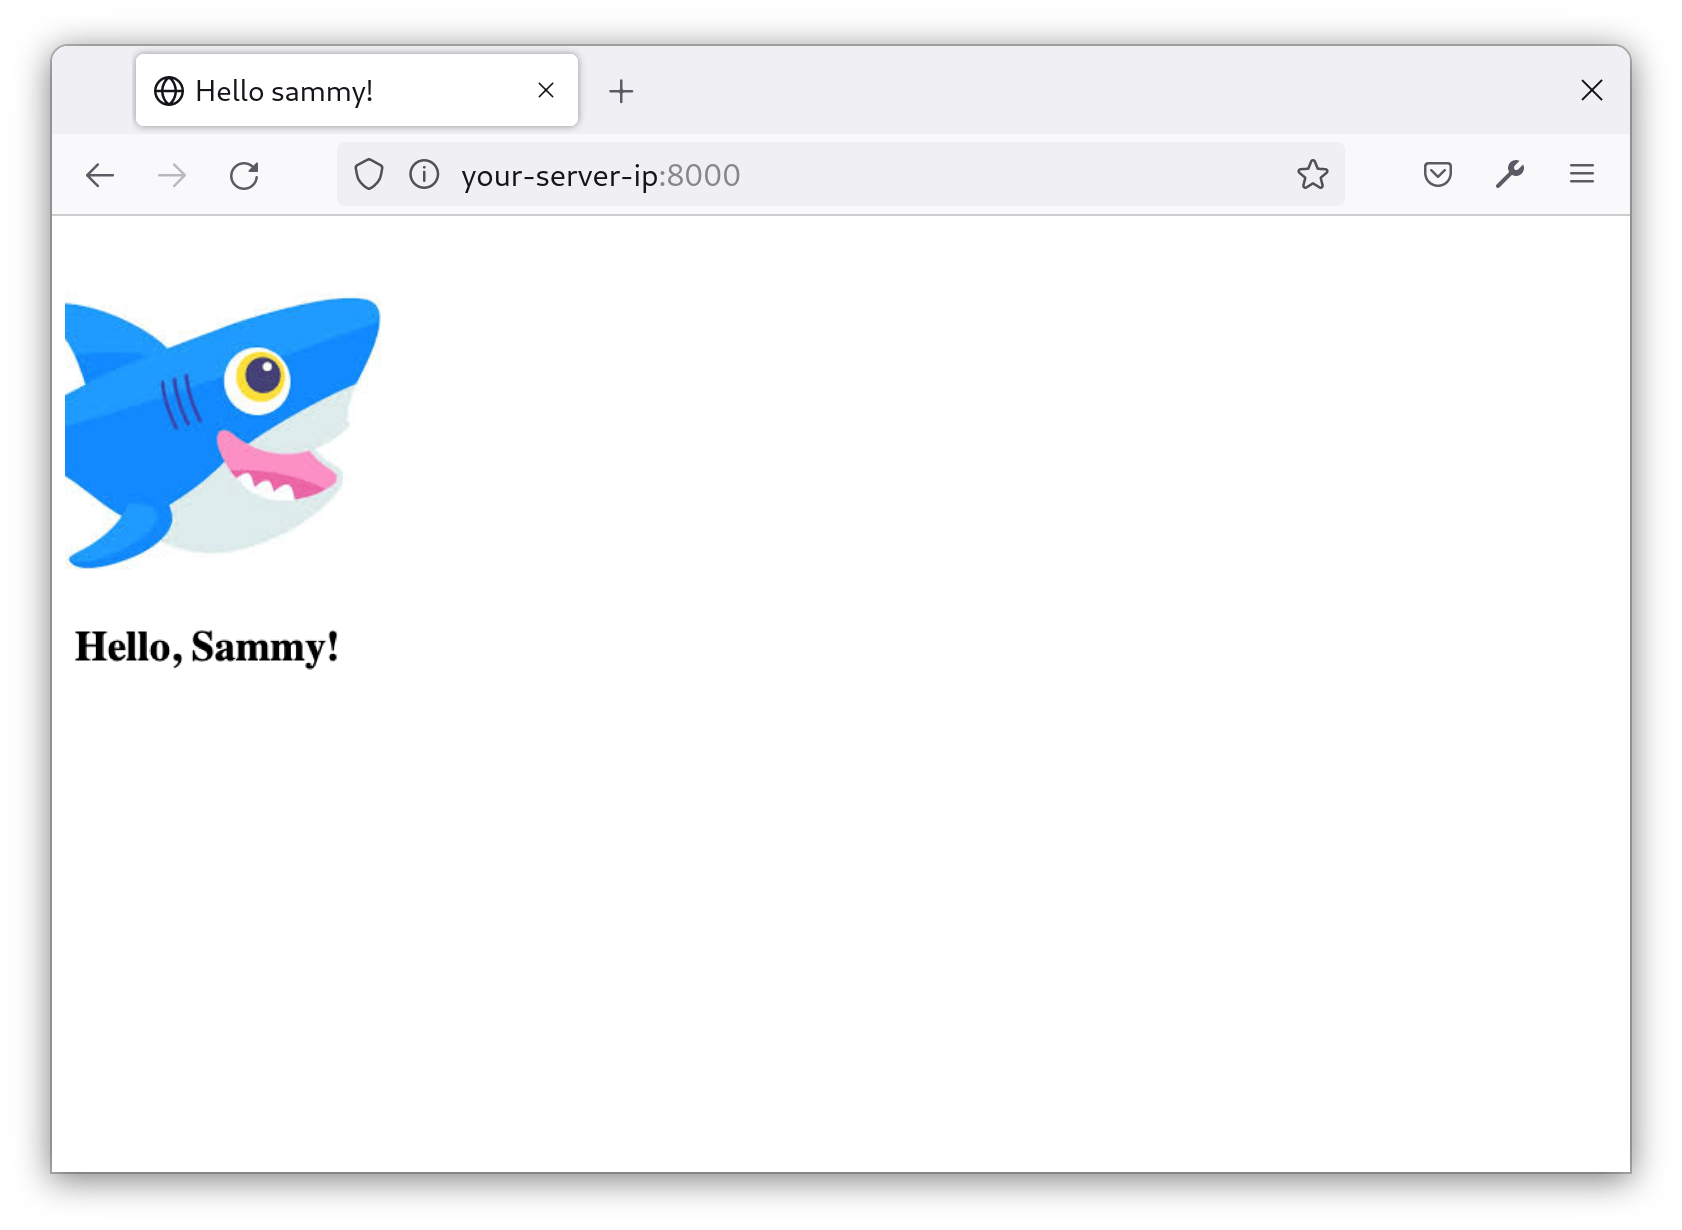
Open a browser and visit your-server-ip:8000. The page should look similar to this:
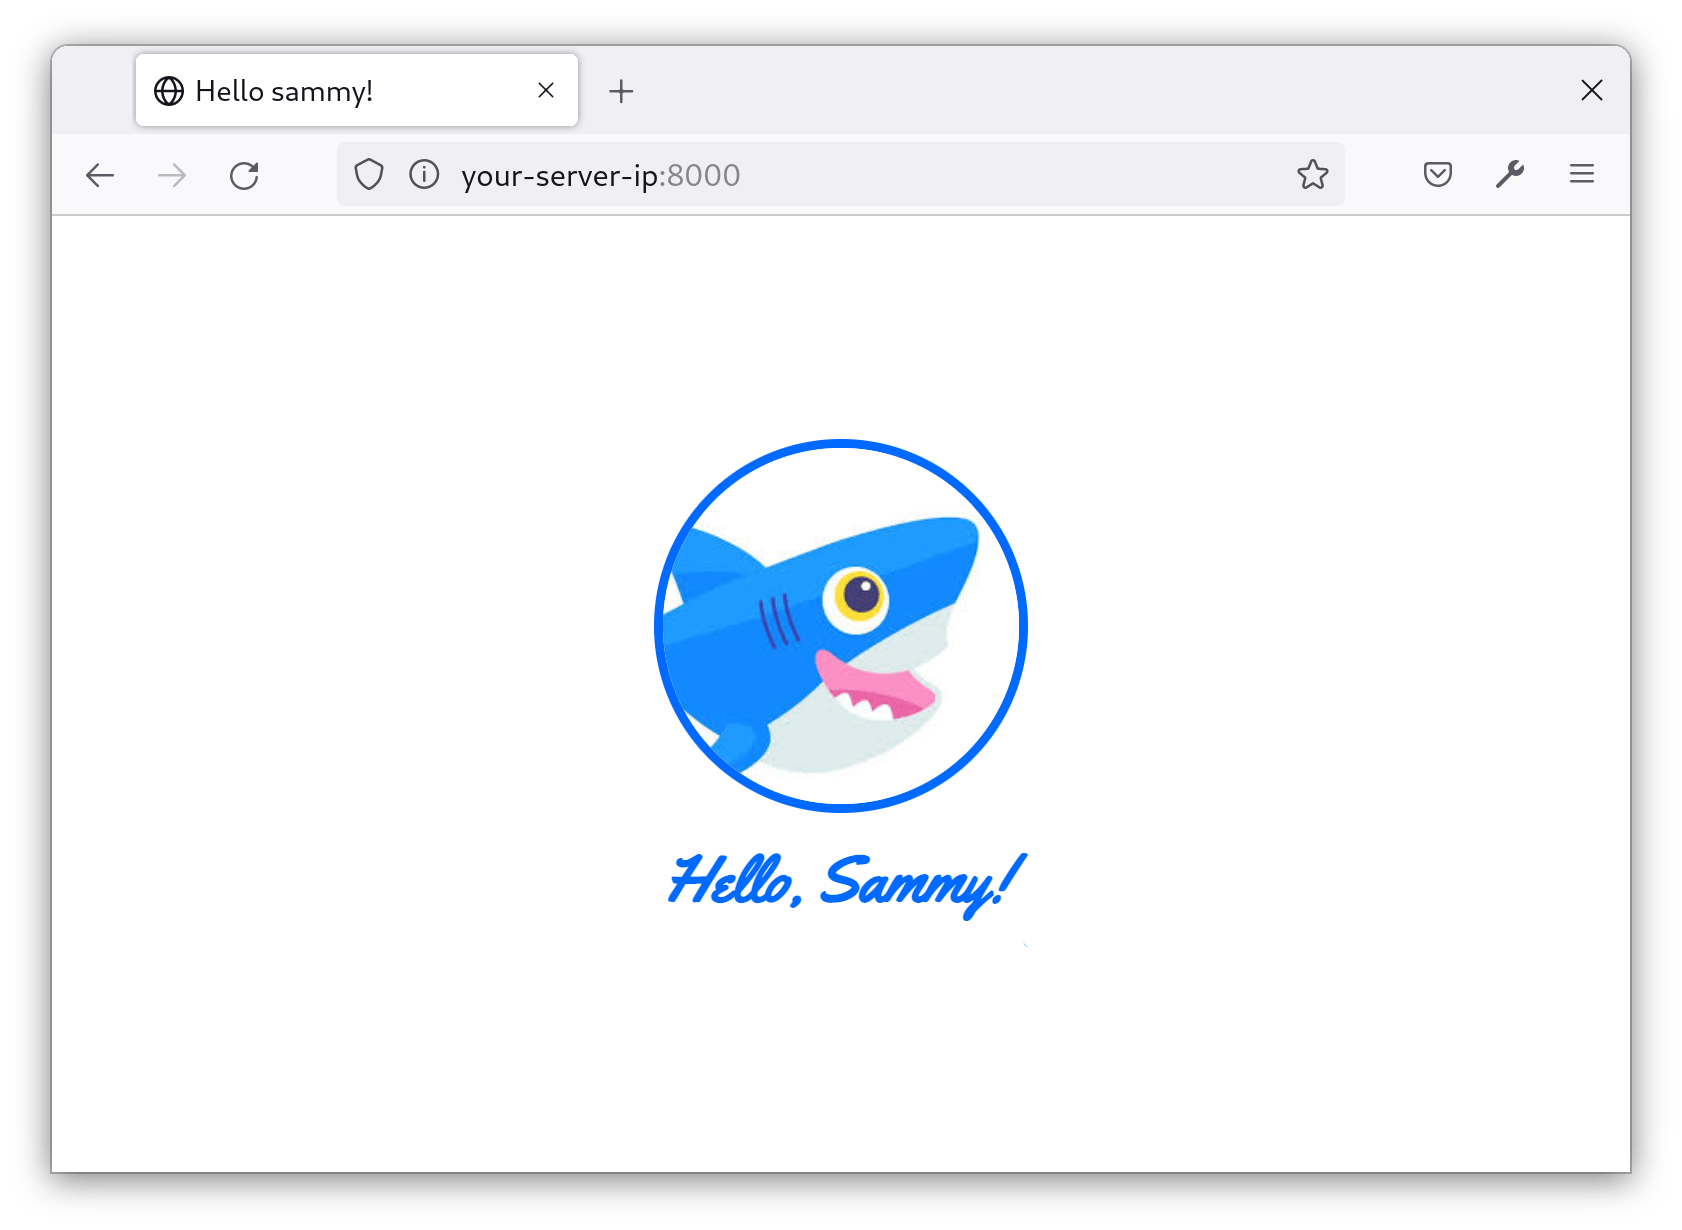
At this point, the page displays a profile picture of Sammy the Shark. Beneath the image is the text Hello, Sammy! in blue script.
To stop the Django development server, hit CONTROL-C.
In this step, you created a basic view that acts as the homepage of your Django project. Next, you’ll add CSP support to your application.
Step 2 — Installing CSP Middleware
In this step, you will install and implement a CSP middleware so that you can add CSP headers and work with CSP features in your views. Middleware adds additional functionality to any request or response Django handles. In this case, the Django-CSP Middleware adds CSP support to Django responses.
First, you will install Mozilla’s CSP Middleware in your Django project using pip, Python’s package manager. Use the following command to install the necessary package from PyPi, the Python Package Index. To run the command, you can either stop the Django development server using CONTROL-C or open a new tab in your terminal:
- pip install django-csp
Next, add the middleware to your Django project’s settings. Open settings.py:
- nano testsite/testsite/settings.py
With django-csp installed, you can now add the middleware in settings.py. This will add CSP headers to your responses.
Add the following line to the MIDDLEWARE config array:
MIDDLEWARE = [
    'csp.middleware.CSPMiddleware',
    'django.middleware.security.SecurityMiddleware',
    'django.contrib.sessions.middleware.SessionMiddleware',
    'django.middleware.common.CommonMiddleware',
    'django.middleware.csrf.CsrfViewMiddleware',
    'django.contrib.auth.middleware.AuthenticationMiddleware',
    'django.contrib.messages.middleware.MessageMiddleware',
    'django.middleware.clickjacking.XFrameOptionsMiddleware',
]
Save and close the file when you’re done. Your Django project now supports CSPs. In the next step, you’ll begin adding CSP headers.
Step 3 — Implementing a CSP Header
Now that your project supports CSPs, it is ready to be security hardened. To achieve that, you’ll configure the project to add CSP headers to your responses. A CSP header is what tells the browser how to behave when it encounters a particular type of content. So, if the header says only allow images from a particular domain, then the browser will only allow images from that domain.
Using nano or your favorite text editor, open settings.py:
- nano testsite/testsite/settings.py
Define the following variables anywhere in the file:
# Content Security Policy

CSP_IMG_SRC = ("'self'")

CSP_STYLE_SRC = ("'self'")

CSP_SCRIPT_SRC = ("'self'")
These rules are the boilerplate for your CSP. These lines indicate which sources are allowed for images, stylesheets, and scripts, respectively. Right now, they all contain the string 'self', which means that only resources from your own domain are allowed.
Save and close the file when you’re done.
Run your Django project with the following command:
- python manage.py runserver your-server-ip:8000
When you visit your-server-ip:8000, you’ll see the site is broken:
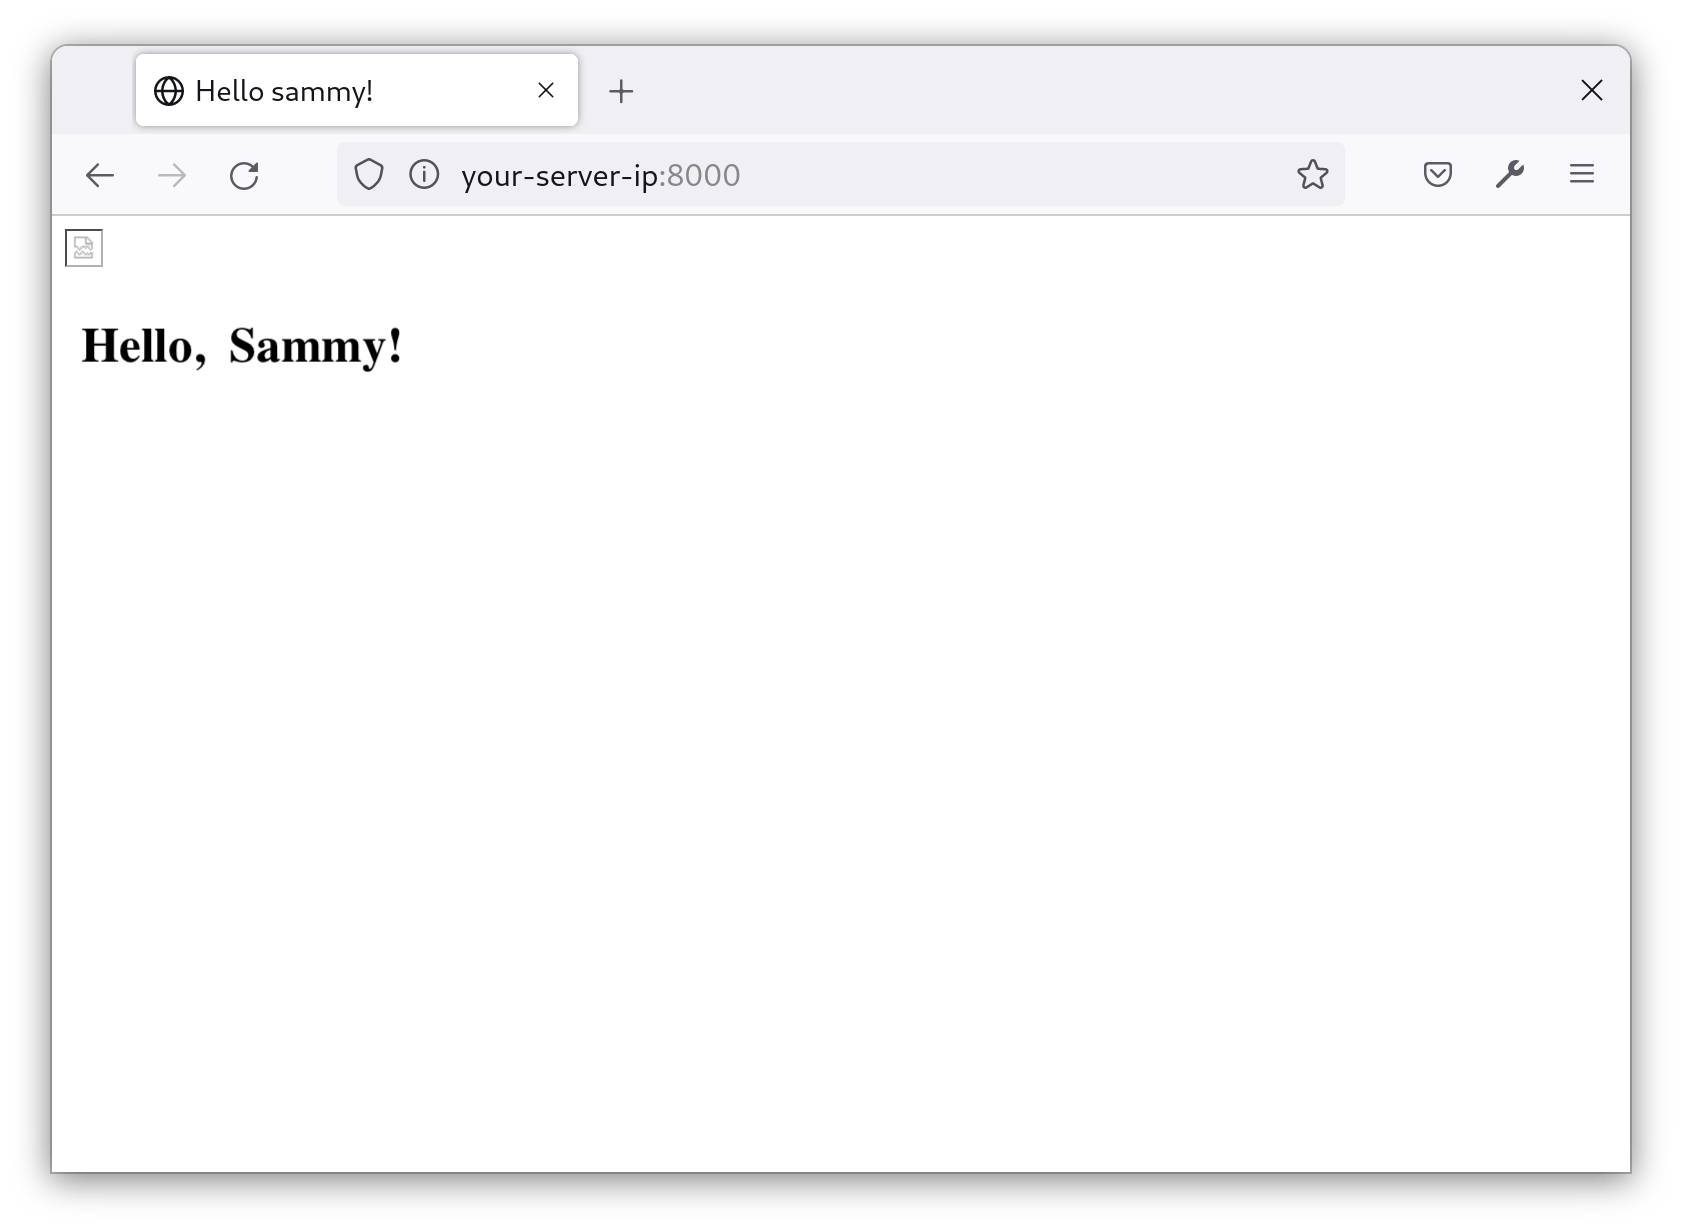
As expected, the image does not appear and the text appears in default styling (bold black). This means the CSP header is being enforced, and our page is now more secure. Because the view you created earlier is referencing stylesheets and images from domains that aren’t your own, the browser blocks them.
Your project now has a working CSP that is telling the browser to block resources that aren’t from your domain. Next, you’ll modify the CSP to allow specific resources, which will fix the homepage’s missing image and styling.
Step 4 — Modifying the CSP to Allow External Resources
Now that you have a basic CSP, you will modify it based on what you’re using on your site. As an example, a website that uses Adobe Fonts and embedded YouTube videos will need to allow these resources. However, if your website only displays images from within your own domain, you can leave the images settings at their restrictive defaults.
The first step is to find every resource you need to approve. You can use your browser’s developer tools to do this. Open the Network Monitor in Inspect Element, refresh the page, and look at the blocked resources:
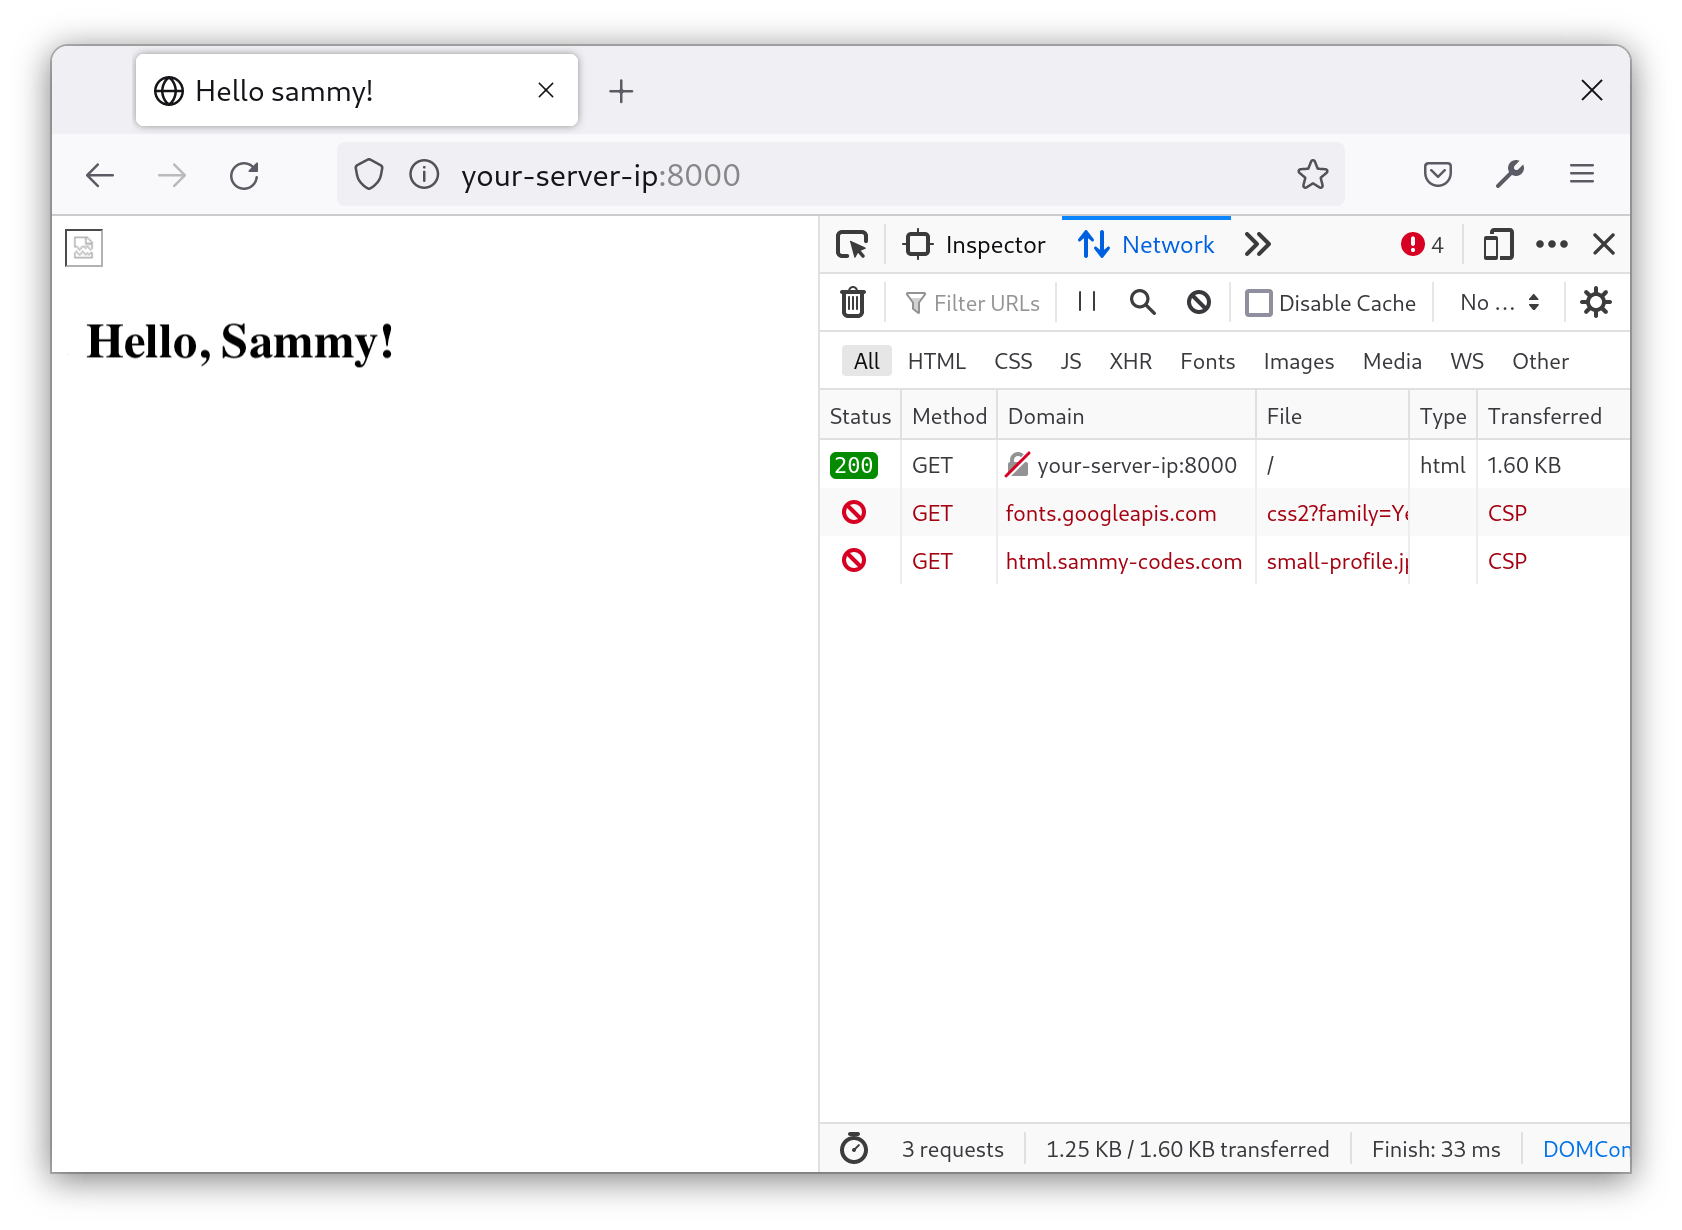
The Network log shows that two resources are being blocked by the CSP: a stylesheet from fonts.googleapis.com and an image from html.sammy-codes.com. To allow these resources in the CSP header, you’ll need to modify the variables in settings.py.
To allow resources from external domains, add the domain to the part of the CSP that matches the file type. So, to allow an image from html.sammy-codes.com, you’ll add html.sammy-codes.com to CSP_STYLE_SRC.
Open settings.py and add the following to the CSP_STYLE_SRC variable:
CSP_IMG_SRC = ("'self'", 'https://html.sammy-codes.com')
Now, instead of only allowing images from your domain, the site also allows images from html.sammy-codes.com.
The index view uses Google Fonts. Google supplies your site with the fonts (from https://fonts.gstatic.com) and with a stylesheet to apply them (from https://fonts.googleapis.com). To allow the fonts to load, add the following to your CSP:
CSP_STYLE_SRC = ("'self'", 'https://fonts.googleapis.com')

CSP_FONT_SRC = ("'self'", 'https://fonts.gstatic.com/')
Similar to allowing images from html.sammy-codes.com, you will also allow stylesheets from fonts.googleapis.com and fonts from fonts.gstatic.com. For context, the stylesheet loaded from fonts.googleapis.com is used to apply the fonts. The fonts themselves are loaded from fonts.gstatic.com.
Save and close the file.
Warning: Similar to self, there are other keywords such as unsafe-inline, unsafe-eval, or unsafe-hashes that can be used in a CSP. It is highly recommended that you avoid using these rules in your CSP. While these will make implementation easier, they can be used to circumvent the CSP and render it useless.
For more information, see the Mozilla product documentation for “Unsafe inline script”.
Now, Google Fonts will be allowed to load styles and fonts on your site and html.sammy-codes.com will be allowed to load images. However, when you visit a page on your server, you may notice only images are loading now. That’s because the inline styles in the HTML that are used to apply the fonts are not allowed. You will fix that in the next step.
Step 5 — Working with Inline Scripts and Styles
At this point, you’ve modified the CSP to allow external resources. But inline resources, such as styles and scripts in your view, are still not allowed. In this step, you’ll get those working so that you can apply font styling.
There are two ways to allow inline scripts and styles: nonces and hashes. If you find that you’re frequently modifying inline scripts and styles, use nonces to avoid frequent changes to your CSP. If you rarely update inline scripts and styles, using hashes is a reasonable approach.
Using nonce to Allow Inline Scripts
First, you’ll use the nonce approach. A nonce is a randomly generated token that is unique to each request. If two people visit your site, they will each get a unique nonce that is embedded in the inline scripts and styles you approve. Think of nonce as a one-time password that approves certain parts of a site to run for a single session.
To add nonce support to your project, you’ll update your CSP in settings.py. Open the file for editing:
- nano testsite/testsite/settings.py
Add script-src in CSP_INCLUDE_NONCE_IN in the settings.py file.
Define CSP_INCLUDE_NONCE_IN anywhere in the file and add 'script-src' to it:
# Content Security Policy

CSP_INCLUDE_NONCE_IN = ['script-src']
CSP_INCLUDE_NONCE_IN indicates which inline scripts you’re allowed to add nonce attributes to. CSP_INCLUDE_NONCE_IN is handled as an array since multiple data sources support nonces (for example, style-src).
Save and close the file.
Nonces are now allowed to be generated for inline scripts when you add the nonce attribute to them in your view template. To try this out, you’ll use a simple JavaScript snippet.
Open index.html for editing:
- nano testsite/testsite/templates/index.html
Add the following snippet in the <head> of the HTML:
<script>
    console.log("Hello from the console!");
</script>
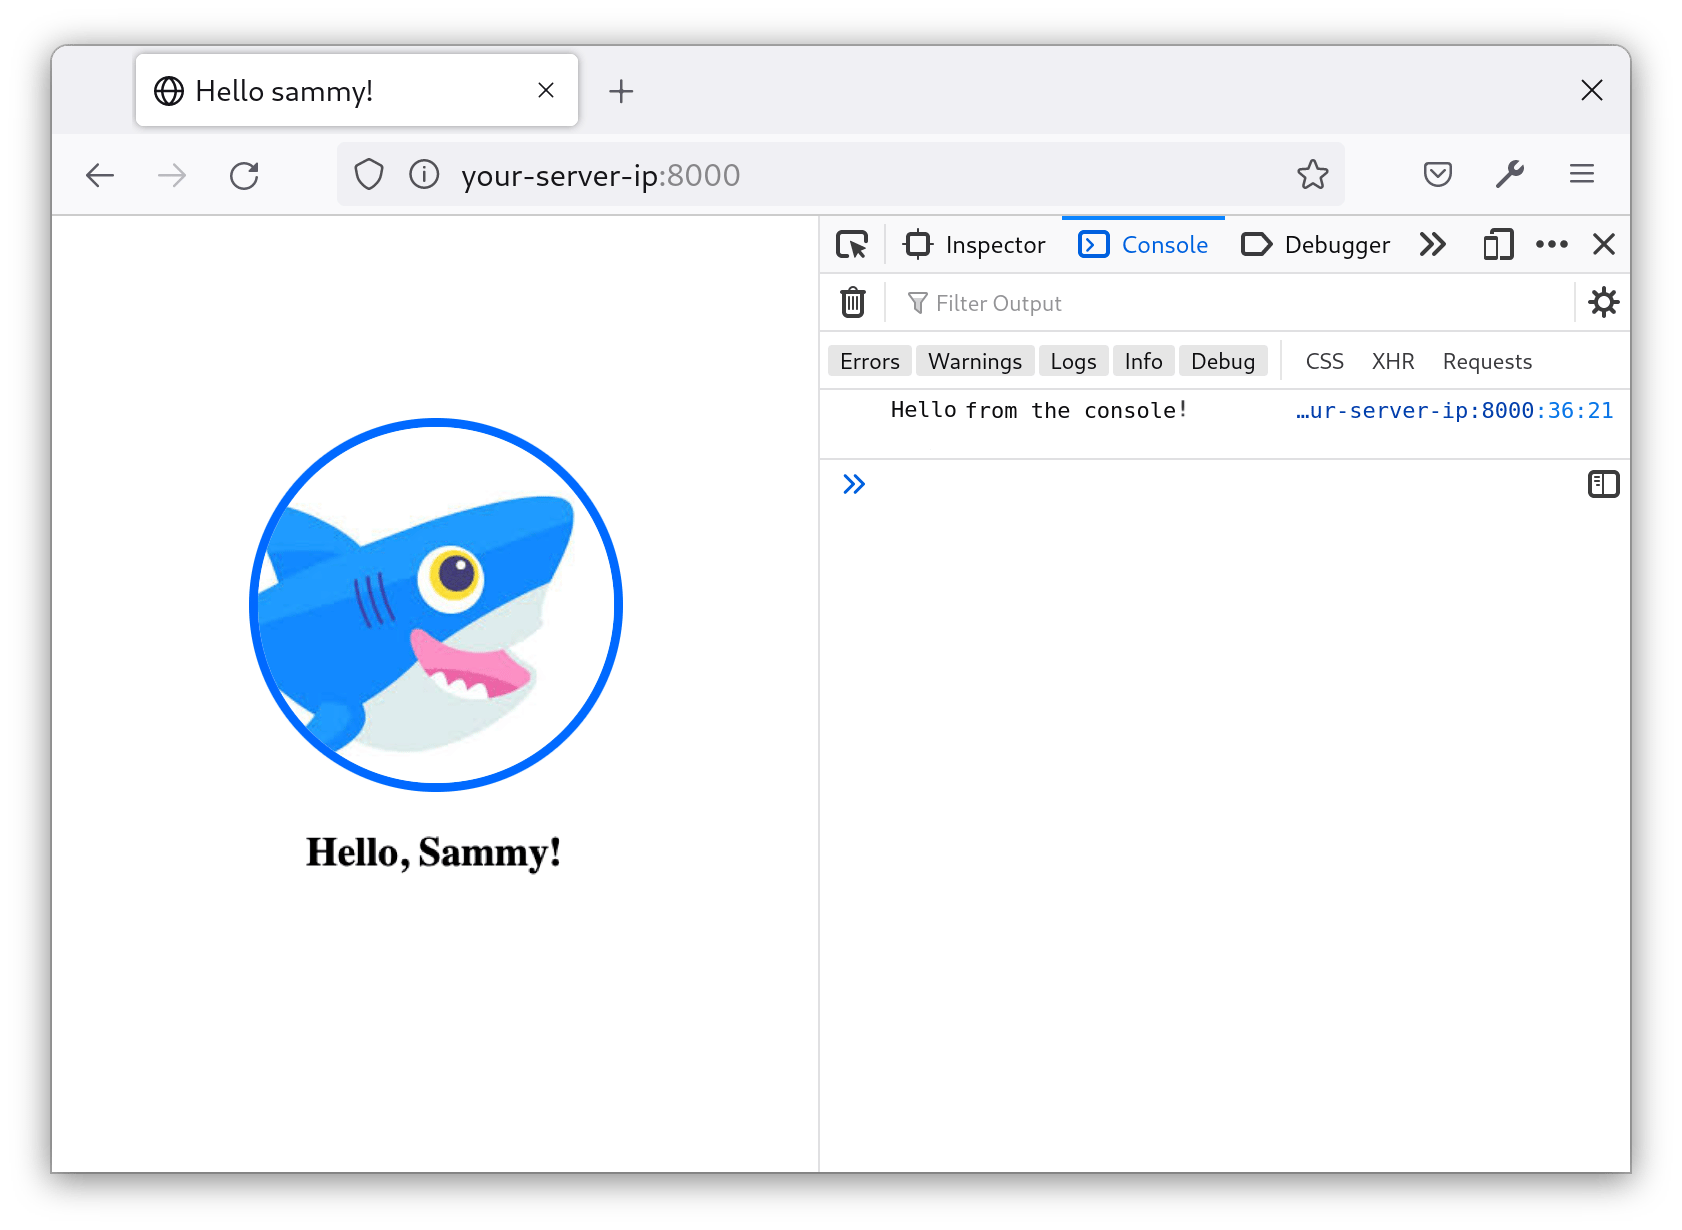
This snippet prints Hello from the console!" to the browser’s console. However, since your project has a CSP that only allows inline scripts if they have a nonce, this script won’t run and will instead produce an error.
You can see this error in your browser’s console when you refresh the page:
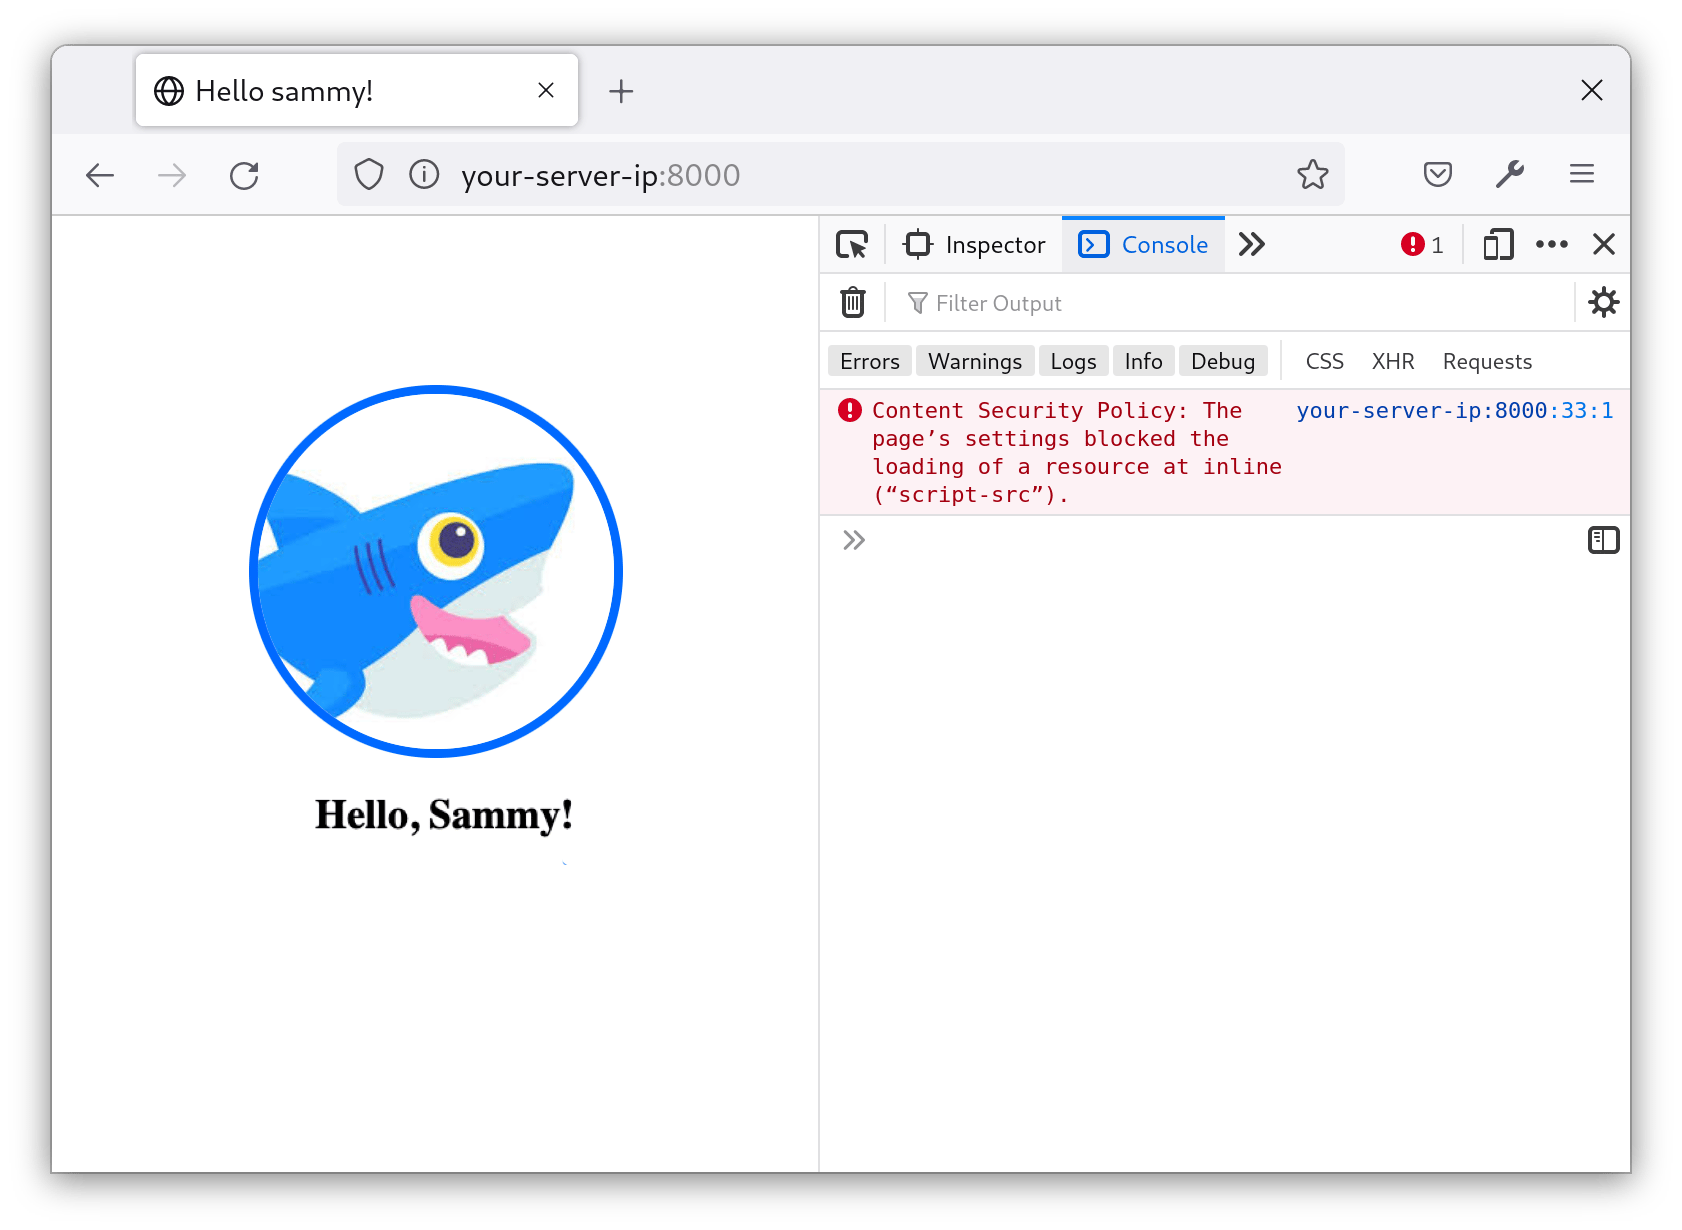
The image loads because you allowed external resources in the previous step. As expected, the styling is currently the default because you haven’t yet allowed inline styles. Also as expected, the console message did not print and returned an error. You’ll need to give it a nonce to approve it.
You can do that by adding nonce="{{request.csp_nonce}}" to this script as an attribute. Open index.html for editing and add the highlighted portion as shown here:
<script nonce="{{request.csp_nonce}}">
    console.log("Hello from the console!");
</script>
Save and close your file when you’re done.
If you refresh the page, the script will now execute:
When you look in Inspect Element, you’ll notice there’s no value for the attribute:
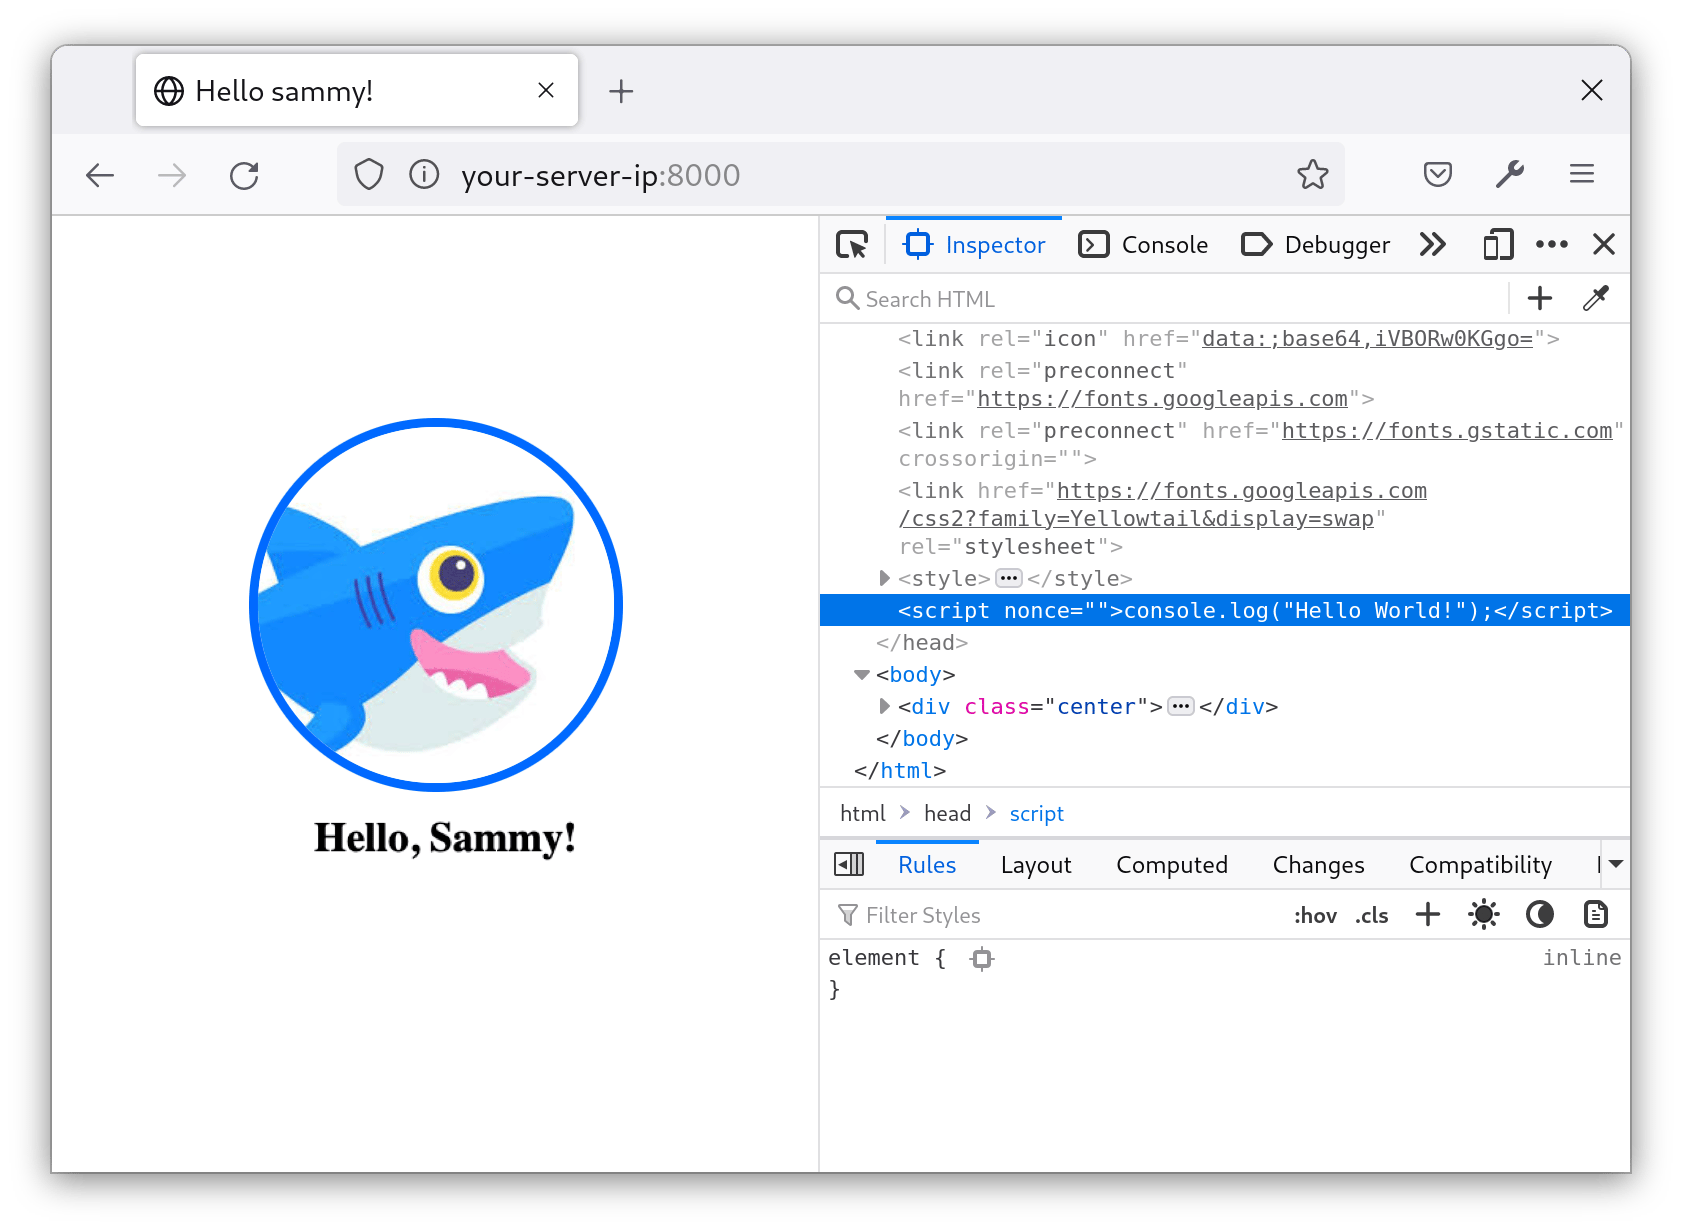
The value does not appear for security reasons. The browser has already processed the value. It is hidden so that any scripts with access to the DOM can’t access it and apply it to some other script. If you View page source instead, this is what the browser received:
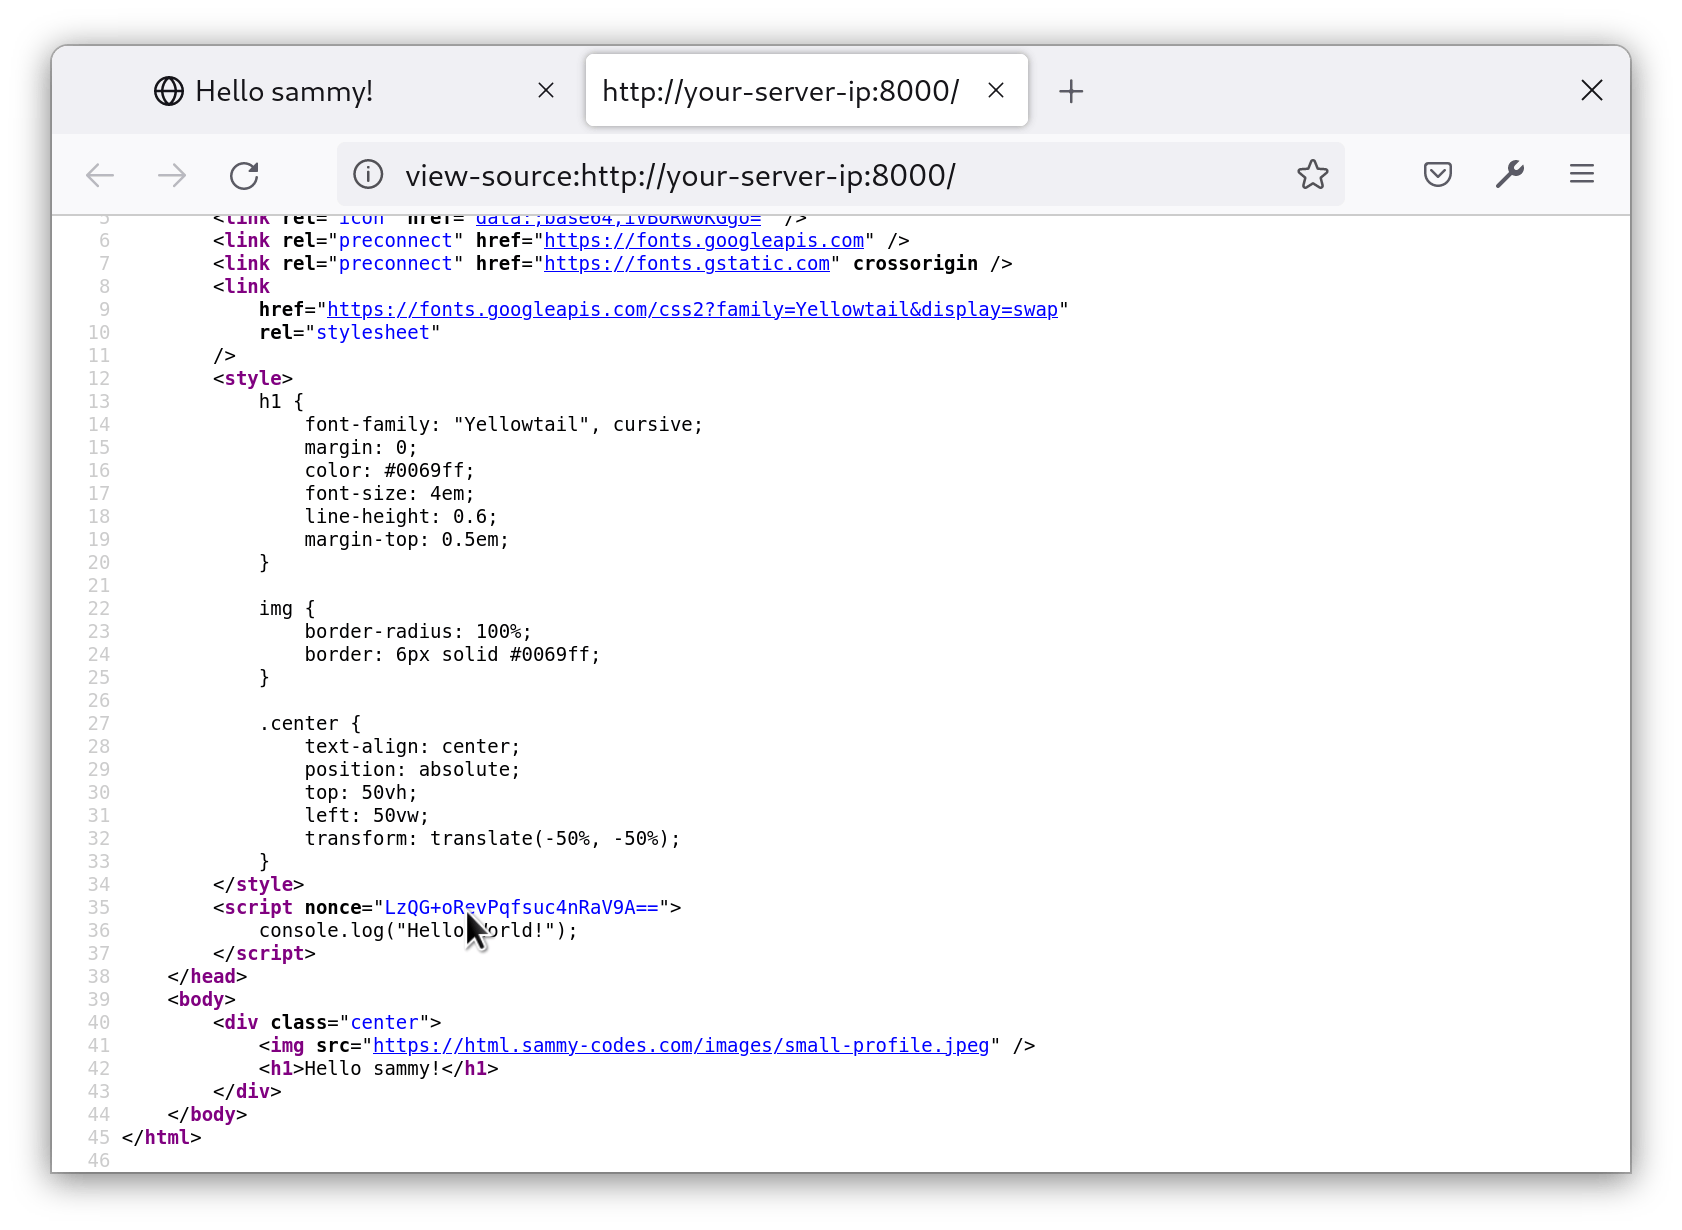
Notice that every time you refresh the page, the nonce value changes. This is because the CSP middleware in our project generates a new nonce for each request.
These nonce values are appended to the CSP header when the browser receives the response:
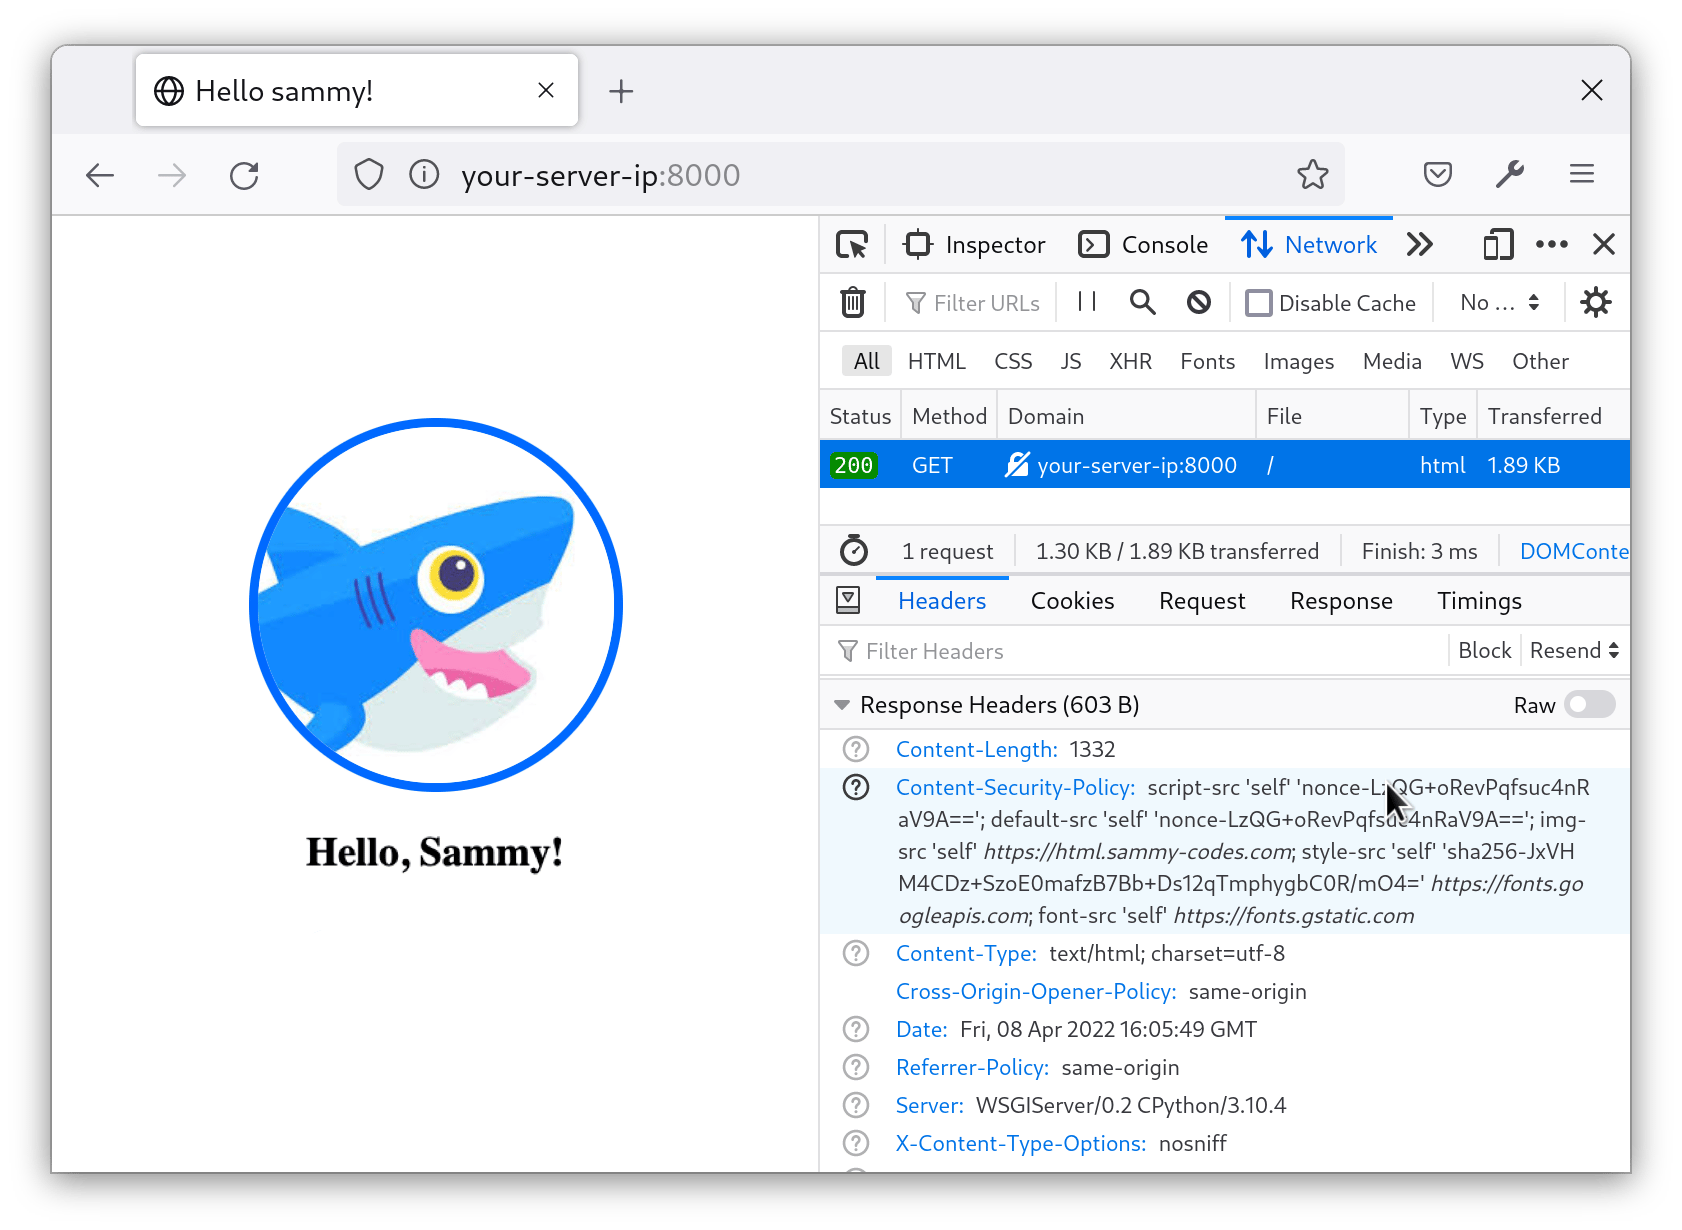
Every request that the browser makes to your site will have a unique nonce value for that script. Since the nonce is provided in the CSP header, that means the Django server approved that specific script to run.
You have updated your project to work with nonce, which can be applied to multiple resources. For example, you can apply it to styles, too,by updating CSP_INCLUDE_NONCE_IN to allow style-src. But there is a simpler approach to approving inline resources, and that is what you’ll do next.
Using Hashes to Allow Inline Styles
Another approach for allowing inline scripts and styles is with hashes. A hash is a unique identifier for a given inline resource.
As an example, this is the inline style in our template:
<style>
    h1 {
        font-family: "Yellowtail", cursive;
        margin: 0.5em 0 0 0;
        color: #0069ff;
        font-size: 4em;
        line-height: 0.6;
    }

    img {
        border-radius: 100%;
        border: 6px solid #0069ff;
    }

    .center {
        text-align: center;
        position: absolute;
        top: 50vh;
        left: 50vw;
        transform: translate(-50%, -50%);
    }
</style>
Currently, however, the styles are not working. When you view the site in the browser, the images load successfully, but the fonts and styles are not applied:
In the browser’s console, you’ll find an error that an inline style violates the CSP. (There may be other errors, but look for the error about inline style.)
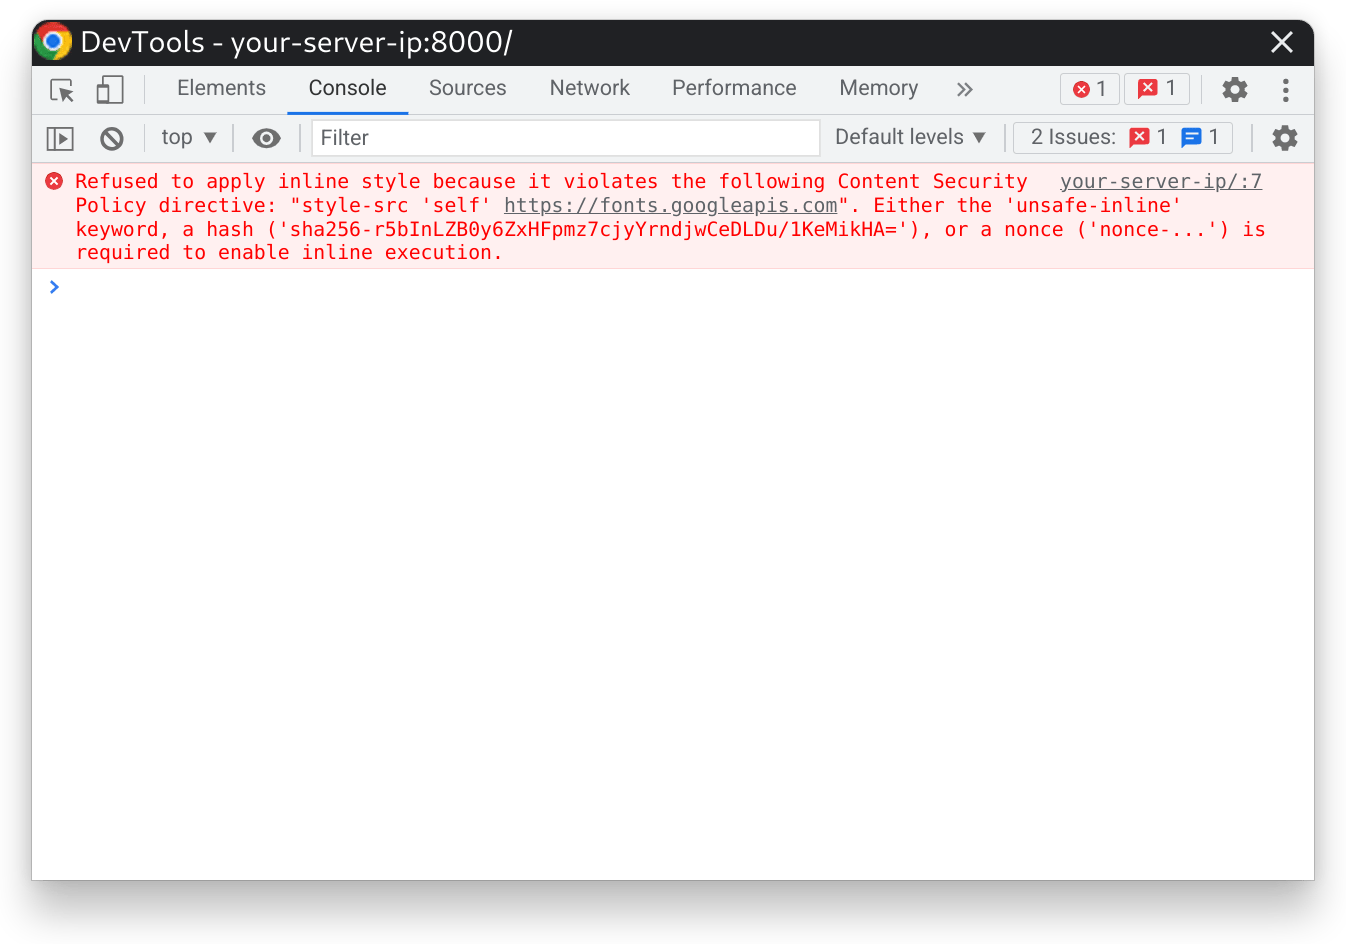
The error is produced because the style is not approved by our CSP. But, notice that the error provides the hash necessary to approve the style snippet. This hash is unique to this specific style snippet. No other snippets will ever have the same hash. When this hash is placed inside the CSP, anytime this specific style is loaded, it will be approved. But, if you ever modify these styles, you’ll need to get the new hash and replace the old one with it in the CSP.
You’ll now apply the hash by adding it to CSP_STYLE_SRC in settings.py, like so:
- nano testsite/testsite/settings.py
CSP_STYLE_SRC = ("'self' 'sha256-r5bInLZB0y6ZxHFpmz7cjyYrndjwCeDLDu/1KeMikHA='", 'https://fonts.googleapis.com')
Adding the sha256-... hash to the CSP_STYLE_SRC list will allow the browser to load the stylesheet without any errors.
Save and close file.
Now, reload the site in the browser, and the fonts and styles should load successfully:
Inline styles and scripts now function correctly. In this step, you used two different approaches, nonces and hashes, to allow inline styles and scripts.
But, there is an important problem to address. CSPs are tedious to maintain, especially for big websites. You may need a way to track when the CSP blocks a resource so that you can determine if it’s a malicious resource or simply a broken part of your site. In the next step, you’ll use Sentry to log and keep track of all the violations produced by your CSP.
Step 6 — Reporting Violations with Sentry (Optional)
Given how strict CSPs tend to be, it’s good to know when it is blocking content — especially since blocking content likely means some functionality on your site won’t work. Tools like Sentry can let you know when the CSP is blocking requests for users. In this step, you’ll configure Sentry to log and report CSP violations.
As a prerequisite, you signed up for an account with Sentry. Now you’ll create a project.
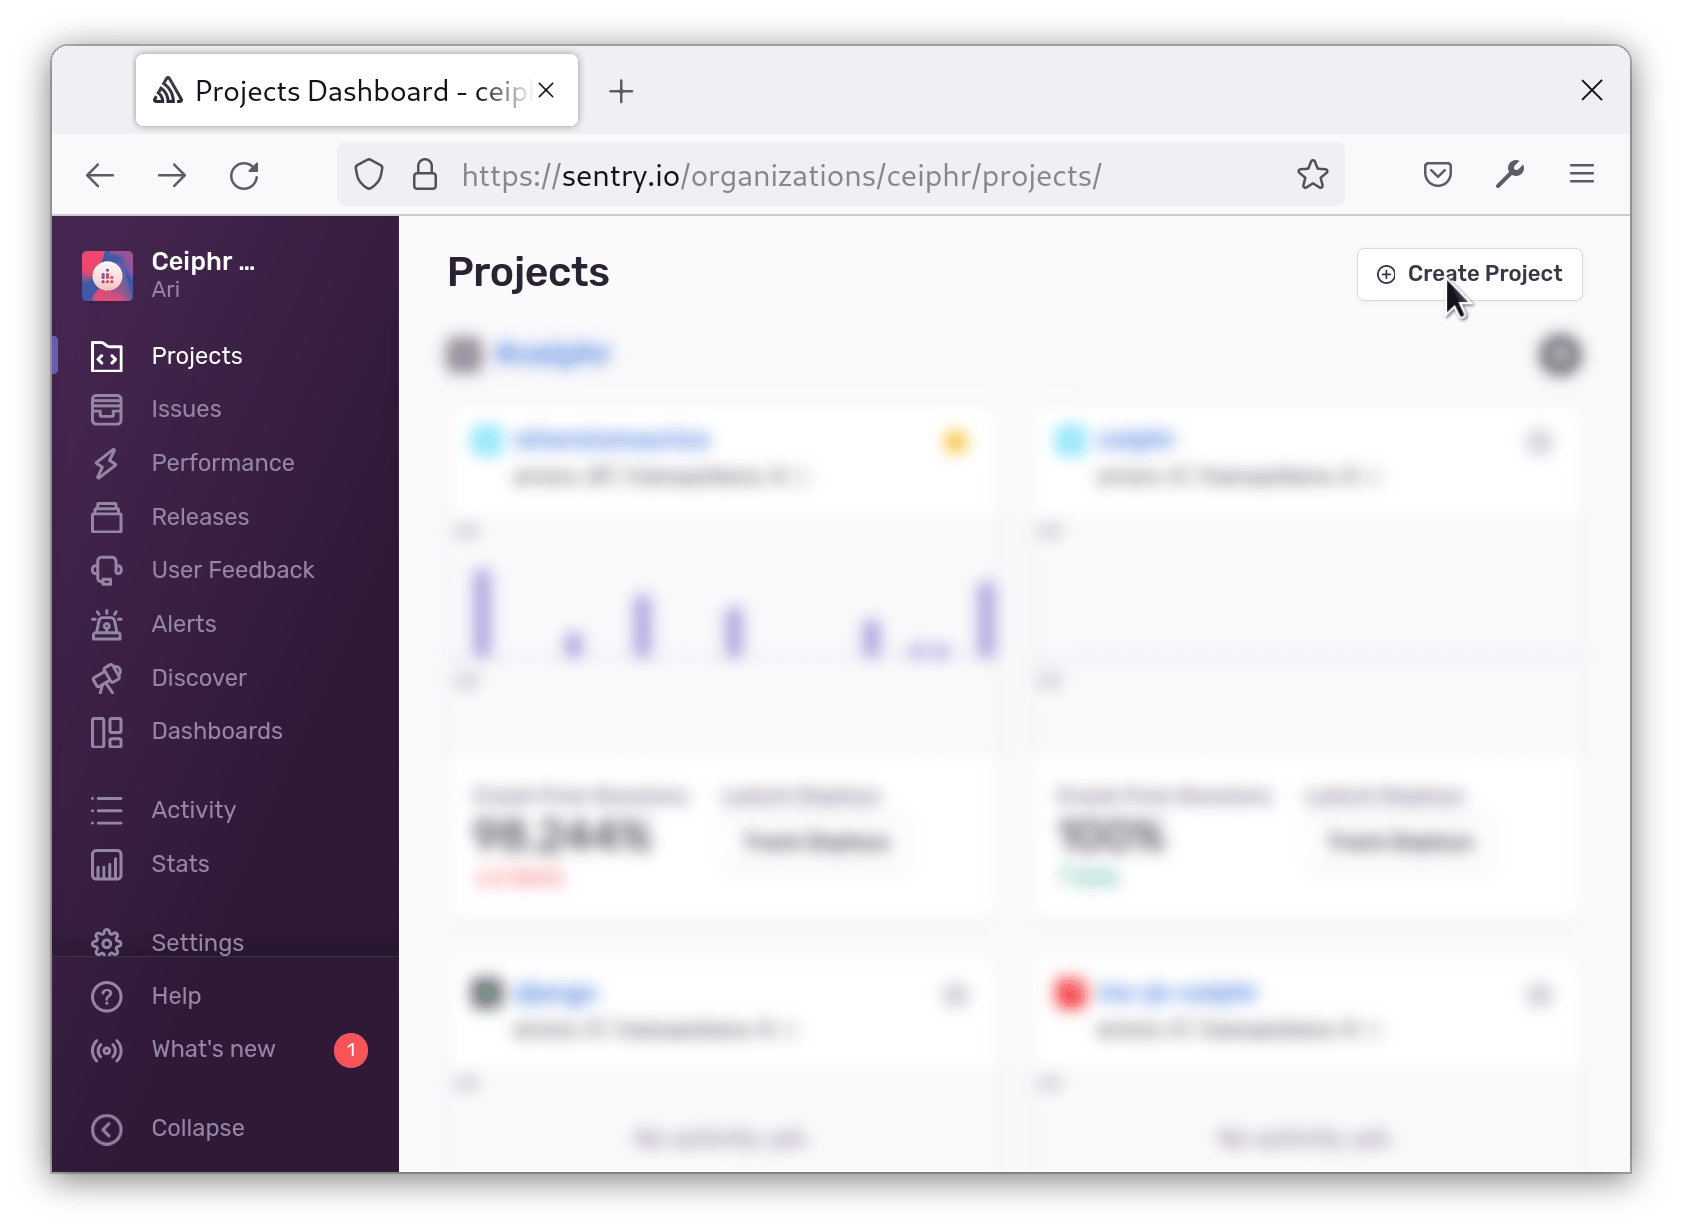
In the top-left corner of the Sentry dashboard, click on the Projects tab:
In the top-right corner, click on the Create Project button:
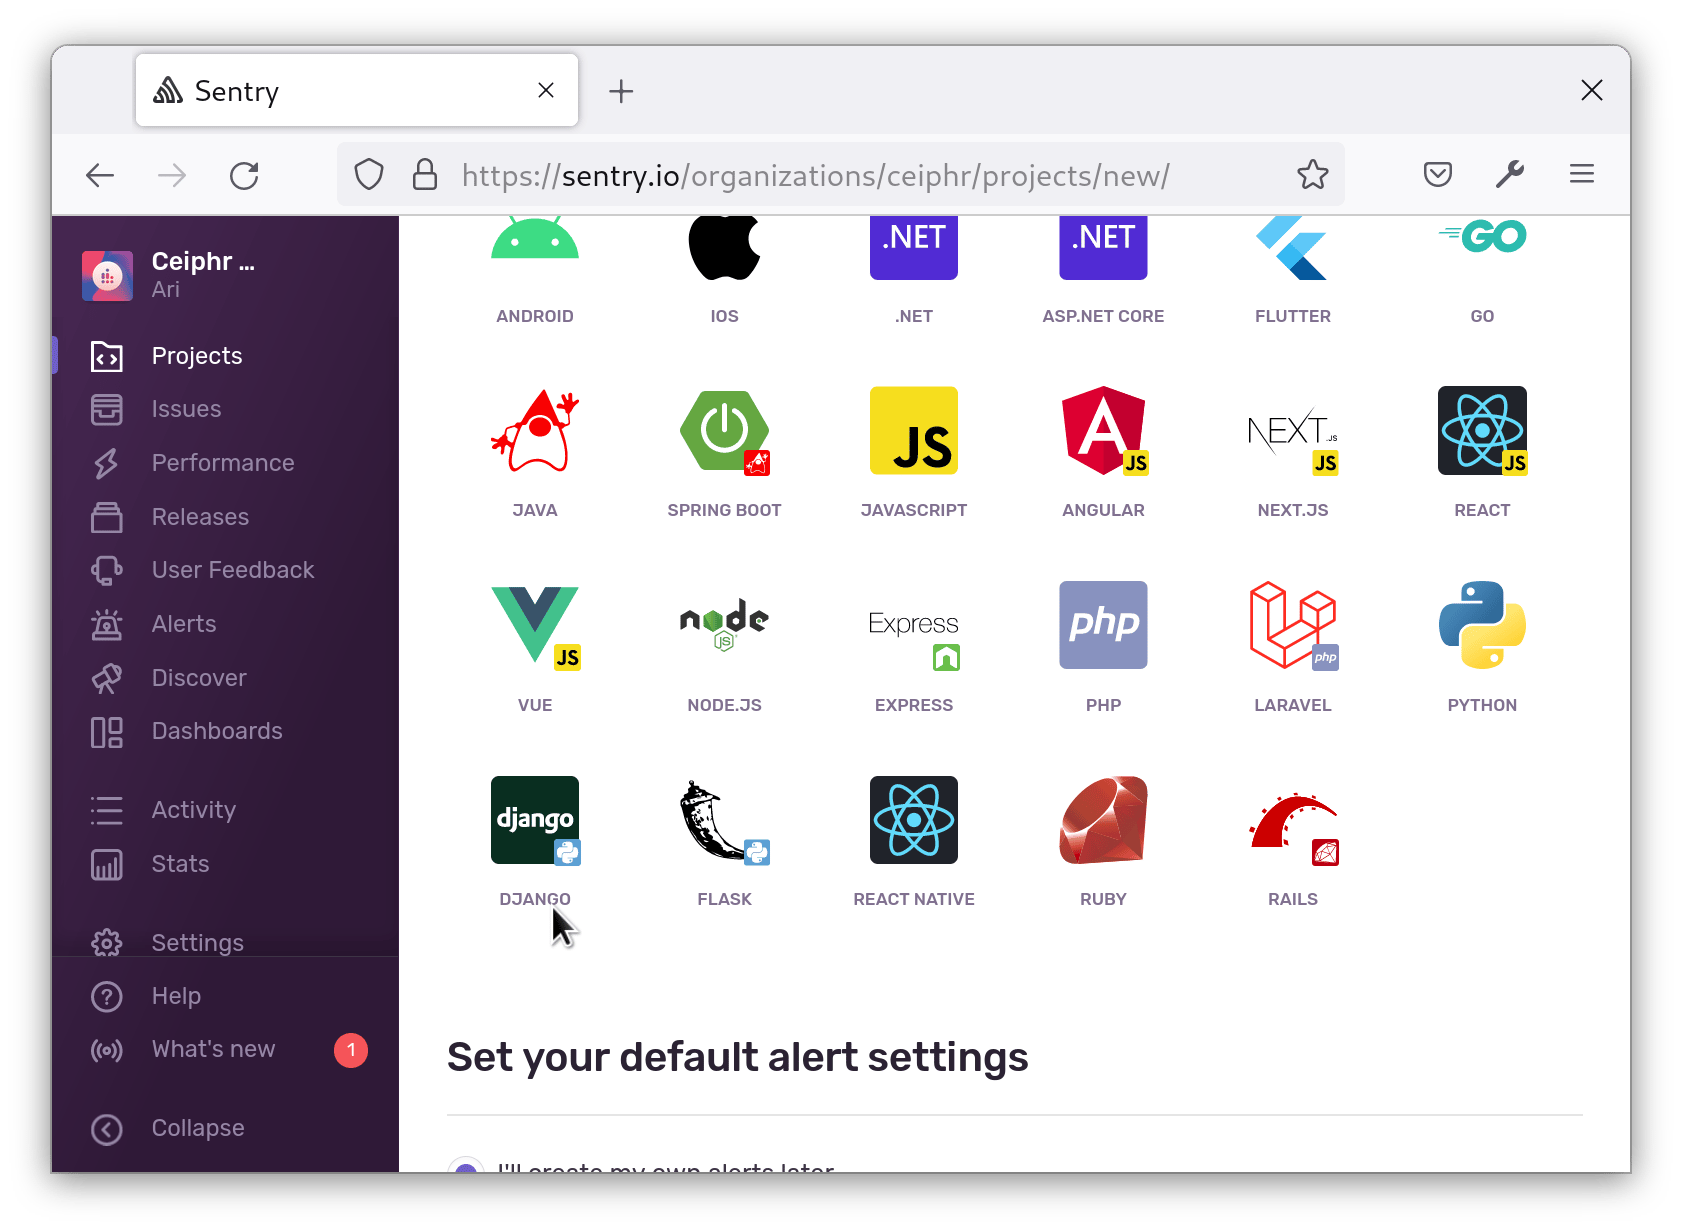
You will see a number of logos with a title stating Choose a platform. Choose Django:
Then, at the bottom, name your project (for this example, we’ll use sammys-tutorial), and click on the Create Project button:
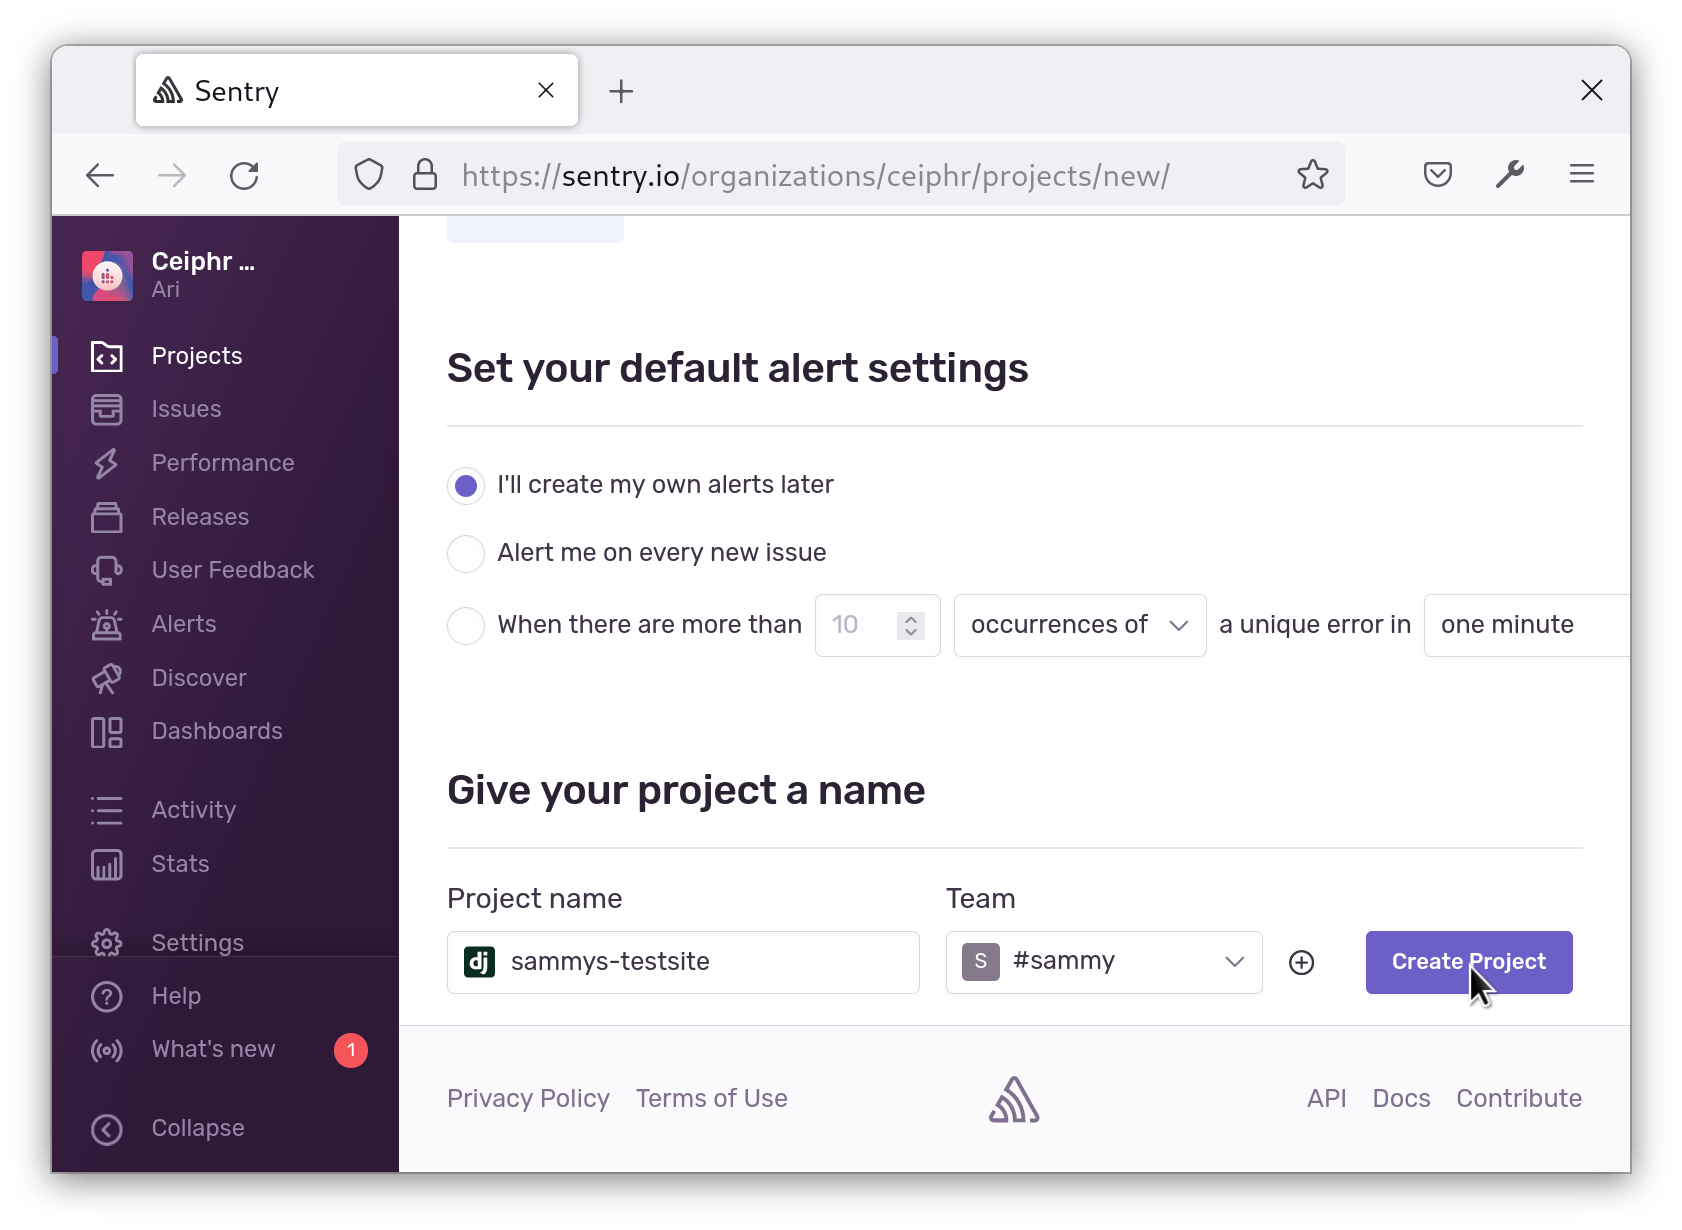
Sentry will give you a code snippet to add to your settings.py file. Save this snippet to add at a later step.
In your terminal, install the Sentry SDK:
- pip install --upgrade sentry-sdk
Open settings.py like so:
- nano testsite/testsite/settings.py
Add the following to the end of the file, and be sure to replace SENTRY_DSN with the value from the dashboard:
import sentry_sdk
from sentry_sdk.integrations.django import DjangoIntegration

sentry_sdk.init(
    dsn="SENTRY_DSN",
    integrations=[DjangoIntegration()],

    # Set traces_sample_rate to 1.0 to capture 100%
    # of transactions for performance monitoring.
    # We recommend adjusting this value in production.
    traces_sample_rate=1.0,

    # If you wish to associate users to errors (assuming you are using
    # django.contrib.auth) you may enable sending PII data.
    send_default_pii=True
)
This code is provided by Sentry so that it can log any errors that occur in your application. It is the default configuration for Sentry and initializes Sentry for logging issues on our server. Technically, you don’t need to initialize Sentry on your server for CSP violations, but in the rare case there’s some issue rendering nonces or hashes, these errors will be logged to Sentry.
Save and close the file.
Next, go back to the dashboard for your project and click the gear icon to go into Settings:
Go to the Security Headers tab:
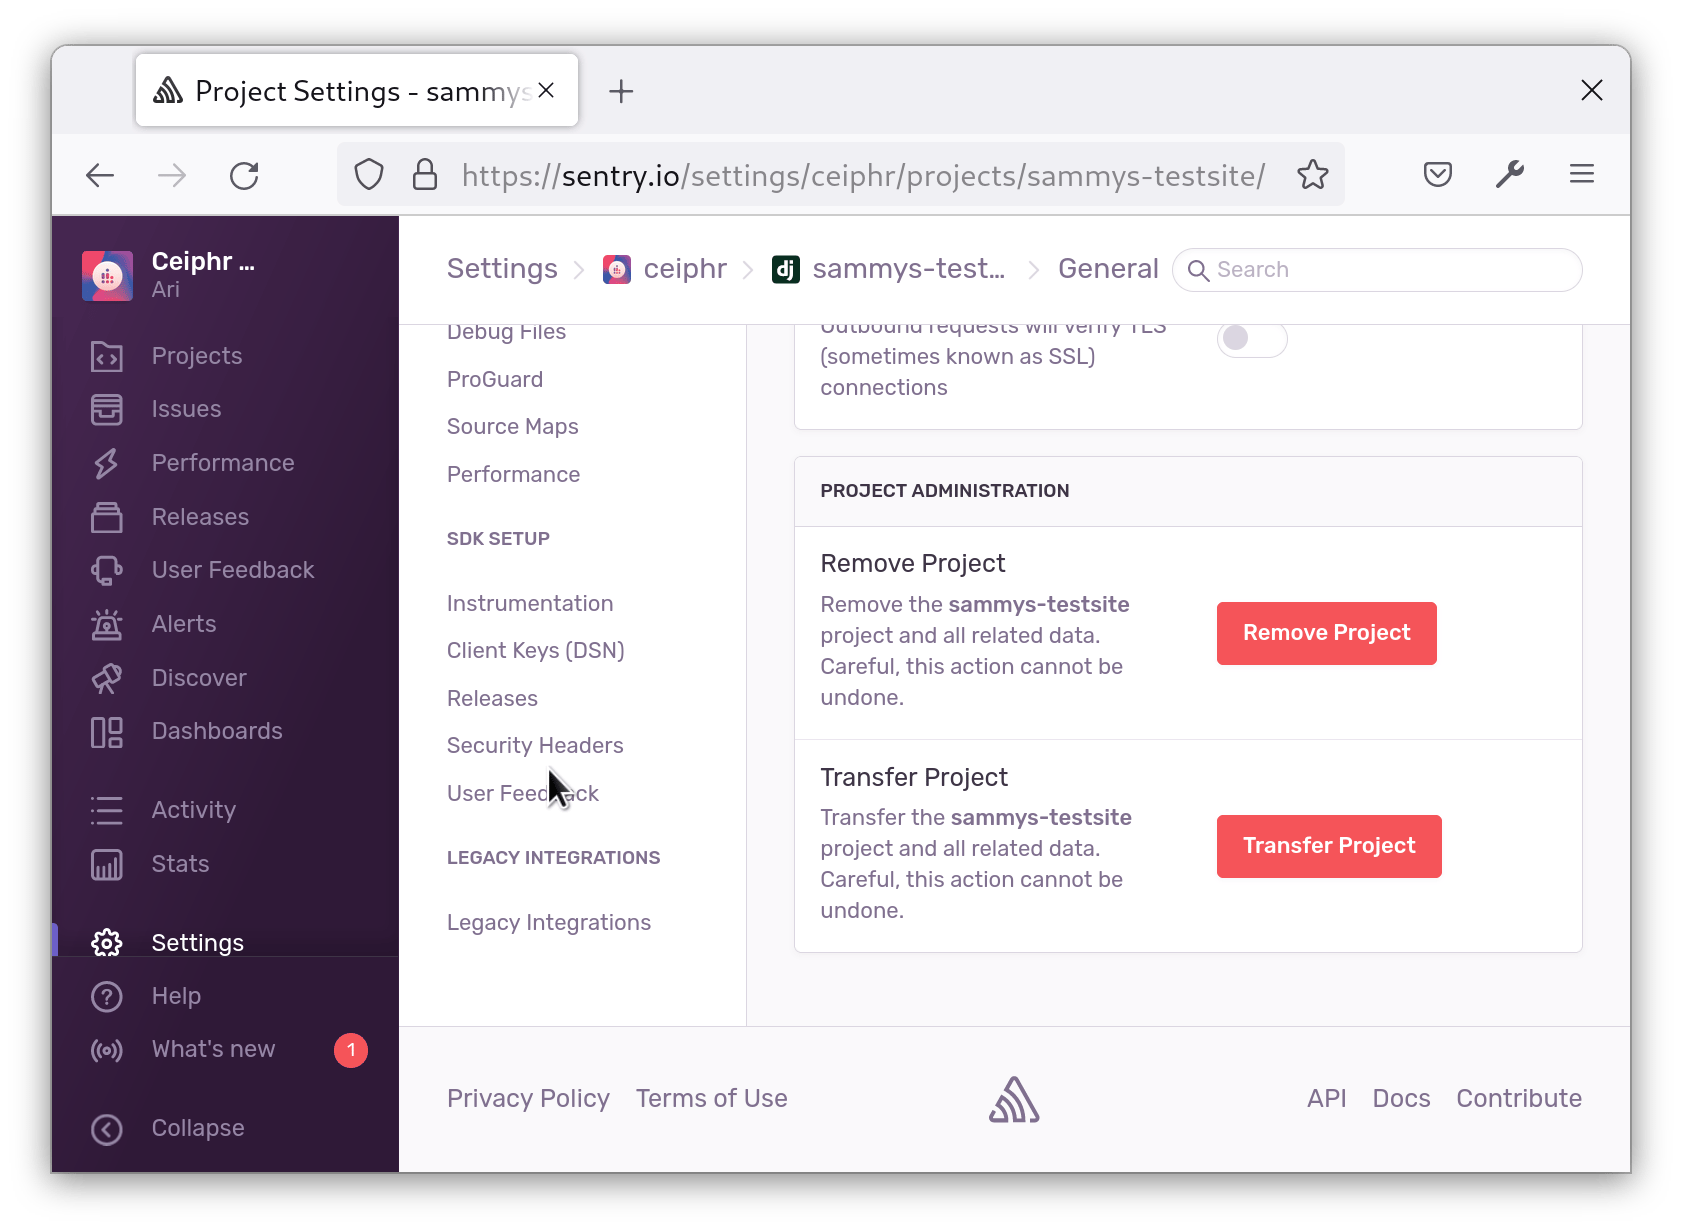
Copy the report-uri:
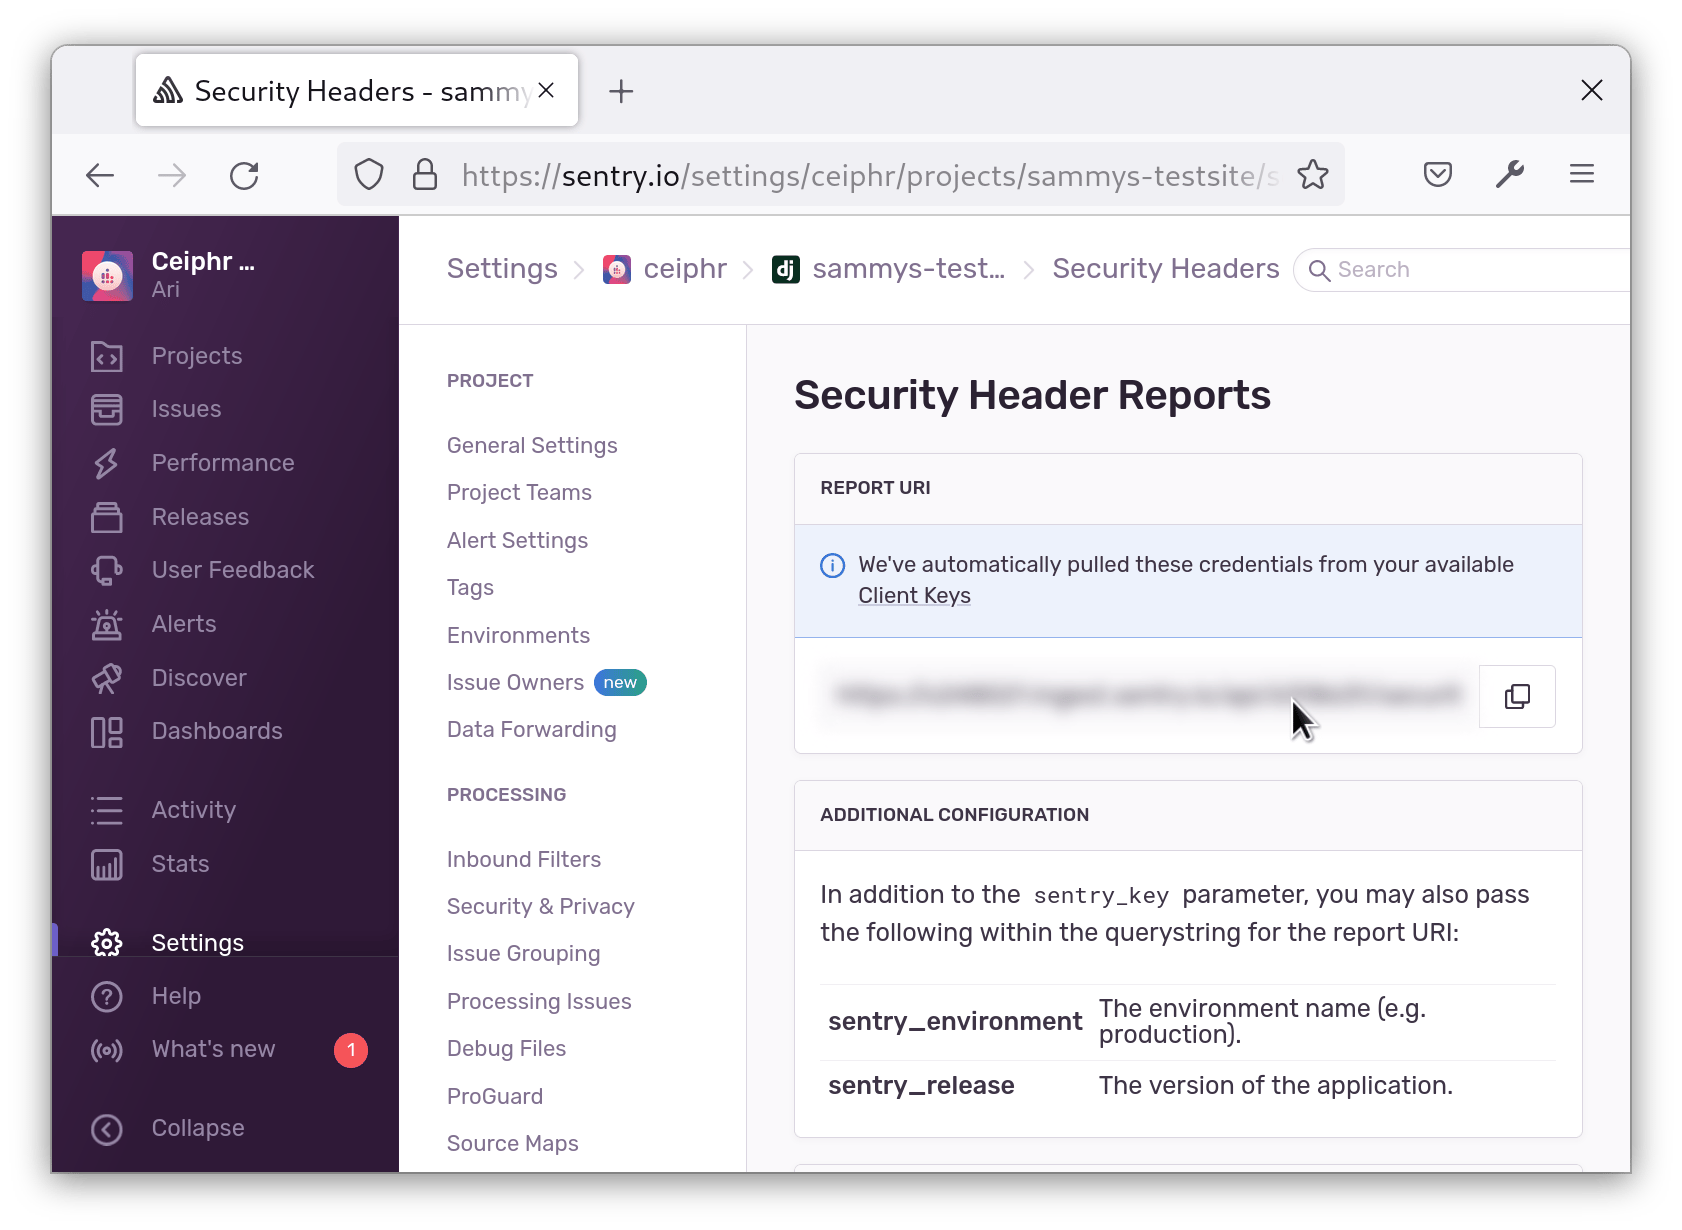
Add it to your CSP like so:
# Content Security Policy

CSP_REPORT_URI = "your-report-uri"
Be sure to replace your-report-uri with the value you copied from the dashboard.
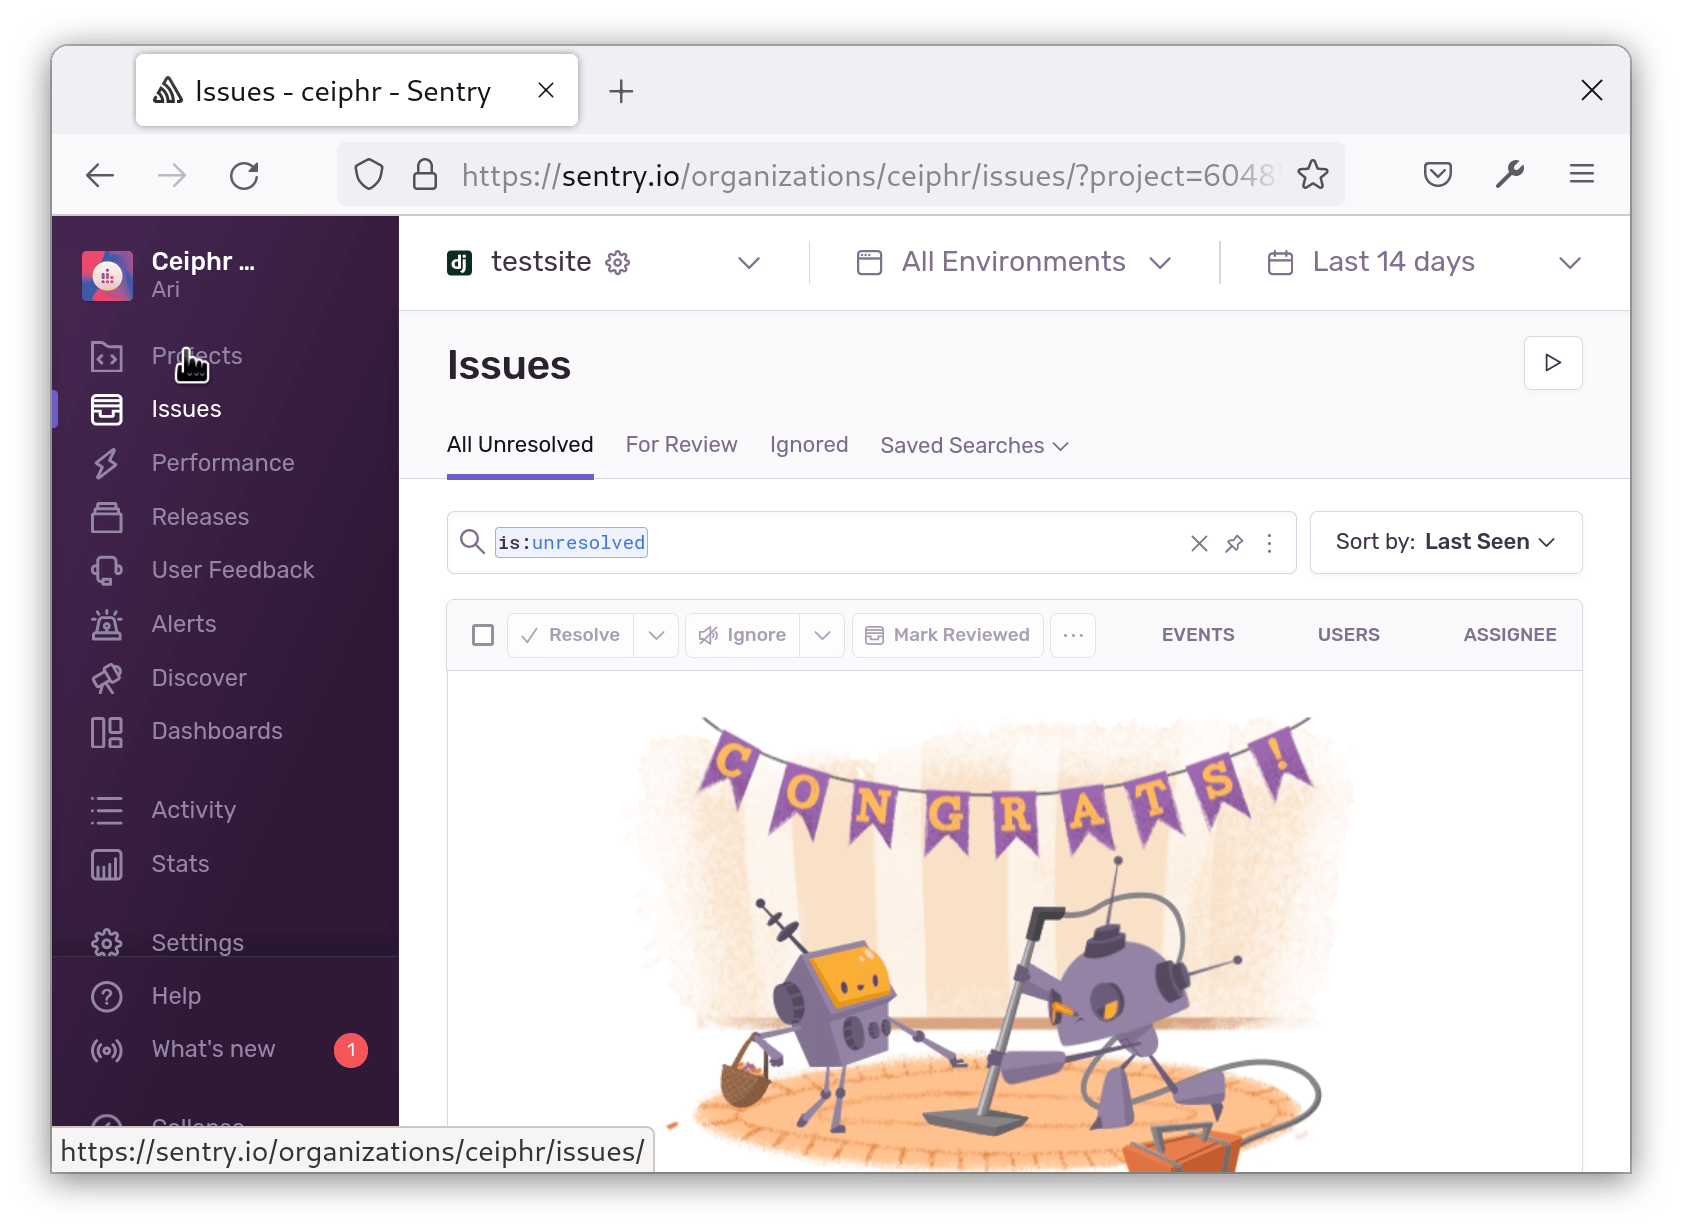
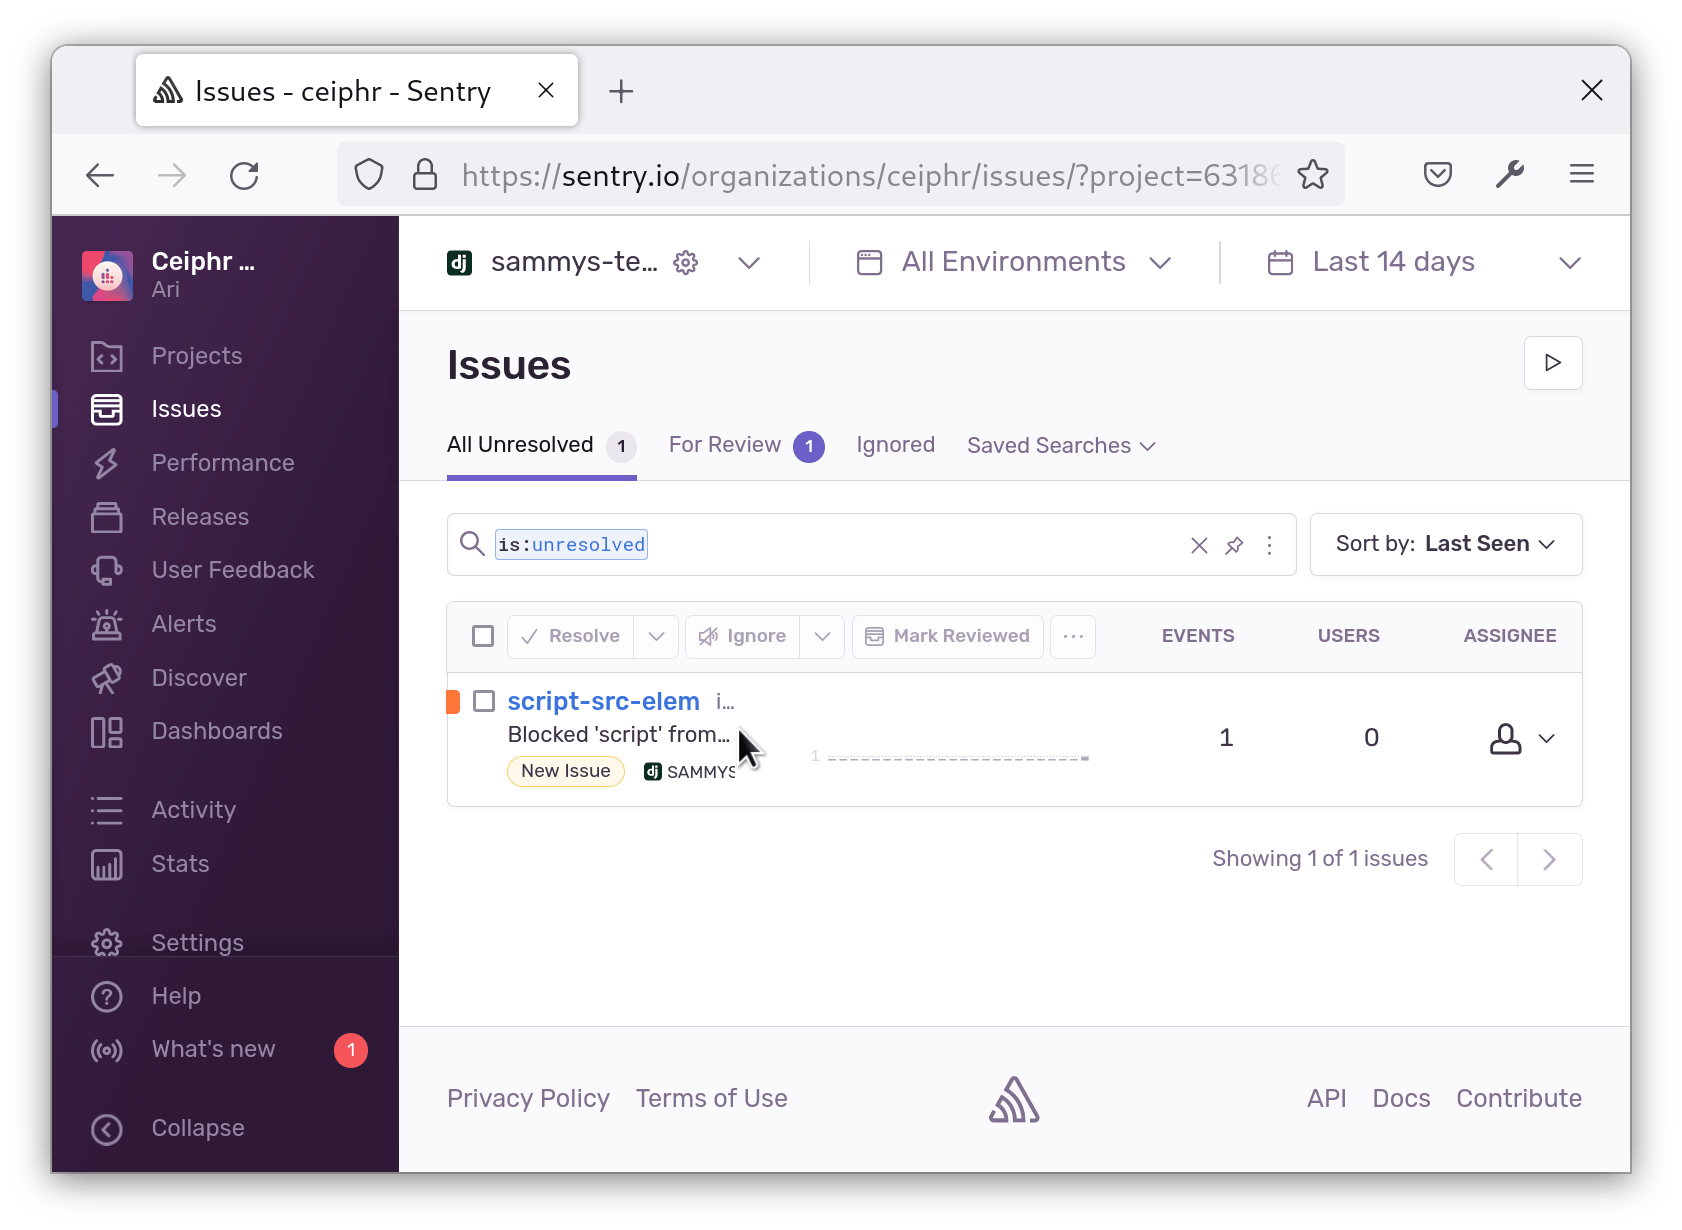
Save and close your file. Now, when CSP enforcement causes a violation, Sentry will log it to this URI. You can try this by removing a domain or hash from your CSP, or by removing the nonce from the script you added earlier. Load the page in the browser and you’ll see the error in Sentry’s Issues page:
 If you find you are overwhelmed by the number of logs, you can also define
 CSP_REPORT_PERCENTAGE in settings.py to only send a percentage of the logs to Sentry.
# Content Security Policy
# Send 10% of the logs to Sentry
CSP_REPORT_PERCENTAGE = 0.1
Now whenever there’s a CSP violation, you’ll get notified and can view the error in Sentry.
Conclusion
In this article, you secured your Django application with a content security policy. You updated your policy to allow external resources, and uses nonces and hashes to allow inline scropts and styles. You also configured it to send violations to Sentry. As a next step, check out the Django CSP documentation to learn more about how to enforce your CSP.
Thanks for learning with the DigitalOcean Community. Check out our offerings for compute, storage, networking, and managed databases.
About the author(s)
CS Student at Stevens Institute of Technology.
Still looking for an answer?
This textbox defaults to using Markdown to format your answer.
You can type !ref in this text area to quickly search our full set of tutorials, documentation & marketplace offerings and insert the link!
Hello. First of all, very useful article, thank you for writing about this. I do have a question though: is it possible to also use nonces for inline styles? I have a lot of them in my latest project and get a lot of errors in the console. I could include the hashes in the CSP_STYLE_SRC but there are 30+ of them so I’d much prefer to use nonces. I tried adding ‘style-src’ to CSP_INCLUDE_NONCE_IN but it does not seem to have any effect. Also, the documentation of django-csp is not very clear about this. Could you please give me a hand? Thanks
 This work is licensed under a Creative Commons Attribution-NonCommercial- ShareAlike 4.0 International License.
Become a contributor for community
Get paid to write technical tutorials and select a tech-focused charity to receive a matching donation.

DigitalOcean Documentation
Full documentation for every DigitalOcean product.

Resources for startups and AI-native businesses
The Wave has everything you need to know about building a business, from raising funding to marketing your product.
The developer cloud
Scale up as you grow — whether you're running one virtual machine or ten thousand.

Start building today
From GPU-powered inference and Kubernetes to managed databases and storage, get everything you need to build, scale, and deploy intelligent applications.
