By Aaron Shea and Hazel Virdó

Introduction
Docker is a popular option for containerization software and CoreOS is specialized for clustered environments, making the two a great match for containerized applications. However, keeping all your containers organized can be complicated, especially if they are only being managed via the Docker command line interface or if you have multiple instances of CoreOS.
Luckily, there’s a useful Docker management tool called Shipyard. It gives you the ability to restart, destroy, and create containers via a useful GUI. It also lets you manage resource allocation to specific containers and manage containers across multiple Docker hosts. However, it’s important to ensure that your Docker server and Shipyard system are secure, especially if they are being used in production.
In this guide, we’ll be setting up Shipyard 2.0.10 on a single CoreOS server and securing Docker with a TLS certificate to ensure that only authorized clients may connect to it. TLS Stands for Transport Layer Security. It’s used to encrypt data as it is transported from the client to the server and back again. In our case, we’ll use it to encrypt our connection to the Docker host, and Docker’s connection to Shipyard.
Prerequisites
To follow this tutorial, you will need:
-
One CoreOS Droplet with at least 512 MB of RAM, but 1 GB or more is recommended. Make sure you choose the latest stable version of CoreOS, not an alpha or beta version.
All CoreOS servers require an SSH key, so if you don’t already have one, you can add one by following steps 1 - 3 of How To Use SSH Keys with DigitalOcean Droplets.
-
A fully qualified domain name (FQDN) or subdomain for your Docker host.
If you do not already own a domain, you may purchase one from any of the various domain registrars. Once you have a domain to use, How to Point to DigitalOcean Nameservers From Common Domain Registrars has instructions on how to set it up under the DigitalOcean DNS.
You can point your domain to your Droplet by adding an A record as described in How To Set Up a Host Name with DigitalOcean.
-
Setting up Docker to use certificates for authentication is a fairly advanced topic, so read through this OpenSSL tutorial for an explanation of how SSL certificates work.
Step One — Creating the Server Certificate
The first thing we need to do is create a Certificate Authority that we can use to sign server and client certificates. CoreOS comes with OpenSSL, a utility that can be used to generate and sign certificates.
To begin, we’ll create an RSA private key. First, create and move to a directory called dockertls, so it’s easy to remember where the files are.
- mkdir ~/dockertls && cd ~/dockertls
Next, create an RSA private key. This command will prompt you to create a passphrase for your key.
- openssl genrsa -aes256 -out private-key.pem 4096
Let’s break down the above command. genrsa means the command will generate a private RSA private key. -out private-key.pem specifies the name of the file we want to generate, which is private-key.pem. The last bit, 4096, is the length of the key in bits. It’s recommended to keep this at a high number like 4096.
Next, generate a new certificate and sign it with the private key we just created. You’ll need to enter the passphrase you chose when creating the key.
- openssl req -new -x509 -sha512 -days 365 -key private-key.pem -out myca.pem
OpenSSL will also ask for some required information, like the FQDN of your server and the county your organization is based out of. Try to answer these questions as accurately as possible. This is the last step in creating our self-signed Certificate Authority, or CA.
Now that we have the CA, we can actually create some server certificates for use with the Docker daemon. The following two commands generate a signing request. Make sure to replace example.com with the domain or subdomain you’re using for Docker.
- openssl genrsa -out docker-1-key.pem 4096
- openssl req -subj "/CN=example.com" -sha512 -new -key docker-1-key.pem -out docker.csr
Finally, sign with the CA’s private key. You’ll need to enter the key passphrase again.
- openssl x509 -req -days 365 -sha256 -in docker.csr -CA myca.pem -CAkey private-key.pem -CAcreateserial -out final-server-cert.pem
This will create a file in the current directory called final-server-cert.pem, which is the server certificate that will be used on the Docker host.
Step Two — Creating the Client Certificate
Now that we have a server certificate, we need to create a client certificate. This will be used whenever we try to connect to the Docker host. It will verify that the client connecting has actually been verified and signed by our personal CA. Therefore, only authorized clients will be allowed to connect and send commands to Docker.
First, create another signing request for the client.
- openssl genrsa -out client-key.pem 4096
- openssl req -subj '/CN=client' -new -key client-key.pem -out docker-client.csr
There’s a small extra step that needs to be done to this client request. We need to create a config file which specifies that the resulting certificate can actually be used for client authentication.
- echo extendedKeyUsage = clientAuth > client.cnf
The above command creates a file called client.cnf with the content extendedKeyUsage = clientAuth without needing to use a text editor.
Next, sign the client with the CA key.
- openssl x509 -req -days 365 -sha512 -in docker-client.csr -CA myca.pem -CAkey private-key.pem -CAcreateserial -out client.pem -extfile client.cnf
Now we have a CA, a server certificate, and a client certificate.
Step Three — Configuring Docker and CoreOS
In this step, we’ll configure the Docker daemon to use our certificates.
We need to modify the startup options for Docker. CoreOS uses systemd to manage services. If you would like to read up on systemd and learn some more about it, you can read How To Use Systemctl to Manage Systemd Services and Units.
First, let’s start by editing the Docker unit file. There’s an option for the systemctl command that will help us by duplicating the actual unit file instead of modifying the original directly. You can think of it like an override for the Docker configuration.
Open the Docker unit file for editing using systemctl.
- sudo systemctl edit --full docker
This will open the file for editing using vim, which you can learn how to use by reading our vim tutorial.
Find the line that begins with ExecStart=/usr/lib/coreos/dockerd. Append the highlighted options below after --host=fd:// on that line, so that the file looks like this:
EnvironmentFile=-/run/flannel_docker_opts.env
MountFlags=slave
LimitNOFILE=1048576
LimitNPROC=1048576
ExecStart=/usr/lib/coreos/dockerd --daemon --host=fd:// --tlsverify --tlscacert=/home/core/dockertls/myca.pem --tlscert=/home/core/dockertls/final-server-cert.pem --tlskey=/home/core/dockertls/docker-1-key.pem -H=0.0.0.0:2376 $DOCKER_OPTS $DOCKER_OPT_BIP $DOCKER_OPT_MTU $DOCKER_OPT_IPMASQ
Let’s take a look at the options we just added:
--tlsverifysimply turns on TLS verification so that only authorized clients may connect.--tlscacertspecifies the location of our CA’s certificate.--tlscertspecifies the server certificate location.--tlskeyspecifies the server key location.-H=0.0.0.0:2376means that Docker will listen for connections from anywhere, but it still will not allow any connections that don’t have an authorized client key or certificate.
Save and close the file, then reload the Docker daemon so it will use our new configuration.
- sudo systemctl restart docker
You can ensure everything is working by checking Docker’s status.
- systemctl status docker
Look for the line that begins with Active:. If it says anything other than active (running), double check your unit file edits and ensure all the required keys and certificates were generated.
Finally, we can test our TLS verification.
- docker --tlsverify --tlscacert=myca.pem --tlscert=client.pem --tlskey=client-key.pem -H=example.com:2376 info
If all is well, you should receive back some basic system info about your Docker host; this means you just secured your Docker host with TLS. If you get an error, check the logs using systemctl status docker.
You can now access your Docker host from anywhere as long as you connect using a valid certificate and client key. You can generate and sign as many client certificates as you want for use in a cluster.
Step Four — Installing Shipyard
Setting up Shipyard is a fairly easy process. All the parts are self-contained withing their own Docker containers, so Docker will automatically pull the required images.
First, we need to set up a data volume where Shipyard’s database will be stored.
- docker create --name shipyard-rethinkdb-data shipyard/rethinkdb
Now we can actually pull down and spawn a new container for RethinkDB. This is the database engine Shipyard uses to keep track of real-time data from Docker.
- docker run -it -d --name shipyard-rethinkdb --restart=always --volumes-from shipyard-rethinkdb-data -p 127.0.0.1:49153:8080 -p 127.0.0.1:49154:28015 -p 127.0.0.1:29015:29015 shipyard/rethinkdb
This command also ensures that RethinkDB will only listen on localhost. This is a good way to secure this database because it means no one will be able to access it from outside the server.
We’ll be using Shipyard version 2.0.10 because it’s the easiest to configure with Docker TLS. The following command will start a new container that runs Shipyard and links it to the RethinkDB container, allowing them to communicate.
- docker run -it -p 8080:8080 -d --restart=always --name shipyard --link shipyard-rethinkdb:rethinkdb shipyard/shipyard:2.0.10
Once you have completed your Shipyard setup, visit http://example.com:8080 or http://your_server_ip:8080 to access the Shipyard control panel. You can log in with the default username admin and password shipyard.
Shipyard will prompt you to add a new engine to the cluster. Click the green + ADD button and you will be presented with a form like this:
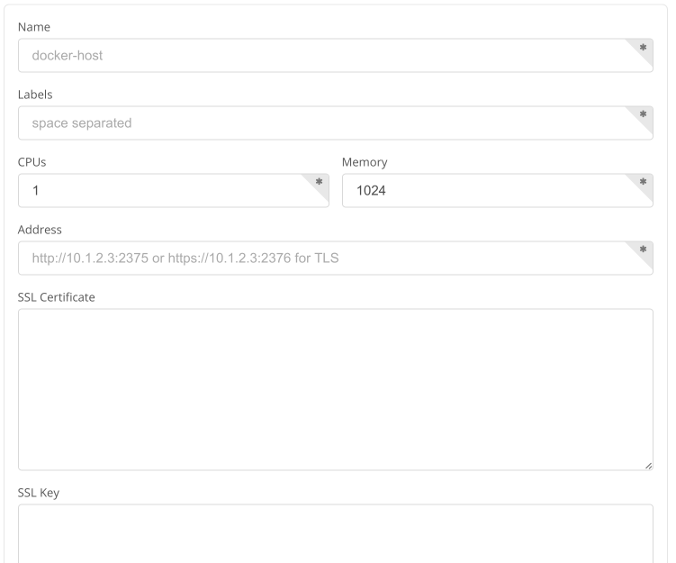
Fill out the information as follows:
- Name can be whatever you want it to be. This will be the name of the engine.
- Labels can also be whatever you want. Just make it short so you can keep your containers organized.
- CPUs is how many CPUs your server has.
- Memory is how much RAM your server has.
- Address must be
https://your_server_ip:2376to use TLS.
There are three large text areas below the basic options. This is where you will paste the certificates and keys so Shipyard can connect securely to your Docker host.
The first field, SSL Certificate, requires the client certificate. Print the content of the certificate.
- cat ~/dockertls/client.pem
Then copy the output and paste it into the SSL Certificate box.
Next, print the contents of the client key.
- cat ~/dockertls/client-key.pem
Paste the output into the SSL Key text area.
Finally, print hte contents of the CA certificate.
- cat ~/dockertls/myca.pem
Paste that content into the CA Certificate box.
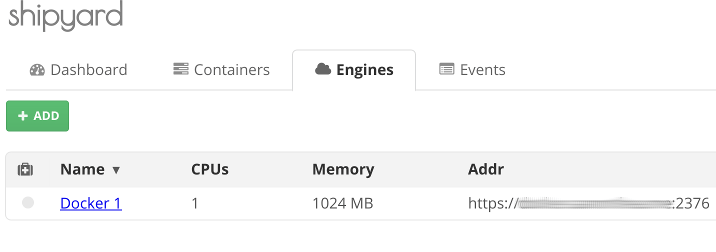
Click the pale blue ADD button at the bottom of the page. If everything is configured correctly, Shipyard should present you with this screen:
Conclusion
You now have a secure Docker host running on your CoreOS server!
Shipyard can help manage your containers and cluster of hosts safely and securely. You can also add a client key and certificate to your local machine so you can remotely manage your Docker cluster from anywhere.
For additional security steps, you can use Nginx to reverse proxy your Shipyard server. This allows you to use HTTPS for an even more secure connection to Shipyard from your local machine. You can learn more about that in the article Docker Explained: How To Containerize and Use Nginx as a Proxy. You can also spin up more CoreOS servers and try out a Docker cluster. You can manage hundreds of engines using Shipyard.
Thanks for learning with the DigitalOcean Community. Check out our offerings for compute, storage, networking, and managed databases.
About the author(s)
former DO tech editor publishing articles here with the community, then founded the DO product docs team (https://do.co/docs). to all of my authors: you are incredible. working with you was a gift. love is what makes us great.
Still looking for an answer?
This textbox defaults to using Markdown to format your answer.
You can type !ref in this text area to quickly search our full set of tutorials, documentation & marketplace offerings and insert the link!
 This work is licensed under a Creative Commons Attribution-NonCommercial- ShareAlike 4.0 International License.
Become a contributor for community
Get paid to write technical tutorials and select a tech-focused charity to receive a matching donation.

DigitalOcean Documentation
Full documentation for every DigitalOcean product.

Resources for startups and AI-native businesses
The Wave has everything you need to know about building a business, from raising funding to marketing your product.
The developer cloud
Scale up as you grow — whether you're running one virtual machine or ten thousand.

Start building today
From GPU-powered inference and Kubernetes to managed databases and storage, get everything you need to build, scale, and deploy intelligent applications.
