
Introduction
KeePass2 is an application that allows you to store, manage, and generate strong passwords for your websites and applications, securely and easily.
In a previous guide, we discussed how to use kpcli to interact with KeePass database files on a remote server. In this guide, we will set up the server to provide secure access to our database file with nginx.
We will then show you how to connect to and use this remote database file with a local installation of KeePass2. This will let you keep your passwords in a secure location while still allowing you to access the database from any of your devices.
Install Nginx
As a prerequisite to this tutorial, we assume that you have completed the previous guide and have a KeePass2 database file on your remote server.
Now, we need to configure a web server to provide secure access to our file. We will be using nginx in this guide.
Install the web server by typing:
sudo apt-get update
sudo apt-get install nginx
This will download and install the web server.
Create SSL Certificates
We will be securing our communication with the server by using SSL. This will encrypt our data during transfer so that outside parties cannot read our password information.
To begin, create a directory under the nginx configuration hierarchy that can be used to store our SSL files:
sudo mkdir /etc/nginx/ssl
Now, we can generate a self-signed SSL certificate by typing:
sudo openssl req -x509 -nodes -days 365 -newkey rsa:2048 -keyout /etc/nginx/ssl/nginx.key -out /etc/nginx/ssl/nginx.crt
This will ask you a series of questions about your site. Answer them as best as you can. The most important question is the one that reads Common Name (e.g. server FQDN or YOUR name). This is asking for the domain name or IP address of your server.
When you are finished, you will have two files called nginx.key and nginx.crt in your /etc/nginx/ssl directory.
Create a Password File
We now have SSL certificates to encrypt our communications to our server.
However, we also need to implement a mechanism for authenticating ourselves to the server. We do not want to allow just anyone to access our passwords database.
The easiest way to do this is actually to install a set of tools called apache2-utils. We can get the package from the repositories:
sudo apt-get install apache2-utils
This will install the htpasswd tool, which can be used to create secure password files that our web server can read and understand.
We can generate the password file by specifying a file location and a user account to create:
<pre> sudo htpasswd -c /etc/nginx/htpasswd <span class=“highlight”>demo_user</span> </pre> <pre> New password: Re-type new password: Adding password for <span class=“highlight”>demo_user</span> </pre>
This will create a file called htpasswd in the /etc/nginx directory, with an entry for a user called demo_user. The user account can be anything you’d like. It does not have to be a user that exists as a system account.
Create a Web Directory
We will be serving a file called password_database.kdbx. We will assume that this file is in your home directory.
In order for our web server to correctly access the file and be able to read and write content, we need to create a proper web directory to store the file. In our home directory (as a regular user), make a new directory for your password database:
mkdir ~/secure_html
Now, move the database file into that directory:
mv ~/password_database.kdbx ~/secure_html
Now, we need to give the user and group that nginx operates under ownership of the directory:
sudo chown www-data:www-data ~/secure_html
We also want to make all of the additional files that will be created under this directory accessible to the web user. We can do this by setting the setgiud bit on our directory:
sudo chmod 2770 ~/secure_html
Now, we need to add our system user to our the www-data group so that we can access the directory that we just secured:
<pre> sudo usermod -aG www-data <span class=“highlight”>demo_user</span> </pre>
Note: At this point, you should log out and log back in so that the system will recognize your new group membership.
We should also give group ownership to our web server for everything already in this directory:
sudo chown :www-data ~/secure_html/*
Our directories and files should now be configured correctly.
- The web server is the user and group owner of the directory.
- The web server is the group owner of all files.
- The web server will be given group ownership of new files created in the directory.
We can now set up our nginx configuration to serve this directory.
Configure Nginx Server Blocks
Now, we’re ready to create our Nginx configuration.
We will be modifying the default server block file. Open it in your text editor with root privileges:
sudo nano /etc/nginx/sites-available/default
Inside, we will create two server blocks. You can delete the other contents or comment them out.
We absolutely want to require SSL for our data transfer, so the first block will tell nginx to redirect regular HTTP traffic to HTTPS. It will look like this:
<pre> server { listen 80 default_server; listen [::]:80 default_server ipv6only=on;
access_log off;
return 302 https://$http_host$request_uri;
} </pre>
This tells the server that for any regular requests coming in on port 80, we want to send the request, in full, straight to port 443 to wrap it in SSL.
Underneath this block, we will specify our rules for SSL traffic. For our SSL portion, we will add a server block that looks like this:
<pre> server { listen 443; listen [::]:443 ipv6only=on ssl; server_name <span class=“highlight”>your_domain.com</span>;
access_log /var/log/nginx/access.log;
root /home/<span class="highlight">demo_user</span>/secure_html;

ssl_certificate /etc/nginx/ssl/nginx.crt;
ssl_certificate_key /etc/nginx/ssl/nginx.key;

location / {
    auth_basic "Restricted";
    auth_basic_user_file "/etc/nginx/htpasswd";

    dav_methods PUT DELETE MOVE COPY;
    dav_access group:rw all:r;
}
} </pre>
This first portion sets up the block as an SSL server. It does standard things like set the log location, set the server name, set the document root to the directory we created, and specify the SSL certificate and key that we created.
Below this, a location block uses the password file we created to restrict access to our directory. Finally, we set up some WebDAV methods that will allow our KeePass2 application to read, modify, and save the data back to the sever.
When you are finished, save and close the file.
We can now restart nginx to implement our new configuration:
sudo service nginx restart
We are now ready to configure our client-side application.
Download and Install KeePass2 on your Local Computer
If you haven’t already done so, you need to download and install the KeePass2 program onto your local computer. This will allow you to interact with our remote database file.
If you are running Linux on your local computer, there’s a good chance that there is a KeePass2 package in your distribution’s repositories. For example, on Ubuntu, you can type:
sudo apt-get update
sudo apt-get install keepass2
This will install the KeePass2 application on your local Ubuntu machine.
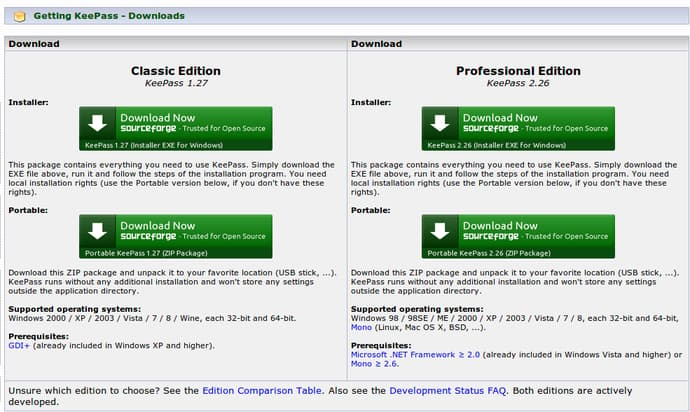
If you are using Windows or OS X on your local computer, you can get the latest release of the KeePass2 application by visiting the Keepass website. Click on the “Downloads” link in the left navigation bar.
If you are using Windows on your local machine, the download link in the upper-right corner labeled “Professional Edition” and “Installer” is what you are looking for:
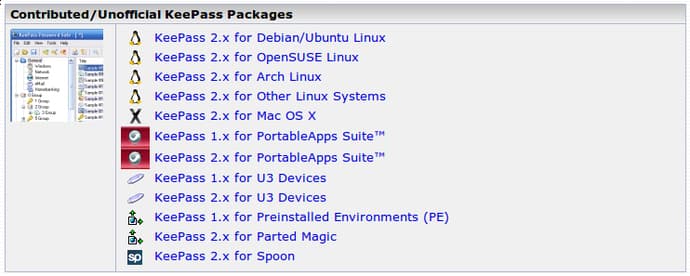
If you are using OS X, you can scroll down to the “Contributed/Unofficial KeePass Packages” section. There is a package for OS X that you can grab:
You may have to go through some extra steps to get the application up and running. Follow the instructions for your operating system.
Connect to your Remote Password Database File
Now that you have the KeePass2 application installed, start the application.
Tell KeePass2 to Allow Self-Signed SSL Certificates
The first thing that we will need to do is tell our application to accept SSL certificates that cannot be verified. Since our SSL certificate was self-signed, it is not signed by any certificate authority in our system’s list of trusted certificate authorities.
We can tell KeePass that we are okay with this by modifying a setting.
Click on Tools, then select Options. Click on the advanced tab. Under the “File Input/Output Connections” setting, check the option that says “Accept invalid SSL certificates (self-signed, expired, …)”:
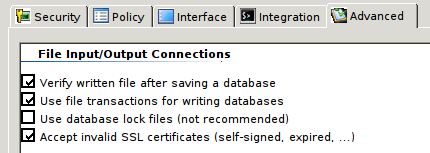
Click on “OK” to implement your changes.
Connect to your Remote File
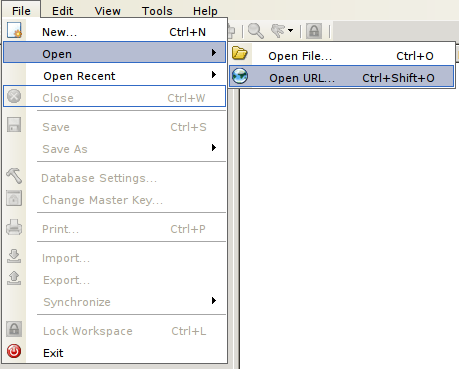
Now, we are ready to connect to our file.
Click on File > Open > Open URL from the menu:
You will be given a dialog box that asks you to fill in the URL and authentication information.
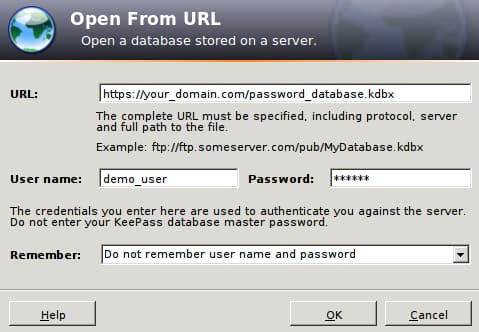
Fill in the URL in the following format:
<pre> https://<span class=“highlight”>your_domain.com</span>/password_database.kdbx </pre>
If you named your database file something different, adjust as necessary. For the username and password, enter the account details that you chose for the htpasswd command to secure the nginx directory location.
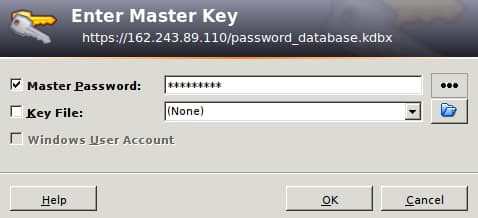
When you connect, you will be then asked for the master password for your database file. This is the password that you selected to protect your database file.
When you are finished, your password database should be opened in your KeePass2 instance:
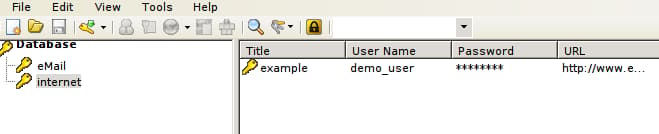
You can now modify and use the passwords and credentials in the database on your local machine. You can write changes back into the file and they will be stored on your remote server.
Conclusion
You should now have a fairly good way to access your database file. Using a remote database file will help you keep your password databases in sync across devices.
It is absolutely essential that you back up your file to several secure locations to avoid losing your login credentials in case of server problems or file corruption. I recommend that you implement an automated syncing system like lsync or BitTorrent Sync to handle the automatic mirroring.
You should also think of implementing a separate backup mechanism that stores previous versions of the file in case your database file becomes corrupted and the changes are synced to your other locations.
<div class=“author”>By Justin Ellingwood</div>
Thanks for learning with the DigitalOcean Community. Check out our offerings for compute, storage, networking, and managed databases.
Tutorial Series: How To Use KeePass as a Self-Hosted Password Management Solution
Effective password management is essential in keeping your accounts and online identities secure. While there are many password management solutions that work on either a local computer or using a web service, these both have their drawbacks. In this series, we will demonstrate how to use some tools to make KeePass2, an open source local password management solution, available on a web-accessible server for remote use.
About the author
Former Senior Technical Writer at DigitalOcean, specializing in DevOps topics across multiple Linux distributions, including Ubuntu 18.04, 20.04, 22.04, as well as Debian 10 and 11.
Still looking for an answer?
This textbox defaults to using Markdown to format your answer.
You can type !ref in this text area to quickly search our full set of tutorials, documentation & marketplace offerings and insert the link!
Excellent tutorial - don’t forget the alternative: just stick the file on dropbox or google drive. Preferably with a key hidden away somewhere so you use key+password auth.
this is a good tutorial and wouldn’t be hard to adapt for apache but i also use the dropbox method and sync between linux and wind*ws boxes. with the current state of the internet it’s time we all took a long, hard, look at passwords and security.
We should be brave to access our passwords without an authority signed certificate. Even authority signed connection is not %100 secure (ex. ssl heartbleed). I consider my passwords very critical and don’t put them on any online storage even if they are encrypted.
thank for for this good tutorial. I didn’t want to run with IPv6 and have deleted those lines. It was then necessary to change the line “listen 443;” to “listen 443 ssl;”. It works well!
I’m stuck at this part sudo usermod -aG www-data demo_user
I create a user in the nginx/htpasswd file called rubana and create a password. However when i run the command above it tells me the user doesn’t exist.
What am I doing wrong?
 This work is licensed under a Creative Commons Attribution-NonCommercial- ShareAlike 4.0 International License.
Become a contributor for community
Get paid to write technical tutorials and select a tech-focused charity to receive a matching donation.

DigitalOcean Documentation
Full documentation for every DigitalOcean product.

Resources for startups and AI-native businesses
The Wave has everything you need to know about building a business, from raising funding to marketing your product.
The developer cloud
Scale up as you grow — whether you're running one virtual machine or ten thousand.

Start building today
From GPU-powered inference and Kubernetes to managed databases and storage, get everything you need to build, scale, and deploy intelligent applications.
