By Lukas Erlacher

Postfix Introduction
This tutorial will tell you how to setup a basic mail server and teach you a bit about the Postfix MTA (Mail Transfer Agent) in the process.
Postfix is extremely flexible. Its architecture is based on a loose composition of services that receive emails and pass them on to other services (with services like “smtp” on the receiving outer edge, and “local” and “virtual” on the delivering outer edge, if you’re looking at receiving mail). Postfix itself implements the core requirements to receive, route, and deliver mail, and relies on third-party extensions to do the rest.
Postfix has several hundred configuration parameters. If you want to administer a mail server that reliably delivers business requirements to a sizable organization, you should make yourself intimate with all of them (man 5 postconf). This tutorial will not be enough, on its own, to make you a competent professional email admin. However, if you want to become familiar with postfix or set up a mail server for yourself and a few friends, this tutorial, and the ones to follow, will be your friend.
Dovecot Introduction
I’m not going to spend a lot of introductory words on dovecot. Dovecot is also huge (here is the wiki for dovecot 2), but we only want a very small set of features from dovecot.
This article explains almost every single setting to be set in detail. You can go ahead and skim over the explanations if you want - at your own risk.
This tutorial assumes (and was built using) the following setup:
- Debian 7.1 wheezy x64_86
- Postfix 2.9.6-2
- dovecot 1:2.1.7-7
While any Debian-based OS should be fine, Postfix is in use in a wide array of versions, including Postfix 1.x, Postfix 2.9, and Postfix 2.10, which have some mutually incompatible settings and features - and using Postfix 2.9, this tutorial is not on the bleeding edge.
This tutorial also assumes a few things about you:
-
That you are comfortable on a GNU/Linux command-line and with the general layout and working principles of a GNU/Linux system like Debian.
-
That your local system is a GNU/Linux or reasonably compatible (MinGW, Cygwin, Mac OS X, *BSD)
-
That you know how to get a rootshell on your droplet
-
That you know how to use a text editor (e.g. vim, nano, emacs, or the standard editor,
ed) on Linux
By default, commands will be entered and files edited from a rootshell on the droplet. As in most other DigitalOcean articles, parts of commands that you need to customize will be highlighted.
System Setup
The following ingredients are necessary to make your droplet ready to be a mail server:
-
A domain, let’s assume it is “mydomain.com”
-
A hostname for your mail server, let’s assume “mail.mydomain.com”
-
An SSL certificate that is valid for “mail.mydomain.com”
Setting up SSL certificate
For SSL, you need a certificate and a private key. In this tutorial, we’re going to assume that the certificate is saved in /etc/ssl/certs/mailcert.pem and the key is saved in /etc/ssl/private/mail.key. Make sure the key is only readable by the root user!
How to set up SSL certificates for your website and e-mail depends on your website structure and the CA you use (self-signed, organisational (sub)-ca, or commercial ca for example). Creating a self-signed test certificate is as easy as executing
sudo openssl req -x509 -nodes -days 365 -newkey rsa:2048 -keyout /etc/ssl/private/mail.key -out /etc/ssl/certs/mailcert.pem
and leaving the default values in by just hitting enter on all questions asked. Don’t use this certificate in production!
Most CAs will require you to submit a certificate signing request. (CSR) You can generate one like this:
sudo openssl req -nodes -days 365 -newkey rsa:2048 -keyout /etc/ssl/private/mail.key -out mailcert.csr
Fill in the information queried properly, like in this transcript: (Check with the CA you intend to use on what information needs to be in the CSR)
Generating a 2048 bit RSA private key
.............................+++
................+++
writing new private key to 'mail.key'
-----
You are about to be asked to enter information that will be incorporated
into your certificate request.
What you are about to enter is what is called a Distinguished Name or a DN.
There are quite a few fields but you can leave some blank
For some fields there will be a default value,
If you enter '.', the field will be left blank.
-----
Country Name (2 letter code) [AU]: US
State or Province Name (full name) [Some-State]: Virginia
Locality Name (eg, city) []: Langley
Organization Name (eg, company) [Internet Widgits Pty Ltd]: Network Services Association
Organizational Unit Name (eg, section) []: Infrastructure Services
Common Name (e.g. server FQDN or YOUR name) []: mail.mydomain.com
Email Address []: postmaster@mydomain.com

Please enter the following 'extra' attributes
to be sent with your certificate request
A challenge password []:
An optional company name []:
(Note that this way you cannot create a certificate valid for more than one domain using the subjectAltName field without some additional work - again, check the CA’s documentation!)
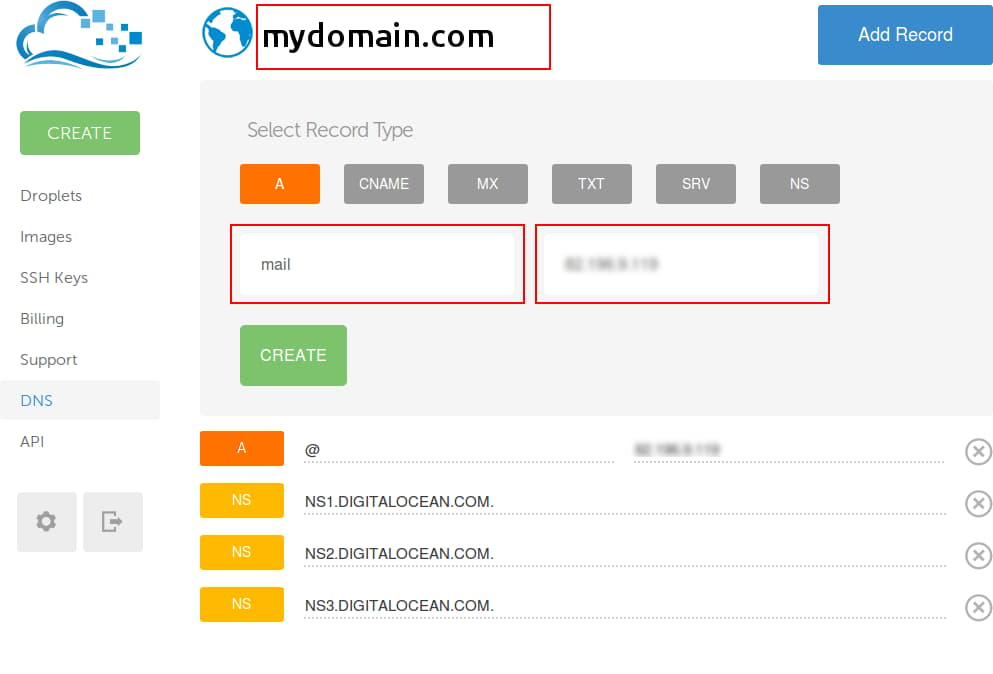
Setting up DNS
You have to set up your DNS with an A record that points to your mail server IP and an MX record that points to the mail servers hostname.
Here is how to do it if you’re using DigitalOcean’s DNS:
- Go to the “DNS” area in your DigitalOcean panel
- Create a new domain or select one you’ve created before
- Click the “Add record” button in the top right
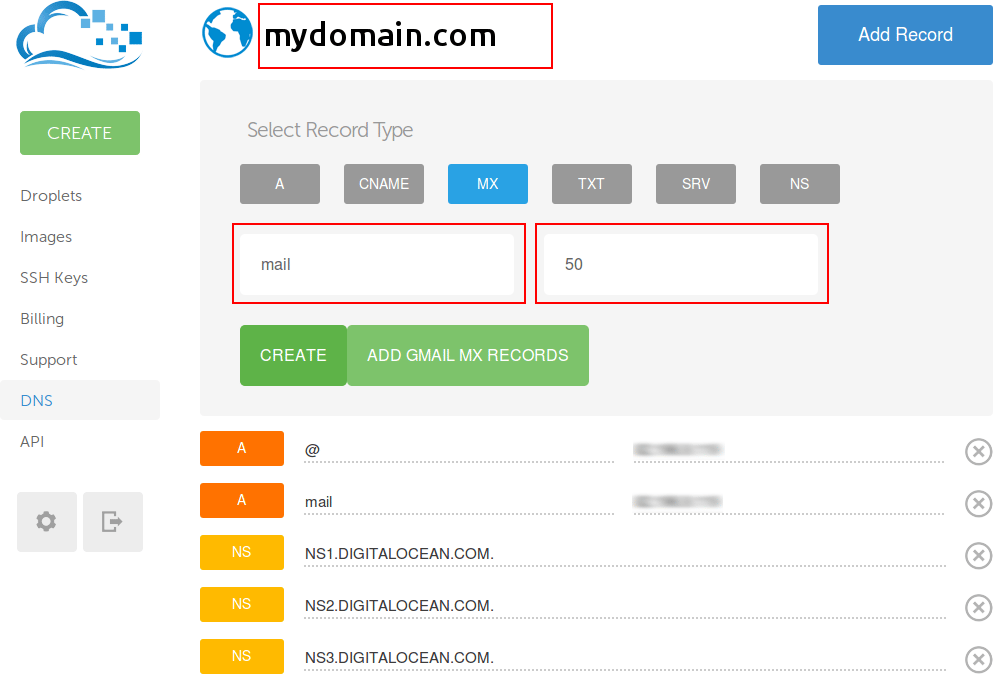
- Add an A record:
- Click “Add record” again and add an MX record that points to the A record:
Additional information can be found in the Host Name setup and DNS tips and tricks articles.
Verify DNS
DNS will take a few hours to propagate all over the internet, but it should be set on your DNS server after a few minutes. You can check with dig & host:
[root@yourbase] ~# dig MX mydomain.com +short @ns1.digitalocean.com
50 mail.mydomain.com.
[root@yourbase] ~# host mail.mydomain.com ns1.digitalocean.com
Using domain server:
Name: ns1.digitalocean.com
Address: 198.199.120.125#53
Aliases:

mail.mydomain.com has address 82.196.9.119
Postfix
We will now set up Postfix to receive and deliver mail for local users.
Packages
The default MTA on Debian is Exim. Off with it! We’ll also stop postfix after it has been installed because we don’t want it to be running yet.
aptitude remove exim4 && aptitude install postfix && postfix stop
A small insert: Postfix manages its daemons by itself and doesn’t need the service (init.d) system. postfix start, postfix stop, and postfix reload are equivalent to service postfix start, service postfix stop and service postfix reload.
Postfix Configuration
Postfix has two main config files: main.cf, which specifies what you would think of as config options, and master.cf, which specifies the services postfix should run.
First, configure the master.cf file (in /etc/postfix/). Add an extra “smtpd” instance called “submission” that will take mail from trusted clients for delivery to the world at large, which we don’t allow for anyone else.
To do that, open master.cf (take a look at man 5 master if you want to understand what’s going on) and uncomment the submission config and add options to enable SASL:
submission inet n       -       -       -       -       smtpd
  -o syslog_name=postfix/submission
  -o smtpd_tls_wrappermode=no
  -o smtpd_tls_security_level=encrypt
  -o smtpd_sasl_auth_enable=yes
  -o smtpd_recipient_restrictions=permit_mynetworks,permit_sasl_authenticated,reject
  -o milter_macro_daemon_name=ORIGINATING
  -o smtpd_sasl_type=dovecot
  -o smtpd_sasl_path=private/auth
This warrants a bit of explanation. The -o ... options override the settings that are taken from defaults or define in the config, which we’ll set later.
In a nutshell what happens here is that this enables the “submission” daemon with TLS to secure the outer connection, and dovecot-mediated SASL to check the username and password of connecting clients. (We will set that up in dovecot later).
The important detail is one that can’t be seen: The smtpd_recipient_restrictions is missing reject_unauth_destination, which is present as a default and restricts relaying.
Then we move on to main.cf. We’ll start with a clean slate here - run cp /etc/postfix/main.cf /etc/postfix/main.cf.orig if you want to save the default config file (it’s also in /usr/share/postfix/main.cf.dist though), then open it and clear it out!
Let’s first set the network information: (information about the domains postfix is handling mail for, and a bit of extra info)
myhostname = mail.domain.com
myorigin = /etc/mailname
mydestination = mail.domain.com, domain.com, localhost, localhost.localdomain
relayhost =
mynetworks = 127.0.0.0/8 [::ffff:127.0.0.0]/104 [::1]/128
mailbox_size_limit = 0
recipient_delimiter = +
inet_interfaces = all
We set the hostname and the default origin, which is sourced from /etc/mailname by debian convention. You can set it explicitly if you don’t have /etc/mailname. The default origin is used to construct the ‘From’ address for local users. mydestination sets the domains that postfix accepts emails for as final destination, and we set “relayhost” empty to disable relaying mail (relaying means accepting mail and then forwarding to a mail server that is not the final destination for the mail and we have no need for that; that is useful e.g. in a corporate intranet where a central mail server should check mail before it leaves the network.)
*Additional note: This has nothing to do with the term “open relay”, which is a mail server that accepts email from anybody without authentication and sends it to MTAs for domains that aren’t in their own network - for this the other relay_* settings are used, which we leave on default and disabled)
Let’s now set the local alias maps. We don’t have to set this setting since we’re just keeping the default setting, but it’s good to make it explicit in case we later want to add another method of defining alias maps. (like a real DBMS)
alias_maps = hash:/etc/aliases
alias_database = hash:/etc/aliases
Then we set up SSL:
smtpd_tls_cert_file=/etc/ssl/certs/mailcert.pem
smtpd_tls_key_file=/etc/ssl/private/mail.key
smtpd_use_tls=yes
smtpd_tls_session_cache_database = btree:${data_directory}/smtpd_scache
smtp_tls_session_cache_database = btree:${data_directory}/smtp_scache
smtpd_tls_security_level=may
smtpd_tls_protocols = !SSLv2, !SSLv3
We set the cert file and the key for it, enable tls, and set the cache files. Then we make TLS optional, because we’re not allowed to make TLS required on a public smtp server per RFC2487. We also disallow SSLv2 and SSLv3, so that only TLSv1.0 and higher is allowed (read a SSL tutorial if you want to know why - in a nutshell, SSLv2 and SSLv3 are obsolete).
Another setting that is fine as default but should be specified explicitly in case you want to add to it later is the local_recipient_maps:
local_recipient_maps = proxy:unix:passwd.byname $alias_maps
This setting tells Postfix to check a lookup table and reject email to users that cannot be found in the table. This is important because the alternative behaviour, if local_recipient_maps is unset, is to accept mail first and then bounce it later. This causes “backscatter”: If postfix cannot determine all valid users immediately (in the smtpd service), like when local_recipients_maps is unset, it will accept mail and then send a non-delivery notice later (when it finds out the mail is undeliverable after it has been handed off by smptd). These non-delivery notices usually hit innocent people whose addresses have been spoofed in spam and scam mails and contribute to the spam problem.
Sane Alias Config
There are a few mail accounts you should set up in your alias config that are important. For example the SMTP RFC mandates that any publicly accessible mailserver that accepts any mail at all must also accept mail to the ‘postmaster’ account, and some people might expect “hostmaster”, “abuse”, “webmaster”, and other mailboxes to be present. You can either redirect those mail addresses to root, or to a specific user. Here is a sane default for /etc/aliases, presuming that you check email for root:
mailer-daemon: postmaster
postmaster: root
nobody: root
hostmaster: root
usenet: root
news: root
webmaster: root
www: root
ftp: root
abuse: root
If you want to redirect all of that to a specific local user, say, “yourname” just add
root: yourname
Postfix will resolve the entire chain of aliases for you and forward all those mail addresses to “yourname”. (This is done by the local daemon using the aliases specification.)
As “aliases” says, after updating the /etc/aliases file, you have to run
newaliases
to compile the file into the database Postfix uses for fast lookup.
Dovecot
This one will be less wall-of-text-y! Take a deep breath, we’re almost done.
Packages
aptitude install dovecot-core dovecot-imapd
Should do it. If you want all the default packages, run
aptitude install dovecot-common
Then go into /etc/dovecot/dovecot.conf and clear out the file again. (that’s important this time - the default config includes a bunch of subordinate config files in /etc/dovecot/conf.d that we don’t want).
Now enter the following config:
disable_plaintext_auth = no
mail_privileged_group = mail
mail_location = mbox:~/mail:INBOX=/var/mail/%u
userdb {
  driver = passwd
}
passdb {
  args = %s
  driver = pam
}
protocols = " imap"
This enables plaintext auth (The “plaintext” authentication will be tunneled through TLS), tells dovecot to use the mail system group for accessing the local mailboxes (plus the location of the mailboxes), use the unix authentication system to authenticate users, and enable imap only.
If you want, you can have dovecot automatically add a Trash and Sent folder to mailboxes:
protocol imap {
  mail_plugins = " autocreate"
}
plugin {
  autocreate = Trash
  autocreate2 = Sent
  autosubscribe = Trash
  autosubscribe2 = Sent
}
Next, we need to open a socket that postfix can use to piggy-back on dovecot’s authentication:
service auth {
  unix_listener /var/spool/postfix/private/auth {
    group = postfix
    mode = 0660
    user = postfix
  }
}
And finally the ssl config:
ssl=required
ssl_cert = </etc/ssl/certs/mailcert.pem
ssl_key = </etc/ssl/private/mail.key
Note the angle brackets! They tell dovecot to read from a file.
The End
Save and close all the config files, and execute
newaliases
postfix start
service dovecot restart
And you should be good to go. Test your config with a mail client, e.g. Mozilla Thunderbird. You should be able to send and receive mails from everywhere and to everywhere!
Continued
If you want to add virtual mailboxes (mail boxes that are not tied to a local user account, but can instead be configured using a local database) continue with Part 2.***
You can now test that sending e-mail both ways works, from a terminal on the droplet:
~# mail someotheremail@gmail.com
Subject: test email from postfix
this is a test
.
EOT
The mail from “root@yourdomain.com” should shortly arrive at “someotheremail@gmail.com” (fill in an email adress you control, obviously). If you reply to it and call mail again, you should see this: (it might take a minute for the mail to arrive).
~# mail
Heirloom mailx version 12.5 6/20/10.  Type ? for help.
"/var/mail/root": 1 message
>N  1 Your Name          Wed Nov 13 23:45   41/1966  Re: test email from postf
And if you hit the Enter key, it will show the message. (then type q and hit Enter to leave the mail client)
The same thing will work with a local e-mail client. Set up a new system user:
~# adduser joe
Adding user `joe' ...
Adding new group `joe' (1001) ...
Adding new user `joe' (1001) with group `joe' ...
Creating home directory `/home/joe' ...
Copying files from `/etc/skel' ...
Enter new UNIX password: Enter password here
Retype new UNIX password: Enter password here
passwd: password updated successfully
Changing the user information for joe
Enter the new value, or press ENTER for the default
        Full Name []:
        Room Number []:
        Work Phone []:
        Home Phone []:
        Other []:
Is the information correct? [Y/n] Y
The password you entered here is the password to use for e-mail. Joe can now use the address joe@yourdomain.com with a local mail client like Thunderbird. In Thunderbird, just add a new Account (File -> New -> Existing Mail Account) and enter joe@yourdomain.com and the password in the dialog.
If your mail client doesn’t auto-detect the necessary settings: The username for the IMAP connection is joe, the port is 143, and the authentication method is unencrypted password via STARTTLS. For SMTP it’s the same, but port 587.
If anything isn’t working, check for error messages in the system log with tail -n 50 /var/log/syslog and in the mail log with tail -n 50 /var/log/mail.log.
Submitted by: Lukas Erlacher
Thanks for learning with the DigitalOcean Community. Check out our offerings for compute, storage, networking, and managed databases.
About the author
Still looking for an answer?
This textbox defaults to using Markdown to format your answer.
You can type !ref in this text area to quickly search our full set of tutorials, documentation & marketplace offerings and insert the link!
I have to put:
mail_location = mbox:~/mail:INBOX=/var/mail/%u
at the end of “dovecot.conf”
Thanks for the note. I don’t have that set, that’s weird - I’ll do some testing and check it out!
Just tested this out on my Droplet and it all worked on the first try! Thanks for the detailed instructions.
Is there any GUI for setting up new mail accounts so anyone don’t need to enter ssh for account creation?
No - in this setup, mail accounts are directly tied to system users. I am working on a follow-up article to allow adding users to a database!
Hi, For SMTP, should I use smtp.yourdomain.com, or mail.yourdomain.com?
I can send mail from the server fine now, just not from a remote location.
Postfix is running smtp directly on the mail server you configured, so at ‘mail.yourdomain.com’. It will accept mail for delivery to local mail addresses via standard smtp on port 25, and it will receive mail for delivery to any mail addresses via authenticated, encrypted submission server (which is also smtp, postfix just calls it submission) on port 587. Make sure that your mail client uses port 587 with plain password auth and starttls.
 This work is licensed under a Creative Commons Attribution-NonCommercial- ShareAlike 4.0 International License.
Become a contributor for community
Get paid to write technical tutorials and select a tech-focused charity to receive a matching donation.

DigitalOcean Documentation
Full documentation for every DigitalOcean product.

Resources for startups and AI-native businesses
The Wave has everything you need to know about building a business, from raising funding to marketing your product.
The developer cloud
Scale up as you grow — whether you're running one virtual machine or ten thousand.

Start building today
From GPU-powered inference and Kubernetes to managed databases and storage, get everything you need to build, scale, and deploy intelligent applications.
