By Savic and Kathryn Hancox

The author selected the Free and Open Source Fund to receive a donation as part of the Write for DOnations program.
Introduction
A Docker registry is a storage and content delivery system for named Docker images, which are the industry standard for containerized applications. A private Docker registry allows you to securely share your images within your team or organization with more flexibility and control when compared to public ones. By hosting your private Docker registry directly in your Kubernetes cluster, you can achieve higher speeds, lower latency, and better availability, all while having control over the registry.
The underlying registry storage is delegated to external drivers. The default storage system is the local filesystem, but you can swap this for a cloud-based storage driver. DigitalOcean Spaces is an S3-compatible object storage designed for developer teams and businesses that want a scalable, simple, and affordable way to store and serve vast amounts of data, and is very suitable for storing Docker images. It has a built-in CDN network, which can greatly reduce latency when frequently accessing images.
In this tutorial, you’ll deploy your private Docker registry to your DigitalOcean Kubernetes cluster using Helm, backed up by DigitalOcean Spaces for storing data. You’ll create API keys for your designated Space, install the Docker registry to your cluster with custom configuration, configure Kubernetes to properly authenticate with it, and test it by running a sample deployment on the cluster. At the end of this tutorial, you’ll have a secure, private Docker registry installed on your DigitalOcean Kubernetes cluster.
If you’re looking for a managed Kubernetes hosting service, check out our simple, managed Kubernetes service built for growth.
Prerequisites
Before you begin this tutorial, you’ll need:
-
Docker installed on the machine that you’ll access your cluster from. For Ubuntu 18.04, visit How To Install and Use Docker on Ubuntu 18.04. You only need to complete Step 1 and Step 2. Otherwise, visit Docker’s website for other distributions.
-
An account at Docker Hub for storing Docker images you’ll create during this tutorial.
-
Git installed on the machine that you’ll use to access the cluster. For Ubuntu 18.04, follow Step 1 of the How To Install Git on Ubuntu 18.04 tutorial. For other platforms, visit the official website.
-
A DigitalOcean Kubernetes cluster with your connection configuration configured as the
kubectldefault. Instructions on how to configurekubectlare shown under the Connect to your Cluster step shown when you create your cluster. To learn how to create a Kubernetes cluster on DigitalOcean, see Kubernetes Quickstart. -
A DigitalOcean Space with API keys (access and secret). To learn how to create a DigitalOcean Space and API keys, see How To Create a DigitalOcean Space and API Key.
-
The Helm package manager installed on your local machine. To do this, complete Step 1 of the How To Install Software on Kubernetes Clusters with the Helm 3 Package Manager tutorial.
-
The Nginx Ingress Controller and Cert-Manager installed on the cluster. For a guide on how to do this, see How To Set Up an Nginx Ingress on DigitalOcean Kubernetes Using Helm.
-
A domain name with two DNS A records pointed to the DigitalOcean Load Balancer used by the Ingress. If you are using DigitalOcean to manage your domain’s DNS records, consult How to Manage DNS Records to create A records. In this tutorial, we’ll refer to the A records as
registry.your_domainandk8s-test.your_domain.Note: The domain names you use in this tutorial must differ from the one used in the How To Set Up an Nginx Ingress on DigitalOcean Kubernetes prerequisite tutorial.
Step 1 — Configuring and Installing the Docker Registry
In this step, you’ll create a configuration file for the registry deployment and install the registry to your cluster with the given config using the Helm package manager.
During the course of this tutorial, you will use a configuration file called chart_values.yaml to override some of the default settings for the Docker registry Helm chart. Helm calls its packages, charts; these are sets of files that outline a related selection of Kubernetes resources. You’ll edit the settings to specify DigitalOcean Spaces as the underlying storage system and enable HTTPS access by wiring up Let’s Encrypt TLS certificates.
As part of the Nginx Ingress Controller prerequisite, you created example Services and an Ingress. You won’t need them in this tutorial, so you can delete them by running the following commands:
- kubectl delete -f hello-kubernetes-first.yaml
- kubectl delete -f hello-kubernetes-second.yaml
- kubectl delete -f hello-kubernetes-ingress.yaml
The kubectl delete command accepts the file to delete when passed the -f parameter.
Instead of using the official Docker registry, which has issues with S3 storage providers, we’ll use GitLab’s Container Registry fork, which you’ll need to download and build.
Create a folder that will serve as your workspace:
- mkdir ~/k8s-registry
Navigate to it by running:
- cd ~/k8s-registry
Download the Container Registry repository using git by running the following command:
- git clone https://gitlab.com/gitlab-org/container-registry.git
The output will be similar to this:
OutputCloning into 'container-registry'...
remote: Enumerating objects: 1706, done.
...
Resolving deltas: 100% (13955/13955), done.
The repository is now in the container-registry directory. Navigate to it:
- cd container-registry
You now have the source code of the container registry. To use it from your cluster, you’ll need to build a Docker image out of it and push it to a public registry, such as Docker Hub.
Switch to the branch of the latest stable version by running:
- git checkout v2.13.1-gitlab
Run the following command to build a Docker image of the registry, replacing your_dockerhub_username with your Docker Hub username:
- docker build -t your_dockerhub_username/registry:dev .
This command can take some time to finish. The output will be long, and should be similar to this:
Output...
Successfully built 27322ec15cf7
Successfully tagged your_dockerhub_username/registry:dev
Now that the image is built, to push it to your account, you first need to log in:
- docker login
Input your Docker Hub username and password when prompted. The end of the output should look like:
Output...
Login Succeeded
You can now push the image:
- docker push your_dockerhub_username/registry:dev
The final output will look like:
OutputThe push refers to repository [docker.io/your_dockerhub_username/registry]
c3baf7582a54: Pushed
bc49969a328b: Pushed
0694fbf8288a: Pushed
3e207b409db3: Mounted from library/alpine
dev: digest: sha256:02399157107a1d72312fb4f383f4c8c53a08f3e206d787a9c9380f446b008184 size: 1156
Now that you’ve built and pushed the registry, navigate back to your workspace:
- cd ~/k8s-registry
Create your chart_values.yaml file using your favorite text editor:
- nano chart_values.yaml
Add the following lines, ensuring you replace the highlighted lines with your details:
ingress:
  enabled: true
  hosts:
    - registry.your_domain
  annotations:
    kubernetes.io/ingress.class: nginx
    cert-manager.io/cluster-issuer: letsencrypt-prod
    nginx.ingress.kubernetes.io/proxy-body-size: "30720m"
  tls:
    - secretName: docker-registry-prod
      hosts:
        - registry.your_domain

storage: s3

secrets:
  htpasswd: ""
  s3:
    accessKey: "your_space_access_key"
    secretKey: "your_space_secret_key"

s3:
  region: your_space_region
  regionEndpoint: your_space_region.digitaloceanspaces.com
  secure: true
  bucket: your_space_name

image:
  repository: your_dockerhub_username/registry
  tag: dev
The first block, ingress, configures the Kubernetes Ingress that will be created as a part of the Helm chart deployment. The Ingress object makes outside HTTP/HTTPS routes point to internal services in the cluster, thus allowing communication from the outside. The overridden values are:
enabled: set totrueto enable the Ingress.hosts: a list of hosts from which the Ingress will accept traffic.annotations: a list of metadata that provides further direction to other parts of Kubernetes on how to treat the Ingress. You set the Ingress Controller tonginx, the Let’s Encrypt cluster issuer to the production variant (letsencrypt-prod), and tell thenginxcontroller to accept files with a max size of 30 GB, which is a sensible limit for even the largest Docker images.tls: this subcategory configures Let’s Encrypt HTTPS. You populate thehostslist that defines from which secure hosts this Ingress will accept HTTPS traffic with our example domain name. ThesecretName(here set todocker-registry-prod) specifies the name of the secret in which the certificate(s) will be stored, and generally must be different for every Ingress you create or deploy.
Then, you set the file system storage to s3 — the other available option would be filesystem. Here s3 indicates using a remote storage system compatible with the industry-standard Amazon S3 API, which DigitalOcean Spaces fulfills.
In the next block, secrets, you configure keys for accessing your DO Space under the s3 subcategory. Finally, in the s3 block, you configure the parameters specifying your Space.
At the end of the file, you specify the registry image you just pushed as the one that will be deployed, instead of the official Docker registry.
Save and close the file.
Now, if you haven’t already done so, set up your A records to point to the Load Balancer you created as part of the Nginx Ingress Controller installation in the prerequisite tutorial. To see how to set your DNS on DigitalOcean, see How to Manage DNS Records.
The chart that deploys the Docker registry is located in the twuni repository. Add it to Helm by running:
- helm repo add twuni https://helm.twun.io
Before installing anything from it, you need to refresh its cache. This will update the latest information about the chart repository. To do this run the following command:
- helm repo update
Now, you’ll deploy the Docker registry chart with this custom configuration via Helm by running:
- helm install docker-registry twuni/docker-registry -f chart_values.yaml
You’ll see the following output:
OutputNAME: docker-registry
LAST DEPLOYED: ...
NAMESPACE: default
STATUS: deployed
REVISION: 1
TEST SUITE: None
NOTES:
1. Get the application URL by running these commands:
  https://registry.your_domain/
The registry is now accessible from the domain name you specified earlier.
You’ve configured and deployed a Docker registry on your Kubernetes cluster. Next, you will test the availability of the newly deployed Docker registry.
Step 2 — Testing Pushing and Pulling
In this step, you’ll test your newly deployed Docker registry by pushing and pulling images to and from it. Currently, the registry is empty. To have something to push, you need to have an image available on the machine you’re working from. Let’s use the mysql Docker image for that purpose.
Start off by pulling mysql from the Docker Hub:
- docker pull mysql
Your output will look like this:
OutputUsing default tag: latest
latest: Pulling from library/mysql
27833a3ba0a5: Pull complete
...
e906385f419d: Pull complete
Digest: sha256:9643e9fbd6330d10686f8922292dcb20995e7b792c17d4e94ddf95255f1d5449
Status: Downloaded newer image for mysql:latest
docker.io/library/mysql:latest
You now have the image available locally. To inform Docker where to push it, you’ll need to tag it with the host name, like so:
- docker tag mysql registry.your_domain/mysql
Then, push the image to the new registry:
- docker push registry.your_domain/mysql
This command will run successfully and indicate that your new registry is properly configured and accepting traffic — including pushing new images. If you see an error, double check your steps against steps 1 and 2.
To test pulling from the registry cleanly, first delete the local mysql images with the following command:
- docker rmi registry.your_domain/mysql && docker rmi mysql
Then, pull it from the registry:
- docker pull registry.your_domain/mysql
This command will take a few seconds to complete. If it runs successfully, that means your registry is working correctly. If it shows an error, double check what you have entered against the previous commands.
You can list Docker images available locally by running the following command:
- docker images
You’ll see output listing the images available on your local machine, along with their ID and date of creation.
Your Docker registry is configured. You’ve pushed an image to it and verified you can pull it down. Now let’s add authentication so only certain people can access the images.
Step 3 — Adding Account Authentication and Configuring Kubernetes Access
In this step, you’ll set up username and password authentication for the registry using the htpasswd utility.
The htpasswd utility comes from the Apache webserver, which you can use for creating files that store usernames and passwords for basic authentication of HTTP users. The format of htpasswd files is username:hashed_password (one per line), which is portable enough to allow other programs to use it as well.
You’ll use a Dockerized variant of htpasswd for simplicity. Run the following command to append a login combination to htpasswd_file, replacing username and password with your desired credentials:
- docker run --rm -ti xmartlabs/htpasswd username password >> htpasswd_file
Docker requires the password to be hashed using the bcrypt algorithm, which is implicitly being used here. The bcrypt algorithm is a password hashing function based on Blowfish block cipher, with a work factor parameter, which specifies how expensive the hash function will be.
You can repeat this command for as many users as you wish to add.
When you are done, show the contents of htpasswd_file by running the following command:
- cat htpasswd_file
Select and copy the contents shown.
To add authentication to your Docker registry, you’ll need to edit chart_values.yaml and add the contents of htpasswd_file in the htpasswd variable.
Open chart_values.yaml for editing:
- nano chart_values.yaml
Find the line that looks like this:
htpasswd: ""
Edit it to match the following, replacing htpasswd\_file\_contents with the contents you copied from the htpasswd_file:
  htpasswd: |-
    htpasswd_file_contents
Be careful with the indentation, each line of the file contents must have four spaces before it. You can remove blank lines, if there are any.
Once you’ve added your contents, save and close the file.
To propagate the changes to your cluster, run the following command:
- helm upgrade docker-registry twuni/docker-registry -f chart_values.yaml
The output will be similar to the one shown when you first deployed your Docker registry:
OutputRelease "docker-registry" has been upgraded. Happy Helming!
NAME: docker-registry
LAST DEPLOYED: ...
NAMESPACE: default
STATUS: deployed
REVISION: 2
TEST SUITE: None
NOTES:
1. Get the application URL by running these commands:
  https://registry.your_domain/
This command calls Helm and instructs it to upgrade an existing release, in your case docker-registry, with its chart defined in stable/docker-registry in the chart repository, after applying the chart_values.yaml file.
Now, you’ll try pulling an image from the registry again:
- docker pull registry.your_domain/mysql
The output will look like the following:
OutputUsing default tag: latest
Error response from daemon: Get https://registry.your_domain/v2/mysql/manifests/latest: no basic auth credentials
It correctly failed because you provided no credentials. This means that your Docker registry authorizes requests correctly.
To log in to the registry, run the following command:
- docker login registry.your_domain
Remember to replace registry.your_domain with your domain address. It will prompt you for a username and password. If it shows an error, double check what your htpasswd_file contains. You must specify a username and password combination from the htpasswd_file, which you created earlier in this step.
To test the login, you can try to pull again by running the following command:
- docker pull registry.your_domain/mysql
The output will look similar to the following:
OutputUsing default tag: latest
latest: Pulling from mysql
Digest: sha256:f2dc118ca6fa4c88cde5889808c486dfe94bccecd01ca626b002a010bb66bcbe
Status: Image is up to date for registry.your_domain/mysql:latest
You’ve now configured Docker and can log in securely. To configure Kubernetes to log in to your registry, run the following command:
- sudo kubectl create secret docker-registry regcred --docker-server=registry.your_domain --docker-username=your_username --docker-password=your_password
This command creates a secret in your cluster with the name regcred which will contain login info for your registry and parses it as dockerconfigjson, which defines a registry credential in Kubernetes.
Remember to replace registry.your_domain with your registry domain and to put one of your login credentials you created earlier in place of your_username and your_password.
You will see the following output:
Outputsecret/regcred created
You’ve used htpasswd to create a login config file, configured the registry to authenticate requests, and created a Kubernetes secret containing the login credentials. Next, you will test the integration between your Kubernetes cluster and registry.
Step 4 — Testing Kubernetes Integration by Running a Sample Deployment
In this step, you’ll run a sample deployment with an image stored in the in-cluster registry to test the connection between your Kubernetes cluster and registry.
In the last step, you created a secret, called regcred, containing login credentials for your private registry. It may contain login credentials for multiple registries, in which case you’ll have to update the Secret accordingly.
You can specify which secret Kubernetes should use when pulling containers in the pod definition by specifying imagePullSecrets. This step is necessary when the Docker registry requires authentication.
You’ll now deploy a sample Hello World image from your private Docker registry to your cluster. First, in order to push it, you’ll pull it to your machine by running the following command:
- docker pull paulbouwer/hello-kubernetes:1.8
Then, tag it by running:
- docker tag paulbouwer/hello-kubernetes:1.8 registry.your_domain/paulbouwer/hello-kubernetes:1.8
Finally, push it to your registry:
- docker push registry.your_domain/paulbouwer/hello-kubernetes:1.8
Delete it from your machine as you no longer need it locally:
- docker rmi registry.your_domain/paulbouwer/hello-kubernetes:1.8
Now, you’ll deploy the sample Hello World application. First, create a new file, hello-world.yaml, using your text editor:
- nano hello-world.yaml
Next, you’ll define a Service and an Ingress to make the app accessible to outside of the cluster. Add the following lines, replacing the highlighted lines with your domains:
apiVersion: networking.k8s.io/v1
kind: Ingress
metadata:
  name: hello-kubernetes-ingress
  annotations:
    kubernetes.io/ingress.class: nginx
spec:
  rules:
  - host: k8s-test.your_domain
    http:
      paths:
      - pathType: Prefix
        path: "/"
        backend:
          service:
            name: hello-kubernetes
            port:
              number: 80
---
apiVersion: v1
kind: Service
metadata:
  name: hello-kubernetes
spec:
  type: NodePort
  ports:
  - port: 80
    targetPort: 8080
  selector:
    app: hello-kubernetes
---
apiVersion: apps/v1
kind: Deployment
metadata:
  name: hello-kubernetes
spec:
  replicas: 3
  selector:
    matchLabels:
      app: hello-kubernetes
  template:
    metadata:
      labels:
        app: hello-kubernetes
    spec:
      containers:
      - name: hello-kubernetes
        image: registry.your_domain/paulbouwer/hello-kubernetes:1.8
        ports:
        - containerPort: 8080
      imagePullSecrets:
      - name: regcred
First, you define the Ingress for the Hello World deployment, which you will route through the Load Balancer that the Nginx Ingress Controller owns. Then, you define a service that can access the pods created in the deployment. In the actual deployment spec, you specify the image as the one located in your registry and set imagePullSecrets to regcred, which you created in the previous step.
Save and close the file. To deploy this to your cluster, run the following command:
- kubectl apply -f hello-world.yaml
You’ll see the following output:
Outputingress.extensions/hello-kubernetes-ingress created
service/hello-kubernetes created
deployment.apps/hello-kubernetes created
You can now navigate to your test domain — the second A record, k8s-test.your_domain in this tutorial. You will see the Kubernetes Hello world! page.
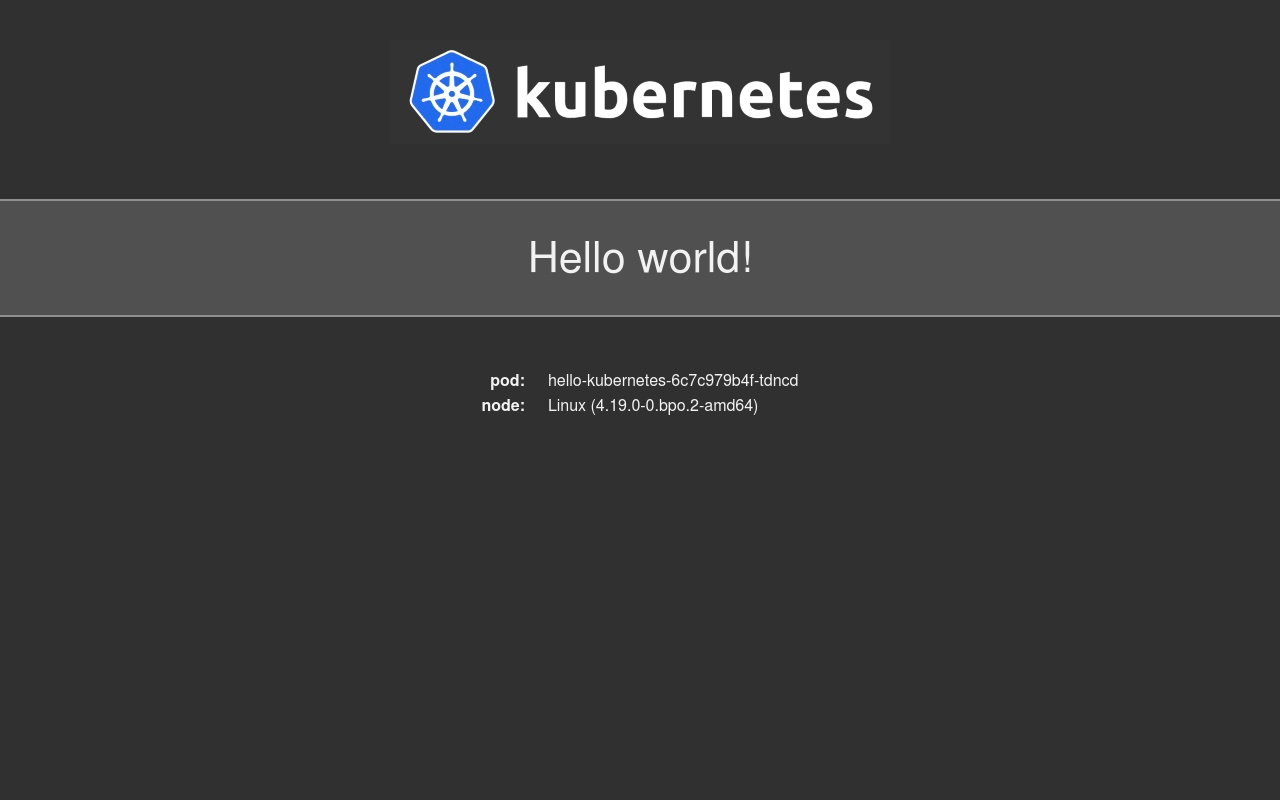
The Hello World page lists some environment information, like the Linux kernel version and the internal ID of the pod the request was served from. You can also access your Space via the web interface to see the images you’ve worked with in this tutorial.
If you want to delete this Hello World deployment after testing, run the following command:
- kubectl delete -f hello-world.yaml
In this step, you’ve created a sample Hello World deployment to test if Kubernetes is properly pulling images from your private registry.
Conclusion
You have now successfully deployed your own private Docker registry on your DigitalOcean Kubernetes cluster, using DigitalOcean Spaces as the storage layer underneath. There is no limit to how many images you can store, Spaces can extend infinitely, while at the same time providing the same security and robustness. In production, though, you should always strive to optimize your Docker images as much as possible, take a look at the How To Optimize Docker Images for Production tutorial.
Thanks for learning with the DigitalOcean Community. Check out our offerings for compute, storage, networking, and managed databases.
About the author(s)
Expert in cloud topics including Kafka, Kubernetes, and Ubuntu.
Former Senior Technical Editor at DigitalOcean, with a strong focus on DevOps and System Administration content. Areas of expertise include Terraform, PyTorch, Python, and Django.
Still looking for an answer?
This textbox defaults to using Markdown to format your answer.
You can type !ref in this text area to quickly search our full set of tutorials, documentation & marketplace offerings and insert the link!
To complement this article, here is a free, hands-on scenario for a comparable way of deploying and using a private registry on Kubernetes.
Hi, did the full tutorial, I have working the echo example and others, but when I try to push the ssl cetificate say “certificate is valid for ingress.local”. I can’t undertand why i’m having this problem, did try to see if the certificate is create and it ok.
Please need some help here im new to this.
regards.
PS: Thanks for all your work and tutorials.
Hi,
how can I do the same example but with 2 site with diferent annotations?
I’m trying to do it but have the error “certificate is valid for ingress.local”
apiVersion: extensions/v1beta1
kind: Ingress
metadata:
  name: docker-registry
  annotations:
    kubernetes.io/ingress.class: nginx
    certmanager.k8s.io/cluster-issuer: letsencrypt-prod
    nginx.ingress.kubernetes.io/proxy-body-size: "30720m"
spec:
  tls:
    - secretName: letsencrypt-prod
      hosts:
        - registry.example.com
  rules:
  - host: registry.example.com
    http:
      paths:
      - backend:
          serviceName: docker-registry
          servicePort: 5000
and the other is
apiVersion: extensions/v1beta1
kind: Ingress
metadata:
  name: docker-registry-2
  annotations:
    kubernetes.io/ingress.class: nginx
    nginx.ingress.kubernetes.io/connection-proxy-header: "keep-alive"
    nginx.ingress.kubernetes.io/force-ssl-redirect: "true"
    nginx.ingress.kubernetes.io/configuration-snippet: |
        proxy_set_header   "Upgrade $http_upgrade";
        proxy_set_header   "Host $host";
        proxy_cache_bypass "$http_upgrade";
        proxy_set_header   "X-Forwarded-For $proxy_add_x_forwarded_for";
        proxy_set_header   "X-Forwarded-Proto $scheme";
spec:
  tls:
    - secretName: letsencrypt-prod
      hosts:
        - registry2.example.com
  rules:
  - host: registry2.example.com
    http:
      paths:
      - backend:
          serviceName: docker-registry-2
          servicePort: 5000
for mac users, I had issues with the htpasswd part. The credentials I put in were not working. I went to the docker-registry helm chart README and found this command:
docker run --entrypoint htpasswd registry:2 -Bbn user password > ./htpasswd_file
Ran that instead of the author’s docker command and my credentials worked. Everything else worked fine as described in the post. Try that command if you run into a similar issue :)
Great article sadly I’m probably missing something. While my registry is running on NodeA any pod that is running on NodeB cannot pull the images for some reasons I cannot explain:
  Normal   Scheduled       2m7s                default-scheduler        Successfully assigned dev/<REDACTED> to preprod-1-me4a
  Normal   SandboxChanged  108s                kubelet, preprod-1-me4a  Pod sandbox changed, it will be killed and re-created.
  Normal   Pulling         53s (x3 over 2m4s)  kubelet, preprod-1-me4a  pulling image "<REDACTED>"
  Warning  Failed          38s (x3 over 109s)  kubelet, preprod-1-me4a  Failed to pull image "<REDACTED>": rpc error: code = Unknown desc = Error response from daemon: Get https://<REDACTED>/v2/: net/http: request canceled while waiting for connection (Client.Timeout exceeded while awaiting headers)
  Warning  Failed          38s (x3 over 109s)  kubelet, preprod-1-me4a  Error: ErrImagePull
  Normal   BackOff         11s (x6 over 107s)  kubelet, preprod-1-me4a  Back-off pulling image "<REDACTED>"
  Warning  Failed          11s (x6 over 107s)  kubelet, preprod-1-me4a  Error: ImagePullBackOff
Could you please hint me ? Thanks
Wow, the ingress tutorial works great, but this tutorial isn’t working at all. After installing the docker registry, the pod for the registry startes up, does 20 seconds of healthy checks and then goes into 503 errors. Eventually K8s kills it and the cycle repeats.
The s3 credentials are definitely right. (It did create some files on it when I tried to push images, but then quickly failed)
Any idea what could be the problem?
Thanks @Kathryn for creating this wonderful article. If I may, I suggest you change edit the article to use
For creating the docker credentials, doing this allowed me to complete this task using macos since the docker credentials are stored in the apple keychain rather than in the docker file.
Great article, it works well for the most part. However, the latest version of the docker-registry helm chart has issues with using Spaces (and maybe other S3 derivatives) as the backing storage. Here is the relevant Github issue with the fix being to use modify the chart to use an older registry image (use 2.5.2 instead of 2.7.1)
This comment has the command I used to update the helm deployment to use the older image.
I was tipped off because the pod had around 1000 restarts, and the _catalog URL was not working. Other things like push and pulls worked but had sporadic failures. Hope this helps other people who come to this tutorial more recently.
It would be nice to add a note about this to the tutorial, but I understand it’s tough to maintain articles as tech changes so quickly.
Hey @Khankox, thanks for the detailed instruction, I’m really appreciated!
I had a small issue (I was so close to the result): at step 4 (Testing Kubernetes Integration by Running a Sample Deployment), I can’t get the sample container to work, when I do kubectl get pods, all of hello-kubernetes pods are marked as ImagePullBackOff.
When I describe the pods, it said ....no basic auth credentials. I think I’ve done something wrong with the regcred, so my K8S can’t pull the image from my registry. But I tried to start over again without any success.
I’ve tried the comment of @lrosa007 and @C00 but it didn’t work either.
Hmm… this is sooooo close… please any ideas to resolve this would be tons of appreciated!
Thanks for the tutorial!
A little update on chart_values.yaml, I had to change the annotation
from:
certmanager.k8s.io/cluster-issuer: letsencrypt-prod
to:
cert-manager.io/cluster-issuer: letsencrypt-prod
cert-manager logs really helped me to troubleshoot the issue of K8s generating a local certificate instead of getting one from lets-encrypt
Follow reference the log entry
I1222 00:33:47.173445 1 sync.go:50] cert-manager/controller/ingress-shim "level"=0 "msg"="not syncing ingress resource as it does not contain a \"cert-manager.io/issuer\" or \"cert-manager.io/cluster-issuer\" annotation" "resource_kind"="Ingress" "resource_name"="docker-registry" "resource_namespace"="default"
 This work is licensed under a Creative Commons Attribution-NonCommercial- ShareAlike 4.0 International License.
Become a contributor for community
Get paid to write technical tutorials and select a tech-focused charity to receive a matching donation.

DigitalOcean Documentation
Full documentation for every DigitalOcean product.

Resources for startups and AI-native businesses
The Wave has everything you need to know about building a business, from raising funding to marketing your product.
The developer cloud
Scale up as you grow — whether you're running one virtual machine or ten thousand.

Start building today
From GPU-powered inference and Kubernetes to managed databases and storage, get everything you need to build, scale, and deploy intelligent applications.
