By finid and Dave Rankin
Not using Ubuntu 16.04?
Choose a different version or distribution.
Introduction
From cloud-based backup solutions to high-availability content delivery networks (CDNs), object storage has become an integral part of the modern technology landscape. And, with its small footprint, straightforward interface, and compatibility with multiple cloud storage services, the Minio object storage server packs a lot of punch.
Minio is an open-source object storage server that stores unstructured data like photos, videos, virtual machine images, containers, and log files as objects. In distributed mode, Minio provides a single object storage server that pools multiple drives spread across many servers.
Minio is written in Go, comes with a command line client plus a browser interface, and supports simple queuing service for Advanced Message Queuing Protocol (AMQP), Elasticsearch, Redis, NATS, and Postgres targets.
In this tutorial, you will:
-
Install the Minio server on your DigitalOcean server and configure it as a systemd service.
-
Set up an SSL/TLS certificate using Let’s Encrypt to secure communication between the server and the client.
-
Access Minio’s browser interface via HTTPS to use and administrate the server.
Prerequisites
To complete this tutorial, you will need:
-
One Ubuntu 16.04 server set up by following this Ubuntu 16.04 initial server setup tutorial, including a sudo non-root user and a firewall.
-
A fully registered domain name. You can purchase one on Namecheap or get one for free on Freenom.
-
The following DNS records set up for your Minio server. You can follow this hostname tutorial for details on how to add them.
-
An A record with your server name (e.g.
minio-server.example.com) pointing to your object server’s IPv4 address. -
An AAAA record with your server name pointing to your object server’s IPv6 address, if you want your server reachable via IPv6.
-
-
Go installed on the server using this guide for installing Go on Ubuntu 16.04.
Step 1 — Installing And Configuring The Minio Server
You can install the Minio server by compiling the source code or via a binary file. In this step, we’ll install the server the easiest way—through the binary—and then we’ll configure everything afterward.
First, log into your server:
- ssh sammy@your_server_ip
If you haven’t updated the package database recently, update it now:
- sudo apt-get update
Next, download the Minio server’s binary file:
- curl -O https://dl.minio.io/server/minio/release/linux-amd64/minio
A file named minio will be downloaded into your working directory. Make it executable:
- sudo chmod +x minio
Now, move the file into the /usr/local/bin directory where Minio’s systemd startup script expects to find it:
- sudo mv minio /usr/local/bin
For security reasons, we don’t want to run the Minio server as root. And, since the systemd script we’ll use in Step 2 looks for a user account and group called minio-user, let’s create them now.
- sudo useradd -r minio-user -s /sbin/nologin
Change ownership of the binary to minio-user:
- sudo chown minio-user:minio-user /usr/local/bin/minio
Next, we need to create a directory where Minio will store files. This will be the storage location for the buckets you’ll create in Step 5.
- sudo mkdir /usr/local/share/minio
Give ownership of that directory to minio-user:
- sudo chown minio-user:minio-user /usr/local/share/minio
The /etc directory is the most common location for server configuration files, so we’ll create a place for Minio there.
- sudo mkdir /etc/minio
Give ownership of that directory to minio-user, too:
- sudo chown minio-user:minio-user /etc/minio
Use nano or your favorite text editor to create the environment file needed to modify the default configuration:
- sudo nano /etc/default/minio
And, add the following variables:
MINIO_VOLUMES="/usr/local/share/minio/"
MINIO_OPTS="-C /etc/minio --address your-server-ip:9000"
-
MINIO_VOLUMES: Points to the storage directory that you created earlier.
-
MINIO_OPTS: Modifies the behavior of the server. The -C flag points Minio to the configuration directory it should use, while the –address flag tells Minio the IP address and port to bind to. If the IP address is not specified, Minio will bind to every address configured on the server, including localhost and any Docker-related IP addresses, so it’s best to specify the IP address in this file explicitly. The default port is 9000, but you can choose another.
Finally, save and close the environment file when you’re finished making changes.
Minio is now installed, so, next, we’ll configure the server to run as a system service.
Step 2 — Installing the Minio Systemd Startup Script
In this step, we’ll configure the Minio server to be managed as a systemd service. First, download the Minio service descriptor file using the following command:
- curl -O https://raw.githubusercontent.com/minio/minio-service/master/linux-systemd/minio.service
After the download has finished, a file named minio.service should be in your working directory.
To audit the contents of minio.service before applying it, open it in a text editor to view its contents:
- nano minio.service
Once you’re comfortable with the script’s contents, close your text editor.
Systemd requires that unit files be stored in the systemd configuration directory, so move minio.service there:
- sudo mv minio.service /etc/systemd/system
Then, run the following command to reload all systemd units:
- sudo systemctl daemon-reload
Finally, enable Minio to start on boot:
- sudo systemctl enable minio
Now that the systemd script is installed and configured, let’s start the server.
Step 3 — Starting The Minio Server
In this step, you’ll start the server and modify the firewall to allow access through the browser interface.
First, start the Minio server:
- sudo systemctl start minio
You can verify Minio’s status, the IP address it’s bound to, its memory usage, and more with the command:
- sudo systemctl status minio
You should get output like the following:
Outputminio.service - Minio
   Loaded: loaded (/etc/systemd/system/minio.service; enabled; vendor preset: enabled)
   Active: active (running) since Fri 2017-04-07 00:26:10 UTC; 11min ago
     Docs: https://docs.minio.io
  Process: 25069 ExecStartPre=/bin/bash -c [ -n "${MINIO_VOLUMES}" ] || echo "Variable MINIO_VOLUMES not set in /etc/default/minio" (code=exit
 Main PID: 25073 (minio)
    Tasks: 6
   Memory: 20.7M
      CPU: 544ms
   CGroup: /system.slice/minio.service
           └─25073 /usr/local/bin/minio server -C /etc/minio --address :9000 /usr/local/share/minio/

Apr 07 00:26:11 ashtonandgray minio[25073]: Browser Access:
Apr 07 00:26:11 ashtonandgray minio[25073]:    http://174.138.67.91:9000
Next, you need to enable access through the firewall to the Minio server on the configured port. In this tutorial, that’s port 9000.
So, first add the rule:
- sudo ufw allow 9000
Then, restart the firewall:
- sudo systemctl restart ufw
Minio is now ready to accept traffic, but before connecting to the server, let’s secure communication by installing an SSL/TLS certificate.
Step 4 — Securing Access to Minio Server With a Let’s Encrypt SSL/TLS Certificate
In this step, we’ll use the console-based certificate generation client, Concert, to create an SSL/TLS certificate using the open source Let’s Encrypt certificate authority. While there are other ways to generate Let’s Encrypt certificates, Concert is both written by Minio’s developers and part of the official installation instructions.
First, download Concert with the command:
- go get -u github.com/minio/concert
Once complete, a file named concert should be in the bin directory of your GOPATH.
Next, we’ll generate the certificate.
Note: To generate the certificate, concert requires that traffic through port 443 be allowed through the firewall.
Run the following command using the --dirs flag to tell Concert the output directory, email address, and domain name you’d like to use:
- sudo GOPATH/bin/concert gen --dir minio-certs sammy@example.com example.com
The output will look like:
Output2017/04/09 01:21:08 Generated certificates for example.com under minio-certs will expire in 89 days.
And, Concert will have generated a private.key and a public.crt file, which you can verify by running ls on the directory you specified.
Next, we’ll copy these two files into the certs directory under Minio’s server configuration folder, which is /etc/minio for this tutorial.
- sudo cp minio-certs/private.key /etc/minio/certs/
- sudo cp minio-certs/public.crt /etc/minio/certs/
Now, change the ownership of the files to minio-user:
- sudo chown minio-user:minio-user /etc/minio/certs/private.key
- sudo chown minio-user:minio-user /etc/minio/certs/public.crt
Restart the Minio server, so that it becomes aware of the certificate and starts using HTTPS:
- sudo systemctl restart minio
Since the Let’s Encrypt certificate generated is valid for just 90 days and repeatedly renewing it manually would be inefficient, start Concert in server mode to set up a system to auto-renew the certificate:
- sudo concert server --dir minio-certs sammy@example.com example.com
With that, Minio’s connection is now secure, and the SSL/TLS certificate will automatically renew for you. In the next step, you’ll connect to Minio through the browser to use and administrate the server.
Step 5 — Securely Connecting to Minio’s Web Interface Using HTTPS
In this step, you’ll securely connect to the Minio web interface via HTTPS, and then you’ll create buckets and upload objects into them.
Access the web interface by pointing your browser to https://example.com:9000.
Next, you’ll need to find your login credentials. Minio wrote its configuration file to the /etc/minio directory when you started the server in Step 3. That configuration file, config.json, contains the accessKey and secretKey values you’ll need to access the server now. Be sure to copy and keep both keys in an easy-to-reach and secure place for the future.
{
	"version": "19",
	"credential": {
		"accessKey": "8ngv6i97QZV959Y87Y007FP",
		"secretKey": "C6hK8ytyBe3Q952bght65434JiZN08itG49jG5RX"
	},
	"region": "us-east-1",
    ...
}
Now, log into the main interface by entering your credentials and clicking the round button with the arrow directly below the input fields.
From there, click the light-red + button on the bottom right of the main interface to bring up two additional yellow buttons.
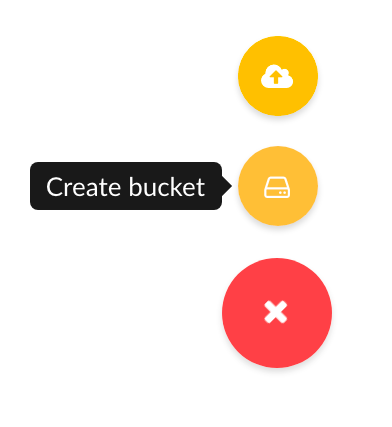
Click the middle, yellow button and enter a name for your new bucket in the prompt, pressing the ENTER key to save your response. Your new bucket is now ready to be used for storage!
When you want to add objects into your bucket, click the same light-red button as before and then click the top, yellow button to open a file-upload prompt.
Note: An object on a Minio object storage server can be up to 5 TB in size—far more than a single DigitalOcean server can hold—but with DigitalOcean’s block storage service, you can extend the amount of available storage to your standalone Minio server considerably.
At this point, you’ve worked through the entire basic web interface, but beyond just creating buckets and uploading objects, you can also generate new login credentials, set expiration dates on objects’ shareable links, and delete objects altogether.
Conclusion
You now have your own object storage server using Minio that you can connect to securely from the web interface using a Let’s Encrypt SSL/TLS certificate. Optionally, you may want to look at the Minio desktop clients for FreeBSD, Linux, Mac, and Windows as an alternative way to use and administrate your object storage server.
Additionally, if you’d like to increase your Minio installation’s storage capacity beyond your server’s disk size, you can use DigitalOcean’s block storage service to attach a volume to your server, extending storage capacity by as much as 80 TB at a fraction of the cost of spinning up an equally-sized Droplet.
Thanks for learning with the DigitalOcean Community. Check out our offerings for compute, storage, networking, and managed databases.
About the author(s)
Jack of all trades, master of a few
Technical Editor @ DigitalOcean
Still looking for an answer?
This textbox defaults to using Markdown to format your answer.
You can type !ref in this text area to quickly search our full set of tutorials, documentation & marketplace offerings and insert the link!
Trying to follow this tutorial but stuck when trying to install ‘Concert’ fails after running:
go get -u github.com/minio/concert
Getting the error:
package context: unrecognized import path “context” (import path does not begin with hostname)
What did I wrong? Thanks in advance.
–address your-server-ip:9000
This row should be
–address=sam.ple.ip.adr:9000
I need security advice about file upload risks. Exploits, mimetypes etc. What’s the risks and solutions for minio ?
I was stuck at the concert too… unable to ‘go’ beyond.
Used OpenSSL with ECDSA signature and copied the keys into ~/.minio/certs folder. Worked like a charm. For more information, follow this link. You may need only few statements from it.
https://docs.minio.io/docs/how-to-secure-access-to-minio-server-with-tls
I had an issue here:
go get -u github.com/minio/concert
concert is deprecated. step 4 needs to be updated.
why i do not get bin directory in my GOPATH,and when i run sudo GOPATH/bin/concert gen --dir minio-certs sammy@example.com example.com command ,i get an error. like sudo: GOPATH/bin/concert: command not found.how can i do? here is my go env.
GOARCH="amd64"
GOBIN=""
GOCACHE="/home/lzz/.cache/go-build"
GOEXE=""
GOHOSTARCH="amd64"
GOHOSTOS="linux"
GOOS="linux"
GOPATH="/home/lzz/go"
GORACE=""
GOROOT="/usr/lib/go-1.10"
GOTMPDIR=""
GOTOOLDIR="/usr/lib/go-1.10/pkg/tool/linux_amd64"
GCCGO="gccgo"
CC="gcc"
CXX="g++"
CGO_ENABLED="1"
CGO_CFLAGS="-g -O2"
CGO_CPPFLAGS=""
CGO_CXXFLAGS="-g -O2"
CGO_FFLAGS="-g -O2"
CGO_LDFLAGS="-g -O2"
PKG_CONFIG="pkg-config"
GOGCCFLAGS="-fPIC -m64 -pthread -fmessage-length=0 -fdebug-prefix-map=/tmp/go-build667063449=/tmp/go-build -gno-record-gcc-switches"
This comment has been deleted
 This work is licensed under a Creative Commons Attribution-NonCommercial- ShareAlike 4.0 International License.
Become a contributor for community
Get paid to write technical tutorials and select a tech-focused charity to receive a matching donation.

DigitalOcean Documentation
Full documentation for every DigitalOcean product.

Resources for startups and AI-native businesses
The Wave has everything you need to know about building a business, from raising funding to marketing your product.
The developer cloud
Scale up as you grow — whether you're running one virtual machine or ten thousand.

Start building today
From GPU-powered inference and Kubernetes to managed databases and storage, get everything you need to build, scale, and deploy intelligent applications.
