Not using Ubuntu 18.04?
Choose a different version or distribution.
Introduction
Jupyter Notebook is an open-source web application that lets you create and share interactive code, visualizations, and more. This tool can be used with several programming languages, including Python, Julia, R, Haskell, and Ruby. It is often used for working with data, statistical modeling, and machine learning.
This tutorial will walk you through setting up Jupyter Notebook to run from an Ubuntu 18.04 server, as well as teach you how to connect to and use the Notebook. Jupyter Notebooks (or simply Notebooks) are documents produced by the Jupyter Notebook app which contain both computer code and rich text elements (paragraph, equations, figures, links, etc.) which aid in presenting and sharing reproducible research. In the final step of this guide, you will run Python 3 code using a Jupyter Notebook running on a remote server.
Prerequisites
In order to complete this guide, you will need an Ubuntu 18.04 server instance with a firewall and a non-root user with sudo privileges configured. You can set this up by running through our initial server setup tutorial.
Step 1 — Setting Up Python
To begin the process, install the dependencies for your Python programming environment from the Ubuntu repositories. Ubuntu 18.04 comes preinstalled with Python 3.6.9. You will use the Python package manager pip to install additional components later.
First, update the local apt package index:
- sudo apt update
Next, install pip and the Python header files, which are used by some of Jupyter’s dependencies:
- sudo apt install python3-pip python3-dev
You can now move on to setting up a Python virtual environment.
Step 2 — Creating a Python Virtual Environment for Jupyter
With some dependencies installed, you can create a Python virtual environment to manage your projects. Jupyter will be installed into this virtual environment.
You will need access to the virtualenv command which can be installed with pip.
First, upgrade pip by typing:
- sudo -H pip3 install --upgrade pip
Then install virtualenv with this command:
- sudo -H pip3 install virtualenv
The -H flag ensures that the security policy sets the home environment variable to the home directory of the target user.
With virtualenv installed, you can start forming your environment. Create and move into a directory where you can keep your project files. The following example directory is called my_project_dir. Use a name that is meaningful for you and what you’re working on.
Create your directory by typing the following command:
- mkdir ~/my_project_dir
Move into the my_project_dir with this command:
- cd ~/my_project_dir
Within the project directory, create a Python virtual environment. This tutorial will refer to the environment as my_project_env but, again, you can call it something that is relevant to your project.
- virtualenv my_project_env
This creates a directory called my_project_env within your my_project_dir directory. Inside, it will install a local version of Python and a local version of pip. You can use this to install and configure an isolated Python environment for Jupyter.
Before installing Jupyter, activate the virtual environment. You can do that by typing:
- source my_project_env/bin/activate
Your prompt should change to indicate that you are now operating within a Python virtual environment similar to this:
-
You’re now ready to install Jupyter into this virtual environment.
Step 3 — Installing Jupyter
With your virtual environment active, install Jupyter with the local instance of pip.
Note: When the virtual environment is activated (when your prompt has (my_project_env) preceding it), use pip instead of pip3, even if you are using Python 3. The virtual environment’s copy of the tool is always named pip, regardless of the Python version.
- pip install jupyter
At this point, you’ve successfully installed all the software needed to run Jupyter. You can now start the Notebook server.
Step 4 — Running Jupyter Notebook
You now have everything you need to run Jupyter Notebook. To run it, execute the following command:
- jupyter notebook
A log of the activities of the Jupyter Notebook will be printed to the terminal. When you run Jupyter Notebook, it runs on a specific port number. The first Notebook you run will usually use port 8888. To check the specific port number Jupyter Notebook is running on, refer to the output of the command used to start it:
Output[I 21:23:21.198 NotebookApp] Writing notebook server cookie secret to /home/sammy/.local/share/jupyter/runtime/notebook_cookie_secret
[I 21:23:21.361 NotebookApp] Serving notebooks from local directory: /home/sammy/my_project_dir
[I 21:23:21.361 NotebookApp] The Jupyter Notebook 6.4.10 is running at:
[I 21:23:21.361 NotebookApp] http://localhost:8888/?token=1fefa6ab49a498a3f37c959404f7baf16b9a2eda3eaa6d72
[I 21:23:21.361 NotebookApp]  or http://127.0.0.1:8888/?token=1fefa6ab49a498a3f37c959404f7baf16b9a2eda3eaa6d72
[I 21:23:21.361 NotebookApp] Use Control-C to stop this server and shut down all kernels (twice to skip confirmation).
[W 21:23:21.361 NotebookApp] No web browser found: could not locate runnable browser.
[C 21:23:21.361 NotebookApp]

    To access the notebook, open this file in a browser:
        file:///home/sammy/.local/share/jupyter/runtime/nbserver-7924-open.html
    Or copy and paste one of these URLs:
        http://localhost:8888/?token=1fefa6ab49a498a3f37c959404f7baf16b9a2eda3eaa6d72
     or http://127.0.0.1:8888/?token=1fefa6ab49a498a3f37c959404f7baf16b9a2eda3eaa6d72
If you are running Jupyter Notebook on a local computer (not on a server), you can navigate to the displayed URL to connect to Jupyter Notebook. If you are running Jupyter Notebook on a server, you will need to connect to the server using SSH tunneling as outlined in the next section.
At this point, you can keep the SSH connection open and keep Jupyter Notebook running or you can exit the app and re-run it once you set up SSH tunneling.
If you would like to stop the Jupyter Notebook process, press CTRL + C, type Y, and then ENTER to confirm. The following output will be displayed:
Output[C 19:23:34.939 NotebookApp] Shutdown confirmed
[I 19:23:34.940 NotebookApp] Shutting down 0 kernels
[I 19:23:34.941 NotebookApp] Shutting down 0 terminals
You can now set up an SSH tunnel to access the Notebook.
Step 5 — Connecting to the Server Using SSH Tunneling
Jupyter Notebook runs on a specific port on the server (such as :8888, :8889 etc.). SSH tunneling enables you to connect to the server’s port securely.
The next two subsections describe how to create an SSH tunnel from a Mac, Linux, and Windows operating system. Please refer to the subsection for your local computer.
SSH Tunneling with a Mac or Linux
If you are using a Mac or Linux, the steps for creating an SSH tunnel are similar to using SSH to log in to your remote server, except that there are additional parameters in the ssh command.
SSH tunneling can be done by running the following SSH command in a new local terminal window:
- ssh -L 8888:localhost:8888 your_server_username@your_server_ip
The ssh command opens an SSH connection, but -L specifies that the given port on the local (client) host is to be forwarded to the given host and port on the remote side (server). This means that whatever is running on the second port number (e.g. 8888) on the server will appear on the first port number (e.g. 8888) on your local computer.
Optionally change port 8888 to one of your choosing to avoid using a port already in use by another process.
server_username is your username (e.g. sammy) on the server which you created and your_server_ip is the IP address of your server.
For example, for the username sammy and the server address 203.0.113.0, the command would be:
- ssh -L 8888:localhost:8888 sammy@203.0.113.0
If no error messages after running the ssh -L command, you can move into your programming environment and run Jupyter Notebook:
- jupyter notebook
You’ll receive output with a URL. From a web browser on your local machine, open the Jupyter Notebook web interface with the URL that starts with http://localhost:8888. Ensure that the token number is included, or enter the token number string when prompted at http://localhost:8888:
Output...
[I 21:23:21.361 NotebookApp] The Jupyter Notebook 6.4.10 is running at:
[I 21:23:21.361 NotebookApp] http://localhost:8888/?token=1fefa6ab49a498a3f37c959404f7baf16b9a2eda3eaa6d72
...
SSH Tunneling with Windows and Putty
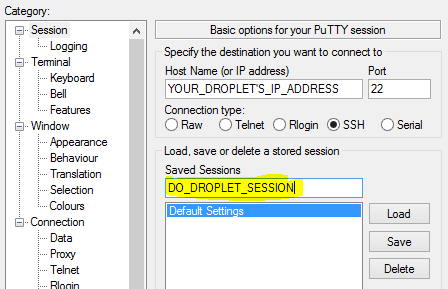
If you are using Windows, you can create an SSH tunnel using Putty.
First, enter the server URL or IP address in the Host Name (or IP address) field as shown:
Next, click SSH on the bottom of the left pane to expand the menu, and then click Tunnels. Enter the local port number you want to use to access Jupyter on your local machine. Choose 8000 or greater to avoid ports used by other services, and set the destination as localhost:8888 where :8888 is the number of the port that Jupyter Notebook is running on.
Click the Add button, and the ports should appear in the Forwarded ports list:
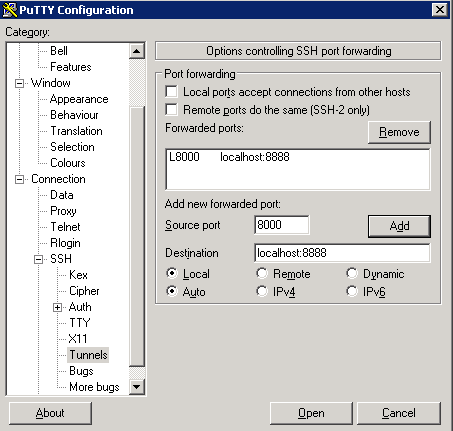
Finally, click the Open button to connect to the server via SSH and tunnel the desired ports. Navigate to http://localhost:8000 (or the port you chose) in a web browser to connect to Jupyter Notebook running on the server. Ensure that the token number is included, or enter the token number string when prompted at http://localhost:8000.
Whether you’re connecting within a Mac/Linux OS or Windows, you should now be connected to your server via SSH tunneling. You’re now ready to use Jupyter Notebook in your web browser.
Step 6 — Using Jupyter Notebook
If you don’t currently have Jupyter Notebook running, start it with the jupyter notebook command:
- jupyter notebook
You should now be connected to it using a web browser. Jupyter Notebook is a very powerful tool with many features. This section will outline a few of the basic features to get you started using the Notebook. Jupyter Notebook will show all of the files and folders in the directory it is run from, so when you’re working on a project make sure to start it from the project directory.
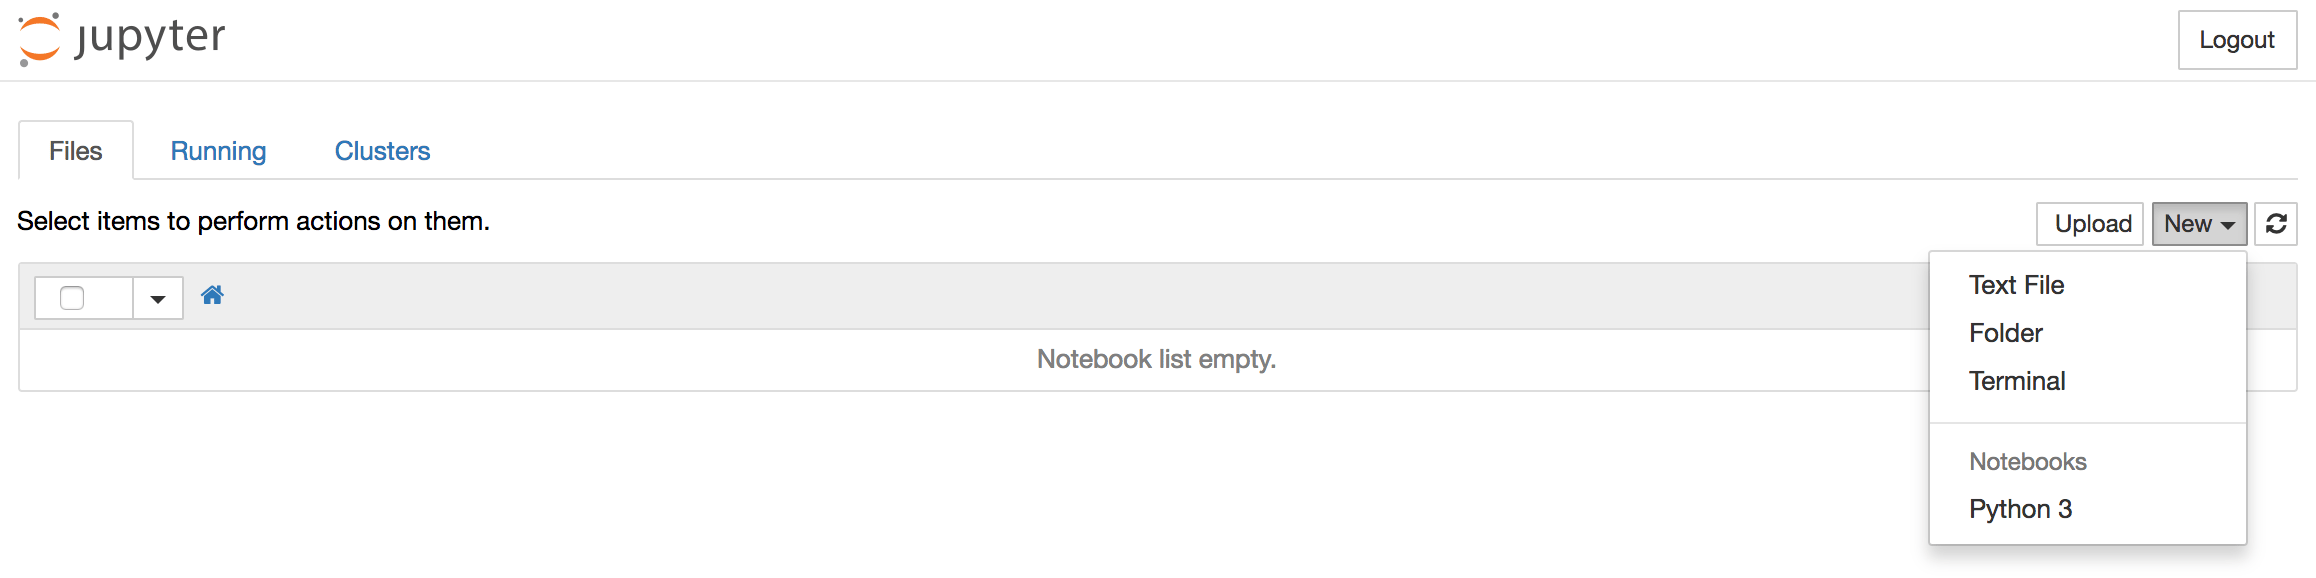
To create a new Notebook file, select New > Python 3 from the top right drop-down menu:
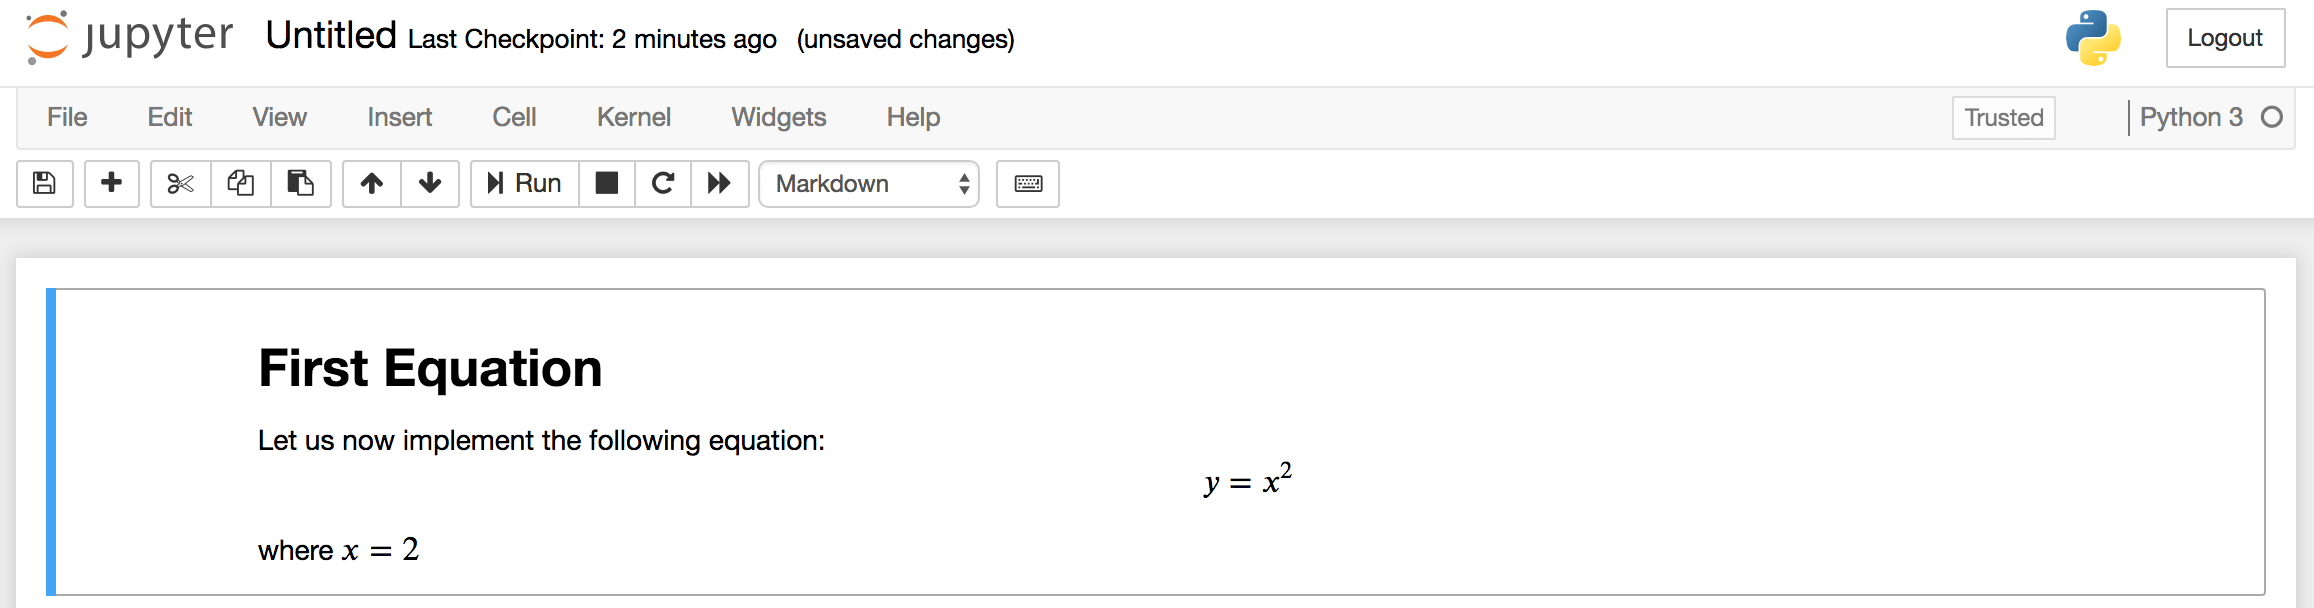
This will open a Notebook. You can now run Python code in the cell or change the cell to markdown. For example, change the first cell to accept Markdown by clicking Cell > Cell Type > Markdown from the top navigation bar. You can now write notes using Markdown and even include equations written in LaTeX by putting them between the $$ symbols. For example, type the following into the cell after changing it to markdown:
# First Equation

Let us now implement the following equation:
$$ y = x^2$$

where $x = 2$
To turn the markdown into rich text, press CTRL + ENTER, and the following should be the results:
You can use the markdown cells to make notes and document your code. To implement that equation and print the result, click on the top cell, then press ALT + ENTER to add a cell below it. Enter the following code in the new cell.
x = 2
y = x**2
print(y)
To run the code, press CTRL + ENTER. You’ll receive the following results:

You now have the ability to import modules and use the Notebook as you would with any other Python development environment.
Conclusion
You should now be able to write reproducible Python code and notes in Markdown using Jupyter Notebook. To get a quick tour of Jupyter Notebook from within the interface, select Help > User Interface Tour from the top navigation menu to learn more.
From here, you can begin a data analysis and visualization project by reading Data Analysis and Visualization with pandas and Jupyter Notebook in Python 3.
If you’re interested in digging in more, you can read our series on Time Series Visualization and Forecasting.
Thanks for learning with the DigitalOcean Community. Check out our offerings for compute, storage, networking, and managed databases.
About the author
Community and Developer Education expert. Former Senior Manager, Community at DigitalOcean. Focused on topics including Ubuntu 22.04, Ubuntu 20.04, Python, Django, and more.
Still looking for an answer?
This textbox defaults to using Markdown to format your answer.
You can type !ref in this text area to quickly search our full set of tutorials, documentation & marketplace offerings and insert the link!
Hi! Thanks for this tutorial, I could finally install jupyter but when I try to import a module (like numpy), jupyter cant find it. Is this cause the modules are not on my virtual enviroment? how can I load then then?
Hello, thanks a lot for the tutorial. I get the following error when I run “jupyter notebook.” Could you give me some advice? Many thanks,
(deepsense_env) ics@DESKTOP-5RV5LDQ:~/deepsense$jupyter notebook
[I 21:51:14.953 NotebookApp] Writing notebook server cookie secret to /home/ics/.local/share/jupyter/runtime/notebook_cookie_secret
[I 21:51:15.248 NotebookApp] Serving notebooks from local directory: /home/ics/deepsense
[I 21:51:15.248 NotebookApp] The Jupyter Notebook is running at:
[I 21:51:15.248 NotebookApp] http://localhost:8888/?token=acf47d612b209822d0679ba92e8b3f77e1a09e27d66debf8
[I 21:51:15.248 NotebookApp]  or http://127.0.0.1:8888/?token=acf47d612b209822d0679ba92e8b3f77e1a09e27d66debf8
[I 21:51:15.248 NotebookApp] Use Control-C to stop this server and shut down all kernels (twice to skip confirmation).
[C 21:51:15.301 NotebookApp]

    To access the notebook, open this file in a browser:
        file:///home/ics/.local/share/jupyter/runtime/nbserver-5948-open.html
    Or copy and paste one of these URLs:
        http://localhost:8888/?token=acf47d612b209822d0679ba92e8b3f77e1a09e27d66debf8
     or http://127.0.0.1:8888/?token=acf47d612b209822d0679ba92e8b3f77e1a09e27d66debf8
Start : This command cannot be run due to the error: The system cannot find the file specified.
At line:1 char:1
+ Start "file:///home/ics/.local/share/jupyter/runtime/nbserver-5948-op ...
+ ~~~~~~~~~~~~~~~~~~~~~~~~~~~~~~~~~~~~~~~~~~~~~~~~~~~~~~~~~~~~~~~~~~~~~
    + CategoryInfo          : InvalidOperation: (:) [Start-Process], InvalidOperationException
    + FullyQualifiedErrorId : InvalidOperationException,Microsoft.PowerShell.Commands.StartProcessCommand
 This work is licensed under a Creative Commons Attribution-NonCommercial- ShareAlike 4.0 International License.
Become a contributor for community
Get paid to write technical tutorials and select a tech-focused charity to receive a matching donation.

DigitalOcean Documentation
Full documentation for every DigitalOcean product.

Resources for startups and AI-native businesses
The Wave has everything you need to know about building a business, from raising funding to marketing your product.
The developer cloud
Scale up as you grow — whether you're running one virtual machine or ten thousand.

Start building today
From GPU-powered inference and Kubernetes to managed databases and storage, get everything you need to build, scale, and deploy intelligent applications.
