By finid and Caitlin Postal
Not using Ubuntu 20.04?
Choose a different version or distribution.
The author selected the Free and Open Source Fund to receive a donation as part of the Write for DOnations program.
Introduction
The ability to store unstructured blobs of object data and make them accessible through HTTP APIs, known as object storage, is integral to the modern technology landscape, especially with cloud-based backup solutions and high-availability content delivery networks (CDNs).
MinIO is an open-source object storage server compatible with the Amazon S3 cloud storage service. Applications configured to interface with Amazon S3 can also be configured to interface with MinIO, which means you can use MinIO as a viable alternative to S3 for more control over your object storage server. The service stores unstructured data such as photos, videos, log files, backups, and container/VM images and can provide a single object storage server that pools multiple drives spread across many servers.
Written in Go, MinIO comes with a command-line client and a graphical interface (the MinIO Console), while supporting simple queuing service for Advanced Message Queuing Protocol (AMQP), Elasticsearch, Redis, NATS, and PostgreSQL targets. Setting up a MinIO object storage server can add a wide range of flexibility and utility to your project for all of these reasons.
MinIO can be installed in Standalone Mode on a single server or in Distributed Mode across two or more servers made up of a total of at least four drives or storage volumes. A Standalone deployment of MinIO lacks some advanced features that are defaults of a Distributed deployment, such as versioning, scaling, redundancy, and availability. A Standalone deployment can be used for evaluation and small development purposes, while a Distributed deployment is highly recommended for production or significant development needs.
In this tutorial, you will set up a Standalone deployment of MinIO by:
- Installing the MinIO server on a server running Ubuntu 20.04.
- Installing the MinIO client on your personal computer and configuring it to communicate with the MinIO server.
- Setting up a digital certificate to secure the communication between the server and client, including via the MinIO Console.
Prerequisites
To complete this tutorial, you will need:
- One Ubuntu 20.04 server, including a sudo non-root user and a firewall. You can set it up by following this Ubuntu 20.04 initial server setup.
Optionally, for access to the MinIO Console via a domain name instead of or in addition to accessing it via your server’s IP address, you will need:
- A registered domain name. This tutorial uses
example.comthroughout. You can purchase a domain name on Namecheap, get one for free on Freenom, or use the domain registrar of your choice. - Both of the following DNS records for your server. Follow the DNS Quickstart for details on how to add them.
- An A record with
example.compointing to your server’s public IP address. - An A record with
www.example.comalso pointing to your server’s public IP address.
- An A record with
Step 1 — Downloading and Installing the MinIO Server
The MinIO server can be installed from a binary file or a .deb package. In this step, you will install it using the .deb package.
To begin, log into your server:
- ssh sammy@your-server-ip
Update the package database:
- sudo apt update
Then, update the system:
- sudo apt upgrade
Confirm the installation with y.
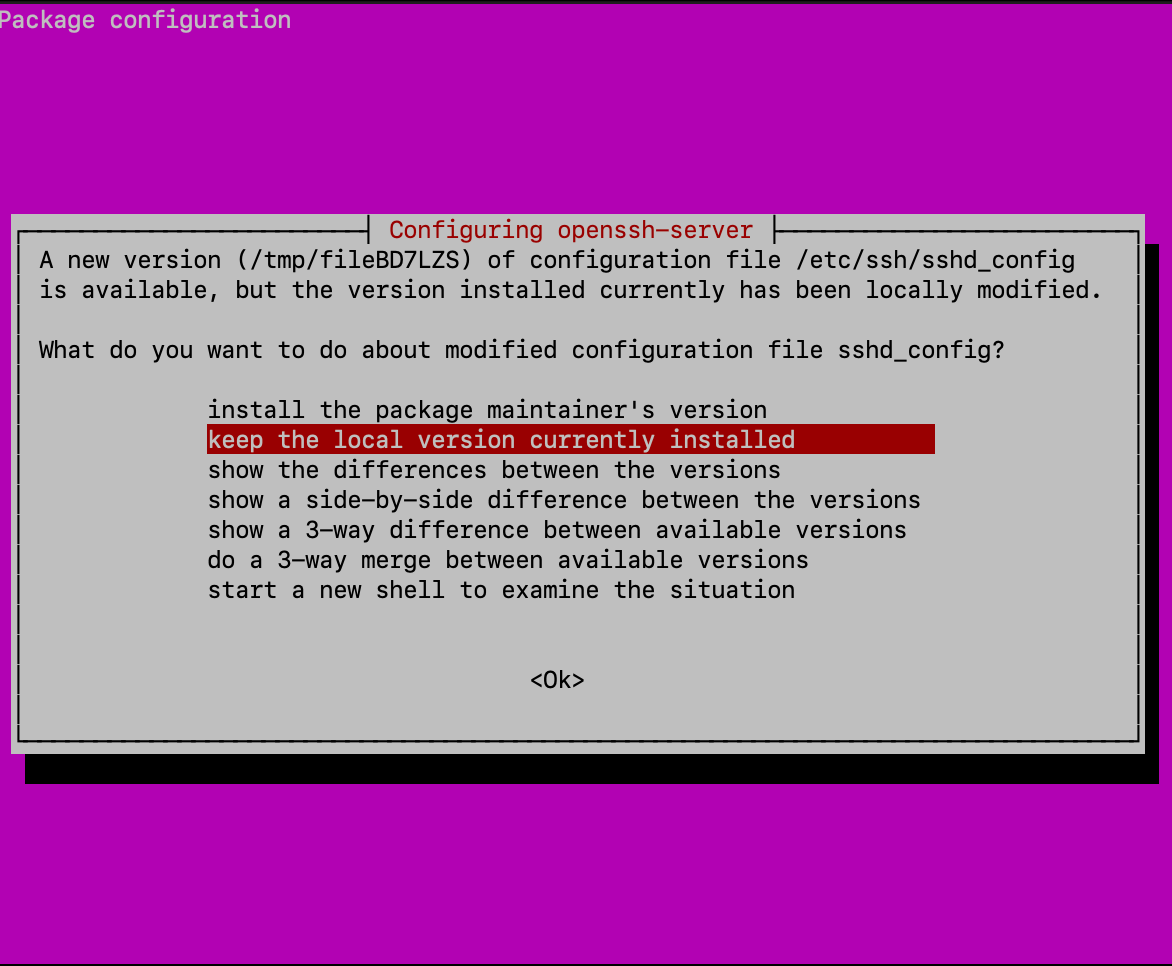
During the upgrade process, you may receive a screen in your terminal (see the image below) requesting input from you about the OpenSSH server’s configuration file. Since it’s not desirable to have the changes you made to the configuration file overwritten, press Enter to accept the default option highlighted in red (“keep the local version currently installed”).
Next, download the MinIO server’s latest .deb package from the MinIO downloads page:
- wget https://dl.min.io/server/minio/release/linux-amd64/minio_20220523184511.0.0_amd64.deb
A file named minio_20220523184511.0.0_amd64.deb will be downloaded into your working directory. The dpkg command is used to manage .deb packages, so install the downloaded file using the following command:
- sudo dpkg -i minio_20220523184511.0.0_amd64.deb
The -i option will install the package.
That command sets up a minio command and a systemd startup script, and both can be used to start the MinIO server.
Here, you updated packages and installed the MinIO service. In the next step, you will create the filesystem objects required for the MinIO server to run.
Step 2 — Creating the MinIO User, Group, Data Directory, and Environment File
In this step, you will set up the requirements for the MinIO server. The MinIO server will not start if the tasks in this step are not completed.
First, create a system group that the MinIO server will run with the following command:
- sudo groupadd -r minio-user
The -r flag instructs the command to make the group a system group.
Then, create the user that the MinIO server will run as:
- sudo useradd -M -r -g minio-user minio-user
The -M flag instructs the command not to create a home directory for the user. The -r flag creates a system user. The -g flag assigns the user to its primary group; in this case, the group is the minio-user group created earlier.
Next, create the data directory where MinIO will store all its files with the following command:
- sudo mkdir /mnt/data
Then, give ownership of the data directory to the MinIO user and group:
- sudo chown minio-user:minio-user /mnt/data
Finally, use the following command to create and open MinIO’s environment file:
- sudo nano /etc/default/minio
This file will hold the variables required by the server and console.
Add the following code to the file, updating sammy with your server’s non-root user:
MINIO_VOLUMES="/mnt/data"

MINIO_OPTS="--certs-dir /home/sammy/.minio/certs --console-address :9001"

MINIO_ROOT_USER=minioadmin

MINIO_ROOT_PASSWORD=minioadmin
The MINIO_VOLUMES variable defines MinIO’s data directory, while the MINIO_OPTS variable defines the directory for the digital certificates, MinIO Console’s listen address and port number (all network interfaces and port 9001). The /home/sammy/.minio/certs directory does not exist yet, but you will create it in Step 4.
You can define the login user and password for the MinIO Console with the MINIO_ROOT_USER and MINIO_ROOT_PASSWORD variables. Both are currently set as minioadmin but you should update the user and password with secure login credentials.
Save and close the file.
In this step, you set up your MinIO user and other requirements. Next, you will configure the firewall to allow MinIO traffic through.
Step 3 — Setting the Firewall to Allow MinIO Traffic
In this step, you will configure the firewall to allow traffic into the ports that access the MinIO server and MinIO Console. The following are pertinent to MinIO:
-
9000is the default port that the MinIO server listens on. -
9001is the recommended port for accessing the MinIO Console.
Allow traffic to both ports through the firewall with the following command:
- sudo ufw allow 9000:9001/tcp
You will see the following output:
OutputRule added
Rule added (v6)
Now that the ports are ready, you can generate a self-signed certificate to enable secure access to the MinIO server.
Step 4 — Securing Access to MinIO Server with a Self-Signed Certificate
In this step, you will use certgen, a Go application from the developers of MinIO, to generate a self-signed certificate. The latest version at the time of writing is version 1.2.0.
Download the latest version with the following command:
- wget https://github.com/minio/certgen/releases/download/v1.2.0/certgen_1.2.0_linux_amd64.deb
This command will put a file named certgen_1.2.0_linux_amd64.deb in your working directory. Install it with the following command:
- sudo dpkg -i certgen_1.2.0_linux_amd64.deb
The certgen command will now be available on the system, and certgen -h will output its usage info.
If you want to point a domain name to the server and wish to reference the MinIO server by that domain name and the IP address, generate a certificate for the MinIO server using the following command:
- sudo certgen -host example.com,your-server-ip
If you want to access the MinIO server via your server’s IP address only, generate a certificate for it using the following command:
- sudo certgen -host your-server-ip
If generated successfully, the output should look like this:
OutputCreated a new certificate 'public.crt', 'private.key' valid for the following names
 - "example.com"
 - "your-server-ip"
If you are not using a domain, your output will list only the server’s IP.
The files public.crt and private.key should be in your working directory. Those files need to be moved to the /home/sammy/.minio/certs directory. Since that directory does not exist yet, create it with the following command, replacing sammy with your server’s non-root user:
- sudo mkdir -p /home/sammy/.minio/certs
The -p option creates parent directories that do not exist.
Move the files with this command (replacing sammy as needed):
- sudo mv private.key public.crt /home/sammy/.minio/certs
Finally, give ownership of both files to the MinIO user and group (replacing sammy as needed):
- sudo chown minio-user:minio-user /home/sammy/.minio/certs/private.key
- sudo chown minio-user:minio-user /home/sammy/.minio/certs/public.crt
You generated a self-signed certificate for your server and/or domain in this step. Next, you will start the MinIO server.
Step 5 — Starting the MinIO Server
In this step, you will start the MinIO server with its systemd service.
The MinIO server can be started with the minio command or by calling its systemd startup script. However, when the MinIO server is started with the minio command, it will not survive a reboot. Also, starting the MinIO server with the minio command will automatically create .minio folder under /root, which will not work with systemd. So it is recommended to start the MinIO server via systemd.
Start the MinIO server with the following command:
- sudo systemctl start minio
Check the status:
- sudo systemctl status minio
The output should look like this:
Outputminio.service - MinIO
     Loaded: loaded (/etc/systemd/system/minio.service; disabled; vendor preset: enabled)
     Active: active (running) since Mon 2022-05-23 02:55:03 UTC; 2s ago
       Docs: https://docs.min.io
    Process: 21978 ExecStartPre=/bin/bash -c if [ -z "${MINIO_VOLUMES}" ]; then echo "Variable MINIO_VOLUMES not set in /etc/default>
   Main PID: 21989 (minio)
      Tasks: 7
     Memory: 49.5M
     CGroup: /system.slice/minio.service
             └─21989 /usr/local/bin/minio server --certs-dir /home/finid/.minio/certs --console-address :9001 /mnt/data

May 23 02:55:03 minio-buntu systemd[1]: Starting MinIO...
May 23 02:55:03 minio-buntu systemd[1]: Started MinIO.
May 23 02:55:03 minio-buntu minio[21989]: WARNING: Detected default credentials 'minioadmin:minioadmin', we recommend that you chang>
May 23 02:55:03 minio-buntu minio[21989]: API: https://161.35.115.223:9000  https://10.10.0.6:9000  https://10.116.0.3:9000  https:/>
May 23 02:55:03 minio-buntu minio[21989]: Console: https://161.35.115.223:9001 https://10.10.0.6:9001 https://10.116.0.3:9001 https:>
May 23 02:55:03 minio-buntu minio[21989]: Documentation: https://docs.min.io
May 23 02:55:03 minio-buntu minio[21989]: Finished loading IAM sub-system (took 0.0s of 0.0s to load data).
If the API and Console in the above output reference https, everything worked as expected.
However, if the API and Console reference http, something went wrong, even if MinIO started successfully. You may need to generate a new certificate using Step 4 in order to direct to https; then restart the MinIO service. Another source of error can occur if the certificate files are not in the correct directory or if the MinIO user does not own them. MinIO does not always log to the systemd journal, so if sudo journalctl -u minio does not show an up-to-date activity when troubleshooting MinIO, use the sudo grep minio /var/log/syslog command instead.
In this step, you started the MinIO server. Next, you will connect to it.
Step 6 — Securely Connecting to MinIO Server via the MinIO Console
The MinIO Console is the graphical interface for performing administration tasks like access log monitoring and server configuration. In this step, you will connect to the MinIO server via this console.
Point your browser to https://your-server-ip:9001.
Note: Because there is no webserver involved, http://your-server-ip:9001 will not redirect to https://your-server-ip:9001. Always use https://your-server-ip:9001 to access your MinIO Console.
Because the certificate is self-signed, your browser will throw up a prompt similar to the one shown in this image:
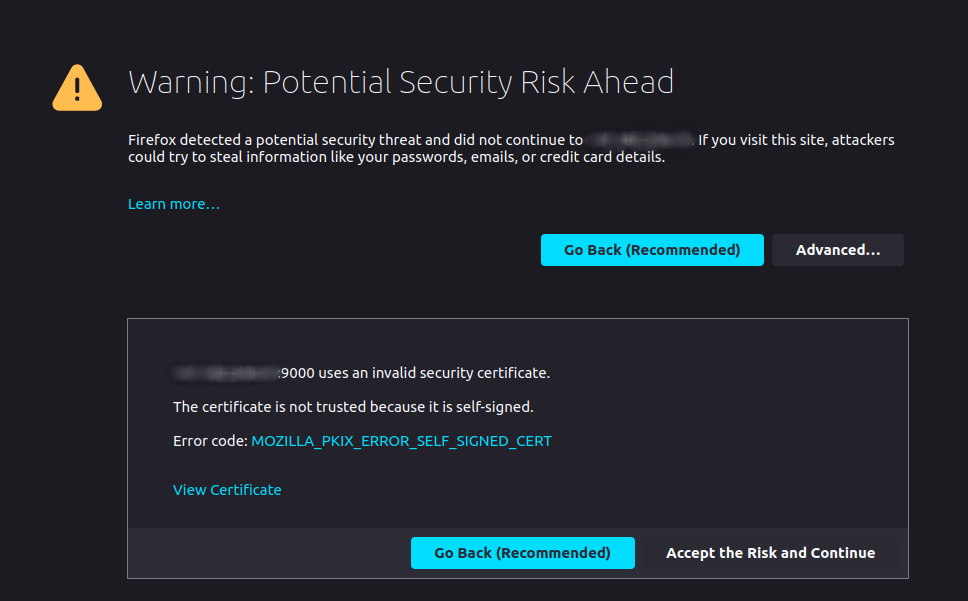
If using Firefox, click on Advanced…, then on Accept the Risk and Continue. For other browsers, it will be a similar process.
The MinIO Console login screen will now load:
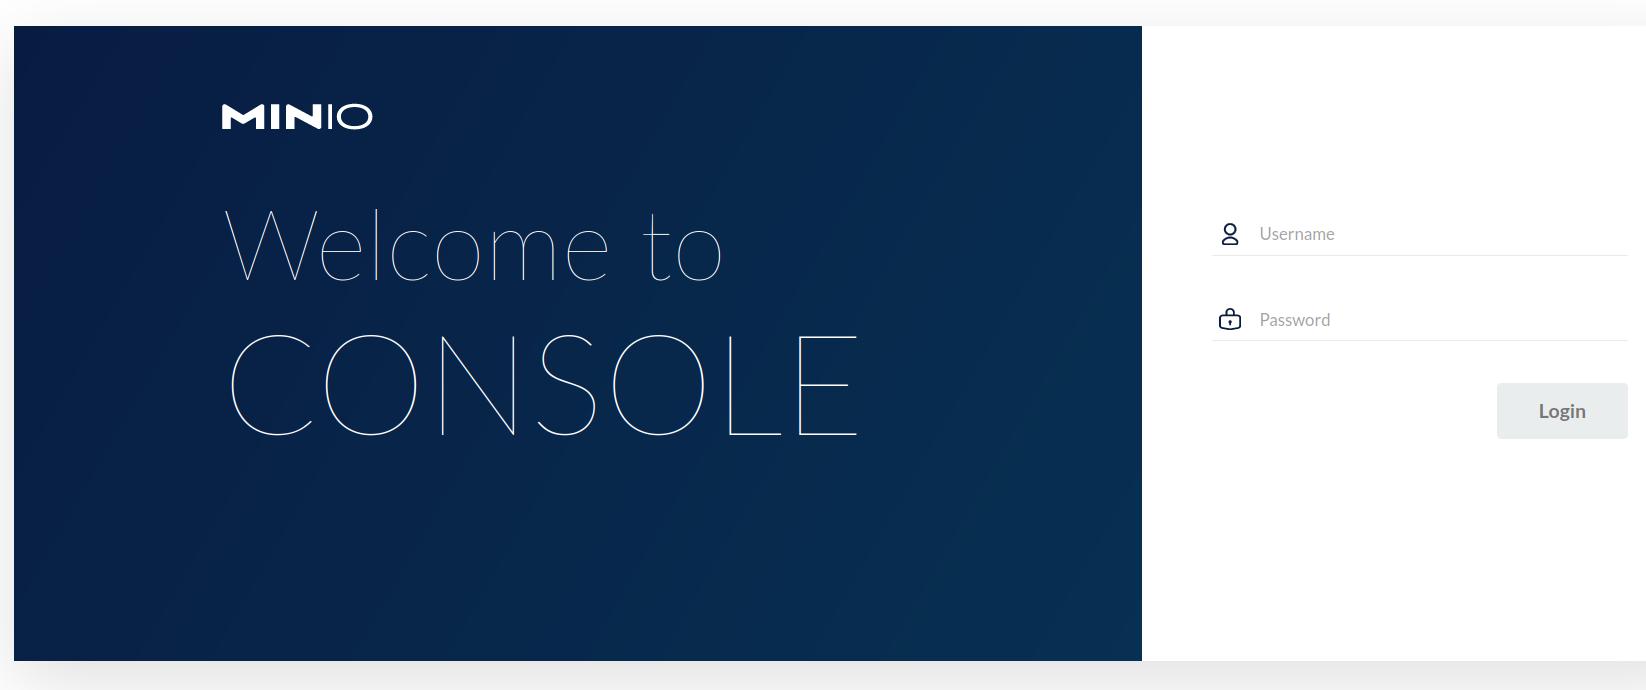
Log in with the credentials configured in MinIO’s environment file created in Step 2.
With a successful login, the main interface will load like this:
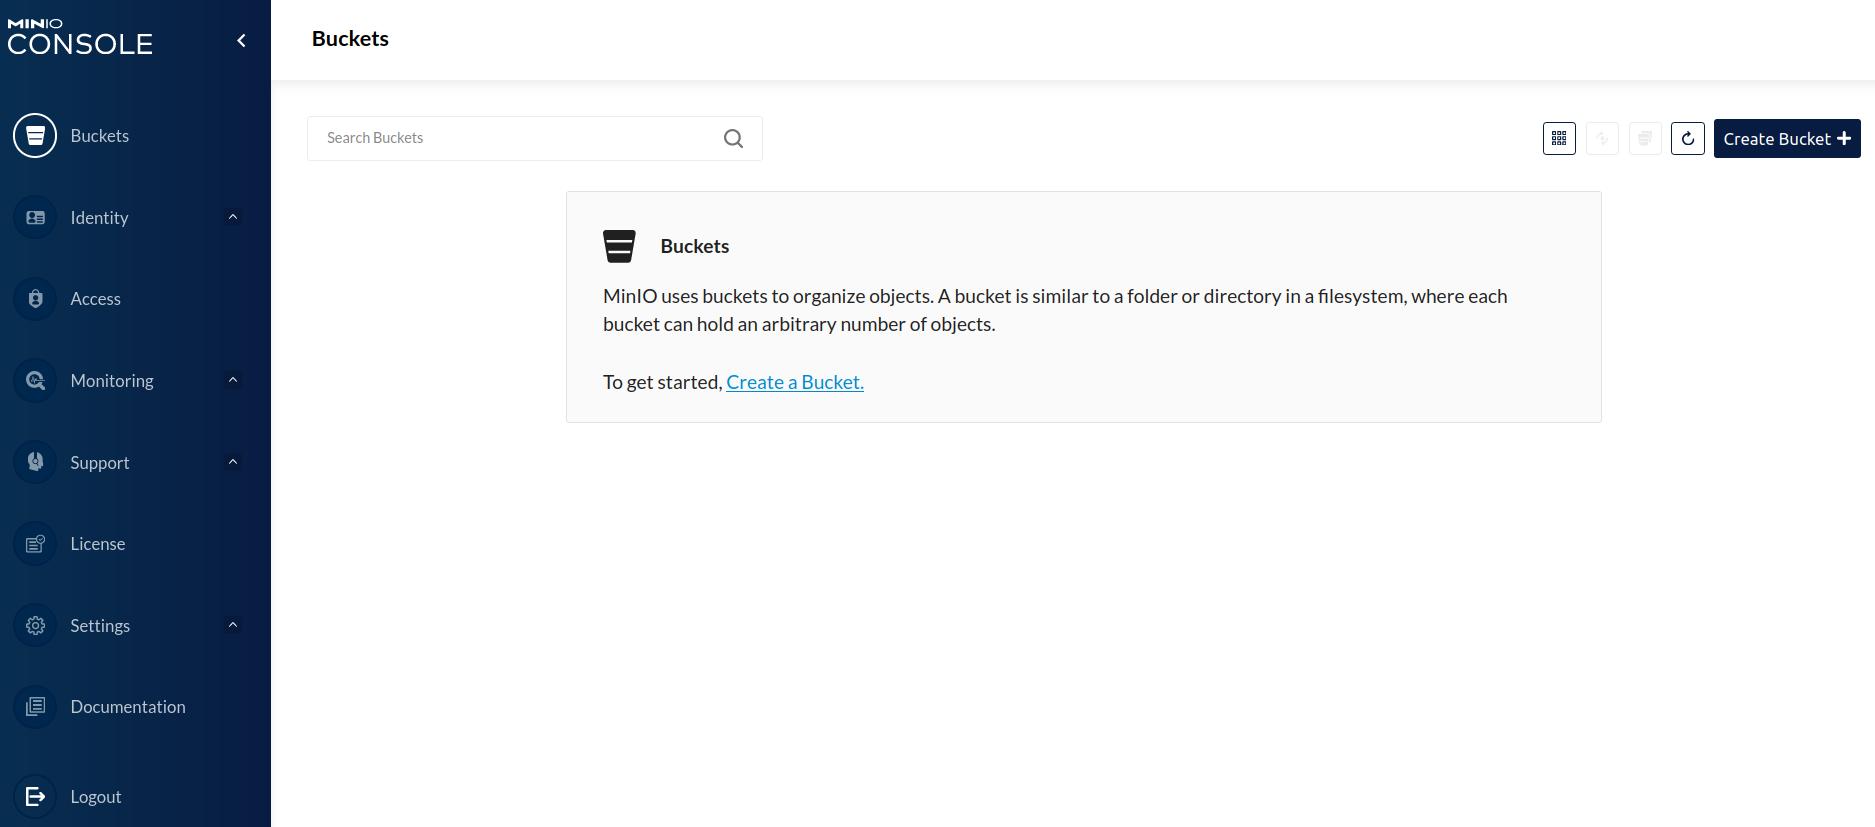
You can perform administrative tasks from the Console interface, such as viewing logs; creating and managing buckets, users, and groups; and other server configuration tasks.
You have now connected to the MinIO server through its graphical interface. In the next step, you will install and use the MinIO client on your personal computer and use it to connect to the MinIO server.
Step 7 — Installing and Using the MinIO Client on Your Local Computer
The MinIO client is the component of MinIO you install on your local computer and use to manage the MinIO server. All commands in this step will be completed on the command line of your local computer. As with the MinIO server, the client can be installed from a binary file or a .deb package. In this step, you will install it using the .deb package.
In a new terminal session on your local machine, download the latest MinIO client .deb package from the MinIO downloads page:
- wget https://dl.min.io/client/mc/release/linux-amd64/mcli_20220509040826.0.0_amd64.deb
wget puts a file named mcli_20220509040826.0.0_amd64.deb in your working directory. Install it using:
- sudo dpkg -i mcli_20220509040826.0.0_amd64.deb
This command makes the MinIO client available on your personal computer, which you may then call with the mcli command. To initialize the client and enable autocompletion for your shell, which would facilitate typing client commands, issue the following command:
- mcli --autocompletion
You will get an output like this:
Outputmcli: Configuration written to `/home/sammy/.mcli/config.json`. Please update your access credentials.
mcli: Successfully created `/home/sammy/.mcli/share`.
mcli: Initialized share uploads `/home/sammy/.mcli/share/uploads.json` file.
mcli: Initialized share downloads `/home/sammy/.mcli/share/downloads.json` file.
mcli: Your shell is set to 'bash', by env var 'SHELL'.
mcli: enabled autocompletion in your 'bash' rc file. Please restart your shell.
This output tells you the location of the hidden configuration folder and other folders and configuration files under it.
To enable autocompletion in your current shell without actually shutting it down and restarting it, issue the following command:
- source .profile
Out of the box, the configuration file contains access credentials of MinIO servers you can use the MinIO client to manage. You can edit the file in a terminal editor or you can add an entry using mcli.
To add an entry for your MinIO server in the configuration file with mcli, use the following command with the credentials that you set up for the server in Step 2:
- mcli --insecure alias set myminio/ https://your-server-ip:9000 minioadmin minioadmin
The name after the alias set command can be set to anything. In this case, it is set as myminio/.
The --insecure flag is necessary because you’re using a self-signed certificate. Without it, the command will fail because the client will try to verify that the certificate is from a trusted Certificate Authority.
Tip: When using the MinIO client to connect to the MinIO server, always call the mcli command with the --insecure flag. It doesn’t mean that the connection is not secure. It just means that the client will not attempt to verify the certificate’s authenticity. The command will fail without that flag but use it only when using a self-signed certificate.
Use the following command to look inside the ~/.mcli/config.json file:
- sudo nano ~/.mcli/config.json
You will see the myminio host you just added:
{
  "version": "10",
  "aliases": {
    "gcs": {
      "url": "https://storage.googleapis.com",
      "accessKey": "YOUR-ACCESS-KEY-HERE",
      "secretKey": "YOUR-SECRET-KEY-HERE",
      "api": "S3v2",
      "path": "dns"
    },
    "local": {
      "url": "http://localhost:9000",
      "accessKey": "",
      "secretKey": "",
      "api": "S3v4",
      "path": "auto"
    },
    "myminio": {
      "url": "https://your_server_ip:9000",
      "accessKey": "minioadmin",
      "secretKey": "minioadmin",
      "api": "S3v4",
      "path": "auto"
    },
    "play": {
      "url": "https://play.min.io",
      "accessKey": "ACCESS-KEY",
      "secretKey": "SECRET-KEY",
      "api": "S3v4",
      "path": "auto"
    },
    "s3": {
      "url": "https://s3.amazonaws.com",
      "accessKey": "YOUR-ACCESS-KEY-HERE",
      "secretKey": "YOUR-SECRET-KEY-HERE",
      "api": "S3v4",
      "path": "dns"
    }
  }
You are now ready to explore the commands that come with the client. Run it with -h flag to print out the help page:
- mcli -h
The output should include the following:
OutputCOMMANDS:
  alias      manage server credentials in configuration file
  ls         list buckets and objects
  mb         make a bucket
  rb         remove a bucket
  cp         copy objects
  mv         move objects
  rm         remove object(s)
  mirror     synchronize object(s) to a remote site
  cat        display object contents
  head       display first 'n' lines of an object
...
...

GLOBAL FLAGS:
  --autocompletion              install auto-completion for your shell
  --config-dir value, -C value  path to configuration folder (default: "/home/finid/.mcli")
  --quiet, -q                   disable progress bar display
  --no-color                    disable color theme
  --json                        enable JSON lines formatted output
  --debug                       enable debug output
  --insecure                    disable SSL certificate verification
  --help, -h                    show help
  --version, -v                 print the version
...
For hints on how to use any command, call it with the -h option. For example:
- mcli alias -h
To glean info about the MinIO server, type:
- mcli --insecure admin info myminio
The output will be similar to this:
Output●  your-server-ip:9000
   Uptime: 8 hours
   Version: 2022-05-19T18:20:59Z
With the MinIO server running, you can restart it using:
- mcli --insecure admin service restart myminio
You cannot start a stopped MinIO server from the client. If the MinIO server is stopped, you have to log in to the server and start it with the systemctl command from Step 5. You can stop the server using:
- mcli --insecure admin service stop myminio
In this step, you connected to your MinIO server from your local computer using the mcli command with the --insecure flag.
Conclusion
In this tutorial, you set up an object storage server using MinIO and created a secure connection to it with a self-signed certificate. You also connected to the MinIO server using the MinIO Console and connected to the MinIO server through the MinIO client you installed on your personal computer.
This setup is a Standalone system for small development projects and evaluation purposes. When you’re ready to use it in production or major development projects, you should set it up in Distributed mode. You can learn more at the MinIO documentation website.
The storage capacity of the Standalone setup is limited to the storage capacity of the server. However, you can use Block Storage Volumes to extend the server’s storage capacity up to 80 TB. Learn more about managing block storage volumes in the product documentation.
Thanks for learning with the DigitalOcean Community. Check out our offerings for compute, storage, networking, and managed databases.
About the author(s)
Jack of all trades, master of a few
Still looking for an answer?
This textbox defaults to using Markdown to format your answer.
You can type !ref in this text area to quickly search our full set of tutorials, documentation & marketplace offerings and insert the link!
Error: Disk /mnt/data is part of root disk, will not be used (*errors.errorString)
Loaded: loaded (/etc/systemd/system/minio.service; disabled; vendor preset: enabled) Active: failed (Result: exit-code) since Mon 2022-06-06 08:25:37 UTC; 3min 30s ago Docs: https://docs.min.io Process: 22510 ExecStartPre=/bin/bash -c if [ -z “${MINIO_VOLUMES}” ]; then echo “Variable MINIO_VOLUMES not set in /etc/default/minio”; exit 1; fi Process: 22511 ExecStart=/usr/local/bin/minio server $MINIO_OPTS $MINIO_VOLUMES (code=exited, status=1/FAILURE) Main PID: 22511 (code=exited, status=1/FAILURE)
Jun 06 08:25:37 openexm systemd[1]: minio.service: Scheduled restart job, restart counter is at 5. Jun 06 08:25:37 openexm systemd[1]: Stopped MinIO. Jun 06 08:25:37 openexm systemd[1]: minio.service: Start request repeated too quickly. Jun 06 08:25:37 openexm systemd[1]: minio.service: Failed with result ‘exit-code’. Jun 06 08:25:37 openexm systemd[1]: Failed to start MinIO.
I did every step in this manual until I reach status line and I get these errors
This seems to work completely fine, but one thing which is a bit interesting is if you look at the official documentation page, Minio states that you must give it exclusive access to mounted drives to store and manage data. (See link below.)
If I understand correctly, the documentation instructs the reader to setup Minio using unformatted (or at least unpartitioned) raw disks. In this Digital Ocean guide, a partitioned drive space is used to hold the data.
Can anyone comment on this? I’ve used the partitioned drive method, as suggested on this Digital Ocean guide. It seems to work fine. Performance might be worse, but I don’t personally care much about that.
Thanks a lot for putting this together. It was very useful for me and worked well.
 This work is licensed under a Creative Commons Attribution-NonCommercial- ShareAlike 4.0 International License.
Become a contributor for community
Get paid to write technical tutorials and select a tech-focused charity to receive a matching donation.

DigitalOcean Documentation
Full documentation for every DigitalOcean product.

Resources for startups and AI-native businesses
The Wave has everything you need to know about building a business, from raising funding to marketing your product.
The developer cloud
Scale up as you grow — whether you're running one virtual machine or ten thousand.

Start building today
From GPU-powered inference and Kubernetes to managed databases and storage, get everything you need to build, scale, and deploy intelligent applications.
