
Status: Deprecated
This article is deprecated and no longer maintained.
Reason
Ubuntu 12.04 reached end of life (EOL) on April 28, 2017 and no longer receives security patches or updates.
See Instead
This article may still be useful as a reference, but may not follow best practices or work on this or other Ubuntu releases. We strongly recommend using a recent article written for the version of Ubuntu you are using.
If you are currently operating a server running Ubuntu 12.04, we highly recommend upgrading or migrating to a supported version of Ubuntu:
Intro
One of the commonly asked questions from our users is how to add another IP address to their server. You can assign your own private IP address to your droplet by creating a VPN tunnel. Whether you want to build your own Virtual Private Network (VPN), or assign an SSL certificate to that IP address, you have several options. From all of the possible options, the most optimal ones are between PPTP and OpenVPN. A Point-To-Point Tunneling Protocol (PPTP) allows you to implement your own VPN very quickly, and is compatible with most mobile devices. Even though PPTP is less secure than OpenVPN, it is also faster and uses less CPU resources.
Step 1 - PPTP Installation
You will have to select one server to be responsible for handling out IPs to others and authenticating all of your servers into your VPN. This will become your PPTP Server.
On CentOS 6 x64:
rpm -i http://poptop.sourceforge.net/yum/stable/rhel6/pptp-release-current.noarch.rpm
yum -y install pptpd
On Ubuntu 12.10 x64:
apt-get install pptpd
Now you should edit /etc/pptpd.conf and add the following lines:
localip 10.0.0.1
remoteip 10.0.0.100-200
Where localip is IP address of your server and remoteip are IPs that will be assigned to clients that connect to it.
Next, you should setup authentication for PPTP by adding users and passwords. Simply add them to /etc/ppp/chap-secrets :
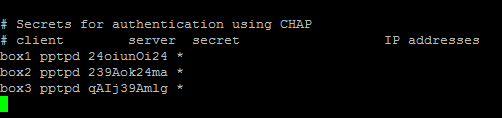
Where client is the username, server is type of service – pptpd for our example, secret is the password, and IP addresses specifies which IP address may authenticate. By setting ‘*’ in IP addresses field, you specify that you would accept username/password pair for any IP.
Step 2 - Add DNS servers to /etc/ppp/pptpd-options
ms-dns 8.8.8.8
ms-dns 8.8.4.4
Now you can start PPTP daemon:
service pptpd restart
Verify that it is running and accepting connections:
)
Step 3 - Setup Forwarding
It is important to enable IP forwarding on your PPTP server. This will allow you to forward packets between public IP and private IPs that you setup with PPTP. Simply edit /etc/sysctl.conf and add the following line if it doesn’t exist there already:
net.ipv4.ip_forward = 1
To make changes active, run sysctl -p
Step 4 - Create a NAT rule for iptables
iptables -t nat -A POSTROUTING -o eth0 -j MASQUERADE && iptables-save
If you would also like your PPTP clients to talk to each other, add the following iptables rules:
iptables --table nat --append POSTROUTING --out-interface ppp0 -j MASQUERADE
iptables -I INPUT -s 10.0.0.0/8 -i ppp0 -j ACCEPT
iptables --append FORWARD --in-interface eth0 -j ACCEPT
Now your PPTP server also acts as a router.
If you would like to restrict which servers can connect to your droplets, you can setup an iptables rule that restricts TCP connects to port 1723.
Step 6 - Add necessary Kernel module
modprobe ppp_mppe
Create a new file /etc/ppp/peers/pptpserver and add the following lines, replacing name and password with your own values:
pty "pptp 198.211.104.17 --nolaunchpppd"
name box1
password 24oiunOi24
remotename PPTP
require-mppe-128
Where 198.211.104.17 is the public IP address of our PPTP server, with username ‘box1’ and password ‘24oiunOi24’ that we specified /etc/ppp/chap-secrets file on our PPTP server.
Now we can ‘call’ this PPTP server, since this is a point-to-point protocol. Whichever name you gave your peers file in/etc/ppp/peers/ should be used in this next line. Since we called our file pptpserver:
pppd call pptpserver
You should see successful connection from PPTP server logs:
)
On your PPTP client, setup routing to your private network via ppp0 interface:
ip route add 10.0.0.0/8 dev ppp0
Your interface ppp0 should come up on PPTP client server, and can be checked by running ifconfig
)
Now you can ping your PPTP server and any other clients that are connected to this network:

We can add our second PPTP client to this network:
yum -y install pptp
modprobe ppp_mppe
Add to /etc/ppp/peers/pptpserver (replacing with your own name and password values):
pty "pptp 198.211.104.17 --nolaunchpppd"
name box2
password 239Aok24ma
remotename PPTP
require-mppe-128
Now run on your second client the following:
pppd call pptpserver
ip route add 10.0.0.0/8 dev ppp0
)
You can also ping the first client, as packets would go through the PPTP server and be routed using the iptables rules we’ve placed earlier:
)
This setup allows you to create your own virtual private network:
)
If you wanted to have all of your devices communicating securely on one network, this is a quick way of implementing it.
You can use it with Nginx, Squid, MySQL, and any other application you can think of.
Since traffic is 128-bit encrypted, it is less CPU-intensive than OpenVPN, and still provides an added level of security to your traffic.
Thanks for learning with the DigitalOcean Community. Check out our offerings for compute, storage, networking, and managed databases.
About the author
Still looking for an answer?
This textbox defaults to using Markdown to format your answer.
You can type !ref in this text area to quickly search our full set of tutorials, documentation & marketplace offerings and insert the link!
Thanks for the guide… but it’s not working for me on Ubuntu 12.04… when I got to the client steps, I did apt-get install pptp-linux (as no pptp package exists, and I assume that this was the client package on linux), but then at this step I got the following:
ip route add 10.0.0.0/8 dev ppp0
Cannot find device “ppp0”
Hi,
If you dont have device ppp0 then either “modprobe ppp_mppe” or “pppd call pptpserver” did not work.
- On client hosts, run “modprobe ppp_mppe && dmesg | tail -10” - what is the output?
- On client host run “pppd call pptpserver” and then on the PPTP server run “tail -10 /var/log/mesages” or if its a Ubuntu box “tail -10 /var/log/syslog” - what is the output you get?
Here are the instructions that I follow, it takes you from a clean droplet to an ssh hardened droplet with a working PPTP server. I was using 12.04 server 32 bit, but I think it should work with most.
http://globalcynic.wordpress.com/2013/04/26/pptpd-ubuntu-12-04-vps-fail2ban/
Sorry, I dont see how to delete or edit my previous comment. I read the instructions in the thread incorrectly, the above article is for joining two droplets to a vpn network. My instructions are for creating a standalone pptpd to act as a VPN server.
"Now your PPTP server also acts as a router. "
what’s the difference if I do not do this step?
Thanks
@desk If you mean not setting up the IPTables rule, it will basically allow all IPs to connect to the PPTP server (they have to authenticate first of course)
I have a few questions.
- Does this allow port forwarding on the client side? If not, how can I do that?
- How can I limit the amount of traffic per user?
I would love to figure out how I can make this work! All went well on the server side but then after I connect my computer to the pptp server I loose basic web connectivity like browsing. Would be nice to just join my computer here and my computer at my sisters house so we can share files and what have ya.
@chadrt did you follow step 3? Try rebooting your droplet so these changes take effect.
 This work is licensed under a Creative Commons Attribution-NonCommercial- ShareAlike 4.0 International License.
Become a contributor for community
Get paid to write technical tutorials and select a tech-focused charity to receive a matching donation.

DigitalOcean Documentation
Full documentation for every DigitalOcean product.

Resources for startups and AI-native businesses
The Wave has everything you need to know about building a business, from raising funding to marketing your product.
The developer cloud
Scale up as you grow — whether you're running one virtual machine or ten thousand.

Start building today
From GPU-powered inference and Kubernetes to managed databases and storage, get everything you need to build, scale, and deploy intelligent applications.
