
Status: Deprecated
This article covers a version of Ubuntu that is no longer supported. If you are currently operate a server running Ubuntu 12.04, we highly recommend upgrading or migrating to a supported version of Ubuntu:
- Upgrade to Ubuntu 14.04.
- Upgrade from Ubuntu 14.04 to Ubuntu 16.04
- Migrate the server data to a supported version
Reason: Ubuntu 12.04 reached end of life (EOL) on April 28, 2017 and no longer receives security patches or updates. This guide is no longer maintained.
See Instead: This guide might still be useful as a reference, but may not work on other Ubuntu releases. If available, we strongly recommend using a guide written for the version of Ubuntu you are using. You can use the search functionality at the top of the page to find a more recent version.
Introduction
An important aspect of server security is being proactive about security screening. If you expose any services to the internet, penetration testing is essential to ensure that you are not vulnerable to known threats.
The Open Vulnerability Assessment System, known more commonly as OpenVAS, is a suite of tools that work together to run tests against client computers using a database of known exploits and weaknesses. The goal is to learn about how well your servers are guarded against known attack vectors.
In this guide, we will install the OpenVAS suite on an Ubuntu 12.04 VPS. We can then use this system to scan itself and other servers.
Add the OpenVAS PPA and Install Software
Although there are some OpenVAS components in Ubuntu’s default repositories, we will use a PPA that maintains updated versions of the packages.
To begin with, we need to install the python-software-properties package, which will allow us to work with PPAs easily.
sudo apt-get update
sudo apt-get install python-software-properties
We can then add the newest stable version to our system:
sudo add-apt-repository ppa:openvas/openvas6
We need to rebuild the apt database to gather information about the packages available through our new PPA. Afterwards, we can install the needed software:
sudo apt-get update
sudo apt-get install openvas-manager openvas-scanner openvas-administrator openvas-cli greenbone-security-assistant sqlite3 xsltproc texlive-latex-base texlive-latex-extra texlive-latex-recommended htmldoc alien rpm nsis fakeroot
This will download and install the components that are necessary to get us started.
Initial Configuration
We can create SSL certificates for OpenVAS using a wrapper utility that is included by default. We need to call this with administrative privileges so that it can be placed in a restricted portion of the file system.
sudo openvas-mkcert
You will be asked a number of questions that will help you build a certificate file for use with this server.
Most of the questions, you can just type ENTER to accept the default values. This is mainly for your own use, so input the values you would like to use.
Next, we will create another certificate. This time, we will create a client certificate for a user named “om” this stands for OpenVAS Manager. We don’t need any specific information for the client portion, so we will tell it to configure things automatically and install the certificates in the needed places:
sudo openvas-mkcert-client -n om -i
Build the Database Information
Now that we have our certificates installed, we can begin building our database so that our local tools are aware of different kinds of threats and vulnerabilities.
Update the network vulnerability tests database by issuing this command:
sudo openvas-nvt-sync
This will download the latest definitions to your local machine.
To continue we’ll need to stop the manager and scanner applications so that we can call the commands without a conflict momentarily.
Stop both of these services by typing:
sudo service openvas-manager stop
sudo service openvas-scanner stop
Now, we can start the scanner application without the parameters found in the init file that are usually called. During this first run, OpenVAS will need to download and sync a lot of data. This will take quite awhile:
sudo openvassd
Once this is finished, you’ll have to rebuild the database generated by the scanner by typing:
sudo openvasmd --rebuild
Next, we will download and update our security content automation protocol data. This is known as “SCAP” data. This is another database that OpenVAS checks against for our security tests.
sudo openvas-scapdata-sync
This will be another long wait. It downloads some general files and then updates them in the database.
We will then run a similar sync operation for the cert data:
sudo openvas-certdata-sync
Running this command for the first time, you might see some errors. They may look something like this:
Error: no such table: meta
This is because the Ubuntu package is actually missing some files that are packaged in some other versions.
We can get these from an RPM package for the manager component. Type this to download it to your home directory:
cd
wget http://www6.atomicorp.com/channels/atomic/fedora/18/i386/RPMS/openvas-manager-4.0.2-11.fc18.art.i686.rpm
Now that we have the file downloaded, we can extract and expand the directory structure present within the RPM. We can do this by typing:
rpm2cpio openvas* | cpio -div
We will create a directory for our new files in a place where OpenVAS will find them. We will then move the files into that directory:
sudo mkdir /usr/share/openvas/cert
sudo cp ./usr/share/openvas/cert/* /usr/share/openvas/cert
Now, we can safely run the cert syncing command again, and it should complete as expected this time:
sudo openvas-certdata-sync
Afterwards, we can delete the extracted RPM data and directories from our home directory:
rm -rf ~/openvas* ~/usr ~/etc
Set Up OpenVAS User and Ports
To sign into our service, we will need a user. We can create one with the OpenVAS administrator component.
Here, we will create a user called “admin” with the role of administrator. You will be asked to provide a password to use for the new account:
sudo openvasad -c add_user -n admin -r Admin
You will be informed that the user has been granted unlimited access.
Next, we need to change the way one of our components starts up. The Greenbone Security Assistant component is a web-based interface to the tools we have installed.
By default, the interface is only accessible from the local computer. Since we are installing the OpenVAS suite on a remote server, we won’t be able to access the web interface with these settings. We need to make it accessible from the internet.
Open the following file with root privileges in your preferred text editor:
sudo nano /etc/default/greenbone-security-assistant
Near the top, you should see a parameter that specifies the address that the web interface will listen on. We need to change the value from 127.0.0.1 to the public IP address of your VPS. This will let it listen to connections from the internet, and we will be able to connect:
<pre> GSA_ADDRESS=<span class=“highlight”>your_server_IP_address</span> </pre>
Save and close the file when you have made the above modification.
Start Up the Services
We will now start up the services that we have been configuring. Most of them are already running in some capacity, but we will have to restart them to make sure that they use the new information we have been gathering.
Start by killing all of the running OpenVAS scanner processes:
sudo killall openvassd
It can take up to 15 or 20 seconds for the process to actually be killed. You can check if there are processes still running by issuing:
ps aux | grep openvassd | grep -v grep
If anything is returned, then your processes have not finished yet and you should continue to wait.
Once the process exits completely, you can begin starting all of your services again:
sudo service openvas-scanner start
sudo service openvas-manager start
sudo service openvas-administrator restart
sudo service greenbone-security-assistant restart
Each of these may take a bit of time to start up.
Access the Web Interface and Run Some Tests
Once the services have all started, you use your web browser to access the Greenbone Security Assistant web interface.
To access this, you must precede the address of your server with https://. You then enter either the domain name or IP address of your server followed by :9392.
<pre> https://<span class=“highlight”>server_domain_or_IP</span>:9392 </pre>
You will be presented with a scary looking warning screen telling you that the certificate is not signed by someone that your browser trusts by default:
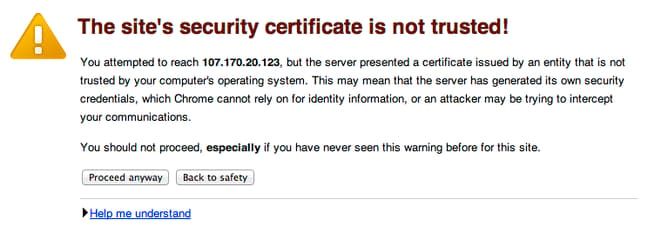
This is expected and not a problem. You should click on the “Proceed anyway” button to continue.
Next, you will be presented with the login screen:
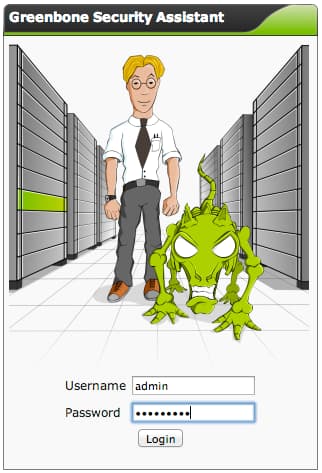
You will need to enter the username and password you configured earlier. For this guide, the username was “admin”.
Once you sign in, you will be immediately greeted by a quick start wizard, which will allow you to run a default scan against a target computer right away:
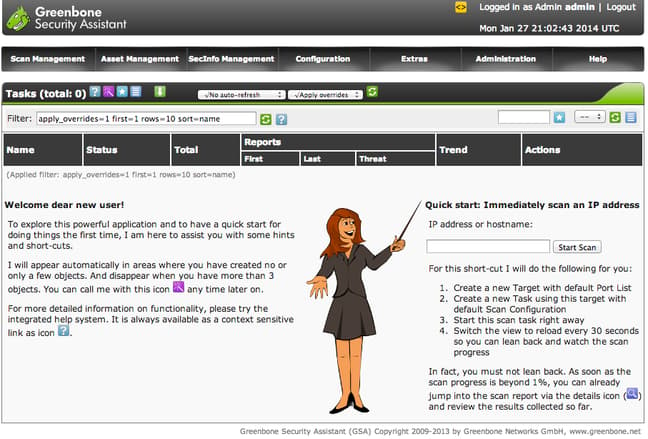
A good choice is to run against another server that you own. It is important to not run these scans against targets that are not under your control, because they may look like potential attacks to other users.
Enter the IP address of the computer you wish to test against and click the “Start Scan” button to begin.
The page will update as the scan progresses and you can also refresh the page manually to track the progress:

When the scan is complete (or even before if you want to review the information as it is coming in), you can click on the purple magnifying glass icon to see the results of the scan. It is normal for the scan to rest on 98% for a while before completing:

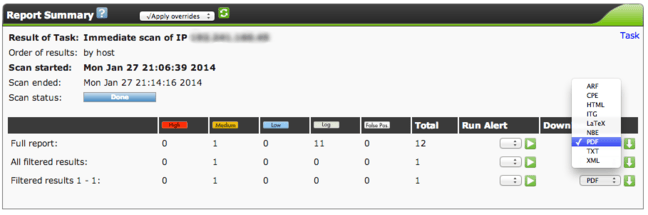
You will be taken to an overview of the scan results. Note that the immediate scan that we have completed is not the most in-depth scan we have available.
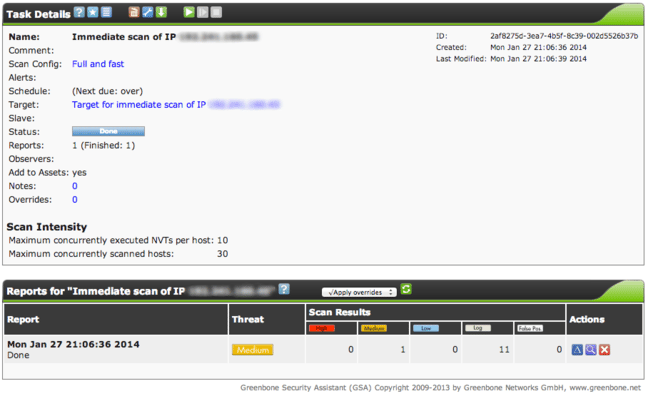
At the bottom, you can see the report that OpenVAS created telling us of potential vulnerabilities in the system we scanned. We can see that the “Threat” level has been categorized as “Medium”.
This means that at least one vulnerability has been found in the system of the rating of “medium”. We can find out more by clicking on the magnifying glass again.
This will take us to a full report of the findings. In the top portion, you have the option to download the results in various formats:
In the middle section, we can filter the results. By default, the interface will only show threats marked “high” or “medium”. On your first time through, you should probably check all of the boxes under the “Threat” category. Click “Apply” to implement this:
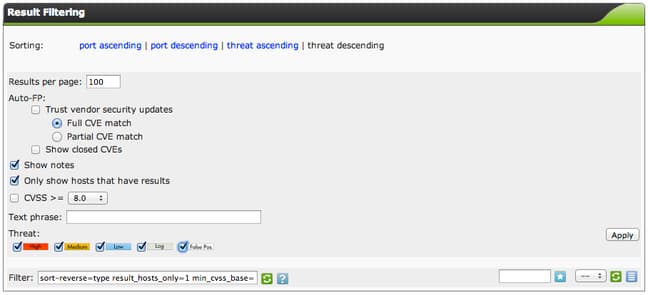
The bottom section tells us about the specific items that were found. If you selected all of the boxes above, you will see some informational messages about open ports and similar findings.
The threats will be color-coded to match their button color. For instance, this is our medium threat:
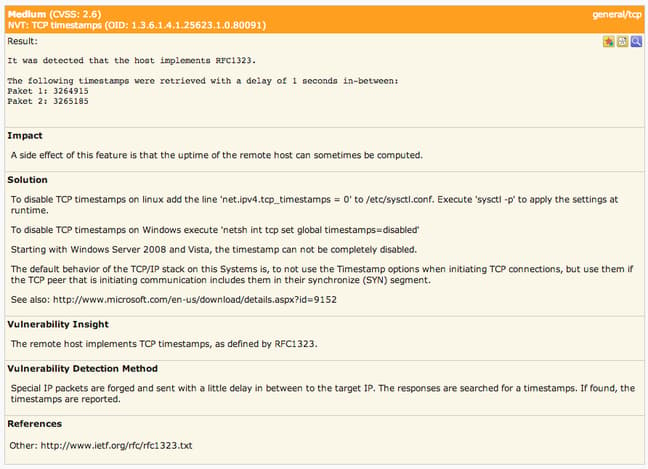
This warning tells us that our target responds to timestamp requests. These requests can let an attacker know how long the host has been online continuously. This could let an attacker know that the host is vulnerable to any recent exploits.
As you can see, the report also includes information about how to address the issue.
Conclusion
You should now have a fully functional OpenVAS server set up to scan your hosts. This can help you spot vulnerabilities and highlight areas to focus on when you are tightening up security.
We have only shown a bare minimum of the functionality of the OpenVAS security suite. Among other tasks, you can easily schedule scans, automatically generate reports, and email alerts when certain threat levels are generated. Explore the Greenbone Security Assistant interface and take advantage of the great built-in help system to learn more about your options.
<div class=“author”>By Justin Ellingwood</div>
Thanks for learning with the DigitalOcean Community. Check out our offerings for compute, storage, networking, and managed databases.
About the author
Former Senior Technical Writer at DigitalOcean, specializing in DevOps topics across multiple Linux distributions, including Ubuntu 18.04, 20.04, 22.04, as well as Debian 10 and 11.
Still looking for an answer?
This textbox defaults to using Markdown to format your answer.
You can type !ref in this text area to quickly search our full set of tutorials, documentation & marketplace offerings and insert the link!
I want to thank you very much for tutorial. I run the tests in some of my server and give me back very useful information but inside the logs I got some information about missing modules, like DIRB, Nikto and wapiti. How can I add this modules, its important or not?
Thank you very much.
Important (maybe to be added to the tutorial): if you’re behind a firewall (csf in my case), make sure you have TCP port 873 outbound opened, otherwise you’ll get an error when running “sudo openvas-scapdata-sync” (the error: “rsync error: error in socket IO (code 10) at clientserver.c(122) [Receiver=3.0.9].” This has been my first issue, but more came up. There is a RPM package to install. On Ubuntu 12.04? And why from a Fedora directory? RPM can be converted with Alien, but for Debian if I’m correct. A bit puzzled… Anyway, I kept following the tutorial to the t, but couldn’t go beyond “sudo killall openvassd”: no killed process even after 20 minutes, and therefore couldn’t proceed through subsequent step… Also noticed ports 9390 through 9394 to be opened when looking at “greenbone-security-assistant” content. Conclusion: if someone managed to install and run OpenVAS properly following this tutorial, I’d be glad to read how.
I want to thank you very much too because I tried to install it both on CentOS, Debian and Ubuntu but it still didn’t work. Now, with this tutorial, it’s up and running.
But, strangely, one of the points did’nt worked on my VPS. It’s about the repository…So i just typed theses lines :
echo “deb http://download.opensuse.org/repositories/security:/OpenVAS:/UNSTABLE:/v6/Debian_7.0/ ./” >> /etc/apt/sources.list wget http://download.opensuse.org/repositories/security:/OpenVAS:/UNSTABLE:/v6/Debian_7.0/Release.key apt-key add ./Release.key sudo apt-get update
In place of this one : sudo add-apt-repository ppa:openvas/openvas6
And now it works perfectly fine.
This is what i did to install it on Ubuntu x64 14.04 LTS:
sudo apt-get update sudo apt-get install python-software-properties sudo add-apt-repository ppa:openvas/openvas6`
echo “deb http://download.opensuse.org/repositories/security:/OpenVAS:/UNSTABLE:/v6/Debian_7.0/ ./” >> /etc/apt/sources.list
wget http://download.opensuse.org/repositories/security:/OpenVAS:/UNSTABLE:/v6/Debian_7.0/Release.key
apt-key add ./Release.key sudo apt-get update
apt-get -y install greenbone-security-assistant openvas-cli openvas-manager openvas-scanner openvas-administrator sqlite3 xsltproc rsync
apt-get -y install texlive-latex-base texlive-latex-extra texlive-latex-recommended htmldoc
apt-get -y install alien rpm nsis fakeroot
After the last command I continues from ‘Initial Configuration’ in this tutorial all the way to the end. After a few reboots at the end and restarting the service I was able to get it working. I hope this helps.
Thank you very much.
However,when I need to create an user, it shows no command ‘openvasad’ found, there’s only ‘openvasd’ from package ‘openvas-server’…or have I made some mistakes before?
Following the guide as is, I get an error when starting openvas-manager and restarting openvas-administrator. Following whernandez’s modified directions, I only get error with openvas-manager. However, in both cases OpenVAS runs and produce reports, so while I don’t know what funcions I don’t have due to the errors, it is still an useful tool to me, so thanks for this guide.
I use Ubuntu 12.04.4 server, and I still don’t find a guide that works better than this one.
Update: now openvas-administrator restarts without problem, in the install made with the original guide.
“ps aux | grep openvassd | grep -v grep”
ps aux | grep [o]penvassd
Also pgrep
This isn’t working.
After adding ppa repository to apt (using sudo add-apt-repository ppa:openvas/openvas6) I get the following error when doing sudo apt-get update.
Err http://ppa.launchpad.net trusty/main amd64 Packages
404 Not Found
Err http://ppa.launchpad.net trusty/main i386 Packages
404 Not Found
W: Failed to fetch http://ppa.launchpad.net/openvas/openvas6/ubuntu/dists/trusty/main/binary-amd64/Packages 404 Not Found
W: Failed to fetch http://ppa.launchpad.net/openvas/openvas6/ubuntu/dists/trusty/main/binary-i386/Packages 404 Not Found
E: Some index files failed to download. They have been ignored, or old ones used instead.
OpenVAS is up and running but I am not able to scan sites that use https only sites with http. Any ideas why?
 This work is licensed under a Creative Commons Attribution-NonCommercial- ShareAlike 4.0 International License.
Become a contributor for community
Get paid to write technical tutorials and select a tech-focused charity to receive a matching donation.

DigitalOcean Documentation
Full documentation for every DigitalOcean product.

Resources for startups and AI-native businesses
The Wave has everything you need to know about building a business, from raising funding to marketing your product.
The developer cloud
Scale up as you grow — whether you're running one virtual machine or ten thousand.

Start building today
From GPU-powered inference and Kubernetes to managed databases and storage, get everything you need to build, scale, and deploy intelligent applications.
