By Timothy Nolan and Timothy Nolan
Not using macOS X?
Choose a different version or distribution.
Introduction
When using the Ruby on Rails web framework, your application is set up by default to use SQLite as a database. SQLite is a lightweight, portable, and user-friendly relational database that performs especially well in low-memory environments, and will work well in many cases. However, for highly complex applications that need more reliable data integrity and programmatic extensibility, a PostgreSQL database will be a more robust and flexible choice. In order to configure your Ruby on Rails setup to use PostgreSQL, you will need to perform a few additional steps to get it up and running.
In this tutorial, you will set up a Ruby on Rails development environment connected to a PostgreSQL database on a local macOS machine. You will install and configure PostgreSQL, and then test your setup by creating a Rails application that uses PostgreSQL as its database server.
Prerequisites
This tutorial requires the following:
-
One computer or virtual machine with macOS installed, with administrative access to that machine and an internet connection. This tutorial has been tested on macOS 10.14 Mojave.
-
A Ruby on Rails development environment installed on your macOS machine. To set this up, follow our guide on How To Install Ruby on Rails with rbenv on macOS. This tutorial will use version 2.6.3 of Ruby and 5.2.3 of Rails; for information on the latest versions, check out the official sites for Ruby and Rails.
Step 1 — Installing PostgreSQL
In order to configure Ruby on Rails to create your web application with PostgreSQL as a database, you will first install the database onto your machine. Although there are many ways to install PostgreSQL on macOS, this tutorial will use the package manager Homebrew.
There are multiple Homebrew packages to install different versions of PostgreSQL. To install the latest version, run the following command:
- brew install postgresql
If you would like to download a specific version of PostgreSQL, replace postgresql in the previous command with your desired package. You can find the available packages at the Homebrew website.
Next, include the PostgreSQL binary in your PATH variable in order to access the PostgreSQL command line tools, making sure to replace the 10 with the version number you are using:
- echo 'export PATH="/usr/local/opt/postgresql@10/bin:$PATH"' >> ~/.bash_profile
Then, apply the changes you made to your ~/.bash_profile file to your current shell session:
- source ~/.bash_profile
To start the service and enable it to start at login, run the following:
- brew services start postgresql@10
Check to make sure the installation was successful:
- postgres -V
You will get the following output:
Outputpostgres (PostgreSQL) 10.9
Once PostgreSQL is installed, the next step is to create a role that your Rails application will use later to create your database.
Step 2 — Creating a Database Role for Your Application
In PostgreSQL, roles can be used to organize permissions and authorization. When starting PostgreSQL with Homebrew, you will automatically have a superuser role created with your macOS username. In order to keep these superuser privileges separate from the database instance you use for your Rails application, in this step you will create a new role with less access.
To create a new role, run the following command, replacing appname with whatever name you’d like to give the role:
- createuser -P -d appname
In this command, you used createuser to create a role named appname. The -d flag gave the role the permission to create new databases.
You also specified the -P flag, which means you will be prompted to enter a password for your new role. Enter your desired password, making sure to record it so that you can use it in a configuration file in a future step.
If you did not use the -P flag and want to set a password for the role after you create it, enter the PostgreSQL console with the following command:
- psql postgres
You will receive the following output, along with the prompt for the PostgreSQL console:
Outputpsql (10.9)
Type "help" for help.

postgres=#
The PostgreSQL console is indicated by the postgres=# prompt. At the PostgreSQL prompt, enter this command to set the password for the new database role, replacing the highlighted name with the one you created:
- \password appname
PostgreSQL will prompt you for a password. Enter your desired password at the prompt, then confirm it.
Now, exit the PostgreSQL console by entering this command:
- \q
Your usual prompt will now reappear.
In this step, you created a new PostgreSQL role without superuser privileges for your application. Now you are ready to create a new Rails app that uses this role to create a database.
Step 3 — Creating a New Rails Application
With your role configured for PostgreSQL, you can now create a new Rails application that is set up to use PostgreSQL as a database.
First, navigate to your home directory:
- cd ~
Create a new Rails application in this directory, replacing appname with whatever you would like to call your app:
- rails new appname -d=postgresql
The -d=postgresql option sets PostgreSQL as the database.
Once you’ve run this command, a new folder named appname will appear in your home directory, containing all the elements of a basic Rails application.
Next, move into the application’s directory:
- cd appname
Now that you have created a new Rails application and have moved into the root directory for your project, you can configure and create your PostgreSQL database from within your Rails app.
Step 4 — Configuring and Creating Your Database
When creating the development and test databases for your application, Rails will use the PostgreSQL role that you created in Step 2. To make sure that Rails creates these databases, you will alter the database configuration file of your project. You will then create your databases.
One of the configuration changes to make in your Rails application is to add the password for the PostgreSQL role you created in the last step. To keep sensitive information like passwords safe, it is a good idea to store this in an environment variable rather than to write it directly in your configuration file.
To store your password in an environment variable at login, run the following command, replacing APPNAME with the name of your app and PostgreSQL_Role_Password with the password you created in the last step:
- echo 'export APPNAME_DATABASE_PASSWORD="PostgreSQL_Role_Password"' >> ~/.bash_profile
This command writes the export command to your ~/.bash_profile file so that the environment variable will be set at login.
To export the variable for your current session, use the source command:
- source ~/.bash_profile
Now that you have stored your password in your environment, it’s time to alter the configuration file.
Open your application’s database configuration file in your preferred text editor. This tutorial will use nano:
- nano config/database.yml
Under the default section, find the line that says pool: <%= ENV.fetch("RAILS_MAX_THREADS") { 5 } %> and add the following highlighted lines, filling in your credentials and the environment variable you created. It should look something like this:
...
default: &default
  adapter: postgresql
  encoding: unicode
  # For details on connection pooling, see Rails configuration guide
  # http://guides.rubyonrails.org/configuring.html#database-pooling
  pool: <%= ENV.fetch("RAILS_MAX_THREADS") { 5 } %>
  username: appname
  password: <%= ENV['APPNAME_DATABASE_PASSWORD'] %>

development:
  <<: *default
  database: appname_development
...
This will make the Rails application run the database with the correct role and password. Save and exit by pressing CTRL+X, Y, then ENTER.
For more information on configuring databases in Rails, see the Rails documentation.
Now that you have made changes to config/database.yml, create your application’s databases by using the rails command:
- rails db:create
Once Rails creates the database, you will receive the following output:
OutputCreated database 'appname_development'
Created database 'appname_test'
As the output suggests, this command created a development and test database in your PostgreSQL server.
You now have a PostgreSQL database connected to your Rails app. To ensure that your application is working, the next step is to test your configuration.
Step 5 — Testing Your Configuration
To test that your application is able to use the PostgreSQL database, try to run your web application so that it will show up in a browser.
First, you’ll use the built-in web server for Rails, Puma, to serve your application. This web server comes with Rails automatically and requires no additional setup. To serve your application, run the following command:
- rails server --binding=127.0.0.1
--binding binds your application to a specified IP. By default, this flag will bind Rails to 0.0.0.0, but since this means that Rails will listen to all interfaces, it is more secure to use 127.0.0.1 to specify the localhost. By default, the application listens on port 3000.
Once your Rails app is running, your command prompt will disappear, replaced by this output:
Output=> Booting Puma
=> Rails 5.2.3 application starting in development
=> Run `rails server -h` for more startup options
Puma starting in single mode...
* Version 3.12.1 (ruby 2.6.3-p62), codename: Llamas in Pajamas
* Min threads: 5, max threads: 5
* Environment: development
* Listening on tcp://127.0.0.1:3000
Use Ctrl-C to stop
To test if your application is running, open up a new terminal window on your server and use the curl command to send a request to 127.0.0.1:3000:
- curl http://127.0.0.1:3000
You will receive a lot of output in HTML, ending in something like:
Output...
        <strong>Rails version:</strong> 5.2.3<br />
        <strong>Ruby version:</strong> 2.6.3 (x86_64-darwin18)
      </p>
    </section>
  </div>
</body>
</html>
You can also access your Rails application in a local web browser by visiting:
http://127.0.0.1:3000
At this URL, you will find a Ruby on Rails welcome page:
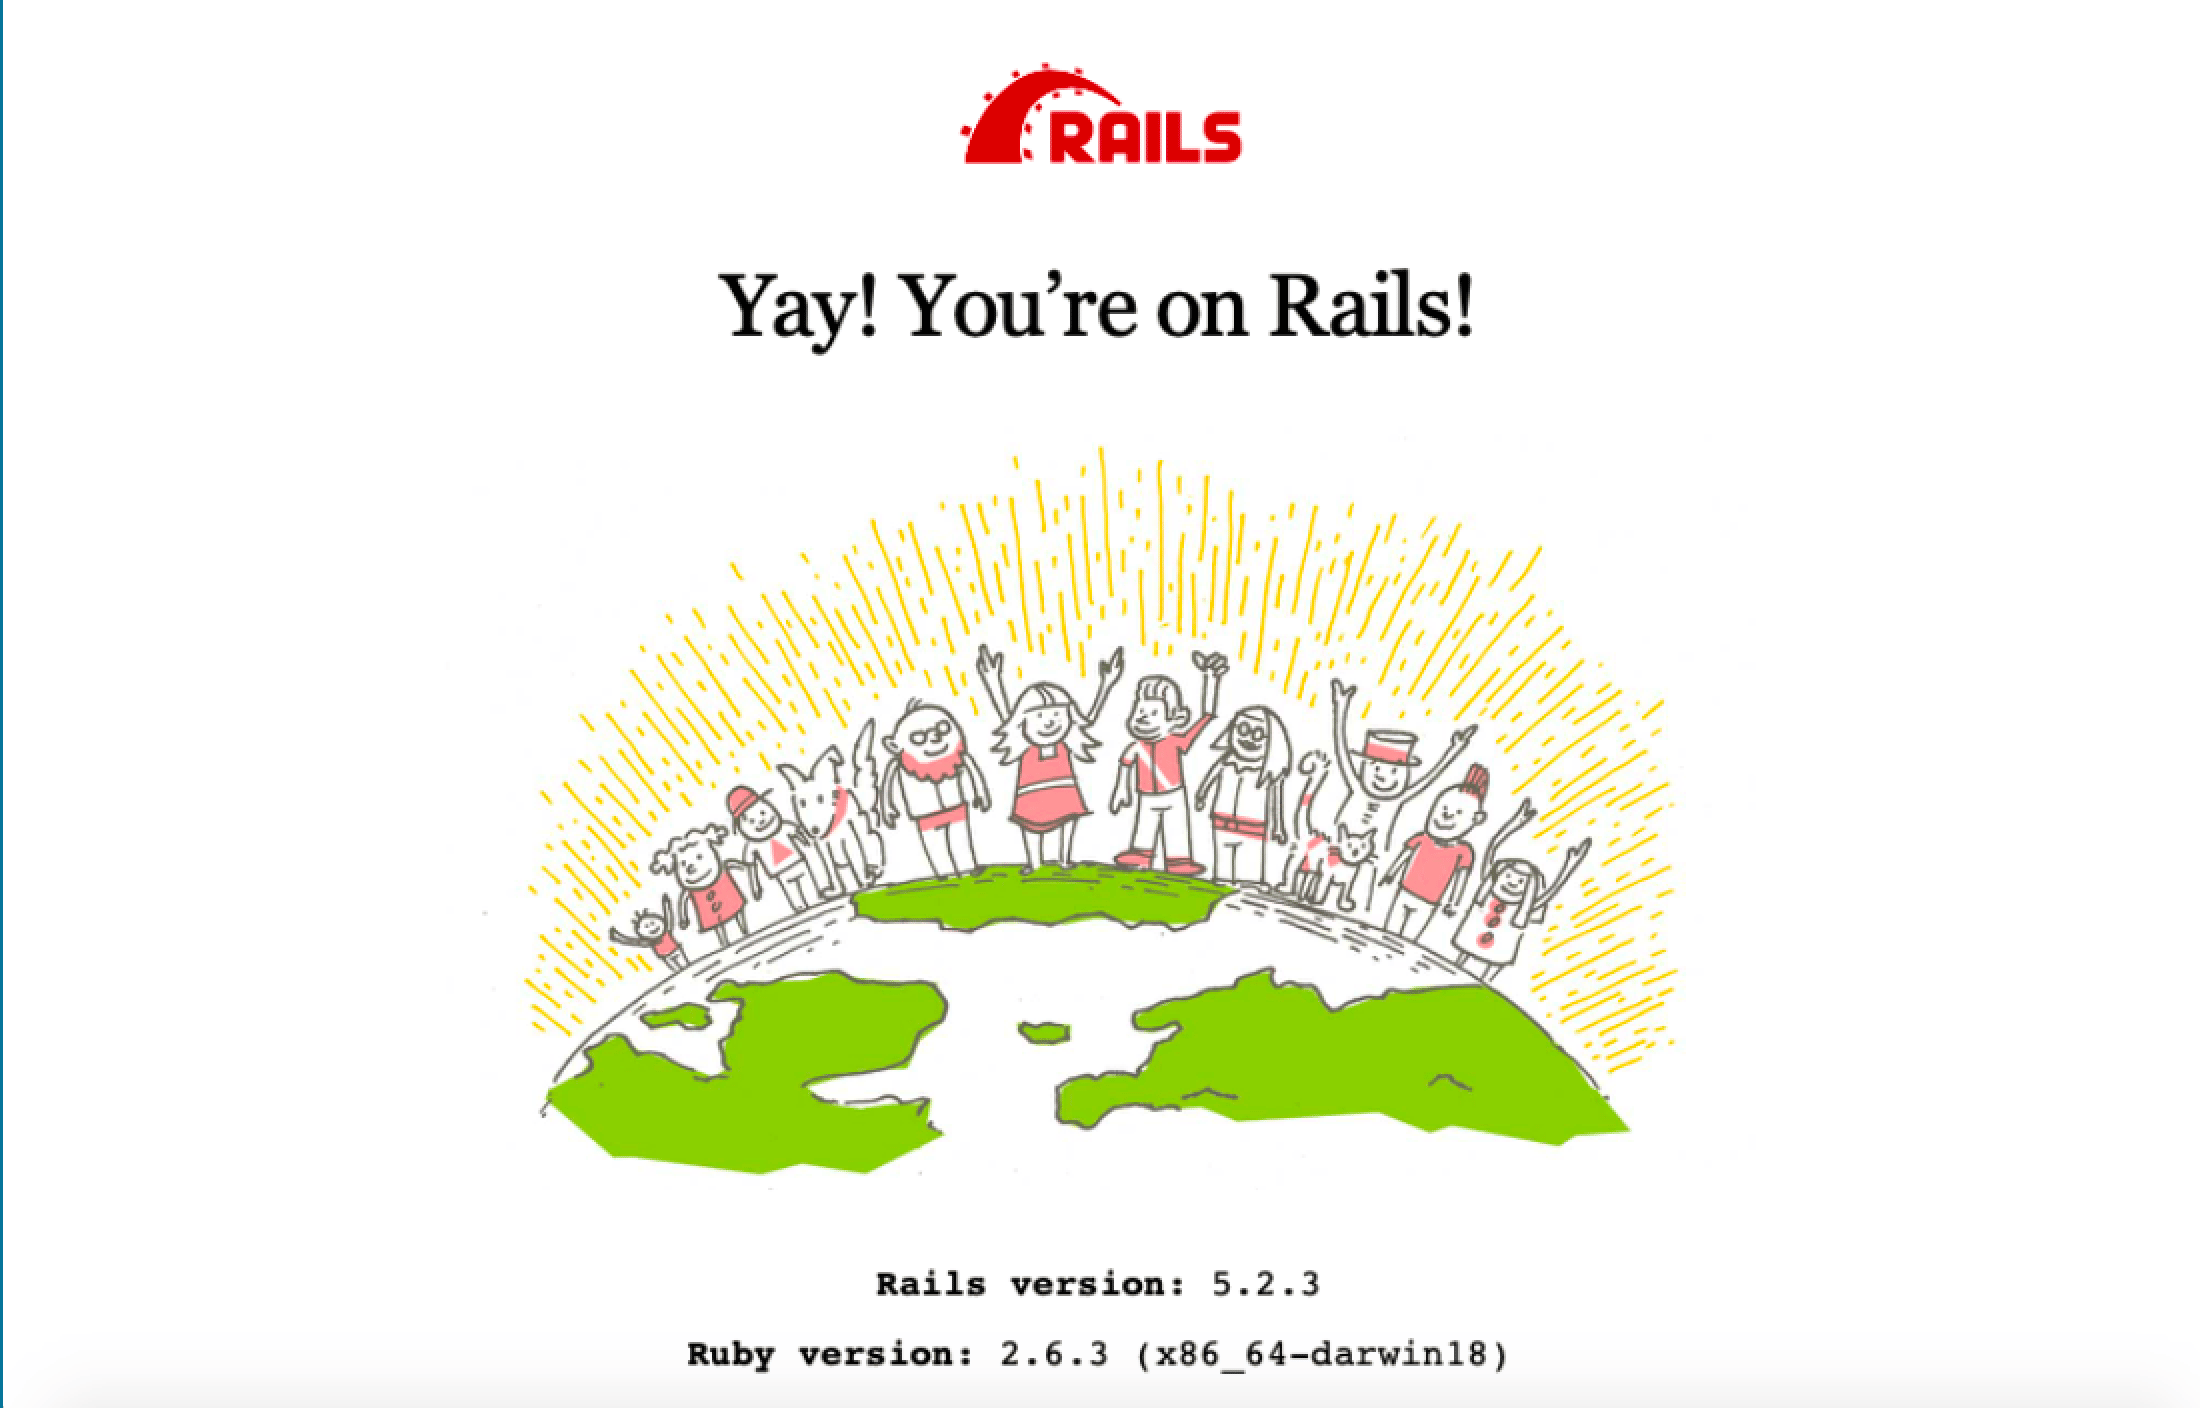
This means that your application is properly configured and connected to the PostgreSQL database.
Conclusion
In this tutorial, you created a Ruby on Rails web application that was configured to use PostgreSQL as a database on a local macOS machine. If you would like to learn more about the Ruby programming language, check out our How To Code in Ruby series.
For more information on choosing a database for your application, check out our tutorial on the differences between and use cases of SQLite, PostgreSQL, and MySQL. If you want to read more about how to use databases, see our An Introduction to Queries in PostgreSQL article, or explore DigitalOcean’s Managed Databases product.
Thanks for learning with the DigitalOcean Community. Check out our offerings for compute, storage, networking, and managed databases.
About the author(s)
Former Senior Technical Editor at DigitalOcean, fiction writer and podcaster elsewhere, always searching for the next good nautical pun! Areas of expertise include Node.js, PostgreSQL, CSS, JavaScript.
Former Senior Technical Editor at DigitalOcean, fiction writer and podcaster elsewhere, always searching for the next good nautical pun! Areas of expertise include Node.js, PostgreSQL, CSS, JavaScript.
Still looking for an answer?
This textbox defaults to using Markdown to format your answer.
You can type !ref in this text area to quickly search our full set of tutorials, documentation & marketplace offerings and insert the link!
 This work is licensed under a Creative Commons Attribution-NonCommercial- ShareAlike 4.0 International License.
Become a contributor for community
Get paid to write technical tutorials and select a tech-focused charity to receive a matching donation.

DigitalOcean Documentation
Full documentation for every DigitalOcean product.

Resources for startups and AI-native businesses
The Wave has everything you need to know about building a business, from raising funding to marketing your product.
The developer cloud
Scale up as you grow — whether you're running one virtual machine or ten thousand.

Start building today
From GPU-powered inference and Kubernetes to managed databases and storage, get everything you need to build, scale, and deploy intelligent applications.
