By Joe Keegan and Anish Singh Walia

Your vLLM pods are probably downloading the same massive model file every time they start.
If you’ve deployed LLM inference on Kubernetes, you may have taken the straightforward path: point vLLM at HuggingFace and let it download the model when the pod starts. It works. But here’s what happens next:
- A pod crashes at 2 AM. The replacement pod spends several minutes downloading gigabytes of model weights from HuggingFace before it can serve a single request.
- You need to scale up during a traffic spike. Each new pod downloads the model independently, competing for bandwidth and delaying your response to demand.
- HuggingFace has a rate limit or outage. Your pods can’t start.
There’s a better way: download the model once to shared storage, then let every pod load directly from that source. No redundant downloads. No external runtime dependencies. Fast access for any new pod you deploy.
In this guide, you’ll deploy vLLM on DigitalOcean Kubernetes Service (DOKS) using Managed NFS for model storage.
We’ll use a single H100 GPU node to keep things simple, but the pattern scales to as many nodes as you need and that’s the point. Once your model is on NFS, adding GPU capacity means instant model access, not another lengthy download.
Key Takeaways
- Eliminate redundant downloads: Download LLM models once to shared NFS storage instead of downloading them every time a pod starts, reducing startup time from minutes to seconds
- Enable fast scaling: New vLLM replicas can start serving requests in under a minute by loading models directly from NFS, rather than waiting for multi-gigabyte downloads
- Remove external dependencies: Store models on DigitalOcean Managed NFS within your VPC, eliminating reliance on HuggingFace availability during pod restarts or scaling events
- Support concurrent access: NFS ReadWriteMany access mode allows multiple pods to read the same model files simultaneously, perfect for horizontal scaling
- Build production-ready patterns: This storage pattern applies to any LLM deployment and scales from single-node setups to large multi-GPU clusters
The Problem: Why “Download Every Time” Hurts
Let’s be specific about the costs of downloading models at pod startup.
Model files are large. Mistral-7B-Instruct-v0.3, the model we’ll use in this guide, is approximately 15GB. Larger models like Llama 70B can exceed 140GB. Every time a pod starts and downloads from HuggingFace, that’s 15GB (or more) traversing the internet.
Every pod restart means another download. Pod crashes happen. Node maintenance happens. Deployments happen. With the “download every time” approach, each of these events triggers a fresh download. If your inference pod crashes and restarts three times in a day, you’ve downloaded the same model files three times.
Scaling becomes a bandwidth competition. When your Horizontal Pod Autoscaler adds replicas during a traffic spike, each new pod downloads the model simultaneously. Three new pods means three concurrent multi-gigabyte downloads, all competing for bandwidth. Instead of responding to increased demand, you’re waiting for downloads to complete.
HuggingFace becomes a runtime dependency. This is the subtle one. During normal operations, HuggingFace availability doesn’t seem like a concern as it’s almost always up. But consider the 2 AM scenario: your GPU node fails, Kubernetes schedules a replacement pod, and HuggingFace is rate-limiting your IP or experiencing an outage. Your ability to recover from a failure now depends on an external service you don’t control.
The principle here is simple: control your dependencies. External services like HuggingFace should be sources for initial acquisition, not runtime dependencies. When a pod needs to start, whether due to scaling, deployment, or failure recovery, it should pull from infrastructure you control.
The Solution: Download Once, Infer Everywhere
The pattern is straightforward:
- Download once: A Kubernetes Job downloads the model from HuggingFace to an NFS share
- Store on NFS: The model files persist on DigitalOcean Managed NFS
- Load from NFS: Every vLLM pod mounts the NFS share and loads the model directly
This approach eliminates the problems we just discussed:
ReadWriteMany access: NFS supports concurrent read access from all pods. Whether you have one replica or ten, they all read from the same source simultaneously.
Persistence: Model files survive pod restarts, node replacements, and cluster upgrades. Download the model once and it’s available until you explicitly remove it.
In-region, no external dependency: Your NFS share is in the same DigitalOcean region as your cluster. Loading happens over the private network which is fast, reliable, and independent of external services.
Managed infrastructure: DigitalOcean handles the NFS servers and availability. You don’t need to manage NFS infrastructure yourself.
The scaling story is where this really shines. When you add a new GPU node tomorrow and deploy another vLLM replica, that pod has instant access to the model. No download step. The pod starts, mounts NFS, loads the model into GPU memory, and starts serving requests. Startup time is just load time, not download time plus load time.
Contrast this with the per-pod download approach: adding a new replica means waiting many minutes for yet another download before that capacity is usable.
Architecture Overview
Here’s what we’re building:
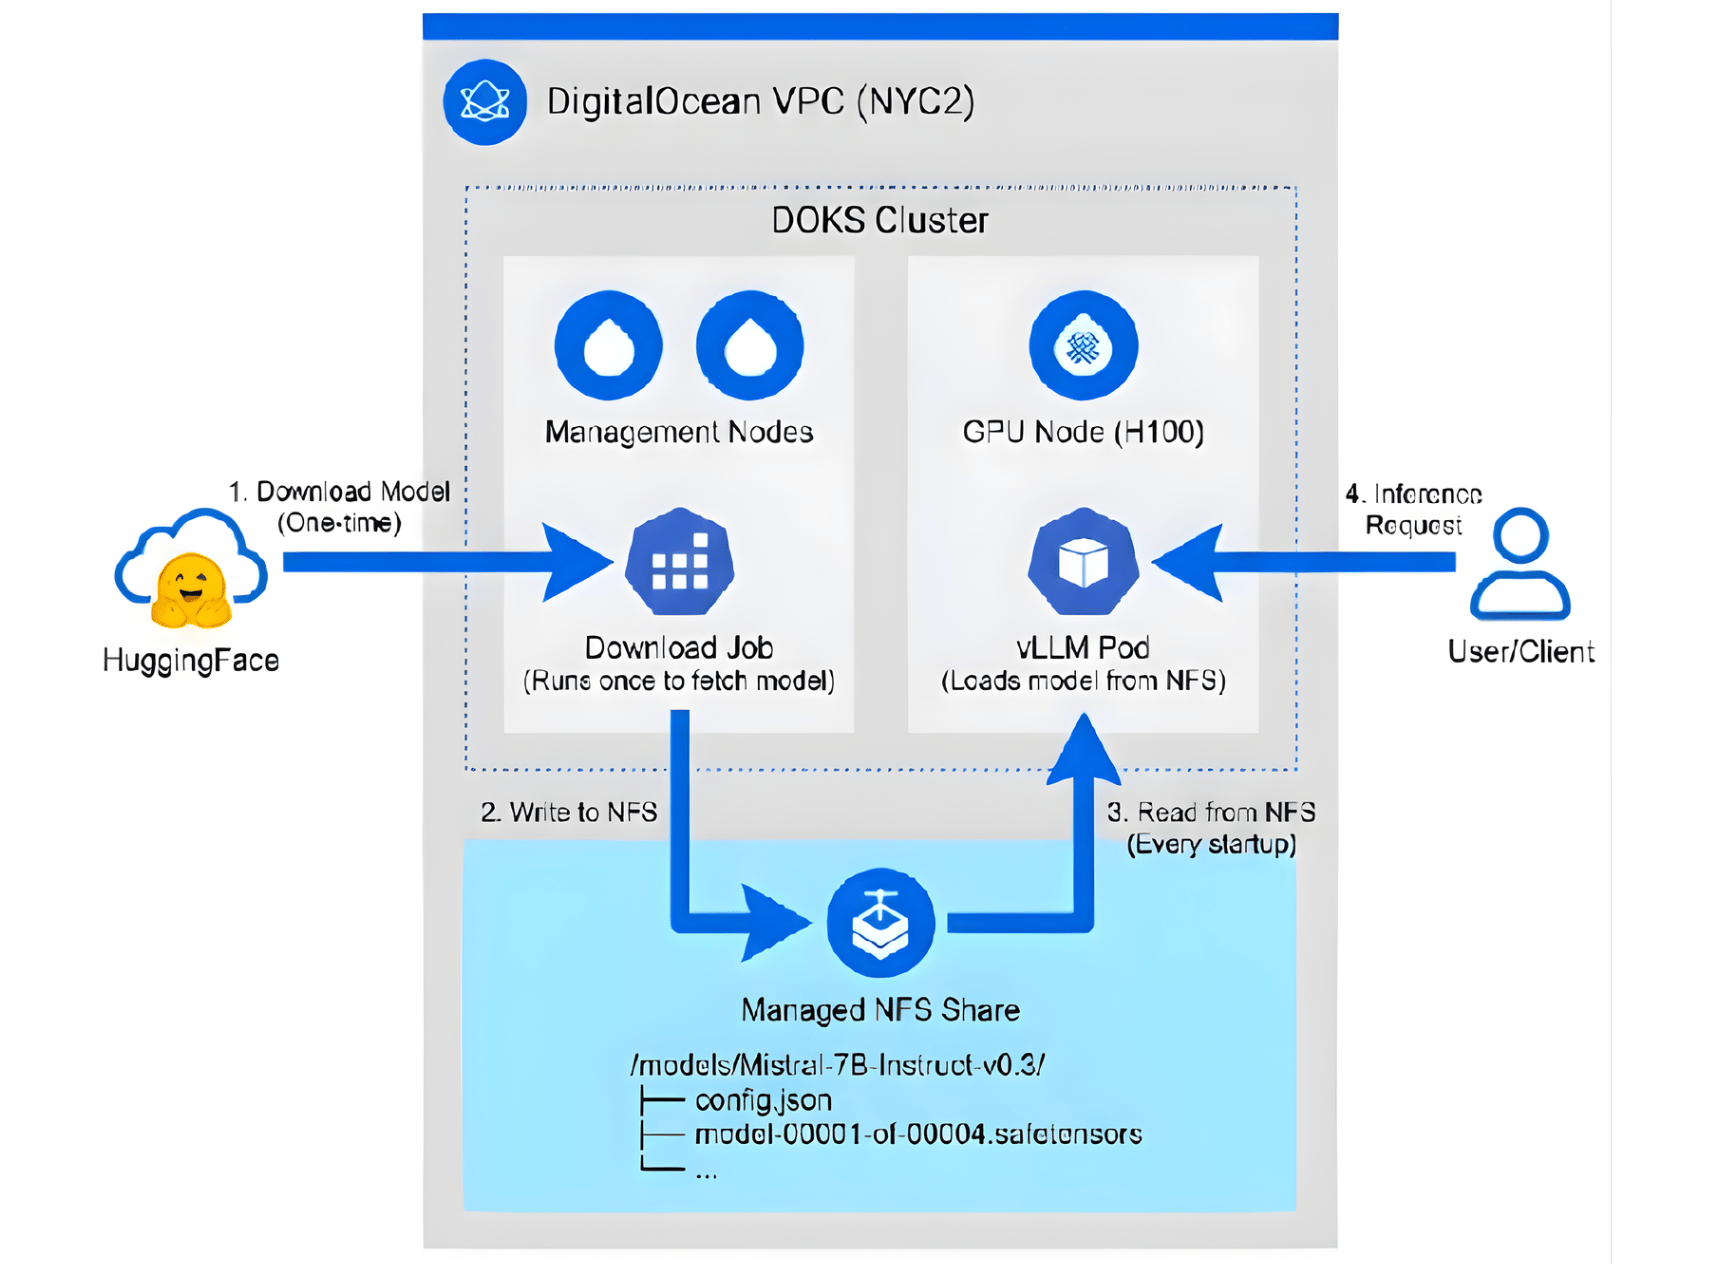
The data flow has two distinct phases:
One-time setup (happens once):
HuggingFace → Download Job → NFS Share
Every pod startup (happens on each start):
NFS Share → vLLM Pod → GPU Memory → Ready to serve
Compare this to the “download every time” flow, where every startup includes the HuggingFace download:
HuggingFace → vLLM Pod → GPU Memory → Ready to serve (every single time)
Prerequisites
Before starting this tutorial, you’ll need:
-
DigitalOcean account with H100 GPU quota approved
- H100 GPUs require quota approval. If you haven’t already, request GPU access through the DigitalOcean Control Panel.
-
HuggingFace account with access to your chosen model
- This guide uses mistralai/Mistral-7B-Instruct-v0.3, which is a non-gated model requiring no approval and you can start immediately.
- You’ll also need a HuggingFace access token with read permissions.
-
kubectl installed locally
- Follow the official kubectl installation guide for your operating system.
-
Basic Kubernetes familiarity
- You should be comfortable with
kubectlcommands and understand basic concepts like pods, deployments, and services. If you’re new to DOKS, start with the DOKS Getting Started guide.
- You should be comfortable with
Step 1: Set Up Your Infrastructure
We need three DigitalOcean resources: a VPC, a DOKS cluster with a GPU node, and an NFS share. All must be in the same region.
Region Selection
Not all DigitalOcean regions have both H100 GPUs and Managed NFS. At the time of writing, NYC2 and ATL1 support both. Choose one of these for your deployment. Check the DigitalOcean Control Panel for all the latest NFS regions at the DigitalOcean NFS Panel.
Create a VPC
The VPC provides private networking between your cluster and NFS share.
- Navigate to Networking > VPCs in the DigitalOcean Control Panel
- Click Create VPC
- Select your region (NYC2 or ATL1)
- Give it a descriptive name (e.g.,
vllm-vpc) - Accept the default IP range or specify your own
- Click Create VPC
For detailed instructions, see How to Create a VPC.
Create a DOKS Cluster
- Navigate to Kubernetes in the Control Panel
- Click Create Cluster
- Select the same region as your VPC
- Under VPC Network, select the VPC you just created
- Configure your node pools:
- Management pool: Keep the default basic droplets for system workloads
- Add a GPU node pool: Click “Add Node Pool”, select
gpu-h100x1-80gbas the droplet type, and set the count to 1
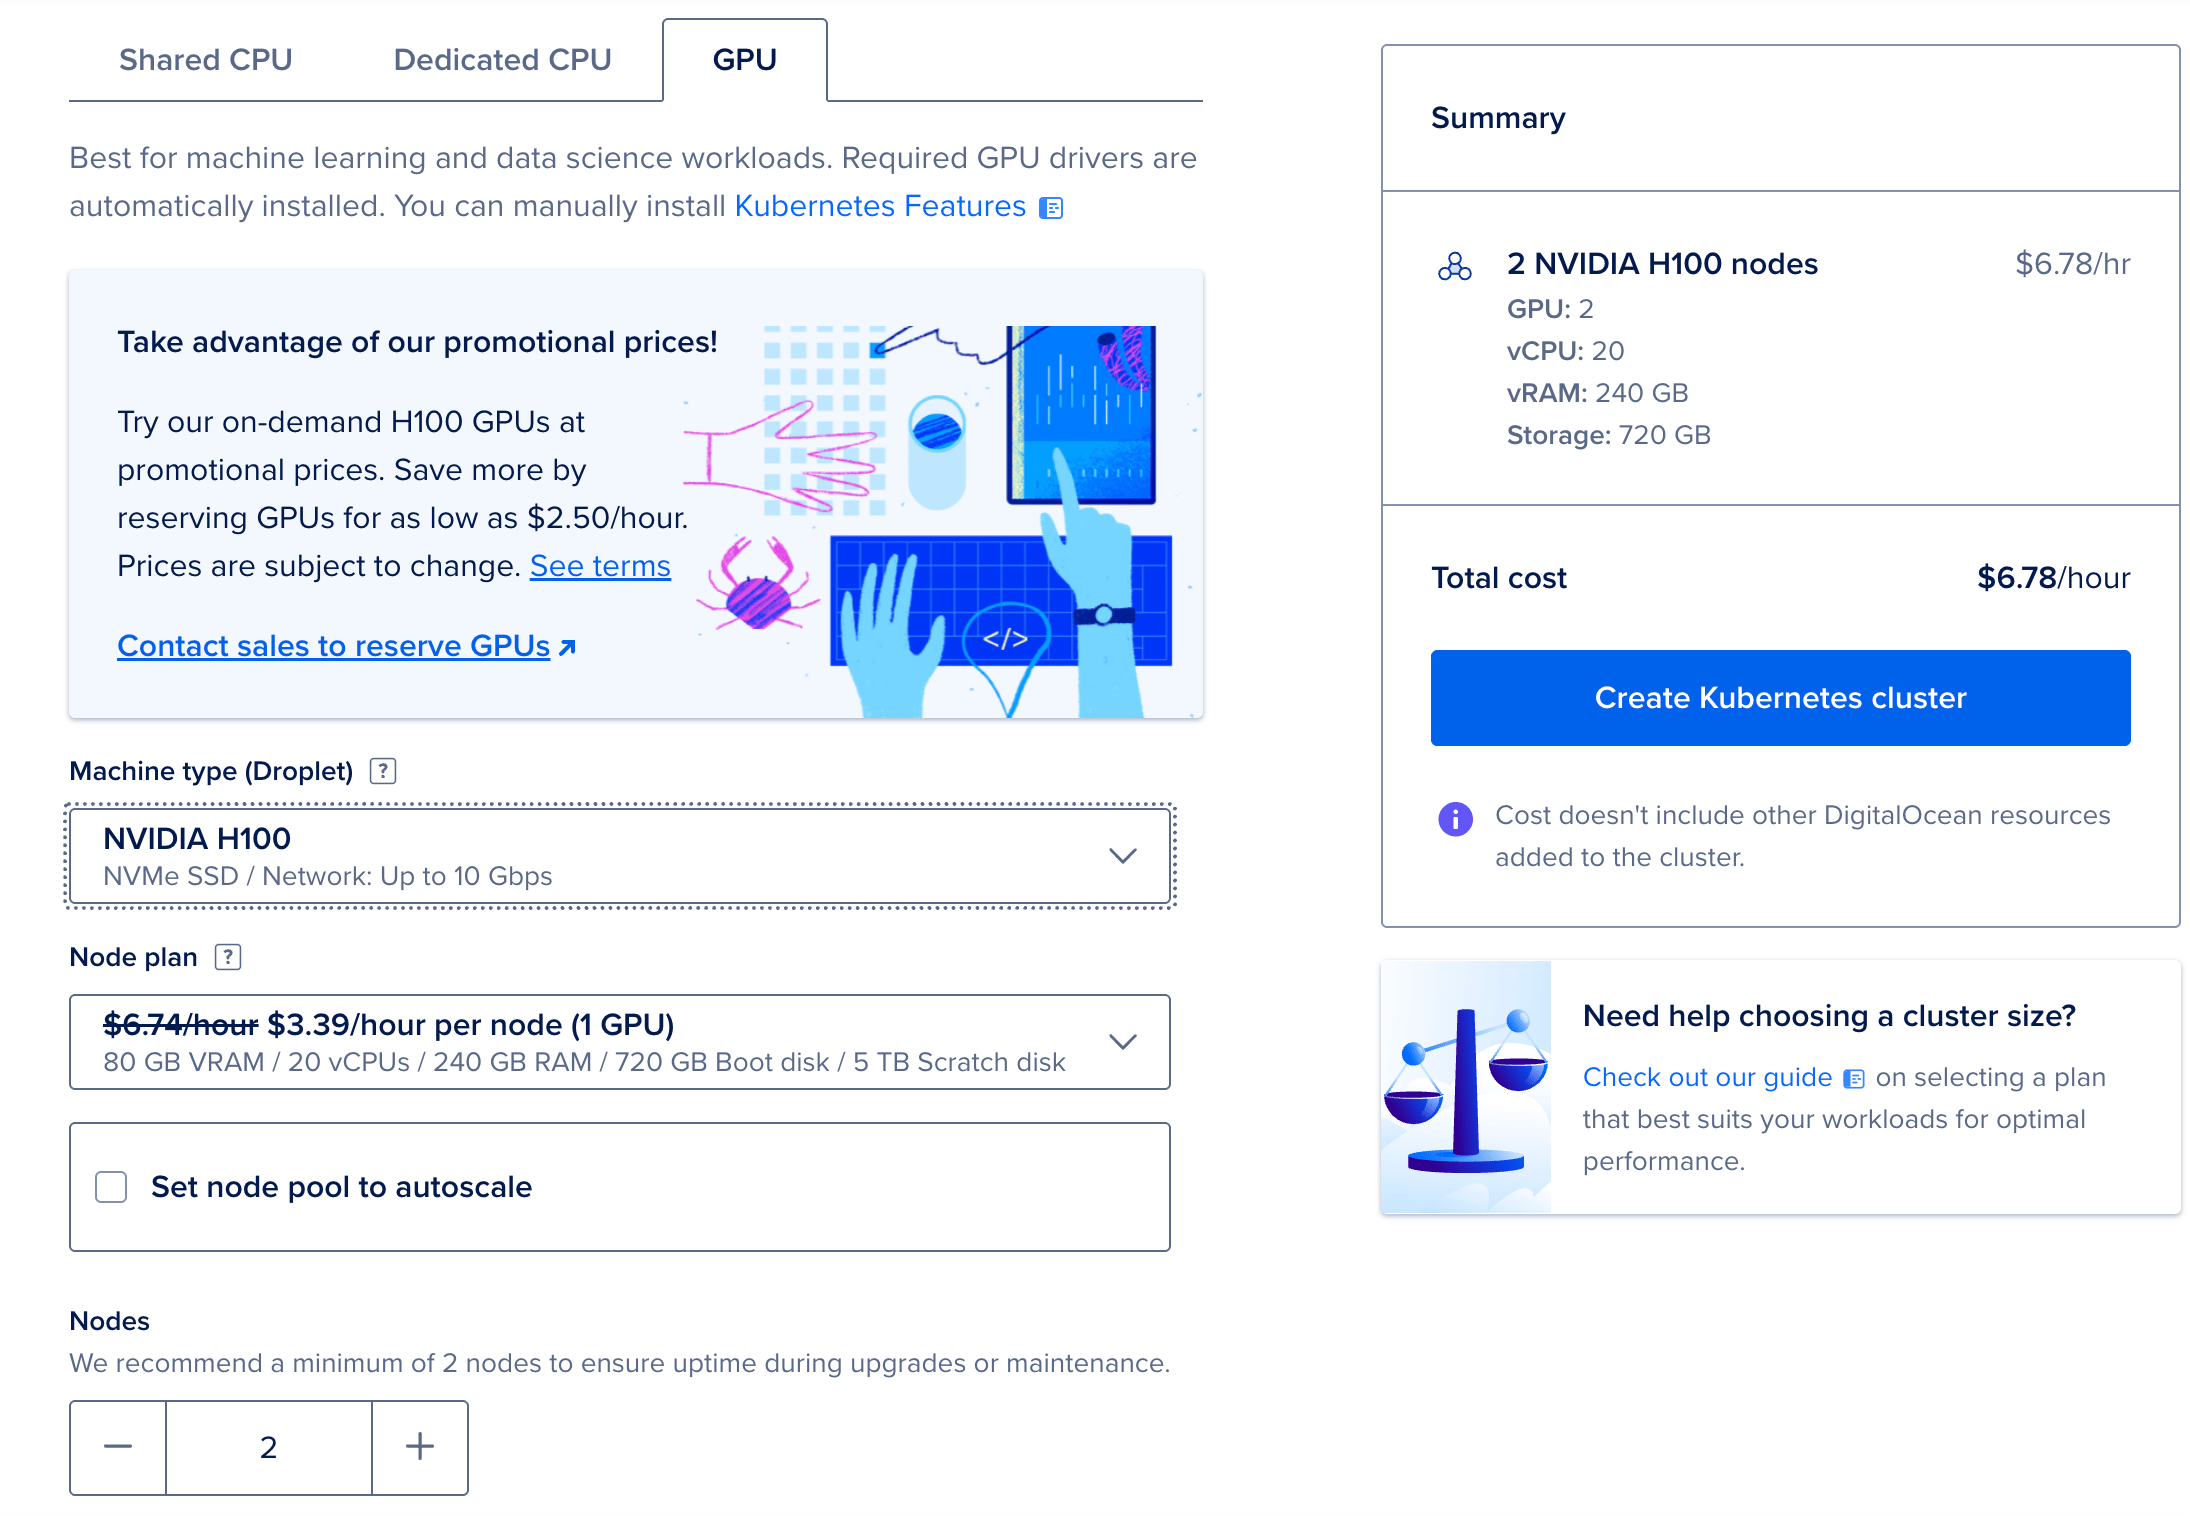
The GPU node pool configuration page. Select the H100 droplet type for LLM inference workloads.
- Click Create Cluster and wait for provisioning to complete
For detailed instructions, see How to Create a Kubernetes Cluster.
Connect kubectl to Your Cluster
Once your cluster is running, configure kubectl access:
- In the cluster overview page, click Actions > Download Config or use the Getting Started guide
- Follow the instructions to configure your kubeconfig
Verify access:
kubectl get nodes
Expected output (node names will vary):
NAME               STATUS   ROLES    AGE   VERSION
mgmt-xxxxx         Ready    <none>   5m    v1.34.1
mgmt-yyyyy         Ready    <none>   5m    v1.34.1
gpu-h100-zzzzz     Ready    <none>   5m    v1.34.1
You should see at least two nodes: management nodes and one GPU node.
For detailed instructions, see How to Connect to a Cluster.
Step 2: Create Your Managed NFS Share
This is the key step as you’re creating the persistent storage that will hold your model files.
- Navigate to Storage > NFS in the DigitalOcean Control Panel
- Click Create NFS Share
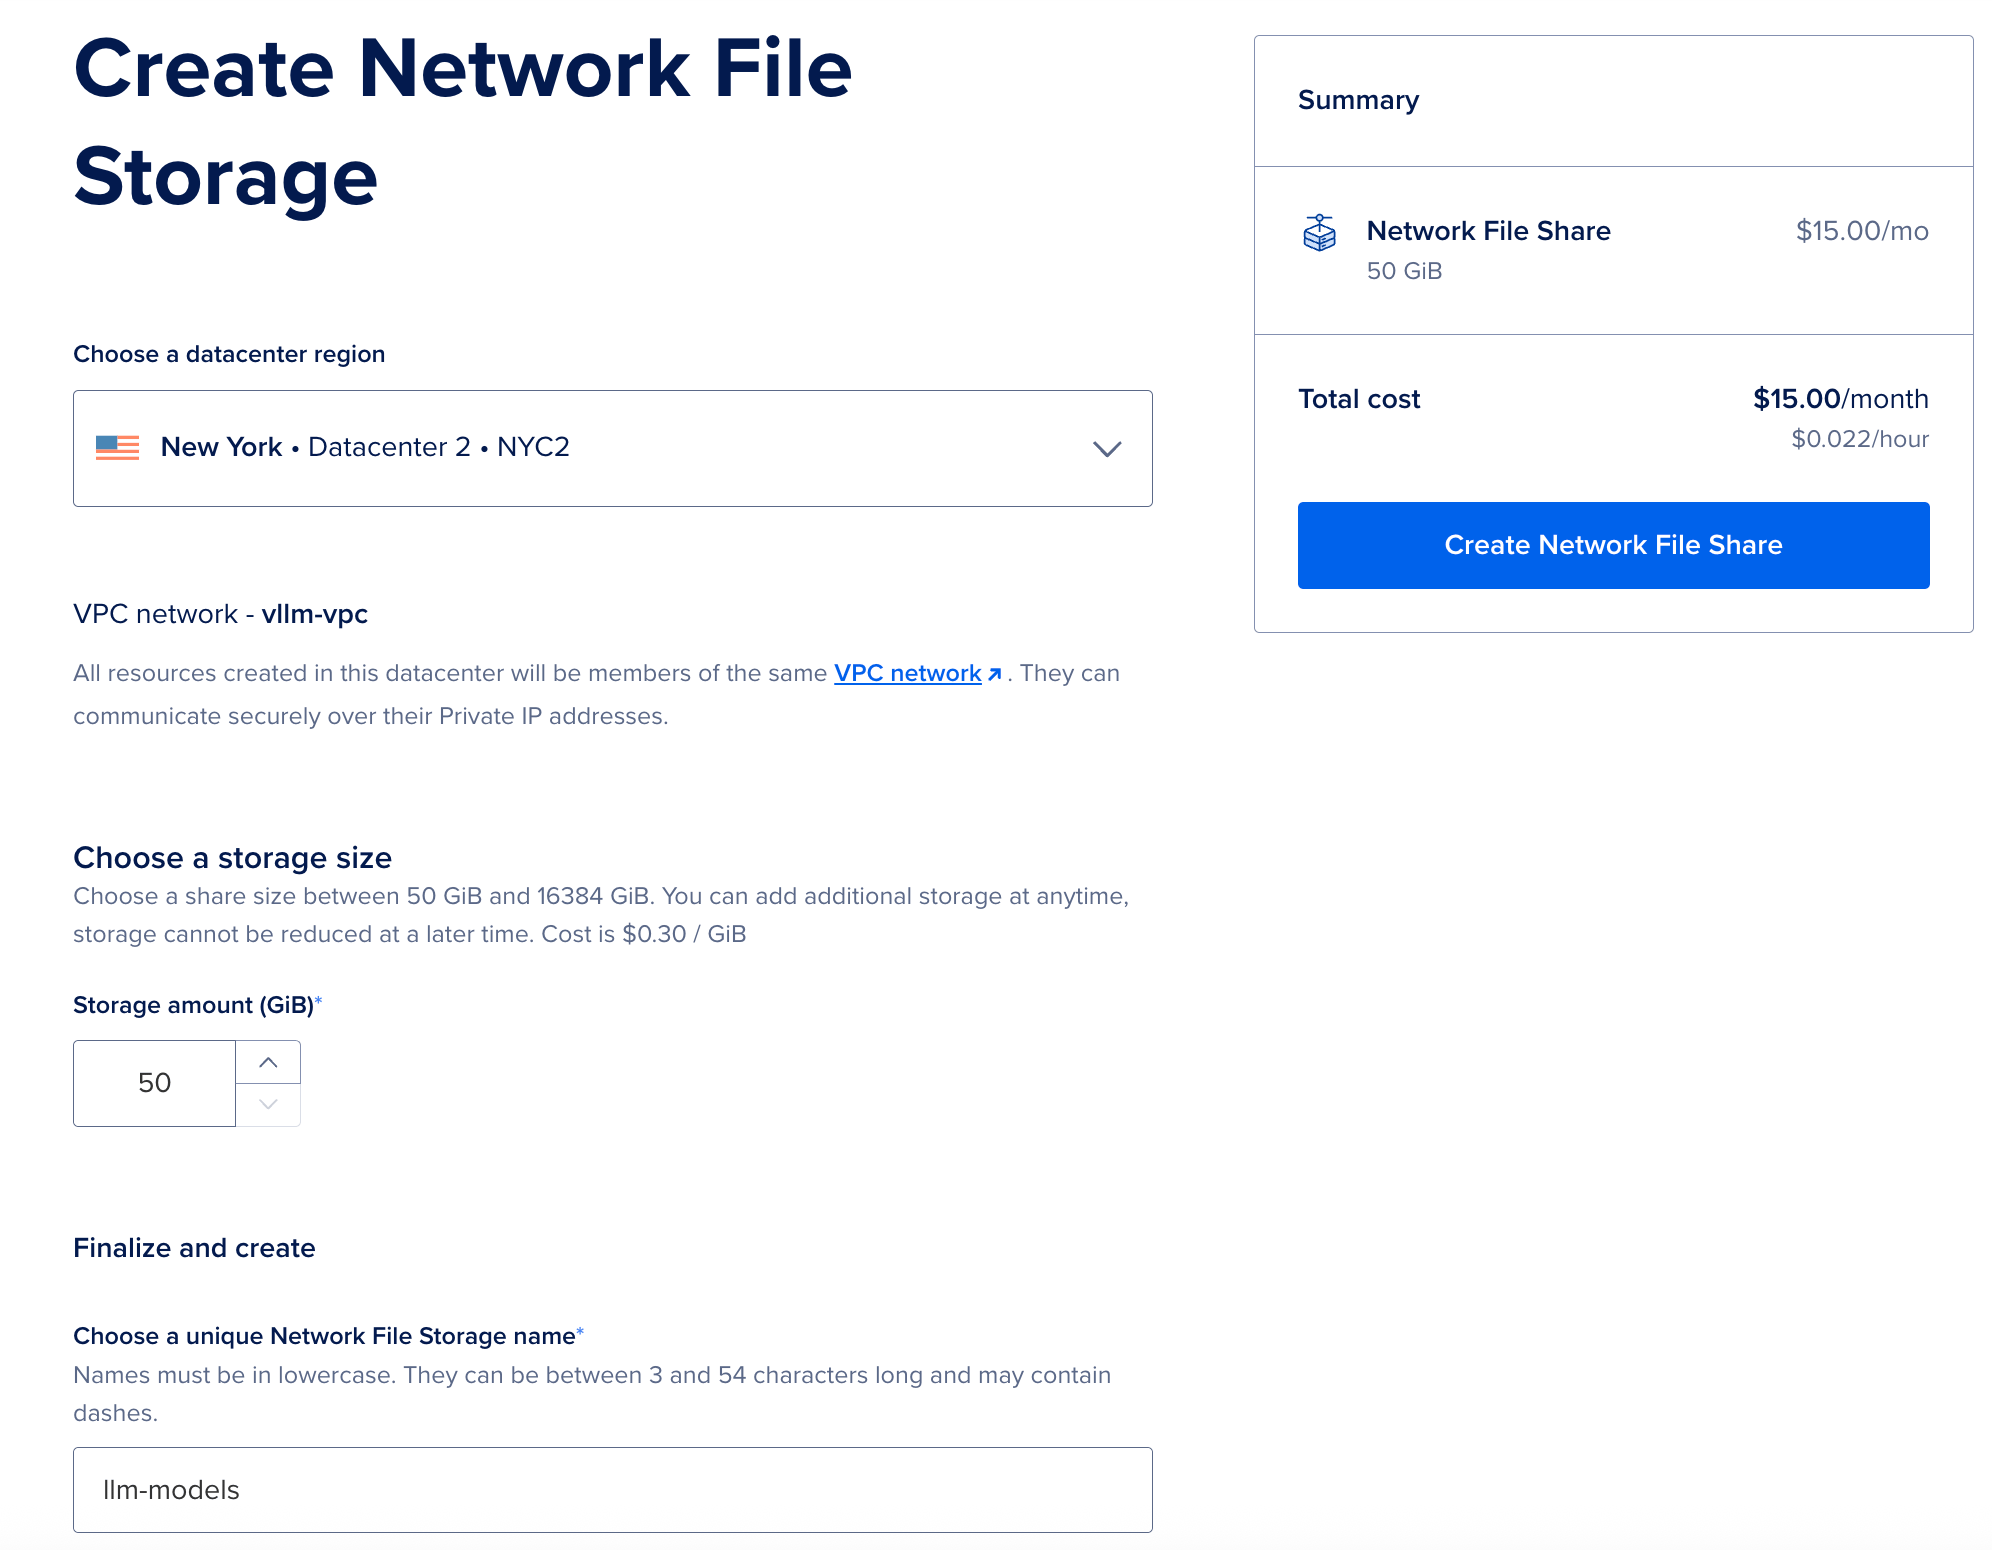
The NFS creation page. Choose a descriptive name and select your VPC.
-
Configure the share:
- Name: Something descriptive like
llm-models - Size: 100GB is sufficient for this tutorial. Need more space later? You can resize your NFS share at any time.
- VPC: Select the same VPC as your DOKS cluster
- Name: Something descriptive like
-
Click Create NFS Share and wait for the status to become ACTIVE
For detailed instructions, see How to Create an NFS Volume.
Note the Mount Source
Once active, note the Mount Source value from the NFS list. This contains the host IP and mount path you’ll need in the next step.
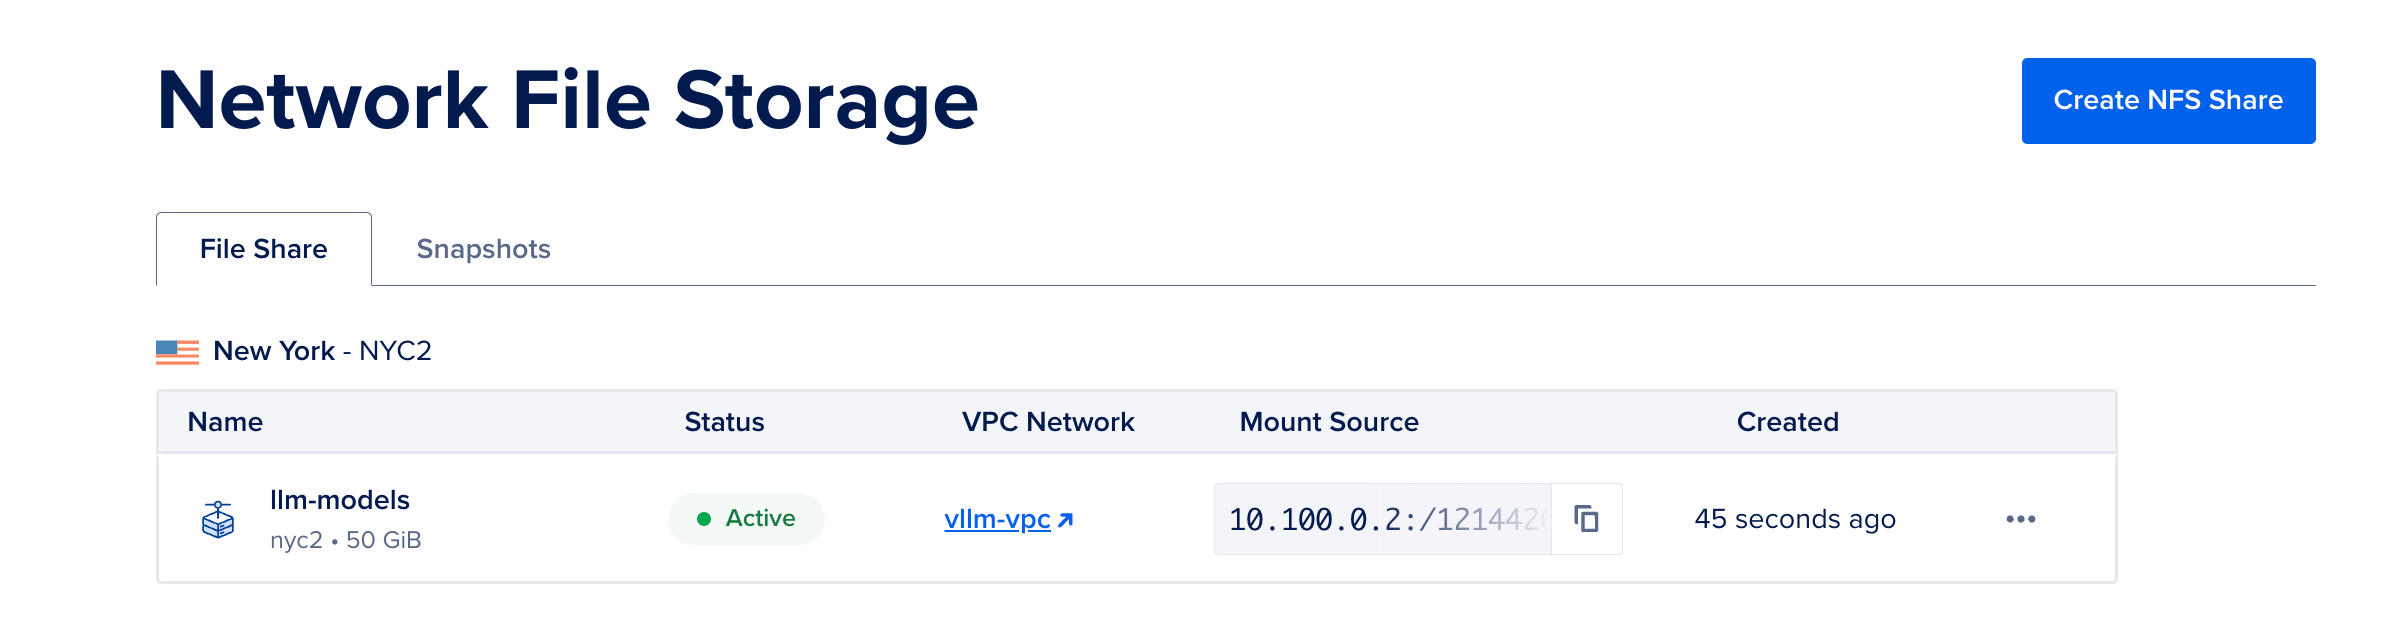
The NFS list shows your share’s status and Mount Source. Note this value—it contains the host IP and path needed for Kubernetes configuration.
The Mount Source has the format <HOST>:<PATH> (e.g., 10.100.32.2:/2633050/7d1686e4-9212-420f-a593-ab544993d99b). You’ll split this into two parts for the PersistentVolume configuration:
- Host: The IP address before the colon (e.g.,
10.100.32.2) - Path: Everything after the colon (e.g.,
/2633050/7d1686e4-9212-420f-a593-ab544993d99b)
Why this matters: This NFS share is now your persistent model library. Any model you download here is accessible to every pod in your cluster, today and in the future. There’s no need to re-download when pods restart or when you scale up.
Step 3: Connect Kubernetes to NFS
Now we’ll create the Kubernetes resources that let pods access your NFS share.
Create the Namespace
First, create a dedicated namespace for your vLLM resources:
# namespace.yaml
apiVersion: v1
kind: Namespace
metadata:
  name: vllm
Apply it:
kubectl apply -f namespace.yaml
Create the PersistentVolume
The PersistentVolume (PV) tells Kubernetes how to connect to your NFS share. Using the Mount Source you noted in Step 2, replace <NFS_HOST> with the IP address and <NFS_MOUNT_PATH> with the path:
# pv.yaml
apiVersion: v1
kind: PersistentVolume
metadata:
  name: vllm-models-pv
  labels:
    pv-name: vllm-models-pv
spec:
  capacity:
    storage: 100Gi
  accessModes:
    - ReadWriteMany  # Allows multiple pods to read simultaneously
  persistentVolumeReclaimPolicy: Retain
  nfs:
    server: <NFS_HOST>       # IP from Mount Source (e.g., 10.100.32.2)
    path: <NFS_MOUNT_PATH>   # Path from Mount Source (e.g., /2633050/7d1686e4-...)
A few things to note:
- ReadWriteMany: This access mode is what allows all your vLLM pods to read from NFS simultaneously. Block storage typically only supports ReadWriteOnce.
- Retain reclaim policy: If you delete the PVC, the data on NFS is preserved. This protects your downloaded models from accidental deletion.
Create the PersistentVolumeClaim
The PersistentVolumeClaim (PVC) is what pods actually reference to access storage:
# pvc.yaml
apiVersion: v1
kind: PersistentVolumeClaim
metadata:
  name: vllm-models-pvc
  namespace: vllm
spec:
  accessModes:
    - ReadWriteMany
  storageClassName: ""  # Empty string binds to a pre-provisioned PV
  resources:
    requests:
      storage: 100Gi
  selector:
    matchLabels:
      pv-name: vllm-models-pv
Apply both resources:
kubectl apply -f pv.yaml
kubectl apply -f pvc.yaml
Verify the PVC is bound:
kubectl get pvc -n vllm
Expected output:
NAME              STATUS   VOLUME           CAPACITY   ACCESS MODES   STORAGECLASS   AGE
vllm-models-pvc   Bound    vllm-models-pv   100Gi      RWX                           10s
The STATUS should show Bound. If it shows Pending, double-check that your PV configuration matches the PVC selector and that the NFS host/path are correct.
Now Kubernetes knows how to access your NFS share. Any pod that mounts vllm-models-pvc gets access to the shared storage.
Step 4: Download the Model (Once!)
This step is the key to the “download once” pattern. We’ll use a Kubernetes Job to download the model to NFS. A Job runs once and completes, it’s not a long-running deployment.
Create the HuggingFace Token Secret
First, create a secret containing your HuggingFace token. Replace <YOUR_HUGGINGFACE_TOKEN> with your actual token:
# hf-secret.yaml
apiVersion: v1
kind: Secret
metadata:
  name: hf-token
  namespace: vllm
type: Opaque
stringData:
  HF_TOKEN: <YOUR_HUGGINGFACE_TOKEN>
Apply the secret:
kubectl apply -f hf-secret.yaml
Deploy the Model Download Job
Now create the job that downloads the model:
# model-download-job.yaml
apiVersion: batch/v1
kind: Job
metadata:
  name: model-download
  namespace: vllm
spec:
  ttlSecondsAfterFinished: 300  # Clean up job after 5 minutes
  template:
    spec:
      restartPolicy: Never
      securityContext:
        runAsUser: 1000
        runAsGroup: 1000
      containers:
        - name: download
          image: python:3.11-slim
          command:
            - /bin/sh
            - -c
            - |
              pip install --target=/tmp/pip huggingface_hub &&
              export PYTHONPATH=/tmp/pip &&
              python -c "from huggingface_hub import snapshot_download; snapshot_download('mistralai/Mistral-7B-Instruct-v0.3', local_dir='/models/Mistral-7B-Instruct-v0.3')"
          env:
            - name: HF_TOKEN
              valueFrom:
                secretKeyRef:
                  name: hf-token
                  key: HF_TOKEN
            - name: HOME
              value: /tmp
            - name: HF_HOME
              value: /tmp/hf_home
          volumeMounts:
            - name: nfs-storage
              mountPath: /models
      volumes:
        - name: nfs-storage
          persistentVolumeClaim:
            claimName: vllm-models-pvc
This job:
- Installs the HuggingFace Hub client
- Downloads Mistral-7B-Instruct-v0.3 to
/models/Mistral-7B-Instruct-v0.3on the NFS share - Uses
local_dirto save files directly (not in HuggingFace’s cache structure) - Runs as a non-root user for security
Apply the job:
kubectl apply -f model-download-job.yaml
Monitor the Download
Watch the job progress:
kubectl logs job/model-download -n vllm -f
You’ll see pip installing huggingface_hub, then progress as the model files download. The download takes approximately 5-10 minutes depending on network conditions.
Wait for the job to complete:
kubectl wait --for=condition=complete job/model-download -n vllm --timeout=15m
Expected output:
job.batch/model-download condition met
Verify the job succeeded:
kubectl get jobs -n vllm
NAME             STATUS     COMPLETIONS   DURATION   AGE
model-download   Complete   1/1           3m         5m
This is the crucial point: This download happens once. Every pod you deploy from now on, today, tomorrow, next month, will use these same model files. No more waiting for downloads on pod restarts.
Step 5: Deploy vLLM
Now we deploy vLLM itself. The pod will mount NFS and load the model directly. No download step from HuggingFace required.
Create the Deployment
# vllm-deployment.yaml
apiVersion: apps/v1
kind: Deployment
metadata:
  name: vllm
  namespace: vllm
  labels:
    app: vllm
spec:
  replicas: 1  # Single replica for this tutorial
  strategy:
    type: RollingUpdate
    rollingUpdate:
      maxSurge: 0        # Delete old pod before creating new (GPU constraint)
      maxUnavailable: 1
  selector:
    matchLabels:
      app: vllm
  template:
    metadata:
      labels:
        app: vllm
    spec:
      tolerations:
        - key: nvidia.com/gpu
          operator: Exists
          effect: NoSchedule
      containers:
        - name: vllm
          image: vllm/vllm-openai:latest
          args:
            - --model
            - /models/Mistral-7B-Instruct-v0.3
            - --served-model-name
            - Mistral-7B-Instruct-v0.3
          ports:
            - containerPort: 8000
              name: http
          env:
            - name: VLLM_PORT
              value: "8000"
            - name: HF_TOKEN
              valueFrom:
                secretKeyRef:
                  name: hf-token
                  key: HF_TOKEN
          volumeMounts:
            - name: model-cache
              mountPath: /models
          resources:
            limits:
              nvidia.com/gpu: 1
            requests:
              nvidia.com/gpu: 1
          readinessProbe:
            httpGet:
              path: /health
              port: 8000
            initialDelaySeconds: 30
            periodSeconds: 10
          livenessProbe:
            httpGet:
              path: /health
              port: 8000
            initialDelaySeconds: 60
            periodSeconds: 30
      volumes:
        - name: model-cache
          persistentVolumeClaim:
            claimName: vllm-models-pvc
Key configuration notes:
replicas: 1: We’re using a single GPU node for this tutorial. Scale this up when you add more GPU nodes.maxSurge: 0: GPU nodes typically have one GPU. This setting ensures the old pod is deleted before the new one is created during updates, since both can’t run simultaneously.tolerations: Allows the pod to schedule on GPU-tainted nodes.nvidia.com/gpu: 1: Requests one GPU for this pod.volumeMounts: Mounts the NFS PVC at/models, where the model files are stored.--model /models/Mistral-7B-Instruct-v0.3: Points vLLM directly to the model on NFS.
A note on container images: This tutorial pulls the vLLM image from Docker Hub for simplicity. For production deployments, mirror the image to DigitalOcean Container Registry (DOCR) and reference it from there. This applies the same “control your dependencies” principle as Docker Hub becomes a one-time source rather than a runtime dependency.
Create the Service
# vllm-service.yaml
apiVersion: v1
kind: Service
metadata:
  name: vllm
  namespace: vllm
  labels:
    app: vllm
spec:
  type: ClusterIP
  ports:
    - port: 8000
      targetPort: 8000
      protocol: TCP
      name: http
  selector:
    app: vllm
Apply both:
kubectl apply -f vllm-deployment.yaml
kubectl apply -f vllm-service.yaml
Wait for the Pod to Be Ready
kubectl wait --for=condition=ready pod -l app=vllm -n vllm --timeout=10m
Check the pod status:
kubectl get pods -n vllm -o wide
Expected output:
NAME                   READY   STATUS    RESTARTS   AGE   IP             NODE
vllm-xxxxxxxxx-xxxxx   1/1     Running   0          2m    10.108.1.123   gpu-h100-xxxxx
Notice what’s not happening here: There’s no download step. vLLM starts, mounts NFS, and loads the model directly into GPU memory.
If the pod had to download the model, you’d be waiting several additional minutes.
Step 6: Test Your Inference Endpoint
Let’s verify everything works by sending requests to your vLLM deployment.
Port-Forward to the Service
Since we’re using a ClusterIP service, we’ll use port-forwarding to access it locally:
kubectl port-forward svc/vllm -n vllm 8000:8000
Keep this running in a terminal. Open another terminal for the following commands.
List Available Models
curl -s http://localhost:8000/v1/models | jq .
Expected output:
{
  "object": "list",
  "data": [
    {
      "id": "Mistral-7B-Instruct-v0.3",
      "object": "model",
      "created": 1234567890,
      "owned_by": "vllm",
      "root": "/models/Mistral-7B-Instruct-v0.3",
      "parent": null,
      "max_model_len": 32768,
      "permission": [...]
    }
  ]
}
Send a Chat Completion Request
curl -s http://localhost:8000/v1/chat/completions \
  -H "Content-Type: application/json" \
  -d '{
    "model": "Mistral-7B-Instruct-v0.3",
    "messages": [{"role": "user", "content": "What is the capital of France?"}],
    "max_tokens": 50
  }' | jq .
Expected output:
{
  "id": "chatcmpl-xxxxxxxxxxxxxxxx",
  "object": "chat.completion",
  "created": 1234567890,
  "model": "Mistral-7B-Instruct-v0.3",
  "choices": [
    {
      "index": 0,
      "message": {
        "role": "assistant",
        "content": "The capital of France is Paris..."
      },
      "finish_reason": "length"
    }
  ],
  "usage": {
    "prompt_tokens": 10,
    "total_tokens": 60,
    "completion_tokens": 50
  }
}
You have a working LLM inference endpoint backed by shared NFS storage.
For production deployments, you’d expose this via Gateway API or a LoadBalancer service instead of port-forwarding. DOKS includes a pre-configured Cilium integration that makes setting up Gateway API straightforward. See How To Route HTTPS Traffic Using Gateway API and Cilium on DigitalOcean Kubernetes for a detailed walkthrough.
For more advanced vLLM deployment strategies and model caching techniques, see vLLM Kubernetes: Model Loading & Caching Strategies.
Keep in mind that this tutorial focuses specifically on model storage. A production LLM deployment involves many other considerations such as authentication, rate limiting, efficient request routing across replicas, observability, and more. All beyond the scope of this guide.
The Scaling Story: What Happens When You Add More GPUs?
This is where the NFS pattern pays off.
Imagine you’ve been running a single vLLM replica and traffic is increasing. You need more capacity.
Scenario: Scale to Multiple Replicas
First, add another GPU node to your cluster through the DigitalOcean Control Panel. Once it’s ready, scale your deployment:
kubectl scale deployment vllm -n vllm --replicas=2
Watch the new pod come up:
kubectl get pods -n vllm -w
NAME                   READY   STATUS              RESTARTS   AGE
vllm-xxxxxxxxx-xxxxx   1/1     Running             0          30m
vllm-xxxxxxxxx-yyyyy   0/1     Pending             0          5s
vllm-xxxxxxxxx-yyyyy   0/1     ContainerCreating   0          10s
vllm-xxxxxxxxx-yyyyy   1/1     Running             0          45s
Notice the timing: The new pod went from Pending to Running in about 45 seconds. That’s the model load time, no several minutes download time.
With the per-pod download approach, this would have taken much longer. The new pod would have downloaded the entire model from HuggingFace while your first pod handled all the traffic alone.
Scenario: Add More GPU Nodes Later
The same principle applies when you add more GPU nodes tomorrow, next week, or next month. The model is already on NFS. New pods have instant access:
- Add a GPU node to your cluster
- Scale your deployment:
kubectl scale deployment vllm -n vllm --replicas=3 - New pod starts and is ready in ~45 seconds
No downloads. No waiting. No bandwidth competition.
For deployments with multiple replicas, you’ll want to put a load balancer in front of vLLM. See the Gateway API tutorial for how to set this up with DOKS. To learn more about Kubernetes storage fundamentals, see How to Use Persistent Volumes in DigitalOcean Kubernetes.
Cleanup
GPU nodes are expensive. When you’re done testing, clean up your resources to avoid unnecessary charges.
Through the DigitalOcean Control Panel:
- Delete your NFS share (Storage > NFS)
- Delete your DOKS cluster (Kubernetes > your cluster > Destroy)
- Delete your VPC (Networking > VPCs > your VPC > Delete)
Delete resources in this order to avoid dependency issues.
Frequently Asked Questions
1. How does NFS compare to other storage options for LLM models?
NFS provides ReadWriteMany access, meaning multiple pods can read the same model files simultaneously. This is essential for horizontal scaling of LLM inference workloads. Block storage options like DigitalOcean Block Storage only support ReadWriteOnce, which limits you to one pod per volume. Object storage like DigitalOcean Spaces could work, but requires additional tooling to mount as a filesystem and typically has higher latency than NFS for model loading operations.
2. Can I use this pattern with other LLM inference frameworks besides vLLM?
Yes. This pattern works with any LLM inference framework that can load models from a filesystem path, including TensorRT-LLM, llama.cpp, and others. The key requirement is that your inference container can mount the NFS PersistentVolumeClaim and read model files from the mounted path. Simply adjust the model path in your deployment configuration to point to the NFS mount location.
3. What happens if my NFS share runs out of space?
DigitalOcean Managed NFS shares can be resized at any time through the Control Panel or API. When you resize, the additional space becomes available immediately without downtime. For this tutorial, we started with 100GB, which is sufficient for Mistral-7B-Instruct-v0.3 (approximately 15GB). Larger models like Llama 70B (140GB+) will require more space. Plan your initial NFS size based on your model requirements, and scale up as needed. See the NFS resize documentation for details.
4. Is there a performance difference between loading from NFS versus local storage?
For model loading operations, NFS performance is typically sufficient because loading happens once per pod startup, not during inference. The model files are read into GPU memory at startup, and subsequent inference operations use the in-memory model, not the NFS share. However, if you’re doing frequent model reloads or checkpointing during training, you may see better performance with local NVMe storage. For inference workloads where models load once and stay in memory, NFS provides the scalability benefits without noticeable performance impact.
5. How do I update or replace a model stored on NFS?
To update a model, you have a few options. First, you can download a new model version to a different directory on the same NFS share (e.g., /models/Mistral-7B-Instruct-v0.4), then update your vLLM deployment to point to the new path. This allows you to test the new model while keeping the old one available for rollback.
Alternatively, you can delete the old model directory and download the new version to the same path. Since the download happens via a Kubernetes Job, you can run the download job again with updated parameters. The NFS share persists across pod restarts, so your model updates remain available.
Conclusion
We’ve gone from “download the model every time a pod starts” to “download once, infer everywhere.”
What you built:
- A model storage pattern you can build on for production LLM deployments
- Shared model storage that scales with your cluster
- No external runtime dependencies as HuggingFace is a one-time source, not a requirement for pod startup
The principle behind this approach, control your dependencies, applies beyond just model storage. External services should be sources for initial acquisition, not runtime dependencies. When your infrastructure needs to respond to failures, traffic spikes, or routine deployments, it should rely only on components you control.
Next Steps
Now that you’ve set up shared model storage with NFS, explore these related resources to build out your production LLM deployment:
- Learn advanced vLLM strategies: Read vLLM Kubernetes: Model Loading & Caching Strategies to explore additional optimization techniques for model loading and caching
- Set up production routing: Configure Gateway API with Cilium on DOKS to expose your vLLM deployment with proper load balancing and TLS termination
- Understand Kubernetes storage: Deepen your knowledge with How to Use Persistent Volumes in DigitalOcean Kubernetes to learn about other storage options and use cases
- Explore DigitalOcean Managed NFS: Review the Managed NFS documentation to understand advanced features like snapshots, resizing, and performance optimization
- Get started with DOKS: If you’re new to DigitalOcean Kubernetes, follow the DOKS Getting Started guide to learn the fundamentals
Ready to deploy your LLM inference workloads? Get started with DigitalOcean Managed Kubernetes and Managed NFS to build scalable, production-ready AI infrastructure. With features like automated backups, high availability, and seamless scaling, DigitalOcean provides the foundation you need for enterprise LLM deployments.
Thanks for learning with the DigitalOcean Community. Check out our offerings for compute, storage, networking, and managed databases.
About the author(s)
A Senior Solutions Architect at DigitalOcean focusing on Cloud Architecture, Kubernetes, Automation and Infrastructure-as-Code.
Anish is a Sr Technical Content Strategist and Team Lead at DigitalOcean with 7+ years of experience as an DevOps SRE at Nutanix and Cloud consultant at AMEX, and technical writing at DOCN, and shipping deep infra and AI inference tutorials that help developers deploy production‑ready applications on DigitalOcean.
Still looking for an answer?
This textbox defaults to using Markdown to format your answer.
You can type !ref in this text area to quickly search our full set of tutorials, documentation & marketplace offerings and insert the link!
 This work is licensed under a Creative Commons Attribution-NonCommercial- ShareAlike 4.0 International License.
Become a contributor for community
Get paid to write technical tutorials and select a tech-focused charity to receive a matching donation.

DigitalOcean Documentation
Full documentation for every DigitalOcean product.

Resources for startups and AI-native businesses
The Wave has everything you need to know about building a business, from raising funding to marketing your product.
The developer cloud
Scale up as you grow — whether you're running one virtual machine or ten thousand.

Start building today
From GPU-powered inference and Kubernetes to managed databases and storage, get everything you need to build, scale, and deploy intelligent applications.
