By Tania Rascia and Lisa Tagliaferri

Introduction
In the Understanding the DOM series, we have discussed the DOM tree and how to access, traverse, add and remove, and modify nodes and elements using the Developer Tools Console.
Although at this point we can now make almost any change we want to the DOM, from a user perspective it is not very helpful because we have only manually triggered changes. By learning about events, we will understand how to tie everything together to make interactive websites.
Events are actions that take place in the browser that can be initiated by either the user or the browser itself. Below are a few examples of common events that can happen on a website:
- The page finishes loading
- The user clicks a button
- The user hovers over a dropdown
- The user submits a form
- The user presses a key on their keyboard
By coding JavaScript responses that execute upon an event, developers can display messages to users, validate data, react to a button click, and many other actions.
In this article, we will go over event handlers, event listeners, and event objects. We’ll also go over three different ways to write code to handle events, and a few of the most common events. By learning about events, you’ll be able to make a more interactive web experience for end users.
Event Handlers and Event Listeners
When a user clicks a button or presses a key, an event is fired. These are called a click event or a keypress event, respectively.
An event handler is a JavaScript function that runs when an event fires.
An event listener attaches a responsive interface to an element, which allows that particular element to wait and “listen” for the given event to fire.
There are three ways to assign events to elements:
- Inline event handlers
- Event handler properties
- Event listeners
We will go over all three methods to ensure that you are familiar with each way an event can be triggered, then discuss the pros and cons of each method.
Inline Event Handler Attributes
To begin learning about event handlers, we’ll first consider the inline event handler. Let’s start with a very basic example that consists of a button element and a p element. We want the user to click the button to change the text content of the p.
Let’s begin with an HTML page with a button in the body. We’ll be referencing a JavaScript file that we’ll add code to in a bit.
<!DOCTYPE html>
<html lang="en-US">

<head>
	<title>Events</title>
</head>

<body>

  <!-- Add button -->
  <button>Click me</button>

  <p>Try to change me.</p>

</body>

<!-- Reference JavaScript file -->
<script src="js/events.js"></script>

</html>
Directly on the button, we will add an attribute called onclick. The attribute value will be a function we create called changeText().
<!DOCTYPE html>
<html lang="en-US">

<head>
	<title>Events</title>
</head>

<body>

	<button onclick="changeText()">Click me</button>

	<p>Try to change me.</p>

</body>

<script src="js/events.js"></script>

</html>
Let’s create our events.js file, which we placed in the js/ directory here. Within it, we will create the changeText() function, which will modify the textContent of the p element.
// Function to modify the text content of the paragraph
const changeText = () => {
	const p = document.querySelector('p');

	p.textContent = "I changed because of an inline event handler.";
}
When you first load the events.html, you’ll see a page that looks like this:

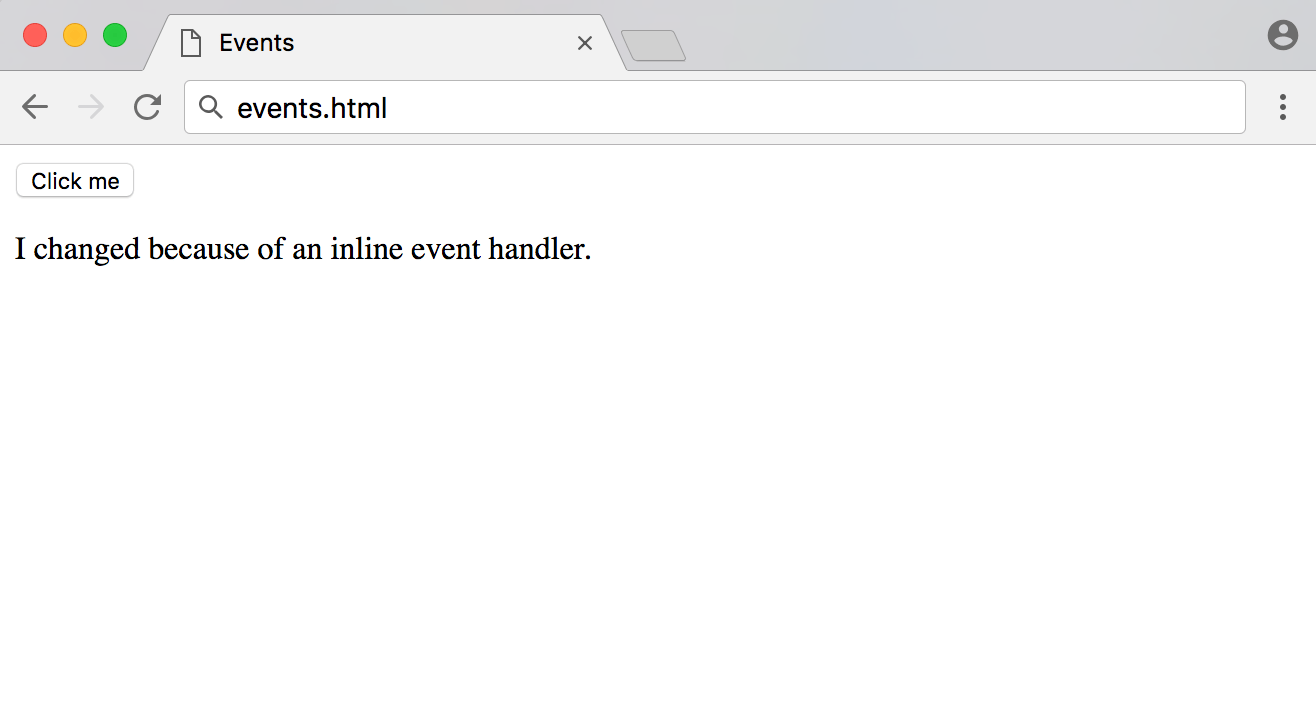
However, when either you or another user clicks on the button, the text of the p tag will change from Try to change me. to I changed because of an inline event handler.:
Inline event handlers are a straightforward way to begin understanding events, but they generally should not be used beyond testing and educational purposes.
You can compare inline event handlers to inline CSS styles on an HTML element. It is much more practical to maintain a separate stylesheet of classes than create inline styles on every element, just as it is more feasible to maintain JavaScript that is handled entirely through a separate script file than add handlers to every element.
Event Handler Properties
The next step up from an inline event handler is the event handler property. This works very similarly to an inline handler, except we’re setting the property of an element in JavaScript instead of the attribute in the HTML.
The setup will be the same here, except we no longer include the onclick="changeText()" in the markup:
...
<body>

	<button>Click me</button>

	<p>I will change.</p>

</body>
...
Our function will remain similar as well, except now we need to access the button element in the JavaScript. We can simply access onclick just as we would access style or id or any other element property, then assign the function reference.
// Function to modify the text content of the paragraph
const changeText = () => {
	const p = document.querySelector('p');

	p.textContent = "I changed because of an event handler property.";
}

// Add event handler as a property of the button element
const button = document.querySelector('button');
button.onclick = changeText;
Note: Event handlers do not follow the camelCase convention that most JavaScript code adheres to. Notice that the code is onclick, not onClick.
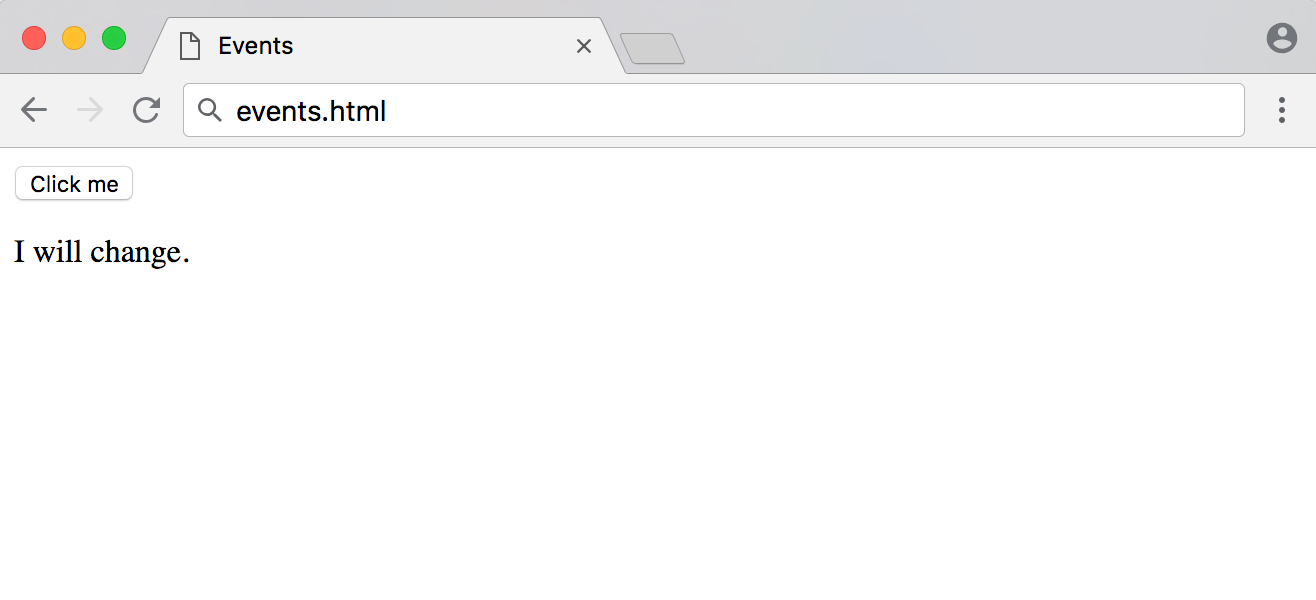
When you first load the page, the browser will display the following:
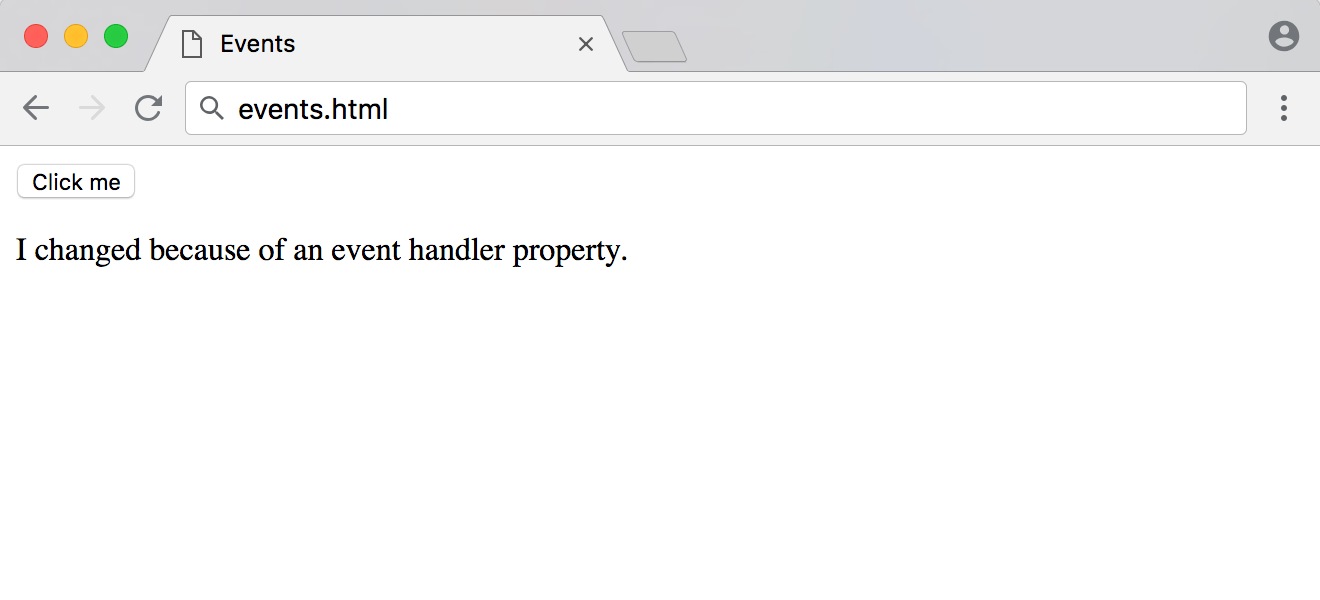
Now when you click the button, it will have a similar effect as before:
Note that when passing a function reference to the onclick property, we do not include parentheses, as we are not invoking the function in that moment, but only passing a reference to it.
The event handler property is slightly more maintainable than the inline handler, but it still suffers from some of the same hurdles. For example, trying to set multiple, separate onclick properties will cause all but the last one to be overwritten, as demonstrated below.
const p = document.querySelector('p');
const button = document.querySelector('button');

const changeText = () => {
	p.textContent = "Will I change?";
}

const alertText = () => {
	alert('Will I alert?');
}

// Events can be overwritten
button.onclick = changeText;
button.onclick = alertText;
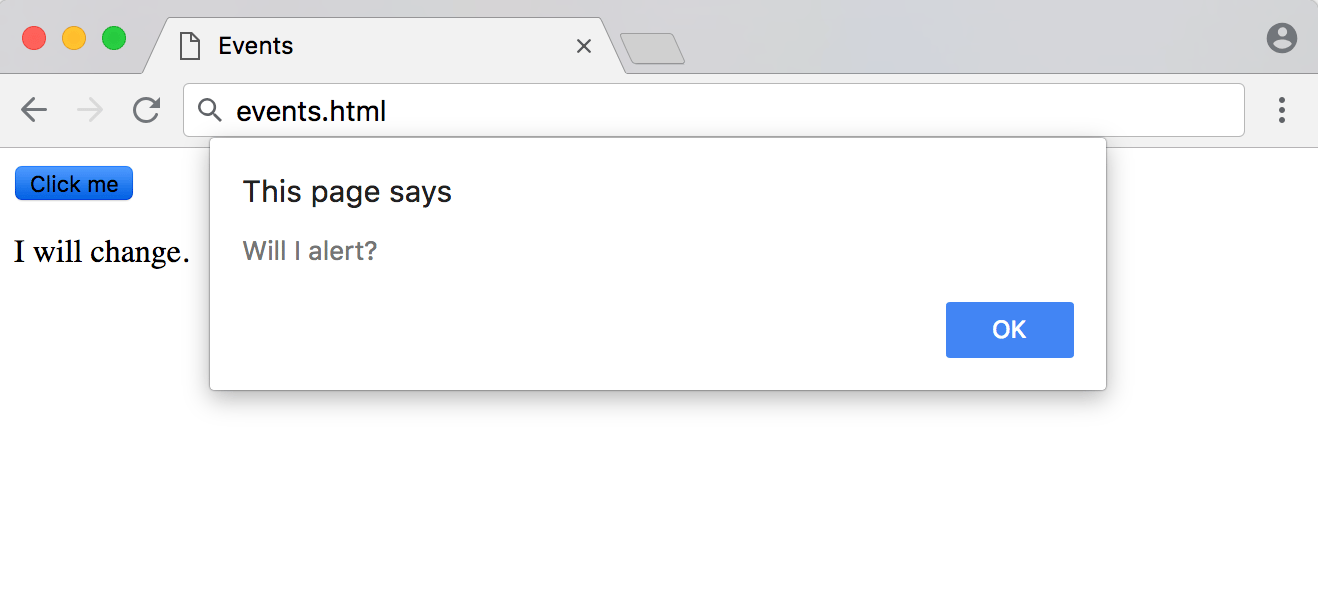
In the above example, the button click would only display an alert, and not change the p text, since the alert() code was the last one added to the property.
With an understanding of both inline event handlers and event handler properties, let’s move onto event listeners.
Event Listeners
The latest addition to JavaScript event handlers are event listeners. An event listener watches for an event on an element. Instead of assigning the event directly to a property on the element, we will use the addEventListener() method to listen for the event.
addEventListener() takes two mandatory parameters — the event it is to be listening for, and the listener callback function.
The HTML for our event listener will be the same as the previous example.
...
	<button>Click me</button>

	<p>I will change.</p>
...
We will still be using the same changeText() function as before. We’ll attach the addEventListener() method to the button.
// Function to modify the text content of the paragraph
const changeText = () => {
const p = document.querySelector('p');
p.textContent = "I changed because of an event listener.";
}
// Listen for click event
const button = document.querySelector('button');
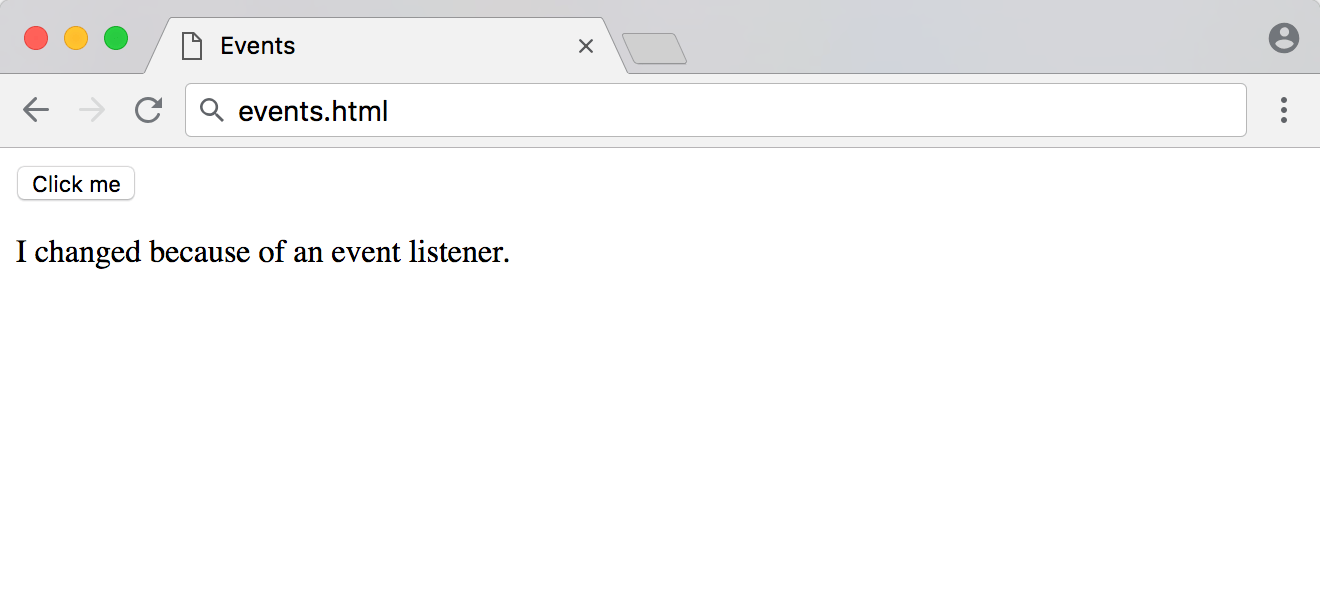
button.addEventListener('click', changeText);
Notice that with the first two methods, a click event was referred to as onclick, but with event listeners it is referred to as click. Every event listener drops the on from the word. In the next section, we will look at more examples of other types of events.
When you reload the page with the JavaScript code above, you’ll receive the following output:
At first look, event listeners seem very similar to event handler properties, but they have a few advantages. We can set multiple event listeners on the same element, as demonstrated in the example below.
const p = document.querySelector('p');
const button = document.querySelector('button');

const changeText = () => {
	p.textContent = "Will I change?";
}

const alertText = () => {
	alert('Will I alert?');
}

// Multiple listeners can be added to the same event and element
button.addEventListener('click', changeText);
button.addEventListener('click', alertText);
In this example, both events will fire, providing the user with both an alert and modified text once clicking out of the alert.
Often, anonymous functions will be used instead of a function reference on an event listener. Anonymous functions are functions that are not named.
// An anonymous function on an event listener
button.addEventListener('click', () => {
	p.textContent = "Will I change?";
});
It is also possible to use the removeEventListener() function to remove one or all events from an element.
// Remove alert function from button element
button.removeEventListener('click', alertText);
Furthermore, you can use addEventListener() on the document and window object.
Event listeners are currently the most common and preferred way to handle events in JavaScript.
Common Events
We have learned about inline event handlers, event handler properties, and event listeners using the click event, but there are many more events in JavaScript. We will go over a few of the most common events below.
Mouse Events
Mouse events are among the most frequently used events. They refer to events that involve clicking buttons on the mouse or hovering and moving the mouse pointer. These events also correspond to the equivalent action on a touch device.
| Event | Description |
|---|---|
click |
Fires when the mouse is pressed and released on an element |
dblclick |
Fires when an element is clicked twice |
mouseenter |
Fires when a pointer enters an element |
mouseleave |
Fires when a pointer leaves an element |
mousemove |
Fires every time a pointer moves inside an element |
A click is a compound event that is comprised of combined mousedown and mouseup events, which fire when the mouse button is pressed down or lifted, respectively.
Using mouseenter and mouseleave in tandem recreates a hover effect that lasts as long as a mouse pointer is on the element.
Form Events
Form events are actions that pertain to forms, such as input elements being selected or unselected, and forms being submitted.
| Event | Description |
|---|---|
submit |
Fires when a form is submitted |
focus |
Fires when an element (such as an input) receives focus |
blur |
Fires when an element loses focus |
Focus is achieved when an element is selected, for example, through a mouse click or navigating to it via the TAB key.
JavaScript is often used to submit forms and send the values through to a backend language. The advantage of using JavaScript to send forms is that it does not require a page reload to submit the form, and JavaScript can be used to validate required input fields.
Keyboard Events
Keyboard events are used for handling keyboard actions, such as pressing a key, lifting a key, and holding down a key.
| Event | Description |
|---|---|
keydown |
Fires once when a key is pressed |
keyup |
Fires once when a key is released |
keypress |
Fires continuously while a key is pressed |
Although they look similar, keydown and keypress events do not access all the exact same keys. While keydown will acknowledge every key that is pressed, keypress will omit keys that do not produce a character, such as SHIFT, ALT, or DELETE.
Keyboard events have specific properties for accessing individual keys.
If a parameter, known as an event object, is passed through to the event listener, we can access more information about the action that took place. Two properties that pertain to keyboard objects include key and code.
For example, if the user presses the letter a key on their keyboard, the following properties pertaining to that key will surface:
| Property | Description | Example |
|---|---|---|
key |
Represents the character name | a |
code |
Represents the physical key being pressed | KeyA |
To show how to gather that information via the JavaScript Console, we can write the following lines of code.
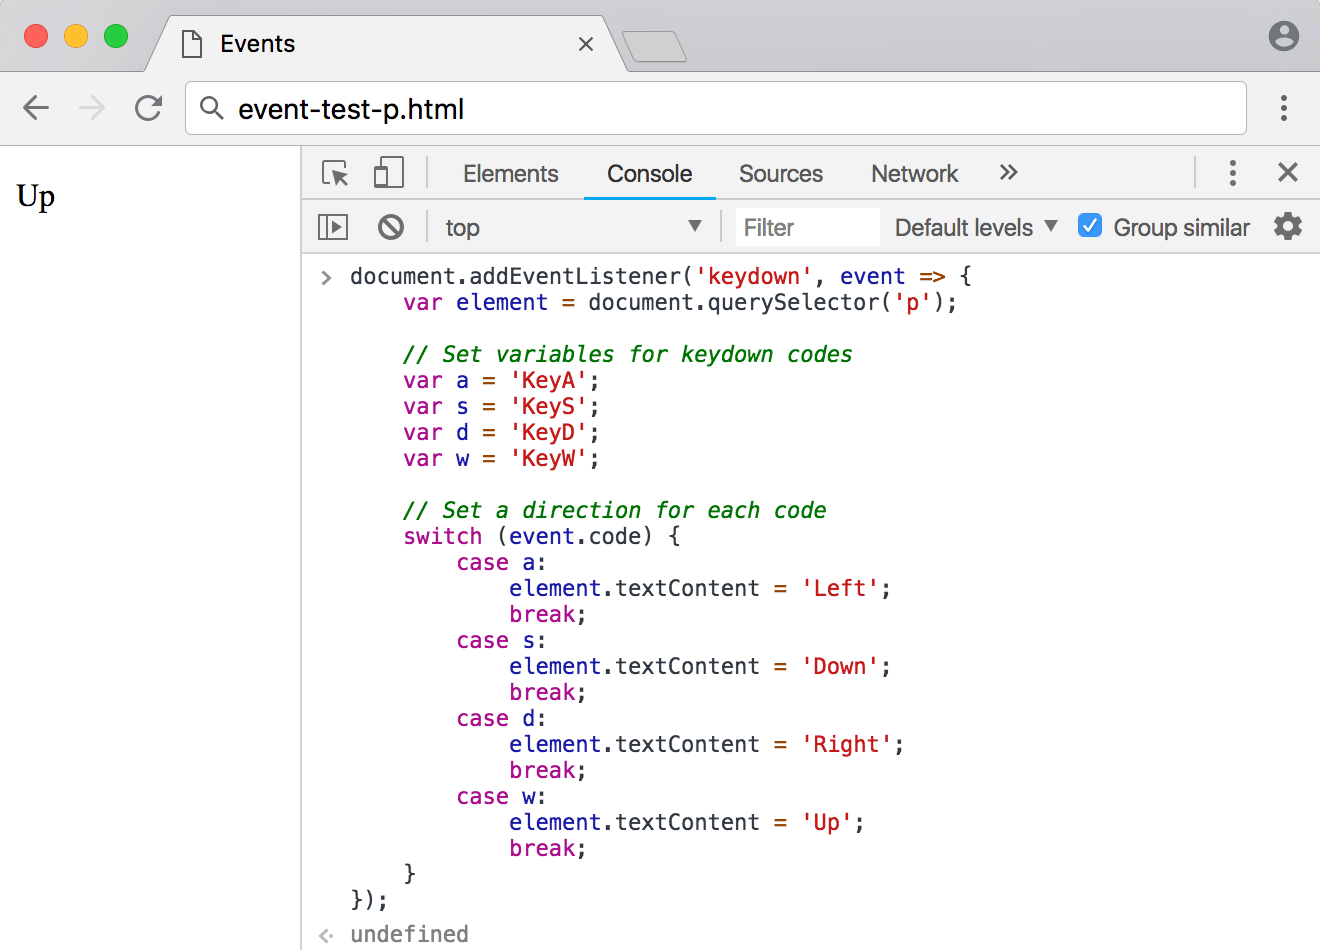
// Test the key and code properties
document.addEventListener('keydown', event => {
	console.log('key: ' + event.key);
	console.log('code: ' + event.code);
});
Once we press ENTER on the Console, we can now press a key on the keyboard, in this example, we’ll press a.
Outputkey: a
code: KeyA
The key property is the name of the character, which can change — for example, pressing a with SHIFT would result in a key of A. The code property represents the physical key on the keyboard.
To learn more, you can view the complete list of events on the Mozilla Developer Network.
Event Objects
The Event object consists of properties and methods that all events can access. In addition to the generic Event object, each type of event has its own extensions, such as KeyboardEvent and MouseEvent.
The Event object is passed through a listener function as a parameter. It is usually written as event or e. We can access the code property of the keydown event to replicate the keyboard controls of a PC game.
To try it out, create a basic HTML file with <p> tags and load it into a browser.
<!DOCTYPE html>
<html lang="en-US">
<head>
    <title>Events</title>
</head>
<body>

  <p></p>

</body>
</html>
Then, type the following JavaScript code into your browser’s Developer Console.
// Pass an event through to a listener
document.addEventListener('keydown', event => {
	var element = document.querySelector('p');

	// Set variables for keydown codes
	var a = 'KeyA';
	var s = 'KeyS';
	var d = 'KeyD';
	var w = 'KeyW';

	// Set a direction for each code
	switch (event.code) {
		case a:
			element.textContent = 'Left';
			break;
		case s:
			element.textContent = 'Down';
			break;
		case d:
			element.textContent = 'Right';
			break;
		case w:
			element.textContent = 'Up';
			break;
	}
});
When you press one of the keys — a, s, d, or w — you’ll see output similar to the following:
From here, you can continue to develop how the browser will respond and to the user pressing those keys, and can create a more dynamic website.
Next, we’ll go over one of the most frequently used event properties: the target property. In the following example, we have three div elements inside one section.
<!DOCTYPE html>
<html lang="en-US">
<head>
    <title>Events</title>
</head>
<body>

  <section>
  	<div id="one">One</div>
  	<div id="two">Two</div>
  	<div id="three">Three</div>
  </section>

</body>
</html>
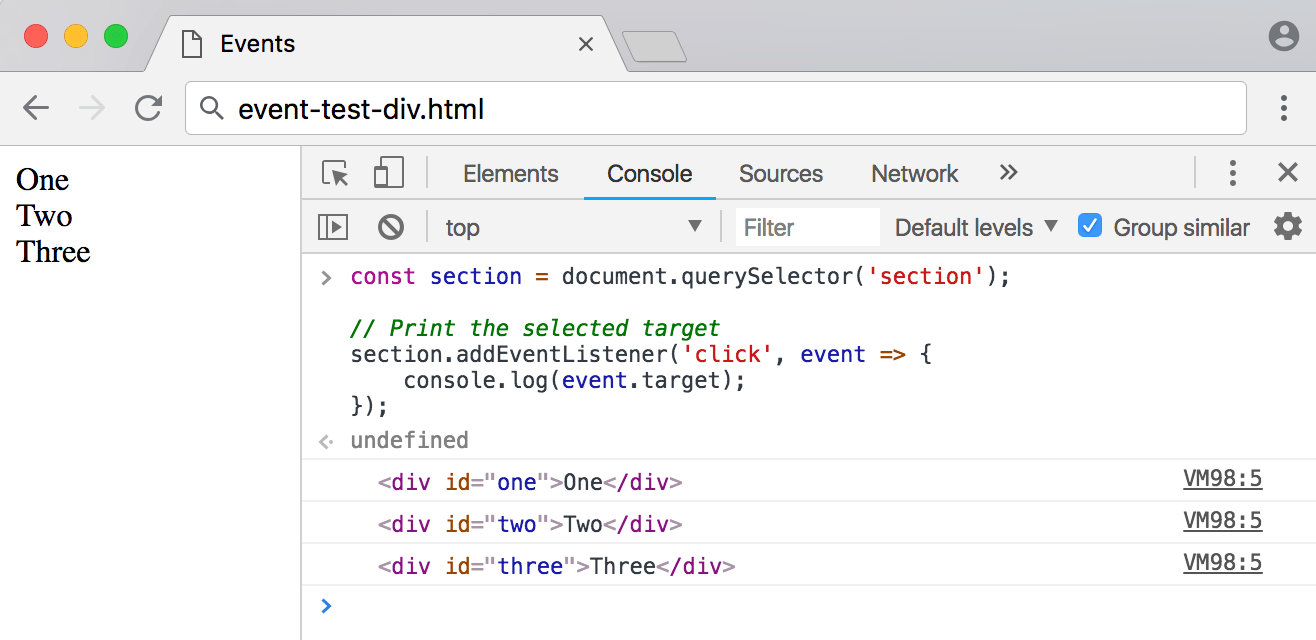
Using event.target with JavaScript in our browser’s Developer Console, we can place one event listener on the outer section element and get the most deeply nested element.
const section = document.querySelector('section');

// Print the selected target
section.addEventListener('click', event => {
	console.log(event.target);
});
Clicking on any one of those elements will return output of the relevant specific element to the Console using event.target. This is extremely useful, as it allows you to place only one event listener that can be used to access many nested elements.
With the Event object, we can set up responses related to all events, including generic events and more specific extensions.
Conclusion
Events are actions that take place on a website, such as clicking, hovering, submitting a form, loading a page, or pressing a key on the keyboard. JavaScript becomes truly interactive and dynamic when we are able to make websites respond to actions the user has taken.
In this tutorial, we learned what events are, examples of common events, the difference between event handlers and event listeners, and how to access the Event object. Using this knowledge, you will be able to begin making dynamic websites and applications.
Thanks for learning with the DigitalOcean Community. Check out our offerings for compute, storage, networking, and managed databases.
Tutorial Series: Understanding the DOM — Document Object Model
The Document Object Model, usually referred to as the DOM, is an essential part of making websites interactive. It is an interface that allows a programming language to manipulate the content, structure, and style of a website. JavaScript is the client-side scripting language that connects to the DOM in an internet browser.
Browse Series: 8 tutorials
Tutorial Series: How To Code in JavaScript
JavaScript is a high-level, object-based, dynamic scripting language popular as a tool for making webpages interactive.
Browse Series: 37 tutorials
About the author(s)
Software engineer and open source creator
Community and Developer Education expert. Former Senior Manager, Community at DigitalOcean. Focused on topics including Ubuntu 22.04, Ubuntu 20.04, Python, Django, and more.
Still looking for an answer?
This textbox defaults to using Markdown to format your answer.
You can type !ref in this text area to quickly search our full set of tutorials, documentation & marketplace offerings and insert the link!
These tutorials are absolutely perfect in showing what JavaScript is all about. I now understand the DOM and how JavaScript can interact with it to make my web pages more dynamic! Thank you. this was a great ride!
A short time very well invested. Thank you!
These tutorials are the clearest and most accessible I have found, and in my experience the most efficient. This series has consolidated concepts I had come across previously in various fragments. I’ve learned a lot in a short time. Thank you very much.
Great explanations.
It would be great to differentiate between browser events and JS events. They are different conceptually though work very similarly. Also a providing concepts around pure JS events, e.g. on the server using Node.js would also help to visualize how JS events work.
To summarize, client-side events in JavaScript are interactions that happen within the user’s browser and are handled using JavaScript code executed in the browser. Server-side events, often facilitated by WebSockets, involve events sent from the server to the client to provide real-time updates or notifications.
 This work is licensed under a Creative Commons Attribution-NonCommercial- ShareAlike 4.0 International License.
Become a contributor for community
Get paid to write technical tutorials and select a tech-focused charity to receive a matching donation.

DigitalOcean Documentation
Full documentation for every DigitalOcean product.

Resources for startups and AI-native businesses
The Wave has everything you need to know about building a business, from raising funding to marketing your product.
The developer cloud
Scale up as you grow — whether you're running one virtual machine or ten thousand.

Start building today
From GPU-powered inference and Kubernetes to managed databases and storage, get everything you need to build, scale, and deploy intelligent applications.
