
Introduction
Apache Tomcat is an application server that can be used to serve Java applications to web users. It is an open implementation of the Java Servlet and JavaServer Pages specs that were developed by Sun Microsystems.
If you develop Java applications, Tomcat is a quick and easy way to serve them in a full server environment specifically designed for that purpose.
In this guide, we will install Tomcat and do some basic configuration on a Debian 7 VPS. To complete this tutorial, you will have to have a normal user with sudo privileges. Follow this guide to learn how to create users on a Debian system.
Install Apache Tomcat
In this guide, we will install Tomcat version 7 and its associated packages. Luckily, these are included in the default Debian repositories.
To get the basic package, we can update our package source list and then install the main package:
sudo apt-get update
sudo apt-get install tomcat7
This is all we need to do to get to the default Tomcat page. Our installation is not complete yet, but you can take a look at the default Tomcat page by going to your IP address or domain followed by :8080 in your web browser:
<pre> <span class=“highlight”>your_domain_or_ip</span>:8080 </pre>

In order to take advantage of more of Tomcat’s features, we will install some additional Tomcat packages.
These will allow us to use a web interface to control Tomcat. It will install some documentation and examples that we can also access through the web interface as well.
sudo apt-get install tomcat7-admin tomcat7-examples tomcat7-docs
Install Java Development Tools
In order to use Tomcat to develop Java applications on your server, you will need to download and install a few things.
The first thing we need to do is install a compatible Java Development Kit. We can install the one that Debian selected as default with the following command:
sudo apt-get install default-jdk
This will install openjdk-6-jdk which will work well in our environment.
The Tomcat documentation also suggests that you install Apache Ant, which is a build tool for Java applications, and a version control system of some sort. We will choose git:
sudo apt-get install ant git
These will help you build your Java applications and keep the code organized.
Configure Tomcat Web Interface
Before we can begin using some of the features we installed, we need to configure our server with a user and password. Tomcat does not do this by default for security reasons.
The configuration is very simple. We need to edit a file called tomcat-users.xml. Open it with an editor like this:
sudo nano /etc/tomcat7/tomcat-users.xml
Inside, you will find a heavily commented user configuration file. In fact, the only portions of the file that are not comments are:
<tomcat-users>
</tomcat-users>
As you might expect, we need to define a user between these two lines. We will give this user access to the web interfaces. We can define a user like this:
<pre> <tomcat-users> <user username=“<span class=“highlight”>admin</span>” password=“<span class=“highlight”>password</span>” roles=“manager-gui,admin-gui”/> </tomcat-users> </pre>
Choose whatever username and password you would like. This will provide you with login credentials that allow you to access the management panels.
Save and close the file when you are finished.
We should restart Tomcat in order to implement our changes:
sudo service tomcat7 restart
Test the Web Interface
Once you have installed Tomcat and configured the user login, you can access the main page by going to your server IP address or domain name followed by :8080 like this:
<pre> <span class=“highlight”>your_domain_or_ip</span>:8080 </pre>
You will see the same default Tomcat page that you saw earlier (if you checked):
Because we have installed and configured more components, however, we will have access to more functionality.
You can access the Tomcat documentation in the browser by clicking the link you see on the page or accessing this page:
<pre> <span class=“highlight”>your_domain_or_ip</span>:8080/docs </pre>

This should be your first stop when you have questions about how to do something with Tomcat.
We also now have access to some example applications that are implemented using a few different technologies. These can be reached from a link on the same initial landing page, or by visiting:
<pre> <span class=“highlight”>your_domain_or_ip</span>:8080/examples </pre>

Clicking through these items gives us an idea of how different functionality can be implemented in this environment. Most examples include the source code that you can use for reference.
The main functionalities that you will want access to are the manager webapp and the host-manager webapp.
Again, you can access those from the initial landing page, or by visiting:
<pre> <span class=“highlight”>your_domain_or_ip</span>:8080/manager/html </pre>
And:
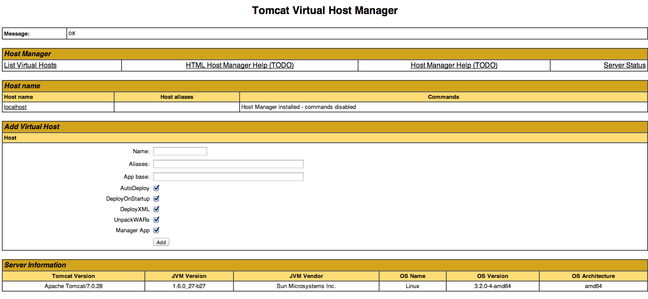
<pre> <span class=“highlight”>your_domain_or_ip</span>:8080/host-manager/html </pre>
The first site will allow you to manage your Java applications. It will let you start, stop, deploy, and reload your apps easily. It can also find memory leaks caused by your running applications:

From the other page, you can test, adjust, and add virtual hosts in order to server your applications. This allows you to set up access to your deployed apps easily:
Conclusion
As you can see, Tomcat provides a nice platform for controlling and serving your Java applications in a web environment. You can easily deploy .war files and have them up and running in very little time.
<div class=“author”>By Justin Ellingwood</div>
Thanks for learning with the DigitalOcean Community. Check out our offerings for compute, storage, networking, and managed databases.
About the author
Former Senior Technical Writer at DigitalOcean, specializing in DevOps topics across multiple Linux distributions, including Ubuntu 18.04, 20.04, 22.04, as well as Debian 10 and 11.
Still looking for an answer?
This textbox defaults to using Markdown to format your answer.
You can type !ref in this text area to quickly search our full set of tutorials, documentation & marketplace offerings and insert the link!
Do u know how can i install oracle java in debian? Thank for the help pages!
Does anyone know how to run a java web app with mysql in debian on digitalocean?
If Tomcat not responding after en web browser:
http://stackoverflow.com/questions/26431922/tomcat7-starts-too-late-on-ubuntu-14-04-x64-digitalocean
Thanks for this tutorial. I followed the instructions and managed to get tomcat7 working. However, I think the roles should be defined in /etc/tomcat7/tomcat-users.xml too.
<tomcat-users>
    <role rolename="manager-gui"/>
    <role rolename="admin-gui"/>
    <user username="admin" password="password" roles="manager-gui,admin-gui"/>
</tomcat-users>
JAVA_HOME is already declared in /etc/init.d/tomcat7, but just in case, I set it globally in /etc/profile.
export JAVA_HOME=/usr/lib/jvm/default-java
Followed instructions to the “T”. IP_ADDRESS:8080 worked after initial install. But upon installing the JDK, nothing works. Start and stop works fine. The pages just won’t load. Any ideas why?
-AOS.
This is the most complete and easy to follow instructions. I’m new to Linux and Raspberry PI. I had installed Apache/Tomcat and it did have Docs, Examples and Manager. Now all is working. Thank you.
 This work is licensed under a Creative Commons Attribution-NonCommercial- ShareAlike 4.0 International License.
Become a contributor for community
Get paid to write technical tutorials and select a tech-focused charity to receive a matching donation.

DigitalOcean Documentation
Full documentation for every DigitalOcean product.

Resources for startups and AI-native businesses
The Wave has everything you need to know about building a business, from raising funding to marketing your product.
The developer cloud
Scale up as you grow — whether you're running one virtual machine or ten thousand.

Get started for free
Sign up and get $200 in credit for your first 60 days with DigitalOcean.*

*This promotional offer applies to new accounts only.