By Cristian Marius Tiutiu, Bikram Gupta and Easha Abid

Introduction
Just like any other setup, the data in a Kubernetes cluster can be at risk of getting lost. To prevent serious issues, it’s essential to have a data recovery plan at hand. A simple and effective way to do this is by making backups, ensuring that your data is safe in case of any unexpected events. Backups can be run one-off or scheduled. It’s a good idea to have scheduled backups to ensure you have a recent backup to easily fall back to.
Velero - an open-source tool designed to help backup and restore operations for Kubernetes clusters. It is ideal for the disaster recovery use case, as well as for snapshotting your application state before performing system operations on your cluster, like upgrades. For more details on this topic, please visit the How Velero Works official page.
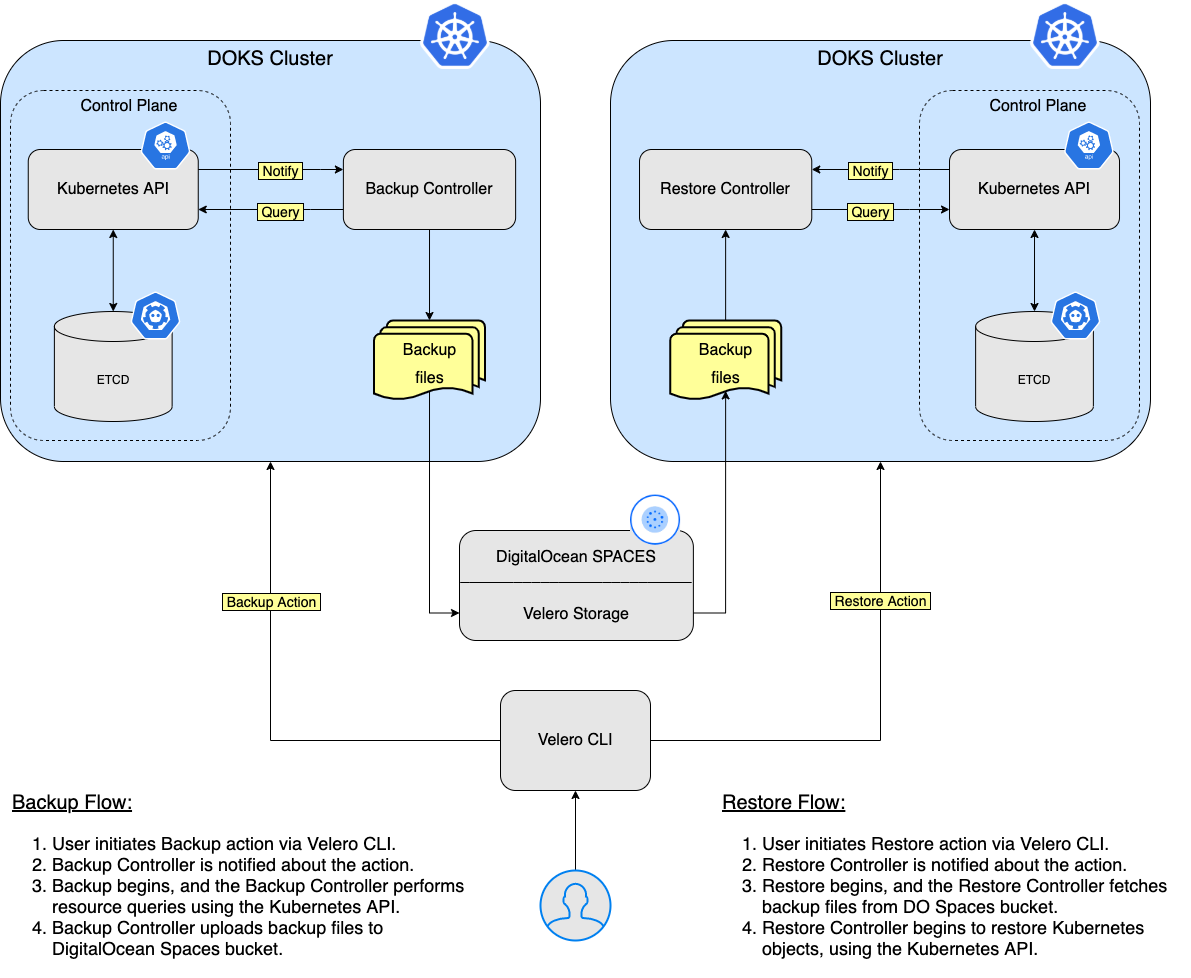
In this tutorial, you will learn how to deploy Velero to your Kubernetes cluster, create backups, and recover from a backup if something goes wrong. You can back up your entire cluster or optionally choose a namespace or label selector to back up your cluster.
Prerequisites
To complete this tutorial, you need the following:
- A DO Spaces Bucket and access keys. Save the access and secret keys in a safe place for later use.
- A DigitalOcean API token for Velero to use.
- A Git client, to clone the Starter Kit repository.
- Helm for managing Velero releases and upgrades.
- Doctl for DigitalOcean API interaction.
- Kubectl for Kubernetes interaction.
- Velero client to manage Velero backups.
Step 1 - Installing Velero using Helm
In this step, you will deploy Velero and all the required components, so that it will be able to perform backups for your Kubernetes cluster resources (PV’s as well). Backup data will be stored in the DO Spaces bucket created earlier in the Prerequisites section.
First, clone the Starter Kit Git repository and change the directory to your local copy:
git clone https://github.com/digitalocean/Kubernetes-Starter-Kit-Developers.git

cd Kubernetes-Starter-Kit-Developers
Next, add the Helm repository and list the available charts:
helm repo add vmware-tanzu https://vmware-tanzu.github.io/helm-charts

helm repo update vmware-tanzu

helm search repo vmware-tanzu
The output looks similar to the following:
NAME                    CHART VERSION   APP VERSION     DESCRIPTION
vmware-tanzu/velero     2.29.7          1.8.1           A Helm chart for velero
The chart of interest is vmware-tanzu/velero, which will install Velero on the cluster. Please visit the velero-chart page for more details about this chart.
Then, open and inspect the Velero Helm values file provided in the Starter Kit repository using an editor of your choice (preferably with YAML lint support).
VELERO_CHART_VERSION="2.29.7"

code 05-setup-backup-restore/assets/manifests/velero-values-v${VELERO_CHART_VERSION}.yaml
Next, please replace the <> placeholders accordingly for your DO Spaces Velero bucket (like name, region, and secrets). Make sure that you provide your DigitalOcean API token as well (DIGITALOCEAN_TOKEN key).
Finally, install Velero using helm:
VELERO_CHART_VERSION="2.29.7"

helm install velero vmware-tanzu/velero --version "${VELERO_CHART_VERSION}" \
  --namespace velero \
  --create-namespace \
  -f 05-setup-backup-restore/assets/manifests/velero-values-v${VELERO_CHART_VERSION}.yaml
A specific version of the Velero Helm chart is used. In this case 2.29.7 is picked, which maps to the 1.8.1 version of the application (see the output from Step 2.). It’s a good practice in general to lock on a specific version. This helps to have predictable results and allows versioning control via Git.
Now, check your Velero deployment by running:
helm ls -n velero
The output looks similar to the following (STATUS column should display deployed):
NAME    NAMESPACE       REVISION        UPDATED                                 STATUS          CHART           APP VERSION
velero  velero          1               2022-06-09 08:38:24.868664 +0300 EEST   deployed        velero-2.29.7   1.8.1
Next, verify that Velero is up and running:
kubectl get deployment velero -n velero
The output looks similar to the following (deployment pods must be in the Ready state):
NAME     READY   UP-TO-DATE   AVAILABLE   AGE
velero   1/1     1            1           67s
If you’re interested in looking further, you can view Velero’s server-side components:
kubectl -n velero get all
Explore Velero CLI help pages to see what commands and sub-commands are available. You can get help for each by using the --help flag:
-
List all the available commands for
Velero:velero --help -
List
backupcommand options forVelero:velero backup --help
Velero uses several CRDs (Custom Resource Definitions) to represent its resources like backups, backup schedules, etc. You’ll discover each in the next steps of the tutorial, along with some basic examples.
Step 2 - Namespace Backup and Restore Example
In this step, you will learn how to perform a one-time backup for an entire namespace from your DOKS cluster and restore it afterward making sure that all the resources are recreated. The namespace in question is ambassador.
Creating the Ambassador Namespace Backup
First, initiate the backup:
velero backup create ambassador-backup --include-namespaces ambassador
Next, check that the backup was created:
velero backup get
The output looks similar to:
NAME                                       STATUS      ERRORS   WARNINGS   CREATED                          EXPIRES   STORAGE LOCATION   SELECTOR
ambassador-backup                          Completed   0        0          2021-08-25 19:33:03 +0300 EEST   29d       default            <none>
Then, after a few moments, you can inspect it:
velero backup describe ambassador-backup --details
The output looks similar to:
Name:         ambassador-backup
Namespace:    velero
Labels:       velero.io/storage-location=default
Annotations:  velero.io/source-cluster-k8s-gitversion=v1.21.2
              velero.io/source-cluster-k8s-major-version=1
              velero.io/source-cluster-k8s-minor-version=21

Phase:  Completed

Errors:    0
Warnings:  0

Namespaces:
  Included:  ambassador
  Excluded:  <none>
  ...
-
Look for the
Phaseline. It should sayCompleted. -
Check that no errors are reported as well.
-
A new Kubernetes backup object is created:
~ kubectl get backup/ambassador-backup -n velero -o yaml

apiVersion: velero.io/v1
kind: Backup
metadata:
annotations:
velero.io/source-cluster-k8s-gitversion: v1.21.2
velero.io/source-cluster-k8s-major-version: "1"
velero.io/source-cluster-k8s-minor-version: "21"
...
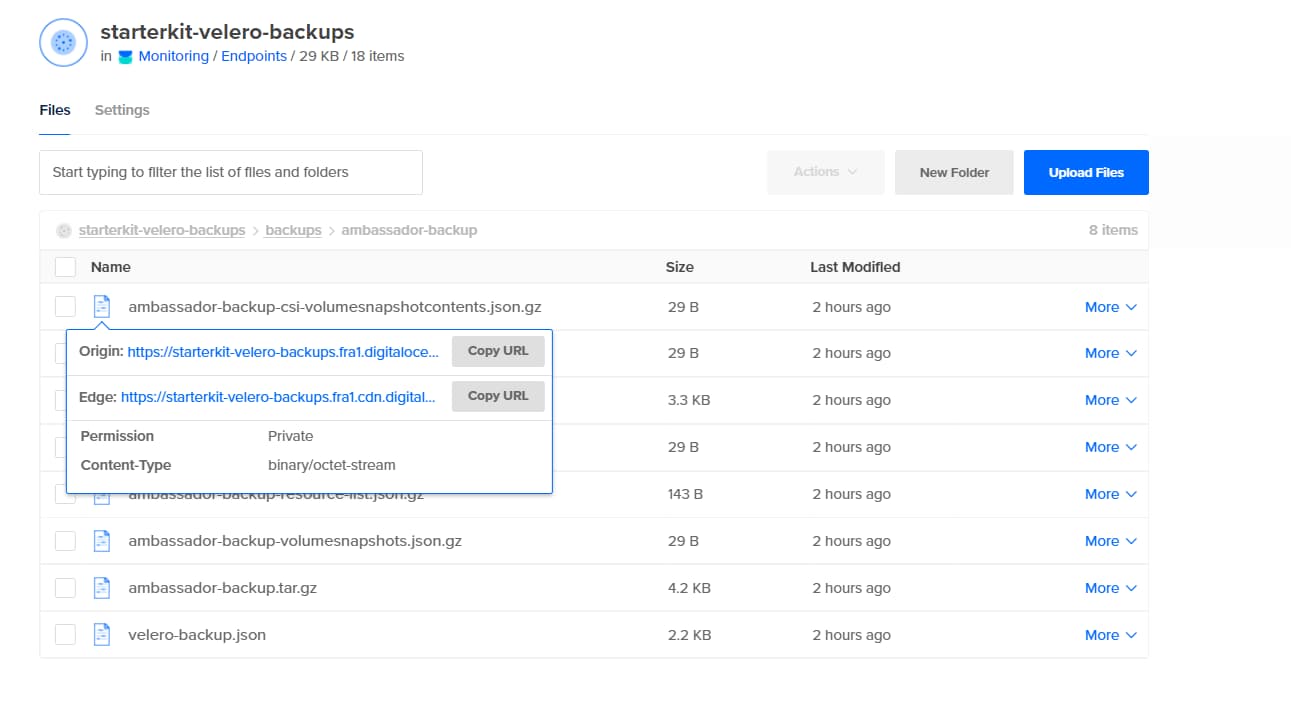
Finally, take a look at the DO Spaces bucket and check there’s a new folder named backups which contains the assets created for your ambassador-backup:
Deleting the Ambassador Namespace and Resources
First, simulate a disaster by intentionally deleting the ambassador namespace:
kubectl delete namespace ambassador
Next, check that the namespace was deleted (namespaces listing should not print ambassador):
kubectl get namespaces
Finally, verify that the echo and quote backend services endpoint is DOWN. Please refer to Creating the Ambassador Edge Stack Backend Services regarding the backend applications used in the Starter Kit tutorial. You can use curl to test (or you can use your web browser):
curl -Li http://quote.starter-kit.online/quote/

curl -Li http://echo.starter-kit.online/echo/
Restoring the Ambassador Namespace Backup
Restore the ambassador-backup:
velero restore create --from-backup ambassador-backup
Important: When you delete the ambassador namespace, the load balancer resource associated with the ambassador service will be deleted as well. So, when you restore the ambassador service, the load balancer will be recreated by DigitalOcean. The issue here is that you will get a NEW IP address for your load balancer, so you will need to adjust the A records for getting traffic into your domains hosted on the cluster.
Checking the Ambassador Namespace Restoration
To verify the restoration of ambassador namespace, check the Phase line from the ambassador-backup restore command output. It should say Completed (also, please take note of the Warnings section - it tells if something went wrong):
velero restore describe ambassador-backup
Next, verify that all the resources were restored for the ambassador namespace. Look for the ambassador pods, services, and deployments.
kubectl get all --namespace ambassador
The output looks similar to:
NAME                                    READY   STATUS    RESTARTS   AGE
pod/ambassador-5bdc64f9f6-9qnz6         1/1     Running   0          18h
pod/ambassador-5bdc64f9f6-twgxb         1/1     Running   0          18h
pod/ambassador-agent-bcdd8ccc8-8pcwg    1/1     Running   0          18h
pod/ambassador-redis-64b7c668b9-jzxb5   1/1     Running   0          18h

NAME                       TYPE           CLUSTER-IP       EXTERNAL-IP      PORT(S)                      AGE
service/ambassador         LoadBalancer   10.245.74.214    159.89.215.200   80:32091/TCP,443:31423/TCP   18h
service/ambassador-admin   ClusterIP      10.245.204.189   <none>           8877/TCP,8005/TCP            18h
service/ambassador-redis   ClusterIP      10.245.180.25    <none>           6379/TCP                     18h

NAME                               READY   UP-TO-DATE   AVAILABLE   AGE
deployment.apps/ambassador         2/2     2            2           18h
deployment.apps/ambassador-agent   1/1     1            1           18h
deployment.apps/ambassador-redis   1/1     1            1           18h

NAME                                          DESIRED   CURRENT   READY   AGE
replicaset.apps/ambassador-5bdc64f9f6         2         2         2       18h
replicaset.apps/ambassador-agent-bcdd8ccc8    1         1         1       18h
replicaset.apps/ambassador-redis-64b7c668b9   1         1         1       18h
Get ambassador hosts:
kubectl get hosts -n ambassador
The output looks similar to:
NAME         HOSTNAME                   STATE   PHASE COMPLETED   PHASE PENDING   AGE
echo-host    echo.starter-kit.online    Ready                                     11m
quote-host   quote.starter-kit.online   Ready                                     11m
STATE should be Ready and the HOSTNAME column should point to the fully qualified hostname.
Get ambassador mappings:
kubectl get mappings -n ambassador
The output looks similar to (notice the echo-backend which is mapped to the echo.starter-kit.online host and /echo/ source prefix, same for quote-backend):
NAME                          SOURCE HOST                SOURCE PREFIX                               DEST SERVICE     STATE   REASON
ambassador-devportal                                     /documentation/                             127.0.0.1:8500
ambassador-devportal-api                                 /openapi/                                   127.0.0.1:8500
ambassador-devportal-assets                              /documentation/(assets|styles)/(.*)(.css)   127.0.0.1:8500
ambassador-devportal-demo                                /docs/                                      127.0.0.1:8500
echo-backend                  echo.starter-kit.online    /echo/                                      echo.backend
quote-backend                 quote.starter-kit.online   /quote/                                     quote.backend
Finally, after reconfiguring your load balancer and DigitalOcean domain settings, please verify that the echo and quote backend services endpoint is UP. Refer to Creating the Ambassador Edge Stack Backend Services.
curl -Li https://quote.starter-kit.online/quote/

curl -Li https://echo.starter-kit.online/echo/
In the next step, you will simulate a disaster by intentionally deleting your DOKS cluster.
Step 3 - Backup and Restore Whole Cluster Example
In this step, you will simulate a disaster recovery scenario. The whole DOKS cluster will be deleted and then restored from a previous backup.
Creating the DOKS Cluster Backup
First, create a backup for the whole DOKS cluster:
velero backup create all-cluster-backup
Next, check that the backup was created and it’s not reporting any errors. The following command lists all the available backups:
velero backup get
The output looks similar to:
NAME                                       STATUS      ERRORS   WARNINGS   CREATED                          EXPIRES   STORAGE LOCATION   SELECTOR
all-cluster-backup                         Completed   0        0          2021-08-25 19:43:03 +0300 EEST   29d       default            <none>
Finally, inspect the backup state and logs (check that no errors are reported):
velero backup describe all-cluster-backup

velero backup logs all-cluster-backup
Recreating the DOKS Cluster and Restoring Applications
Important: Whenever you destroy a DOKS cluster without specifying the --dangerous flag to the doctl command and then restoring it, the same load balancer with the same IP is recreated. This means that you don’t need to update your DigitalOcean DNS A records.
But when the --dangerous flag is applied to the doctl command, the existing load balancer will be destroyed and a new load balancer with a new external IP will be created when Velero restores your ingress controller. So, please make sure to update your DigitalOcean DNS A records accordingly.
First, delete the whole DOKS cluster (make sure to replace the <> placeholders accordingly).
To delete the Kubernetes cluster without destroying the associated load balancer, run:
doctl kubernetes cluster delete <DOKS_CLUSTER_NAME>
Or to delete the Kubernetes cluster along with the associated load balancer:
doctl kubernetes cluster delete <DOKS_CLUSTER_NAME> --dangerous
Next, recreate the cluster, as described in Set up DigitalOcean Kubernetes. It is important to ensure the new DOKS cluster node count is equal or greater to the original one.
Then, install Velero CLI and Server, as described in the Prerequisites section and Step 1 - Installing Velero using Helm respectively. It is important to use the same Helm Chart version.
Finally, restore everything by running the following command:
velero restore create --from-backup all-cluster-backup
Checking DOKS Cluster Applications State
First, check the Phase line of the all-cluster-backup restore describe command output. (Replace the <> placeholders accordingly). It should say Completed.
velero restore describe all-cluster-backup-<timestamp>
Now, verify all cluster resources by running:
kubectl get all --all-namespaces
Now, the backend applications should respond to HTTP requests as well. Please refer to Creating the Ambassador Edge Stack Backend Services regarding the backend applications used in the Starter Kit tutorial.
curl -Li http://quote.starter-kit.online/quote/

curl -Li http://echo.starter-kit.online/echo/
In the next step, you will learn how to perform scheduled (or automatic) backups for your DOKS cluster applications.
Step 4 - Scheduled Backups
Taking backups automatically based on a schedule is a really useful feature. It allows you to rewind time and restore the system to a previous working state if something goes wrong.
Creating a scheduled backup is a very straightforward process. An example is provided below for a 1 minute interval (the kube-system namespace was picked).
First, create the schedule:
velero schedule create kube-system-minute-backup --schedule="@every 1m" --include-namespaces kube-system
Linux cronjob format is also supported:
schedule="*/1 * * * *"
Next, verify that the schedule was created:
velero schedule get
The output looks similar to:
NAME                        STATUS    CREATED                          SCHEDULE    BACKUP TTL   LAST BACKUP   SELECTOR
kube-system-minute-backup   Enabled   2021-08-26 12:37:44 +0300 EEST   @every 1m   720h0m0s     32s ago       <none>
Then, inspect all the backups after one minute or so:
velero backup get
The output looks similar to:
NAME                                       STATUS      ERRORS   WARNINGS   CREATED                          EXPIRES   STORAGE LOCATION   SELECTOR
kube-system-minute-backup-20210826093916   Completed   0        0          2021-08-26 12:39:20 +0300 EEST   29d       default            <none>
kube-system-minute-backup-20210826093744   Completed   0        0          2021-08-26 12:37:44 +0300 EEST   29d       default            <none>
Verifying the Scheduled Backup state
First, check the Phase line from one of the backups (please replace the <> placeholders accordingly). It should say Completed.
velero backup describe kube-system-minute-backup-<timestamp>
Finally, take note of possible errors and warnings from the above output as well to check if something went wrong.
Restoring the Scheduled Backup
To restore backups from a minute ago, please follow the same steps as you learned in the previous steps of this tutorial. This is a good way to exercise and test your experience accumulated so far.
In the next step, you will learn how to manually or automatically delete specific backups you created over time.
Step 5 - Deleting Backups
If you don’t need older backups, you can free up some resources both on the Kubernetes cluster as well as on the Velero DO Spaces bucket.
Manually Deleting a Backup
First, pick a one-minute backup for example, and issue the following command (please replace the <> placeholders accordingly):
velero backup delete kube-system-minute-backup-<timestamp>
Now, check that it’s gone from the velero backup get command output. It should be deleted from the DO Spaces bucket as well.
Next, you will delete multiple backups at once by using a selector. The velero backup delete subcommand provides a flag called --selector. It allows you to delete multiple backups at once based on Kubernetes labels. The same rules apply as for Kubernetes Label Selectors.
First, list the available backups:
velero backup get
The output looks similar to:
NAME                                       STATUS      ERRORS   WARNINGS   CREATED                          EXPIRES   STORAGE LOCATION   SELECTOR
ambassador-backup                          Completed   0        0          2021-08-25 19:33:03 +0300 EEST   23d       default            <none>
backend-minute-backup-20210826094116       Completed   0        0          2021-08-26 12:41:16 +0300 EEST   24d       default            <none>
backend-minute-backup-20210826094016       Completed   0        0          2021-08-26 12:40:16 +0300 EEST   24d       default            <none>
backend-minute-backup-20210826093916       Completed   0        0          2021-08-26 12:39:16 +0300 EEST   24d       default            <none>
backend-minute-backup-20210826093816       Completed   0        0          2021-08-26 12:38:16 +0300 EEST   24d       default            <none>
backend-minute-backup-20210826093716       Completed   0        0          2021-08-26 12:37:16 +0300 EEST   24d       default            <none>
backend-minute-backup-20210826093616       Completed   0        0          2021-08-26 12:36:16 +0300 EEST   24d       default            <none>
backend-minute-backup-20210826093509       Completed   0        0          2021-08-26 12:35:09 +0300 EEST   24d       default            <none>
Next, say that you want to delete all the backend-minute-backup-* assets. Pick a backup from the list, and inspect the Labels:
velero describe backup backend-minute-backup-20210826094116
The output looks similar to (notice the velero.io/schedule-name label value):
Name:         backend-minute-backup-20210826094116
Namespace:    velero
Labels:       velero.io/schedule-name=backend-minute-backup
              velero.io/storage-location=default
Annotations:  velero.io/source-cluster-k8s-gitversion=v1.21.2
              velero.io/source-cluster-k8s-major-version=1
              velero.io/source-cluster-k8s-minor-version=21

Phase:  Completed

Errors:    0
Warnings:  0

Namespaces:
Included:  backend
Excluded:  <none>
...
Next, you can delete all the backups that match the backend-minute-backup value of the velero.io/schedule-name label:
velero backup delete --selector velero.io/schedule-name=backend-minute-backup
Finally, check that all the backend-minute-backup-* assets have disappeared from the velero backup get command output as well as from the DO Spaces bucket.
Automatic Backup Deletion via TTL
When you create a backup, you can specify a TTL (Time To Live), by using the --ttl flag. If Velero sees that an existing backup resource is expired, it removes:
- The
Backupresource - The backup file from cloud object
storage - All
PersistentVolumesnapshots - All associated
Restores
The TTL flag allows the user to specify the backup retention period with the value specified in hours, minutes, and seconds in the form --ttl 24h0m0s. If not specified, a default TTL value of 30 days will be applied.
First, create the ambassador backup, using a TTL value of 3 minutes:
velero backup create ambassador-backup-3min-ttl --ttl 0h3m0s --include-namespaces ambassador
Next, inspect the ambassador backup:
velero backup describe ambassador-backup-3min-ttl
The output looks similar to this (notice the Namespaces -> Included section - it should display ambassador, and TTL field is set to 3ms0):
Name:         ambassador-backup-3min-ttl
Namespace:    velero
Labels:       velero.io/storage-location=default
Annotations:  velero.io/source-cluster-k8s-gitversion=v1.21.2
              velero.io/source-cluster-k8s-major-version=1
              velero.io/source-cluster-k8s-minor-version=21

Phase:  Completed

Errors:    0
Warnings:  0

Namespaces:
Included:  ambassador
Excluded:  <none>

Resources:
Included:        *
Excluded:        <none>
Cluster-scoped:  auto

Label selector:  <none>

Storage Location:  default

Velero-Native Snapshot PVs:  auto

TTL:  3m0s
...
A new folder should be created in the DO Spaces Velero bucket as well, named ambassador-backup-3min-ttl.
Finally, after three minutes or so, the backup and associated resources should be automatically deleted. You can verify that the backup object was destroyed using: velero backup describe ambassador-backup-3min-ttl. It should fail with an error stating that the backup doesn’t exist anymore. The corresponding ambassador-backup-3min-ttl folder from the DO Spaces Velero bucket will be deleted as well.
Going further, you can explore all the available velero backup delete options, via:
velero backup delete --help
Conclusion
In this tutorial, you learned how to perform one-time, as well as scheduled backups, and restore everything. Having scheduled backups in place is very important as it allows you to revert to a previous snapshot in time if something goes wrong along the way. You walked through a disaster recovery scenario as well.
Learn More
- Backup and Restore DOKS Data using Velero
- DigitalOcean Managed Kubernetes Backups with SnapShooter
- Restore Volumes from Snapshots in Kubernetes Clusters
Next, you will learn how to handle Kubernetes Secrets using Vault or Sealed Secrets.
Thanks for learning with the DigitalOcean Community. Check out our offerings for compute, storage, networking, and managed databases.
About the author(s)
Still looking for an answer?
This textbox defaults to using Markdown to format your answer.
You can type !ref in this text area to quickly search our full set of tutorials, documentation & marketplace offerings and insert the link!
while installing the velero using above suggested helm chart getting below error
Error: INSTALLATION FAILED: failed post-install: job failed: BackoffLimitExceeded
client.go:142: [debug] creating 1 resource(s)
client.go:142: [debug] creating 1 resource(s)
client.go:142: [debug] creating 1 resource(s)
client.go:142: [debug] creating 1 resource(s)
client.go:142: [debug] creating 1 resource(s)
client.go:142: [debug] creating 1 resource(s)
client.go:142: [debug] creating 1 resource(s)
client.go:142: [debug] creating 1 resource(s)
client.go:142: [debug] creating 1 resource(s)
client.go:142: [debug] creating 1 resource(s)
client.go:142: [debug] creating 1 resource(s)
wait.go:48: [debug] beginning wait for 11 resources with timeout of 1m0s
install.go:205: [debug] Clearing REST mapper cache
client.go:142: [debug] creating 1 resource(s)
client.go:142: [debug] creating 7 resource(s)
client.go:486: [debug] Starting delete for “default” BackupStorageLocation
client.go:490: [debug] Ignoring delete failure for “default” velero.io/v1, Kind=BackupStorageLocation: backupstoragelocations.velero.io “default” not found
client.go:142: [debug] creating 1 resource(s)
client.go:486: [debug] Starting delete for “default” VolumeSnapshotLocation
client.go:490: [debug] Ignoring delete failure for “default” velero.io/v1, Kind=VolumeSnapshotLocation: volumesnapshotlocations.velero.io “default” not found
client.go:142: [debug] creating 1 resource(s)
client.go:486: [debug] Starting delete for “velero-upgrade-crds” Job
client.go:490: [debug] Ignoring delete failure for “velero-upgrade-crds” batch/v1, Kind=Job: jobs.batch “velero-upgrade-crds” not found
client.go:142: [debug] creating 1 resource(s)
client.go:712: [debug] Watching for changes to Job velero-upgrade-crds with timeout of 5m0s
client.go:740: [debug] Add/Modify event for velero-upgrade-crds: ADDED
client.go:779: [debug] velero-upgrade-crds: Jobs active: 1, jobs failed: 0, jobs succeeded: 0
client.go:740: [debug] Add/Modify event for velero-upgrade-crds: MODIFIED
client.go:779: [debug] velero-upgrade-crds: Jobs active: 0, jobs failed: 0, jobs succeeded: 0
client.go:740: [debug] Add/Modify event for velero-upgrade-crds: MODIFIED
Error: INSTALLATION FAILED: failed post-install: 1 error occurred:
- job failed: BackoffLimitExceeded
helm.go:84: [debug] failed post-install: 1 error occurred:
- job failed: BackoffLimitExceeded
INSTALLATION FAILED
main.newInstallCmd.func2
helm.sh/helm/v3/cmd/helm/install.go:154
github.com/spf13/cobra.(*Command).execute
github.com/spf13/cobra@v1.7.0/command.go:940
github.com/spf13/cobra.(*Command).ExecuteC
github.com/spf13/cobra@v1.7.0/command.go:1068
github.com/spf13/cobra.(*Command).Execute
github.com/spf13/cobra@v1.7.0/command.go:992
main.main
helm.sh/helm/v3/cmd/helm/helm.go:83
runtime.main
runtime/proc.go:250
runtime.goexit
runtime/asm_amd64.s:1598
Dear Author,
I face an issue with the call Storage.GetVolumeInfo. Even though I see that kopia has uploaded my volumes backup to my spaces bucket.
I get this error log from velero back logs <backup-name>
time="2025-02-03T10:47:09Z" level=error msg="Storage.GetVolumeInfo returned error: GET https://api.digitalocean.com/v2/volumes/0171f400-8fb0-11ef-928c-0a58ac14d885: 404 (request \"890766cb-d55a-4588-b625-2ee860535fe6\") failed to get volume: not found" backup=velero/thingsboard-backup cmd=/plugins/velero-digitalocean logSource="/go/src/github.com/digitalocean/velero-plugin/velero-digitalocean/volume_snapshotter.go:109" pluginName=velero-digitalocean

time="2025-02-03T10:47:09Z" level=info msg="1 errors encountered backup up item" backup=velero/thingsboard-backup logSource="pkg/backup/backup.go:788" name=logs-tb-coap-transport-0

time="2025-02-03T10:47:09Z" level=error msg="Error backing up item" backup=velero/thingsboard-backup error="error getting volume info: rpc error: code = Aborted desc = plugin panicked: runtime error: invalid memory address or nil pointer dereference" logSource="pkg/backup/backup.go:792" name=logs-tb-coap-transport-0
Since I was able to upload files to my bucket, I know that my secrets and plugins are set up correctly. Your input will be greatly value. Thank you in advance :)
 This work is licensed under a Creative Commons Attribution-NonCommercial- ShareAlike 4.0 International License.
Become a contributor for community
Get paid to write technical tutorials and select a tech-focused charity to receive a matching donation.

DigitalOcean Documentation
Full documentation for every DigitalOcean product.

Resources for startups and AI-native businesses
The Wave has everything you need to know about building a business, from raising funding to marketing your product.
The developer cloud
Scale up as you grow — whether you're running one virtual machine or ten thousand.

Start building today
From GPU-powered inference and Kubernetes to managed databases and storage, get everything you need to build, scale, and deploy intelligent applications.
