
Introduction
If you are actively developing an application, using Docker can simplify your workflow and the process of deploying your application to production. Working with containers in development offers the following benefits:
- Environments are consistent, meaning that you can choose the languages and dependencies you want for your project without worrying about system conflicts.
- Environments are isolated, making it easier to troubleshoot issues and onboard new team members.
- Environments are portable, allowing you to package and share your code with others.
This tutorial will show you how to set up a development environment for a Ruby on Rails application using Docker. You will create multiple containers – for the application itself, the PostgreSQL database, Redis, and a Sidekiq service – with Docker Compose. The setup will do the following:
- Synchronize the application code on the host with the code in the container to facilitate changes during development.
- Persist application data between container restarts.
- Configure Sidekiq workers to process jobs as expected.
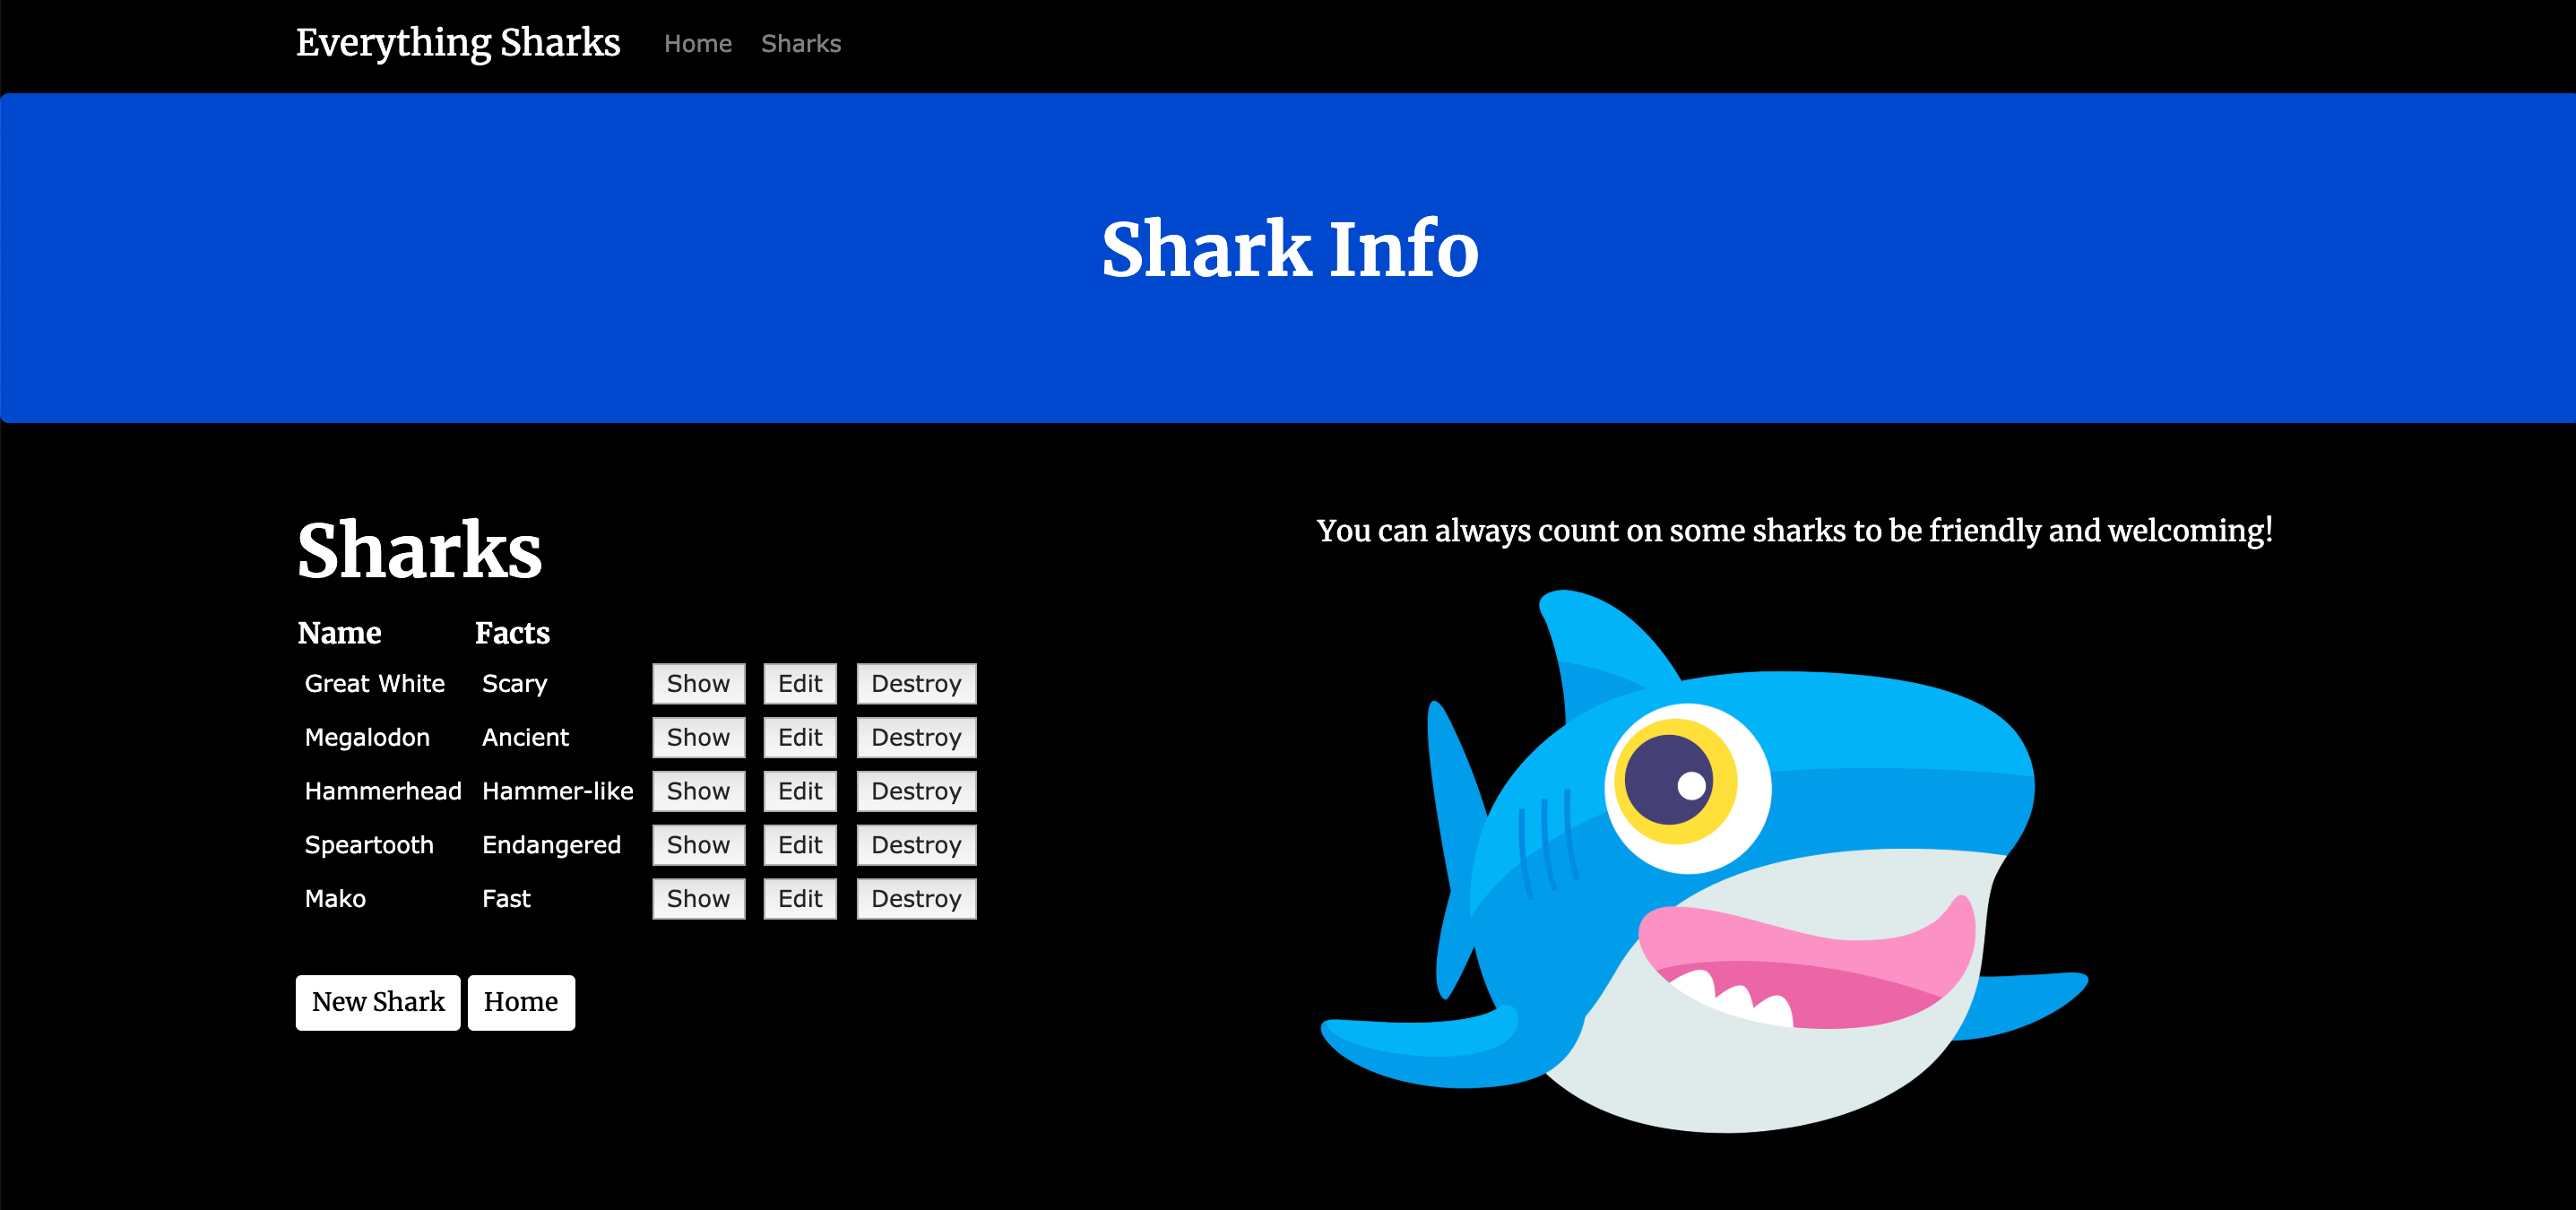
At the end of this tutorial, you will have a working shark information application running on Docker containers:
Prerequisites
To follow this tutorial, you will need:
- A local development machine or server running Ubuntu 18.04, along with a non-root user with
sudoprivileges and an active firewall. For guidance on how to set these up, please see this Initial Server Setup guide. - Docker installed on your local machine or server, following Steps 1 and 2 of How To Install and Use Docker on Ubuntu 18.04.
- Docker Compose installed on your local machine or server, following Step 1 of How To Install Docker Compose on Ubuntu 18.04.
Step 1 — Cloning the Project and Adding Dependencies
Our first step will be to clone the rails-sidekiq repository from the DigitalOcean Community GitHub account. This repository includes the code from the setup described in How To Add Sidekiq and Redis to a Ruby on Rails Application, which explains how to add Sidekiq to an existing Rails 5 project.
Clone the repository into a directory called rails-docker:
- git clone https://github.com/do-community/rails-sidekiq.git rails-docker
Navigate to the rails-docker directory:
- cd rails-docker
In this tutorial we will use PostgreSQL as a database. In order to work with PostgreSQL instead of SQLite 3, you will need to add the pg gem to the project’s dependencies, which are listed in its Gemfile. Open that file for editing using nano or your favorite editor:
- nano Gemfile
Add the gem anywhere in the main project dependencies (above development dependencies):
. . .
# Reduces boot times through caching; required in config/boot.rb
gem 'bootsnap', '>= 1.1.0', require: false
gem 'sidekiq', '~>6.0.0'
gem 'pg', '~>1.1.3'

group :development, :test do
. . .
We can also comment out the sqlite gem, since we won’t be using it anymore:
. . .
# Use sqlite3 as the database for Active Record
# gem 'sqlite3'
. . .
Finally, comment out the spring-watcher-listen gem under development:
. . .
gem 'spring'
# gem 'spring-watcher-listen', '~> 2.0.0'
. . .
If we do not disable this gem, we will see persistent error messages when accessing the Rails console. These error messages derive from the fact that this gem has Rails use listen to watch for changes in development, rather than polling the filesystem for changes. Because this gem watches the root of the project, including the node_modules directory, it will throw error messages about which directories are being watched, cluttering the console. If you are concerned about conserving CPU resources, however, disabling this gem may not work for you. In this case, it may be a good idea to upgrade your Rails application to Rails 6.
Save and close the file when you are finished editing.
With your project repository in place, the pg gem added to your Gemfile, and the spring-watcher-listen gem commented out, you are ready to configure your application to work with PostgreSQL.
Step 2 — Configuring the Application to Work with PostgreSQL and Redis
To work with PostgreSQL and Redis in development, we will want to do the following:
- Configure the application to work with PostgreSQL as the default adapter.
- Add an
.envfile to the project with our database username and password and Redis host. - Create an
init.sqlscript to create asammyuser for the database. - Add an initializer for Sidekiq so that it can work with our containerized
redisservice. - Add the
.envfile and other relevant files to the project’sgitignoreanddockerignorefiles. - Create database seeds so that our application has some records for us to work with when we start it up.
First, open your database configuration file, located at config/database.yml:
- nano config/database.yml
Currently, the file includes the following default settings, which are applied in the absence of other settings:
default: &default
  adapter: sqlite3
  pool: <%= ENV.fetch("RAILS_MAX_THREADS") { 5 } %>
  timeout: 5000
We need to change these to reflect the fact that we will use the postgresql adapter, since we will be creating a PostgreSQL service with Docker Compose to persist our application data.
Delete the code that sets SQLite as the adapter and replace it with the following settings, which will set the adapter appropriately and the other variables necessary to connect:
default: &default
  adapter: postgresql
  encoding: unicode
  database: <%= ENV['DATABASE_NAME'] %>
  username: <%= ENV['DATABASE_USER'] %>
  password: <%= ENV['DATABASE_PASSWORD'] %>
  port: <%= ENV['DATABASE_PORT'] || '5432' %>
  host: <%= ENV['DATABASE_HOST'] %>
  pool: <%= ENV.fetch("RAILS_MAX_THREADS") { 5 } %>
  timeout: 5000
. . .
Next, we’ll modify the setting for the development environment, since this is the environment we’re using in this setup.
Delete the existing SQLite database configuration so that section looks like this:
. . .
development:
  <<: *default
. . .
Finally, delete the database settings for the production and test environments as well:
. . .
test:
  <<: *default

production:
  <<: *default
. . .
These modifications to our default database settings will allow us to set our database information dynamically using environment variables defined in .env files, which will not be committed to version control.
Save and close the file when you are finished editing.
Note that if you are creating a Rails project from scratch, you can set the adapter with the rails new command, as described in Step 3 of How To Use PostgreSQL with Your Ruby on Rails Application on Ubuntu 18.04. This will set your adapter in config/database.yml and automatically add the pg gem to the project.
Now that we have referenced our environment variables, we can create a file for them with our preferred settings. Extracting configuration settings in this way is part of the 12 Factor approach to application development, which defines best practices for application resiliency in distributed environments. Now, when we are setting up our production and test environments in the future, configuring our database settings will involve creating additional .env files and referencing the appropriate file in our Docker Compose files.
Open an .env file:
- nano .env
Add the following values to the file:
DATABASE_NAME=rails_development
DATABASE_USER=sammy
DATABASE_PASSWORD=shark
DATABASE_HOST=database
REDIS_HOST=redis
In addition to setting our database name, user, and password, we’ve also set a value for the DATABASE_HOST. The value, database, refers to the database PostgreSQL service we will create using Docker Compose. We’ve also set a REDIS_HOST to specify our redis service.
Save and close the file when you are finished editing.
To create the sammy database user, we can write an init.sql script that we can then mount to the database container when it starts.
Open the script file:
- nano init.sql
Add the following code to create a sammy user with administrative privileges:
CREATE USER sammy;
ALTER USER sammy WITH SUPERUSER;
This script will create the appropriate user on the database and grant this user administrative privileges.
Set appropriate permissions on the script:
- chmod +x init.sql
Next, we’ll configure Sidekiq to work with our containerized redis service. We can add an initializer to the config/initializers directory, where Rails looks for configuration settings once frameworks and plugins are loaded, that sets a value for a Redis host.
Open a sidekiq.rb file to specify these settings:
- nano config/initializers/sidekiq.rb
Add the following code to the file to specify values for a REDIS_HOST and REDIS_PORT:
Sidekiq.configure_server do |config|
  config.redis = {
    host: ENV['REDIS_HOST'],
    port: ENV['REDIS_PORT'] || '6379'
  }
end

Sidekiq.configure_client do |config|
  config.redis = {
    host: ENV['REDIS_HOST'],
    port: ENV['REDIS_PORT'] || '6379'
  }
end
Much like our database configuration settings, these settings give us the ability to set our host and port parameters dynamically, allowing us to substitute the appropriate values at runtime without having to modify the application code itself. In addition to a REDIS_HOST, we have a default value set for REDIS_PORT in case it is not set elsewhere.
Save and close the file when you are finished editing.
Next, to ensure that our application’s sensitive data is not copied to version control, we can add .env to our project’s .gitignore file, which tells Git which files to ignore in our project. Open the file for editing:
- nano .gitignore
At the bottom of the file, add an entry for .env:
yarn-debug.log*
.yarn-integrity
.env
Save and close the file when you are finished editing.
Next, we’ll create a .dockerignore file to set what should not be copied to our containers. Open the file for editing:
- .dockerignore
Add the following code to the file, which tells Docker to ignore some of the things we don’t need copied to our containers:
.DS_Store
.bin
.git
.gitignore
.bundleignore
.bundle
.byebug_history
.rspec
tmp
log
test
config/deploy
public/packs
public/packs-test
node_modules
yarn-error.log
coverage/
Add .env to the bottom of this file as well:
. . .
yarn-error.log
coverage/
.env
Save and close the file when you are finished editing.
As a final step, we will create some seed data so that our application has a few records when we start it up.
Open a file for the seed data in the db directory:
- nano db/seeds.rb
Add the following code to the file to create four demo sharks and one sample post:
# Adding demo sharks
sharks = Shark.create([{ name: 'Great White', facts: 'Scary' }, { name: 'Megalodon', facts: 'Ancient' }, { name: 'Hammerhead', facts: 'Hammer-like' }, { name: 'Speartooth', facts: 'Endangered' }])
Post.create(body: 'These sharks are misunderstood', shark: sharks.first)
This seed data will create four sharks and one post that is associated with the first shark.
Save and close the file when you are finished editing.
With your application configured to work with PostgreSQL and your environment variables created, you are ready to write your application Dockerfile.
Step 3 — Writing the Dockerfile and Entrypoint Scripts
Your Dockerfile specifies what will be included in your application container when it is created. Using a Dockerfile allows you to define your container environment and avoid discrepancies with dependencies or runtime versions.
Following these guidelines on building optimized containers, we will make our image as efficient as possible by using an Alpine base and attempting to minimize our image layers generally.
Open a Dockerfile in your current directory:
- nano Dockerfile
Docker images are created using a succession of layered images that build on one another. Our first step will be to add the base image for our application, which will form the starting point of the application build.
Add the following code to the file to add the Ruby alpine image as a base:
FROM ruby:2.5.1-alpine
The alpine image is derived from the Alpine Linux project, and will help us keep our image size down. For more information about whether or not the alpine image is the right choice for your project, please see the full discussion under the Image Variants section of the Docker Hub Ruby image page.
Some factors to consider when using alpine in development:
- Keeping image size down will decrease page and resource load times, particularly if you also keep volumes to a minimum. This helps keep your user experience in development quick and closer to what it would be if you were working locally in a non-containerized environment.
- Having parity between development and production images facilitates successful deployments. Since teams often opt to use Alpine images in production for speed benefits, developing with an Alpine base helps offset issues when moving to production.
Next, set an environment variable to specify the Bundler version:
. . .
ENV BUNDLER_VERSION=2.0.2
This is one of the steps we will take to avoid version conflicts between the default bundler version available in our environment and our application code, which requires Bundler 2.0.2.
Next, add the packages that you need to work with the application to the Dockerfile:
. . .
RUN apk add --update --no-cache \
      binutils-gold \
      build-base \
      curl \
      file \
      g++ \
      gcc \
      git \
      less \
      libstdc++ \
      libffi-dev \
      libc-dev \
      linux-headers \
      libxml2-dev \
      libxslt-dev \
      libgcrypt-dev \
      make \
      netcat-openbsd \
      nodejs \
      openssl \
      pkgconfig \
      postgresql-dev \
      python \
      tzdata \
      yarn
These packages include nodejs and yarn, among others. Since our application serves assets with webpack, we need to include Node.js and Yarn for the application to work as expected.
Keep in mind that the alpine image is extremely minimal: the packages listed here are not exhaustive of what you might want or need in development when you are containerizing your own application.
Next, install the appropriate bundler version:
. . .
RUN gem install bundler -v 2.0.2
This step will guarantee parity between our containerized environment and the specifications in this project’s Gemfile.lock file.
Now set the working directory for the application on the container:
. . .
WORKDIR /app
Copy over your Gemfile and Gemfile.lock:
. . .
COPY Gemfile Gemfile.lock ./
Copying these files as an independent step, followed by bundle install, means that the project gems do not need to be rebuilt every time you make changes to your application code. This will work in conjunction with the gem volume that we will include in our Compose file, which will mount gems to your application container in cases where the service is recreated but project gems remain the same.
Next, set the configuration options for the nokogiri gem build:
. . .
RUN bundle config build.nokogiri --use-system-libraries
. . .
This step builds nokigiri with the libxml2 and libxslt library versions that we added to the application container in the RUN apk add… step above.
Next, install the project gems:
. . .
RUN bundle check || bundle install
This instruction checks that the gems are not already installed before installing them.
Next, we’ll repeat the same procedure that we used with gems with our JavaScript packages and dependencies. First we’ll copy package metadata, then we’ll install dependencies, and finally we’ll copy the application code into the container image.
To get started with the Javascript section of our Dockerfile, copy package.json and yarn.lock from your current project directory on the host to the container:
. . .
COPY package.json yarn.lock ./
Then install the required packages with yarn install:
. . .
RUN yarn install --check-files
This instruction includes a --check-files flag with the yarn command, a feature that makes sure any previously installed files have not been removed. As in the case of our gems, we will manage the persistence of the packages in the node_modules directory with a volume when we write our Compose file.
Finally, copy over the rest of the application code and start the application with an entrypoint script:
. . .
COPY . ./

ENTRYPOINT ["./entrypoints/docker-entrypoint.sh"]
Using an entrypoint script allows us to run the container as an executable.
The final Dockerfile will look like this:
FROM ruby:2.5.1-alpine

ENV BUNDLER_VERSION=2.0.2

RUN apk add --update --no-cache \
      binutils-gold \
      build-base \
      curl \
      file \
      g++ \
      gcc \
      git \
      less \
      libstdc++ \
      libffi-dev \
      libc-dev \
      linux-headers \
      libxml2-dev \
      libxslt-dev \
      libgcrypt-dev \
      make \
      netcat-openbsd \
      nodejs \
      openssl \
      pkgconfig \
      postgresql-dev \
      python \
      tzdata \
      yarn

RUN gem install bundler -v 2.0.2

WORKDIR /app

COPY Gemfile Gemfile.lock ./

RUN bundle config build.nokogiri --use-system-libraries

RUN bundle check || bundle install

COPY package.json yarn.lock ./

RUN yarn install --check-files

COPY . ./

ENTRYPOINT ["./entrypoints/docker-entrypoint.sh"]
Save and close the file when you are finished editing.
Next, create a directory called entrypoints for the entrypoint scripts:
- mkdir entrypoints
This directory will include our main entrypoint script and a script for our Sidekiq service.
Open the file for the application entrypoint script:
- nano entrypoints/docker-entrypoint.sh
Add the following code to the file:
#!/bin/sh

set -e

if [ -f tmp/pids/server.pid ]; then
  rm tmp/pids/server.pid
fi

bundle exec rails s -b 0.0.0.0
The first important line is set -e, which tells the /bin/sh shell that runs the script to fail fast if there are any problems later in the script. Next, the script checks that tmp/pids/server.pid is not present to ensure that there won’t be server conflicts when we start the application. Finally, the script starts the Rails server with the bundle exec rails s command. We use the -b option with this command to bind the server to all IP addresses rather than to the default, localhost. This invocation makes the Rails server route incoming requests to the container IP rather than to the default localhost.
Save and close the file when you are finished editing.
Make the script executable:
- chmod +x entrypoints/docker-entrypoint.sh
Next, we will create a script to start our sidekiq service, which will process our Sidekiq jobs. For more information about how this application uses Sidekiq, please see How To Add Sidekiq and Redis to a Ruby on Rails Application.
Open a file for the Sidekiq entrypoint script:
- nano entrypoints/sidekiq-entrypoint.sh
Add the following code to the file to start Sidekiq:
#!/bin/sh

set -e

if [ -f tmp/pids/server.pid ]; then
  rm tmp/pids/server.pid
fi

bundle exec sidekiq
This script starts Sidekiq in the context of our application bundle.
Save and close the file when you are finished editing. Make it executable:
- chmod +x entrypoints/sidekiq-entrypoint.sh
With your entrypoint scripts and Dockerfile in place, you are ready to define your services in your Compose file.
Step 4 — Defining Services with Docker Compose
Using Docker Compose, we will be able to run the multiple containers required for our setup. We will define our Compose services in our main docker-compose.yml file. A service in Compose is a running container, and service definitions — which you will include in your docker-compose.yml file — contain information about how each container image will run. The Compose tool allows you to define multiple services to build multi-container applications.
Our application setup will include the following services:
- The application itself
- The PostgreSQL database
- Redis
- Sidekiq
We will also include a bind mount as part of our setup, so that any code changes we make during development will be immediately synchronized with the containers that need access to this code.
Note that we are not defining a test service, since testing is outside of the scope of this tutorial and series, but you could do so by following the precedent we are using here for the sidekiq service.
Open the docker-compose.yml file:
- nano docker-compose.yml
First, add the application service definition:
version: '3.4'

services:
  app:
    build:
      context: .
      dockerfile: Dockerfile
    depends_on:
      - database
      - redis
    ports:
      - "3000:3000"
    volumes:
      - .:/app
      - gem_cache:/usr/local/bundle/gems
      - node_modules:/app/node_modules
    env_file: .env
    environment:
      RAILS_ENV: development
The app service definition includes the following options:
build: This defines the configuration options, including thecontextanddockerfile, that will be applied when Compose builds the application image. If you wanted to use an existing image from a registry like Docker Hub, you could use theimageinstruction instead, with information about your username, repository, and image tag.context: This defines the build context for the image build — in this case, the current project directory.dockerfile: This specifies theDockerfilein your current project directory as the file Compose will use to build the application image.depends_on: This sets up thedatabaseandrediscontainers first so that they are up and running beforeapp.ports: This maps port3000on the host to port3000on the container.volumes: We are including two types of mounts here:- The first is a bind mount that mounts our application code on the host to the
/appdirectory on the container. This will facilitate rapid development, since any changes you make to your host code will be populated immediately in the container. - The second is a named volume,
gem_cache. When thebundle installinstruction runs in the container, it will install the project gems. Adding this volume means that if you recreate the container, the gems will be mounted to the new container. This mount presumes that there haven’t been any changes to the project, so if you do make changes to your project gems in development, you will need to remember to delete this volume before recreating your application service. - The third volume is a named volume for the
node_modulesdirectory. Rather than havingnode_modulesmounted to the host, which can lead to package discrepancies and permissions conflicts in development, this volume will ensure that the packages in this directory are persisted and reflect the current state of the project. Again, if you modify the project’s Node dependencies, you will need to remove and recreate this volume.
- The first is a bind mount that mounts our application code on the host to the
env_file: This tells Compose that we would like to add environment variables from a file called.envlocated in the build context.environment: Using this option allows us to set a non-sensitive environment variable, passing information about the Rails environment to the container.
Next, below the app service definition, add the following code to define your database service:
. . .
  database:
    image: postgres:12.1
    volumes:
      - db_data:/var/lib/postgresql/data
      - ./init.sql:/docker-entrypoint-initdb.d/init.sql
Unlike the app service, the database service pulls a postgres image directly from Docker Hub. Note that we’re also pinning the version here, rather than setting it to latest or not specifying it (which defaults to latest). This way, we can ensure that this setup works with the versions specified here and avoid unexpected surprises with breaking code changes to the image.
We are also including a db_data volume here, which will persist our application data in between container starts. Additionally, we’ve mounted our init.sql startup script to the appropriate directory, docker-entrypoint-initdb.d/ on the container, in order to create our sammy database user. After the image entrypoint creates the default postgres user and database, it will run any scripts found in the docker-entrypoint-initdb.d/ directory, which you can use for necessary initialization tasks. For more details, look at the Initialization scripts section of the PostgreSQL image documentation
Next, add the redis service definition:
. . .
  redis:
    image: redis:5.0.7
Like the database service, the redis service uses an image from Docker Hub. In this case, we are not persisting the Sidekiq job cache.
Finally, add the sidekiq service definition:
. . .
  sidekiq:
    build:
      context: .
      dockerfile: Dockerfile
    depends_on:
      - app
      - database
      - redis
    volumes:
      - .:/app
      - gem_cache:/usr/local/bundle/gems
      - node_modules:/app/node_modules
    env_file: .env
    environment:
      RAILS_ENV: development
    entrypoint: ./entrypoints/sidekiq-entrypoint.sh
Our sidekiq service resembles our app service in a few respects: it uses the same build context and image, environment variables, and volumes. However, it is dependent on the app, redis, and database services, and so will be the last to start. Additionally, it uses an entrypoint that will override the entrypoint set in the Dockerfile. This entrypoint setting points to entrypoints/sidekiq-entrypoint.sh, which includes the appropriate command to start the sidekiq service.
As a final step, add the volume definitions below the sidekiq service definition:
. . .
volumes:
  gem_cache:
  db_data:
  node_modules:
Our top-level volumes key defines the volumes gem_cache, db_data, and node_modules. When Docker creates volumes, the contents of the volume are stored in a part of the host filesystem, /var/lib/docker/volumes/, that’s managed by Docker. The contents of each volume are stored in a directory under /var/lib/docker/volumes/ and get mounted to any container that uses the volume. In this way, the shark information data that our users will create will persist in the db_data volume even if we remove and recreate the database service.
The finished file will look like this:
version: '3.4'

services:
  app:
    build:
      context: .
      dockerfile: Dockerfile
    depends_on:
      - database
      - redis
    ports:
      - "3000:3000"
    volumes:
      - .:/app
      - gem_cache:/usr/local/bundle/gems
      - node_modules:/app/node_modules
    env_file: .env
    environment:
      RAILS_ENV: development

  database:
    image: postgres:12.1
    volumes:
      - db_data:/var/lib/postgresql/data
      - ./init.sql:/docker-entrypoint-initdb.d/init.sql

  redis:
    image: redis:5.0.7

  sidekiq:
    build:
      context: .
      dockerfile: Dockerfile
    depends_on:
      - app
      - database
      - redis
    volumes:
      - .:/app
      - gem_cache:/usr/local/bundle/gems
      - node_modules:/app/node_modules
    env_file: .env
    environment:
      RAILS_ENV: development
    entrypoint: ./entrypoints/sidekiq-entrypoint.sh

volumes:
  gem_cache:
  db_data:
  node_modules:
Save and close the file when you are finished editing.
With your service definitions written, you are ready to start the application.
Step 5 — Testing the Application
With your docker-compose.yml file in place, you can create your services with the docker-compose up command and seed your database. You can also test that your data will persist by stopping and removing your containers with docker-compose down and recreating them.
First, build the container images and create the services by running docker-compose up with the -d flag, which will run the containers in the background:
- docker-compose up -d
You will see output that your services have been created:
OutputCreating rails-docker_database_1 ... done
Creating rails-docker_redis_1    ... done
Creating rails-docker_app_1      ... done
Creating rails-docker_sidekiq_1  ... done
You can also get more detailed information about the startup processes by displaying the log output from the services:
- docker-compose logs
You will see something like this if everything has started correctly:
Outputsidekiq_1   | 2019-12-19T15:05:26.365Z pid=6 tid=grk7r6xly INFO: Booting Sidekiq 6.0.3 with redis options {:host=>"redis", :port=>"6379", :id=>"Sidekiq-server-PID-6", :url=>nil}
sidekiq_1   | 2019-12-19T15:05:31.097Z pid=6 tid=grk7r6xly INFO: Running in ruby 2.5.1p57 (2018-03-29 revision 63029) [x86_64-linux-musl]
sidekiq_1   | 2019-12-19T15:05:31.097Z pid=6 tid=grk7r6xly INFO: See LICENSE and the LGPL-3.0 for licensing details.
sidekiq_1   | 2019-12-19T15:05:31.097Z pid=6 tid=grk7r6xly INFO: Upgrade to Sidekiq Pro for more features and support: http://sidekiq.org
app_1       | => Booting Puma
app_1       | => Rails 5.2.3 application starting in development
app_1       | => Run `rails server -h` for more startup options
app_1       | Puma starting in single mode...
app_1       | * Version 3.12.1 (ruby 2.5.1-p57), codename: Llamas in Pajamas
app_1       | * Min threads: 5, max threads: 5
app_1       | * Environment: development
app_1       | * Listening on tcp://0.0.0.0:3000
app_1       | Use Ctrl-C to stop
. . .
database_1  | PostgreSQL init process complete; ready for start up.
database_1  |
database_1  | 2019-12-19 15:05:20.160 UTC [1] LOG:  starting PostgreSQL 12.1 (Debian 12.1-1.pgdg100+1) on x86_64-pc-linux-gnu, compiled by gcc (Debian 8.3.0-6) 8.3.0, 64-bit
database_1  | 2019-12-19 15:05:20.160 UTC [1] LOG:  listening on IPv4 address "0.0.0.0", port 5432
database_1  | 2019-12-19 15:05:20.160 UTC [1] LOG:  listening on IPv6 address "::", port 5432
database_1  | 2019-12-19 15:05:20.163 UTC [1] LOG:  listening on Unix socket "/var/run/postgresql/.s.PGSQL.5432"
database_1  | 2019-12-19 15:05:20.182 UTC [63] LOG:  database system was shut down at 2019-12-19 15:05:20 UTC
database_1  | 2019-12-19 15:05:20.187 UTC [1] LOG:  database system is ready to accept connections
. . .
redis_1     | 1:M 19 Dec 2019 15:05:18.822 * Ready to accept connections
You can also check the status of your containers with docker-compose ps:
- docker-compose ps
You will see output indicating that your containers are running:
Output         Name                        Command               State           Ports
-----------------------------------------------------------------------------------------
rails-docker_app_1        ./entrypoints/docker-resta ...   Up      0.0.0.0:3000->3000/tcp
rails-docker_database_1   docker-entrypoint.sh postgres    Up      5432/tcp
rails-docker_redis_1      docker-entrypoint.sh redis ...   Up      6379/tcp
rails-docker_sidekiq_1    ./entrypoints/sidekiq-entr ...   Up
Next, create and seed your database and run migrations on it with the following docker-compose exec command:
- docker-compose exec app bundle exec rake db:setup db:migrate
The docker-compose exec command allows you to run commands in your services; we are using it here to run rake db:setup and db:migrate in the context of our application bundle to create and seed the database and run migrations. As you work in development, docker-compose exec will prove useful to you when you want to run migrations against your development database.
You will see the following output after running this command:
OutputCreated database 'rails_development'
Database 'rails_development' already exists
-- enable_extension("plpgsql")
   -> 0.0140s
-- create_table("endangereds", {:force=>:cascade})
   -> 0.0097s
-- create_table("posts", {:force=>:cascade})
   -> 0.0108s
-- create_table("sharks", {:force=>:cascade})
   -> 0.0050s
-- enable_extension("plpgsql")
   -> 0.0173s
-- create_table("endangereds", {:force=>:cascade})
   -> 0.0088s
-- create_table("posts", {:force=>:cascade})
   -> 0.0128s
-- create_table("sharks", {:force=>:cascade})
   -> 0.0072s
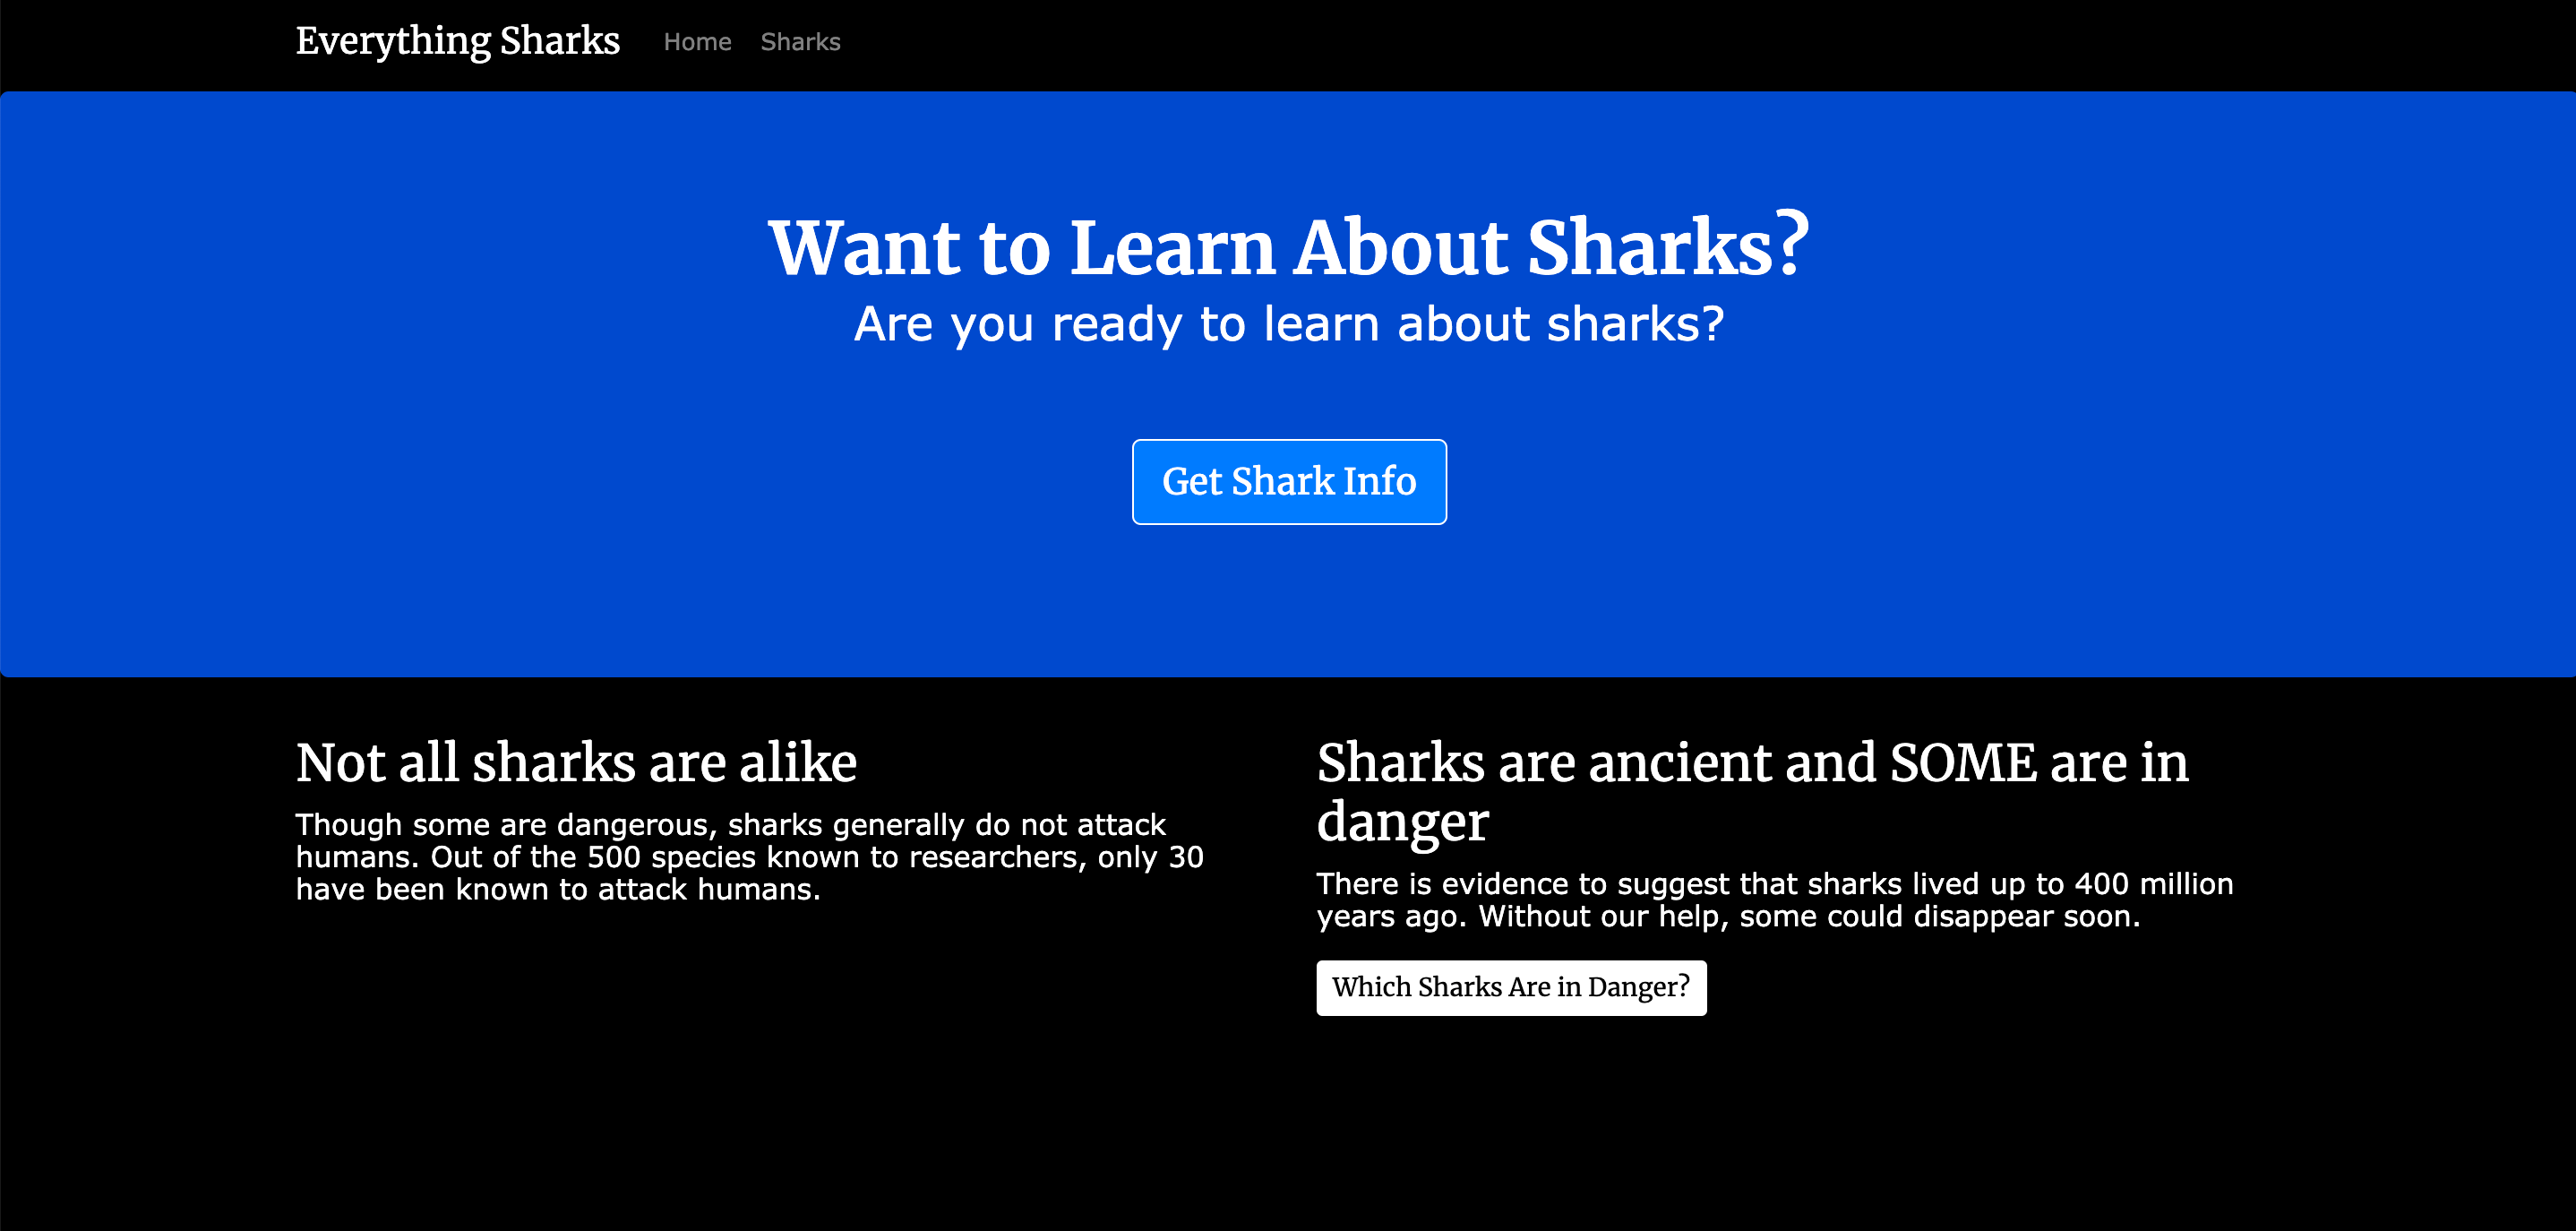
With your services running, you can visit localhost:3000 or http://your_server_ip:3000 in the browser. You will see a landing page that looks like this:
We can now test data persistence. Create a new shark by clicking on Get Shark Info button, which will take you to the sharks/index route:
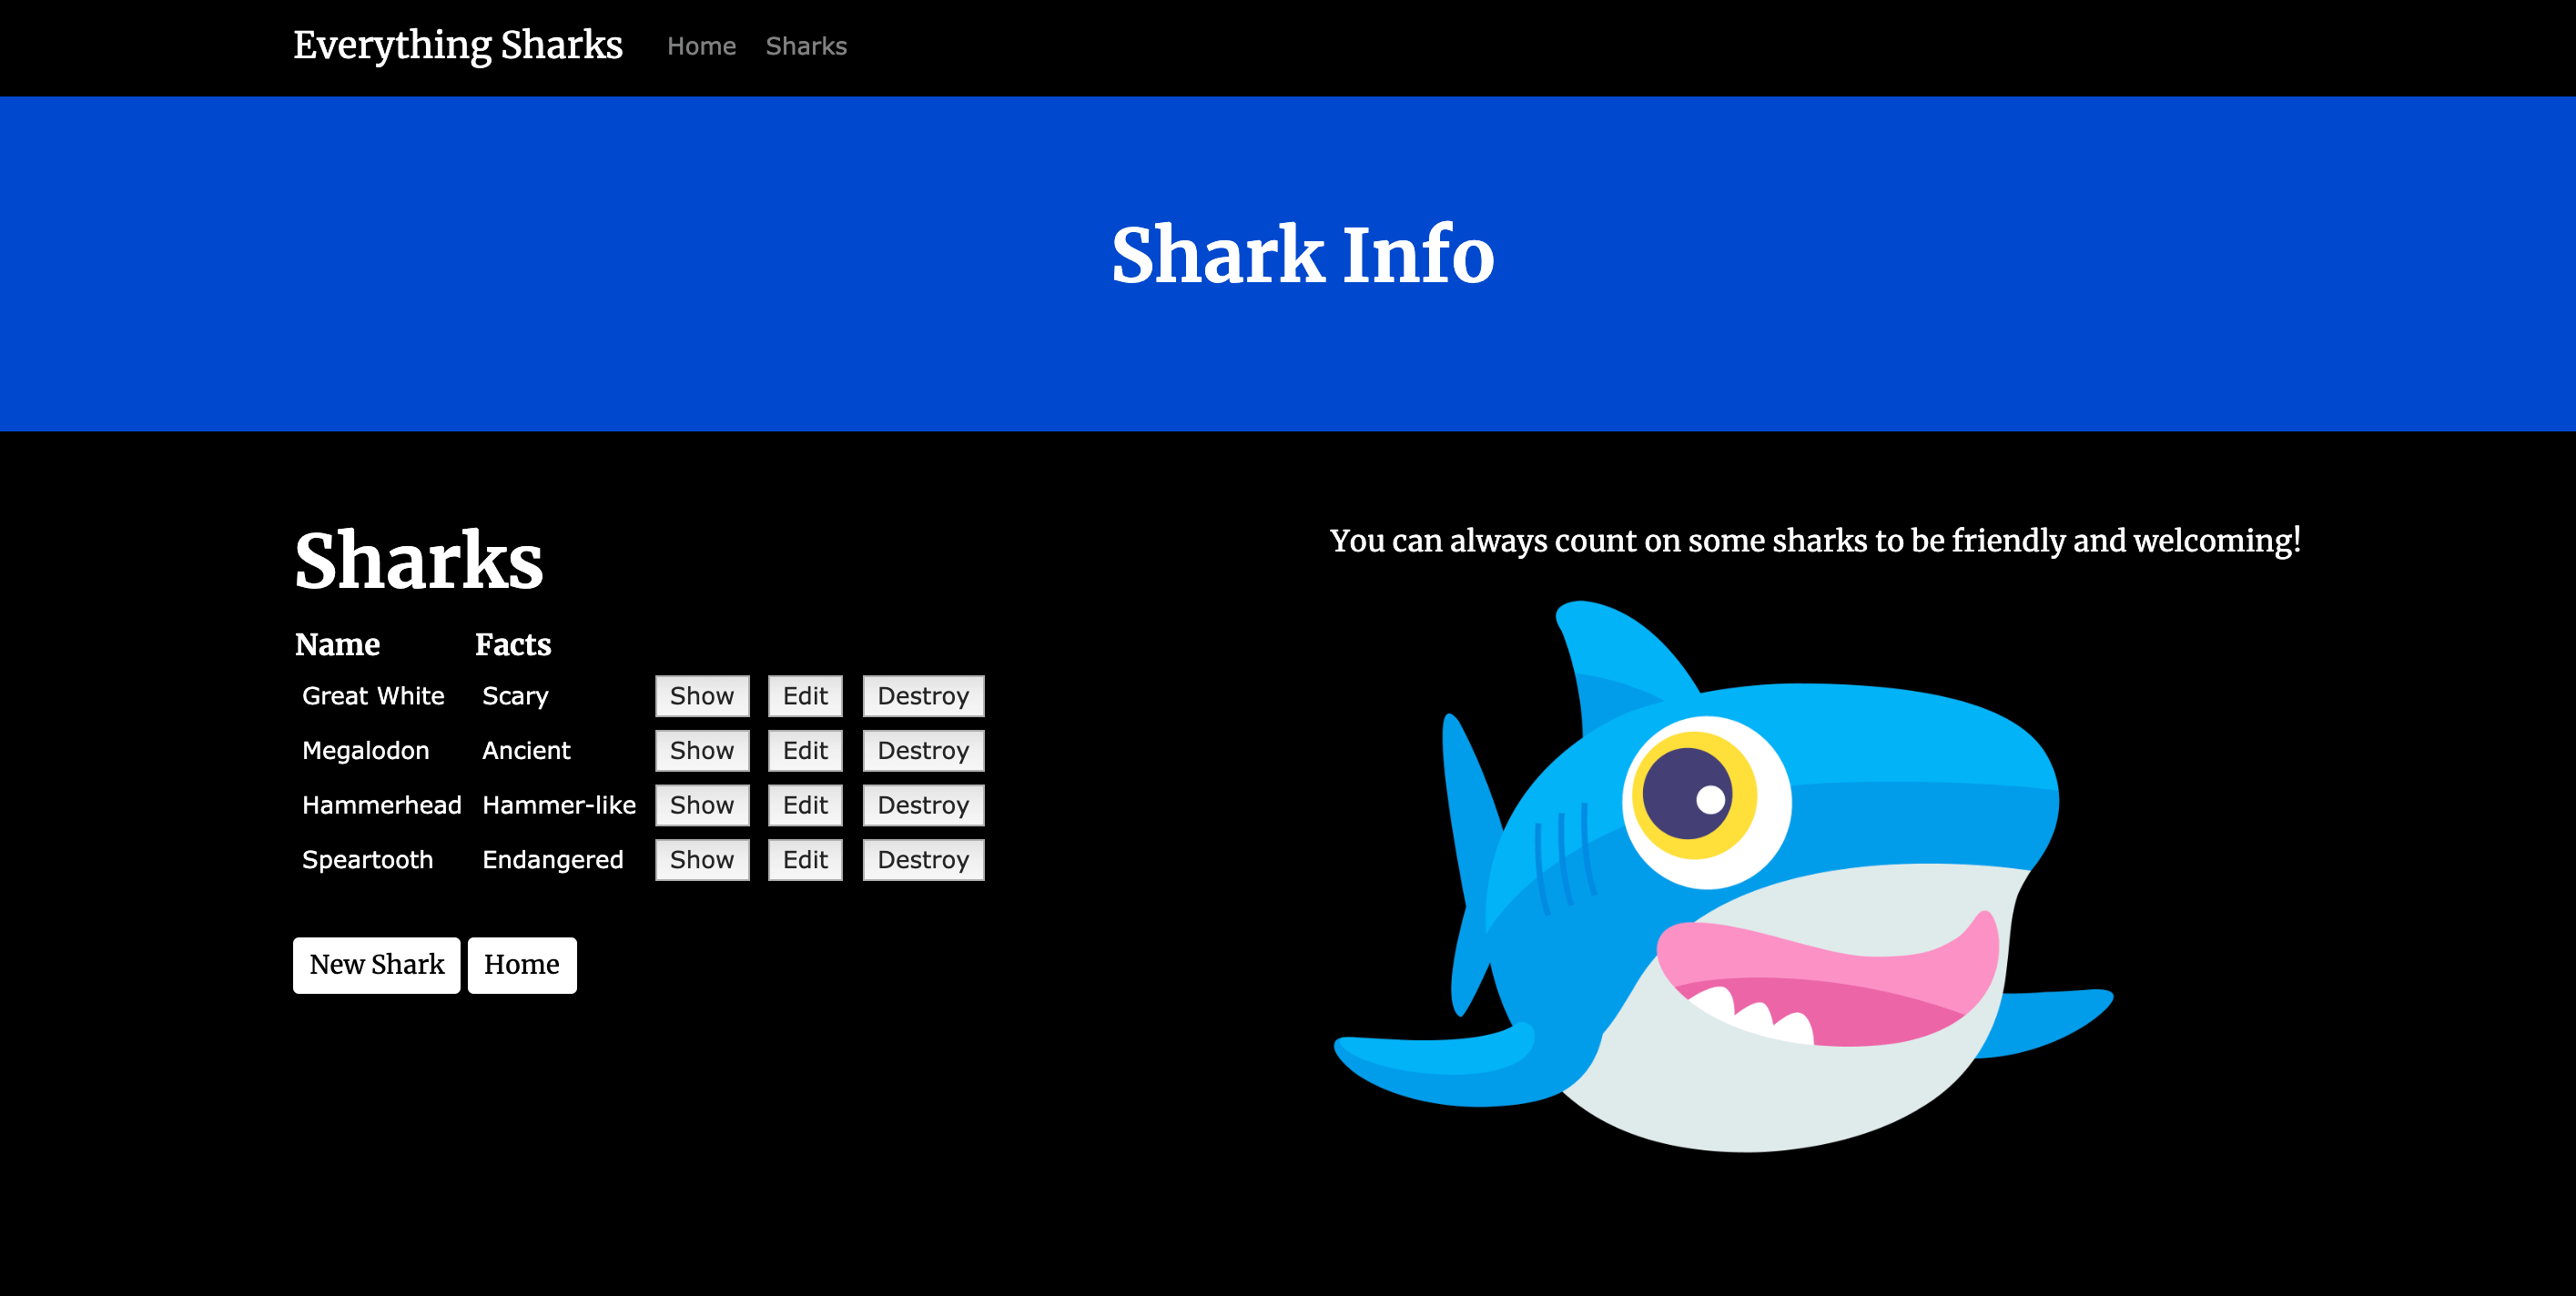
To verify that the application is working, we can add some demo information to it. Click on New Shark. You will be prompted for a username (sammy) and password (shark), thanks to the project’s authentication settings.
On the New Shark page, input “Mako” into the Name field and “Fast” into the Facts field.
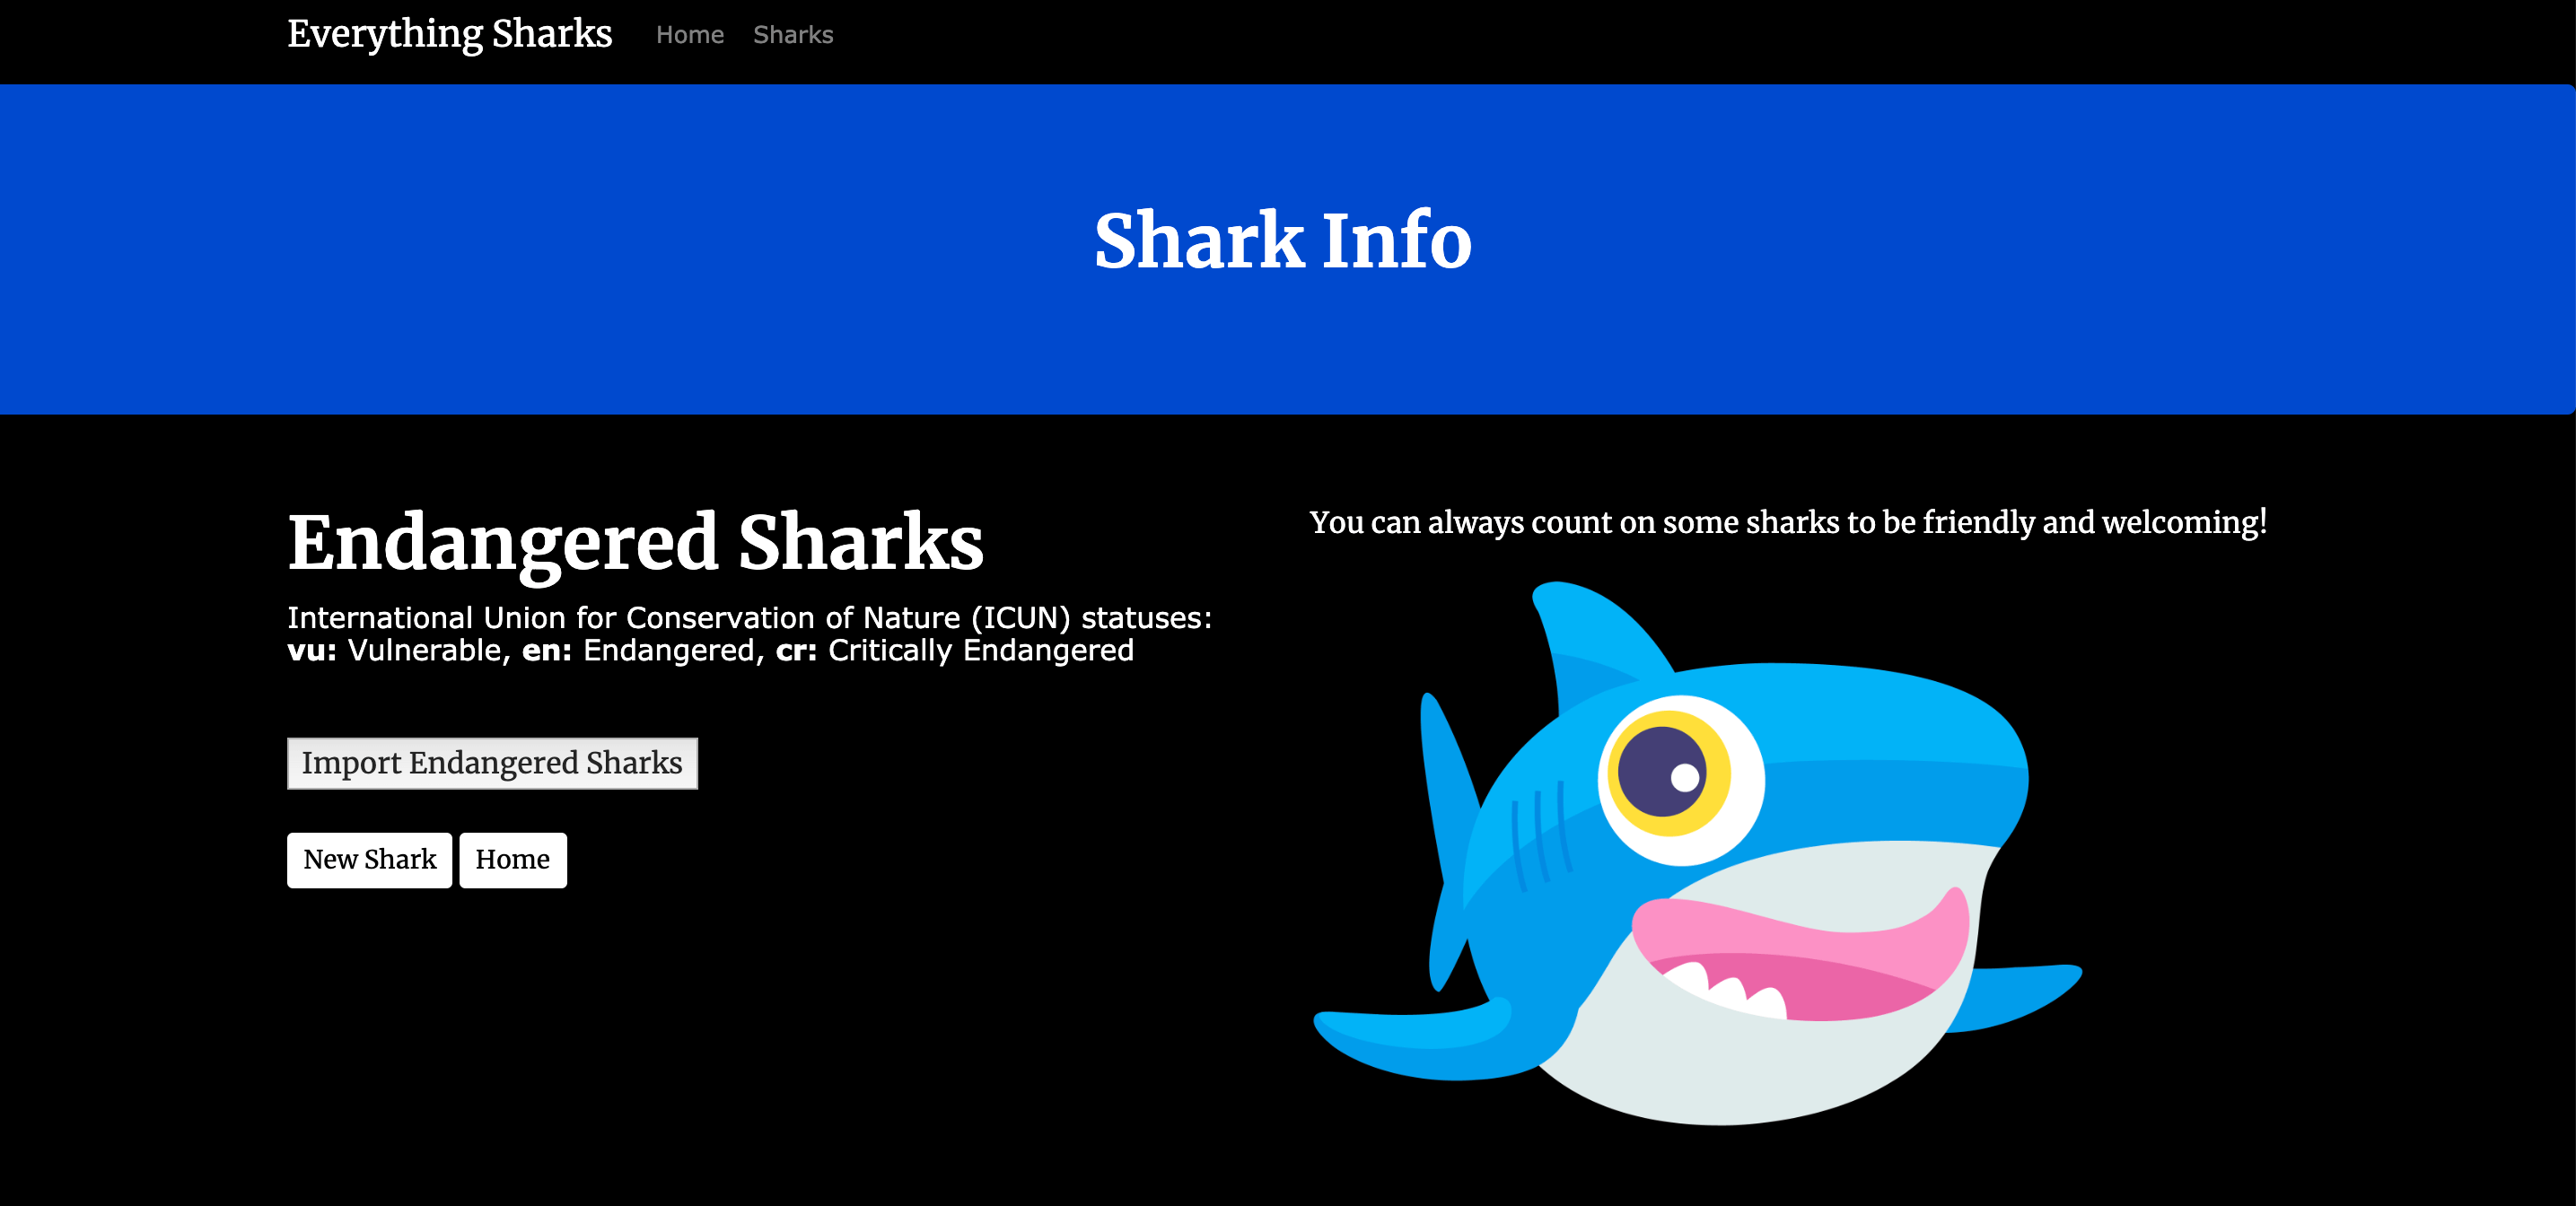
Click on the Create Shark button to create the shark. Once you have created the shark, click Home on the site’s navbar to get back to the main application landing page. We can now test that Sidekiq is working.
Click on the Which Sharks Are in Danger? button. Since you have not uploaded any endangered sharks, this will take you to the endangered index view:
Click on Import Endangered Sharks to import the sharks. You will see a status message telling you that the sharks have been imported:
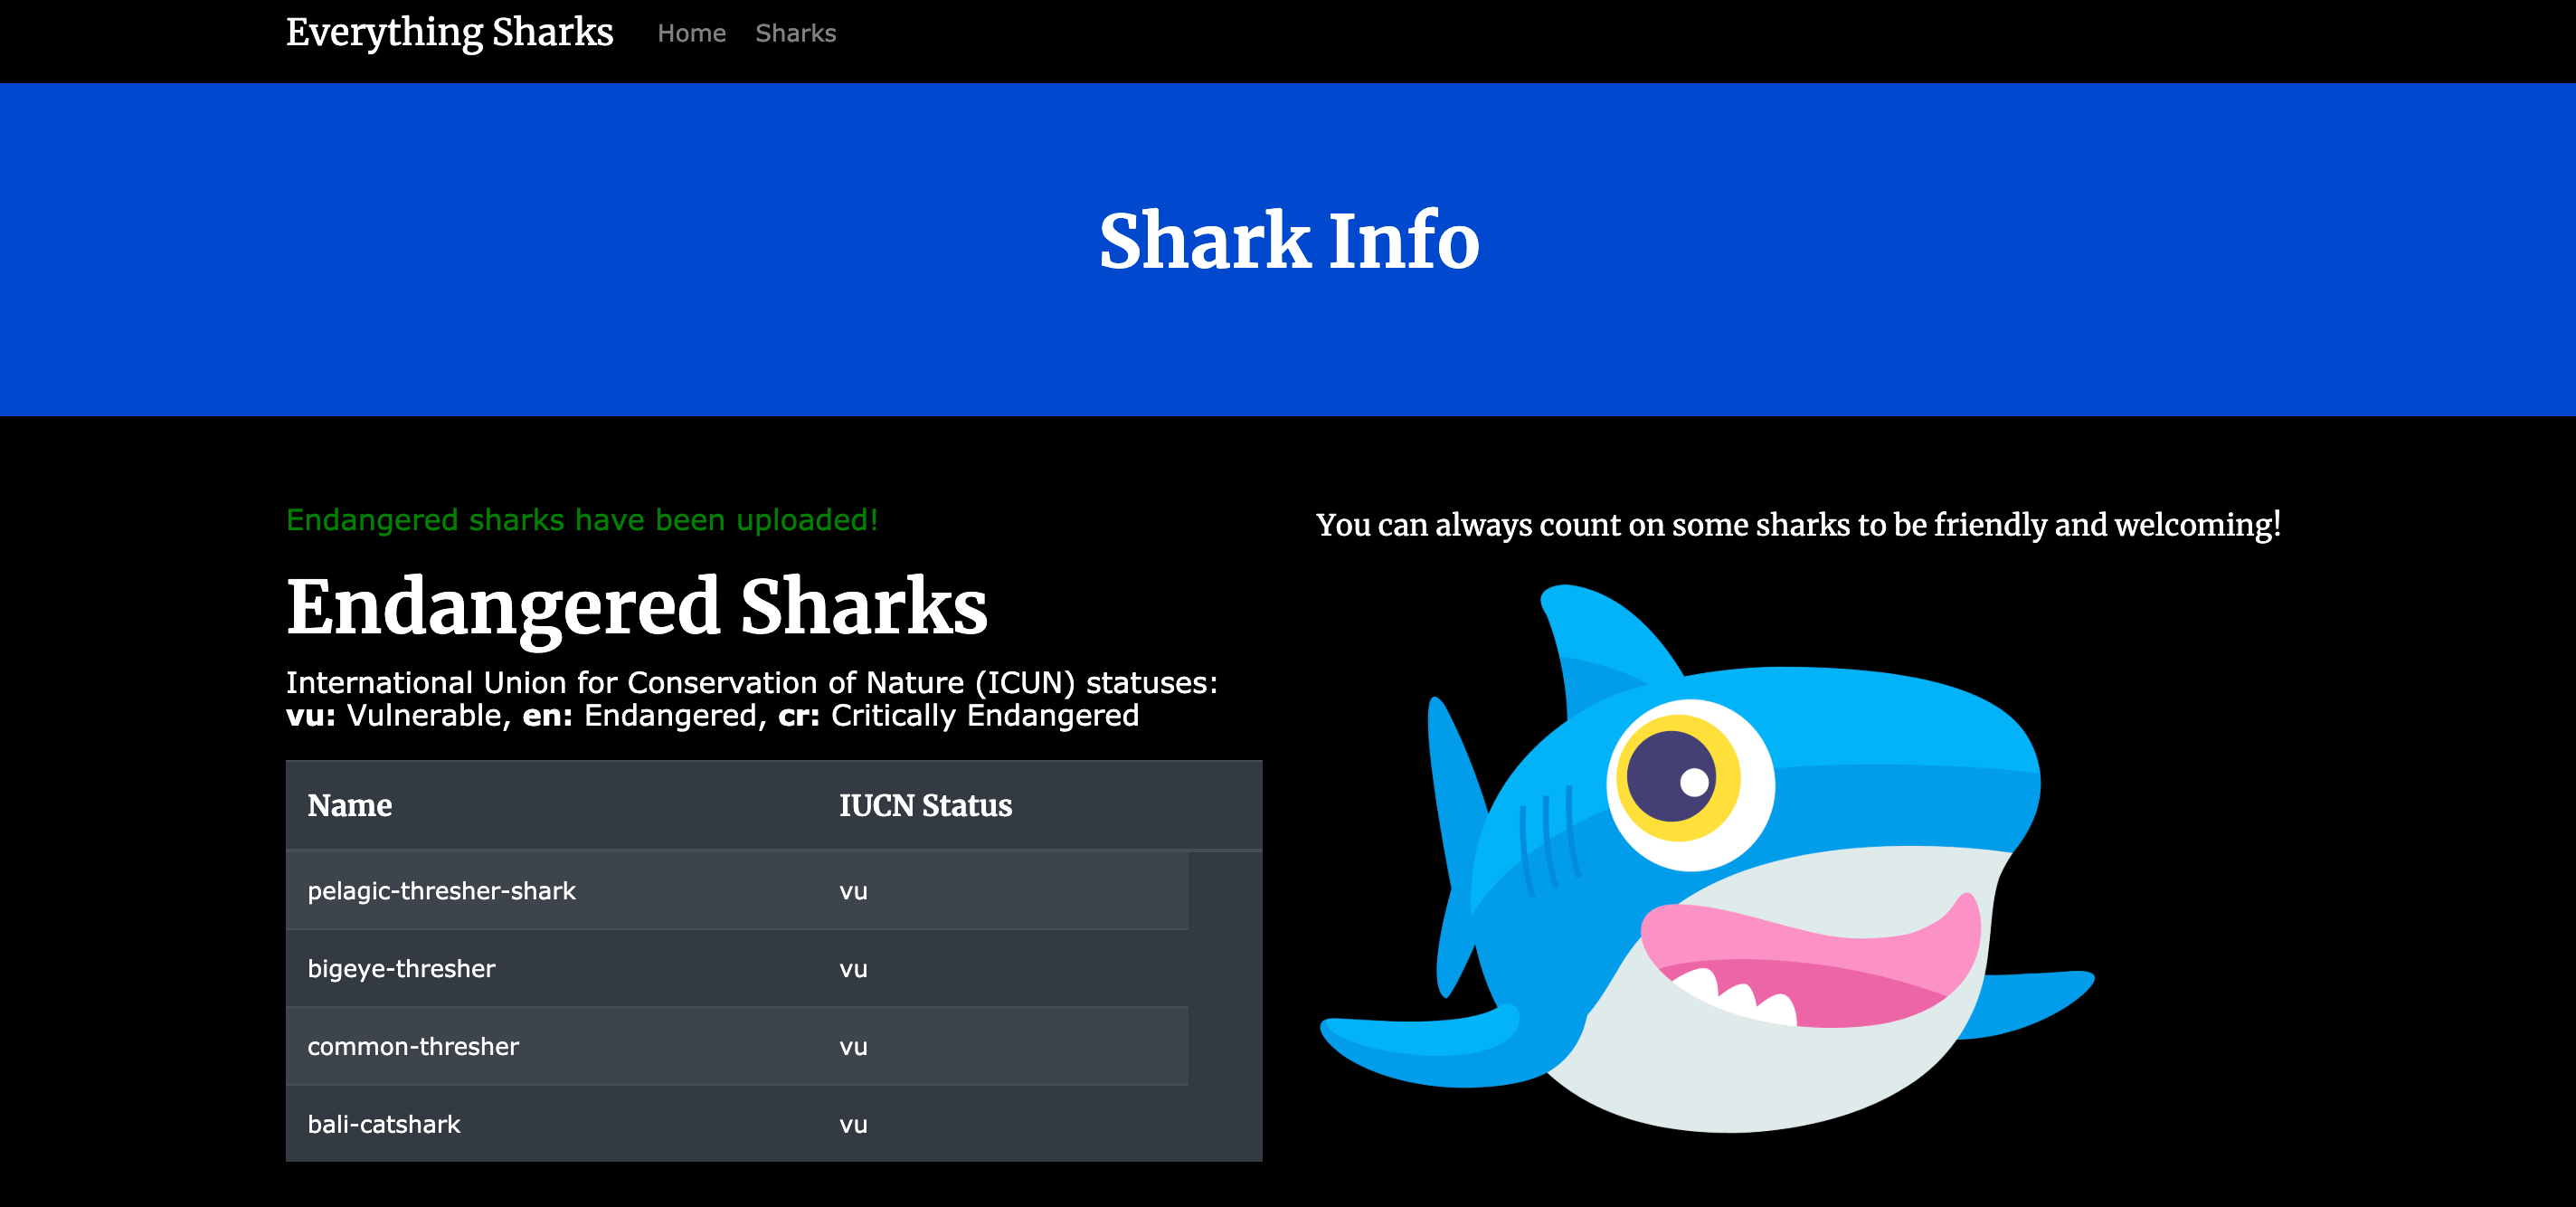
You will also see the beginning of the import. Refresh your page to see the entire table:
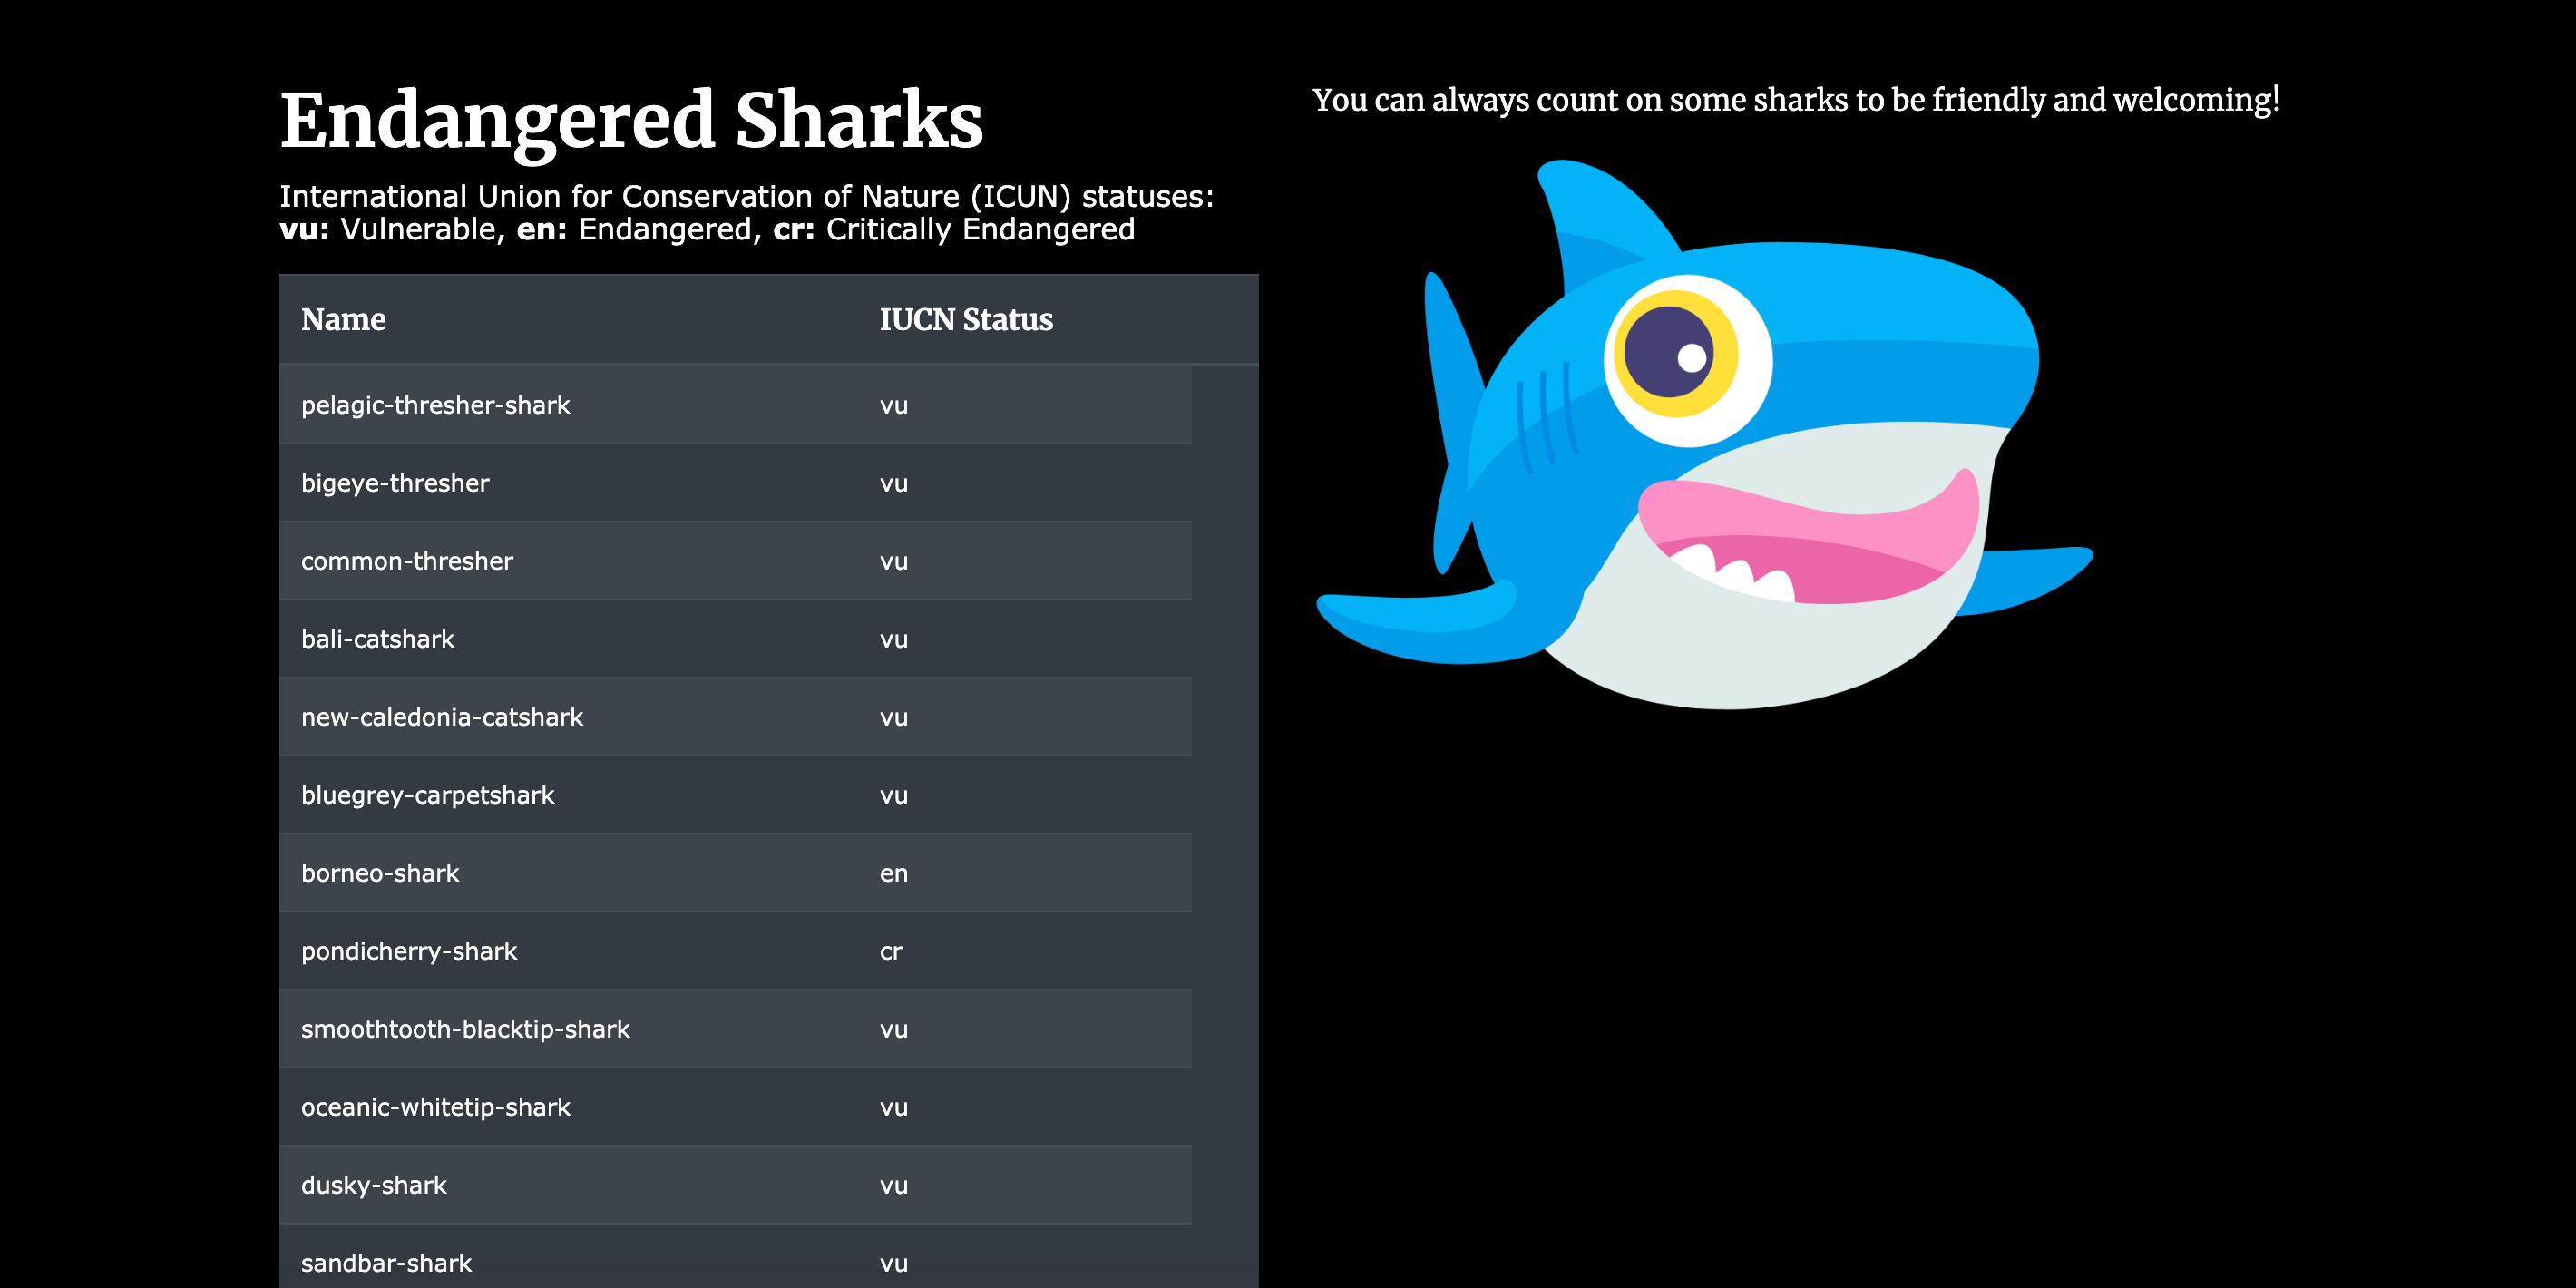
Thanks to Sidekiq, our large batch upload of endangered sharks has succeeded without locking up the browser or interfering with other application functionality.
Click on the Home button at the bottom of the page, which will bring you back to the application main page:
From here, click on Which Sharks Are in Danger? again. You will see the uploaded sharks once again.
Now that we know our application is working properly, we can test our data persistence.
Back at your terminal, type the following command to stop and remove your containers:
- docker-compose down
Note that we are not including the --volumes option; hence, our db_data volume is not removed.
The following output confirms that your containers and network have been removed:
OutputStopping rails-docker_sidekiq_1  ... done
Stopping rails-docker_app_1      ... done
Stopping rails-docker_database_1 ... done
Stopping rails-docker_redis_1    ... done
Removing rails-docker_sidekiq_1  ... done
Removing rails-docker_app_1      ... done
Removing rails-docker_database_1 ... done
Removing rails-docker_redis_1    ... done
Removing network rails-docker_default
Recreate the containers:
- docker-compose up -d
Open the Rails console on the app container with docker-compose exec and bundle exec rails console:
- docker-compose exec app bundle exec rails console
At the prompt, inspect the last Shark record in the database:
- Shark.last.inspect
You will see the record you just created:
IRB session  Shark Load (1.0ms)  SELECT  "sharks".* FROM "sharks" ORDER BY "sharks"."id" DESC LIMIT $1  [["LIMIT", 1]]
=> "#<Shark id: 5, name: \"Mako\", facts: \"Fast\", created_at: \"2019-12-20 14:03:28\", updated_at: \"2019-12-20 14:03:28\">"
You can then check to see that your Endangered sharks have been persisted with the following command:
- Endangered.all.count
IRB session   (0.8ms)  SELECT COUNT(*) FROM "endangereds"
=> 73
Your db_data volume was successfully mounted to the recreated database service, making it possible for your app service to access the saved data. If you navigate directly to the index shark page by visiting localhost:3000/sharks or http://your_server_ip:3000/sharks you will also see that record displayed:
Your endangered sharks will also be at the localhost:3000/endangered/data or http://your_server_ip:3000/endangered/data view:
Your application is now running on Docker containers with data persistence and code synchronization enabled. You can go ahead and test out local code changes on your host, which will be synchronized to your container thanks to the bind mount we defined as part of the app service.
Conclusion
By following this tutorial, you have created a development setup for your Rails application using Docker containers. You’ve made your project more modular and portable by extracting sensitive information and decoupling your application’s state from your code. You have also configured a boilerplate docker-compose.yml file that you can revise as your development needs and requirements change.
As you develop, you may be interested in learning more about designing applications for containerized and Cloud Native workflows. Please see Architecting Applications for Kubernetes and Modernizing Applications for Kubernetes for more information on these topics. Or, if you would like to invest in a Kubernetes learning sequence, please have a look at out Kubernetes for Full-Stack Developers curriculum.
To learn more about the application code itself, please see the other tutorials in this series:
Thanks for learning with the DigitalOcean Community. Check out our offerings for compute, storage, networking, and managed databases.
Tutorial Series: Rails on Containers
This series covers how to build and containerize a Ruby on Rails application. It walks through common development tasks – adding nested resources, a JavaScript framework (Stimulus.js), Bootstrap stylings, and Sidekiq and Redis to handle background jobs – before moving on to showing you how to containerize a Rails application for development.
Browse Series: 7 tutorials
About the author
Former Developer at DigitalOcean community. Expertise in areas including Ubuntu, Docker, Ruby on Rails, Debian, and more.
Still looking for an answer?
This textbox defaults to using Markdown to format your answer.
You can type !ref in this text area to quickly search our full set of tutorials, documentation & marketplace offerings and insert the link!
Why do we need to check for server.pid (tmp/pids/server.pid) before running the Sidekiq? I think it’s only relevant for app container. Is there any better way to check if Sidekiq is running and force stop it?
I’m referring to this code block:
#!/bin/sh

set -e

if [ -f tmp/pids/server.pid ]; then
  rm tmp/pids/server.pid
fi

bundle exec sidekiq
Wow! That might be the best technical article I’ve ever read. (And I’ve read a lot.)
You started with the perfect amount of pre-coded application code. Added just the right of wonderfully explained details at the right time. There was one verb tense that was off, which either confirms you are human, or a very clever AI…other than that, this was the perfect article. So good…just Wow!
Thank you for sharing your awesomeness.
Keep up the good work!
If you get a mimemagic error try adding this to your Gemfile
gem ‘mimemagic’, github: ‘mimemagicrb/mimemagic’, ref: ‘01f92d86d15d85cfd0f20dabd025dcbd36a8a60f’
Hey guys! Great article and great series but I was wondering if you could right something about how to deploy to DO an app configured like this with docker, docker compose and having db, regis, sidekiq services. I’m really struggling on that. The docker/docker compose runs fine locally but when I need to deploy to production, I’m facing big difficulties.
 This work is licensed under a Creative Commons Attribution-NonCommercial- ShareAlike 4.0 International License.
Become a contributor for community
Get paid to write technical tutorials and select a tech-focused charity to receive a matching donation.

DigitalOcean Documentation
Full documentation for every DigitalOcean product.

Resources for startups and AI-native businesses
The Wave has everything you need to know about building a business, from raising funding to marketing your product.
The developer cloud
Scale up as you grow — whether you're running one virtual machine or ten thousand.

Start building today
From GPU-powered inference and Kubernetes to managed databases and storage, get everything you need to build, scale, and deploy intelligent applications.
