
Introduction
DigitalOcean Spaces can provide an object storage solution for WordPress site data. This data is often diverse, including media assets and database files, making it a good candidate for object storage. Because solutions like Spaces can store large amounts of unstructured data, they can accommodate your site’s static assets. Storing static assets separately can optimize site performance by freeing up space and resources on your servers. If your site has dynamic assets – resources with high request rates or database files that need frequent modification – you may consider pairing a block storage solution with your DigitalOcean Space to optimally store your data. To learn more about object and block storage, check out our tutorial on Object Storage vs. Block Storage Services.
In this tutorial, we will use Spaces to back up WordPress data. Because the DigitalOcean Spaces API is interoperable with the AWS S3 API, we will be able to use S3-compatible plugins to manage our backups, as well as S3cmd, a client tool for working with S3 and S3-compatible object stores. We will go over several different methods for creating backups: using a WordPress plugin, creating manual backups using S3cmd, and automating backups with S3cmd and a script created for that purpose.
Prerequisites
This tutorial assumes that you have a WordPress instance on a server as well as a DigitalOcean Space. If not, you can set up the following:
- One Ubuntu server, set up following our Initial Server Setup with Ubuntu tutorial.
- A LAMP stack, installed on your server following our tutorial on How To Install Linux, Apache, MySQL, PHP (LAMP) stack on Ubuntu.
- WordPress, installed on your server following our tutorial on How To Install WordPress with LAMP on Ubuntu.
- A DigitalOcean Space and API key, created by following How To Create a DigitalOcean Space and API Key.
With these prerequisites in place, we can start backing up a WordPress site to Spaces.
Modifying WordPress Permissions
Throughout this tutorial, we will be working with the wp-content/uploads folder in our WordPress project, so it is important that this folder exists and has the correct permissions. You can create it with the mkdir command, using the -p flag to create the folder if it doesn’t exist, and avoid throwing an error if it does:
- sudo mkdir -p /var/www/html/wp-content/uploads
You can now set permissions on the folder. First, set its ownership to your user (we will use sammy here, but be sure to use your non-root sudo user), and group ownership to the www-data group:
- sudo chown -R sammy:www-data /var/www/html/wp-content/uploads
Next, establish the permissions that will give the web server write access to this folder:
- sudo chmod -R g+w /var/www/html/wp-content/uploads
We will now be able to use plugins to create backups for the assets in the wp-content/uploads folder and to engage with our assets from the WordPress interface.
Using Plugins to Create Backups
There are a variety of S3-compatible plugins that you can use to back up your WordPress site to your Space. One factor to consider as you evaluate plugins is whether or not you would like to back up your database files, as some of these resources do not offer that capability. Another factor to keep in mind is whether or not the plugin will pull resources from other plugins. If you are using a document manager, for example, you may want to consider whether or not your backup plugin will capture the files and resources created by your document manager within the wp-content/uploads folder.
Installing Plugins with WP-CLI
It is possible to work with WP-CLI to manage your WordPress plugins from the command line. We will install it in this section and use it in the next to demonstrate how to work with plugins to back up WordPress data to Spaces.
To install WP-CLI, we will follow the project’s suggested steps. Run the following command to download the binary to your tmp folder:
- cd /tmp
- curl -O https://raw.githubusercontent.com/wp-cli/builds/gh-pages/phar/wp-cli.phar
To make this file executable and usable from the command line, type the following:
- chmod +x /tmp/wp-cli.phar
Once we have made the file executable, we can rename it and move it to a location in our PATH:
- sudo mv /tmp/wp-cli.phar /usr/local/bin/wp
If we want to check that our installation was successful, we can run the following:
- wp --info
This will give us general information about the version we are using and its path.
We can now use WP-CLI to install any plugins we wish to use and to manage other tasks related to our WordPress site.
Installing and Configuring UpdraftPlus Backup
If you are concerned about backing up database files along with other media assets, then you may want to use a plugin that offers a database backup option. UpdraftPlus Backup offers a S3-compatible, free-of-cost version that enables database and media backups, along with backup scheduling.
To install UpdraftPlus, we can navigate to our WordPress plugin directory:
- cd /var/www/html/wp-content/plugins
From here, we can install updraftplus using the wp command:
- wp plugin install updraftplus
To activate the plugin, we can run:
- wp plugin activate updraftplus
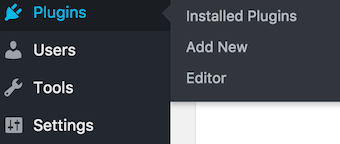
From here, we can navigate to the Plugins tab on the left-hand side of our WordPress administrative dashboard:
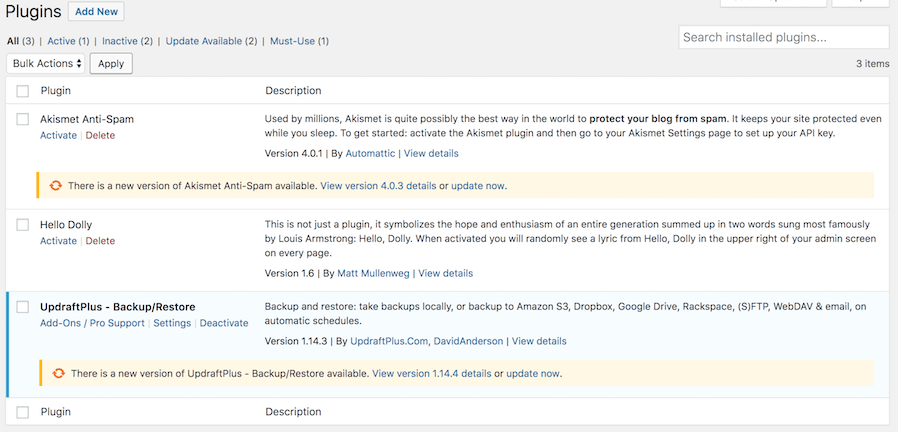
By selecting Installed Plugins, we will arrive at a page that lists our installed plugins. We should see UpdraftPlus - Backup/Restore in the list of available options:
To configure the settings for your backups, navigate to the Settings tab in your administrative dashboard, and select UpdraftPlus Backups from the list of available options. There will be a landing screen that looks like this:
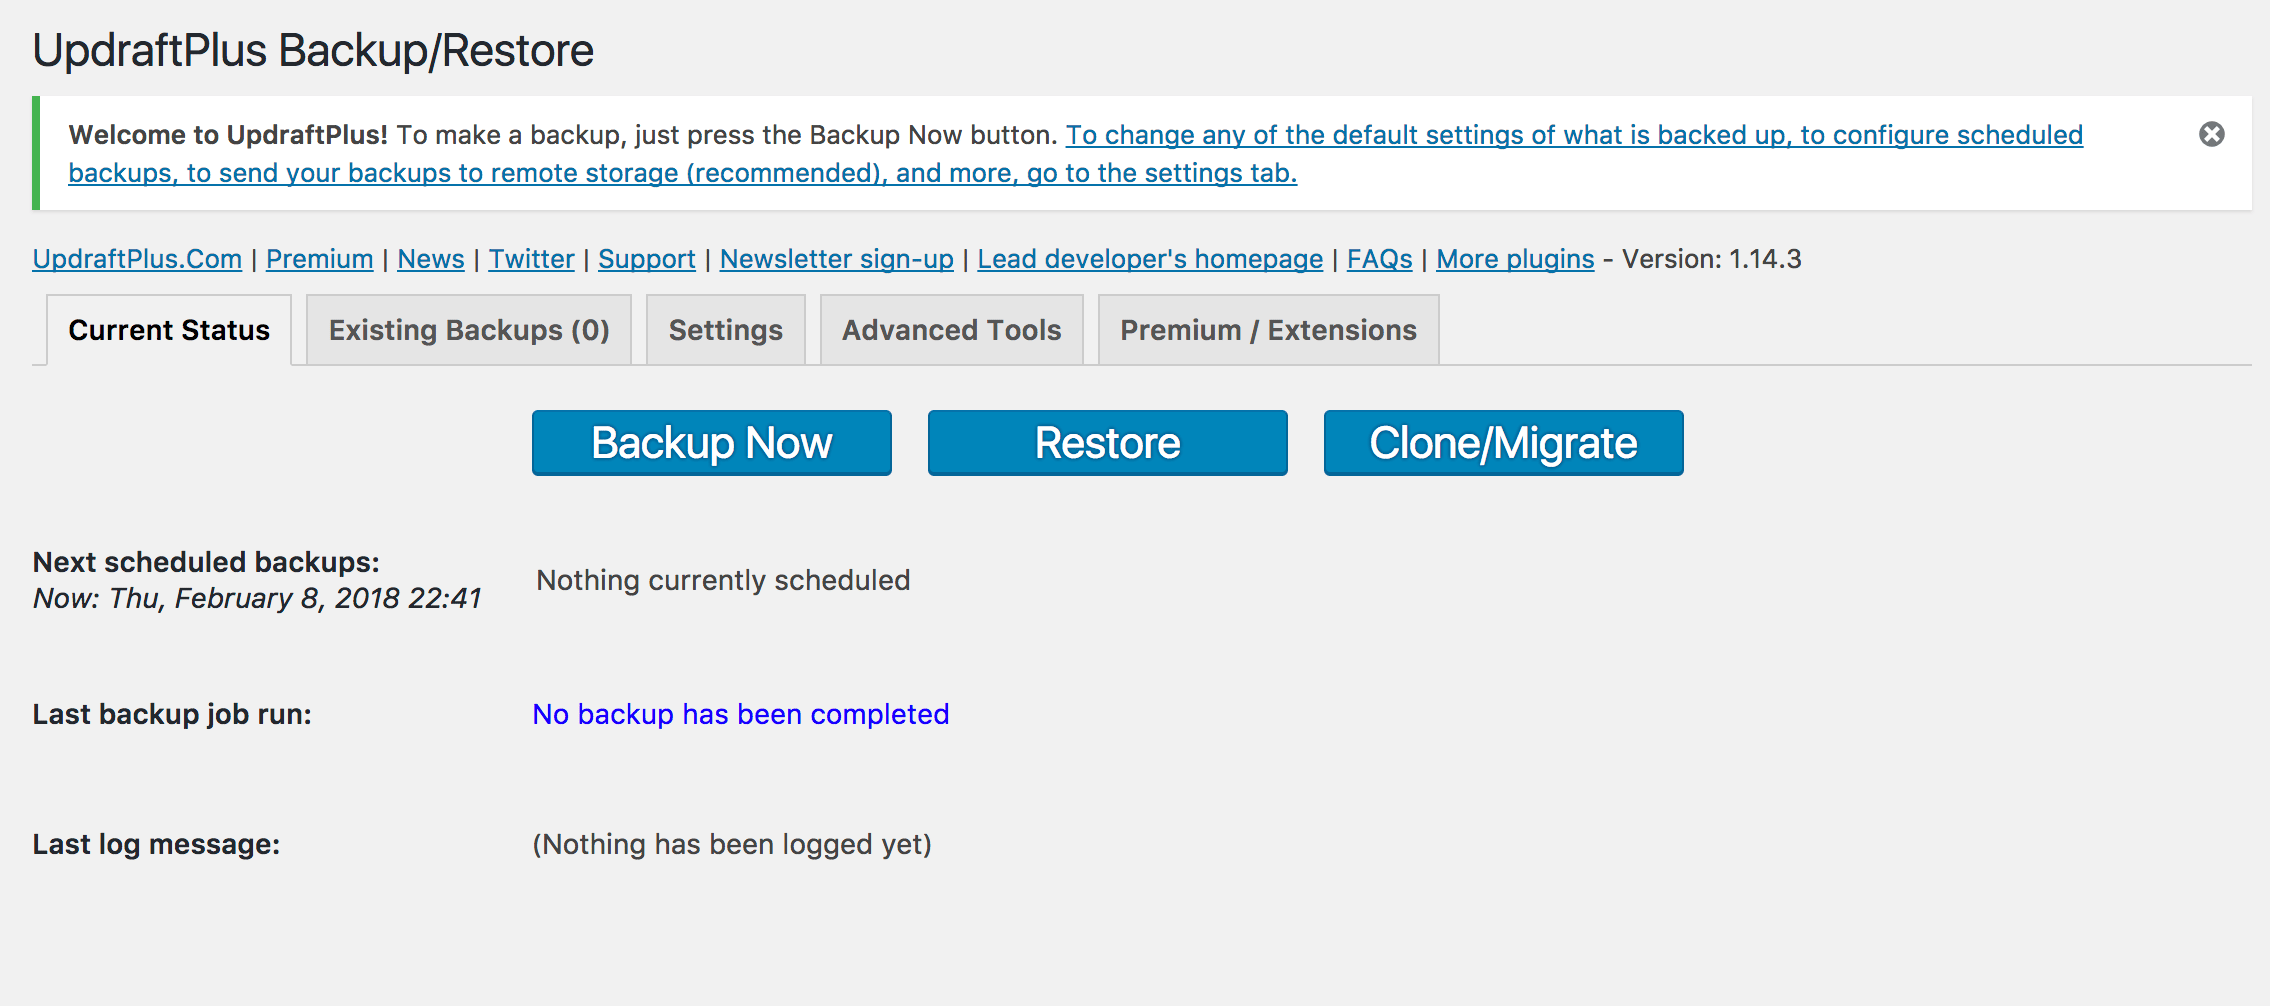
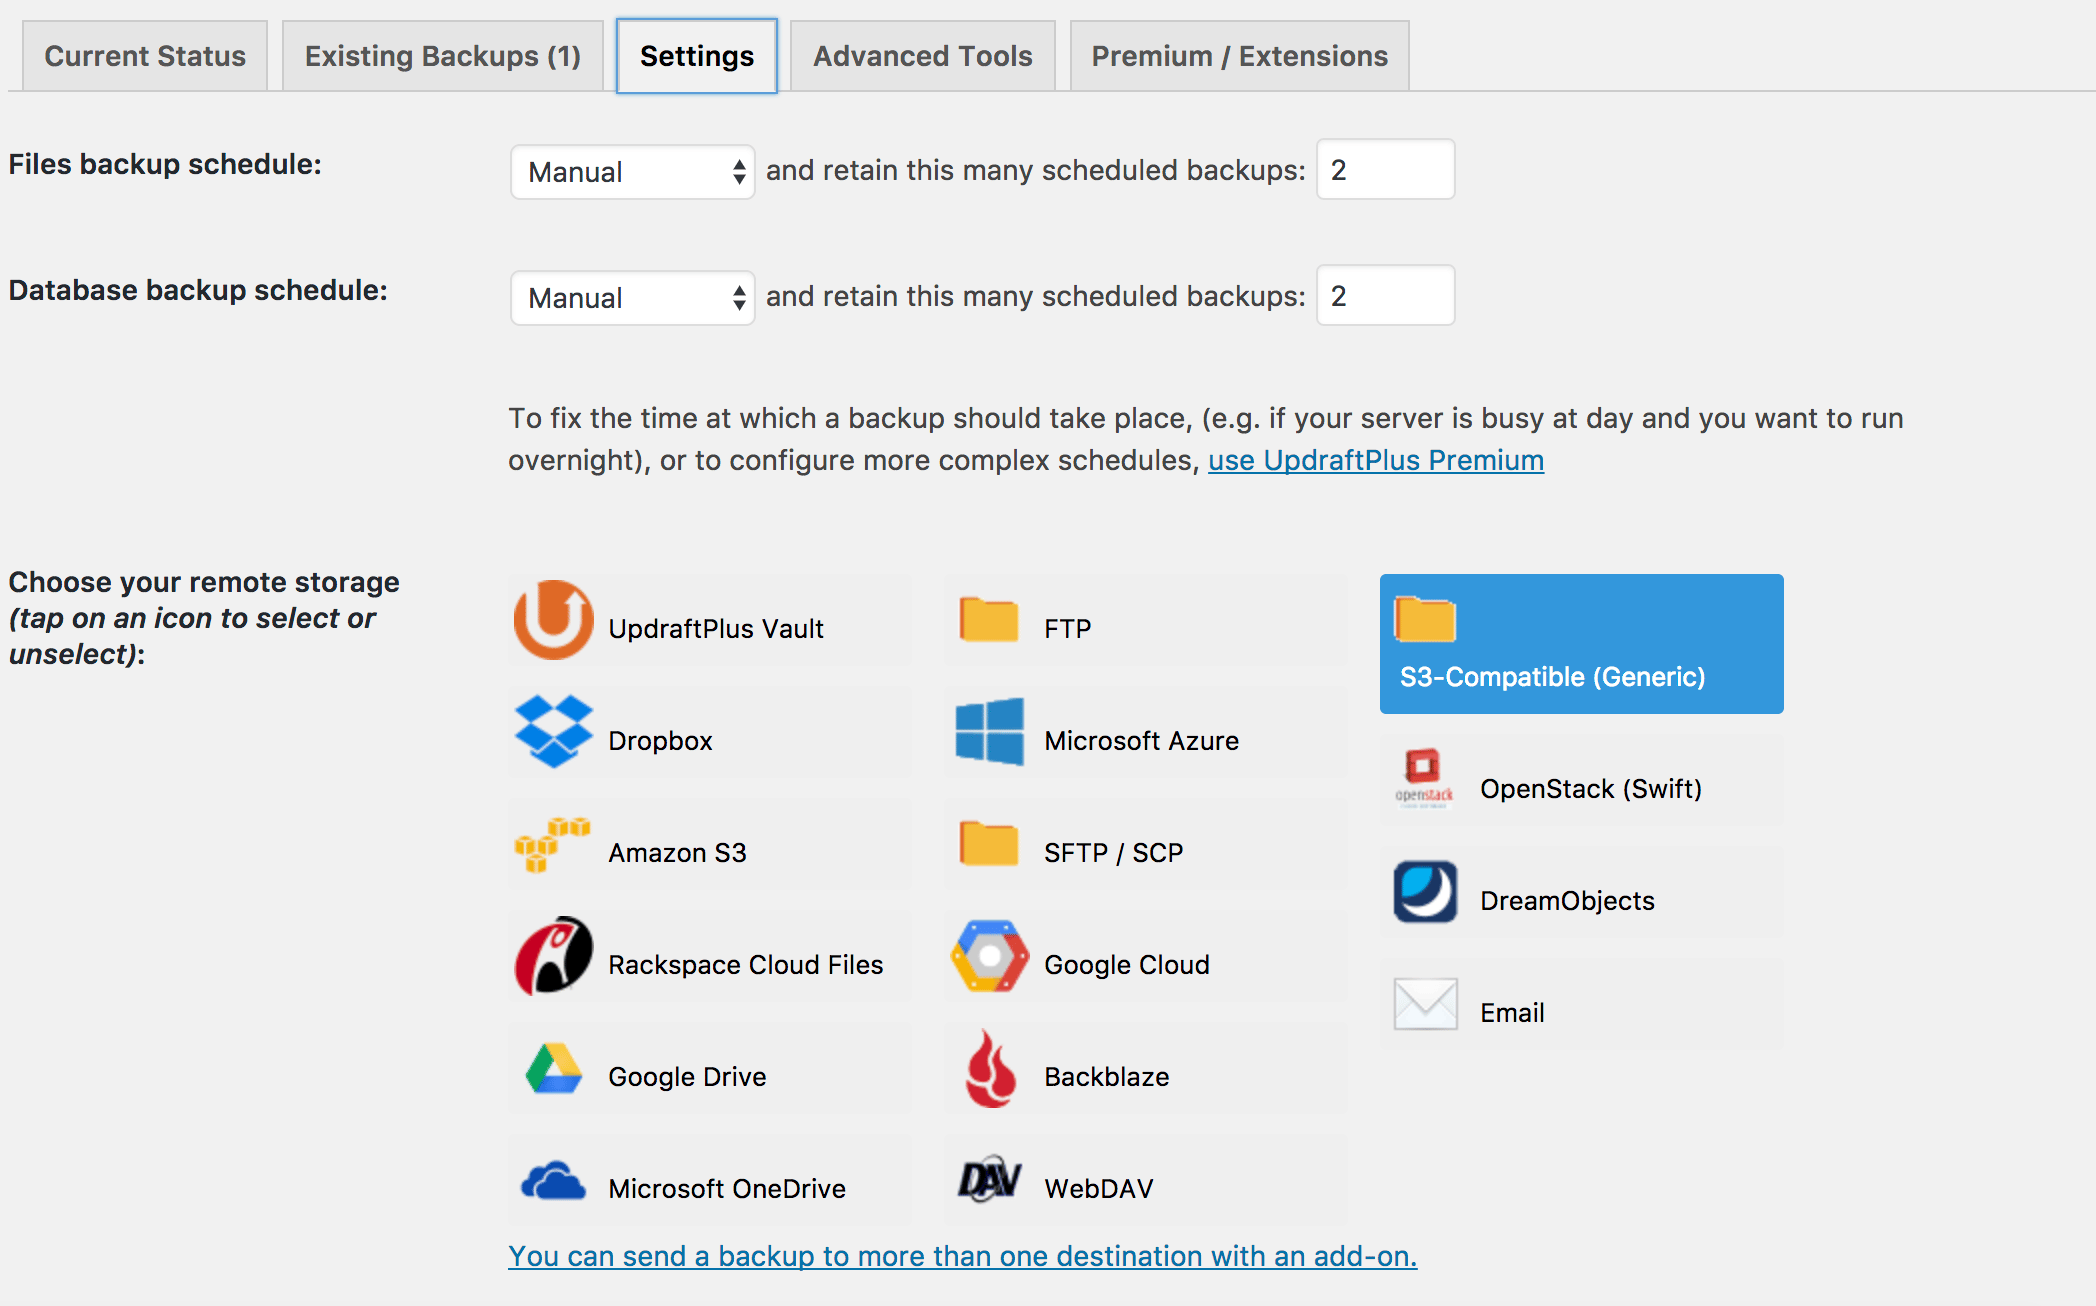
We will cover how to do a basic site backup with this plugin. Under the Settings tab at the top of the page, you will find a menu that allows you to schedule your backups:

If you would like to test that the plugin works, you can leave this set to Manual. We will preserve this setting for now to test that the plugin works correctly.
Underneath this menu, you will see different remote storage options. Select S3-Compatible (Generic):
Upon selecting this option, you will be presented with a menu that asks for your DigitalOcean Space information:
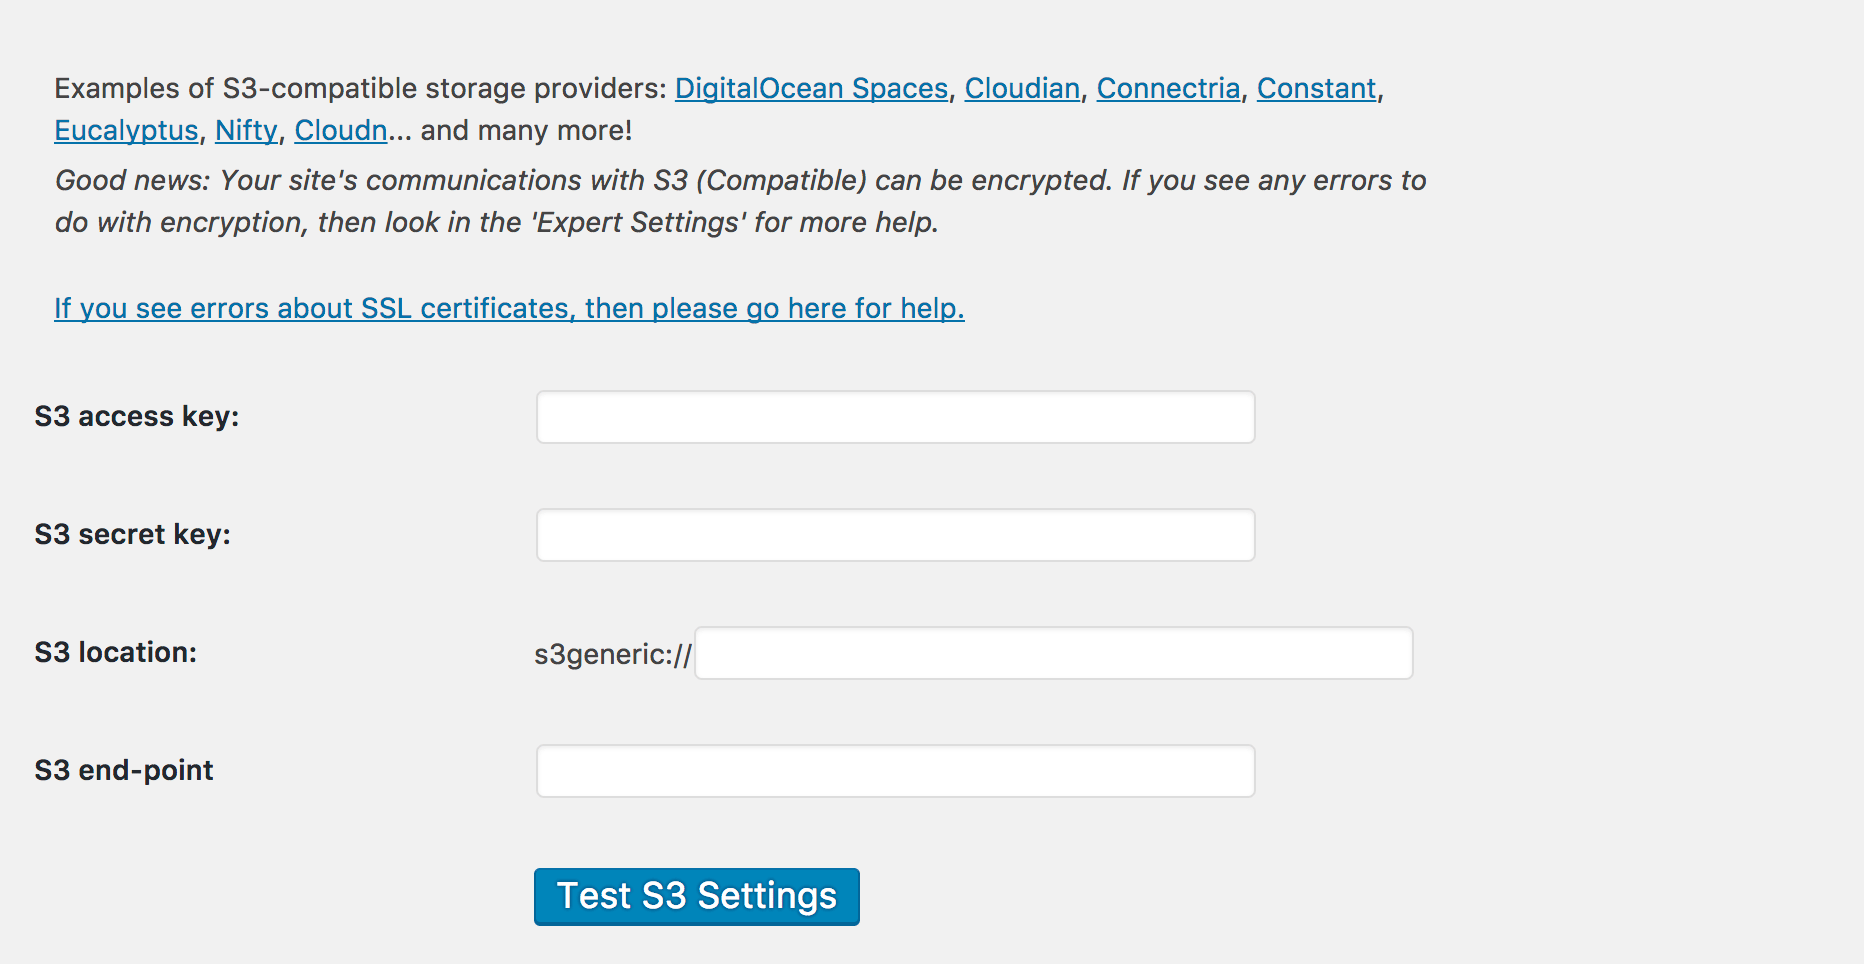
Based on your Space’s URL, you’ll be able to determine its bucket name and endpoint. For example, if the URL of your Space is https://example-name.nyc3.digitaloceanspaces.com, then example-name will be your bucket, and nyc3.digitaloceanspaces.com will be your endpoint. The S3 location will be your bucket name, and S3 end-point will be your endpoint.
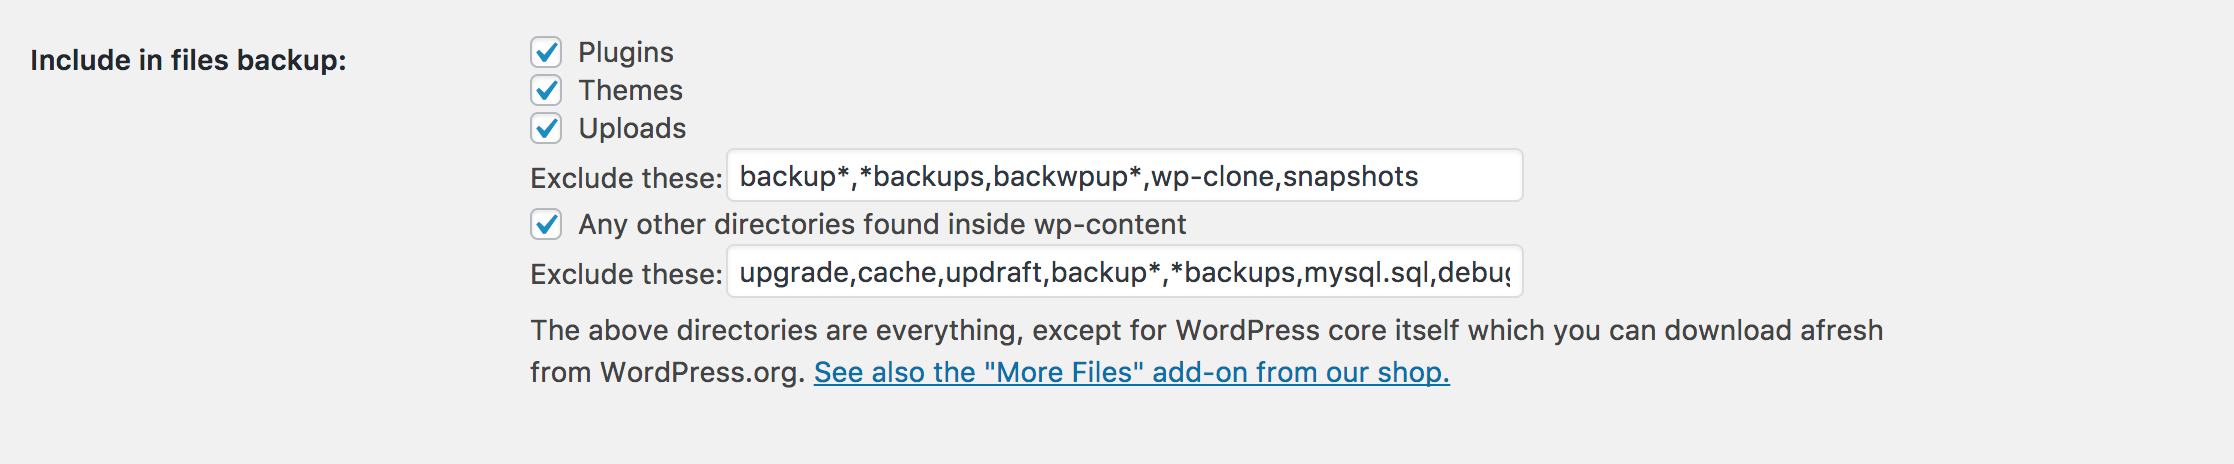
Below this, you will find options for files to include and exclude in your backup:
Once you have filled out these settings to reflect what you would like to back up, you can navigate back to the Current Status tab. When you select Backup Now from the available buttons at the top of the screen, you will be presented with the following menu:
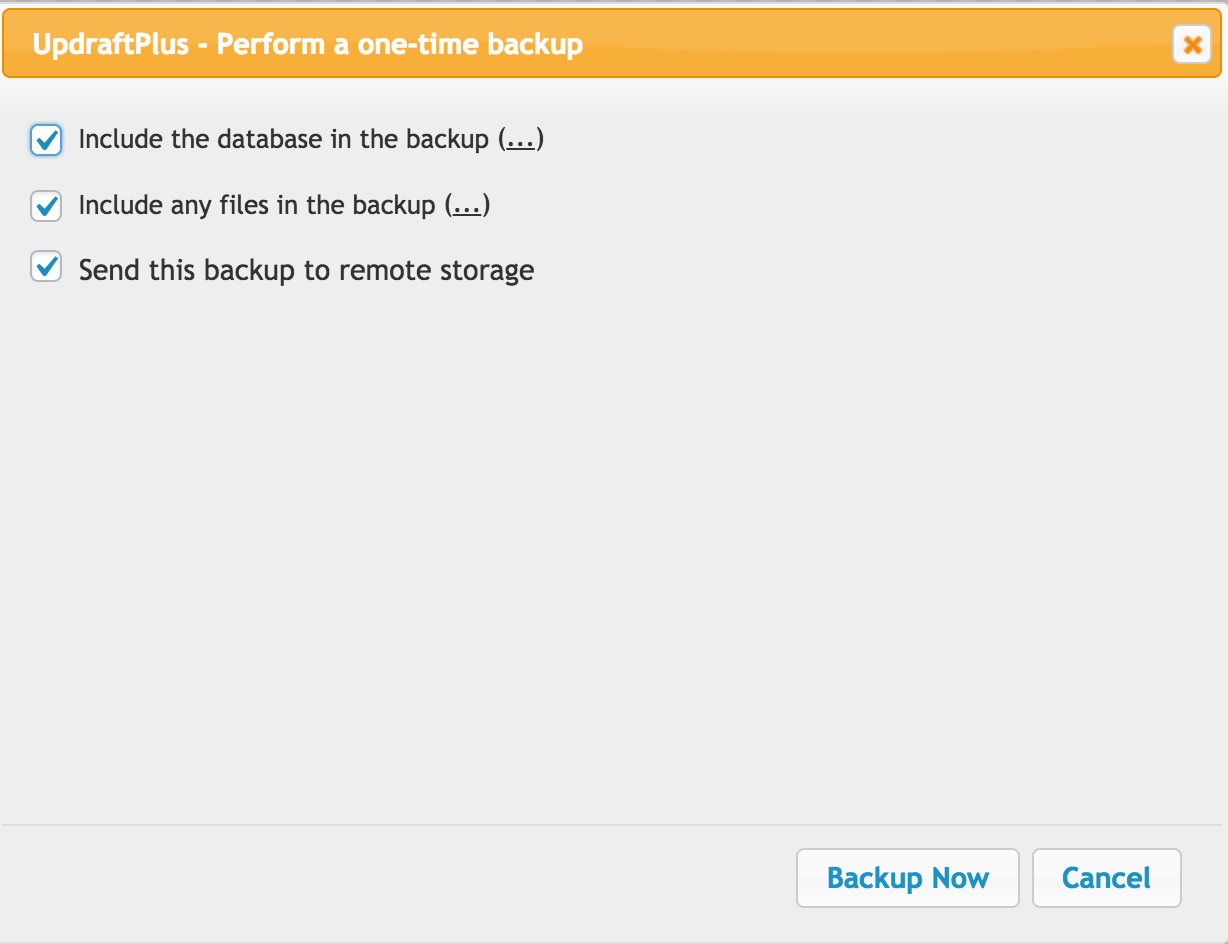
Here, you can select whether or not you would like to back up your database.
Once you have selected the Backup Now option at the bottom of this menu, your backup files should populate your bucket. You can navigate to your Spaces page in the DigitalOcean control panel to check that they are there. Once you have tested the plugin’s functionality, you can modify the backup schedule settings to suit your needs.
Backing Up WordPress with S3cmd
As a command-line tool for managing data in object storage solutions, S3cmd offers a variety of options for backing up your WordPress data to Spaces. It can be used in isolated commands and in scripts that automate the backup process.
If you don’t already have s3cmd installed on your server, you can install it by following the “Install S3cmd” section of this tutorial and configure it with your Spaces information by following the “Configure S3cmd” section.
You should now have s3cmd installed and configured with your Spaces information. You can verify the s3cmd configuration by typing:
- s3cmd --dump-config
You should see output like the following:
Output
[default]
access_key = Your_Spaces_Access_Key
access_token =
add_encoding_exts =
add_headers =
bucket_location = US
ca_certs_file =
cache_file =
check_ssl_certificate = True
check_ssl_hostname = True
cloudfront_host = cloudfront.amazonaws.com
default_mime_type = binary/octet-stream
delay_updates = False
delete_after = False
delete_after_fetch = False
delete_removed = False
dry_run = False
enable_multipart = True
encrypt = False

...
Once we have inspected our s3cmd configuration information to ensure that it matches our Spaces credentials we will be ready to use s3cmd to back up files to our Space. We will do this manually first, before moving on to create a script that will automate this work.
Creating Manual Backups of the wp-content/uploads Folder
To create a backup of our wp-content/uploads folder, we will use a command called s3cmd sync. This will allow us to transfer only those files that don’t already exist in our Space. Though this may not be significant for a one-time transfer, it can quickly become important as you move more data to your Space. We will use sammys-bucket for our bucket, and sammys-backups to designate a backup folder on our Space, but you should replace these with the names of your bucket and backup folder (if applicable). To ensure that our files are going to their intended destination, we will use the --dry-run option with s3cmd, as follows:
s3cmd sync --dry-run /var/www/html/wp-content/uploads s3://sammys-bucket/sammys-backups/
If the output of the command indicates that your data will reach its intended destination, then you can go ahead and run the command without the --dry-run option:
s3cmd sync /var/www/html/wp-content/uploads s3://sammys-bucket/sammys-backups/
Creating Manual Backups of the MySQL Database
We can now create a manual backup of our MySQL database. This will happen in 4 parts. First, we can create a folder in our home directory to hold our database files:
- mkdir ~/mysqldmp
Next, we will create a file to hold our database user and password information. This will help us avoid passing that information to the command line in the process of creating our backup files. User-specific options for MySQL are typically stored in ~/.my.cnf, so we will create that file in our home directory. Type:
- nano ~/.my.cnf
Inside the file, we will specify the username and password for our MySQL client:
[client]
user=mysql_user
password=mysql_password
Save this file by typing CTRL+X followed by Y.
To restrict read and write permissions to our user, we can type the following:
- chmod 600 .my.cnf
Now we will be able to run the mysqldump command to make a copy of our database files without passing password information to the command line. When we run mysqldump, it will look for our .my.cnf file as part of its process for reading default options. To compress the output from our database, we can also use gzip, as follows:
- mysqldump mysqldatabase_name | gzip > ~/mysqldmp/mysql_dump.sql.gz
Finally, we can use s3cmd to send the compressed file to our Space:
- s3cmd sync mysqldmp/mysql_dump.sql.gz s3://sammys-bucket/sammys-backups/
You should now see the compressed database file in your Space.
Automating WordPress Backups with Cron
Automating your backups will ensure that your WordPress data remains accessible and recoverable. Though it is possible to create backups manually, this is a time-consuming process that can be usefully automated with the cron job scheduler. To learn more about using cron to schedule tasks, check out our tutorial on How To Schedule Routine Tasks With Cron and Anacron on a VPS.
To create a file for our backup script, we can use the following command:
- nano ~/wp-sync.sh
Within the empty file, we will first write the following to indicate that this script will be run by the Bash shell:
#!/bin/bash
Next, we will declare variables that will specify information about which files and databases we will back up. Our DATABASE and UPLOADS_DIR variables will specify information about the database and folder that we will back up. We will declare these variables as arrays, which would allow us to specify more than one value:
...
DATABASE=("mysqldatabase_name") # To add more than one database, separate values with spaces: ("database1" "database2")
UPLOADS_DIR=("/var/www/html/wp-content/uploads") # To add more than one directory, separate values with spaces: ("folder1" "folder2")

BACKUP_DIR=/home/sammy/mysqldmp
The DATABASE variable specifies the name of the WordPress database or databases that mysqldump will back up. UPLOADS_DIR points to the directory or directories that we are backing up. BACKUP_DIR tells the script where mysqldump should write the backup file.
Next, we will set our s3cmd information, including our Spaces bucket information. This information will mirror the s3 bucket information from our s3cmd configuration file. When we specify our S3_CMD variable, we will include a path to the s3cmd binary for cron. We will also include a DATE variable, which will allow us to create timestamps for our backup files:
...

DATE=$(date +%y%m%d-%H_%M_%S)


S3_CMD="/usr/local/bin/s3cmd"
S3_BUCKET=s3://sammys-bucket/sammys-backups/$DATE/
Here, we’ve made the DATE variable very granular, to capture the year(%y), month (%m), day (%d), hour (%H), minute (%M), and second (%S) of our backup. Depending on the frequency of your backup schedule, you can modify this in a way that will allow you to usefully track your backups. Our S3_CMD variable will point to the s3cmd executable that will allow us to run our commands.
Next, we’ll include a set of commands that will create our mysqldmp directory, in the case that it doesn’t already exist, and remove any files from that directory in the course of the update process:
...

mkdir -p $BACKUP_DIR
rm -rf "${BACKUP_DIR:?}/*"
Finally, we will create for loops to run s3cmd sync for our database files. We will again use mysqldump to create a compressed database file, but we will add to it the --defaults-extra-file option, which tells mysqldump to read .my.cnf in addition to the standard option files. We will also iterate through our database array, enacting the same set of actions on each database:
...

for DB in "${DATABASE[@]}"
do
mysqldump --defaults-extra-file=/home/sammy/.my.cnf "$DB" | gzip > "$BACKUP_DIR/mysql_dump.sql.gz"
$S3_CMD sync "$BACKUP_DIR/mysql_dump.sql.gz" "$S3_BUCKET"
done
The mysqldump and s3cmd sync commands do the same work as they did in the previous section. However, because we added the timestamp of the DATE variable to our bucket, our files will be created in our Space in a way that lets us easily track when they were created.
Next, we will create a loop for our directory. Again, we will iterate through the UPLOADS_DIR array to enact the same actions on each directory:
...

for DIR in "${UPLOADS_DIR[@]}"
do
$S3_CMD sync "$DIR" "$S3_BUCKET"
done
Again, the s3cmd sync command is identical to the command we used to make a manual backup of this directory. The difference is the timestamp that gets affixed to this material in our Space.
The script in full will look like this:
#!/bin/bash

DATABASE=("mysqldatabase_name") # To add more than one database, separate values with spaces: ("database1" "database2")
UPLOADS_DIR=("/var/www/html/wp-content/uploads") # To add more than one directory, separate values with spaces: ("folder1" "folder2")

BACKUP_DIR=/home/sammy/mysqldmp

DATE=$(date +%y%m%d-%H_%M_%S)

S3_CMD="/usr/local/bin/s3cmd"
S3_BUCKET=s3://sammys-bucket/sammys-backups/$DATE/

mkdir -p $BACKUP_DIR
rm -rf "${BACKUP_DIR:?}/*"

for DB in "${DATABASE[@]}"
do
mysqldump --defaults-extra-file=/home/sammy/.my.cnf "$DB" | gzip > "$BACKUP_DIR/mysql_dump.sql.gz"
$S3_CMD sync "$BACKUP_DIR/mysql_dump.sql.gz" "$S3_BUCKET"
done

for DIR in "${UPLOADS_DIR[@]}"
do
$S3_CMD sync "$DIR" "$S3_BUCKET"
done
We can now make our wp-sync.sh script executable:
- chmod +x ~/wp-sync.sh
To test it, we can run:
- sudo ~/wp-sync.sh
Navigate to your Space, and be sure that your files are copied as intended. Once you have checked this, you can edit the crontab file to run the script at a desired interval.
Open the crontab file by typing:
- crontab -e
If this is your first time editing this file, you will be asked to choose an editor:
no crontab for root - using an empty one
Select an editor.  To change later, run 'select-editor'.
  1. /bin/ed
  2. /bin/nano        <---- easiest
  3. /usr/bin/vim.basic
  4. /usr/bin/vim.tiny
Choose 1-4 [2]:
...
You can select 2 for nano, or enter the number corresponding to the editor of your choice.
At the bottom of the file, we will add a line to specify how often our script should run. To test our script’s functionality, we can set our time interval to two minutes as follows:
...

*/2 * * * * /home/sammy/wp-sync.sh
After two minutes, you should see a time-stamped deposit of files in your Space. You can now modify the crontab file to specify the time interval you would like to use for your backups.
Conclusion
We have covered several ways you can back up your WordPress data to DigitalOcean’s Spaces object storage service.
To learn more about working with s3cmd and Spaces, check out our guide to configuring s3cmd 2x to manage DigitalOcean Spaces. You can also check out our tutorials on How To Automate Backups with DigitalOcean Spaces and How To Backup Your Git Repository To DigitalOcean Spaces for more examples of automation scripts and backup options. Finally, for more information on optimizing how you use Spaces, check out Best Practices for Performance on DigitalOcean Spaces.
Thanks for learning with the DigitalOcean Community. Check out our offerings for compute, storage, networking, and managed databases.
About the author
Former Developer at DigitalOcean community. Expertise in areas including Ubuntu, Docker, Ruby on Rails, Debian, and more.
Still looking for an answer?
This textbox defaults to using Markdown to format your answer.
You can type !ref in this text area to quickly search our full set of tutorials, documentation & marketplace offerings and insert the link!
Great tutorial, but it would be good if the script could also be written so it could create backups on a daily basis, move the 7th daily to a weekly and delete any backups over 7 days and then when there are 5 weeks, move to a monthly and delete any more than 5 weeks
If that makes sense
This as is would just keep adding daily backups for ever and eventually fill the space?
 This work is licensed under a Creative Commons Attribution-NonCommercial- ShareAlike 4.0 International License.
Become a contributor for community
Get paid to write technical tutorials and select a tech-focused charity to receive a matching donation.

DigitalOcean Documentation
Full documentation for every DigitalOcean product.

Resources for startups and AI-native businesses
The Wave has everything you need to know about building a business, from raising funding to marketing your product.
The developer cloud
Scale up as you grow — whether you're running one virtual machine or ten thousand.

Start building today
From GPU-powered inference and Kubernetes to managed databases and storage, get everything you need to build, scale, and deploy intelligent applications.
