By sainttobs and Rachel Lee

The author selected the Owasp Foundation to receive a donation as part of the Write for DOnations program.
Introduction
Django is a free, open-source, high-level Python web framework for developing dynamic websites and applications. With Django, you can quickly create Python web applications and rely on the framework to do most of the heavy lifting.
Building an application requires making a choice about databases: SQL or NoSQL. (For more about databases, see our tutorials on Understanding Relational Database and A Comparison of NoSQL Database Management Systems and Models.) NoSQL databases like MongoDB have the advantage of being efficient at storing large amounts of data, which makes them ideal for use in Big Data applications, the Internet of Things (IoT), and more. NoSQL databases are commonly used in companies that handle huge amounts of data.
The most commonly used NoSQL database is MongoDB, an open-source Document Database used for high-volume data storage. Instead of using tables and rows like traditional relational databases, MongoDB makes use of collections and documents. Documents consist of key-value pairs, which are the basic unit of data in MongoDB.
PyMongo is the official distribution recommended by Python to connect your Django application to a MongoDB database. PyMongo is an open-source Python distribution containing tools for interacting with MongoDB. It makes it easier to perform CRUD operations (Create, Read, Update, and Delete) with a MongoDB database.
In this tutorial, you will create a Managed MongoDB database cluster and use PyMongo to connect it with your Django application. You’ll then use PyMongo to store data in your MongoDB instance and retrieve the data.
Prerequisites
For this tutorial, you’ll need the following:
- Django installed on your system. To do this, follow the How To Install the Django Web Framework tutorial for your distribution.
- A DigitalOcean account. If you do not have one, sign up for a new account.
Step 1 — Creating a DigitalOcean Managed MongoDB Cluster
In this step, you will use your DigitalOcean account to set up the managed MongoDB database cluster.
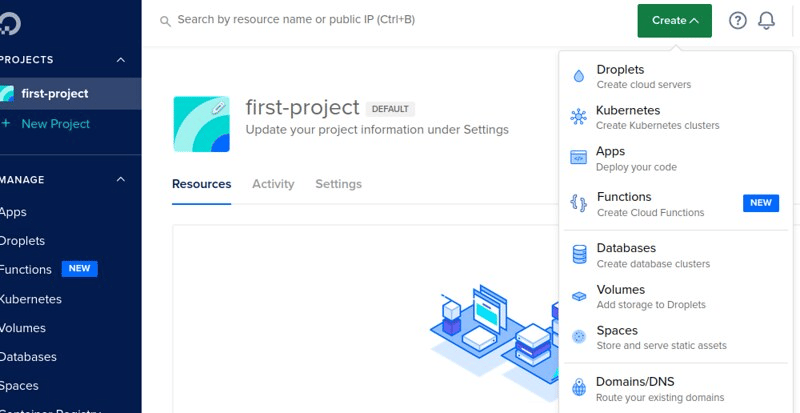
To get started, sign in to your DigitalOcean account. If you created a new account, a default project is created for you. You can use this project or create a new one to follow this guide. In the Project you created, click on the green Create button and select the Databases option.
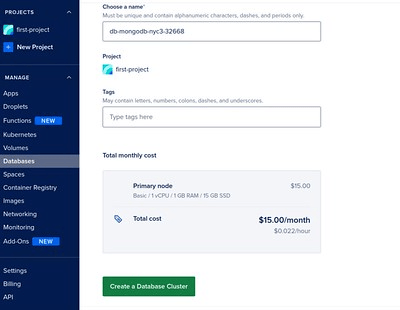
Select MongoDB as your database engine and choose a Datacenter. You can rename the database cluster name or use the default name given. After that, click on Create Database Cluster.
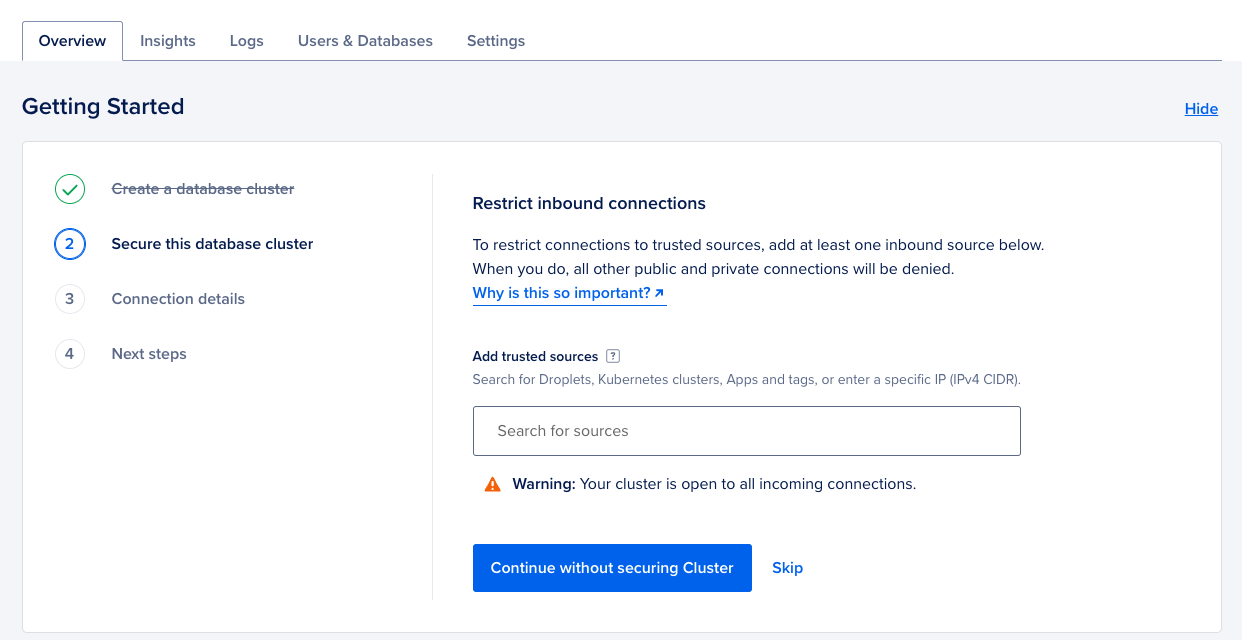
While the database is provisioning, you will be asked to secure your database cluster by specifying trusted sources. In the Add trusted sources field, you can add the IP address of your personal computer and the server your Django application is on. Only connections from these IP addresses will be allowed to connect to your database.
Next, you will be given the Connection details and of your database. These details include username, password, host, and a default database. Copy these details and store them somewhere secure. For this tutorial, we’ll use the Connection String, which is a string that contains all the details of your database. It looks like this:
mongodb+srv://username:password@HOSTNAME/DATABASE_NAME?authSource=admin&tls=true&tlsCAFile=<PATH_TO_CA_FILE>
You can access the Connection string under Overview, then Connection Details. Select the Connection parameters drop-down, and choose Connection string.
You will also need to download the CA certificate. You will need the certificate to connect to the database because SSL connections are required to connect to the database. Click Download CA certificate beneath the cluster’s connection details in the DigitalOcean Control Panel to download your cluster’s CA certificate.
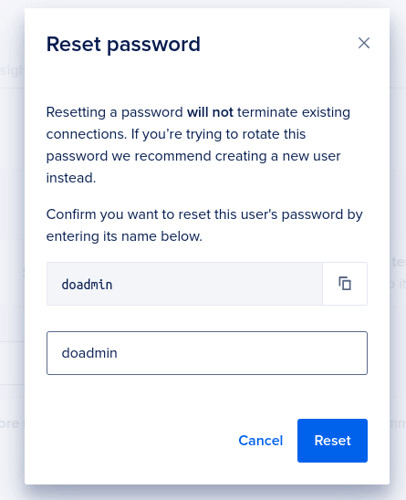
Finally, reset the password for the admin user by clicking on the Users & Databases tab. Then click on the three dots beside the user and use the Reset Password option.
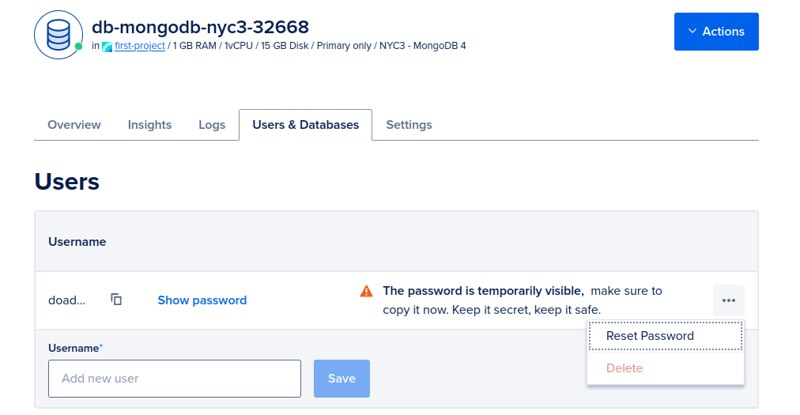
This action opens a modal where you re-enter the admin username and reset the password. Keep track of this password, as you will use the password in your app in later steps.
In this step, you have created your MongoDB database and have the details you will need to connect it to your Django application. The next step is creating the Django application itself.
Step 2 — Creating the Django Application
In this step, you will create the Django application and run it.
First, create a directory for your project and change into it:
- mkdir ~/django-test
- cd ~/django-test
Next, use django-admin with the startproject command to create your Django project. You can use any project name; this tutorial uses DjangoMongo:
- django-admin startproject DjangoMongo
startproject will create a directory within your current working directory that includes:
- A management script,
manage.py, which you can use to administer various Django-specific tasks. - A directory (with the same name as the project) that includes the actual project code.
Next, move to the project folder:
- cd DjangoMongo
To create the Django application, use the following command:
- python3 manage.py startapp djangoapp
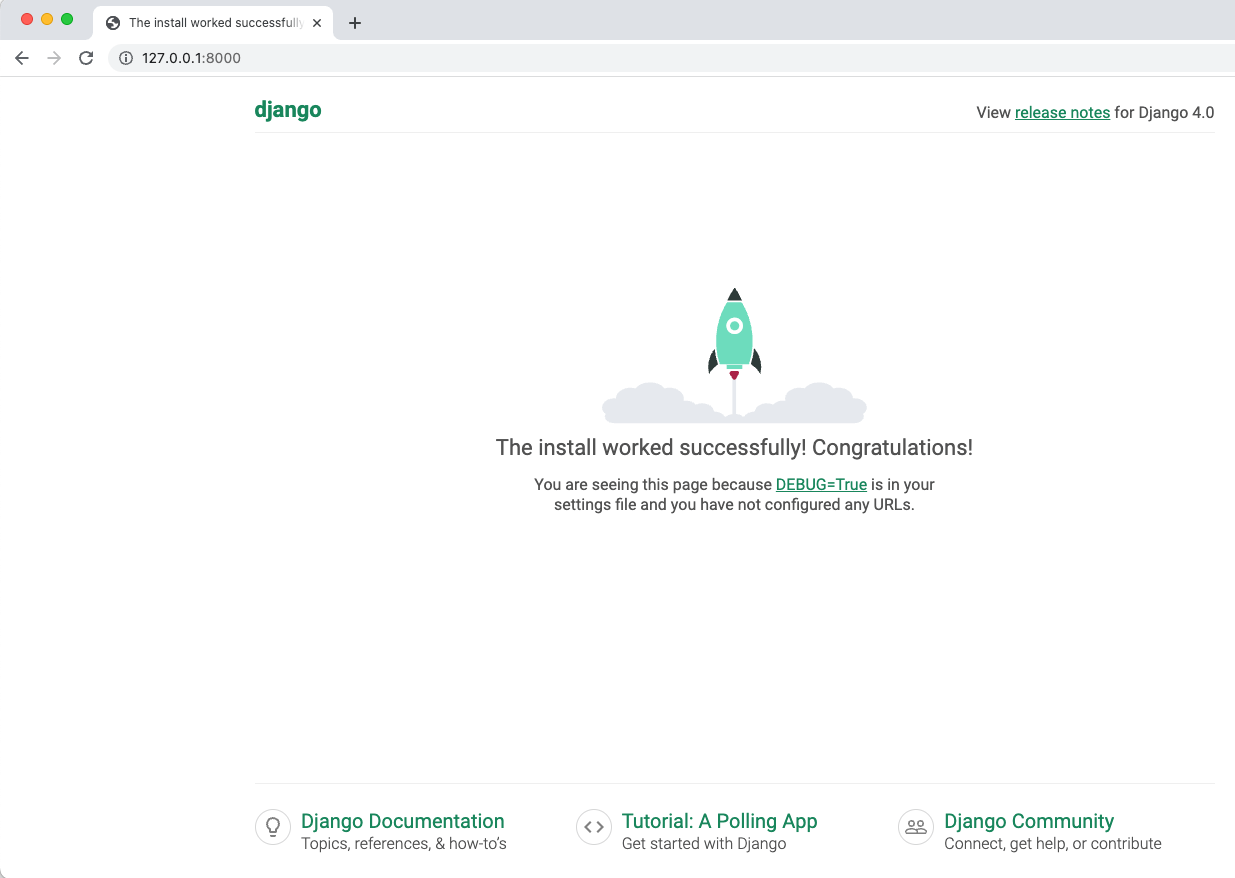
Finally, run the Django server to confirm that everything was set up correctly:
- python3 manage.py runserver
You will see the following output:
OutputPerforming system checks...

System check identified no issues (0 silenced).

You have 13 unapplied migration(s). Your project may not work properly until you apply the migrations for app(s): admin, auth, contenttypes, sessions.
Run 'python manage.py migrate' to apply them.

March 06, 2022 - 20:20:09
Django version 1.11.22, using settings 'DjangoMongo.settings'
Starting development server at http://127.0.0.1:8000/
Quit the server with CONTROL-C.
Open the link http://127.0.0.1:8000 in your browser and you will see the default Django App Page.
In this step, you created a Django application and ran it successfully in the browser. Next, you will set up PyMongo to connect your MongoDB cluster to the Django application.
Step 3 — Setting up PyMongo
In this step, you will install PyMongo and Dnspython. PyMongo is a Python distribution containing tools for working with MongoDB. PyMongo allows you to save JSON data in your database and work with all MongoDB commands. Dnspython is DNS toolkit for Python. It is needed to use the mongodb+srv:// URIs to connect to the DigitalOcean-managed MongoDB.
Install PyMongo using pip3 command:
- pip3 install pymongo
Install Dnspython using pip3:
- pip3 install dnspython
To connect PyMongo to your MongoDB database, you’ll first need to edit some details. Under the DjangoMongo project folder, open the settings.py file for editing using nano or your favorite text editor:
- nano settings.py
Comment out the entire database section in the file, as shown here:
# DATABASES = {
#     'default': {
#         'ENGINE': 'django.db.backends.sqlite3',
#         'NAME': BASE_DIR / 'db.sqlite3',
#     }
# }
Next, find the INSTALLED APPS section and add your Django app to the list of applications:
INSTALLED_APPS = [
    'djangoapp',
    'django.contrib.admin',
    'django.contrib.auth',
    'django.contrib.contenttypes',
    'django.contrib.sessions',
    'django.contrib.messages',
    'django.contrib.staticfiles',
]
This addition registers your application under the Django project so that it is recognized by the Django project. You can have multiple applications under a Django project; each will need to be registered here.
Save and close the file when you’re done.
In this step, you have installed PyMongo and Dnspython in your Django application, both of which are necessary for connecting your Django application to your MongoDB database. Next, you will configure PyMongo to set up the connection to your Django application.
Step 4 — Configuring PyMongo
In this step, you will set up the connection to your MongoDB database by editing the settings in the urls.py and views.py files.
To get started, you will register new URLs for your Django application. Under your project folder, open urls.py for editing. Currently, there is a URL registered there for /admin. You will register a URL for the root path. You’ll also add an import to the top of the file. Add the highlighted lines to your file:
from django.contrib import admin
from django.urls import path, include

urlpatterns = [
    path('',include('djangoapp.urls')),
    path('admin/', admin.site.urls),
]
Save and close the file when you’re done.
Next, navigate to the djangoapp application folder and create a new urls.py file. In the new urls.py file, add the code below:
from django.urls import path

from . import views

urlpatterns = [path('',views.index,name='index'),]
This code connects the URL you just created to the views.py file so that when the URL is opened, it reflects the contents of the views.py file.
Save and close the file when you’re done.
The last file you’ll edit is the views.py file, which is also in the djangoapp application folder. Open djangoapp/views.py for editing and add the following code block:
from django.http import HttpResponse

# Create your views here.
def index(request):
    return HttpResponse("<h1>Hello and welcome to my first <u>Django App</u> project!</h1>")
The first line adds an import. You can leave any other imports that were generated with the file.
The lines after the import will display the text “Hello and welcome to my Django App Project” instead of the default Django page when the application is opened in the broswer.
Next, add the following line to import PyMongo:
import pymongo
In the same file, add the following line to instantiate the PyMongo client. Replace the connection string with your own connection string, and update the path to the CA-certificate file you downloaded.
client = pymongo.MongoClient('mongodb+srv://username:password@HOSTNAME/DATABASE_NAME?authSource=admin&tls=true&tlsCAFile=<PATH_TO_CA_FILE>')
Next, define the database name and collection you are connecting to. When you create a database cluster on DigitalOcean managed MongoDB, a default database named admin is created for you. You can use that or create another database on the console.
#Define Db Name
dbname = client['admin']

#Define Collection
collection = dbname['mascot']
In this case, the name of the database is admin and the name of the collection you are creating is mascot. A collection in MongoDB is a group of documents.
Now, you will add a document to the collection in the database:
mascot_1={
    "name": "Sammy",
    "type" : "Shark"
}
This is a simple document with only a name and type.
Next, you will insert this document into the collection like so:
collection.insert_one(mascot_1)
Now, you’ll retrieve details of the document you just inserted into the database to confirm it worked correctly:
mascot_details = collection.find({})

for r in mascot_details:
    print(r['name'])
The code above retrieves all the data you stored in the database, then loops through it to display the mascot’s name in the terminal. You are looping through the data here because collection.find will return the documents as an array. To return a single document, you can use the findOne command.
The final code in the views.py file looks like this:
from django.shortcuts import render
from django.http import HttpResponse

# Create your views here.
def index(request):
    return HttpResponse("<h1>Hello and welcome to my <u>Django App</u> project!</h1>")

import pymongo

client = pymongo.MongoClient('mongodb+srv://username:password@HOSTNAME/DATABASE_NAME?authSource=admin&tls=true&tlsCAFile=<PATH_TO_CA_FILE>')
#Define DB Name
dbname = client['admin']

#Define Collection
collection = dbname['mascot']

mascot_1={
    "name": "Sammy",
    "type" : "Shark"
}

collection.insert_one(mascot_1)

mascot_details = collection.find({})

for r in mascot_details:
    print(r['name'])
Save and close the file when you’re done.
Now, run your final Django app with the command:
- python3 manage.py runserver
The output will look like the following:
OutputWatching for file changes with StatReloader
Performing system checks...

Sammy
System check identified no issues (0 silenced).
March 08, 2022 - 00:35:01
Django version 3.2.12, using settings 'DjangoProject.settings'
Starting development server at http://127.0.0.1:8000/
Quit the server with CONTROL-C.
As you see in the output above, you successfully connected to your MongoDb database, inserted some data into it, and retrieved the data.
Conclusion
You have successfully connected your Django application to a MongoDB database using PyMongo. You should note that while there are other Python drivers for connecting a Django application to a MongoDB database (such as Djongo and MongoEngine), Pymongo is the official driver.
You can use all available MongoDB commands with PyMongo to create, read, edit, and delete data from your database. More instructions on how to use PyMongo can be found in the PyMongo official documentation.
Thanks for learning with the DigitalOcean Community. Check out our offerings for compute, storage, networking, and managed databases.
About the author(s)
I am a Software Engineer and Hacker.
Still looking for an answer?
This textbox defaults to using Markdown to format your answer.
You can type !ref in this text area to quickly search our full set of tutorials, documentation & marketplace offerings and insert the link!
Hi, first of all I want to say this tutorial is just so helpful.
But in the step 1,
You will also need to download the CA certificate. You will need the certificate to connect to the database because SSL connections are required to connect to the database. Click Download CA certificate beneath the cluster’s connection details in the DigitalOcean Control Panel to download your cluster’s CA certificate.
I couldn’t find where to download the CA certificate.
Could you please help me with this question?
Thank you so much!
 This work is licensed under a Creative Commons Attribution-NonCommercial- ShareAlike 4.0 International License.
Become a contributor for community
Get paid to write technical tutorials and select a tech-focused charity to receive a matching donation.

DigitalOcean Documentation
Full documentation for every DigitalOcean product.

Resources for startups and AI-native businesses
The Wave has everything you need to know about building a business, from raising funding to marketing your product.
The developer cloud
Scale up as you grow — whether you're running one virtual machine or ten thousand.

Start building today
From GPU-powered inference and Kubernetes to managed databases and storage, get everything you need to build, scale, and deploy intelligent applications.
