By Rajkishore J and Caitlin Postal

The author selected the Diversity in Tech Fund to receive a donation as part of the Write for DOnations program.
Introduction
The phpMyAdmin tool allows users to interact with MySQL database management through a web interface that can handle the administration tasks. This tool provides a web interface to create, store, and edit entire databases created with MySQL. You can use the script interface to run PHP scripts to connect to MySQL databases for customized operations rather than using the command line interface.
In this tutorial, you will install phpMyAdmin and use it to connect to a MySQL Managed Database cluster on your Ubuntu 20.04 server.
Prerequisites
To complete this guide, you will need:
-
An Ubuntu 20.04 server with a
sudo-enabled non-root user and a firewall configured withufw. To set this up, follow our Initial Server Setup with Ubuntu 20.04. -
A DigitalOcean account. If you do not have one, sign up for a new account.
-
A MySQL Managed Database cluster. To deploy a MySQL Managed Database, follow our How to Create MySQL Database Clusters guide.
-
(Optional) A registered domain name to connect via SSL. You can purchase a domain name on Namecheap, get one for free on Freenom, or use the domain registrar of your choice. Be sure that the DNS records for your domain point to your server’s IP address by following the DNS Quickstart to add them. You can configure your domain with an SSL/TLS certificate by following How To Secure Apache with Let’s Encrypt on Ubuntu 20.04.
Step 1 — Installing phpMyAdmin and Configuring Apache
In this step, you will install the phpMyAdmin package and the web server necessary to access your MySQL Managed Database.
First, log in to your Ubuntu server and update it with the latest packages:
- sudo apt update
Then install phpMyAdmin from the default Ubuntu repositories:
- sudo apt -y install phpmyadmin
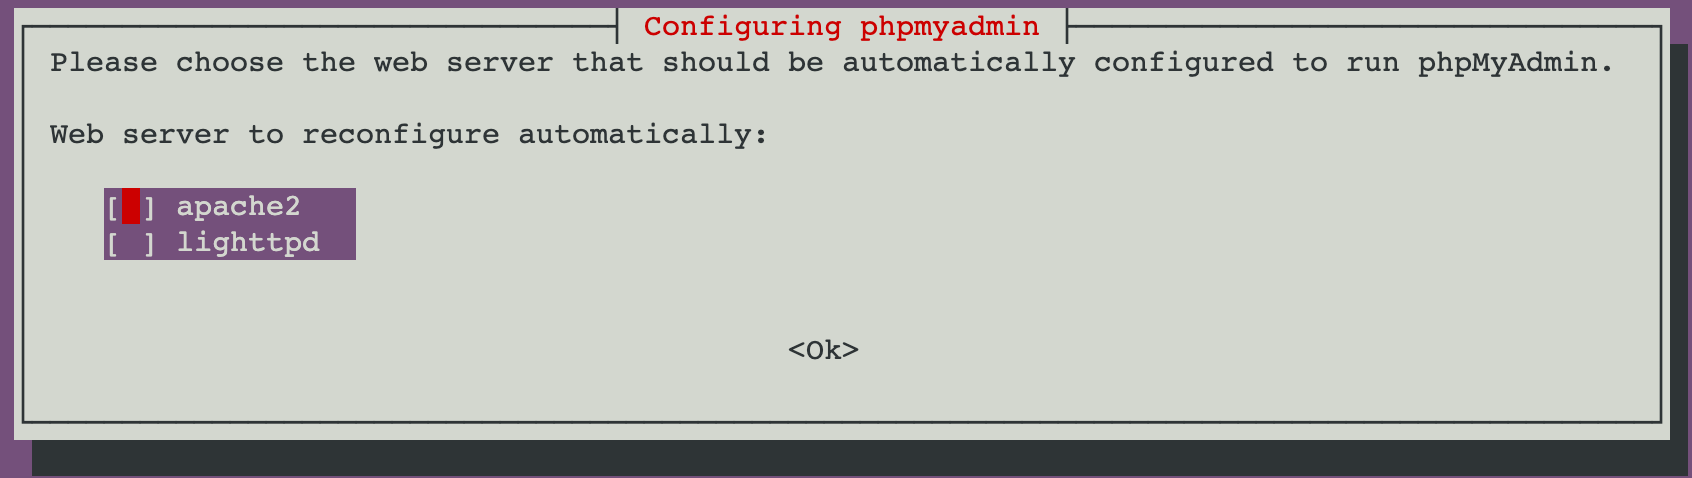
During the installation process, you will be prompted to choose a web server: Apache or Lighttpd. Select apache2 for this tutorial.
Next, you will be prompted to select Yes or No to use dbconfig-common for setting up the database in the same Ubuntu server.

Choose No if you are installing phpMyAdmin to connect to MySQL Managed Database and you do not want to install MySQL in the localhost Ubuntu server.
Once the phpMyAdmin package has finished installing, you will update the apache.conf file. Use your favorite text editor to edit the linked file that has been placed in your Apache configuration directory. This example uses nano:
- sudo nano /etc/apache2/apache2.conf
Add the following line to the bottom of the file:
...
# phpMyAdmin Configuration
Include /etc/phpmyadmin/apache.conf
This line will set up phpMyAdmin under the Apache web server. Save and close the file.
You have now updated your server by installing phpMyAdmin and configuring Apache. Next, you will configure phpMyAdmin with the MySQL Managed Database credentials.
Step 2 — Configuring phpMyAdmin with MySQL Managed Database
In this step, you will configure phpMyAdmin with your MySQL Managed Database connection details.
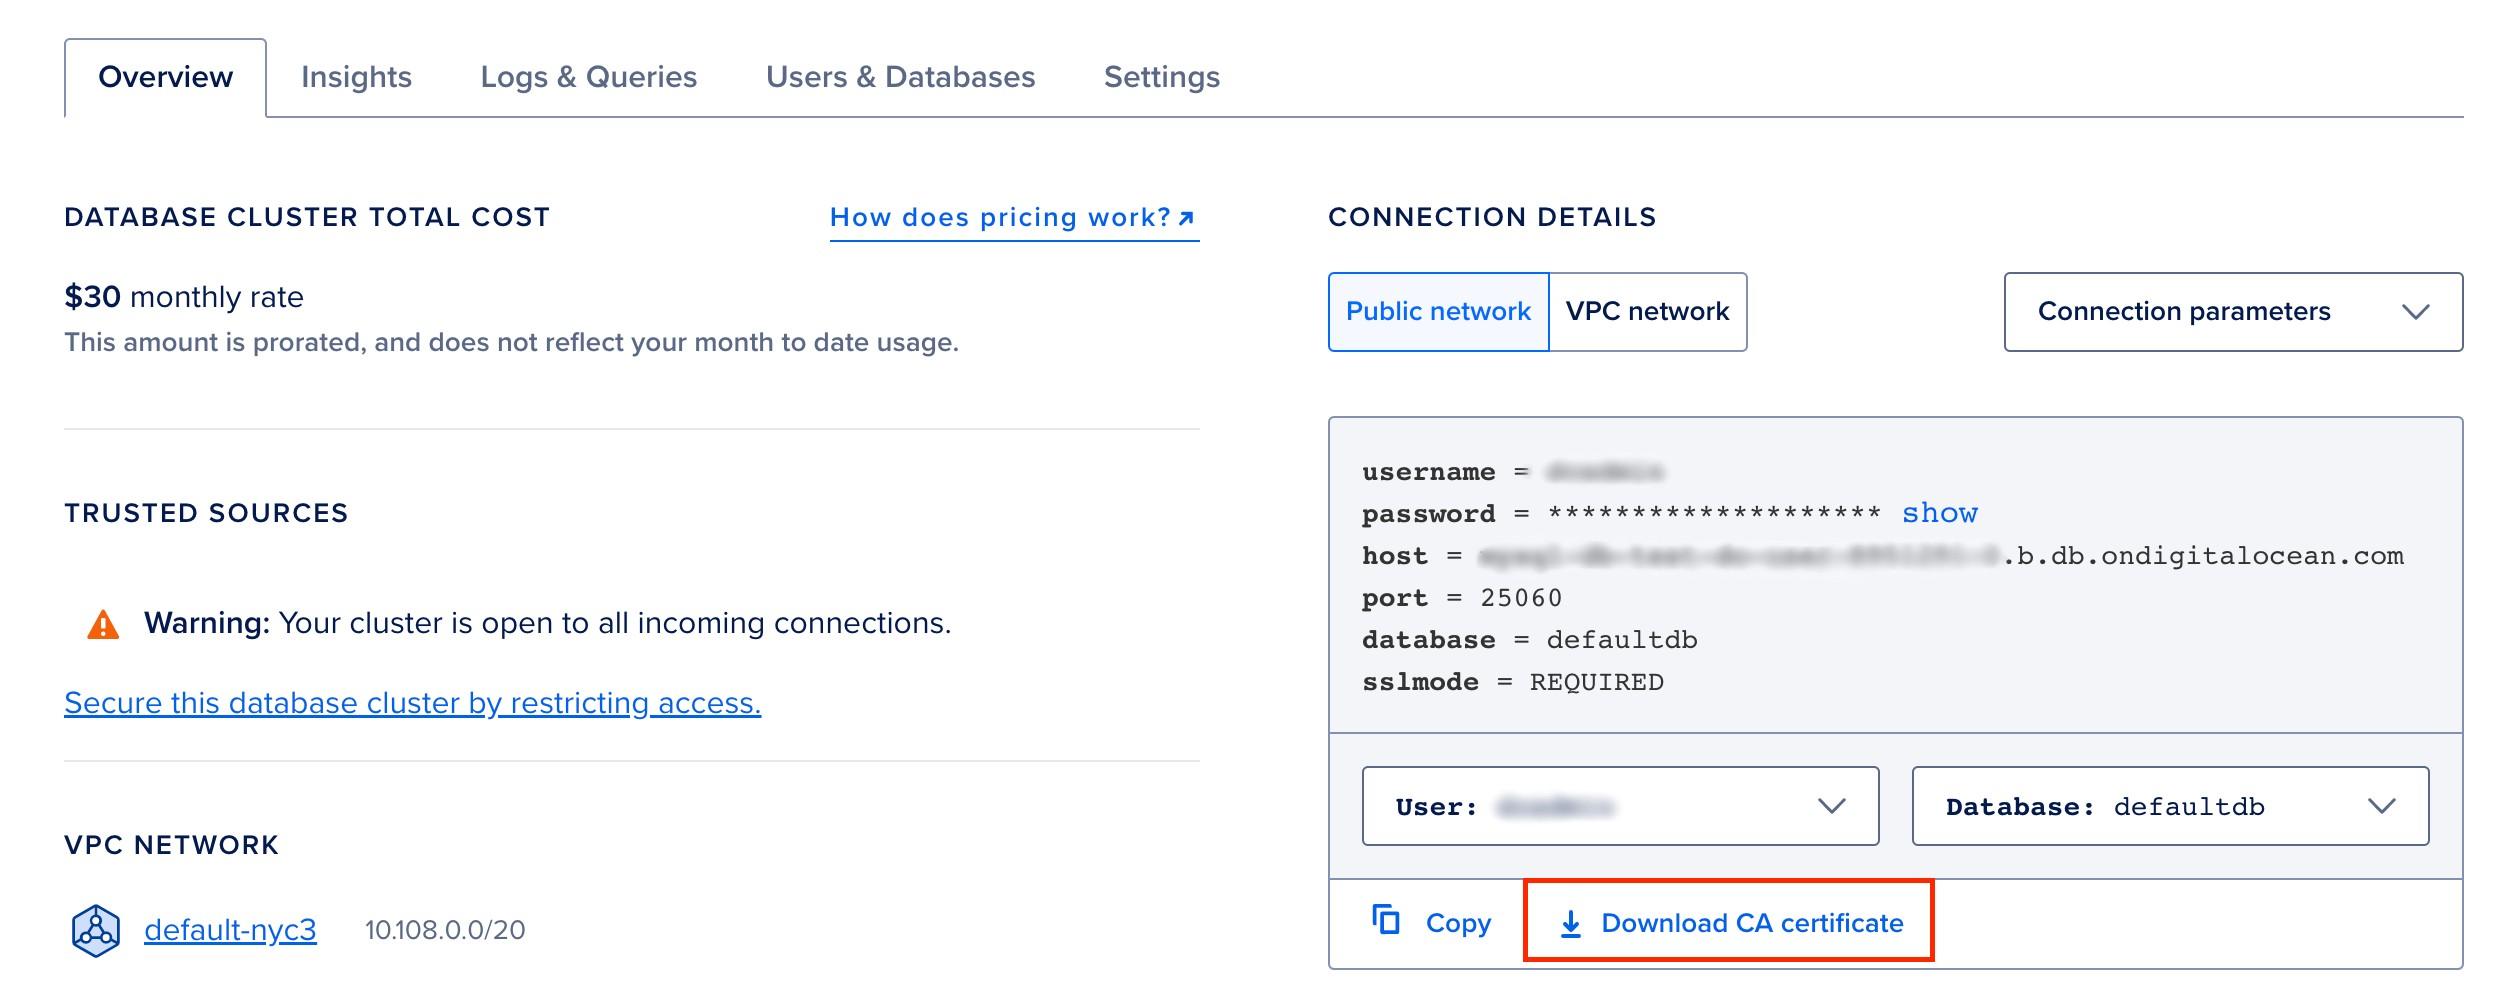
Navigate to your MySQL Managed Database panel and find the Connection Details section. Click the Download CA certificate link to download the ca-certificate.crt file from your database page overview tab:
In a new terminal session from your local machine, copy the certificate file to /etc/phpmyadmin/ on the Ubuntu server:
- scp Downloads/ca-certificate.crt root@your-server-ip:/etc/phpmyadmin
Back in the terminal session for your server, open the phpMyAdmin configuration file named config.inc.php:
- sudo nano /etc/phpmyadmin/config.inc.php
At the bottom of the config.inc.php file, add the following lines with the Managed Database configuration details:
...
$i++;
$cfg['Servers'][$i]['host'] = 'your_database_cluster_hostname.b.db.ondigitalocean.com';
$cfg['Servers'][$i]['port'] = '25060';
$cfg['Servers'][$i]['ssl'] = true;
$cfg['Servers'][$i]['ssl_ca'] = '/etc/phpmyadmin/ca-certificate.crt';
The initial $i++; is a post-increment operator that returns $i, then increments $i by one. This line helps you manage multiple MySQL Managed Databases with phpMyAdmin.
Because phpMyAdmin supports the administration of multiple MySQL servers, the $cfg['Servers'] array has been added, which can contain the login information for different servers.
$cfg['Servers'][$i]['host'] refers to the MySQL Managed Database hostname, and $cfg['Servers'][$i]['port'] is the port number that it calls to (in this case, port 25060).
$cfg['Servers'][$i]['ssl'], which evaluates to true in this circumstance, communicates whether to enable SSL for the connection between phpMyAdmin and the MySQL Managed Database to secure the connection. With that, you also update the $cfg['Servers'][$i]['ssl_ca'] line with the path to the CA file that will connect to the MySQL Managed Database when using SSL.
If you want to add another MySQL Managed Database, you can add lines from $i++; to $cfg['Servers'][$i]['ssl_ca'] in config.inc.php with the appropriate hostname and CA-certificate file.
Save and close the configuration file.
Then restart apache2 with this command:
- sudo service apache2 restart
Now you can access the web interface by visiting your server’s public IP address or your domain name followed by phpmyadmin:
http://your_domain_or_ip/phpmyadmin
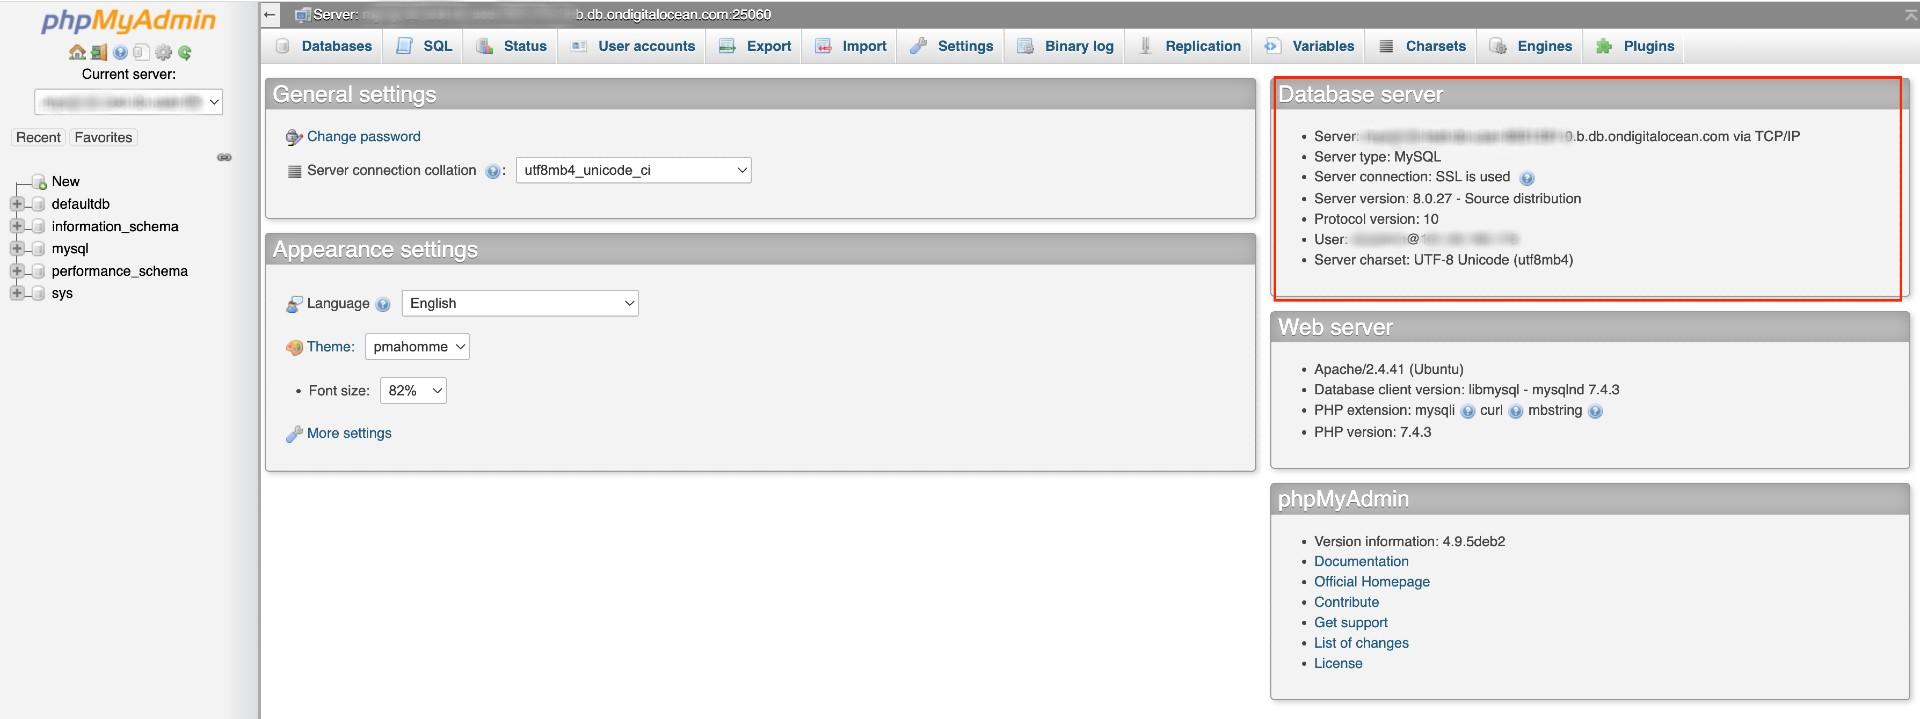
You will have to supply your MySQL Managed Database username and password to log in to the MySQL Database.

Once you have logged in to the database, you will see the following administration screen:
You can add the IP address of the server where you have installed phpMyAdmin as a trusted source. This modification will limit access to the database to this specific IP address.
Conclusion
You have now configured phpMyAdmin to connect to a MySQL Managed Database cluster on your Ubuntu 20.04 server. Using this interface, you can create databases, users, and tables and perform the usual operations like deleting and modifying structures and data.
You can review other database tutorials, such as securing your phpMyAdmin instance in Step 3 of How To Install and Secure phpMyAdmin on Ubuntu 20.04.
Thanks for learning with the DigitalOcean Community. Check out our offerings for compute, storage, networking, and managed databases.
About the author(s)
Still looking for an answer?
This textbox defaults to using Markdown to format your answer.
You can type !ref in this text area to quickly search our full set of tutorials, documentation & marketplace offerings and insert the link!
This does not work, I have followed to the letter more than 5 times with different droplets and in all when accessing my ip 1.1.1.1/phpmyadmin it does not load.
I got this error with the ssl configuration
#2002 - <br />The server is not responding (or the local server’s socket is not correctly configured).
Several comments:
- In Step 2 above, I had some difficulty with folder permissions when attempting to copy the CA certificate file. I had to to temporarily grant full write permissions for the folder using the “chmod” command. I then used an FTP program (Transmit) to copy the certificate, after which I restored the write permissions to their initial values. Maybe this was the long way around but it worked.
- When editing /etc/phpmyadmin/config.inc.php, make sure you are copying the host for the PUBLIC network and not the VPC network. When accessing your database through phpMyAdmin you will be on the public side.
- In Step 3 of How to Install and Secure phpMyAdmin on Ubuntu 22.4, the configuration file we are asked to modify (/etc/apache2/conf-available/phpmyadmin.conf) is actually in a different location when using a managed database. I found it in /etc/phpmyadmin/apache.conf.
I would NOT neglect step three of securing your database, above. Leaving the login for phpMyAdmin publicly exposed is just begging for trouble…
The good news is that everything is working. I am able to use phpMyAdmin through the secure mode described. Thank you to the authors for their step-by-step guides.
Thank you for the information. I have followed this tutorial but have not been successful in accessing phpmyadmin. When I go to the ipaddress:port/phpmyadmin i see the following code which I do not understand why - suggestions?
<?php
declare(strict_types=1);
use PhpMyAdmin\Common;
use PhpMyAdmin\Routing;
if (! defined('ROOT_PATH')) {
// phpcs:disable PSR1.Files.SideEffects
define('ROOT_PATH', __DIR__ . DIRECTORY_SEPARATOR);
// phpcs:enable
}
if (PHP_VERSION_ID < 80000) {
die(
'<p>PHP 8.0.0+ is required ('
. '<a href="https://bugs.launchpad.net/ubuntu/+source/symfony/+bug/1975892">Ubuntu Launchpad bug #1975892</a>'
. ' and <a href="https://github.com/phpmyadmin/phpmyadmin/issues/17503">phpMyAdmin issue #17503</a>'
. ').</p><p>Currently installed version is: ' . PHP_VERSION . '</p>'
);
}
// phpcs:disable PSR1.Files.SideEffects
define('PHPMYADMIN', true);
// phpcs:enable
require_once ROOT_PATH . 'libraries/constants.php';
/**
* Activate autoloader
*/
if (! @is_readable(AUTOLOAD_FILE)) {
die(
'<p>File <samp>' . AUTOLOAD_FILE . '</samp> missing or not readable.</p>'
. '<p>Most likely you did not run Composer to '
. '<a href="https://docs.phpmyadmin.net/en/latest/setup.html#installing-from-git">'
. 'install library files</a>.</p>'
);
}
require AUTOLOAD_FILE;
global $route, $containerBuilder, $request;
Common::run();
$dispatcher = Routing::getDispatcher();
Routing::callControllerForRoute($request, $route, $dispatcher, $containerBuilder);
 This work is licensed under a Creative Commons Attribution-NonCommercial- ShareAlike 4.0 International License.
Become a contributor for community
Get paid to write technical tutorials and select a tech-focused charity to receive a matching donation.

DigitalOcean Documentation
Full documentation for every DigitalOcean product.

Resources for startups and AI-native businesses
The Wave has everything you need to know about building a business, from raising funding to marketing your product.
The developer cloud
Scale up as you grow — whether you're running one virtual machine or ten thousand.

Start building today
From GPU-powered inference and Kubernetes to managed databases and storage, get everything you need to build, scale, and deploy intelligent applications.
