Sr Technical Content Strategist and Team Lead
Not using Ubuntu 20.04?
Choose a different version or distribution.
Introduction
While many users need the functionality of a database management system like MySQL, they may not feel comfortable interacting with the system solely from the MySQL prompt.
phpMyAdmin was created so that users can interact with MySQL through a web interface. In this guide, we will discuss how to install and secure phpMyAdmin so that you can safely use it to manage your databases on an Ubuntu server.
This tutorial has been validated on Ubuntu servers running Ubuntu 20.04, 22.04, and 24.04. The package names and commands described here work across these versions, although the default PHP version may differ between releases.
Key takeaways
- You can use this tutorial across multiple Ubuntu LTS versions because the core package names and commands are consistent for Ubuntu 20.04, 22.04, and 24.04 or higher.
- phpMyAdmin is only one security layer so you should always combine it with HTTPS and firewall rules before exposing it to the internet.
- MySQL root often uses socket based authentication by default which means you may need to adjust its authentication plugin or create a dedicated user for phpMyAdmin access.
- Apache configuration and
.htaccessoverrides are central to securing phpMyAdmin including enablingAllowOverride Alland adding a separate password prompt in front of the web interface. - SSH tunneling and IP allow lists give you more control when you need to access phpMyAdmin from a limited set of locations or from your local development machine.
1-Click deploy a database using DigitalOcean Managed Databases. Let DigitalOcean focus on scaling, maintenance, and upgrades for your database.
Prerequisites
In order to complete this tutorial, you will need:
- An Ubuntu server. This server should have a non-root user with administrative privileges and a firewall configured with
ufw. To set this up, follow our initial server setup guide for Ubuntu. - A LAMP (Linux, Apache, MySQL, and PHP) stack installed on your Ubuntu server.
Additionally, there are important security considerations when using software like phpMyAdmin, since it:
- Communicates directly with your MySQL installation
- Handles authentication using MySQL credentials
- Executes and returns results for arbitrary SQL queries
For these reasons, and because it is a widely-deployed PHP application which is frequently targeted for attack, you should never run phpMyAdmin on remote systems over a plain HTTP connection.
If you do not have an existing domain configured with an SSL/TLS certificate, you can follow this guide on securing Apache with Let’s Encrypt on Ubuntu. This will require you to register a domain name, create DNS records for your server, and set up an Apache Virtual Host.
Step 1 — Installing phpMyAdmin
You can use APT package repository to install phpMyAdmin from the default Ubuntu repositories.
As your non-root sudo user, update your server’s package index:
- sudo apt update
Following that you can install the phpmyadmin package. Along with this package, the official documentation also recommends that you install a few PHP extensions onto your server to enable certain functionalities and improve performance.
If you followed the prerequisite LAMP stack tutorial, several of these modules will have been installed along with the php package. However, it’s recommended that you also install these packages:
php-mbstring: A module for managing non-ASCII strings and convert strings to different encodingsphp-zip: This extension supports uploading.zipfiles to phpMyAdminphp-gd: Enables support for the GD Graphics Libraryphp-json: Provides PHP with support for JSON serializationphp-curl: Allows PHP to interact with different kinds of servers using different protocols
Be aware that if you’re using a version of PHP other than the default one installed in the prerequisite LAMP stack tutorial, you will need to install the appropriate versions of these module packages. For instance, if you’re using PHP version 8.0, you will need to install the php8.0-mbstring package instead of the default php-mbstring package.
Run the following command to install these packages onto your system. Please note, though, that the installation process requires you to make some choices to configure phpMyAdmin correctly. We’ll walk through these options shortly:
- sudo apt install phpmyadmin php-mbstring php-zip php-gd php-json php-curl
Here are the options you should choose when prompted in order to configure and install phpmyadmin correctly:
- For the server selection, choose
apache2
Warning: When the prompt appears, “apache2” is highlighted, but not selected. If you do not hit SPACE to select Apache, the installer will not move the necessary files during installation. Hit SPACE, TAB, and then ENTER to select Apache.
- Select
Yeswhen asked whether to usedbconfig-commonto set up the database - You will then be asked to choose and confirm a MySQL application password for phpMyAdmin
Note: Assuming you installed MySQL by following Step 2 of the prerequisite LAMP stack tutorial, you may have decided to enable the Validate Password plugin. As of this writing, enabling this component will trigger an error when you attempt to set a password for the phpmyadmin user:
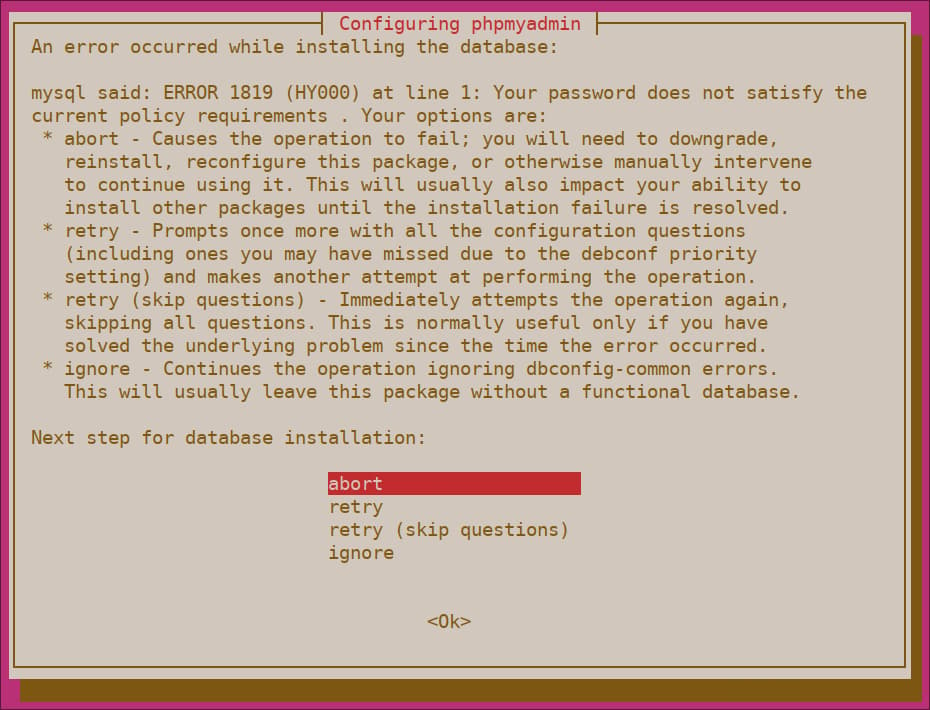
To resolve this, select the abort option to stop the installation process. Then, open up your MySQL prompt:
- sudo mysql
Or, if you enabled password authentication for the root MySQL user, run this command and then enter your password when prompted:
- mysql -u root -p
From the prompt, run the following command to disable the Validate Password component. Note that this won’t actually uninstall it, but just stop the component from being loaded on your MySQL server:
- UNINSTALL COMPONENT "file://component_validate_password";
Following that, you can close the MySQL client:
- exit
Then try installing the phpmyadmin package again and it will work as expected:
- sudo apt install phpmyadmin
Once phpMyAdmin is installed, you can open the MySQL prompt once again with sudo mysql or mysql -u root -p and then run the following command to re-enable the Validate Password component:
- INSTALL COMPONENT "file://component_validate_password";
The installation process adds the phpMyAdmin Apache configuration file into the /etc/apache2/conf-enabled/ directory, where it is read automatically. To finish configuring Apache and PHP to work with phpMyAdmin, the only remaining task in this section of the tutorial is to is explicitly enable the mbstring PHP extension, which you can do by typing:
- sudo phpenmod mbstring
Afterwards, restart Apache for your changes to be recognized:
- sudo systemctl restart apache2
phpMyAdmin is now installed and configured to work with Apache. However, before you can log in and begin interacting with your MySQL databases, you will need to ensure that your MySQL users have the privileges required for interacting with the program.
PHP Version Compatibility with MySQL 8.0
When using phpMyAdmin with MySQL 8.0 (if you haven’t already, you’ll need to Install MySQL on Ubuntu before continuing with this guide), it’s important to understand the authentication method compatibility with different PHP versions:
Authentication Methods
MySQL 8.0 uses caching_sha2_password as its default authentication plugin, which is more secure than the older mysql_native_password. However, this can cause compatibility issues with older PHP versions:
- PHP 7.4 and later: Fully compatible with
caching_sha2_password - PHP 7.2 and 7.3: May have issues with
caching_sha2_password - PHP 7.1 and earlier: Not compatible with
caching_sha2_password
Checking Your PHP Version
You can check your PHP version by running:
- php -v
Handling Compatibility Issues
If you’re using PHP 7.2 or 7.3 and encounter authentication issues, you have two options:
-
Upgrade PHP (Recommended):
- sudo apt update
- sudo apt install php7.4 php7.4-mysql
-
Switch to mysql_native_password (Alternative): If upgrading PHP isn’t possible, you can modify the MySQL user to use the older authentication method:
- ALTER USER 'root'@'localhost' IDENTIFIED WITH mysql_native_password BY 'your_password';
Warning: Using mysql_native_password is less secure than caching_sha2_password. It’s recommended to upgrade PHP instead of switching authentication methods.
Verifying Authentication Method
To check which authentication method your MySQL user is using:
- SELECT user, host, plugin FROM mysql.user WHERE user = 'root';
This will help you ensure your setup is using the appropriate authentication method for your PHP version.
Step 2 — Adjusting User Authentication and Privileges
When you installed phpMyAdmin onto your server, it automatically created a database user called phpmyadmin which performs certain underlying processes for the program. Rather than logging in as this user with the administrative password you set during installation, it’s recommended that you log in as either your root MySQL user or as a user dedicated to managing databases through the phpMyAdmin interface.
Configuring Password Access for the MySQL Root Account
In Ubuntu systems running MySQL 5.7 (and later versions), the root MySQL user is set to authenticate using the auth_socket plugin by default rather than with a password. This allows for some greater security and usability in many cases, but it can also complicate things when you need to allow an external program like phpMyAdmin to access the user.
In order to log in to phpMyAdmin as your root MySQL user, you will need to switch its authentication method from auth_socket to one that makes use of a password, if you haven’t already done so. To do this, open up the MySQL prompt from your terminal:
- sudo mysql
Next, check which authentication method each of your MySQL user accounts use with the following command:
- SELECT user,authentication_string,plugin,host FROM mysql.user;
Output+------------------+-------------------------------------------+-----------------------+-----------+
| user             | authentication_string                     | plugin                | host      |
+------------------+-------------------------------------------+-----------------------+-----------+
| root             |                                           | auth_socket           | localhost |
| mysql.session    | *THISISNOTAVALIDPASSWORDTHATCANBEUSEDHERE | caching_sha2_password | localhost |
| mysql.sys        | *THISISNOTAVALIDPASSWORDTHATCANBEUSEDHERE | caching_sha2_password | localhost |
| debian-sys-maint | *8486437DE5F65ADC4A4B001CA591363B64746D4C | caching_sha2_password | localhost |
| phpmyadmin       | *5FD2B7524254B7F81B32873B1EA6D681503A5CA9 | caching_sha2_password | localhost |
+------------------+-------------------------------------------+-----------------------+-----------+
5 rows in set (0.00 sec)
In this example, you can see that the root user does in fact authenticate using the auth_socket plugin. To configure the root account to authenticate with a password, run the following ALTER USER command. Be sure to change password to a strong password of your choosing:
- ALTER USER 'root'@'localhost' IDENTIFIED WITH caching_sha2_password BY 'password';
Note: The previous ALTER USER statement sets the root MySQL user to authenticate with the caching_sha2_password plugin. Per the official MySQL documentation, caching_sha2_password is MySQL’s preferred authentication plugin, as it provides more secure password encryption than the older, but still widely used, mysql_native_password.
However, some versions of PHP don’t work reliably with caching_sha2_password. PHP has reported that this issue was fixed as of PHP 7.4, but if you encounter an error when trying to log in to phpMyAdmin later on, you may want to set root to authenticate with mysql_native_password instead:
- ALTER USER 'root'@'localhost' IDENTIFIED WITH mysql_native_password BY 'password';
Then, check the authentication methods employed by each of your users again to confirm that root no longer authenticates using the auth_socket plugin:
- SELECT user,authentication_string,plugin,host FROM mysql.user;
Output+------------------+-------------------------------------------+-----------------------+-----------+
| user             | authentication_string                     | plugin                | host      |
+------------------+-------------------------------------------+-----------------------+-----------+
| root             | *DE06E242B88EFB1FE4B5083587C260BACB2A6158 | caching_sha2_password | localhost |
| mysql.session    | *THISISNOTAVALIDPASSWORDTHATCANBEUSEDHERE | caching_sha2_password | localhost |
| mysql.sys        | *THISISNOTAVALIDPASSWORDTHATCANBEUSEDHERE | caching_sha2_password | localhost |
| debian-sys-maint | *8486437DE5F65ADC4A4B001CA591363B64746D4C | caching_sha2_password | localhost |
| phpmyadmin       | *5FD2B7524254B7F81B32873B1EA6D681503A5CA9 | caching_sha2_password | localhost |
+------------------+-------------------------------------------+-----------------------+-----------+
5 rows in set (0.00 sec)
You can see from this output that the root user will authenticate using a password. You can now log in to the phpMyAdmin interface as your root user with the password you’ve set for it here.
Configuring Password Access for a Dedicated MySQL User
Alternatively, some may find that it better suits their workflow to connect to phpMyAdmin with a dedicated user. You can create a user that connects either locally or remotely. For details on how to allow remote connection access to MySQL, you’ll need to configure MySQL to accept connections from other IP addresses. To start mysql locally, open up the MySQL shell once again:
- sudo mysql
If you have password authentication enabled for your root user, as described in the previous section, you will need to run the following command and enter your password when prompted in order to connect:
- mysql -u root -p
From there, create a new user and give it a strong password:
- CREATE USER 'sammy'@'localhost' IDENTIFIED WITH caching_sha2_password BY 'password';
Note: Again, depending on what version of PHP you have installed, you may want to set your new user to authenticate with mysql_native_password instead of caching_sha2_password:
- ALTER USER 'sammy'@'localhost' IDENTIFIED WITH mysql_native_password BY 'password';
Then, grant your new user appropriate privileges. For example, you could grant the user privileges to all tables within the database, as well as the power to add, change, and remove user privileges, with this command (see our guides on creating MySQL users and granting permissions and managing PostgreSQL roles and permissions for more details):
- GRANT ALL PRIVILEGES ON *.* TO 'sammy'@'localhost' WITH GRANT OPTION;
Following that, exit the MySQL shell:
- exit
You can now access the web interface by visiting your server’s domain name or public IP address followed by /phpmyadmin:
https://your_domain_or_IP/phpmyadmin
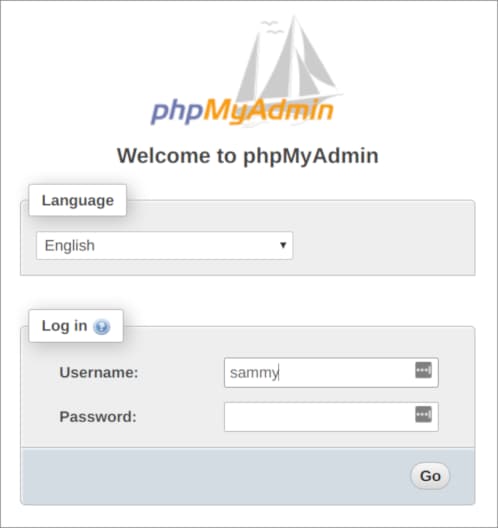
Log in to the interface, either as root or with the new username and password you just configured.
When you log in, you’ll see the user interface, which will look something like this:
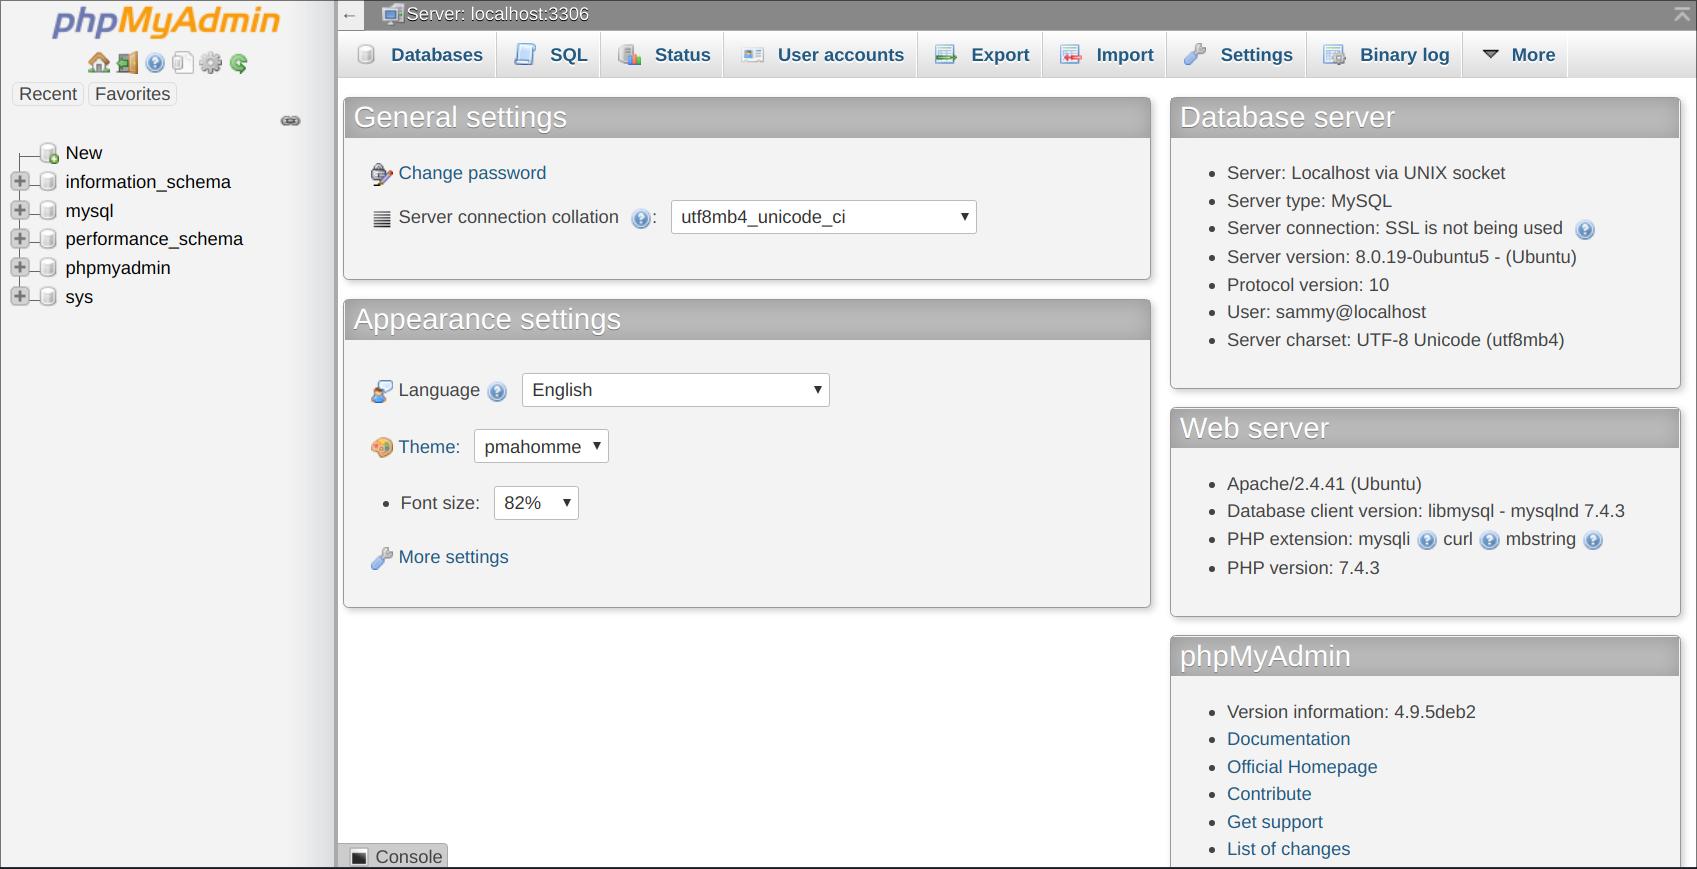
Now that you’re able to connect and interact with phpMyAdmin, all that’s left to do is harden your system’s security to protect it from attackers.
Step 3 — Securing Your phpMyAdmin Instance
Because of its ubiquity, phpMyAdmin is a popular target for attackers, and you should take extra care to prevent unauthorized access. One way of doing this is to place a gateway in front of the entire application by using Apache’s built-in .htaccess authentication and authorization functionalities. For more details, see our guide on how to install and secure phpMyAdmin with Apache.
To do this, you must first enable the use of .htaccess file overrides by editing your phpMyAdmin installation’s Apache configuration file.
Use your preferred text editor to edit the phpmyadmin.conf file that has been placed in your Apache configuration directory. Here, we’ll use nano:
- sudo nano /etc/apache2/conf-available/phpmyadmin.conf
Add an AllowOverride All directive within the <Directory /usr/share/phpmyadmin> section of the configuration file, like this:
<Directory /usr/share/phpmyadmin>
    Options SymLinksIfOwnerMatch
    DirectoryIndex index.php
    AllowOverride All
    . . .
When you have added this line, save and close the file. If you used nano to edit the file, do so by pressing CTRL + X, Y, and then ENTER.
To implement the changes you made, restart Apache:
- sudo systemctl restart apache2
Now that you have enabled the use of .htaccess files for your application, you need to create one to actually implement some security.
In order for this to be successful, the file must be created within the application directory. You can create the necessary file and open it in your text editor with root privileges by typing:
- sudo nano /usr/share/phpmyadmin/.htaccess
Within this file, enter the following information:
AuthType Basic
AuthName "Restricted Files"
AuthUserFile /etc/phpmyadmin/.htpasswd
Require valid-user
Here is what each of these lines mean:
AuthType Basic: This line specifies the authentication type that you are implementing. This type will implement password authentication using a password file.AuthName: This sets the message for the authentication dialog box. You should keep this generic so that unauthorized users won’t gain any information about what is being protected.AuthUserFile: This sets the location of the password file that will be used for authentication. This should be outside of the directories that are being served. We will create this file shortly.Require valid-user: This specifies that only authenticated users should be given access to this resource. This is what actually stops unauthorized users from entering.
When you are finished, save and close the file.
The location that you selected for your password file was /etc/phpmyadmin/.htpasswd. You can now create this file and pass it an initial user with the htpasswd utility:
- sudo htpasswd -c /etc/phpmyadmin/.htpasswd username
You will be prompted to select and confirm a password for the user you are creating. Afterwards, the file is created with the hashed password that you entered.
If you want to enter an additional user, you need to do so without the -c flag, like this:
- sudo htpasswd /etc/phpmyadmin/.htpasswd additionaluser
Then restart Apache to put .htaccess authentication into effect:
- sudo systemctl restart apache2
Now, when you access your phpMyAdmin subdirectory, you will be prompted for the additional account name and password that you just configured:
https://domain_name_or_IP/phpmyadmin
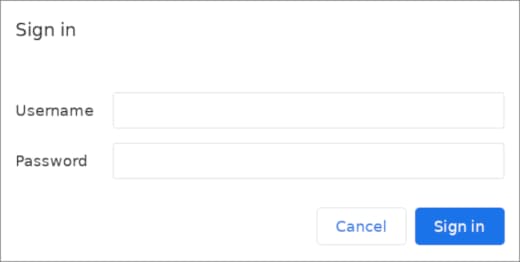
After entering the Apache authentication, you’ll be taken to the regular phpMyAdmin authentication page to enter your MySQL credentials. By adding an extra set of non-MySQL credentials, you’re providing your database with an additional layer of security. This is desirable, since phpMyAdmin has been vulnerable to security threats in the past.
If you’re using Nginx instead of Apache, check out our guide on installing and securing phpMyAdmin with Nginx for detailed instructions on setting up similar authentication.
Step 4 — Enabling HTTPS with Let’s Encrypt
Enabling SSL encryption for phpMyAdmin using a free Let’s Encrypt certificate is essential to protect sensitive data from potential attackers. This robust security measure guarantees that all data transmitted between your browser and the server is encrypted.
4.1 Install Certbot
Start by installing Certbot and its Apache plugin:
sudo apt install certbot python3-certbot-apache
4.2 Generate and Install the Certificate
Use the following command to obtain a certificate and automatically configure Apache:
sudo certbot --apache
The process is straightforward and user-friendly. Follow the prompts to select your domain name and allow HTTPS redirection. After a successful run, Certbot will handle HTTPS traffic for your server, including /phpmyadmin.
4.3 Enable Auto-Renewal
Let’s Encrypt certificates expire every 90 days. Certbot sets up a systemd timer to renew them automatically:
sudo systemctl status certbot.timer
Now you can access phpMyAdmin securely at:
https://your_domain/phpmyadmin
Use this setup to enable phpMyAdmin SSL and prevent credential leaks.
Step 5 — Accessing phpMyAdmin via SSH Tunnel (Optional but Recommended)
If you’re using phpMyAdmin on a server without a public domain name or don’t want to expose it over the internet, you can tunnel access through SSH.
5.1 Open SSH Tunnel from Your Local Machine
On your local machine, run:
ssh -L 8888:localhost:80 username@your_server_ip
Replace username and your_server_ip with your actual SSH credentials.
This command forwards local port 8888 to the server’s port 80, where Apache serves phpMyAdmin.
5.2 Access phpMyAdmin via Browser
Once the tunnel is active, open your browser and go to:
http://localhost:8888/phpmyadmin
You now have secure, local-only access to phpMyAdmin — ideal for development or staging environments.
This is one of the best ways to secure phpMyAdmin on Ubuntu 20.04 in restricted-access scenarios.
Step 6 — Fixing Common phpMyAdmin Errors
Here are some of the most frequent errors users encounter while setting up or using phpMyAdmin — and how to fix them:
6.1 phpMyAdmin 404 Not Found
Cause: Apache didn’t properly link the config.
Fix:
sudo ln -s /etc/phpmyadmin/apache.conf /etc/apache2/conf-enabled/phpmyadmin.conf
sudo systemctl reload apache2
6.2 Access Denied (MySQL)
Cause: Wrong credentials or insufficient MySQL privileges.
Fix: Log into MySQL and verify the user has the necessary access:
SELECT user, host FROM mysql.user;
6.3 CSRF Token Mismatch
Cause: Session expired or cookies are corrupted.
Fix: Clear your browser cookies or restart your browser. You can also increase the session lifetime in php.ini:
session.gc_maxlifetime = 1440
Restart Apache:
sudo systemctl restart apache2
6.4 Forbidden Error (403)
Cause: .htaccess permissions or missing AllowOverride All.
Fix:
Ensure .htaccess is readable:
sudo chown www-data:www-data /usr/share/phpmyadmin/.htaccess
Check Apache config:
<Directory /usr/share/phpmyadmin>
    AllowOverride All
</Directory>
Step 7 — Extra Layer: IP Whitelisting (Optional)
To limit access even further, restrict phpMyAdmin to specific IP addresses.
Open your Apache config:
sudo nano /etc/apache2/conf-available/phpmyadmin.conf
Inside the <Directory /usr/share/phpmyadmin> block, add:
<RequireAll>
    Require ip 203.0.113.4
    Require valid-user
</RequireAll>
Replace 203.0.113.4 with your actual static IP. Then reload Apache:
sudo systemctl reload apache2
This is a must-do if you’re running phpMyAdmin on production. It adds another layer of access control.
FAQ
1. How do I install phpMyAdmin on Ubuntu?
To install phpMyAdmin on an Ubuntu server, start by updating your package index using:
sudo apt update
Then install the required packages:
sudo apt install phpmyadmin php-mbstring php-zip php-gd php-json php-curl
These PHP modules ensure full functionality. During installation, select apache2 when prompted. Also confirm the use of dbconfig-common to auto-configure the database. You’ll be asked to set a MySQL application password—use a strong one.
Once installed, enable mbstring:
sudo phpenmod mbstring
sudo systemctl restart apache2
phpMyAdmin will be available at http://your_domain/phpmyadmin. After installation, you should secure the interface with SSL and access controls to prevent unauthorized access.
2. How do I log into phpMyAdmin using the MySQL root user?
By default, MySQL on Ubuntu uses the auth_socket plugin for the root user, which doesn’t allow web-based login. To enable login via phpMyAdmin, you need to switch to password authentication.
Log into MySQL:
sudo mysql
Then run:
ALTER USER 'root'@'localhost' IDENTIFIED WITH caching_sha2_password BY 'your_password';
Now, navigate to http://your_domain/phpmyadmin, enter root as the username and the password you just set. You’ll be able to log in.
However, for production, it’s not best practice to use the root user for daily tasks. Instead, create a separate user with limited privileges for accessing phpMyAdmin and keep root access disabled unless necessary.
3. How do I secure phpMyAdmin from external access?
Securing phpMyAdmin involves multiple layers of protection. First, enable HTTPS using Let’s Encrypt to encrypt traffic:
sudo apt install certbot python3-certbot-apache
sudo certbot --apache
Next, enable .htaccess authentication:
AuthType Basic
AuthName "Restricted Area"
AuthUserFile /etc/phpmyadmin/.htpasswd
Require valid-user
Use the htpasswd utility to generate credentials:
sudo htpasswd -c /etc/phpmyadmin/.htpasswd your_username
Optionally, restrict access by IP in Apache’s configuration by adding:
<Directory /usr/share/phpmyadmin>
    Order Deny,Allow
    Deny from all
    Allow from your.ip.address.here
</Directory>
Finally, restart Apache:
sudo systemctl restart apache2
These steps dramatically improve security against unauthorized access.
4. How can I access phpMyAdmin without exposing it publicly?
For private, secure access, use SSH tunneling. This is especially useful when working from a trusted device or local development environment.
On your local machine, run:
ssh -L 8888:localhost:80 username@your_server_ip
This command creates a secure tunnel from your local port 8888 to the remote server’s port 80. You can now access phpMyAdmin at:
http://localhost:8888/phpmyadmin
This method avoids exposing phpMyAdmin over the internet. Only users with SSH access to the server can reach the interface.
To improve this setup, consider using SSH keys instead of passwords and enabling two-factor authentication on your local SSH client.
5. Why do I see a “403 Forbidden” error in phpMyAdmin?
A 403 error typically means that the server is denying access to phpMyAdmin due to a misconfiguration. Start by checking if Apache is set to allow overrides:
<Directory /usr/share/phpmyadmin>
    AllowOverride All
</Directory>
Make sure .htaccess exists and is readable by the web server. Check file ownership and permissions:
sudo chown -R www-data:www-data /usr/share/phpmyadmin
Restart Apache to apply changes:
sudo systemctl restart apache2
If you’ve restricted by IP or via a .htaccess file, ensure your client IP is allowed. Finally, check Apache error logs (/var/log/apache2/error.log) to identify the specific reason for denial.
6. What causes a CSRF token mismatch error?
CSRF token mismatches happen when your session token is no longer valid. Common reasons include session timeout, expired login cookies, or corrupted sessions.
To fix this:
- Clear your browser cookies and cache
- Log in again to generate a new session token
- Avoid using multiple tabs/windows for phpMyAdmin sessions
To increase session lifetime, edit php.ini:
session.gc_maxlifetime = 1440
Then restart Apache:
sudo systemctl restart apache2
This error can also appear if you restore a browser session from history or switch networks (causing IP mismatch). Always ensure phpMyAdmin is accessed freshly with a valid login.
7. How can I change the default login URL for phpMyAdmin?
Changing the URL helps obscure phpMyAdmin from bots and common scanners. Move the directory:
sudo mv /usr/share/phpmyadmin /usr/share/dbadmin
Then update Apache configuration:
Alias /dbadmin /usr/share/dbadmin
Save the config, then reload Apache:
sudo systemctl reload apache2
Now, phpMyAdmin is accessible at http://your_domain/dbadmin.
Make sure any hardcoded paths in the config or scripts are updated too. This method isn’t foolproof, but it adds another layer of security through obscurity.
8. How do I remove phpMyAdmin completely?
If you want to remove phpMyAdmin and all related files, run:
sudo apt purge phpmyadmin
sudo rm -rf /usr/share/phpmyadmin
sudo rm -rf /etc/phpmyadmin
Check if any database named phpmyadmin exists in MySQL:
DROP DATABASE phpmyadmin;
Removing it ensures there are no leftover credentials or sensitive information. You may also want to delete Apache config files:
sudo rm /etc/apache2/conf-available/phpmyadmin.conf
sudo systemctl reload apache2
This ensures a clean uninstall and frees up system resources.
9. Can I use phpMyAdmin with Nginx instead of Apache?
Yes, phpMyAdmin works with Nginx, but setup differs since Nginx doesn’t support .htaccess or built-in PHP. You’ll need PHP-FPM and custom rules.
Ensure PHP-FPM is installed:
sudo apt install php-fpm
Add to your Nginx config:
location /phpmyadmin {
    root /usr/share/;
    index index.php;
    location ~ ^/phpmyadmin/(.+\\.php)$ {
        try_files $uri =404;
        fastcgi_pass unix:/run/php/php7.4-fpm.sock;
        include fastcgi_params;
        fastcgi_param SCRIPT_FILENAME $document_root$fastcgi_script_name;
    }
}
Secure with HTTPS using Certbot and consider adding basic auth.
Full guide: DigitalOcean phpMyAdmin on Nginx
10. Where is phpMyAdmin installed on Ubuntu?
The default installation path is:
/usr/share/phpmyadmin
Apache configuration is usually stored in:
/etc/apache2/conf-available/phpmyadmin.conf
To confirm it’s enabled:
ls /etc/apache2/conf-enabled | grep phpmyadmin
You can also check Apache’s active configuration by running:
apache2ctl -S
This will show you virtual host and alias mappings. If you modified the URL path or changed the default folder, remember to update any dependent scripts or users with the new location.
11. Can I use Nginx instead of Apache for phpMyAdmin?
Absolutely. Check out our phpMyAdmin on Nginx guide for detailed instructions.
Conclusion
You should now have phpMyAdmin successfully installed, configured, and secured on your Ubuntu server. This web-based interface offers a user-friendly and powerful alternative to managing MySQL or MariaDB databases via the command line. With phpMyAdmin, you can easily create and manage databases, run SQL queries, import/export data, configure user privileges, and handle everyday administrative tasks.
In this guide, you’ve also taken key steps to harden your setup:
- Enabled HTTPS encryption to protect data in transit
- Added
.htaccessauthentication to block unauthorized users - Optionally tunneled access via SSH to avoid exposing the interface publicly
- Addressed common issues like authentication errors, CSRF tokens, and 403 restrictions
Whether you’re using this on a production server or a local development environment, the combination of these practices ensures that your database management layer is both functional and secure.
What’s next?
If you want to go further:
- Secure Apache with Let’s Encrypt
- Create a New MySQL User and Grant Permissions
- Back Up a MySQL Database to DigitalOcean Spaces Using LVM Snapshots
Launch a pre-configured Ubuntu server in minutes with DigitalOcean Droplets – a scalable, SSD-backed environment perfect for running phpMyAdmin and your entire LAMP stack.
You’re now ready to manage your databases confidently through a secure and intuitive interface.
Thanks for learning with the DigitalOcean Community. Check out our offerings for compute, storage, networking, and managed databases.
About the author
Anish is a Sr Technical Content Strategist and Team Lead at DigitalOcean with 7+ years of experience as an DevOps SRE at Nutanix and Cloud consultant at AMEX, and technical writing at DOCN, and shipping deep infra and AI inference tutorials that help developers deploy production‑ready applications on DigitalOcean.
Still looking for an answer?
This textbox defaults to using Markdown to format your answer.
You can type !ref in this text area to quickly search our full set of tutorials, documentation & marketplace offerings and insert the link!
Hello Mark,
thanks for the tutorial, could follow well. Just had a problem to access phpmyadmin via localhost. I got a 404 error.
What helped was:
Troubleshooting Phpmyadmin If you get a 404 error upon visiting http://localhost/phpmyadmin: You will need to configure apache2.conf to work with Phpmyadmin.
$ gksudo gedit /etc/apache2/apache2.conf
vInclude the following line at the bottom of the file, save and quit.
$ Include /etc/phpmyadmin/apache.conf
Source: https://help.ubuntu.com/community/ApacheMySQLPHP#Troubleshooting_Phpmyadmin_.26_mysql-workbench
In case anybody else has the same problem. Cheers, Thomas
Hi Mark!
I followed the tutorial but the address to access phpmyadmin does not work. I have an error “The request URL was not found on this server”. And apparently the file sudo nano /etc/apache2/conf-available/phpmyadmin.conf does not exist because when i tried to open it was empty. I need help for today. Please
This doesnt help for the Worpress Droplet. I keep getting errors about user debian-sys-maint not having enough rights to configure phpmyadmin package while installing.
Package phpmyadmin is not available, but is referred to by another package. This may mean that the package is missing, has been obsoleted, or is only available from another source
E: Package ‘phpmyadmin’ has no installation candidate
Hi all. Mark, thank you for the great tutorial. I did something unintended, namely, I copied this phrase into my terminal and now I have a user username.
sudo htpasswd -c /etc/phpmyadmin/.htpasswd username
It is no big problem, but I want to keep my administration nice and tidy. How can I remove this user username? I have created a user with the name that I want to use, so that I can enter phpmyadmin.
Hello Mark,
I’m trying to run a create table SQL and it’s giving me the following error:
Error in processing request
Error code: 403
Error text: Forbidden (rejected)
It seems that the connection to server has been lost. Please check your network connectivity and server status.
Here is my SQL:
CREATE TABLE `testTable` (
  `the_id` varchar(10) NOT NULL
) ENGINE=InnoDB DEFAULT CHARSET=utf8;
COMMIT;
Here’s a screencast: https://gyazo.com/4ec6302e8f595327455908cb91c34a83
It seems to be working fine for some other types (e.g. mediumint / date). For example the following sql works:
CREATE TABLE `testTable` (
  `the_id` mediumint NOT NULL
) ENGINE=InnoDB DEFAULT CHARSET=utf8;
COMMIT;
Followed the above instructions a few times and it’s giving me the same error. Any insight on what the issue is?
Thanks in advance, Will
Step 2 — Adjusting User Authentication and Privileges -> I completed this step on a brand new D.O. Ubuntu 20.4 install that followed the D.O. LAMP guide and I’ve lost all access to MySQL. Per the LAMP setup guide I configured a complex password for MySQL in case authentication needed to be switched from UNIX_Socket to Password (seems they recommend against it) and… I cannot log into MySQL nor change the password. Surely I had a misstep but can’t figure out where!
:D What I like DigitalOcean is guide article is best with detail on how to get me walkthrough any technical problem.
Clear and know what the step will be error and get fix. Keep it up.
 This work is licensed under a Creative Commons Attribution-NonCommercial- ShareAlike 4.0 International License.
Become a contributor for community
Get paid to write technical tutorials and select a tech-focused charity to receive a matching donation.

DigitalOcean Documentation
Full documentation for every DigitalOcean product.

Resources for startups and AI-native businesses
The Wave has everything you need to know about building a business, from raising funding to marketing your product.
The developer cloud
Scale up as you grow — whether you're running one virtual machine or ten thousand.

Start building today
From GPU-powered inference and Kubernetes to managed databases and storage, get everything you need to build, scale, and deploy intelligent applications.
