
Status: Deprecated
This article covers a version of Ubuntu that is no longer supported. If you are currently operate a server running Ubuntu 12.04, we highly recommend upgrading or migrating to a supported version of Ubuntu:
- Upgrade to Ubuntu 14.04.
- Upgrade from Ubuntu 14.04 to Ubuntu 16.04
- Migrate the server data to a supported version
Reason: Ubuntu 12.04 reached end of life (EOL) on April 28, 2017 and no longer receives security patches or updates. This guide is no longer maintained.
See Instead: This guide might still be useful as a reference, but may not work on other Ubuntu releases. If available, we strongly recommend using a guide written for the version of Ubuntu you are using. You can use the search functionality at the top of the page to find a more recent version.
Introduction
MongoDB is a NoSQL document database system that scales well horizontally and implements data storage through a key-value system. A popular choice for web applications and websites, MongoDB is easy to implement and access programmatically.
MongoDB achieves scaling through a technique known as “sharding”. Sharding is the process of writing data across different servers to distribute the read and write load and data storage requirements.
In a previous tutorial, we covered how to install MongoDB on an Ubuntu 12.04 VPS. We will use this as a jumping off point to talk about how to implement sharding across a number of different nodes.
MongoDB Sharding Topology
Sharding is implemented through three separate components. Each part performs a specific function:
-
Config Server: Each production sharding implementation must contain exactly three configuration servers. This is to ensure redundancy and high availability.
Config servers are used to store the metadata that links requested data with the shard that contains it. It organizes the data so that information can be retrieved reliably and consistently.
-
Query Routers: The query routers are the machines that your application actually connects to. These machines are responsible for communicating to the config servers to figure out where the requested data is stored. It then accesses and returns the data from the appropriate shard(s).
Each query router runs the “mongos” command.
-
Shard Servers: Shards are responsible for the actual data storage operations. In production environments, a single shard is usually composed of a replica set instead of a single machine. This is to ensure that data will still be accessible in the event that a primary shard server goes offline.
Implementing replicating sets is outside of the scope of this tutorial, so we will configure our shards to be single machines instead of replica sets. You can easily modify this if you would like to configure replica sets for your own configuration.
Initial Set Up
If you were paying attention above, you probably noticed that this configuration requires quite a few machines. In this tutorial, we will configure an example sharding cluster that contains:
- 3 Config Servers (Required in production environments)
- 2 Query Routers (Minimum of 1 necessary)
- 4 Shard Servers (Minimum of 2 necessary)
This means that you will need nine VPS instances to follow along exactly. In reality, some of these functions can overlap (for instance, you can run a query router on the same VPS you use as a config server) and you only need one query router and a minimum of 2 shard servers.
We will go above this minimum in order to demonstrate adding multiple components of each type. We will also treat all of these components as discrete machines for clarity and simplicity.
Set Up Initial Base Image
To get started, install and configure an initial MongoDB server on Ubuntu using this guide. We will use this to bootstrap the rest of our sharding components.
When you have finished that tutorial for your first server, shut down the instance with this command:
sudo shutdown -h now
Now, we are going to take a snapshot of this configured droplet and use it to spin up our other VPS instances. While it is possible to take a snapshot of a running system, powering down ensures that the filesystem is in a consistent state. Snapshots cost $0.05 per gigabyte per month, based on the amount of utilized space within the filesystem, so it is probably best to remove the snapshot when you are finished.
In your DigitalOcean control panel, select the droplet. Click on the “Snapshots” tab. Enter a snapshot name and click “Take Snapshot”:
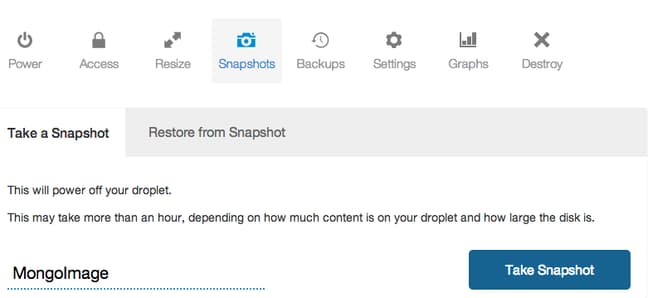
Your snapshot will be taken and the initial server will be rebooted.
Spin Up VPS Instances Based on Snapshot
Now that we have an image saved through the snapshot process, we can use this as a base for the rest of our MongoDB components.
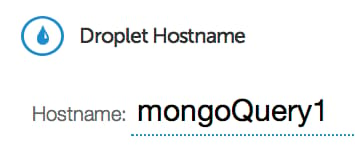
From the control panel, click on the “Create” button. Enter a name that describes the purpose that your droplet will have in the sharding configuration:
Select the droplet size and the region. It is best to choose the same region for all of your components.
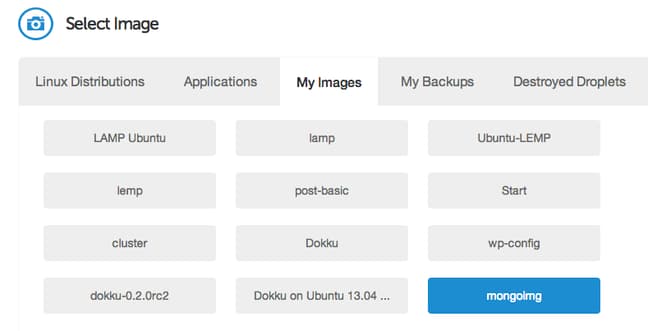
Under the “Select Image” section, click on the “My Images” tab and select the MongoDB snapshot you just created.
Add any SSH keys you need and select the settings you would like to use. Click “Create Droplet” to spin up your new VPS instance.
Repeat this step for each of the sharding components. Remember, to follow along with this tutorial exactly (not necessary, but demonstrative), you need 3 config servers, 2 query servers, and 4 shard servers.
Configure DNS Subdomain Entries for Each Component (Optional)
The MongoDB documentation recommends that you refer to all of your components by a DNS resolvable name instead of by a specific IP address. This is important because it allows you to change servers or redeploy certain components without having to restart every server that is associated with it.
For ease of use, I recommend that you give each server its own subdomain on the domain that you wish to use. You can use this guide to learn how to set up DNS subdomains using DigitalOcean’s control panel.
For the purposes of this tutorial, we will refer to the components as being accessible at these subdomain:
-
Config Servers
- <span class=“highlight”>config0.example.com</span>
- <span class=“highlight”>config1.example.com</span>
- <span class=“highlight”>config2.example.com</span>
-
Query Routers
- <span class=“highlight”>query0.example.com</span>
- <span class=“highlight”>query1.example.com</span>
-
Shard Servers
- <span class=“highlight”>shard0.example.com</span>
- <span class=“highlight”>shard1.example.com</span>
- <span class=“highlight”>shard2.example.com</span>
- <span class=“highlight”>shard3.example.com</span>
If you do not set up subdomains, you can still follow along, but your configuration will not be as robust. If you wish to go this route, simply substitute the subdomain specifications with your droplet’s IP address.
Initialize the Config Servers
The first components that must be set up are the configuration servers. These must be online and operational before the query routers or shards can be configured.
Log into your first configuration server as root.
The first thing we need to do is create a data directory, which is where the configuration server will store the metadata that associates location and content:
mkdir /mongo-metadata
Now, we simply have to start up the configuration server with the appropriate parameters. The service that provides the configuration server is called mongod. The default port number for this component is 27019.
We can start the configuration server with the following command:
mongod --configsvr --dbpath /mongo-metadata --port 27019
The server will start outputting information and will begin listening for connections from other components.
Repeat this process exactly on the other two configuration servers. The port number should be the same across all three servers.
Configure Query Router Instances
At this point, you should have all three of your configuration servers running and listening for connections. They must be operational before continuing.
Log into your first query router as root.
The first thing we need to do is stop the mongodb process on this instance if it is already running. The query routers use data locks that conflict with the main MongoDB process:
service mongodb stop
Next, we need to start the query router service with a specific configuration string. The configuration string must be exactly the same for every query router you configure (including the order of arguments). It is composed of the address of each configuration server and the port number it is operating on, separated by a comma.
They query router service is called mongos. The default port number for this process is 27017 (but the port number in the configuration refers to the configuration server port number, which is 27019 by default).
The end result is that the query router service is started with a string like this:
<pre> mongos --configdb <span class=“highlight”>config0.example.com</span>:27019,<span class=“highlight”>config1.example.com</span>:27019,<span class=“highlight”>config2.example.com</span>:27019 </pre>
Your first query router should begin to connect to the three configuration servers. Repeat these steps on the other query router. Remember that the mongodb service must be stopped prior to typing in the command.
Also, keep in mind that the exact same command must be used to start each query router. Failure to do so will result in an error.
Add Shards to the Cluster
Now that we have our configuration servers and query routers configured, we can begin adding the actual shard servers to our cluster. These shards will each hold a portion of the total data.
Log into one of your shard servers as root.
As we mentioned in the beginning, in this guide we will only be using single machine shards instead of replica sets. This is for the sake of brevity and simplicity of demonstration. In production environments, a replica set is very highly recommended in order to ensure the integrity and availability of the data. To configure replica sets in MongoDB, follow this guide.
To actually add the shards to the cluster, we will need to go through the query routers, which are now configured to act as our interface with the cluster. We can do this by connecting to any of the query routers like this:
<pre> mongo --host <span class=“highlight”>query0.example.com</span> --port 27017 </pre>
This will connect to the appropriate query router and open a mongo prompt. We will add all of our shard servers from this prompt.
To add our first shard, type:
<pre> sh.addShard( “<span class=“highlight”>shard0.example.com</span>:27017” ) </pre>
You can then add your remaining shard droplets in this same interface. You do not need to log into each shard server individually.
<pre> sh.addShard( “<span class=“highlight”>shard1.example.com</span>:27017” ) sh.addShard( “<span class=“highlight”>shard2.example.com</span>:27017” ) sh.addShard( “<span class=“highlight”>shard3.example.com</span>:27017” ) </pre>
If you are configuring a production cluster, complete with replication sets, you have to instead specify the replication set name and a replication set member to establish each set as a distinct shard. The syntax would look something like this:
<pre> sh.addShard( “<span class=“highlight”>rep_set_name</span>/<span class=“highlight”>rep_set_member</span>:27017” ) </pre>
How to Enable Sharding for a Database Collection
MongoDB organizes information into databases. Inside each database, data is further compartmentalized through “collections”. A collection is akin to a table in traditional relational database models.
In this section, we will be operating using the querying routers again. If you are not still connected to the query router, you can access it again using the same mongo command you used in the last section:
<pre> mongo --host <span class=“highlight”>config0.example.com</span> --port 27017 </pre>
Enable Sharding on the Database Level
We will enable sharding first on the database level. To do this, we will create a test database called (appropriately) test_db.
To create this database, we simply need to change to it. It will be marked as our current database and created dynamically when we first enter data into it:
use test_db
We can check that we are currently using the database we just created by typing:
db
test_db
We can see all of the available databases by typing:
show dbs
You may notice that the database that we just created does not show up. This is because it holds no data so it is not quite real yet.
We can enable sharding on this database by issuing this command:
sh.enableSharding("test_db")
Again, if we enter the show dbs command, we will not see our new database. However, if we switch to the config database which is generated automatically, and issue a find() command, our new database will be returned:
use config
db.databases.find()
{ "_id" : "admin", "partitioned" : false, "primary" : "config" }
{ "_id" : "test_db", "partitioned" : true, "primary" : "shard0003" }
Your database will show up with the show dbs command when MongoDB has added some data to the new database.
Enable Sharding on the Collections Level
Now that our database is marked as being available for sharding, we can enable sharding on a specific collection.
At this point, we need to decide on a sharding strategy. Sharding works by organizing data into different categories based on a specific field designated as the shard key in the documents it is storing. It puts all of the documents that have a matching shard key on the same shard.
For instance, if your database is storing employees at a company and your shard key is based on favorite color, MongoDB will put all of the employees with blue in the favorite color field on a single shard. This can lead to disproportional storage if everybody likes a few colors.
A better choice for a shard key would be something that’s guaranteed to be more evenly distributed. For instance, in a large company, a birthday (month and day) field would probably be fairly evenly distributed.
In cases where you’re unsure about how things will be distributed, or there is no appropriate field, you can create a “hashed” shard key based on an existing field. This is what we will be doing for our data.
We can create a collection called test_collection and hash its “_id” field. Make sure we’re using our test_db database and then issue the command:
use test_db
db.test_collection.ensureIndex( { _id : "hashed" } )
We can then shard the collection by issuing this command:
sh.shardCollection("test_db.test_collection", { "_id": "hashed" } )
This will shard the collection across all of the available shards.
Insert Test Data into the Collection
We can see our sharding in action by using a loop to create some objects. This loop comes directly from the MongoDB website for generating test data.
We can insert data into the collection using a simple loop like this:
use test_db
for (var i = 1; i <= 500; i++) db.test_collection.insert( { x : i } )
This will create 500 simple documents ( only an ID field and an “x” field containing a number) and distribute them among the different shards. You can see the results by typing:
db.test_collection.find()
{ "_id" : ObjectId("529d082c488a806798cc30d3"), "x" : 6 }
{ "_id" : ObjectId("529d082c488a806798cc30d0"), "x" : 3 }
{ "_id" : ObjectId("529d082c488a806798cc30d2"), "x" : 5 }
{ "_id" : ObjectId("529d082c488a806798cc30ce"), "x" : 1 }
{ "_id" : ObjectId("529d082c488a806798cc30d6"), "x" : 9 }
{ "_id" : ObjectId("529d082c488a806798cc30d1"), "x" : 4 }
{ "_id" : ObjectId("529d082c488a806798cc30d8"), "x" : 11 }
. . .
To get more values, type:
it
{ "_id" : ObjectId("529d082c488a806798cc30cf"), "x" : 2 }
{ "_id" : ObjectId("529d082c488a806798cc30dd"), "x" : 16 }
{ "_id" : ObjectId("529d082c488a806798cc30d4"), "x" : 7 }
{ "_id" : ObjectId("529d082c488a806798cc30da"), "x" : 13 }
{ "_id" : ObjectId("529d082c488a806798cc30d5"), "x" : 8 }
{ "_id" : ObjectId("529d082c488a806798cc30de"), "x" : 17 }
{ "_id" : ObjectId("529d082c488a806798cc30db"), "x" : 14 }
{ "_id" : ObjectId("529d082c488a806798cc30e1"), "x" : 20 }
. . .
To get information about the specific shards, you can type:
sh.status()
--- Sharding Status ---
  sharding version: {
    "_id" : 1,
    "version" : 3,
    "minCompatibleVersion" : 3,
    "currentVersion" : 4,
    "clusterId" : ObjectId("529cae0691365bef9308cd75")
}
  shards:
    {  "_id" : "shard0000",  "host" : "162.243.243.156:27017" }
    {  "_id" : "shard0001",  "host" : "162.243.243.155:27017" }
. . .
This will provide information about the chunks that MongoDB distributed between the shards.
Conclusion
By the end of this guide, you should be able to implement your own MongoDB sharding configuration. The specific configuration of your servers and the shard key that you choose for each collection will have a big impact on the performance of your cluster.
Choose the field or fields that have the best distribution properties and most closely represent the logical groupings that will be reflected in your database queries. If MongoDB only has to go to a single shard to retrieve your data, it will return faster.
<div class=“author”>By Justin Ellingwood</div>
Thanks for learning with the DigitalOcean Community. Check out our offerings for compute, storage, networking, and managed databases.
About the author
Former Senior Technical Writer at DigitalOcean, specializing in DevOps topics across multiple Linux distributions, including Ubuntu 18.04, 20.04, 22.04, as well as Debian 10 and 11.
Still looking for an answer?
This textbox defaults to using Markdown to format your answer.
You can type !ref in this text area to quickly search our full set of tutorials, documentation & marketplace offerings and insert the link!
In Add Shards to the Cluster section, it says: “To actually add the shards to the cluster, we will need to go through the query routers, which are now configured to act as our interface with the cluster. We can do this by connecting to any of the query routers like this:”
mongo --host config0.example.com --port 27017
But shouldn’t we be using query0.example.com or query1.example.com as the host parameter? Pl confirm. Thanks.
Awesome Tutorial, have this up and running perfectly, Just wondering why I have 2 query routers? While connecting to the DB via PHP, do I just connect to the first Query Server or do I have to structure my PHP Code to chose a query server? I.E. When querying pictures I connect to Query Router 2 and when I’m querying products I connect to Query Router 1
@web.dept: You can use one query router instead of two, however, once your application requires more than that and one query router can’t handle it, you can add more query routers to handle the excess load.
Awesome Tutorial.Worked Fine.How could we configure fail over on a mongos (Query Routers).
It is very helpful those are new in the field of mongodb. Just want to know, in which machine(config server, query router, shard server) create, update , delete & find query would be fire, and how? Please provide the input to it.
Thanks a lot in advance.
Great article! Is there a way to ensure that related data is stored on the same shard? For example if you have another collection that points to the test_collection:
{
  _id: Object('123'),
  test_collection: ObjectId('abc...')
}
My thinking is that all of a user’s data would be on the same shard. Or is that unnecessary optimization?
Thanks!
Nice Article. I’ve written a auto-shard creation script & you can find at http://dbversity.com/mongodb-shard-creation-script/
Hi Mariusc23, you can use tag aware sharding for your requirement btw. More details at http://dbversity.com/tag-aware/
Thanks, DBversity
Some errors still exist in sharding section of this tutorial:
“you can access it again using the same mongo command you used in the last section: mongo --host config0.example.com --port 27017”
There i think you should not connect to config0.example.com but to query0.example.com. End client never should talk to config or shard server, but only to query servers.
Also i don’t see part where it is explained how to start mongo instances on each shard. And that must be done before calling:
sh.addShard( “shard1.example.com:27017” ) sh.addShard( “shard2.example.com:27017” ) sh.addShard( “shard3.example.com:27017” )
So before adding shards i did following on each shard: mongod --shardsvr
( you can also add --storageEngine wiredTiger , if you want to try new storage engine)
Thanks for this great tutorial, exactly what i needed. I hope that my suggestions will help to those who was unable to make it working.
You can refer to http://dbversity.com/mongodb-shard-creation-script/ for the details script & instructions for shard setup
 This work is licensed under a Creative Commons Attribution-NonCommercial- ShareAlike 4.0 International License.
Become a contributor for community
Get paid to write technical tutorials and select a tech-focused charity to receive a matching donation.

DigitalOcean Documentation
Full documentation for every DigitalOcean product.

Resources for startups and AI-native businesses
The Wave has everything you need to know about building a business, from raising funding to marketing your product.
The developer cloud
Scale up as you grow — whether you're running one virtual machine or ten thousand.

Start building today
From GPU-powered inference and Kubernetes to managed databases and storage, get everything you need to build, scale, and deploy intelligent applications.
