
Introduction
TypeScript is an extension of the JavaScript language that uses JavaScript’s runtime with a compile-time type checker. This combination allows developers to use the full JavaScript ecosystem and language features, while also adding optional static type-checking, enums, classes, and interfaces on top of it.
Though the pre-made, basic types in TypeScript will cover many use cases, creating your own custom types based on these basic types will allow you to ensure the type checker validates the data structures specific to your project. This will reduce the chance of bugs in your project, while also allowing for better documentation of the data structures used throughout the code.
This tutorial will show you how to use custom types with TypeScript, how to compose those types together with unions and intersections, and how to use utility types to add flexibility to your custom types. It will lead you through different code samples, which you can follow in your own TypeScript environment or the TypeScript Playground, an online environment that allows you to write TypeScript directly in the browser.
Beyond core TypeScript, modern AI coding assistants like GitHub Copilot and Codeium can accelerate type definition and enforcement at scale. In this tutorial, you’ll pair AI-assisted completions and refactors with strict compiler options, runtime validation, code generation from API schemas, governance controls, and CI automation to reliably maintain type safety across large projects and monorepos.
Key Takeaways:
- Custom types: Define object shapes with
type, add optional properties (?), and use index signatures orRecordfor flexible key/value maps. - Composing types: Create powerful unions (
|) and intersections (&), and enforce exhaustiveness with discriminated unions andneverchecks inswitchstatements. - Arrays and tuples: Model “at least N items” using tuples with rest elements (for example,
[string, string, ...string[]]). - Template literal types: Constrain string formats with backtick-based types (for example, ``type Id = `user_${number}```).
- Type assertions and narrowing: Prefer type guards (
value is T),in/instanceof, and control-flow analysis overasassertions. - Utility types: Apply
Record,Pick,Omit, andPartialto transform shapes without rewriting types. - AI for TypeScript at scale: Use GitHub Copilot and Codeium to generate types from JSON, suggest discriminated unions, and refactor toward strictness; pair with runtime validation (for example,
zod) to enforce data shape at the boundaries. - Codegen pipelines: Generate and version API types from OpenAPI/GraphQL (
openapi-typescript,@graphql-codegen/cli), and block merges when generated files drift. - Project configuration: Enable strict TypeScript options (
strict,noImplicitAny,strictNullChecks,exactOptionalPropertyTypes,noUncheckedIndexedAccess), and enforce hygiene withtypescript-eslintrules. - Governance and privacy: Adopt a governance checklist and YAML manifest (approved models, regions, retention, public code filters), and restrict prompts from including secrets/PII.
- Automation and CI: Add
tsc --noEmitand ESLint to CI, and pre-commit hooks to runcodegenandvalidateto keep types in sync.
Prerequisites
To follow this tutorial, you will need:
-
An environment in which you can execute TypeScript programs to follow along with the examples. To set this up on your local machine, you will need the following:
- Both Node and npm (or yarn) installed in order to run a development environment that handles TypeScript-related packages. This tutorial was tested with Node.js 20 LTS and npm 10.x. To install on macOS or Ubuntu, follow the steps in How to Install Node.js and Create a Local Development Environment on macOS or the Linux installation guide for your distribution. This also works if you are using the Windows Subsystem for Linux (WSL).
- Additionally, you will need the TypeScript Compiler (
tsc) installed on your machine. To do this, refer to the official TypeScript website.
-
If you do not wish to create a TypeScript environment on your local machine, you can use the official TypeScript Playground to follow along.
-
You will need sufficient knowledge of JavaScript, especially ES6+ syntax, such as destructuring, rest operators, and imports/exports. If you need more information on these topics, reading our How To Code in JavaScript series is recommended.
-
This tutorial will reference aspects of text editors and AI tools that support TypeScript and show in-line errors. This is not necessary to use TypeScript, but does take more advantage of TypeScript features. To gain the benefit of these, you can use a text editor like Visual Studio Code, which has full support for TypeScript out of the box. Additionally, AI tools like GitHub Copilot and Codeium can accelerate type definition and enforcement at scale. You can also try out these benefits in the TypeScript Playground.
-
Optional quickstart (dev tooling):
npm i -D typescript eslint @typescript-eslint/parser @typescript-eslint/eslint-plugin zod openapi-typescript @graphql-codegen/cli husky lint-staged
All examples shown in this tutorial were created using TypeScript 5.x.
Creating Custom Types
In cases where programs have complex data structures, using TypeScript’s basic types may not completely describe the data structures you are using. In these cases, declaring your own type will help you address the complexity. In this section, you are going to create types that can be used to describe any object shape you need to use in your code.
Custom Type Syntax
In TypeScript, the syntax for creating custom types is to use the type keyword followed by the type name and then an assignment to a {} block with the type properties. Take the following:
type Programmer = {
  name: string;
  knownFor: string[];
};
The syntax resembles an object literal, where the key is the name of the property and the value is the type this property should have. This defines a type Programmer that must be an object with the name key that holds a string value and a knownFor key that holds an array of strings.
As shown in the earlier example, you can use ; as the separator between each property. It is also possible to use a comma, ,, or to completely omit the separator, as shown here:
type Programmer = {
  name: string
  knownFor: string[]
};
Using your custom type is the same as using any of the basic types. Add a colon and then add your type name:
type Programmer = {
name: string;
knownFor: string[];
};
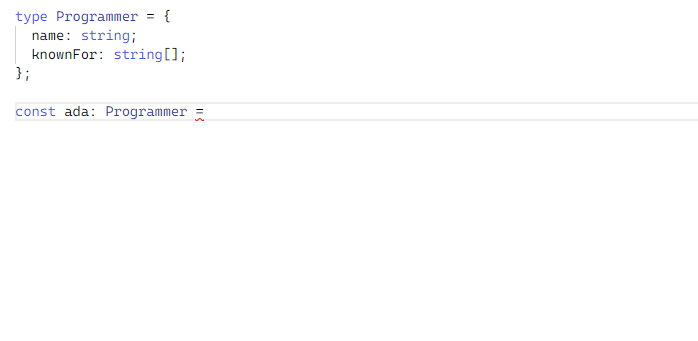
const ada: Programmer = {
name: 'Ada Lovelace',
knownFor: ['Mathematics', 'Computing', 'First Programmer']
};
The ada constant will now pass the type checker without throwing an error.
If you write this example in any editor with full support of TypeScript, like in the TypeScript Playground, the editor will suggest the fields expected by that object and their types, as shown in the following animation:
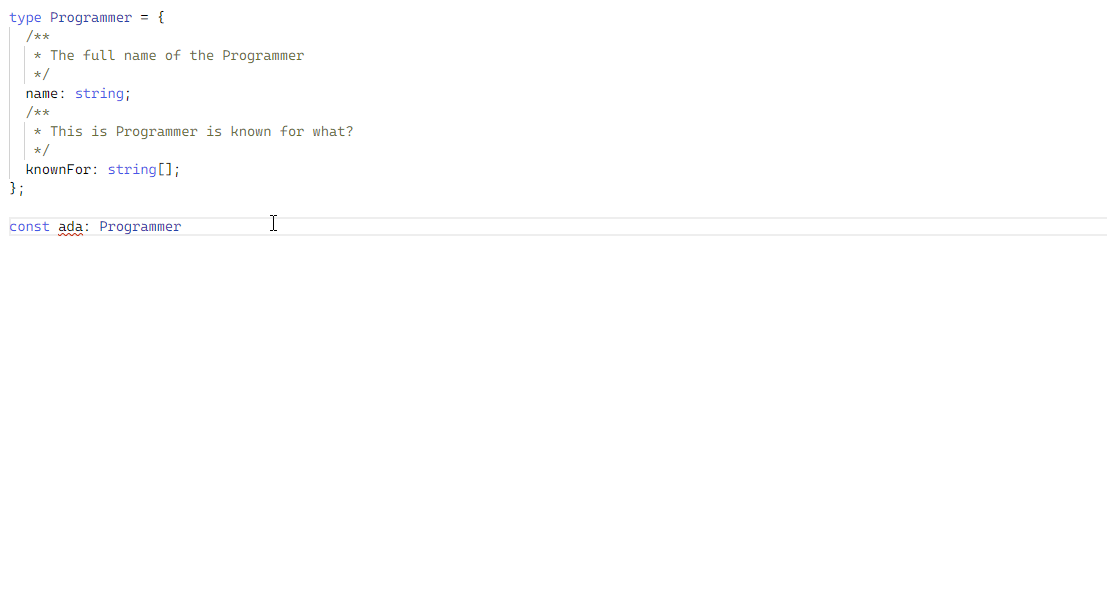
If you add comments to the fields using the TSDoc format, a popular style of TypeScript comment documentation, they are also suggested in code completion. Take the following code with explanations in comments:
type Programmer = {
  /**
   * The full name of the Programmer
   */
  name: string;
  /**
   * This Programmer is known for what?
   */
  knownFor: string[];
};

const ada: Programmer = {
  name: 'Ada Lovelace',
  knownFor: ['Mathematics', 'Computing', 'First Programmer']
};
The commented descriptions will now appear with the field suggestions:
When creating an object with the custom type Programmer, if you assign a value with an unexpected type to any of the properties, TypeScript will throw an error. Take the following code block, with a highlighted line that does not adhere to the type declaration:
type Programmer = {
  name: string;
  knownFor: string[];
};

const ada: Programmer = {
  name: true,
  knownFor: ['Mathematics', 'Computing', 'First Programmer']
};
The TypeScript Compiler (tsc) will show the error 2322:
OutputType 'boolean' is not assignable to type 'string'. (2322)
If you omitted any of the properties required by your type, like in the following:
type Programmer = {
  name: string;
  knownFor: string[];
};

const ada: Programmer = {
  name: 'Ada Lovelace'
};
The TypeScript Compiler will give the error 2741:
OutputProperty 'knownFor' is missing in type '{ name: string; }' but required in type 'Programmer'. (2741)
Adding a new property not specified in the original type will also result in an error:
type Programmer = {
  name: string;
  knownFor: string[];
};

const ada: Programmer = {
  name: "Ada Lovelace",
  knownFor: ['Mathematics', 'Computing', 'First Programmer'],
  age: 36
};
In this case, the error shown is the 2322:
OutputType '{ name: string; knownFor: string[]; age: number; }' is not assignable to type 'Programmer'.
Object literal may only specify known properties, and 'age' does not exist in type 'Programmer'.(2322)
Nested Custom Types
You can also nest custom types together. Imagine you have a Company type that has a manager field that adheres to a Person type. You could create those types like this:
type Person = {
  name: string;
};

type Company = {
  name: string;
  manager: Person;
};
Then you could create a value of type Company like this:
const manager: Person = {
  name: 'John Doe',
}

const company: Company = {
  name: 'ACME',
  manager,
}
This code would pass the type checker, since the manager constant fits the type designated for the manager field. Note that this uses the object property shorthand to declare manager.
You can omit the type in the manager constant because it has the same shape as the Person type. TypeScript is not going to raise an error when you use an object with the same shape as the one expected by the type of the manager property, even if it is not set explicitly to have the Person type
The following will not throw an error:
const manager = {
  name: 'John Doe'
}

const company: Company = {
  name: 'ACME',
  manager
}
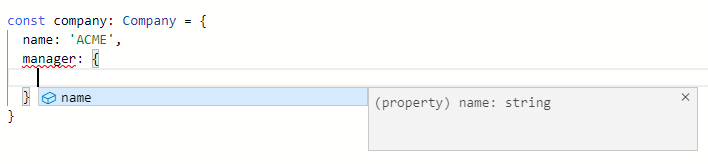
You can even go one step further and set the manager directly inside this company object literal:
const company: Company = {
  name: 'ACME',
  manager: {
    name: 'John Doe'
  }
};
All these scenarios are valid.
If writing these examples in an editor that supports TypeScript, you will find that the editor will use the available type information to document itself. For the previous example, as soon as you open the {} object literal for manager, the editor will expect a name property of type string:
Now that you have gone through some examples of creating your own custom type with a fixed number of properties, next you’ll try adding optional properties to your types.
Optional Properties
With the custom type declaration in the previous sections, you cannot omit any of the properties when creating a value with that type. There are, however, some cases that require optional properties that can pass the type checker with or without the value. In this section, you will declare these optional properties.
To add optional properties to a type, add the ? modifier to the property. Using the Programmer type from the previous sections, turn the knownFor property into an optional property by adding the following highlighted character:
type Programmer = {
  name: string;
  knownFor?: string[];
};
Here you are adding the ? modifier after the property name. This makes TypeScript consider this property as optional and not raise an error when you omit that property:
type Programmer = {
  name: string;
  knownFor?: string[];
};

const ada: Programmer = {
  name: 'Ada Lovelace'
};
This will pass without an error.
Now that you know how to add optional properties to a type, it is time to learn how to create a type that can hold an unlimited number of fields.
Indexable Types
The previous examples showed that you cannot add properties to a value of a given type if that type does not specify those properties when it was declared. In this section, you will create indexable types, which are types that allow for any number of fields if they follow the index signature of the type.
Imagine you had a Data type to hold an unlimited number of properties of the any type. You could declare this type like this:
type Data = {
  [key: string]: any;
};
Here you create a normal type with the type definition block in curly brackets ({}), and then add a special property in the format of [key: typeOfKeys]: typeOfValues, where typeOfKeys is the type the keys of that object should have, and typeOfValues is the type the values of those keys should have.
You can then use it normally like any other type:
type Data = {
  [key: string]: any;
};

const someData: Data = {
  someBooleanKey: true,
  someStringKey: 'text goes here'
  // ...
}
Using indexable types, you can assign an unlimited number of properties, as long as they match the index signature, which is the name used to describe the types of the keys and values of an indexable type. In this case, the keys have a string type, and the values have any type.
It is also possible to add specific properties that are always required to your indexable type, just like you could with a normal type. In the following highlighted code, you are adding the status property to your Data type:
type Data = {
  status: boolean;
  [key: string]: any;
};

const someData: Data = {
  status: true,
  someBooleanKey: true,
  someStringKey: 'text goes here'
  // ...
}
This would mean that a Data type object must have a status key with a boolean value to pass the type checker.
Now that you can create an object with different numbers of elements, you can move on to learning about arrays in TypeScript, which can have a custom number of elements or more.
Creating Arrays with Number of Elements or More
Using both the array and tuple basic types available in TypeScript, you can create custom types for arrays that should have a minimum amount of elements. In this section, you will use the TypeScript rest operator ... to do this.
Imagine you have a function responsible for merging multiple strings. This function is going to take a single array parameter. This array must have at least two elements, each of which should be strings. You can create a type like this with the following:
type MergeStringsArray = [string, string, ...string[]];
The MergeStringsArray type is taking advantage of the fact that you can use the rest operator with an array type and uses the result of that as the third element of a tuple. This means that the first two strings are required, but additional string elements after that are not required.
If an array has less than two string elements, it will be invalid, like the following:
const invalidArray: MergeStringsArray = ['some-string']
The TypeScript Compiler is going to give error 2322 when checking this array:
OutputType '[string]' is not assignable to type 'MergeStringsArray'.
Source has 1 element(s) but target requires 2. (2322)
Up to this point, you have created your own custom types from a combination of basic types. In the next section, you will make a new type by composing two or more custom types together.
Composing Types
This section will go through two ways that you can compose types together. These will use the union operator to pass any data that adheres to one type or the other and the intersection operator to pass data that satisfies all the conditions in both types.
Unions
Unions are created using the | (pipe) operator, which represents a value that can have any of the types in the union. Take the following example:
type ProductCode = number | string
In this code, ProductCode can be either a string or a number. The following code will pass the type checker:
type ProductCode = number | string;

const productCodeA: ProductCode = 'this-works';

const productCodeB: ProductCode = 1024;
A union type can be created from a union of any valid TypeScript types.
Intersections
You can use intersection types to create a completely new type that has all the properties of all the types being intersected together.
For example, imagine you have some common fields that always appear in the response of your API calls, then specific fields for some endpoints:
type StatusResponse = {
  status: number;
  isValid: boolean;
};

type User = {
  name: string;
};

type GetUserResponse = {
  user: User;
};
In this case, all responses will have status and isValid properties, but only user responses will have the additional user field. To create the resulting response of a specific API User call using an intersection type, combine both StatusResponse and GetUserResponse types:
type ApiGetUserResponse = StatusResponse & GetUserResponse;
The type ApiGetUserResponse is going to have all the properties available in StatusResponse and those available in GetUserResponse. This means that data will only pass the type checker if it satisfies all the conditions of both types. The following example will work:
let response: ApiGetUserResponse = {
    status: 200,
    isValid: true,
    user: {
        name: 'Sammy'
    }
}
Another example would be the type of the rows returned by a database client for a query that contains joins. You would be able to use an intersection type to specify the result of such a query:
type UserRoleRow = {
  role: string;
}

type UserRow = {
  name: string;
};

type UserWithRoleRow = UserRow & UserRoleRow;
Later, if you used a fetchRowsFromDatabase() function like the following:
const joinedRows: UserWithRoleRow = fetchRowsFromDatabase()
The resulting constant joinedRows would have to have a role property and a name property that both held string values in order to pass the type checker.
Using Template String Types
Starting with TypeScript 4.1, it is possible to create types using template string types. This will allow you to create types that check specific string formats and add more customization to your TypeScript project.
To create template string types, you use a syntax that is almost the same as what you would use when creating template string literals. But instead of values, you will use other types inside the string template.
Imagine you wanted to create a type that passes all strings that begin with get. You would be able to do that using template string types:
type StringThatStartsWithGet = `get${string}`;

const myString: StringThatStartsWithGet = 'getAbc';
myString will pass the type checker here because the string starts with get then is followed by an additional string.
If you passed an invalid value to your type, like the following invalidStringValue:
type StringThatStartsWithGet = `get${string}`;

const invalidStringValue: StringThatStartsWithGet = 'something';
The TypeScript Compiler would give you the error 2322:
OutputType '"something"' is not assignable to type '`get${string}`'. (2322)
Making types with template strings helps you to customize your type to the specific needs of your project. In the next section, you will try out type assertions, which add a type to otherwise untyped data.
Using Type Assertions
The any type can be used as the type of any value, which often does not provide the strong typing needed to get the full benefit out of TypeScript. But sometimes you may end up with some variables bound to any that are outside of your control. This will happen if you are using external dependencies that were not written in TypeScript or that do not have type declaration available.
In case you want to make your code type-safe in those scenarios, you can use type assertions, which is a way to change the type of a variable to another type. Type assertions are made possible by adding as NewType after your variable. This will change the type of the variable to that specified after the as keyword.
Take the following example:
const valueA: any = 'something';

const valueB = valueA as string;
valueA has the type any, but, using the as keyword, this code coerces the valueB to have the type string.
Note: To assert a variable of TypeA to have the type TypeB, TypeB must be a subtype of TypeA. Almost all TypeScript types, besides never, are a subtype of any, including unknown.
Utility Types
In the previous sections, you reviewed multiple ways to create custom types out of basic types. But sometimes you do not want to create a completely new type from scratch. There are times when it might be best to use a few properties of an existing type, or even create a new type that has the same shape as another type, but with all the properties set to be optional.
All of this is possible using existing utility types available with TypeScript. This section will cover a few of those utility types; for a full list of all available ones, take a look at the Utility Types part of the TypeScript handbook.
All utility types are Generic Types, which you can think of as a type that accepts other types as parameters. A Generic type can be identified by being able to pass type parameters to it using the <TypeA, TypeB, ...> syntax.
Record<Key, Value>
The Record utility type can be used to create an indexable type in a cleaner way than using the index signature covered previously.
In your indexable types example, you had the following type:
type Data = {
  [key: string]: any;
};
You can use the Record utility type instead of an indexable type like this:
type Data = Record<string, any>;
The first type parameter of the Record generic is the type of each key. In the following example, all the keys must be strings:
type Data = Record<string, any>
The second type parameter is the type of each value of those keys. The following would allow the values to be any:
type Data = Record<string, any>
Omit<Type, Fields>
The Omit utility type is useful to create a new type based on another one, while excluding some properties you do not want in the resulting type.
Imagine you have the following type to represent the type of a user row in a database:
type UserRow = {
  id: number;
  name: string;
  email: string;
  addressId: string;
};
If in your code you are retrieving all the fields but the addressId one, you can use Omit to create a new type without that field:
type UserRow = {
  id: number;
  name: string;
  email: string;
  addressId: string;
};

type UserRowWithoutAddressId = Omit<UserRow, 'addressId'>;
The first argument to Omit is the type that you are basing the new type on. The second is the field that you’d like to omit.
If you hover over UserRowWithoutAddressId in your code editor, you will find that it has all the properties of the UserRow type but the ones you omitted.
You can pass multiple fields to the second type parameter using a union of strings. Say you also wanted to omit the id field, you could do this:
type UserRow = {
  id: number;
  name: string;
  email: string;
  addressId: string;
};

type UserRowWithoutIds = Omit<UserRow, 'id' | 'addressId'>;
Pick<Type, Fields>
The Pick utility type is the exact opposite of the Omit type. Instead of saying the fields you want to omit, you specify the fields you want to use from another type.
Using the same UserRow you used before:
type UserRow = {
  id: number;
  name: string;
  email: string;
  addressId: string;
};
Imagine you need to select only the email key from the database row. You could create such a type using Pick like this:
type UserRow = {
  id: number;
  name: string;
  email: string;
  addressId: string;
};

type UserRowWithEmailOnly = Pick<UserRow, 'email'>;
The first argument to Pick here specifies the type you are basing the new type on. The second is the key that you would like to include.
This would be equivalent to the following:
type UserRowWithEmailOnly = {
    email: string;
}
You are also able to pick multiple fields using an union of strings:
type UserRow = {
  id: number;
  name: string;
  email: string;
  addressId: string;
};

type UserRowWithEmailOnly = Pick<UserRow, 'name' | 'email'>;
Partial<Type>
Using the same UserRow example, imagine you want to create a new type that matches the object your database client can use to insert new data into your user table, but with one small detail: Your database has default values for all fields, so you are not required to pass any of them. To do this, you can use a Partial utility type to optionally include all fields of the base type.
Your existing type, UserRow, has all the properties as required:
type UserRow = {
  id: number;
  name: string;
  email: string;
  addressId: string;
};
To create a new type where all properties are optional, you can use the Partial<Type> utility type like the following:
type UserRow = {
  id: number;
  name: string;
  email: string;
  addressId: string;
};

type UserRowInsert = Partial<UserRow>;
This is exactly the same as having your UserRowInsert like this:
type UserRow = {
  id: number;
  name: string;
  email: string;
  addressId: string;
};

type UserRowInsert = {
  id?: number | undefined;
  name?: string | undefined;
  email?: string | undefined;
  addressId?: string | undefined;
};
Utility types are a great resource to have, because they provide a faster way to build up types than creating them from the basic types in TypeScript.
Using AI Tools to Define and Enforce Types at Scale
As TypeScript adoption grows in large codebases, AI coding assistants like GitHub Copilot and Codeium can accelerate how teams define, refactor, and enforce types consistently.
Practical workflows
- Generate types from examples: Paste sample JSON or API payloads and prompt:
Create strict TypeScript types and a Zod schema for this payload. AI can produce both compile-time types and runtime validators. - Refactor toward strictness: When enabling
"strict": true(includingnoImplicitAny,strictNullChecks), AI can suggest safe migrations fromanyto precise unions, branded types, andunknownwith type-narrowing. - Discriminated unions and exhaustiveness: From switch statements, AI can infer discriminants and add
neverchecks to enforce exhaustiveness in reducers and state machines. - API schema scaffolding: With OpenAPI/GraphQL schemas, AI can help wire codegen outputs (e.g.,
openapi-typescript,graphql-codegen) into project types and usage sites. - Runtime validation: AI can pair types with validators (e.g.,
zod) to enforce shape at boundaries:
import { z } from 'zod';

// Example JSON from an API
const payload = {
  id: 'ord_123',
  totalCents: 2599,
  status: 'paid',
  items: [{ sku: 'sku-1', qty: 2 }],
};

// AI-suggested types and schema
const OrderItemSchema = z.object({
  sku: z.string(),
  qty: z.number().int().positive(),
});

const OrderSchema = z.object({
  id: z.string(),
  totalCents: z.number().int().nonnegative(),
  status: z.enum(['pending', 'paid', 'failed']),
  items: z.array(OrderItemSchema).min(1),
});

type Order = z.infer<typeof OrderSchema>;

function parseOrder(input: unknown): Order {
  return OrderSchema.parse(input);
}

const order = parseOrder(payload);
Recommended configuration for large projects
- tsconfig.json: Enable strictness to maximize AI suggestions’ usefulness.
{
  "compilerOptions": {
    "strict": true,
    "noImplicitAny": true,
    "strictNullChecks": true,
    "noUncheckedIndexedAccess": true,
    "exactOptionalPropertyTypes": true
  }
}
- ESLint with typescript-eslint: Enforce type hygiene and let AI auto-fix many issues.
// .eslintrc.cjs
module.exports = {
  extends: [
    'eslint:recommended',
    'plugin:@typescript-eslint/recommended',
    'plugin:@typescript-eslint/recommended-type-checked',
  ],
  parser: '@typescript-eslint/parser',
  parserOptions: { project: ['./tsconfig.json'] },
  rules: {
    '@typescript-eslint/no-explicit-any': 'warn',
    '@typescript-eslint/no-unsafe-assignment': 'error',
    '@typescript-eslint/consistent-type-definitions': ['error', 'type'],
    '@typescript-eslint/no-floating-promises': 'error'
  }
};
- Editor setup: In VS Code, use the workspace TypeScript version and enable AI extensions. Keep TypeScript at 5.x to access modern type-system features that AI leverages in suggestions.
- CI: Add fast, non-emitting checks so type regressions fail builds.
// package.json (scripts)
{
  "scripts": {
    "typecheck": "tsc -p tsconfig.json --noEmit",
    "lint": "eslint . --ext .ts,.tsx",
    "validate": "npm run typecheck && npm run lint"
  }
}
Monorepo and scaling tips
- Enable TypeScript project references for faster builds and clear boundaries:
// tsconfig.json
{
  "files": [],
  "references": [
    { "path": "packages/types" },
    { "path": "packages/app" }
  ]
}
- In each package, set
"composite": trueintsconfig.jsonto support build graphs. - Track type coverage with tools such as
type-coverageand surface metrics in CI.
Copilot/Codeium VS Code configuration checklist
- Pin the workspace TypeScript version so AI suggestions match your typescript features.
- Enable Copilot’s public code filter (org-level policy) and restrict telemetry.
- Prefer workspace scope; avoid sending secrets/PII in prompts.
// .vscode/settings.json
{
  // Pin workspace TypeScript
  "typescript.tsdk": "node_modules/typescript/lib",
  "typescript.enablePromptUseWorkspaceTsdk": true,

  // General hygiene
  "telemetry.telemetryLevel": "off",

  // GitHub Copilot (editor-side)
  "github.copilot.enable": {
    "*": true,
    "yaml": true,
    "markdown": true
  },
  // Note: Public code filter is configured at the org level (Copilot Business/Enterprise). Ensure it is enabled in your GitHub org settings.

  // Codeium
  // Keep suggestions on for TypeScript, prefer workspace context
  "codeium.enabledLanguages": {
    "typescript": true,
    "typescriptreact": true
  }
}
Model and privacy restrictions
- Use approved models only: Configure your editor/AI plugin to use organization-approved providers/regions. Disable training on your code and chat history.
- Copilot policy settings: Enable the public code filter, disable code snippet suggestions that closely match public sources, and restrict telemetry per org policy. Prefer workspace TypeScript version.
- Repository allowlists: Limit AI context to your workspace and necessary dependencies. Avoid sending PII, secrets, or proprietary schemas in prompts.
- License boundaries: Ask AI to avoid verbatim code from public repos; prefer idiomatic, minimal examples and references to docs.
Codegen pipelines for types
Automate type generation so drift is minimized and AI suggestions align with source-of-truth schemas.
- OpenAPI → TS types: Use
openapi-typescriptto generate API types.
{
  "scripts": {
    "codegen:openapi": "openapi-typescript openapi/schema.yaml -o src/types/api.d.ts"
  }
}
- GraphQL → TS types: Use
@graphql-codegen/cli.
# codegen.yml
schema: schema.graphql
generates:
  src/types/graphql.ts:
    plugins:
      - typescript
      - typescript-operations
{
  "scripts": {
    "codegen:graphql": "graphql-codegen --config codegen.yml",
    "codegen": "npm run codegen:openapi && npm run codegen:graphql"
  }
}
- CI guardrails: Run codegen in CI and fail if generated diff isn’t committed.
# .github/workflows/codegen.yml
name: Types Codegen
on: [push, workflow_dispatch]
jobs:
  generate:
    runs-on: ubuntu-latest
    steps:
      - uses: actions/checkout@v4
      - run: npm ci
      - run: npm run codegen
      - run: git diff --quiet || (git config user.name ci && git config user.email ci@example && git commit -am "chore(codegen): refresh types" && git push)
Prompt library
Use concise, directive prompts to steer AI toward safe, strict typing outcomes.
- “From this sample JSON, derive strict TypeScript types, a Zod schema, and an exhaustive discriminated union where applicable.”
- “Scan this diff for
any/unknownand propose safer replacements with necessary narrowing and guards.” - “Design a discriminated union for these variants and refactor this switch to be exhaustive using a
nevercheck.” - “Given this OpenAPI schema, show typed fetch examples and end-to-end request/response types.”
- “Replace type assertions (
as) with type guards and control-flow narrowing where possible.” - “Propose a
tsconfigstrictness upgrade plan (enableexactOptionalPropertyTypes,noUncheckedIndexedAccess) and the minimal code changes required.” - “Create Zod validators for inbound API handlers and derive Typescript types with
z.infer.” - “Introduce branded types for identifiers (e.g.,
UserId,OrderId) and migrate usages safely.” - “Generate tests that enforce exhaustiveness for union types via
assertNever.” - “Suggest ESLint rules and autofixes to prevent regressions into
anyand unsafe assignments.”
Governance checklist
Keep this table in your repo (for example, docs/AI-GOVERNANCE.md) and review quarterly.
| Item | Description | Example value |
|---|---|---|
| Model / Provider / Version | Approved assistant(s) and version pin | Copilot Chat (OpenAI GPT-4o, rev 2025-06), Codeium Enterprise 1.8 |
| Region / Endpoint | Hosting region and endpoint URL | Azure EastUS, https://api.contoso.ai |
| Training & Retention | Whether prompts/code are used for training or retained | Training: off; Retention: 30 days masked logs |
| Public Code Filter | Block suggestions that match public code | Enabled |
| Allowed Repos/Projects | Scope where AI is permitted | org/*-web, org/*-services |
| Allow/Deny Context | What files/classes of data are allowed in prompts | Allow: schemas, types; Deny: secrets, PII, contracts |
| Type Source of Truth | Where types are derived from | openapi/schema.yaml, schema.graphql |
| Codegen Policy | How and when to regenerate types | npm run codegen on PR + nightly CI |
| Type Strictness Baseline | Minimal tsconfig strict options |
strict, exactOptionalPropertyTypes, noUncheckedIndexedAccess |
| Lint Baseline | Required rules to prevent unsafe types | @typescript-eslint/no-explicit-any, no-unsafe-* (error) |
| Secret/PII Guardrails | Scanners and redaction | GitHub secret scanning, pre-commit redaction |
| Telemetry/Logging | What is logged by AI tools | Errors only; no code snippets |
| Approval Owner | Who approves model/config changes | Eng Platform Lead |
| Last Review Date | Last policy review timestamp | 2025-07-01 |
YAML governance manifest (drop-in)
Add this file at /.well-known/ai-governance.yml (or docs/ai-governance.yml) and keep it in sync with the table above.
version: 1
models:
  - name: copilot-chat
    provider: openai
    model: gpt-4o
    revision: "2025-06"
    region: azure-eastus
    endpoint: https://api.contoso.ai
    approved: true
    training_enabled: false
    retention_policy: masked-logs-30d
    public_code_filter: enabled
  - name: codeium-enterprise
    provider: codeium
    version: "1.8"
    approved: true
privacy:
  allow_context:
    - schemas
    - types
  deny_context:
    - secrets
    - pii
    - contracts
governance:
  approval_owner: "Engineering Platform Lead"
  last_review_date: "2025-07-01"
  next_review_due_days: 90
type_sources:
  - openapi/schema.yaml
  - schema.graphql
codegen:
  on_pr: true
  nightly_ci: true
tsconfig_baseline:
  strict: true
  exactOptionalPropertyTypes: true
  noUncheckedIndexedAccess: true
eslint_baseline:
  rules:
    "@typescript-eslint/no-explicit-any": "error"
    "@typescript-eslint/no-unsafe-assignment": "error"
    "@typescript-eslint/no-floating-promises": "error"
ci:
  checks:
    - typecheck
    - lint
telemetry:
  log_level: error
  include_code_snippets: false
security:
  secret_scanning: github
  precommit_redaction: enabled
Pre-commit hook to block pending codegen/validation
Use either Husky or a raw Git hook to prevent commits when npm run validate fails or npm run codegen produces uncommitted diffs.
# .husky/pre-commit (Husky)
#!/bin/sh
. "$(dirname "$0")/_/husky.sh"

npm run codegen
if ! git diff --quiet; then
  echo "codegen produced changes. Commit generated files before proceeding." >&2
  exit 1
fi

npm run validate
# .git/hooks/pre-commit (raw Git hook)
#!/usr/bin/env bash
set -euo pipefail

npm run codegen
if ! git diff --quiet; then
  echo "codegen produced changes. Commit generated files before proceeding." >&2
  exit 1
fi

npm run validate
FAQs
1. Interface vs type — when should I use which?
Use interface for object shapes you expect to extend (via extends) or merge (declaration merging). Use type for unions, intersections, mapped types, conditional types, and template literal types. For plain object shapes, either works—pick one convention and stay consistent.
2. What’s the difference between any, unknown, and never?
- any: Opts out of type safety; avoid in production.
- unknown: Safer top type; must be narrowed before use.
- never: Represents values that never occur (functions that throw or exhaustive switches). Useful for enforcing exhaustiveness.
3. How do I narrow types safely without as assertions?
Prefer type guards and control-flow analysis:
function isString(value: unknown): value is string {
  return typeof value === 'string';
}

function upper(input: unknown) {
  if (isString(input)) return input.toUpperCase();
  if (typeof input === 'number') return String(input).toUpperCase();
  return '';
}
Also use in/instanceof and discriminants (like kind fields) to refine unions.
4. How do I model variants and enforce exhaustive switches?
Use a discriminated union and a never check:
type Shape = { kind: 'circle'; r: number } | { kind: 'rect'; w: number; h: number };

function area(s: Shape): number {
  switch (s.kind) {
    case 'circle':
      return Math.PI * s.r * s.r;
    case 'rect':
      return s.w * s.h;
    default: {
      const _exhaustive: never = s; // error if a new variant isn’t handled
      return _exhaustive;
    }
  }
}
5. Which tsconfig strict options matter most?
Enable strict and, at minimum: noImplicitAny, strictNullChecks, exactOptionalPropertyTypes, and noUncheckedIndexedAccess. Combine with ESLint rules like @typescript-eslint/no-explicit-any and CI tsc --noEmit to prevent regressions.
6. How can I create a type for an object that can have any number of properties?
You can create a type for an object with a flexible number of key-value pairs using indexable types. There are two common ways to do this:
- Index Signature: Use the syntax
type Data = { [key: string]: any; };to define an object where keys are strings and values can be of any type. - Record Utility Type: Use the
Record<Key, Value>utility type for a cleaner syntax, such astype Data = Record<string, any>;.
7. How can I create a type for an array that must have at least a certain number of items?
You can define a type for an array that must contain a minimum number of elements by combining a tuple with the rest operator (...). For example, to ensure an array has at least two strings, you would define the type as type MergeStringsArray = [string, string, ...string[]];. This syntax makes the first two elements required, while allowing any number of additional strings afterward.
8. What are template literal types and how are they useful?
Template literal types allow you to create types that enforce a specific string format using syntax similar to JavaScript’s template literals. This is useful for creating more precise and self-documenting types for variables that must follow a certain pattern. For instance, you could create a type type StringThatStartsWithGet = \`get\${string}\`; to ensure a string value always begins with the prefix “get”.
9. How do you create a new type that reuses another type but makes all of its properties optional?
You can use the Partial<Type> utility type to create a new type where all properties from an existing type become optional. For example, if you have a UserRow type where all fields are required, you can create a UserRowInsert type where all fields are optional by defining it as type UserRowInsert = Partial<UserRow>;. This is useful in scenarios like database inserts where some fields may have default values and are not required to be provided.
Conclusion
Creating your own custom types to represent the data structures used in your own code can provide a flexible and useful TypeScript solution for your project. In addition to increasing the type-safety of your own code as a whole, having your own business objects typed as data structures in the code will increase the overall documentation of the code-base and improve your own developer experience when working with teammates on the same code-base.
Furthermore, incorporating AI tools like DigitalOcean Gradient™ AI Platform can enhance your TypeScript development by providing smart linting and auto-completion features, leading to better type management and a more efficient coding process.
For more tutorials on TypeScript, check out our How To Code in TypeScript series page.
Keep learning: Related DigitalOcean tutorials
- How To Use Basic Types in TypeScript: Learn how to work with fundamental types like numbers, strings, booleans, arrays, and tuples in TypeScript, ensuring a solid foundation for your projects.
- How To Use Interfaces in TypeScript: Discover how to define and extend interfaces to shape objects, implement contracts, and ensure type safety in your code.
- How To Use Classes in TypeScript: Explore the world of classes in TypeScript, including class fields, access modifiers, inheritance, and abstract classes, to write more structured and maintainable code.
- How To Use Generics in TypeScript: Master the art of writing reusable, type-safe functions, classes, and interfaces using generics, making your code more flexible and efficient.
Thanks for learning with the DigitalOcean Community. Check out our offerings for compute, storage, networking, and managed databases.
Tutorial Series: How To Code in TypeScript
TypeScript is an extension of the JavaScript language that uses JavaScript’s runtime with a compile-time type checker. This combination allows developers to use the full JavaScript ecosystem and language features, while also adding optional static type-checking, enum data types, classes, and interfaces.
This series will show you the syntax you need to get started with TypeScript, allowing you to leverage its typing system to make scalable, enterprise-grade code.
Browse Series: 9 tutorials
About the author(s)
Anish is a Sr Technical Content Strategist and Team Lead at DigitalOcean with 7+ years of experience as an DevOps SRE at Nutanix and Cloud consultant at AMEX, and technical writing at DOCN, and shipping deep infra and AI inference tutorials that help developers deploy production‑ready applications on DigitalOcean.
With over 6 years of experience in tech publishing, Mani has edited and published more than 75 books covering a wide range of data science topics. Known for his strong attention to detail and technical knowledge, Mani specializes in creating clear, concise, and easy-to-understand content tailored for developers.
Still looking for an answer?
This textbox defaults to using Markdown to format your answer.
You can type !ref in this text area to quickly search our full set of tutorials, documentation & marketplace offerings and insert the link!
Custom types in TypeScript help developers define clear and reusable data structures, making code easier to understand and maintain. Instead of repeatedly specifying the shape of an object, you can create a custom type and use it throughout your application.
One common way to create a custom type is with the type keyword:
type User = {
  id: number;
  name: string;
  email: string;
};
Custom types provide several benefits:
- Improve code readability and consistency
- Reduce duplication across files
- Make refactoring easier
- Help catch type-related errors during development
- Create a clear contract for functions and objects You can also combine types using unions and intersections:
type Status = "active" | "inactive";
This restricts values to specific options, improving reliability. For larger projects, custom types help organize complex data models and ensure that developers follow the same structure throughout the codebase. Whether you’re building APIs, web applications, or reusable libraries, custom types are an important feature that improves maintainability and makes TypeScript code more predictable and easier to work with.
 This work is licensed under a Creative Commons Attribution-NonCommercial- ShareAlike 4.0 International License.
Become a contributor for community
Get paid to write technical tutorials and select a tech-focused charity to receive a matching donation.

DigitalOcean Documentation
Full documentation for every DigitalOcean product.

Resources for startups and AI-native businesses
The Wave has everything you need to know about building a business, from raising funding to marketing your product.
The developer cloud
Scale up as you grow — whether you're running one virtual machine or ten thousand.

Start building today
From GPU-powered inference and Kubernetes to managed databases and storage, get everything you need to build, scale, and deploy intelligent applications.
